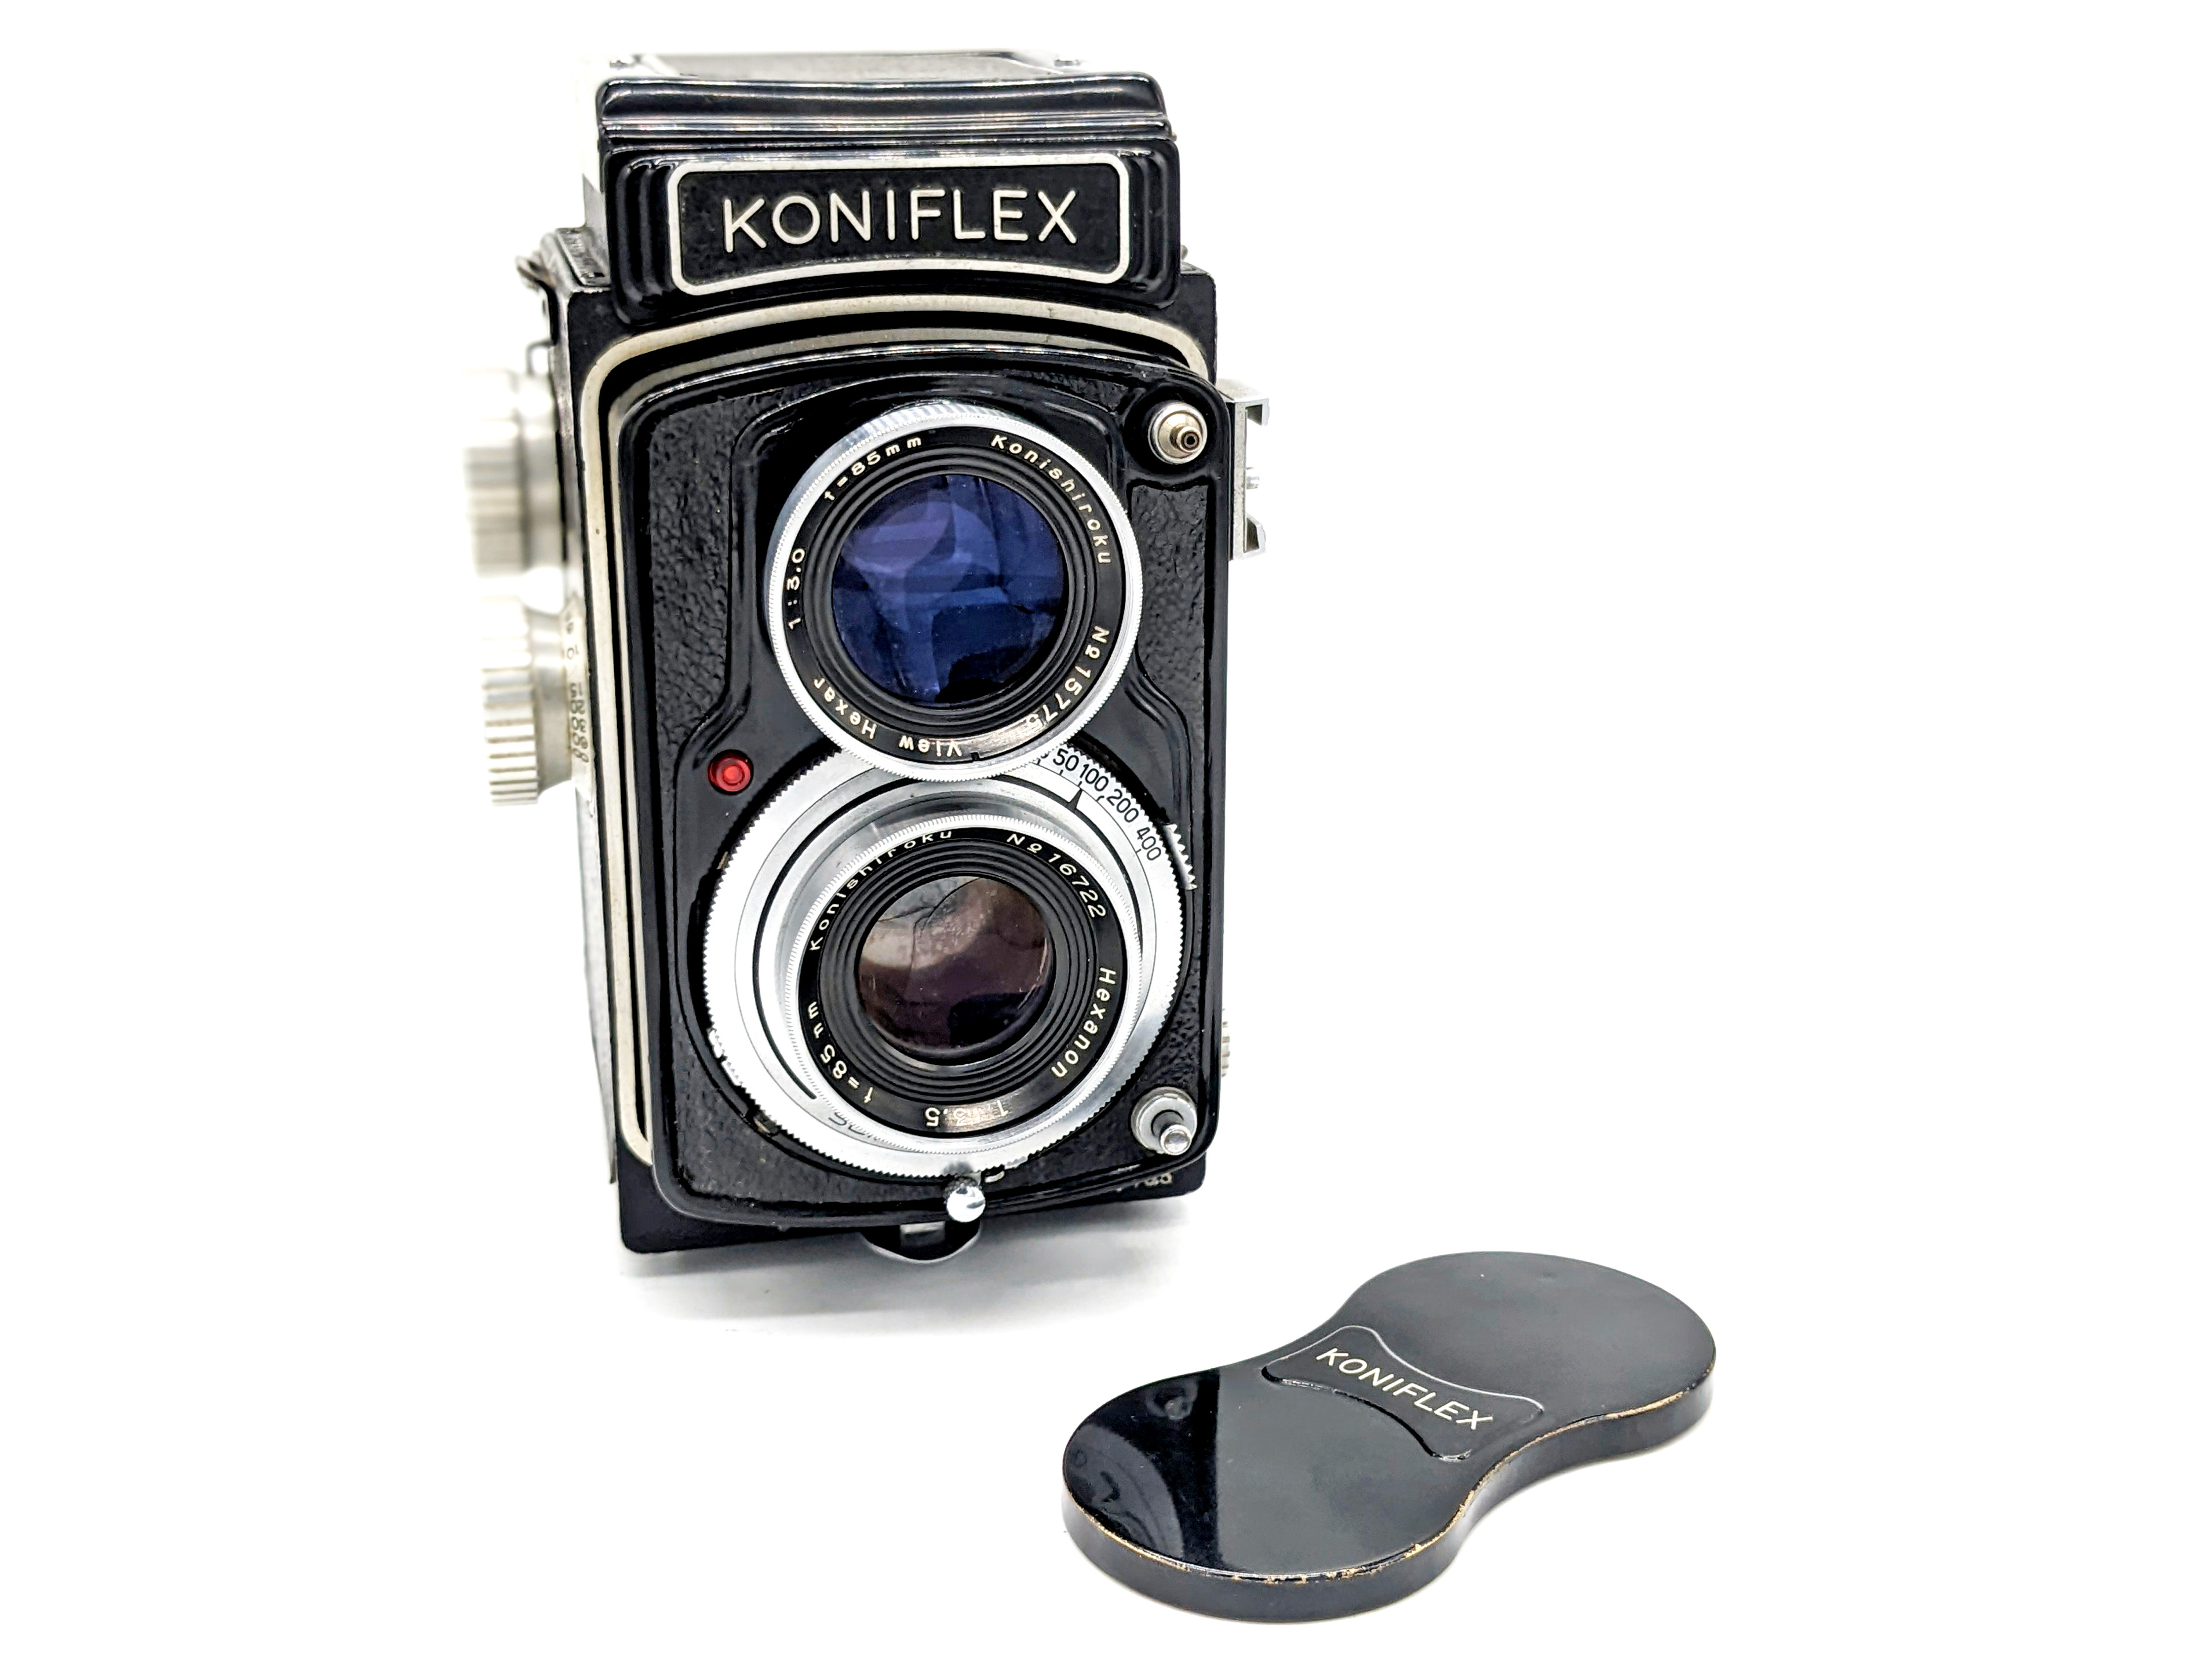
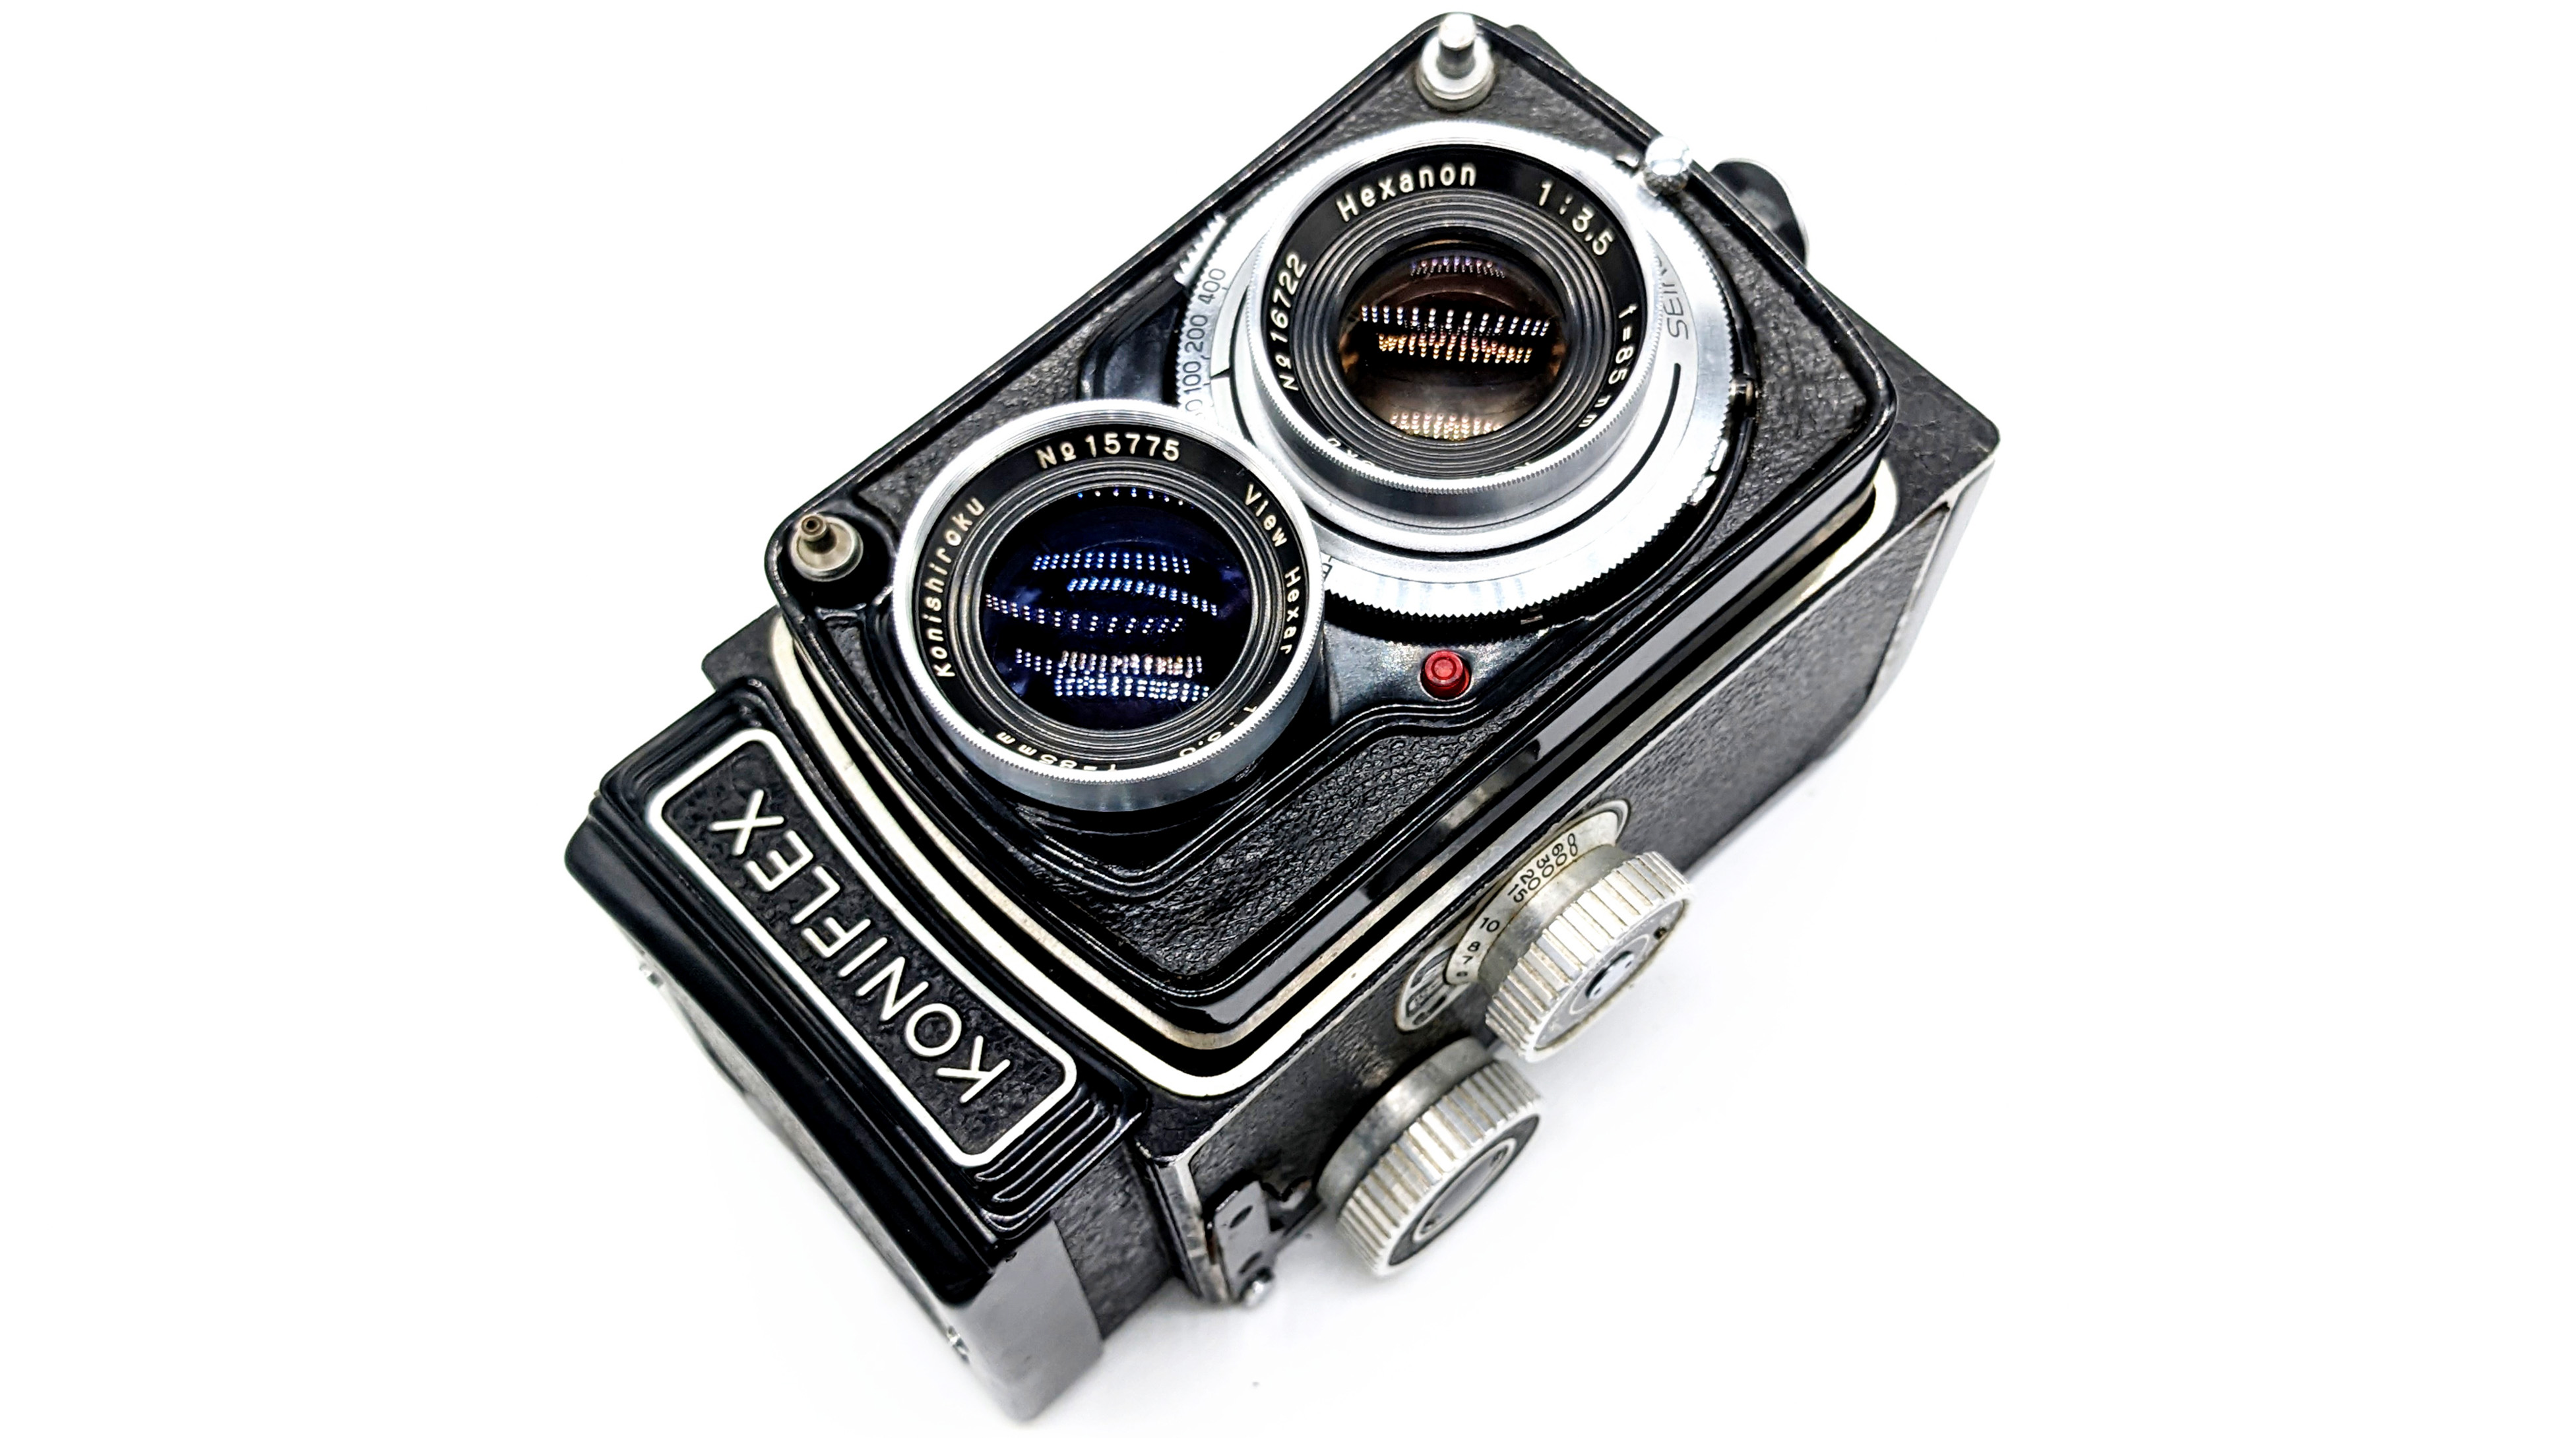
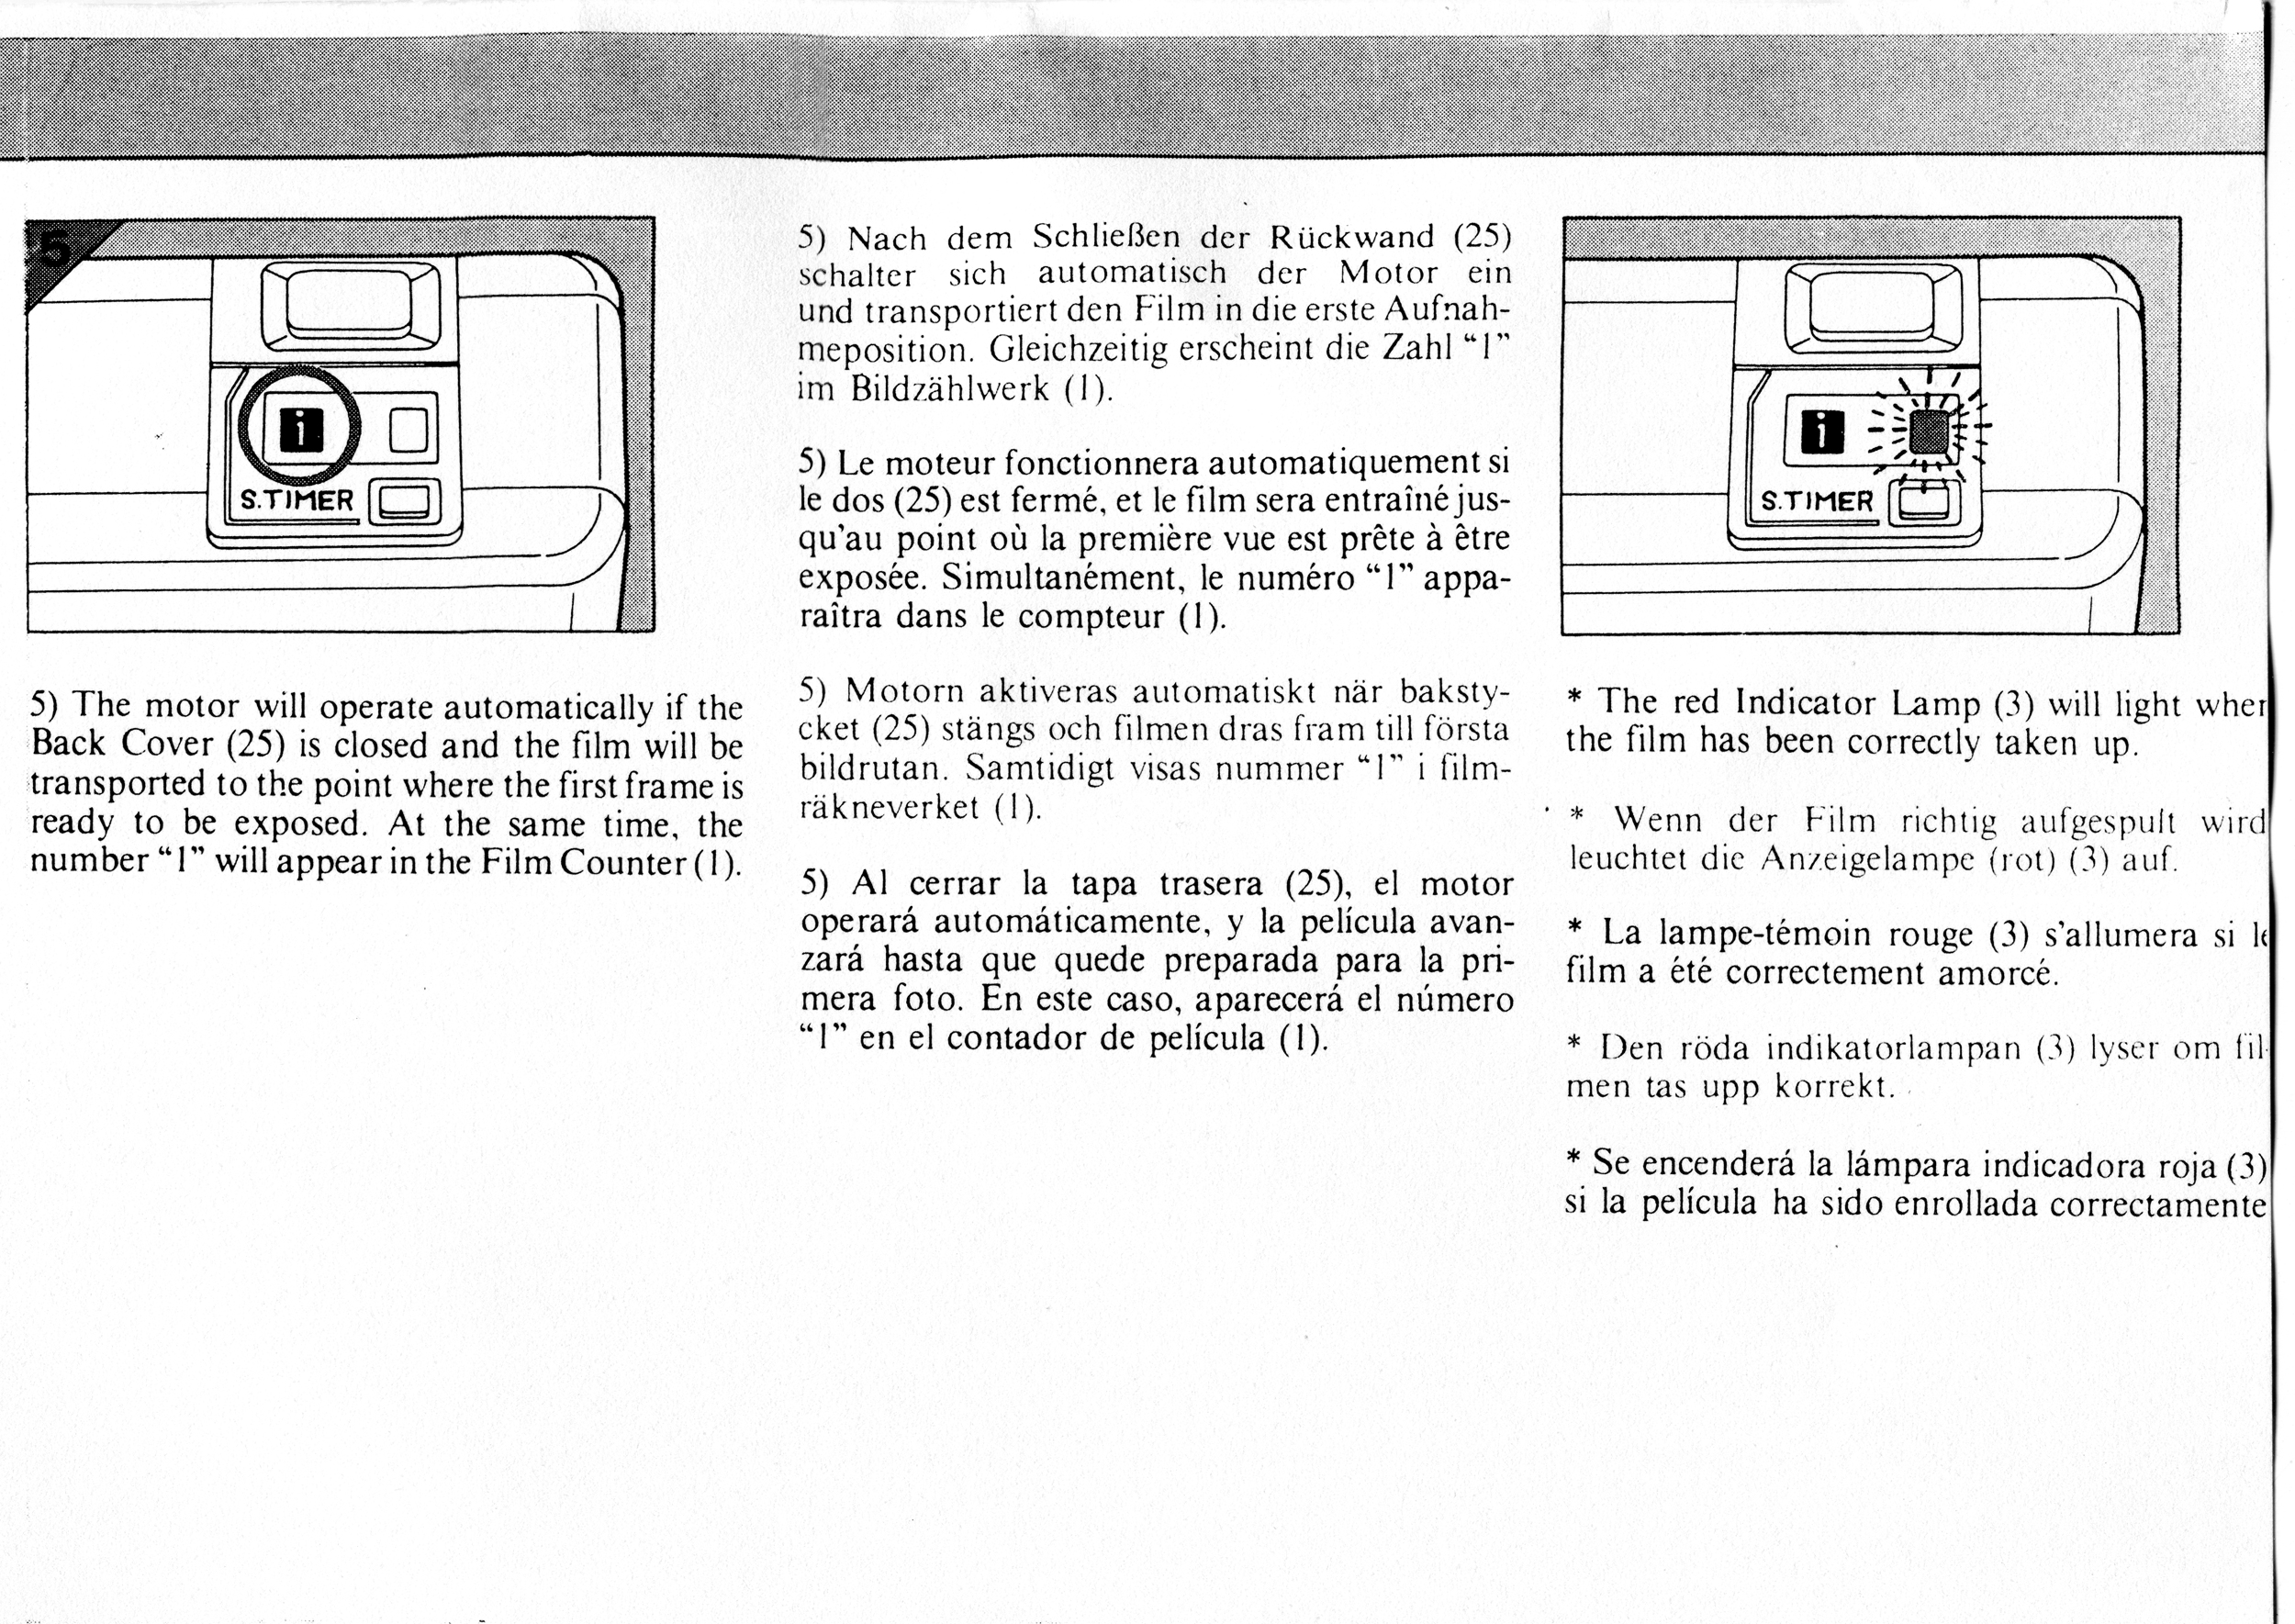
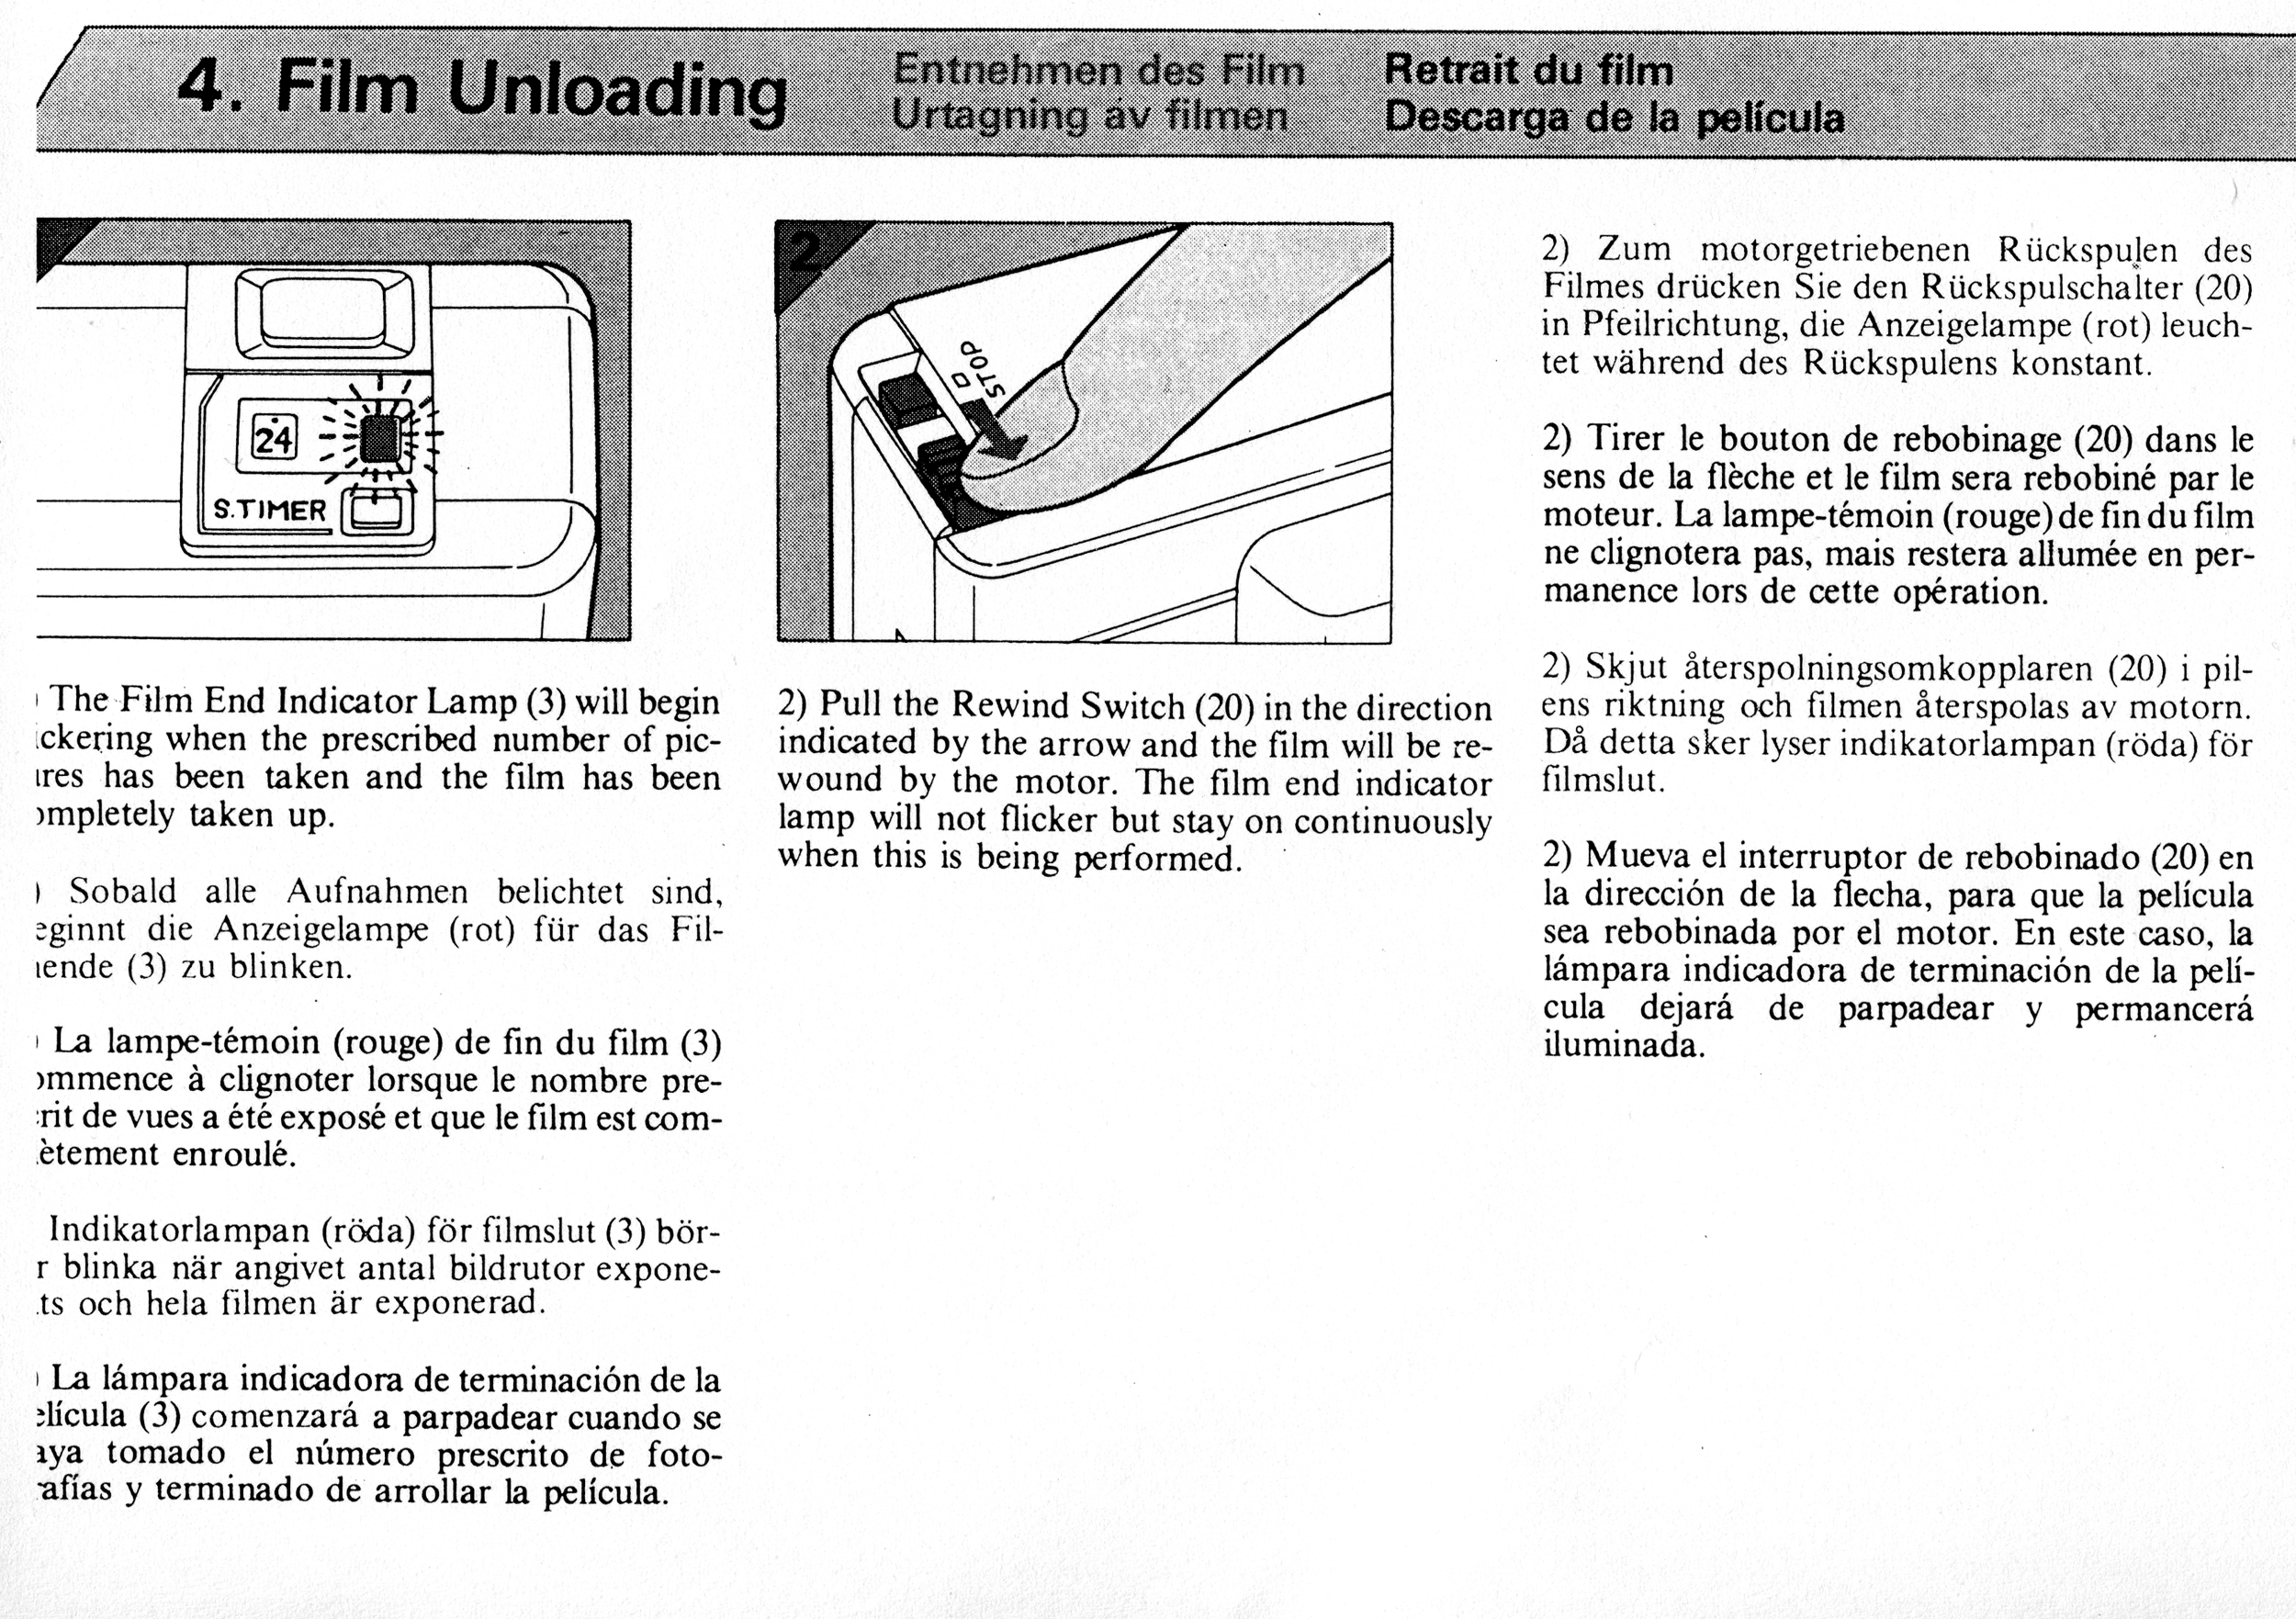
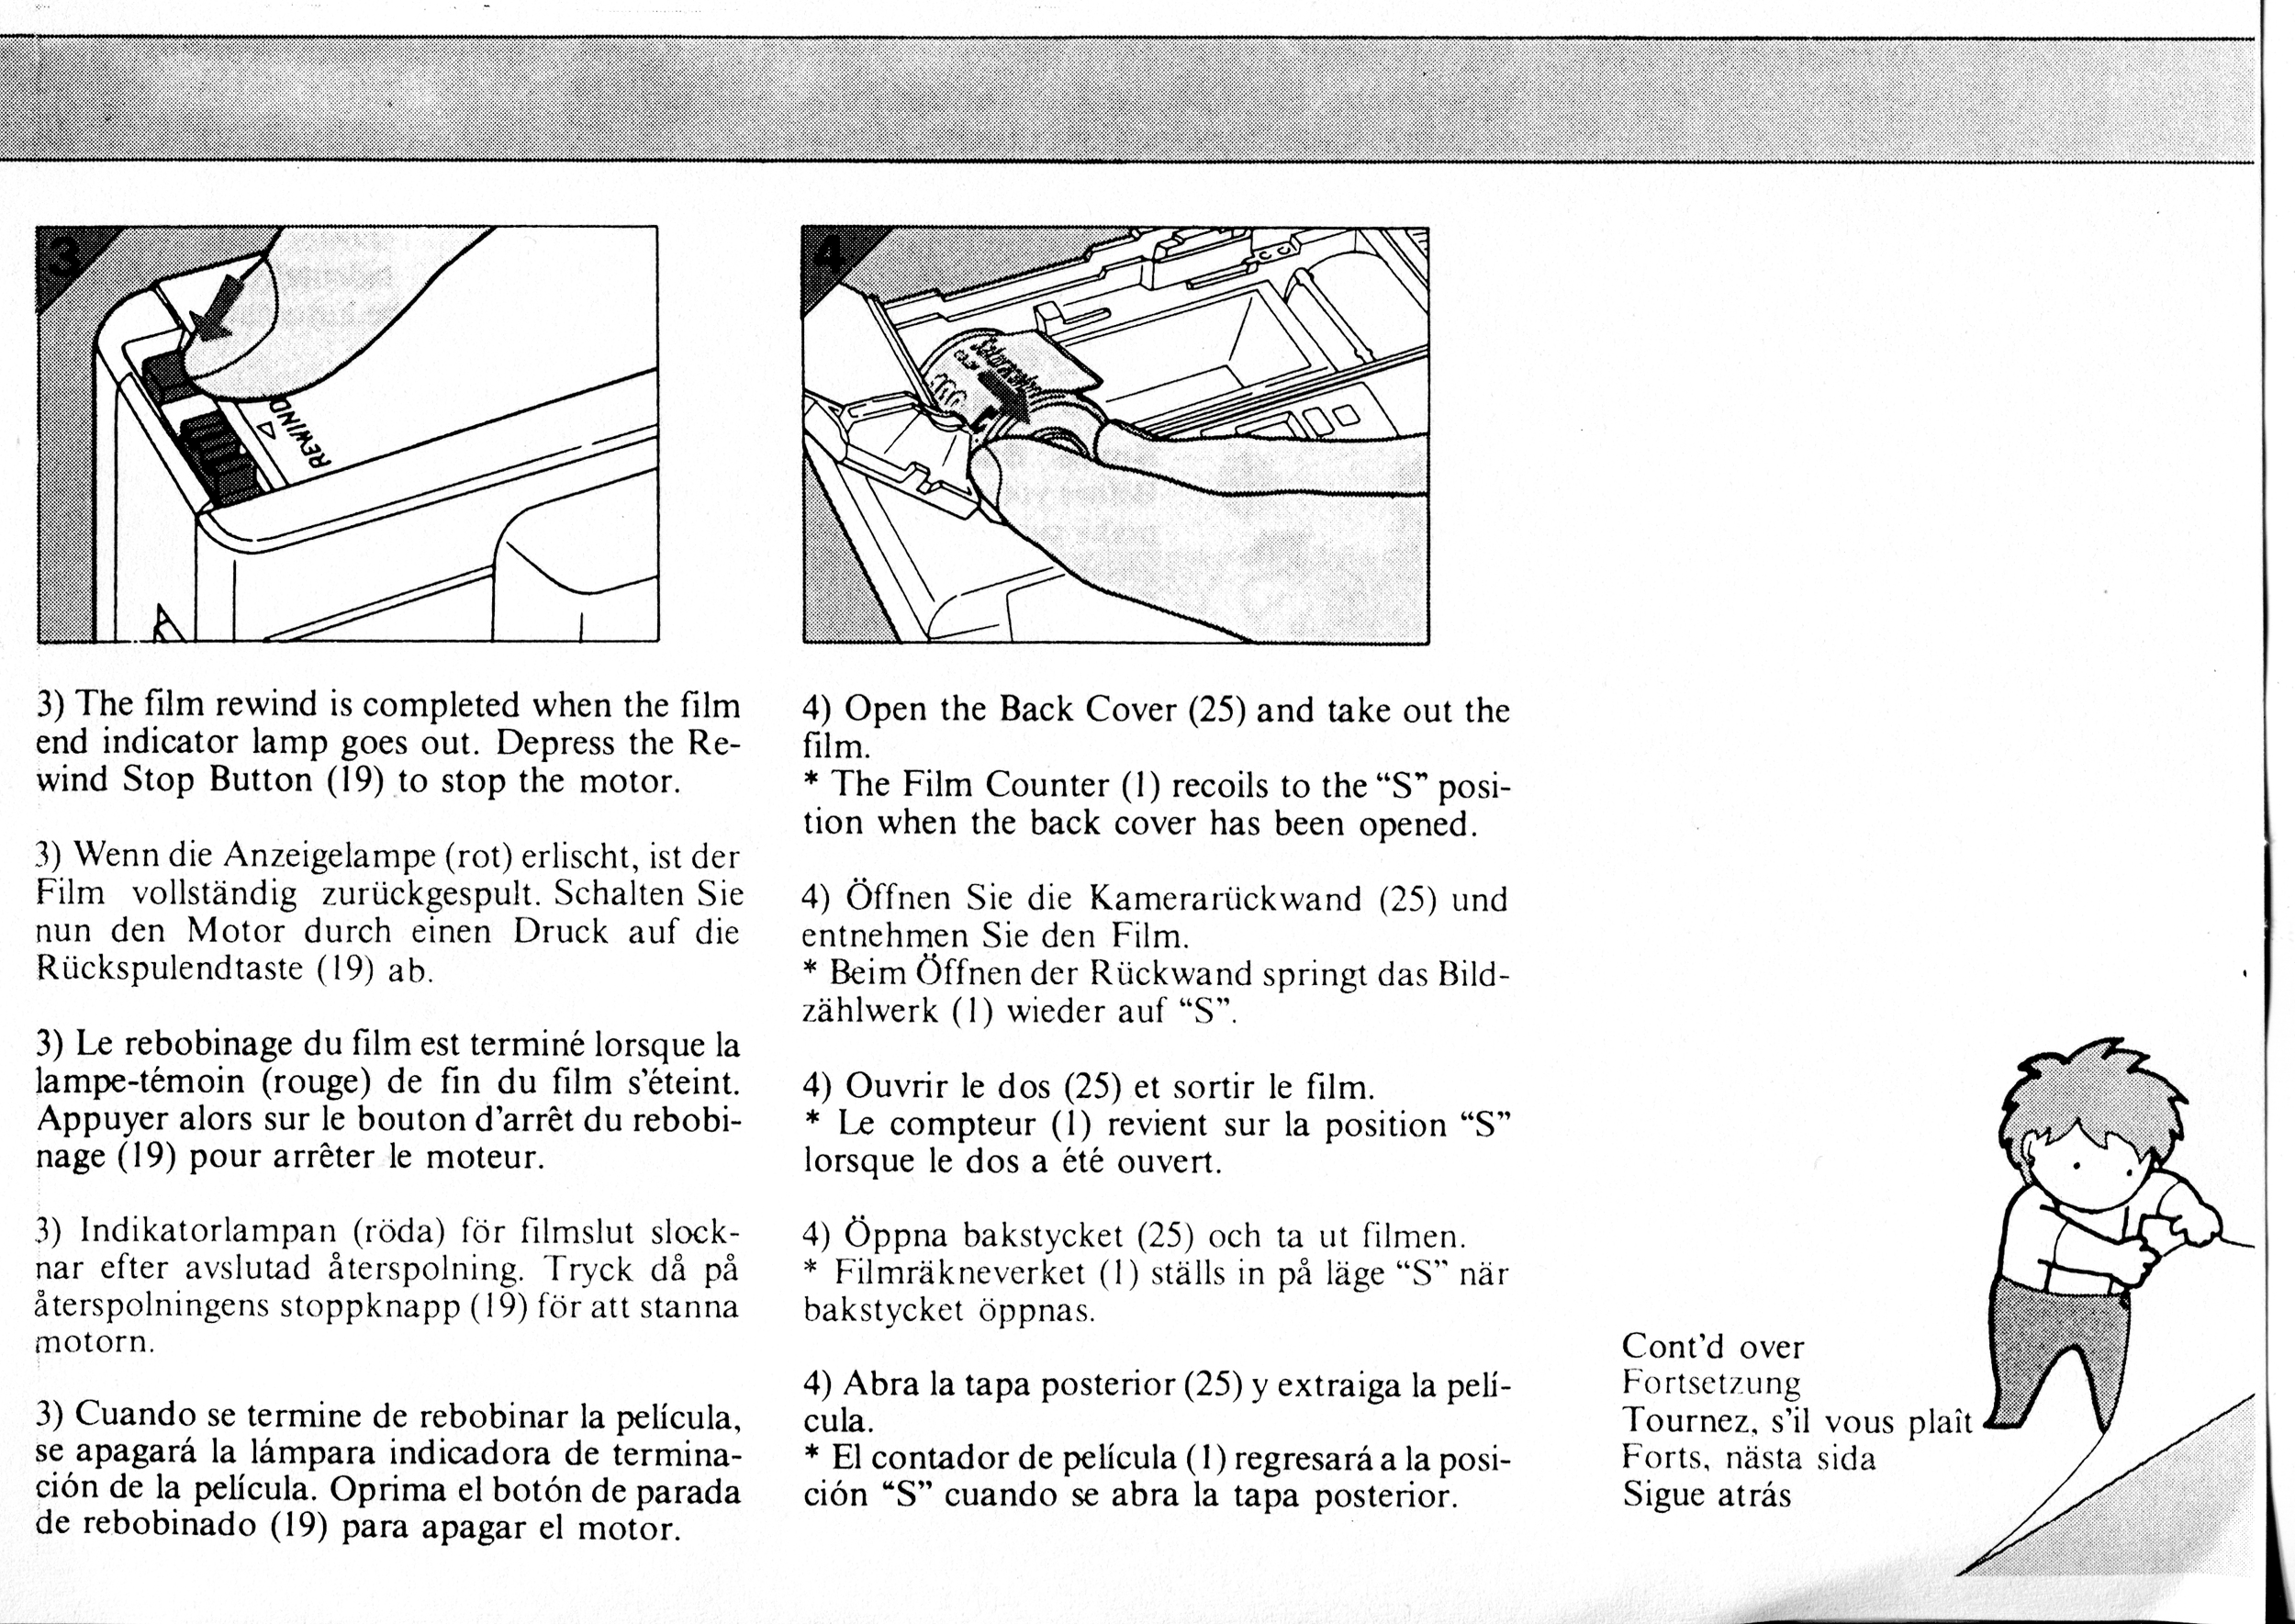
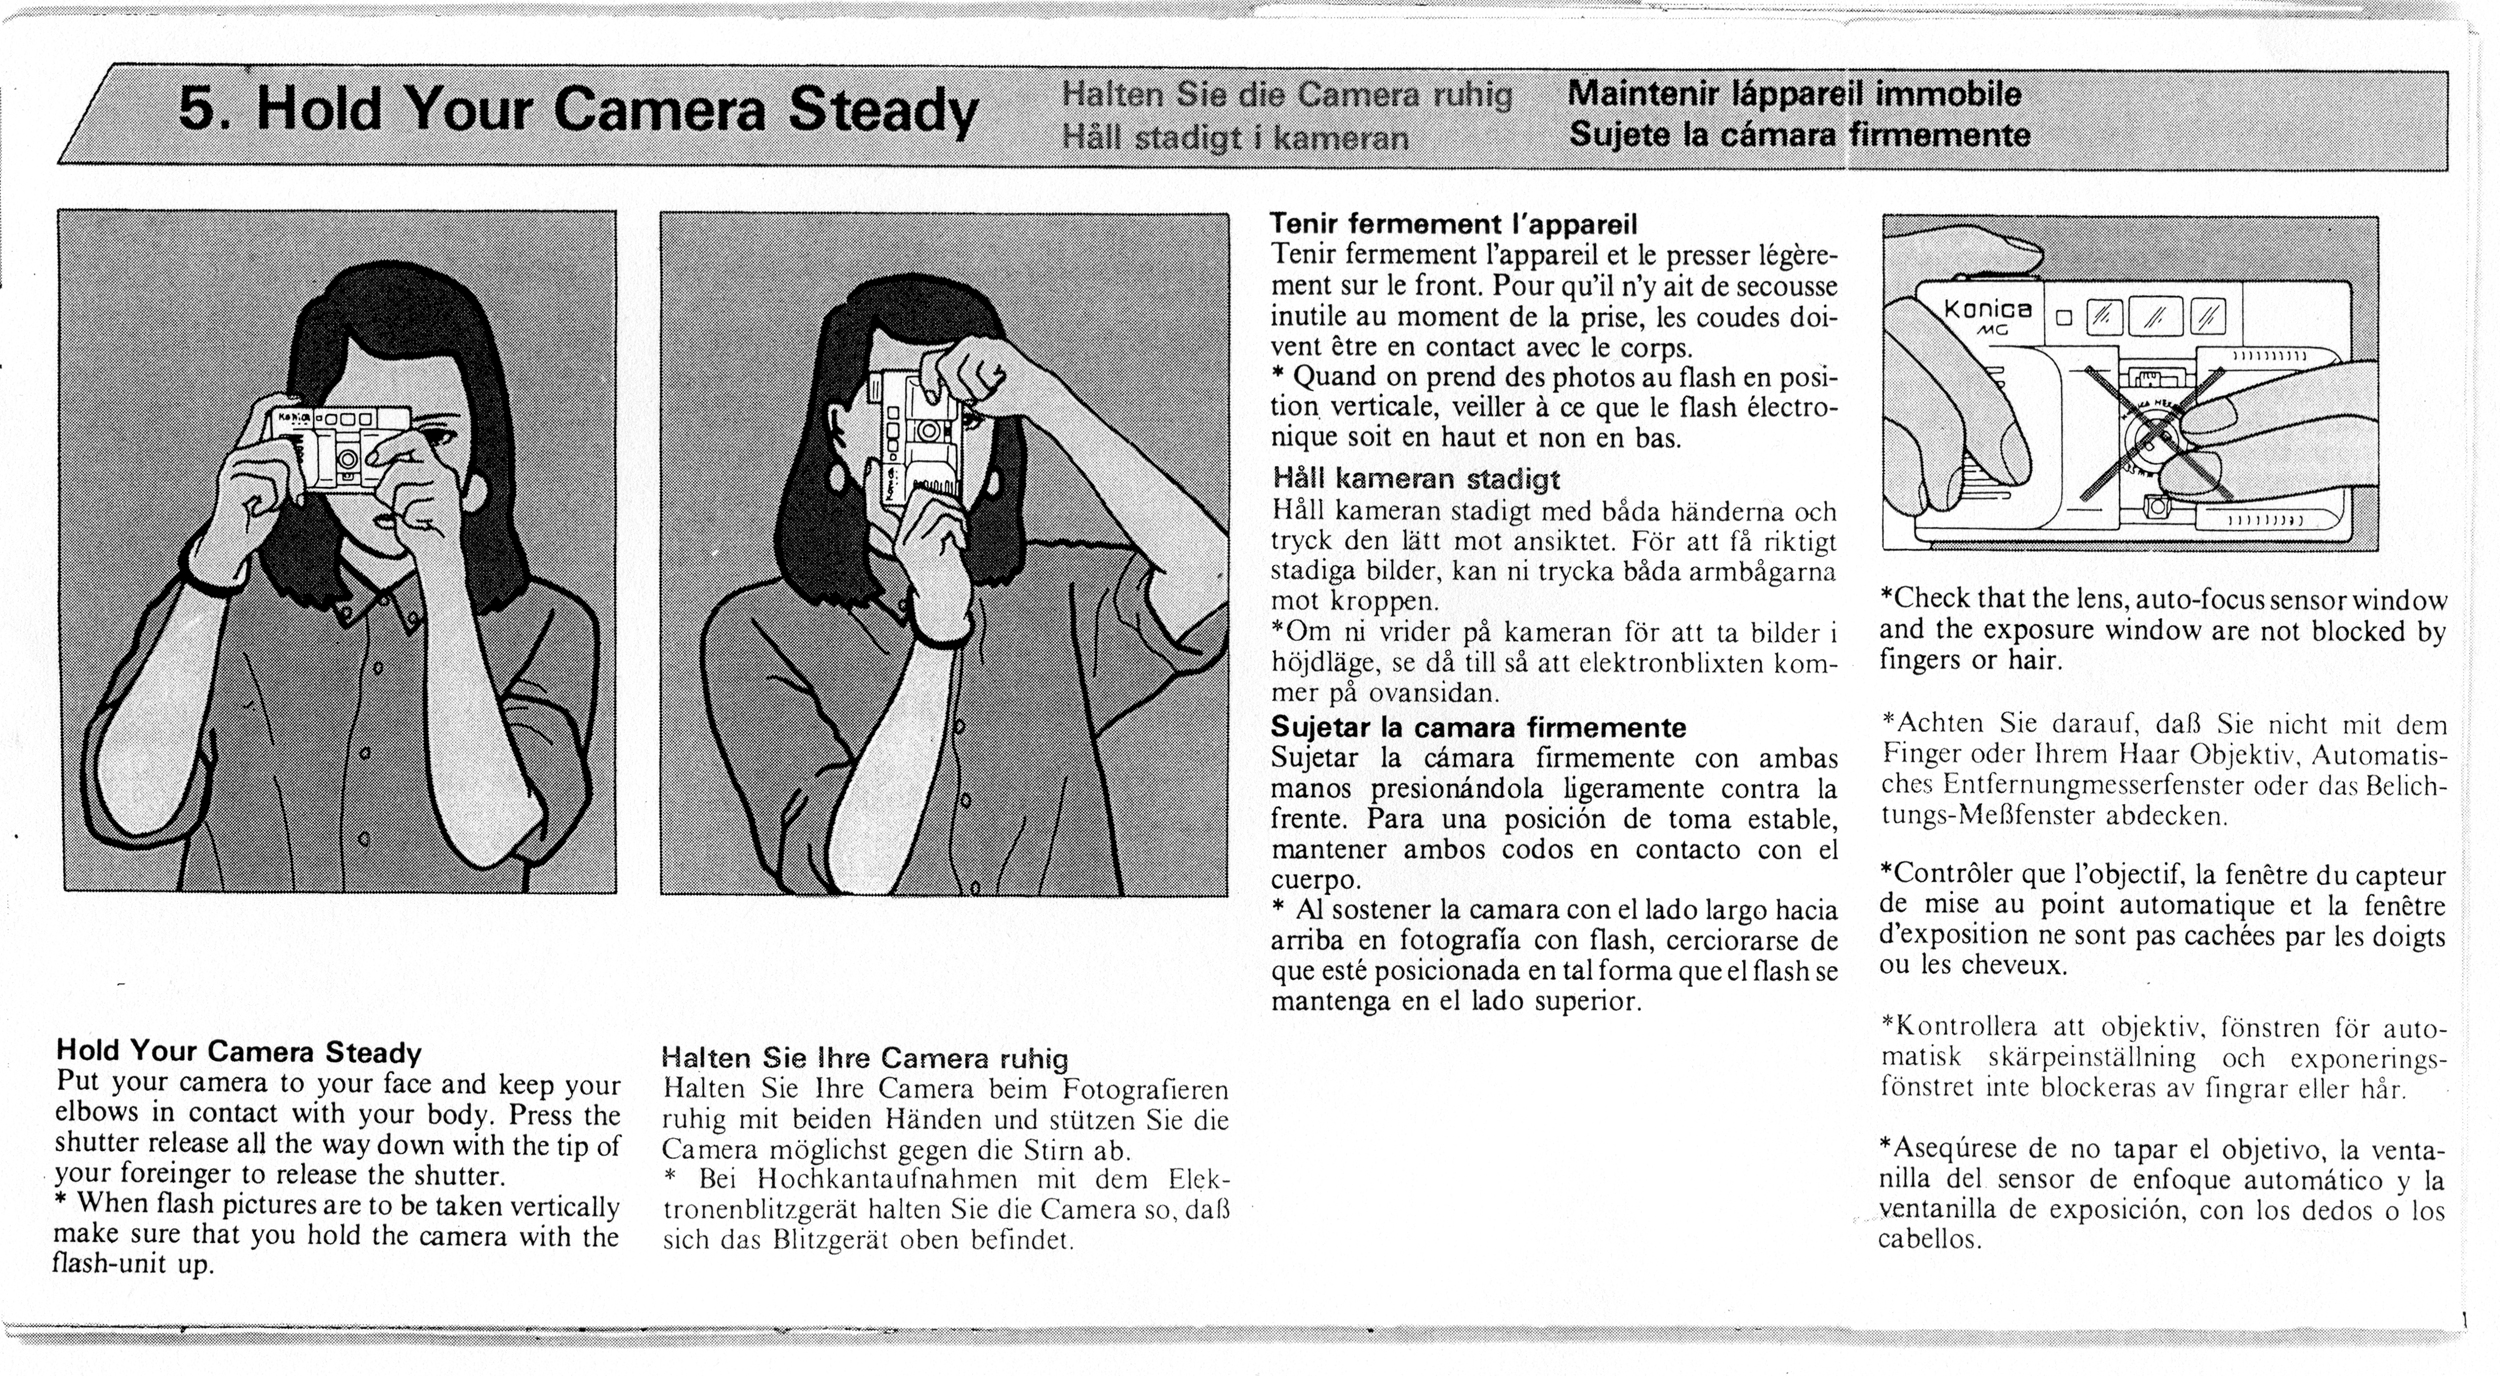
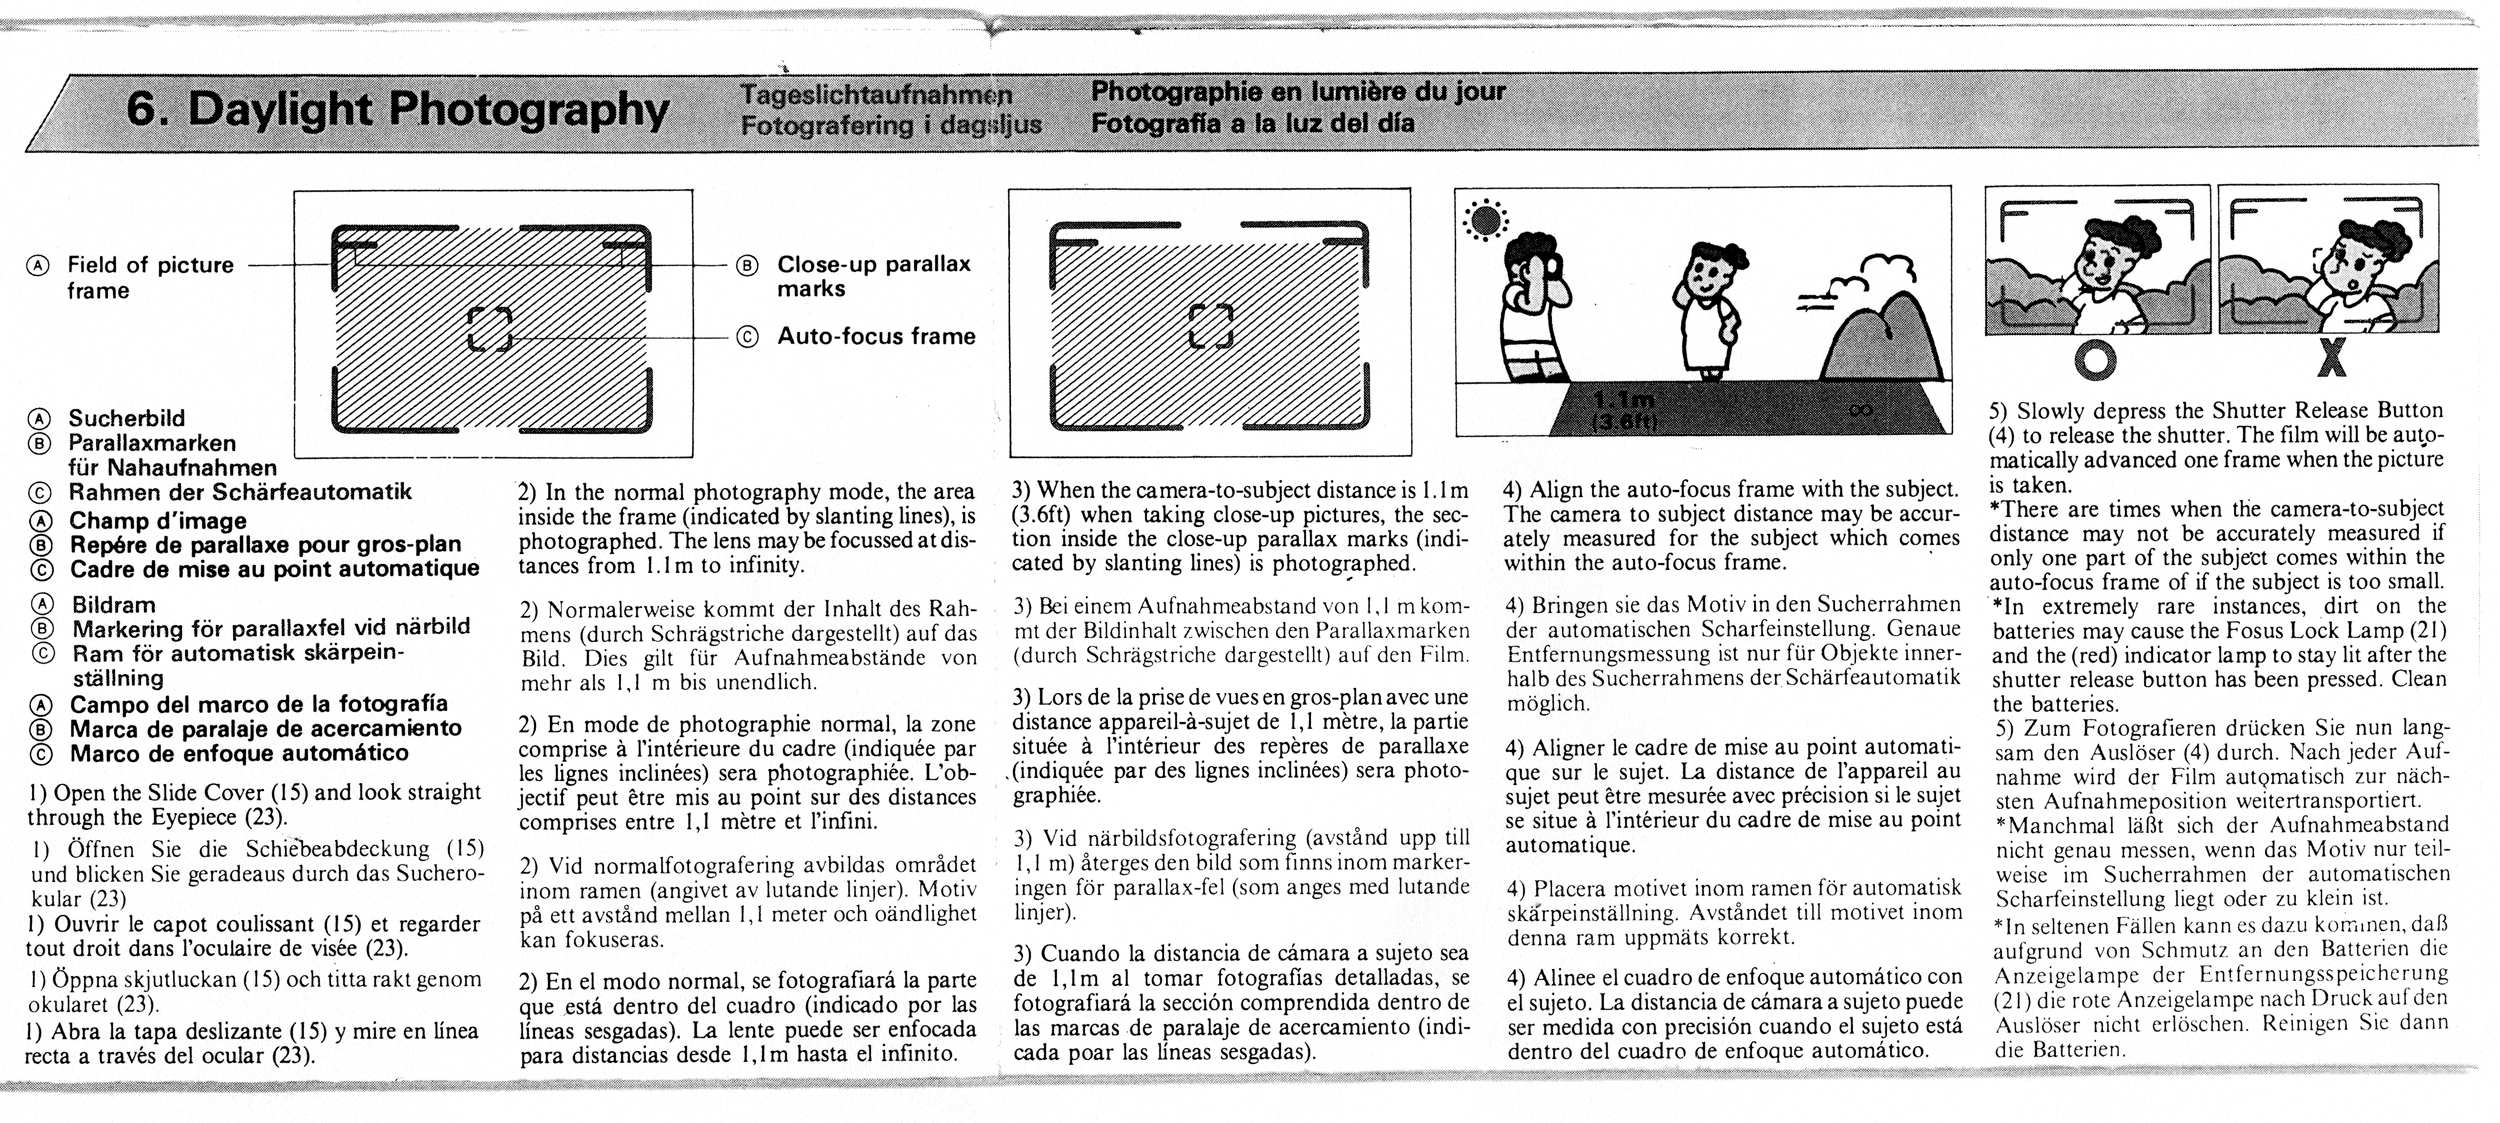
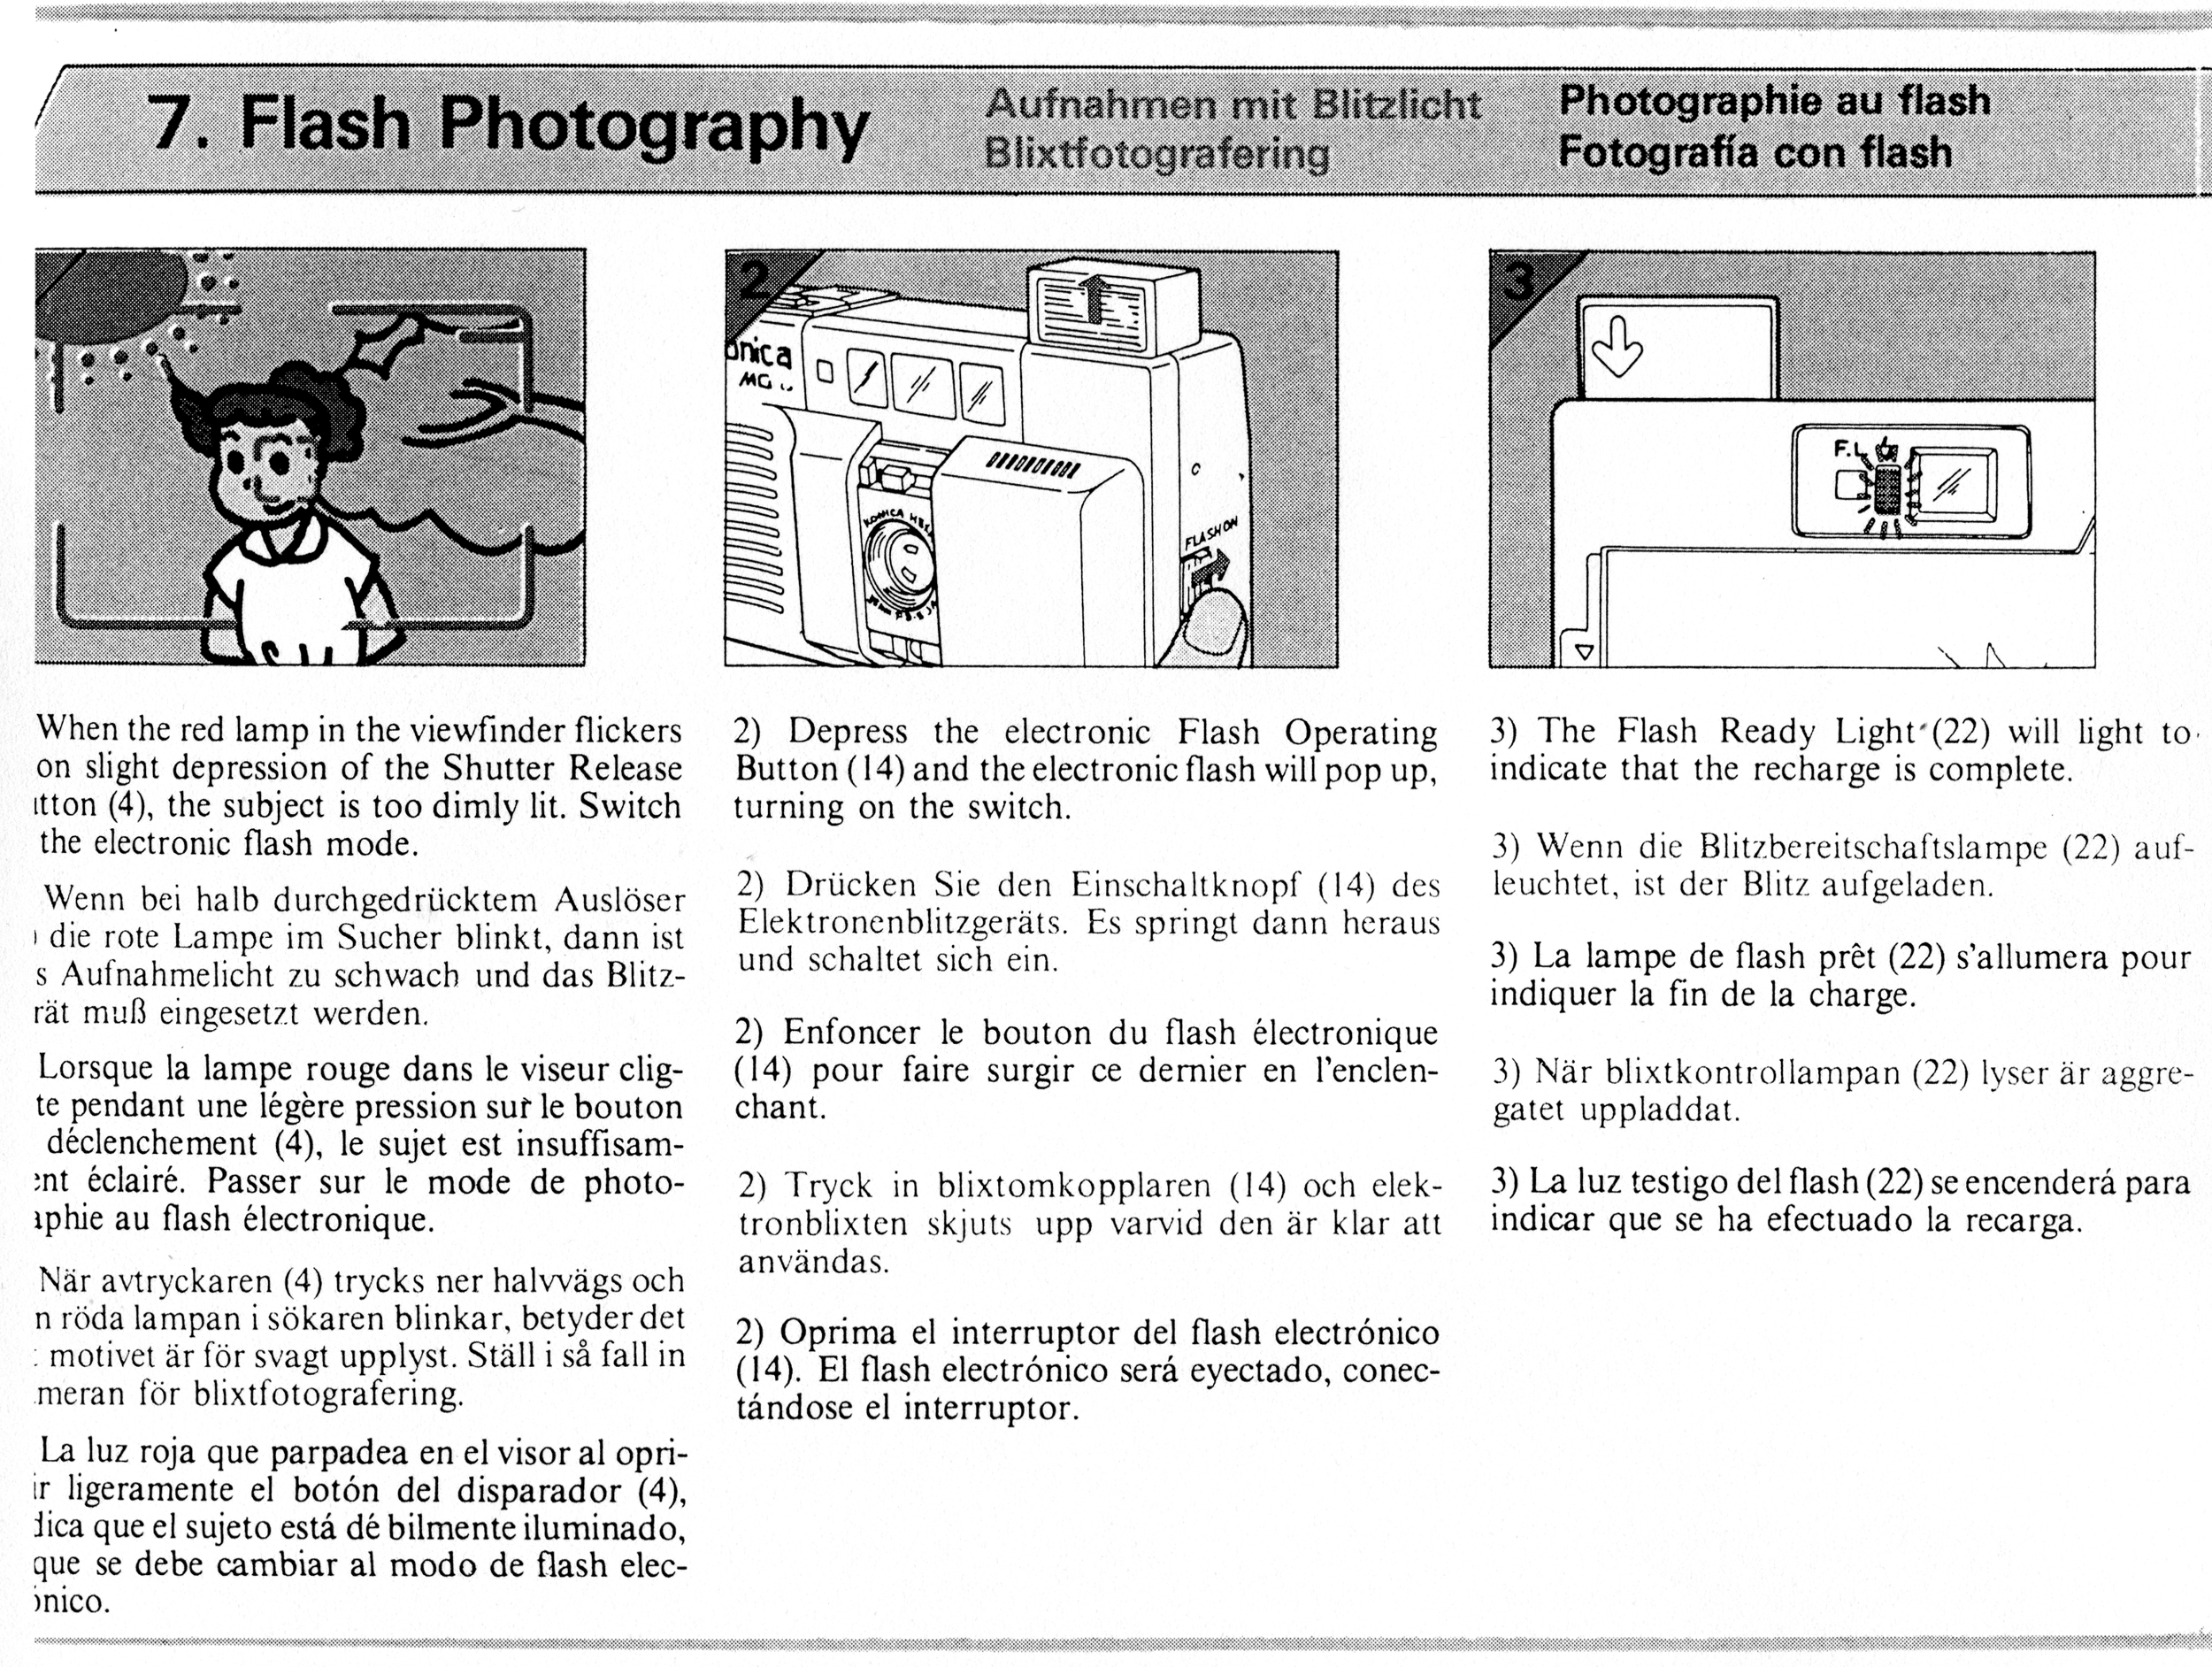
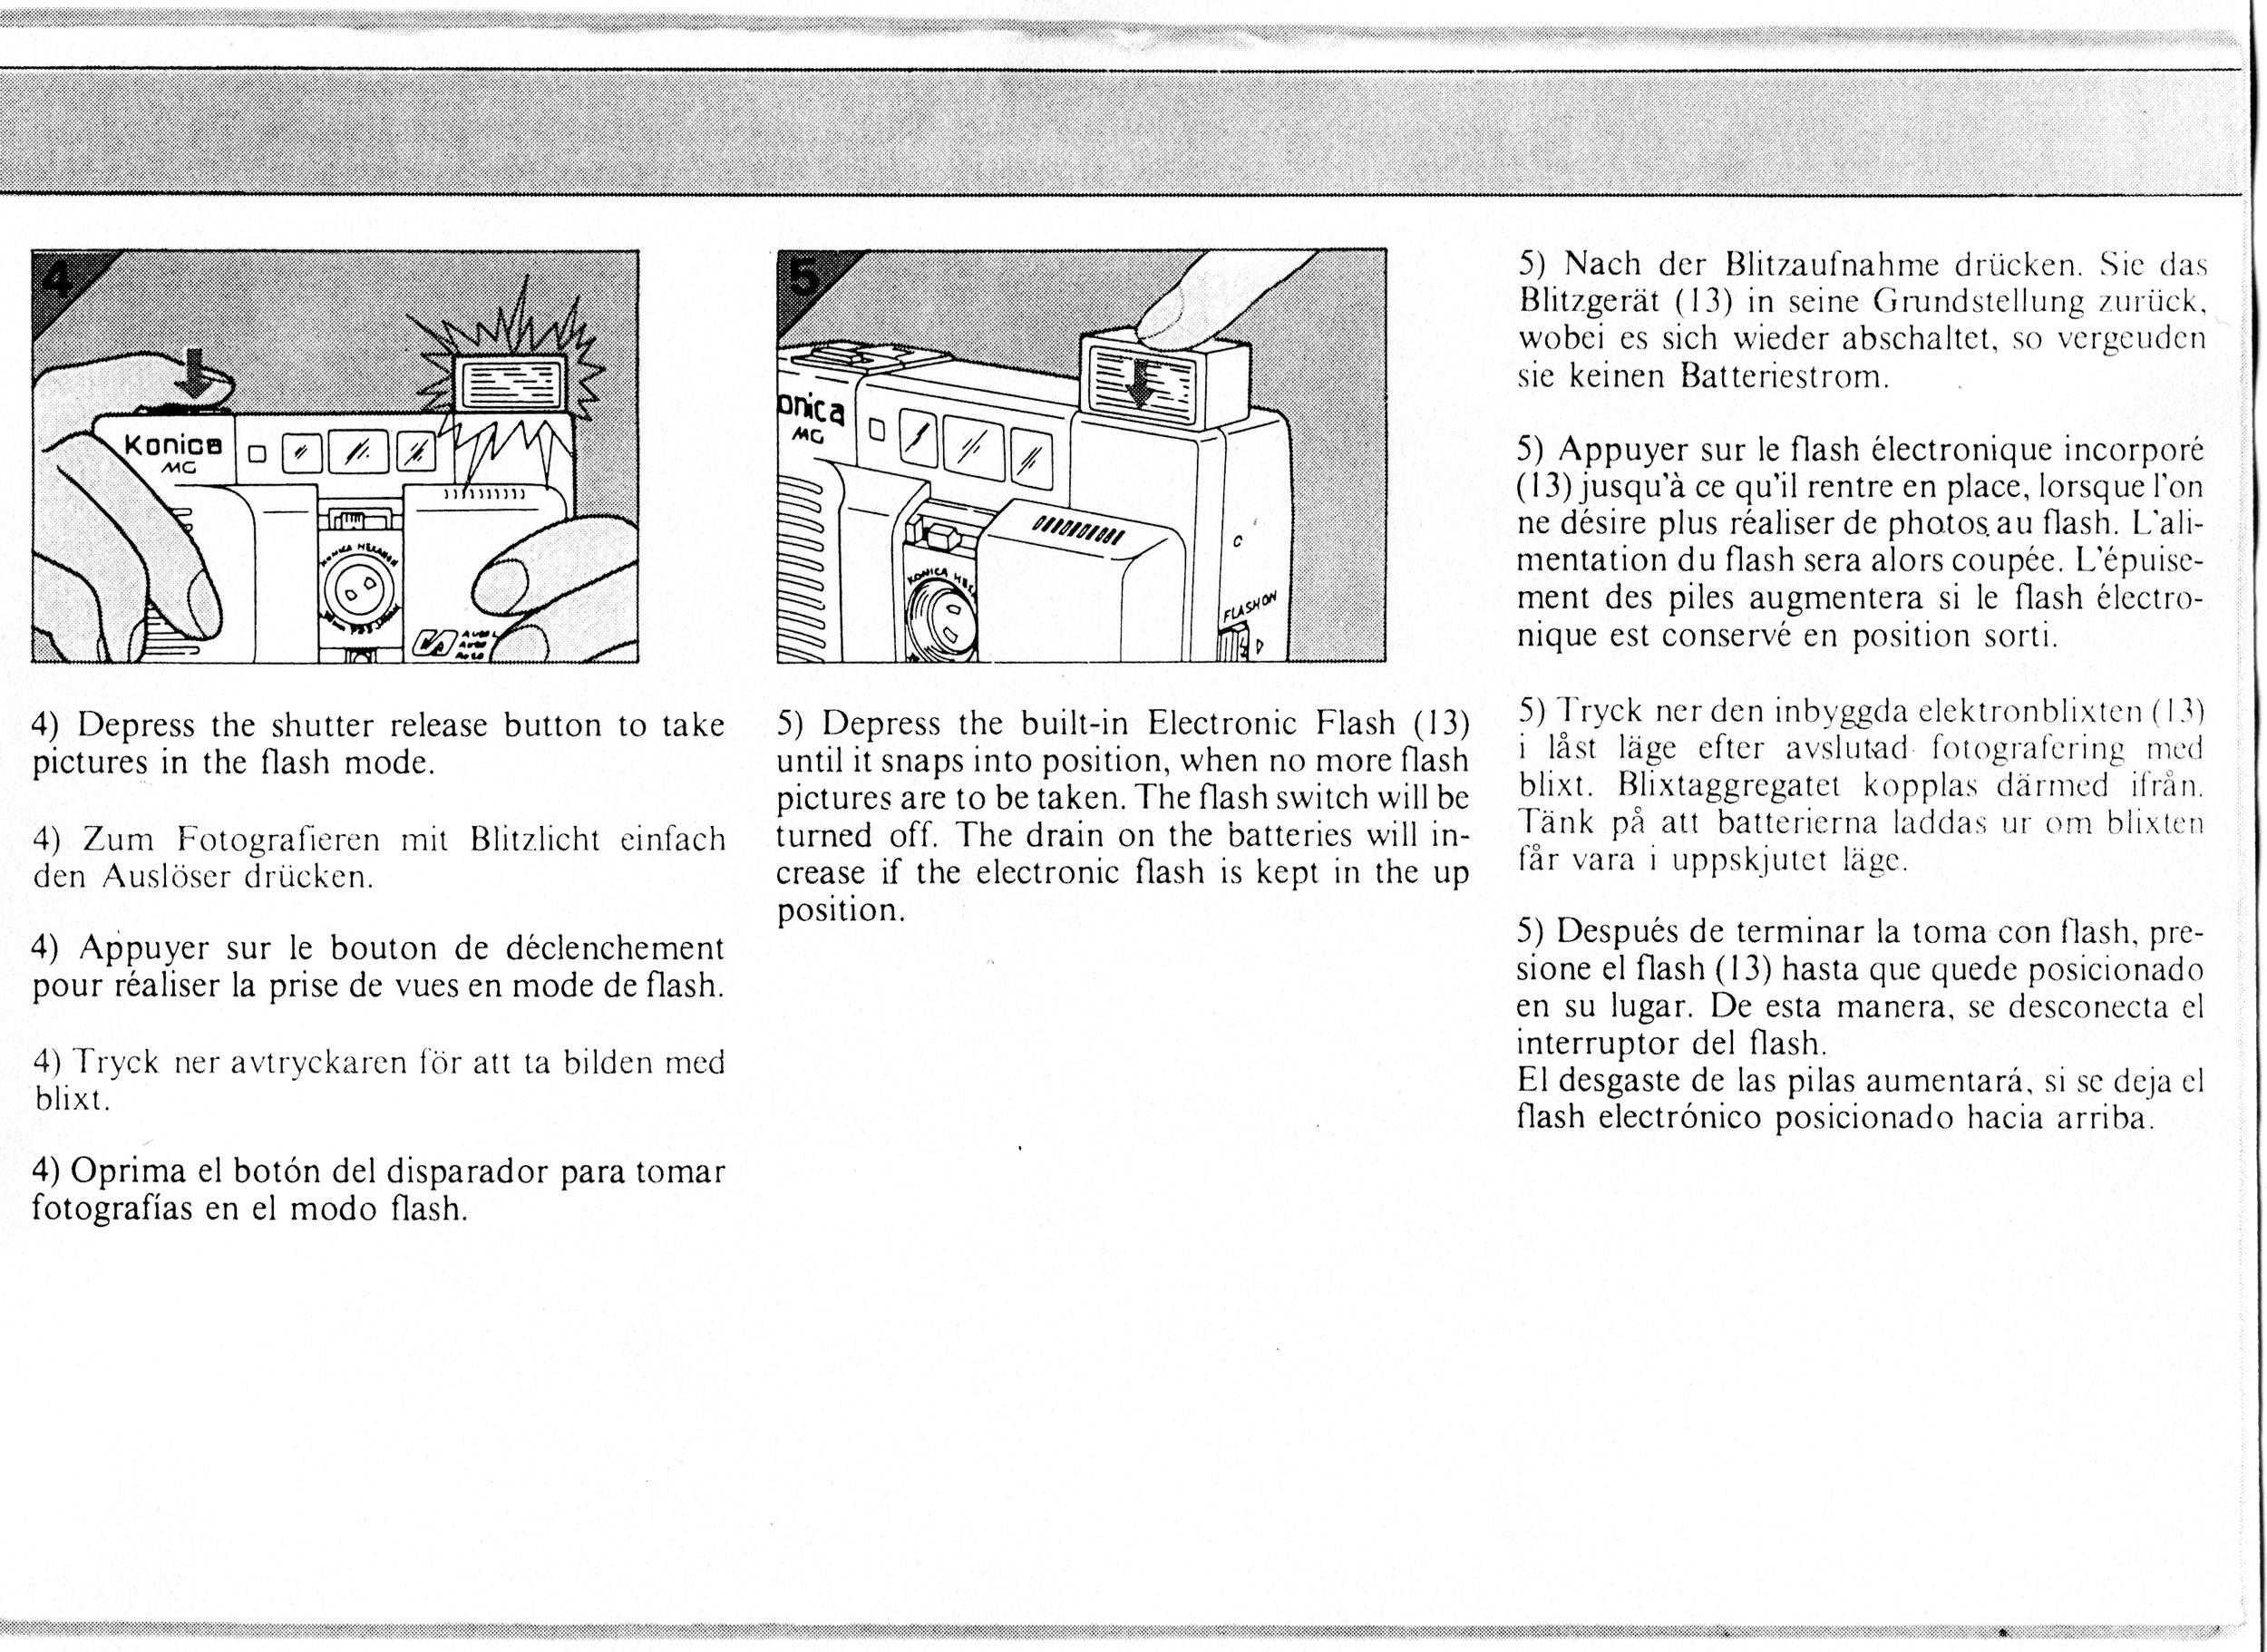
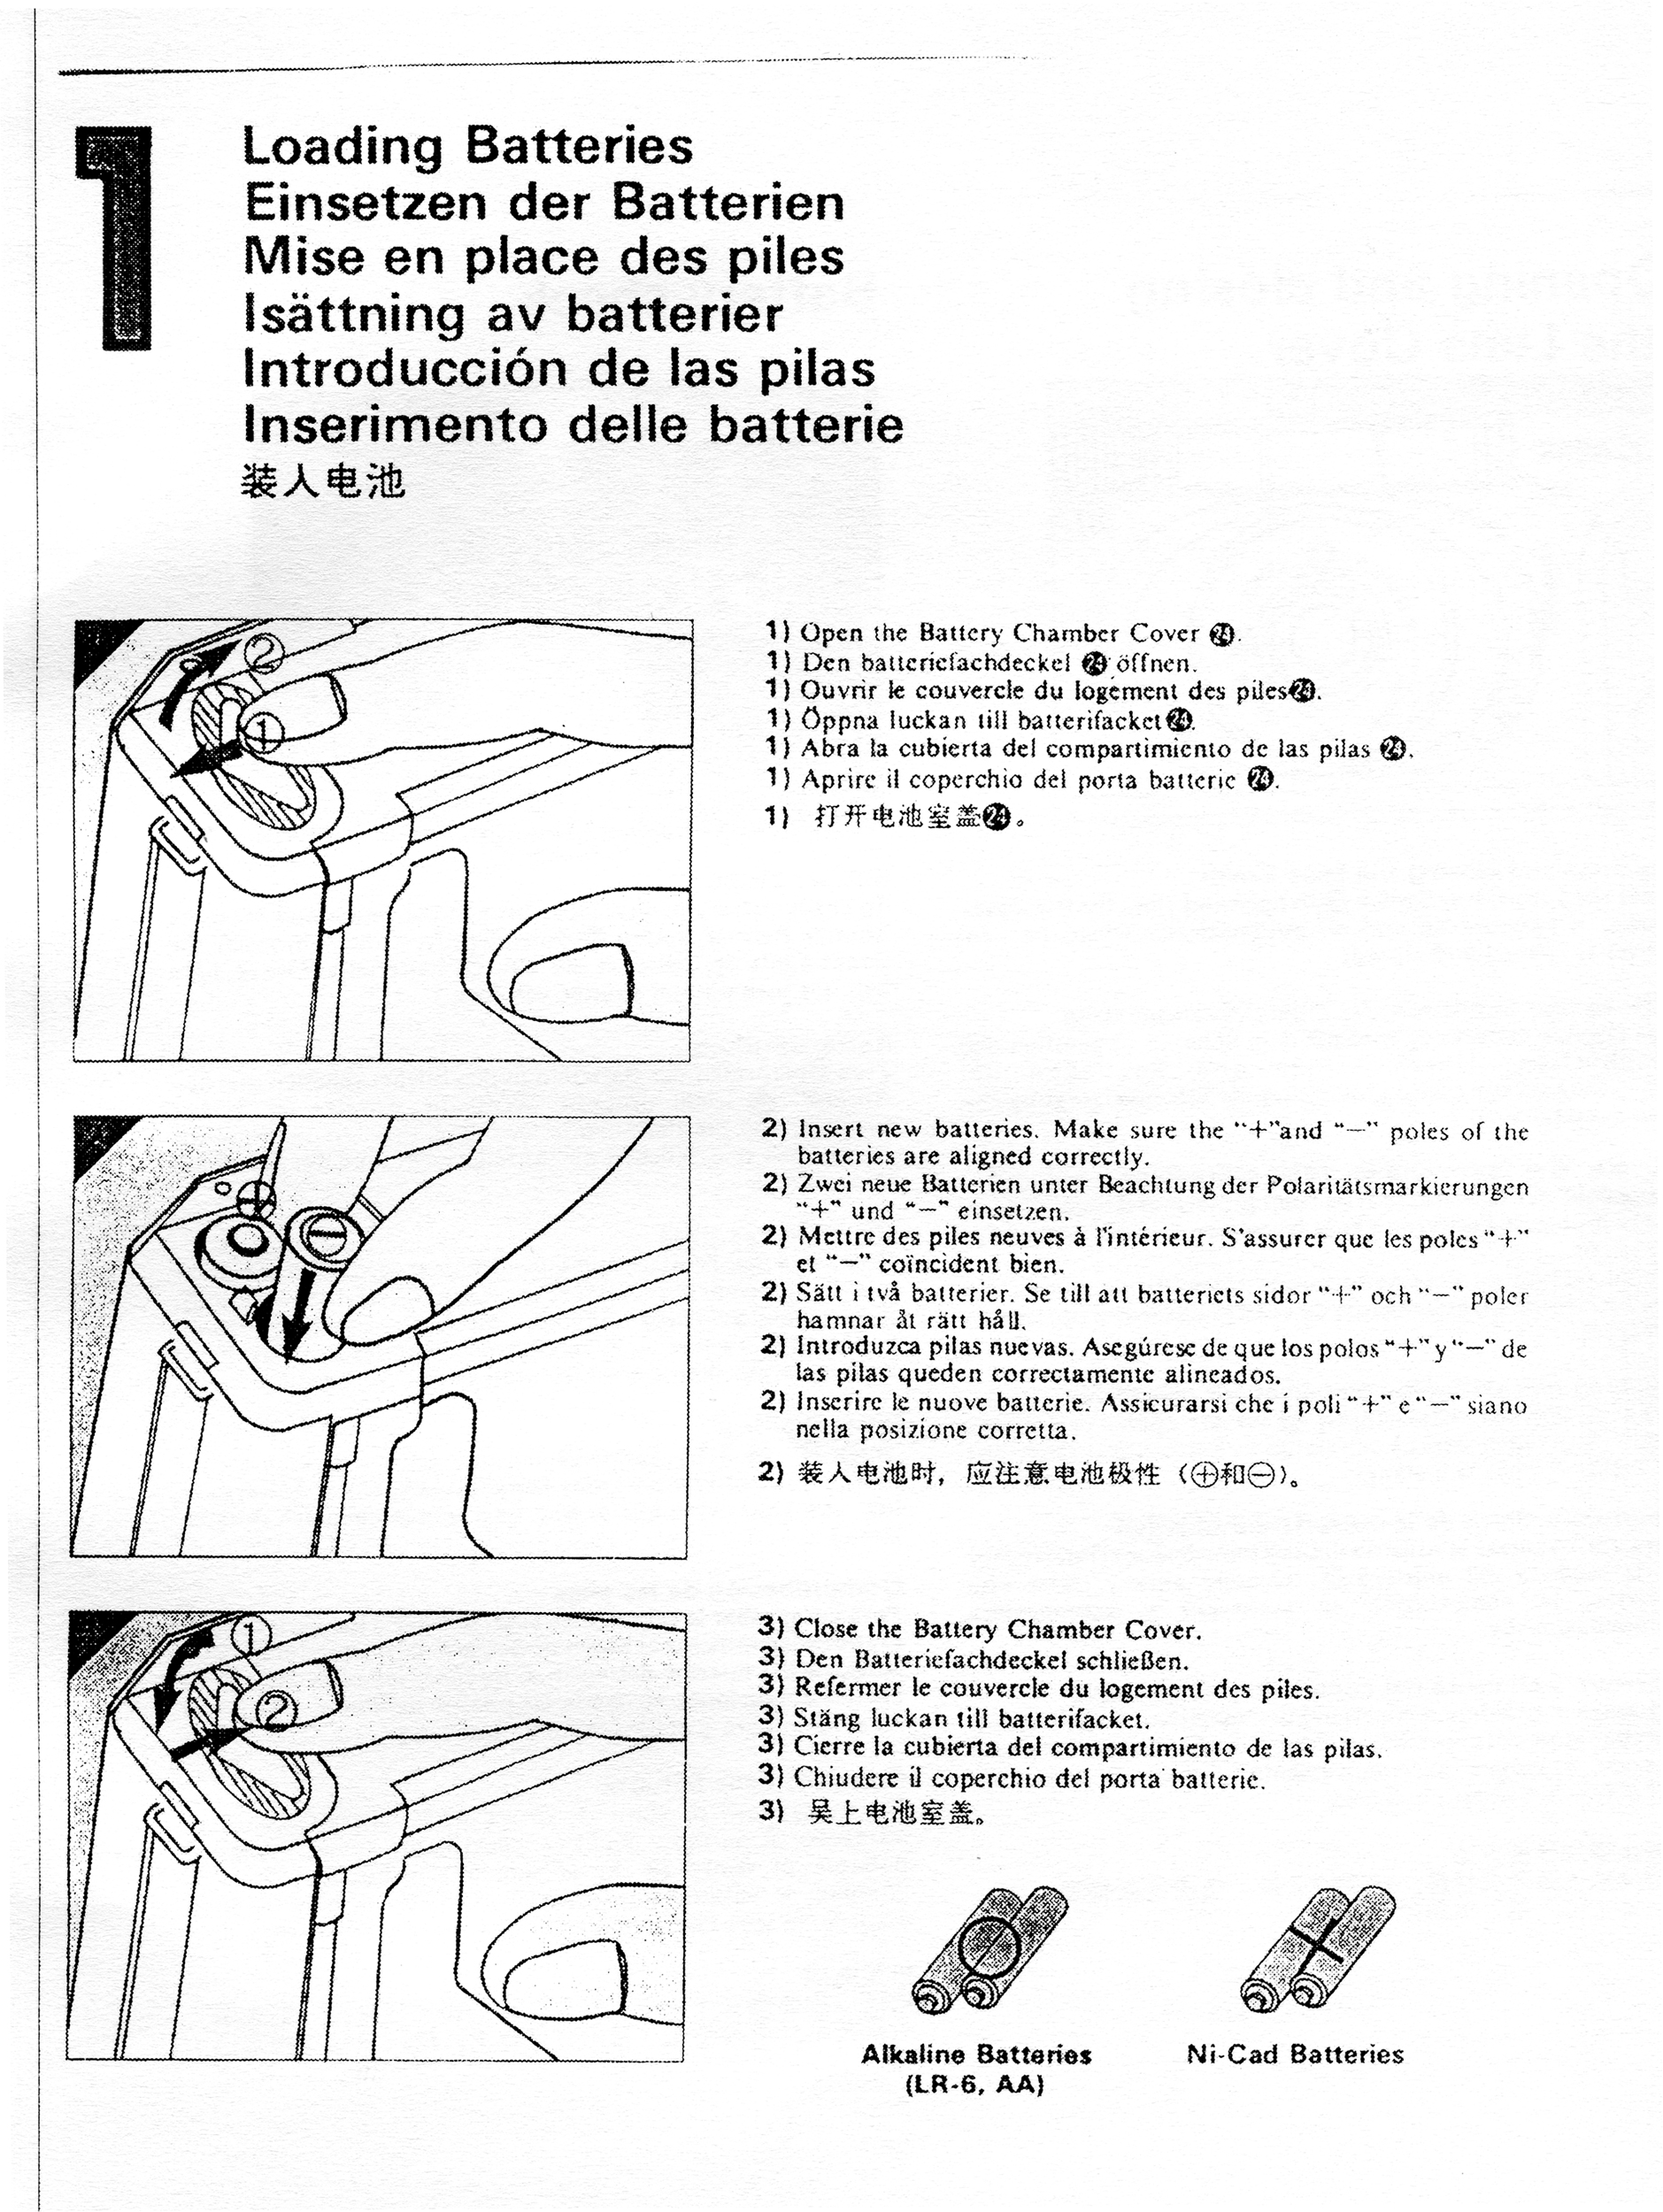
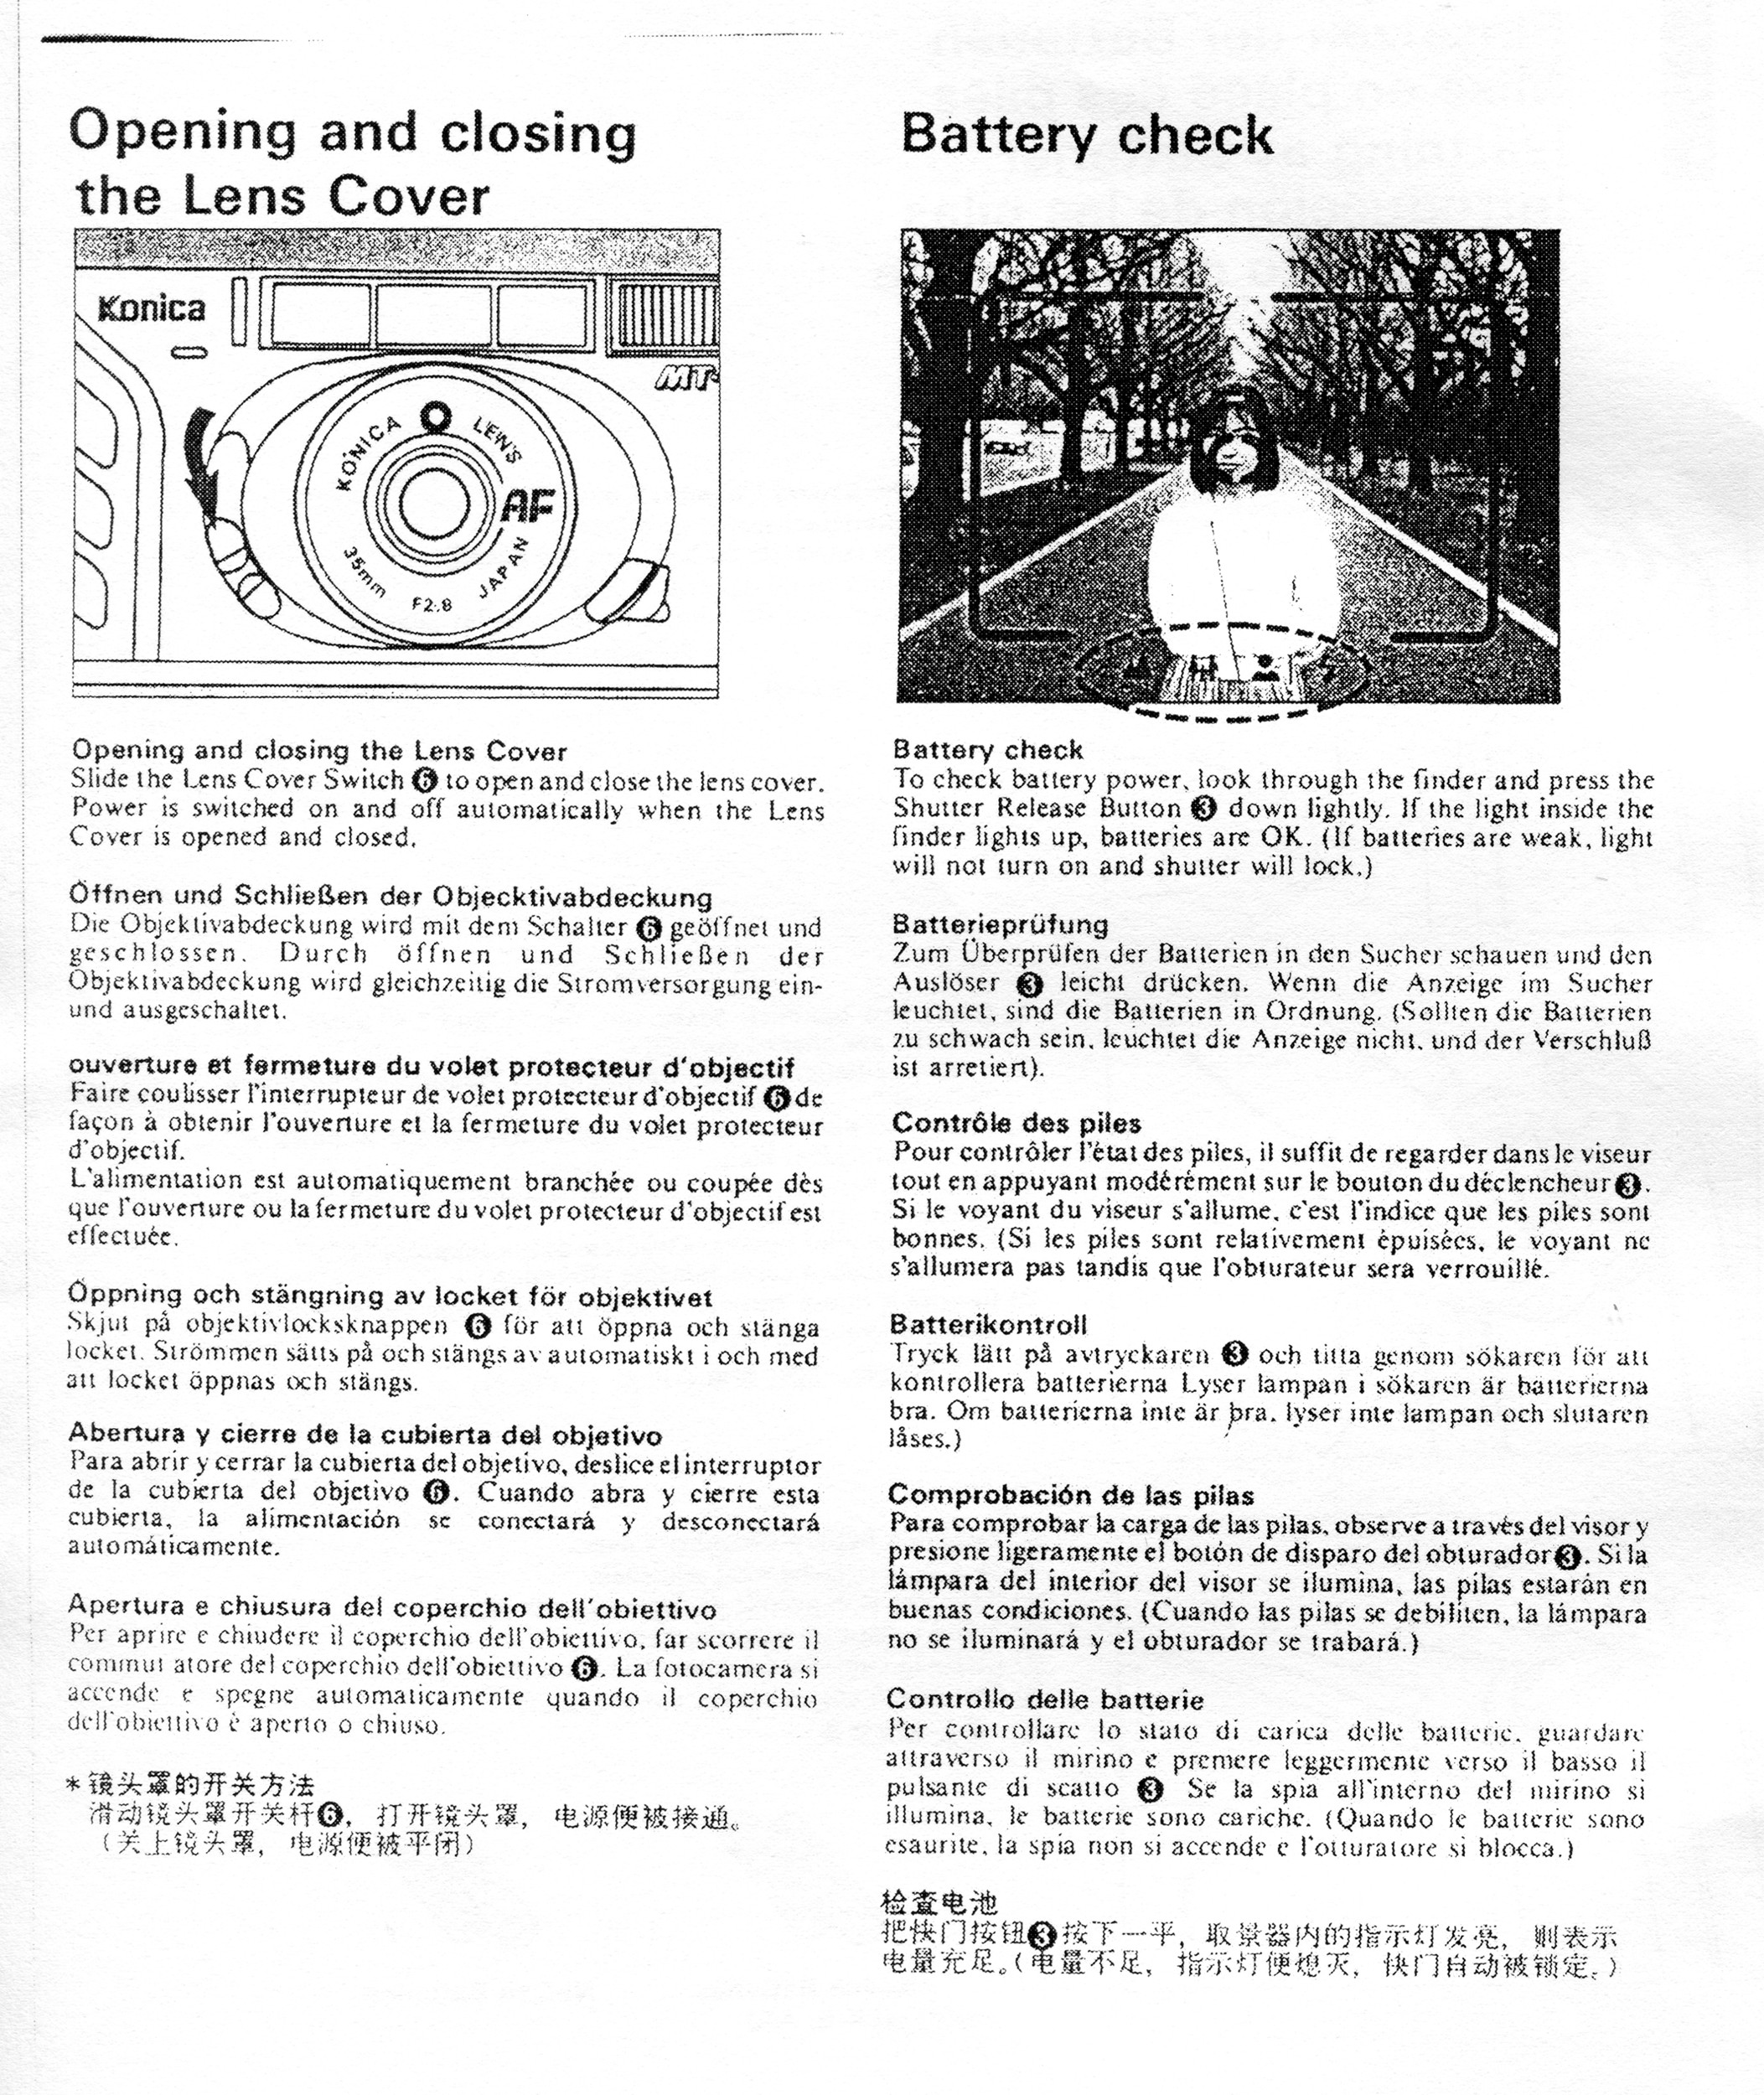
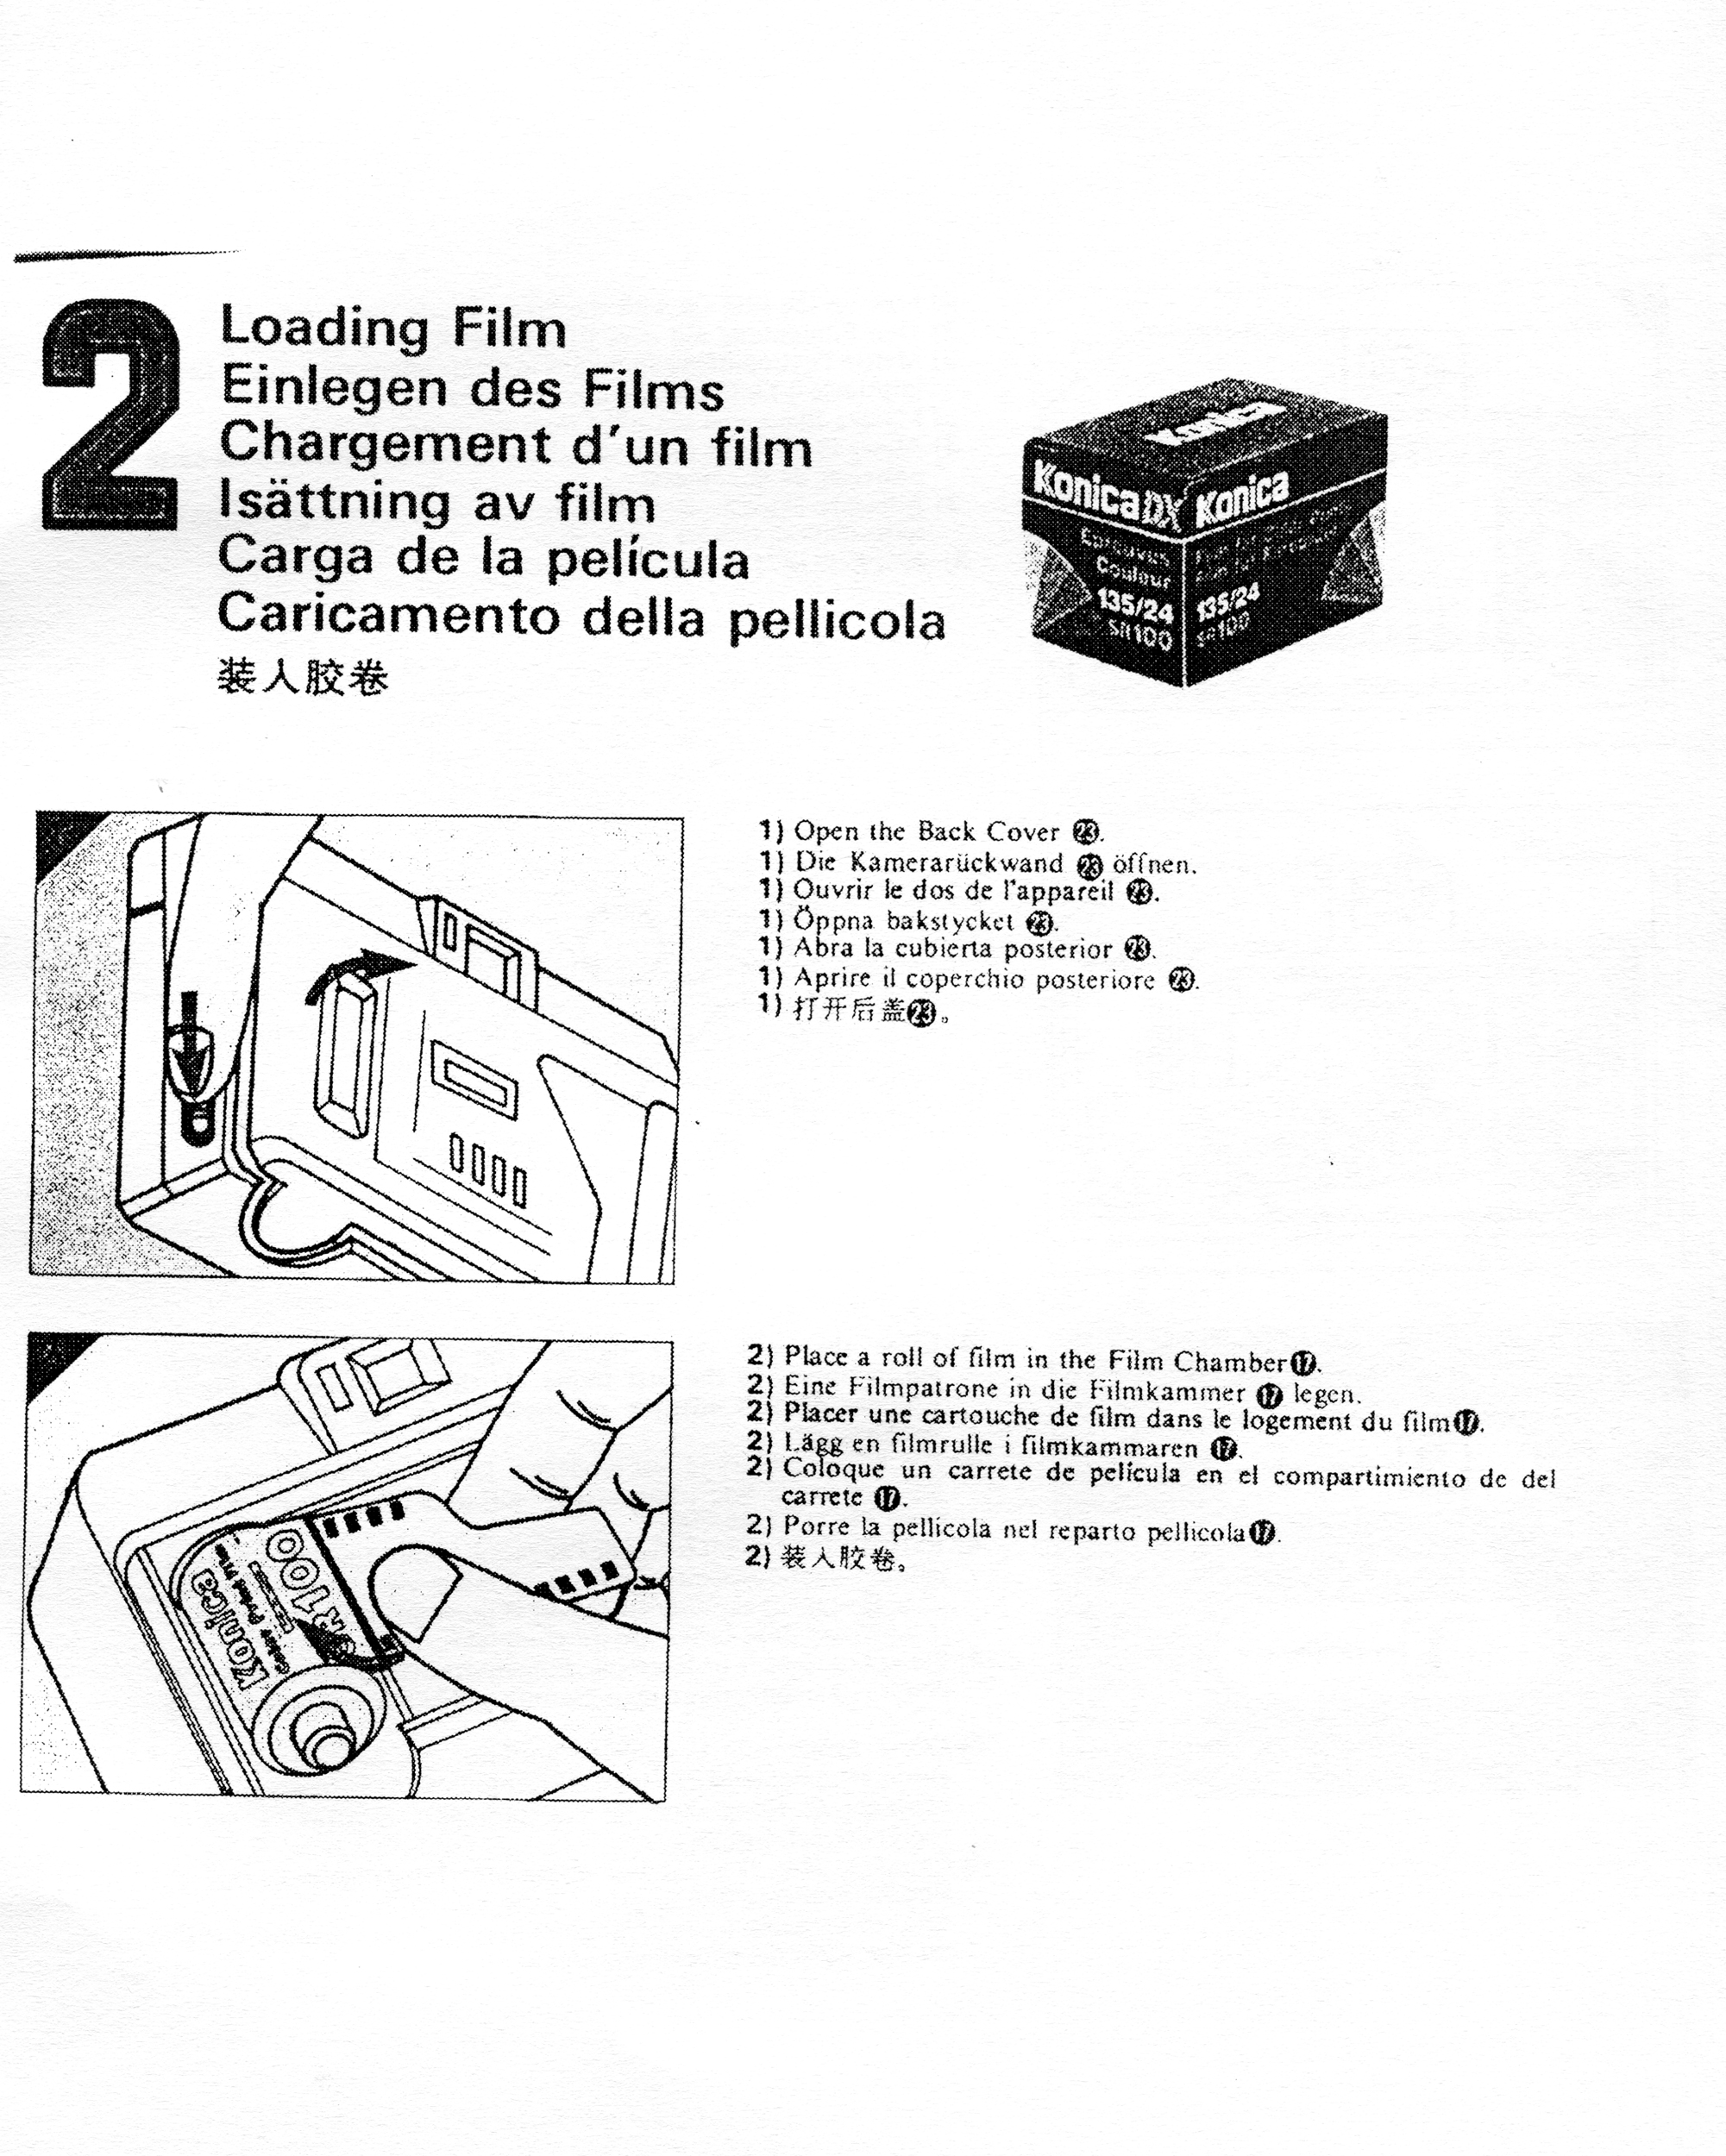
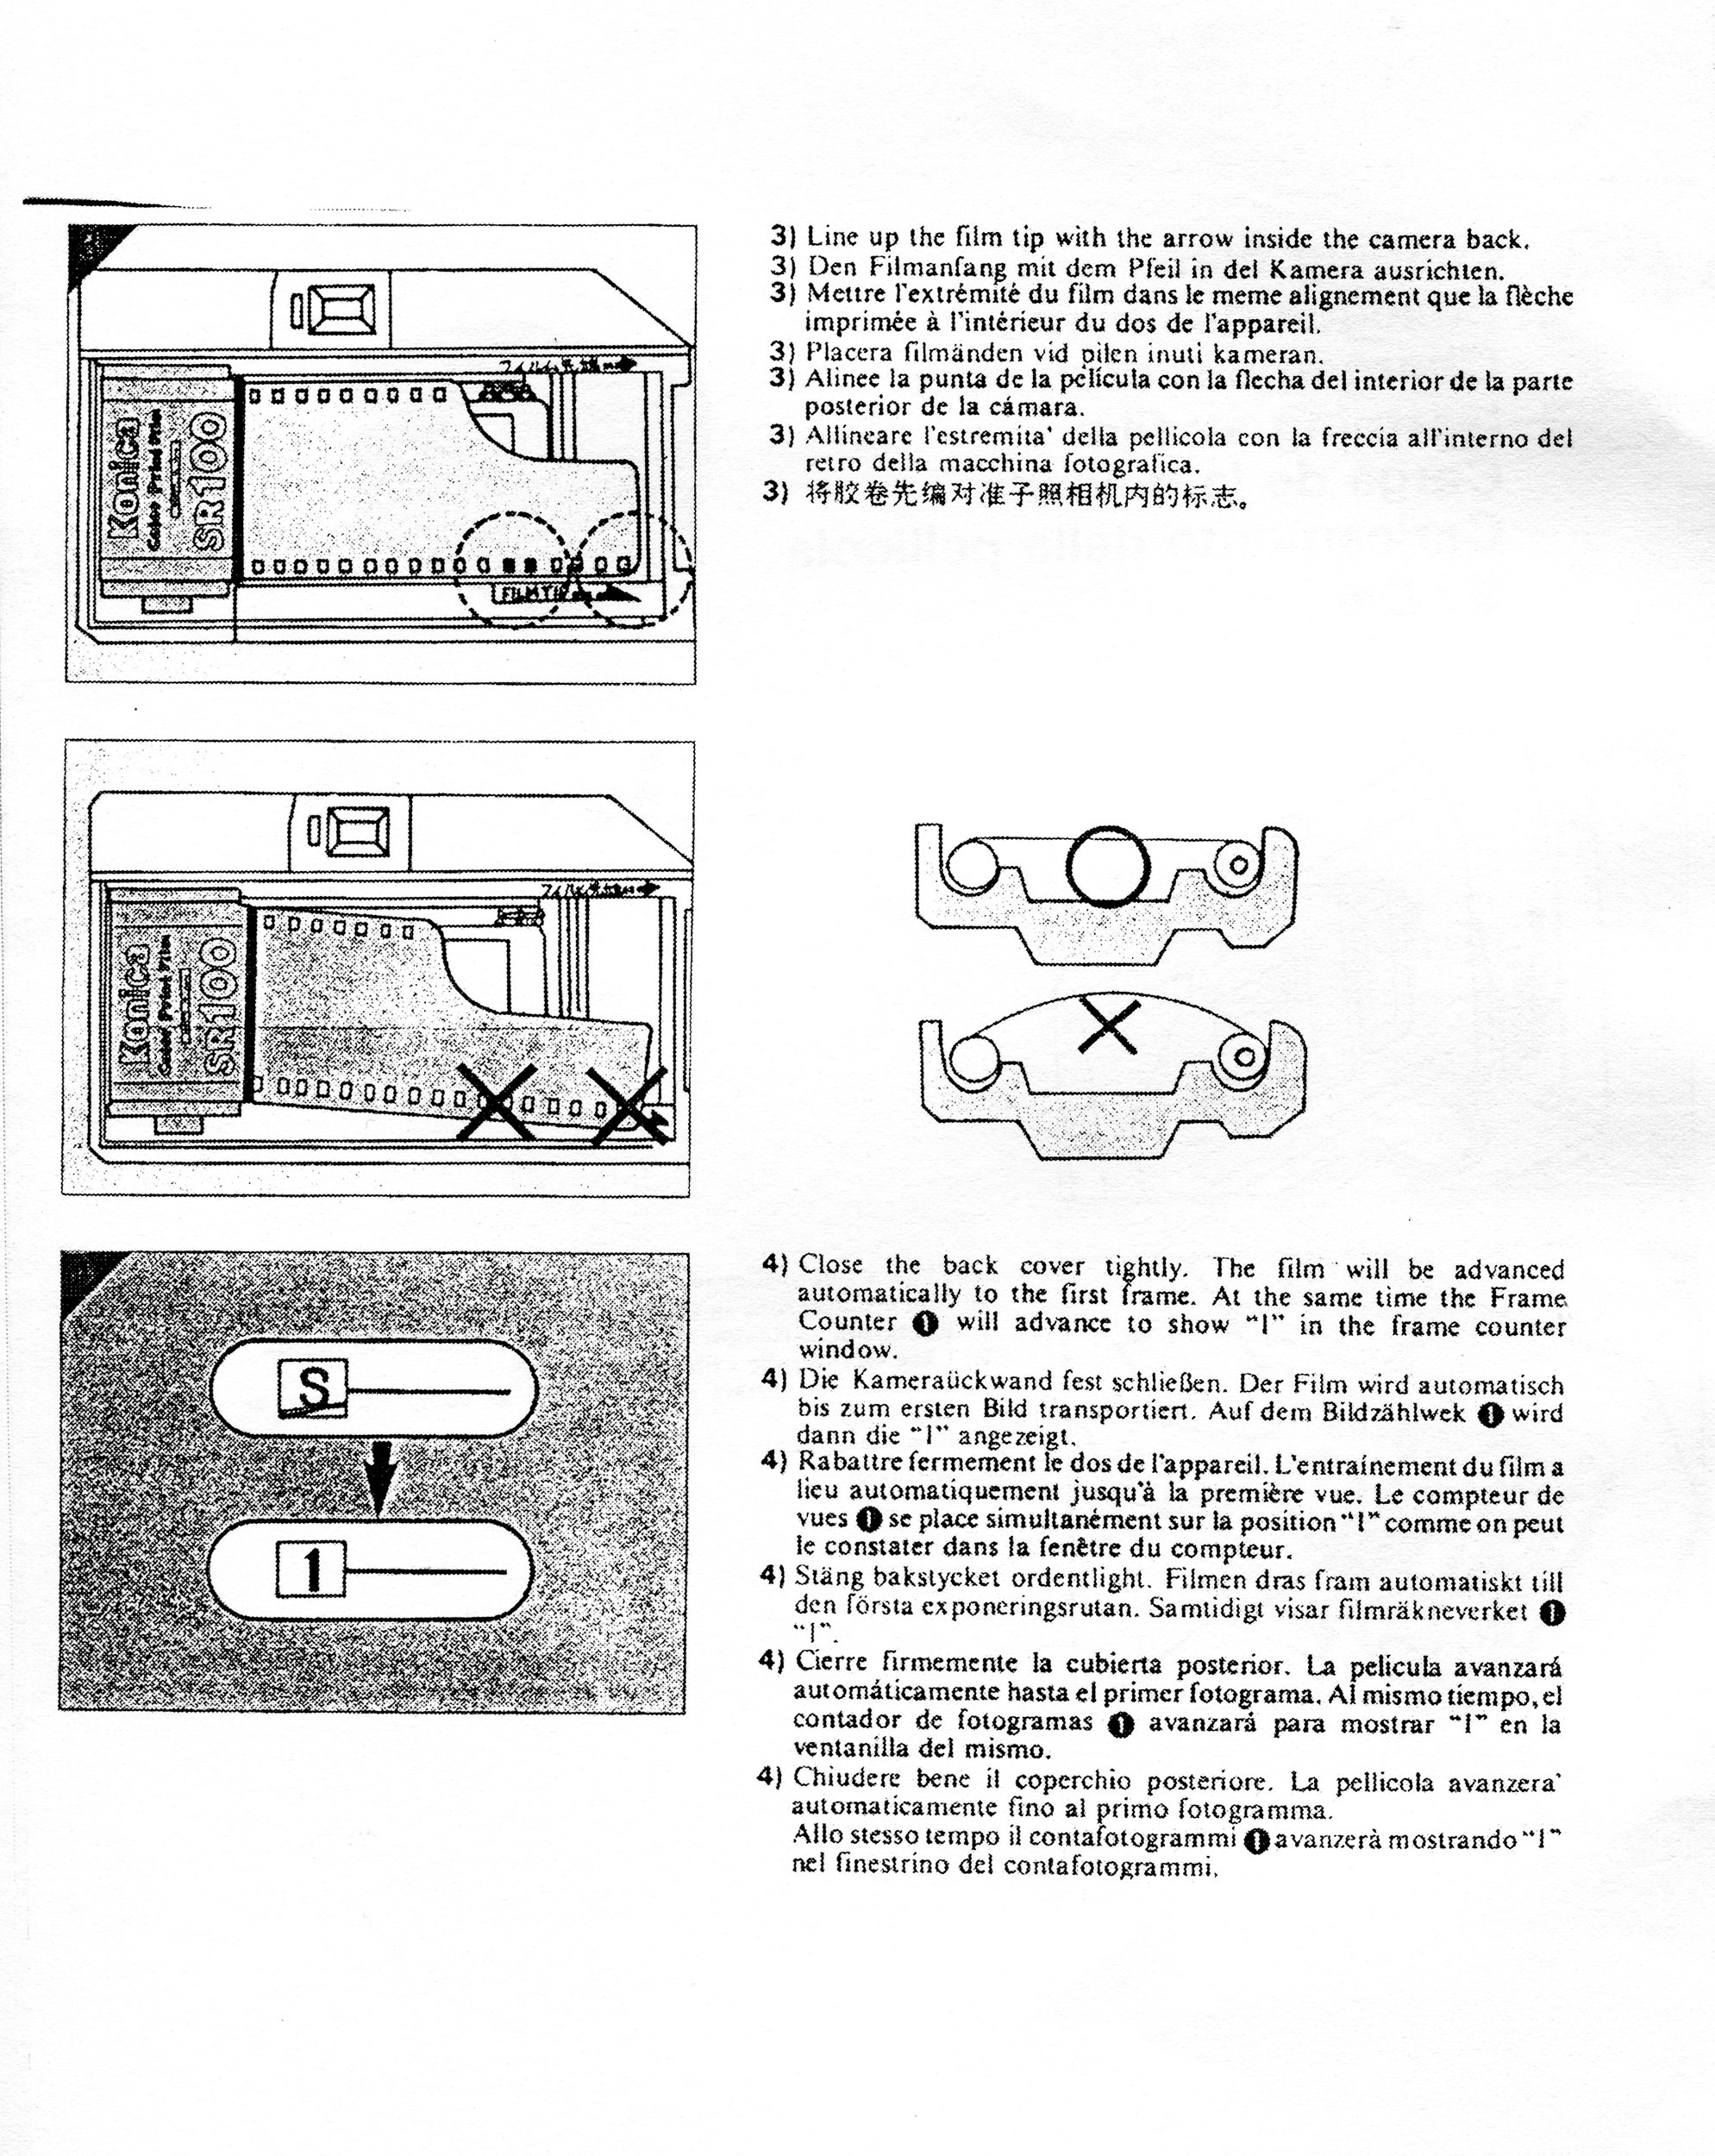
The Koniflex is a high-quality 6×6 TLR produced by Konica during the 1950s. An expensive camera during an era where multiple companies were mass-producing TLRs at a fraction of the price, the Koniflex did not sell well in North America. While not as advanced in operation as contemporary higher-end Rolleiflexes, the Koniflex has a professionally bright focusing screen and world-class viewing and taking lenses. Despite its remarkable build quality and excellent optical performance, because it was not a commercial success (at least in the Europe and the Americas), the Koniflex remains today a mostly-unknown and perhaps under-appreciated 6×6 camera.
While primary known for its 35mm film cameras and lenses, Konica produced, or had a hand in producing, a number of post-war medium format cameras, including the 1950s folding Pearl 645 series, the 1950s Koniflex 6×6 TLR, the 1950s-70s Koni-Omega 6×7 press cameras, and 1968 Koni-Omegaflex 6×7 camera system. The latter two models had a range of high-quality interchangeable lenses.
Although TLR cameras existed before WW2, they came roaring back in the post-war period. During December 1949, Rollei introduced its first new post-war TLRs, including both the new “2.8A” and the cheaper “Automat.” The 2.8A was the first of a series of higher-end Rolleiflexes with a 80mm f/2.8 lens, made with several different lens designers over the years. The Automat did not really mess with the previous wartime configuration and featured a 75mm f/3.5 taking lens. In 1950, Rollei introduced the “Rolleicord 3,” a cheaper, defeatured model with an older-style knob winder and manual shutter cocking.
The early 1950s witnessed in Japan an incredible explosion in the popularity of TLR cameras. At the end of 1952, Konica introduced its first and only TLR camera: the “Koniflex.” From first glance, the Koniflex appeared to be similar in operability to the Rolleicord, with a knob advance and manual shutter cocking mechanism. The Koniflex’s primary departure from the prior TLR formula was its use of a brand-new 85mm f/3.5 five-element taking lens. The 85mm lens was not a Tessar-derived design but a derivative of the Voigtlander Heliar design. It also used a brand-new-for-1952 Seikosha-Rapid #0 shutter. Finally, Konica took a different approach to the issue of focusing screen brightness by using a condenser lens rather than the fresnel/frosted glass (or often plastic) screen found on most every other TLR. During its production run, Konica made a few changes such as using a standard PC flash socket, adding internal baffling, and improved bottom latch. Folks have called this later version the Koniflex “II,” though Konica never officially gave it any special designation.
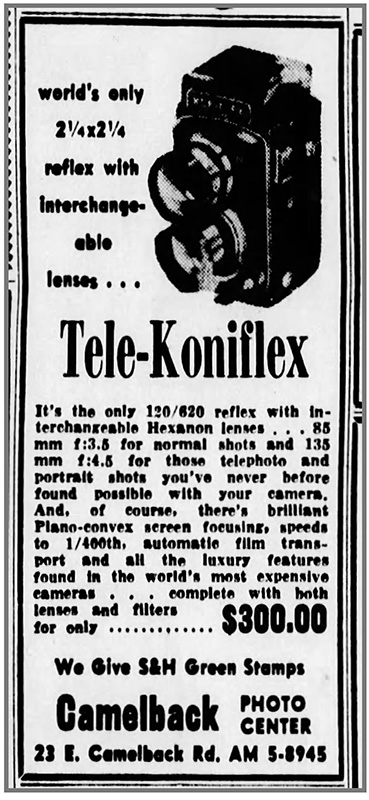
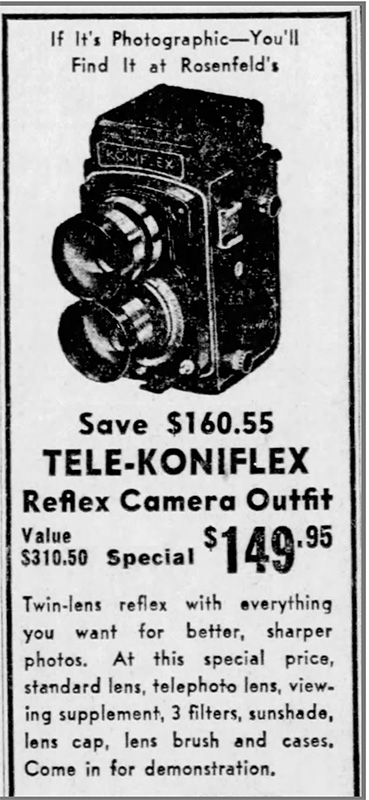
It appears that it was not until some time in mid-1955 that the Koniflex II made it to market in North America. It appears that the most widely-marketed Koniflex was the “Tele-Koniflex.” Retailing at around $300 in 1955-56, the Tele-Koniflex included two screw-on auxiliary lenses to extend the focal length on 135mm. Unfortunately for Konica, this was about the same price as the contemporary Rolleiflex 2.8D. Compare that with the Yashica LM that only cost around $50 at the time. It does not seem that the Tele-Koniflex sold particularly well in North America. By 1957, the Tele-Koniflex was being advertised in the USA for as low as $150, which included filters, the lens hood, and case.
1956
1957
So what about this rare bird Koniflex? For my part, I have never really been into TLR cameras of any vintage or mark because they can be pretty awkward to use as an everyday camera. However, as a lifelong Konica fan, I have always been intrigued by its products that never really made it out of Japan. Let’s take a look.
Specifications for the Koniflex II
Year of Introduction
1955 (1952 Originally)
Film
120 or 620
Taking Lens
85mm f/3.5 Hexanon (5 elements, 3 groups)
Viewing Lens
85mm f/3 View Hexar
Minimum Focus
1.00m
Shutter
Seikosha Rapid #0 Leaf Shutter
Shutter Speeds
B, 1 sec – 1/400
Filter Diameter
39.5mm
Weight
960g
Flash Sync
PC; All Speeds
Advance
Knob; Semi-Automatic
Shutter Tripping
Button or Cocking Lever
Self-Timer
Yes
Operation
The 85mm Experience: Perhaps the reason why folks would be drawn to the Koniflex is the use of its slight more “normal” 85mm lens, the basic equivalent of using a 50mm lens in the 35mm format. While nearly all wartime and prewar Rolleiflexes and 1950s Japanese TLRs used Tessar-type lenses, many consider the Heliar design to be more advanced and to produce more pleasing out-of-focus areas. The minimum focusing distance of 1.00m is par for the course in this class. The amber lens coating of the taking lens is typical of most Konica products of the era. The viewing lens has a blueish lens coating.
Old-Style Shutter Speeds: Throughout much of the 1950s, Konica used in several products different models of Seikosha shutters that used the “old style” of speeds, so B, 1, 1/2, 1/10, 1/25, 1/50, 1/100, 1/200, and 1/400. In real life, this does not really make a difference. Seikosha shutters have proven to be fairly reliable over the years but still require service from time to time.
Odd 39.5mm Filter Size: The 39.5mm filter size is long obsolete, and no modern filters are made in that size. During the era, Konica produced a number of filters (labelled “Konifilters”). However, I would not advise using any of them. My advice is to find a 39.5mm to 40.5mm step up ring and employ quality modern filters.
Shutter Speed / Aperture Use: If one is coming from a later Rolleiflex or many other TLRs, the operation of the Koniflex shutter speed and aperture controls will seem quite different. Instead of using two little dials between the taking and focusing lenses to adjust these settings, the shutter speeds are adjusted by turning the ring attached to the taking lens itself and the aperture with a little lever. While you can see the aperture setting from above, you cannot see the shutter speed.
Manual Shutter Operation: Perhaps the largest downside to the Koniflex is its method of shutter cocking and film advance. Unlike Rolleis and many other TLRs, the shutter is charged by switching a lever underneath the taking lens. Unfortunately, advancing the film does not cock the shutter for the next shot. Konica’s 645 Pearl cameras also lacked the capability for the film advance to cock the shutter. Tripping the shutter is achieved by either pressing the shutter button, or pressing the shutter cocking lever to the opposite side.
Cable Release: The Koniflex uses an older style cable release. One can use either something like the Nikon AR-2 cable or an adapter that allows the use of modern cables.
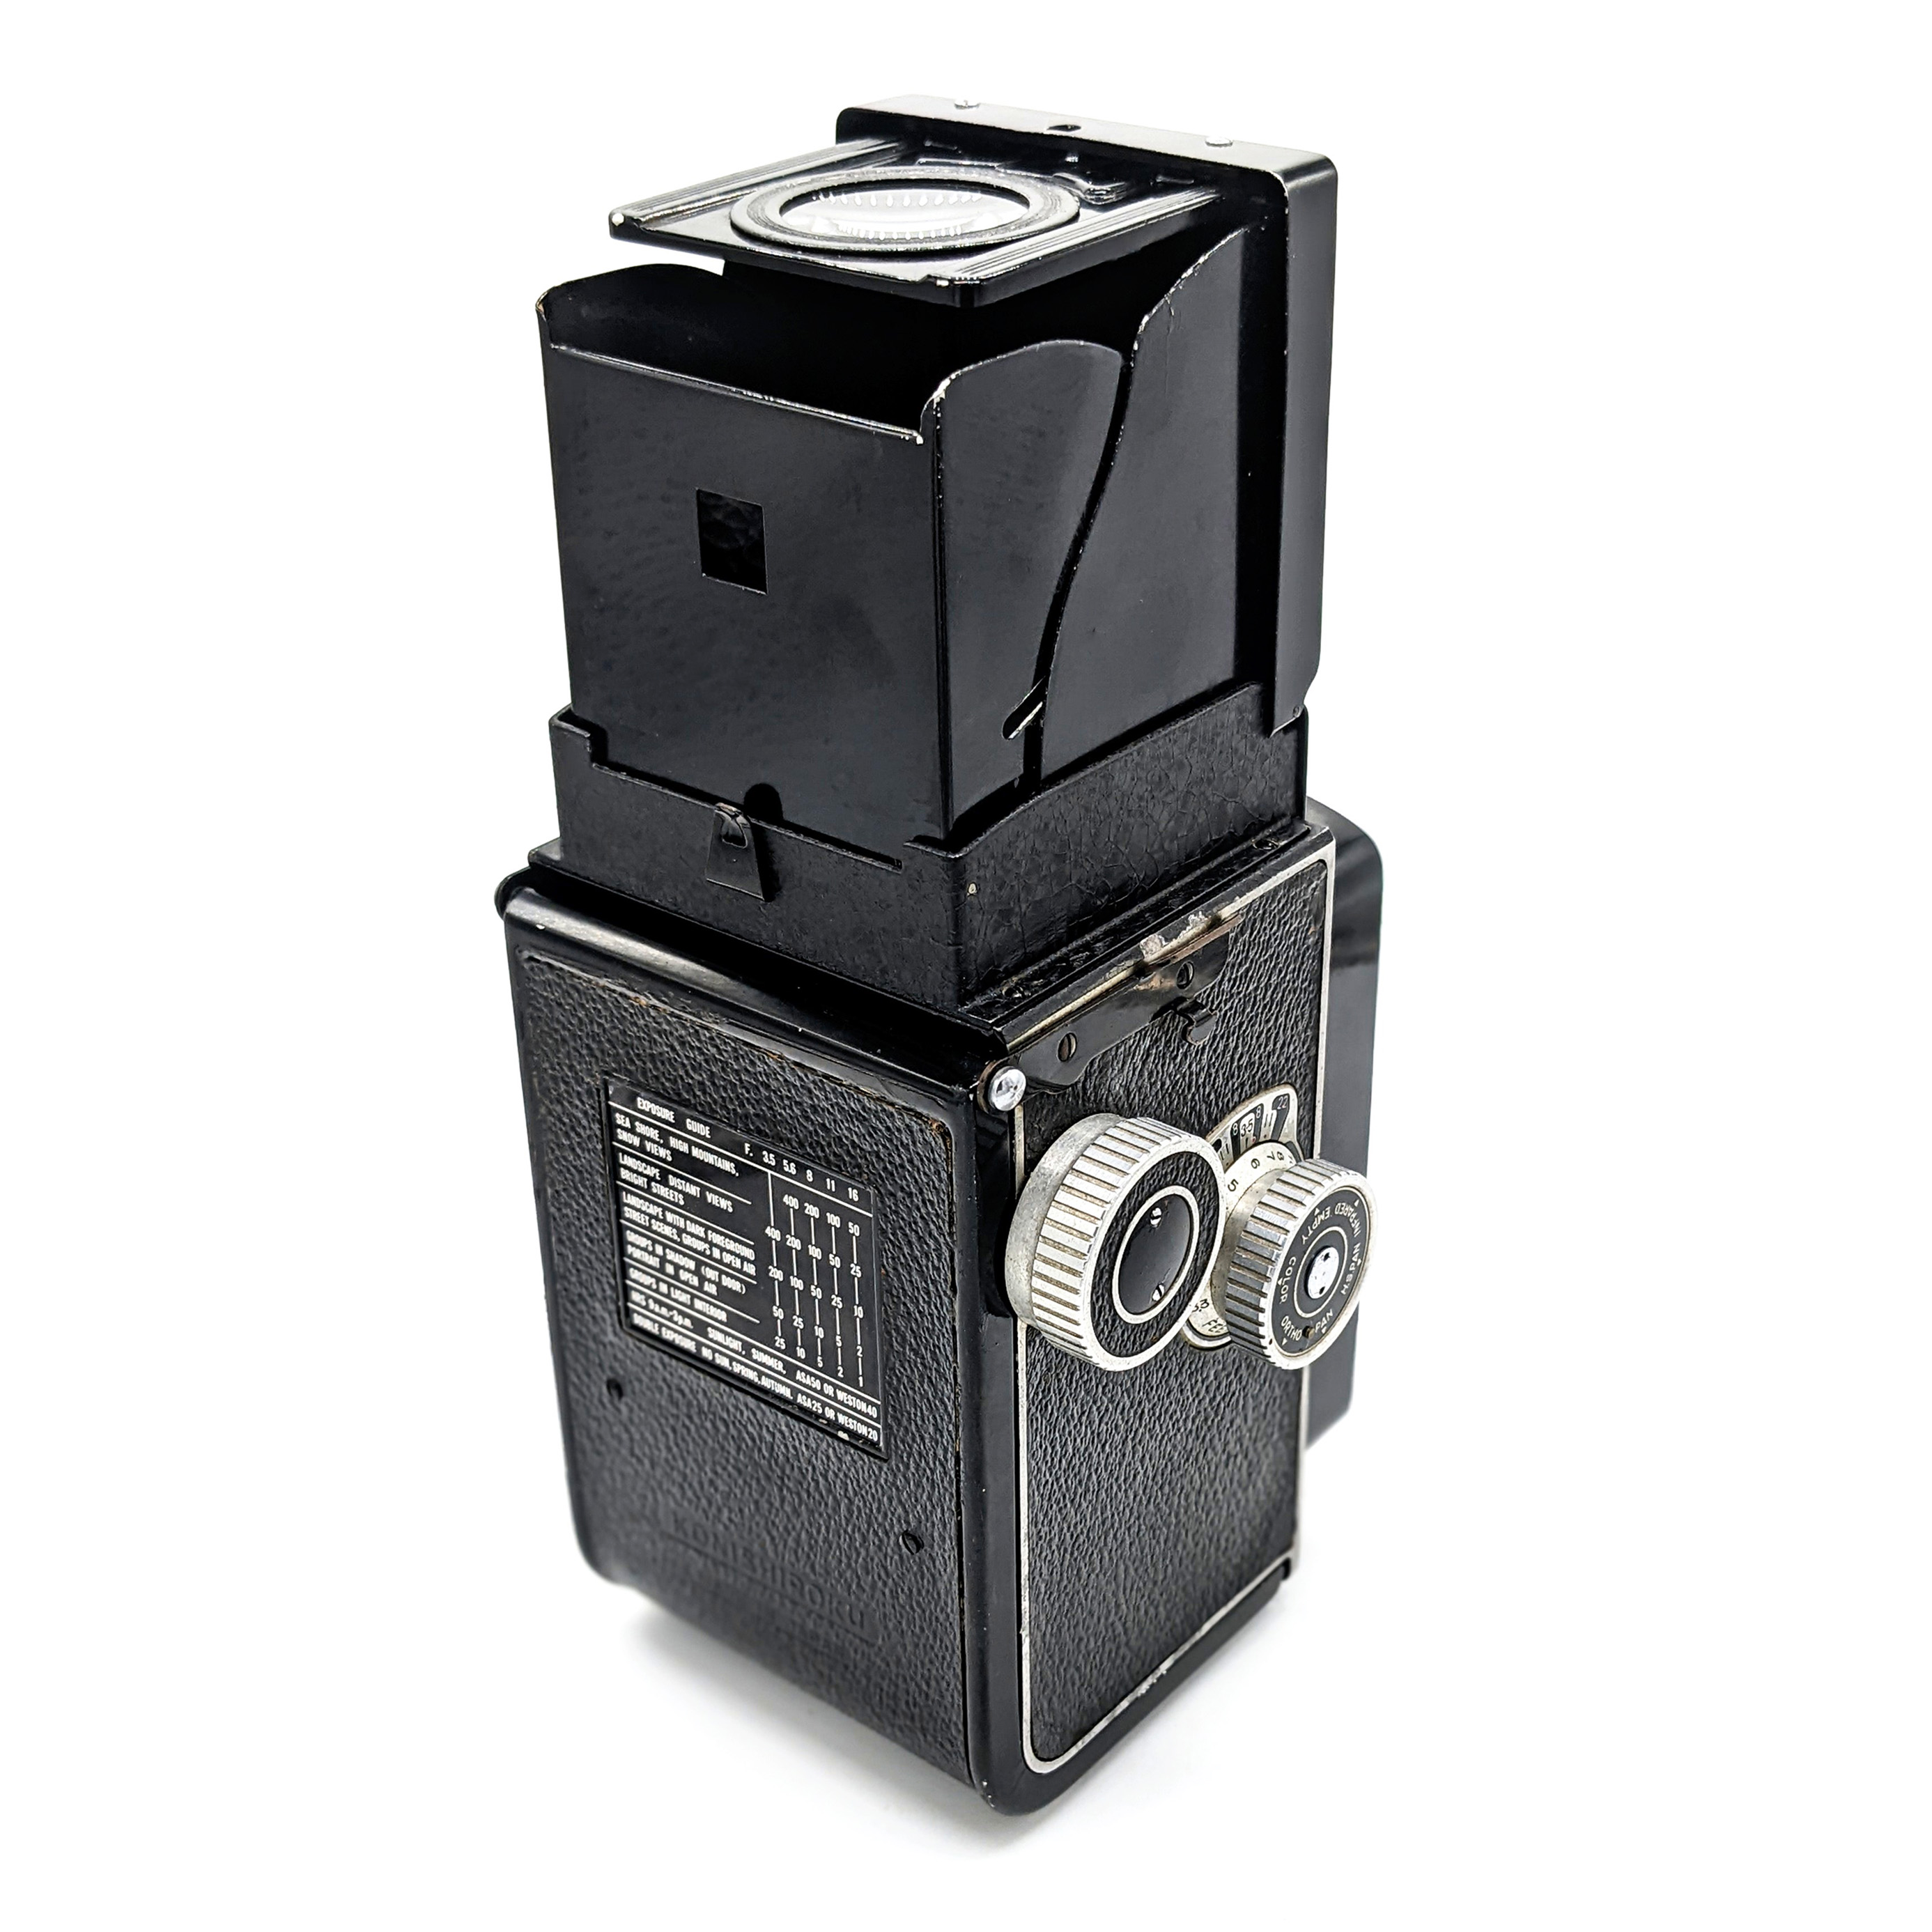
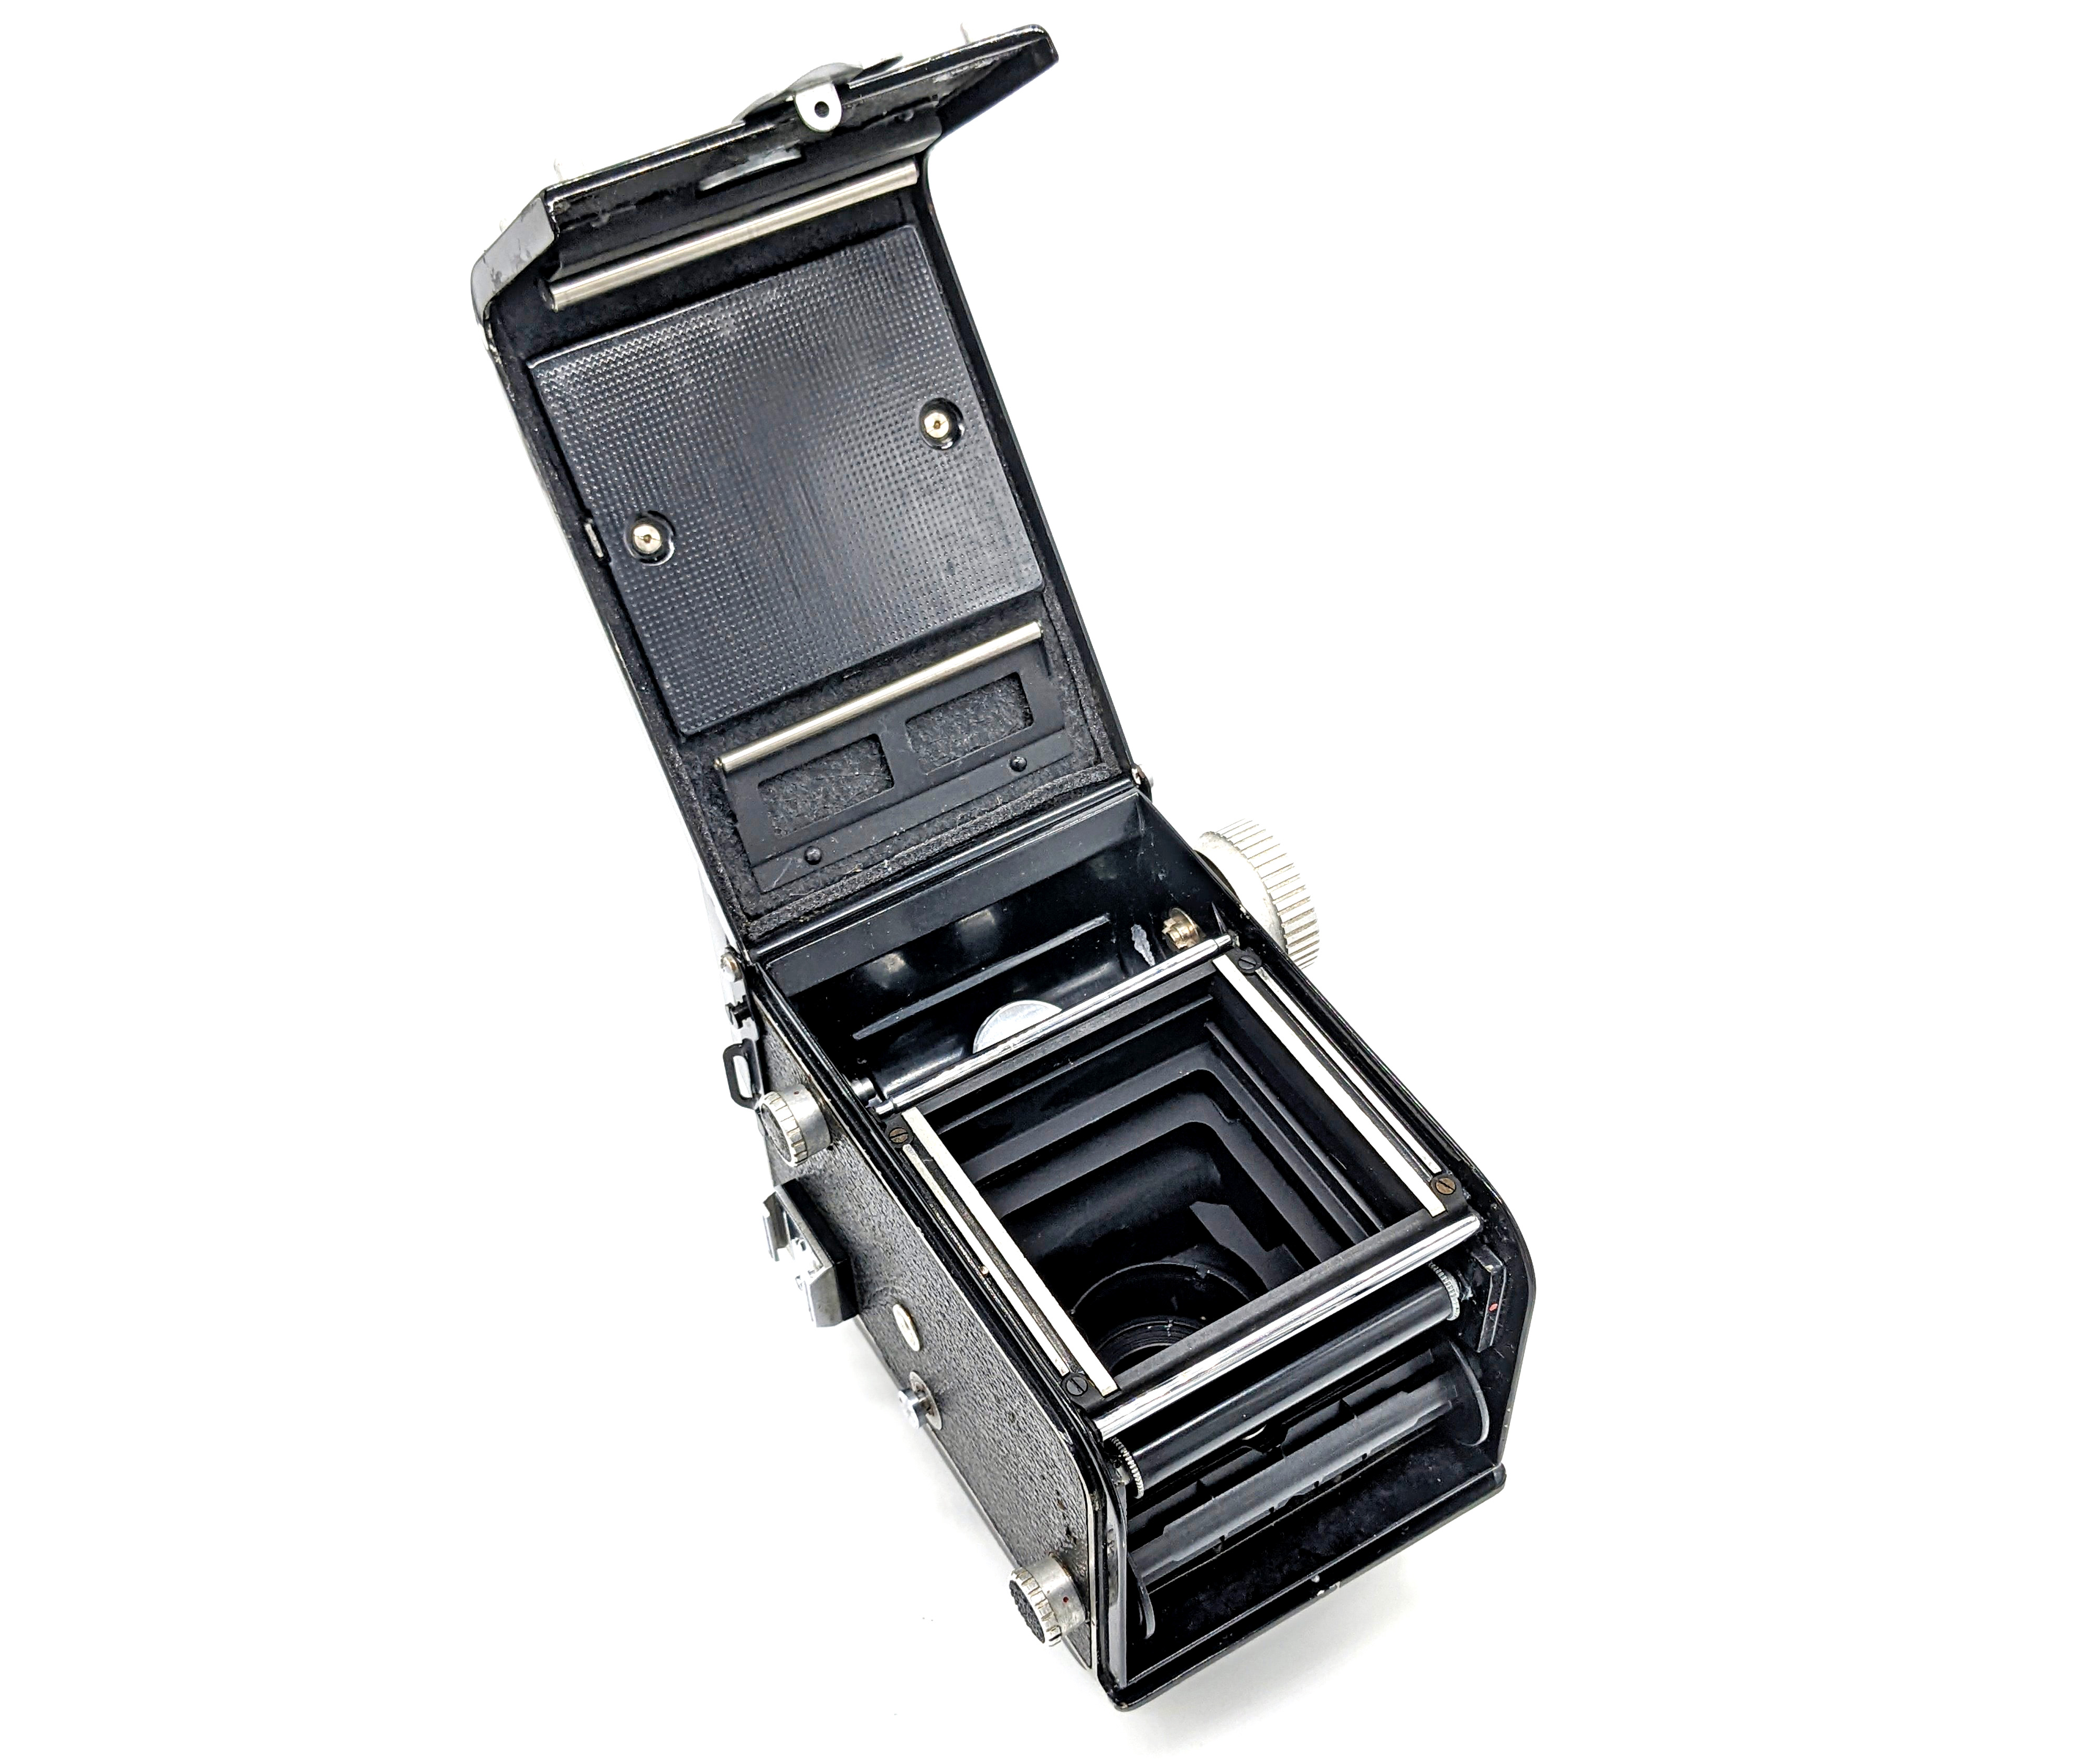
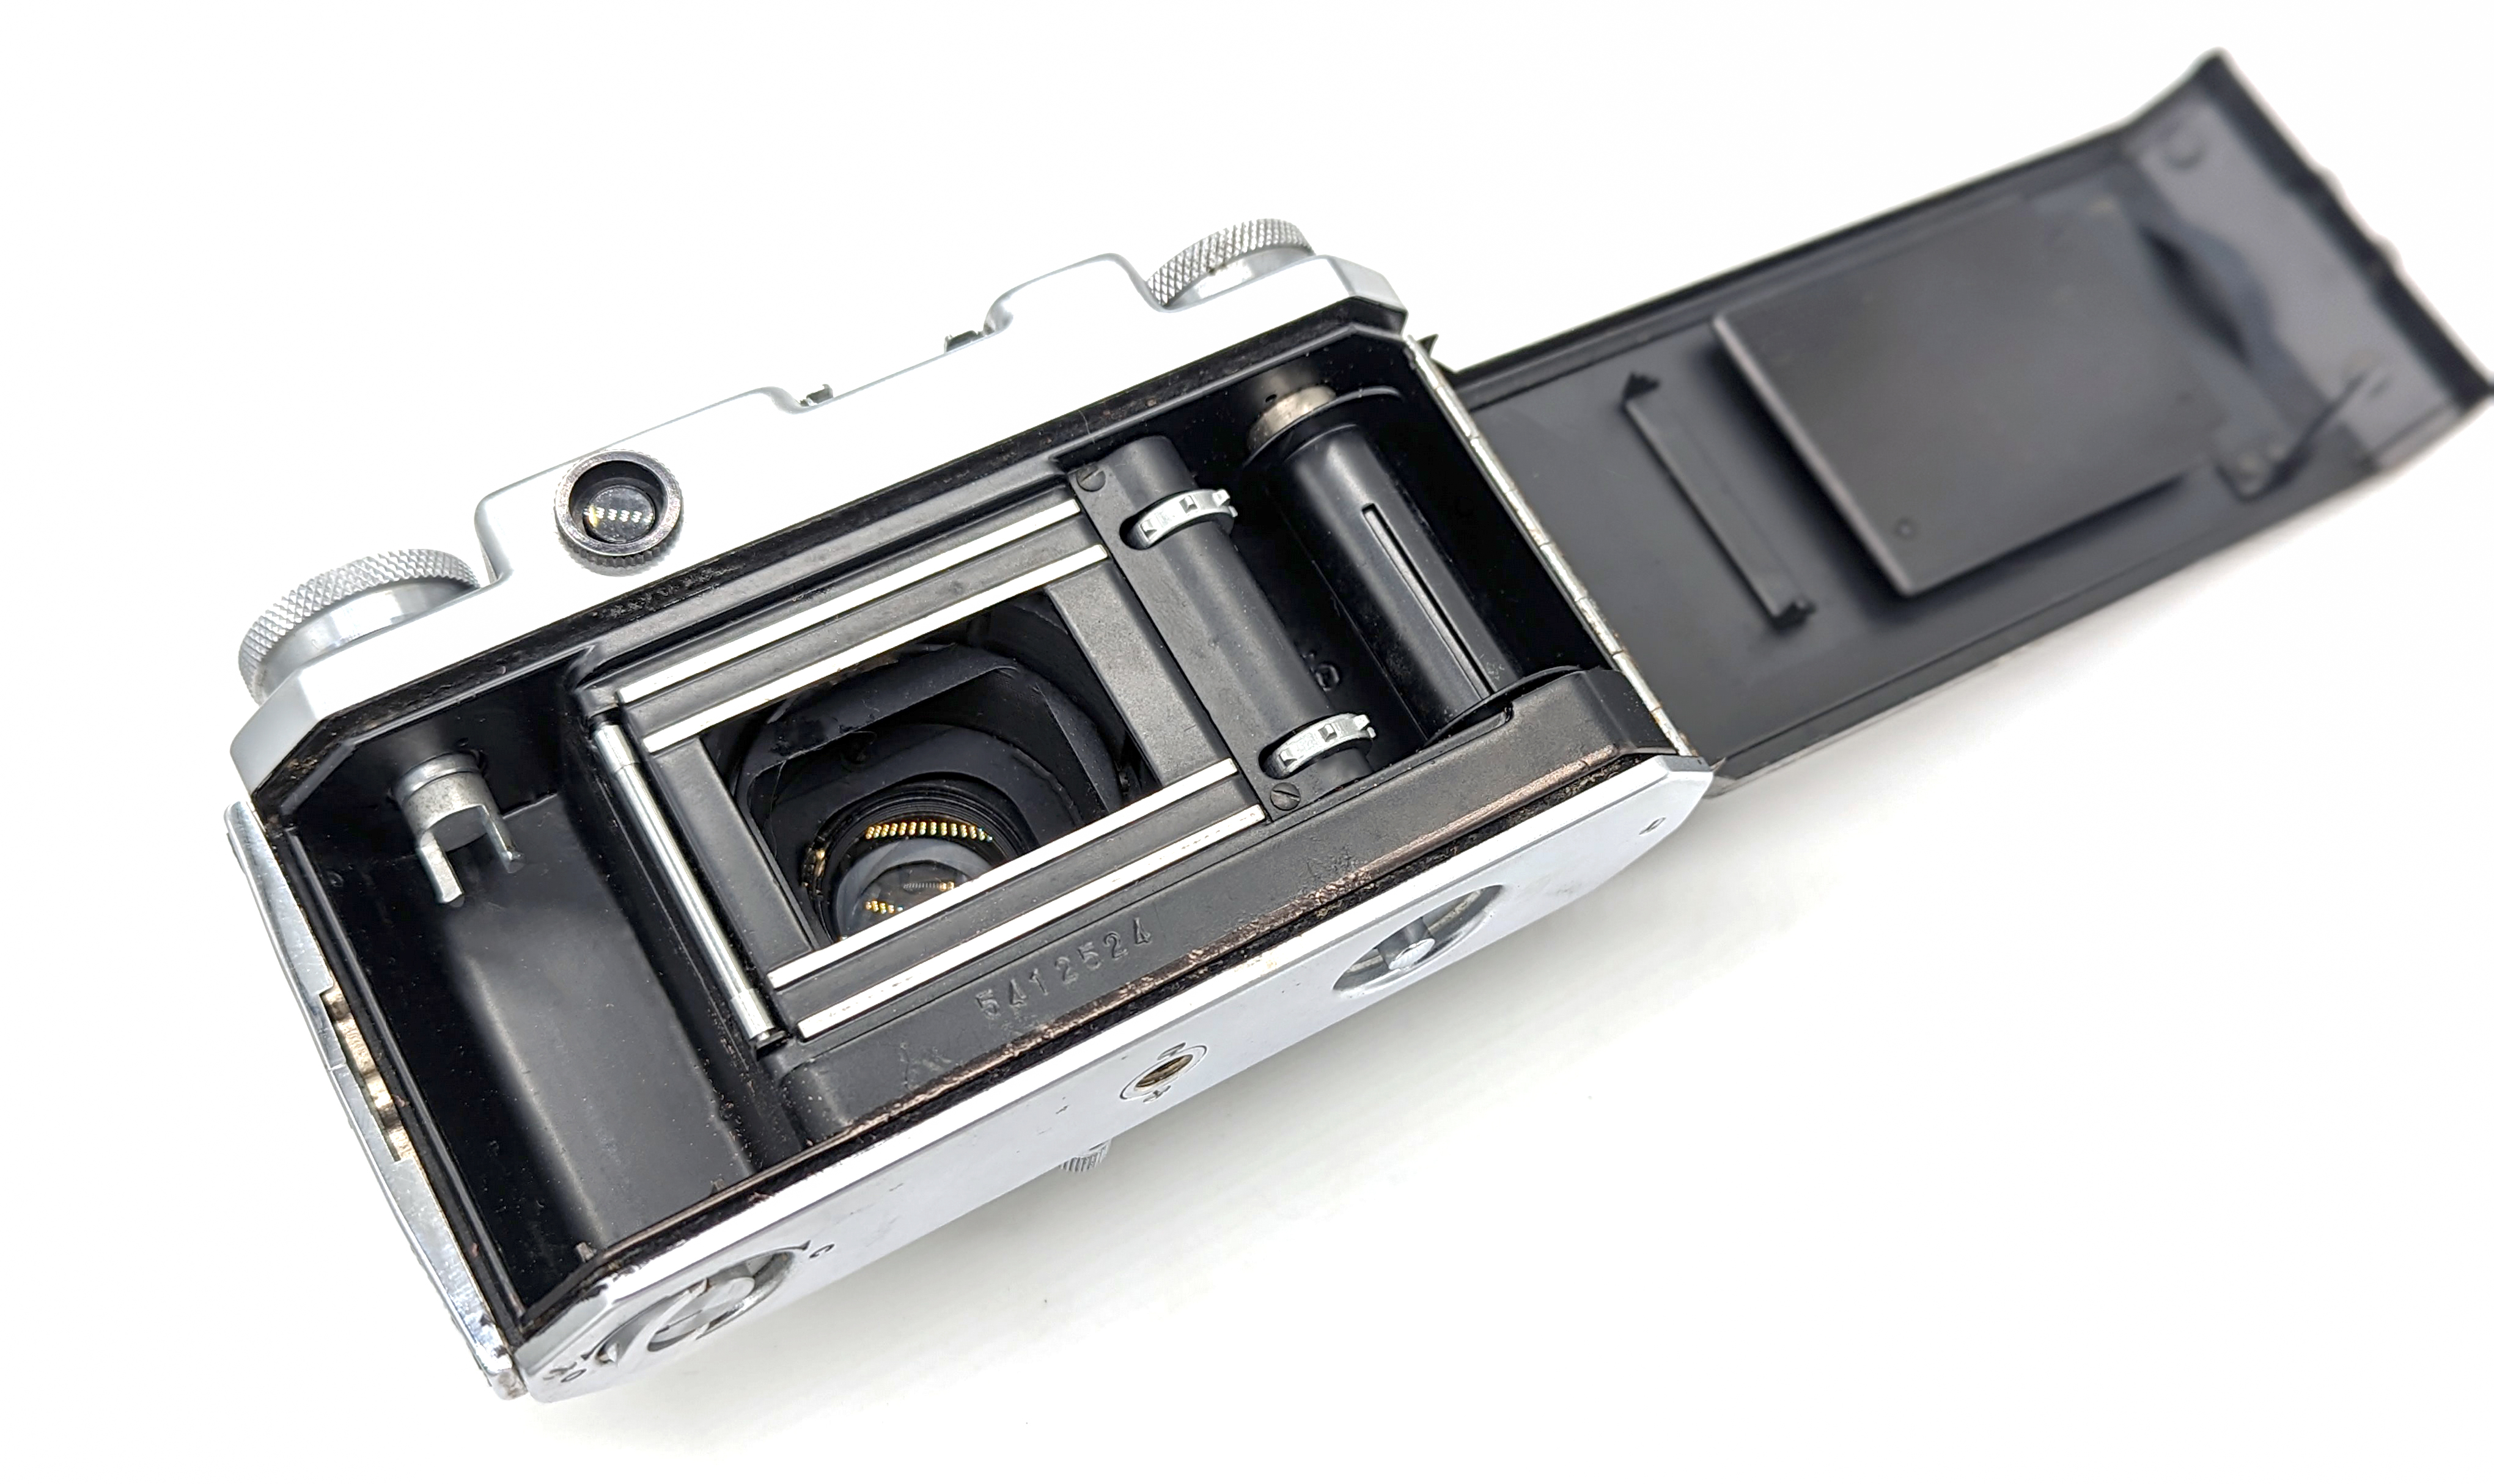
Focusing: Focusing is straightforward using the knob. The Koniflex has an excellent stock focusing screen with a simply “+,” which works fairly well to both determine the absolute center of the frame as well as ensuring that the scene is level. Seemingly unique in the history of TLR design by 1952, the Koniflex uses a curved condenser lens in combination with the glass fresnel lens. This provides excellent and even illumination across the focusing screen. Focusing is achieved by looking down into the camera and/or by using the pop-up magnifier for more critical applications. Remember that the image will be laterally reversed when focusing. There is also a “sports-finder,” which is just a small cut-out in the hood. Konica did not manufacture any other types of hoods or prisms. The focusing mechanism permits the lens assembly to be pulled further back into the body which will also “lock” the shutter. This is useful for stowing the unit after a photo is taken so that shutter does not accidentally get tripped. 120 film was not cheap in the 1950s.
Film Flatness: Konica’s higher-end cameras often made film flatness a priority, which can have a significant impact on the sharpness of any photo. Not only does the Koniflex have a well-engineered pressure plate, the mechanism has rollers to aid in keeping the film flat.
Accessory Shoe: The Koniflex has a nice cold shoe on its side for your flash or external light meter.
Flash Sync: While the Koniflex I had an older Kodak-style flash socket, the II switched to a standard PC socket. Flashes sync at all speeds because of the Seikosha leaf shutter.
120 & 620 Film: Although this was probably a big deal at the time and not such a big deal anymore, the Koniflex’s ability to use both 620 and 120 film was pretty neat. 620 was a format that was used by some super-old Rolleiflexes and many Kodak cameras from the 1930s to the 1960s.
Strap Lugs: Although you could use the Koniflex case itself as a strap, the camera includes two standard lugs for any strap you wish to use.
Accessories
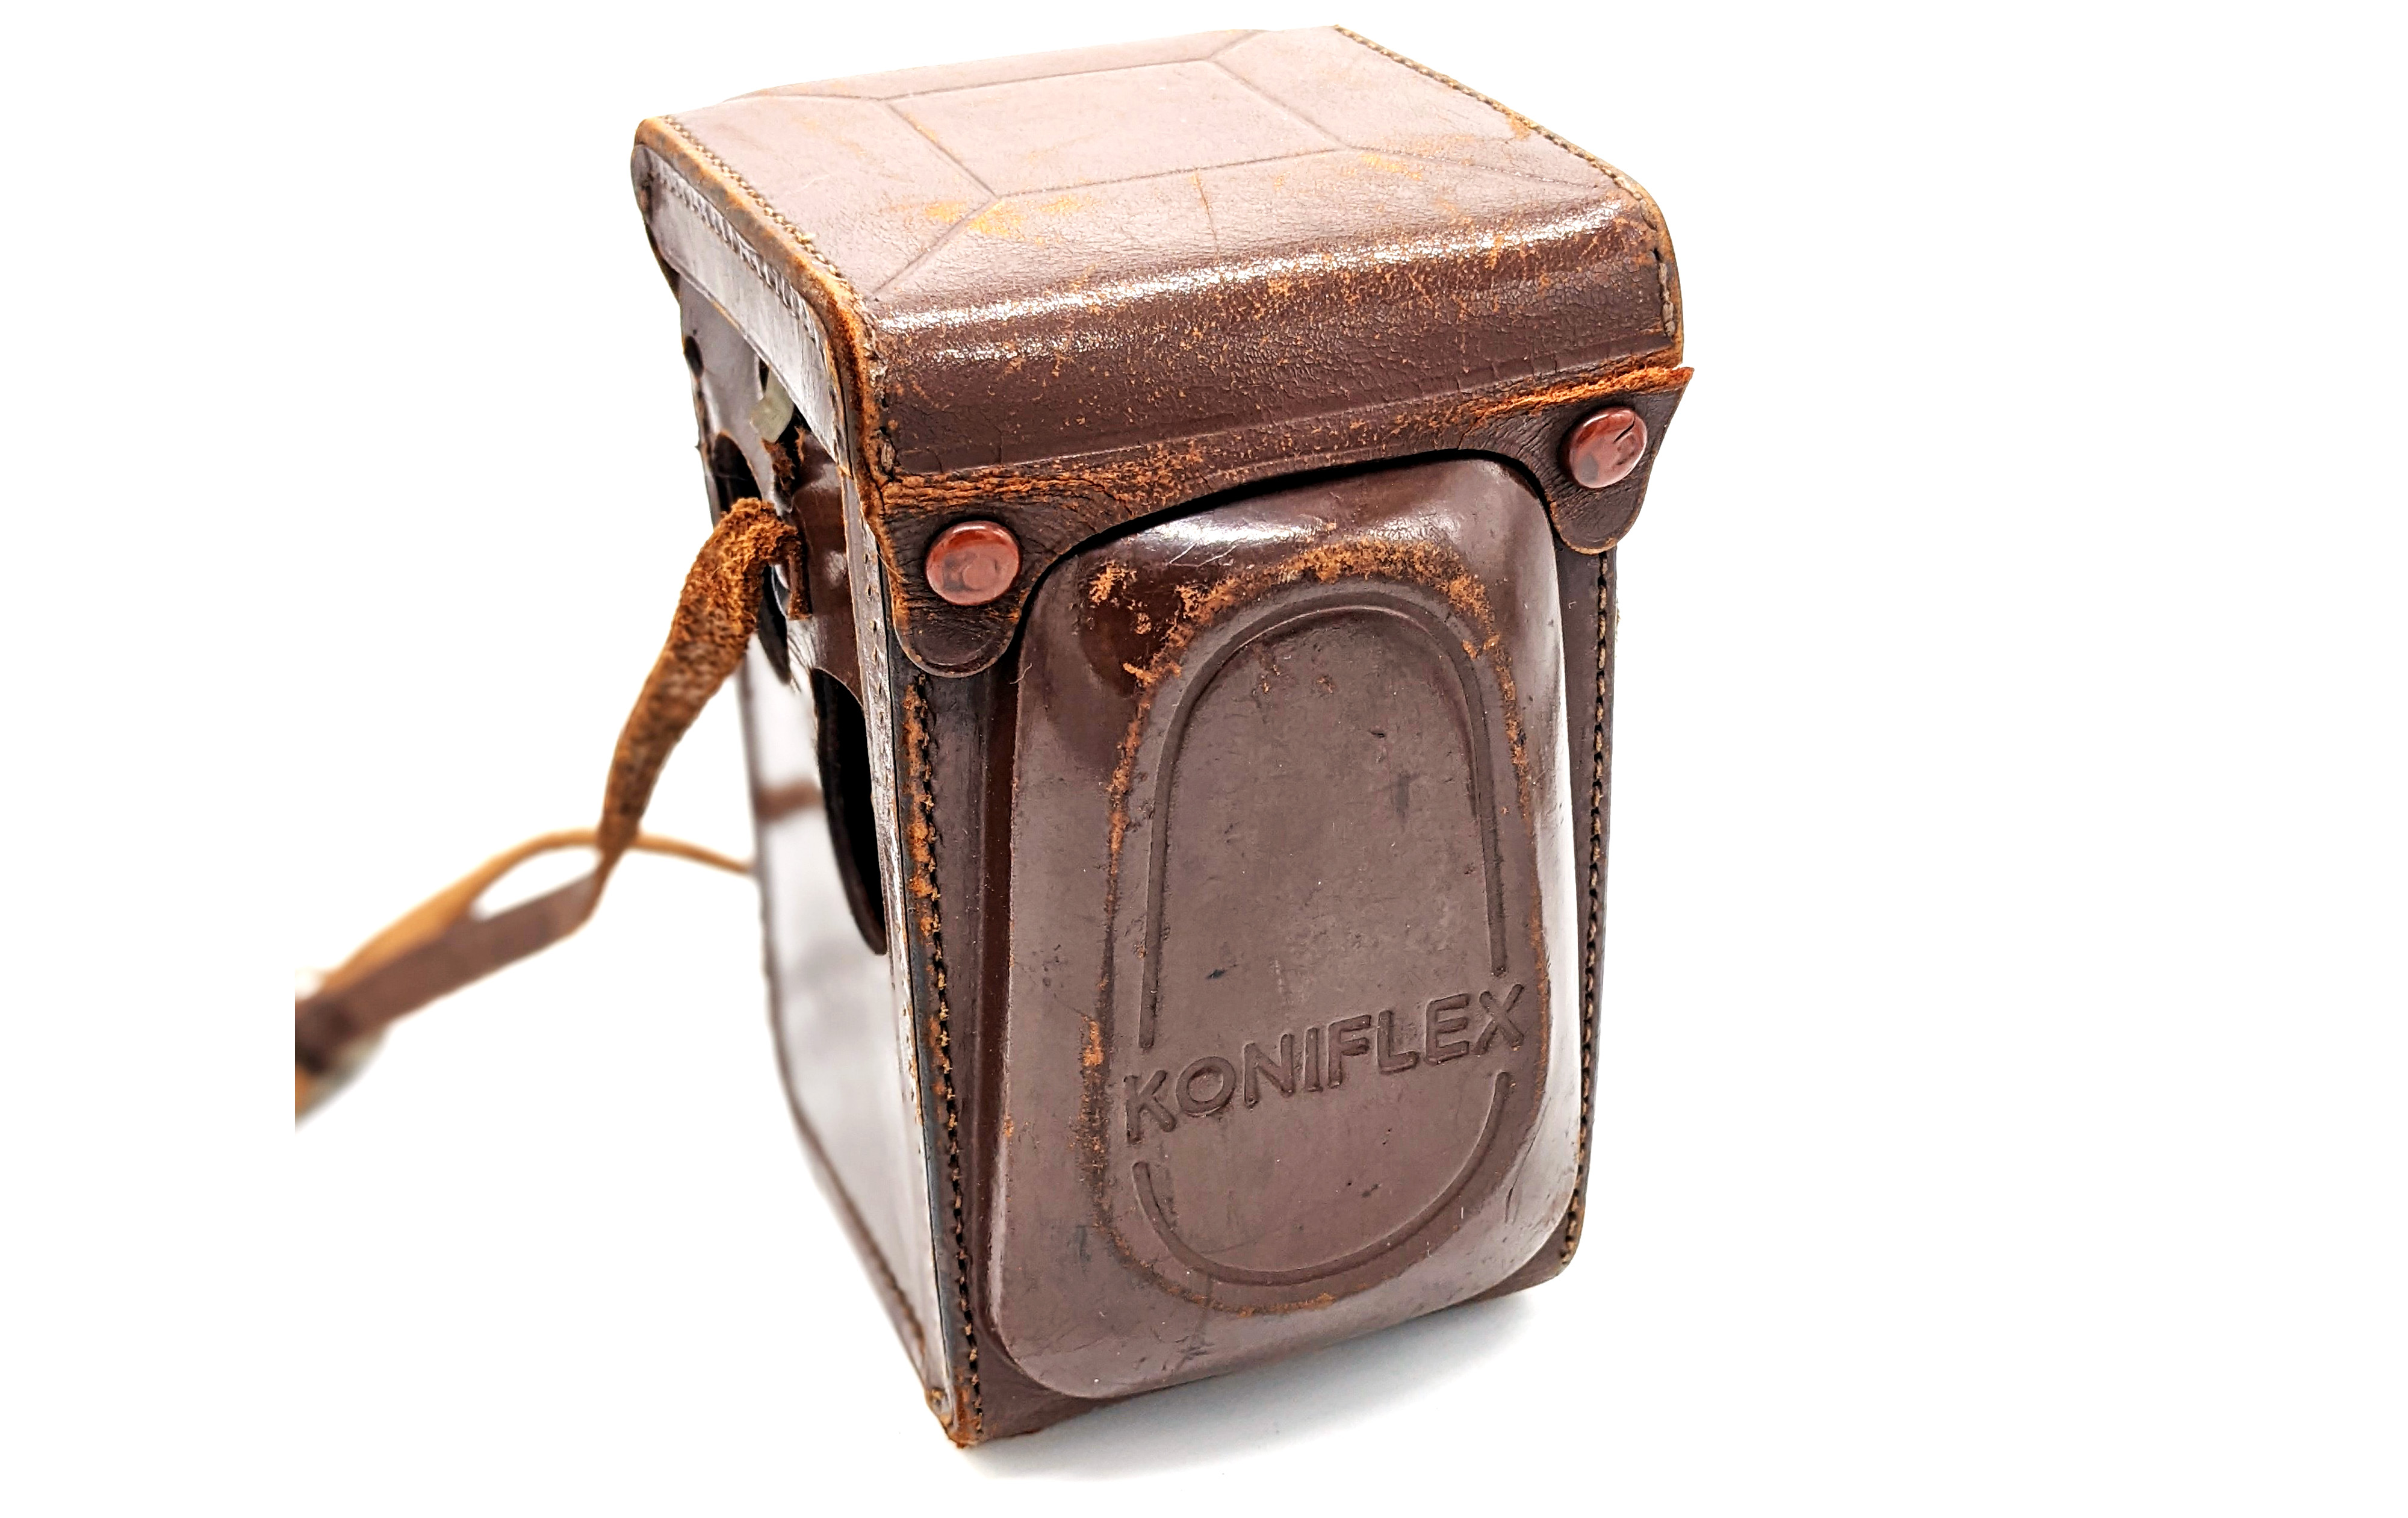
Case: The Koniflex came with a standard leather case that also doubled as a strap. A good way to protect the camera.
Konifilters: As stated above, Konica produced some very specific filters for the Koniflex that are not very useful today with the extreme advances in filter technology. Konica had a variety of different “Konifilters” for different cameras so it is sometimes hard to track down the right ones even if you can find them. Go with a 39.5mm step up ring to use more common filters.
Lens Hood: Konica produced a “Konihood” for the taking lens. Like the “Konifilters,” Konica made a variety of “Konihoods” for a number of different cameras in different sizes. If your Koniflex does not come with the original hood, an aftermarket one will do.
Close Up Attachment: An extremely rare accessory is the “Koni-up” close-up lens set. This was Konica’s answer to the Rolleinars. Good luck finding one.
Conclusion
The Koniflex was an expensive camera for its time, and that may have been its downfall. In a crowded market topped indisputably by Rolleiflex and with at least a dozen other Japanese-made TLRs selling for 1/5 of its price, the Koniflex may have had a hard time finding a target audience. With its high-quality lens and its fantastic and innovative viewfinder, the Koniflex should be properly considered as one of the best non-Rollei 1950s TLRs. With the vast majority of examples in Japan and seeming to be the “Koniflex I” variety, I would recommend holding out for a Koniflex II (or even a Tele-Koniflex if it ever pops up). If you like TLRs, this is worth checking out for sure.
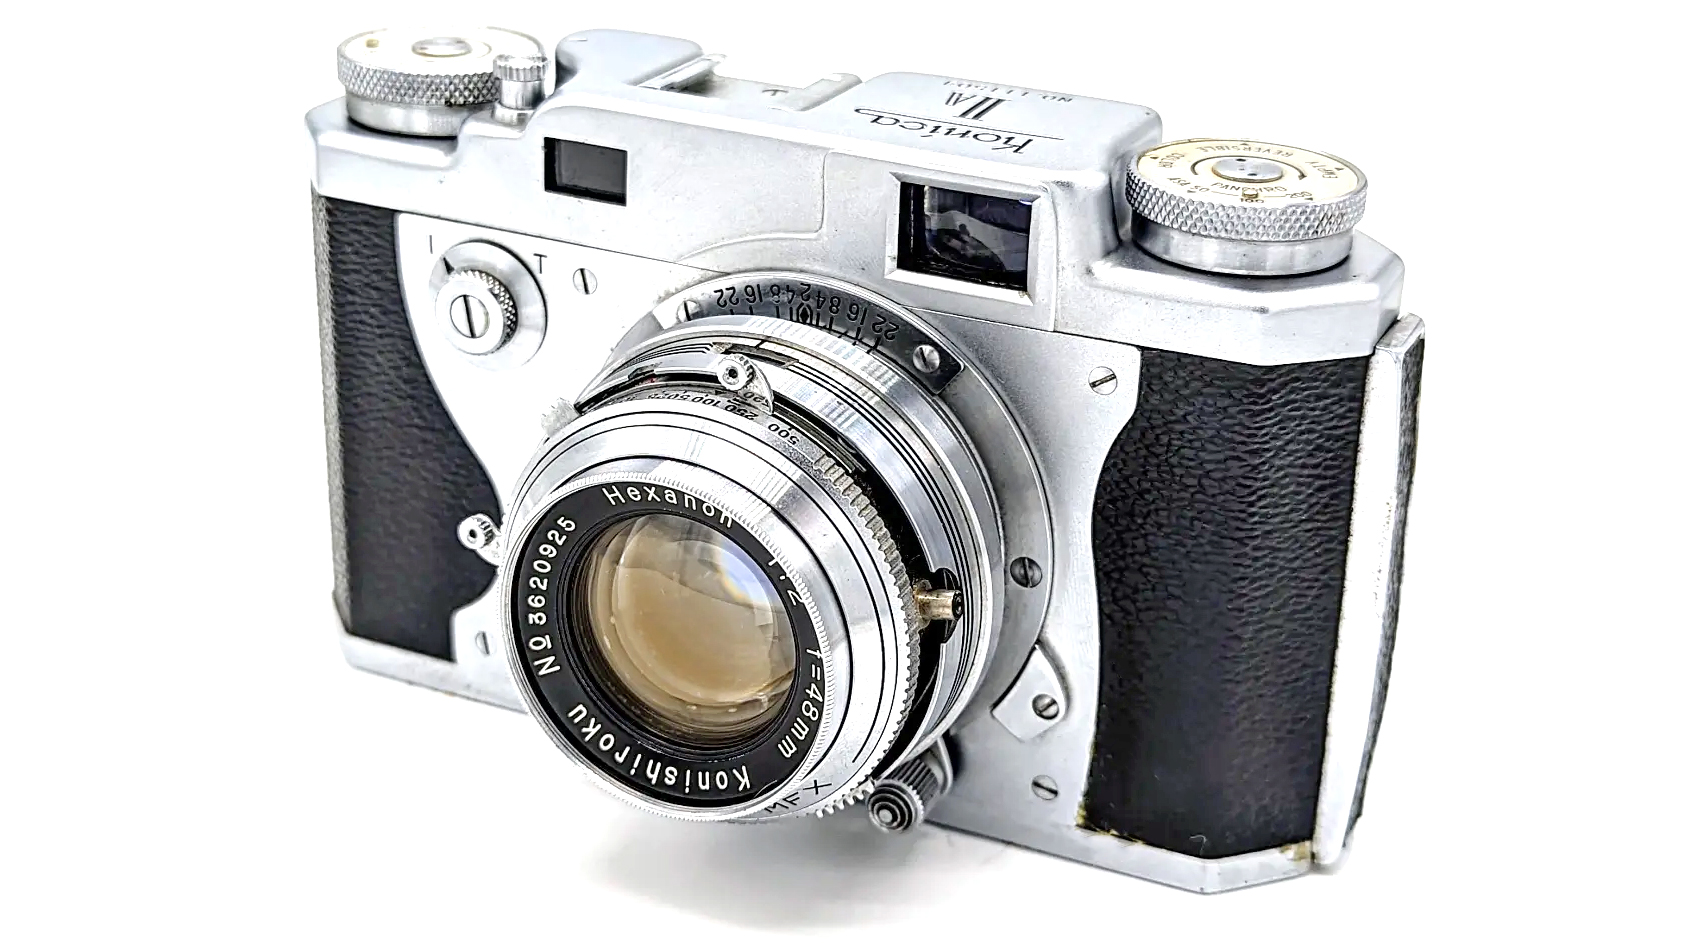
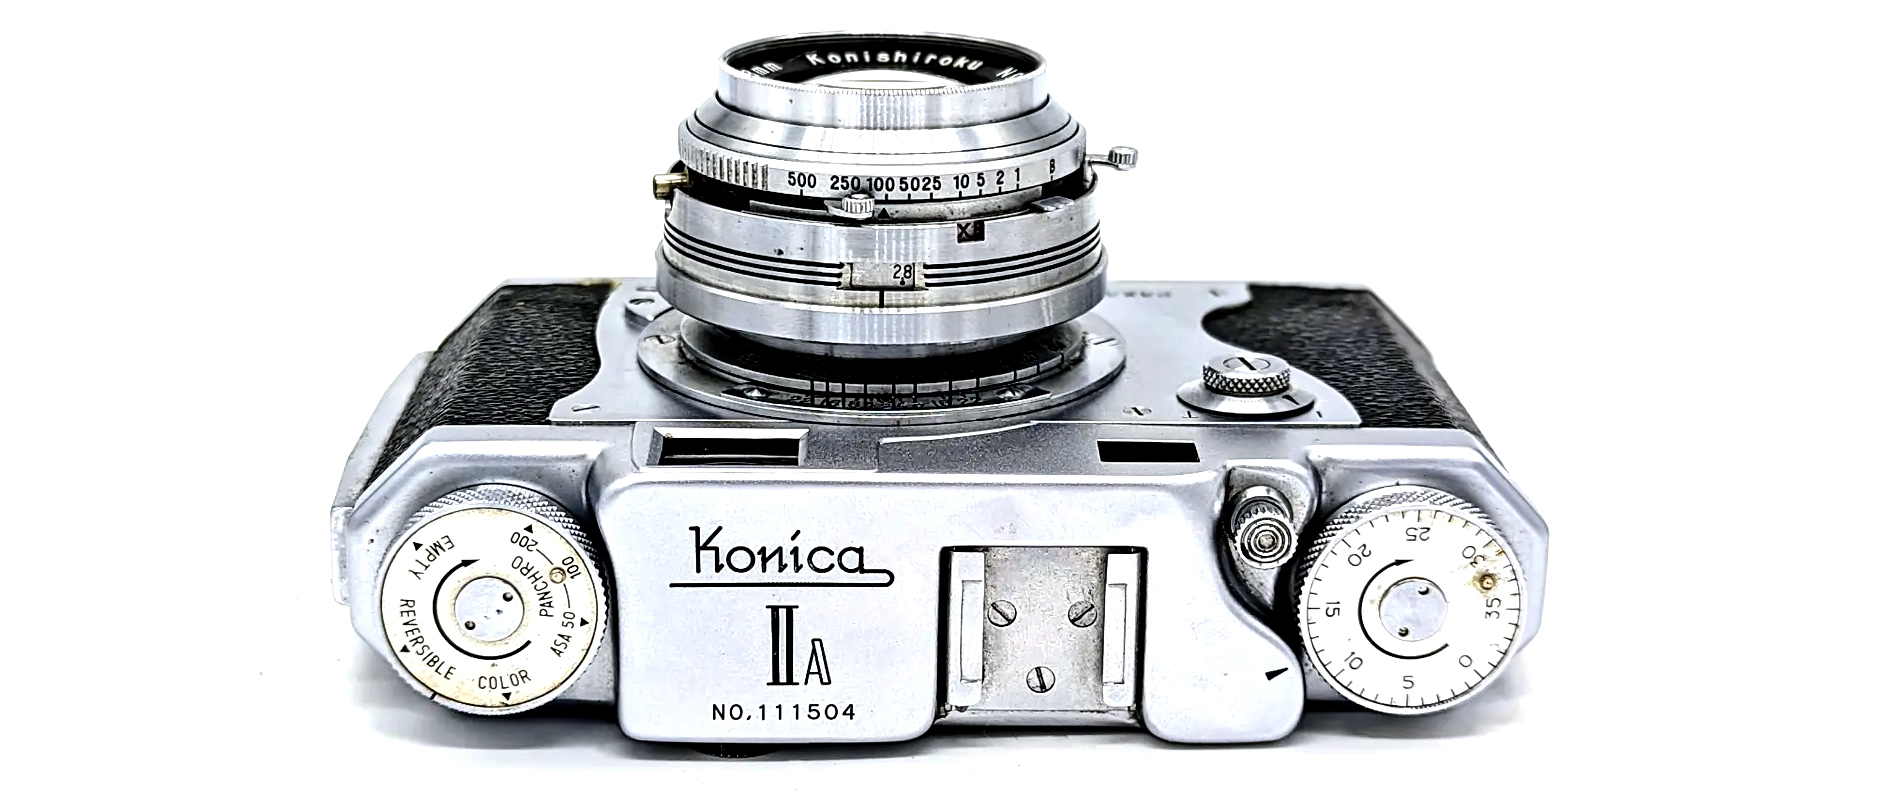
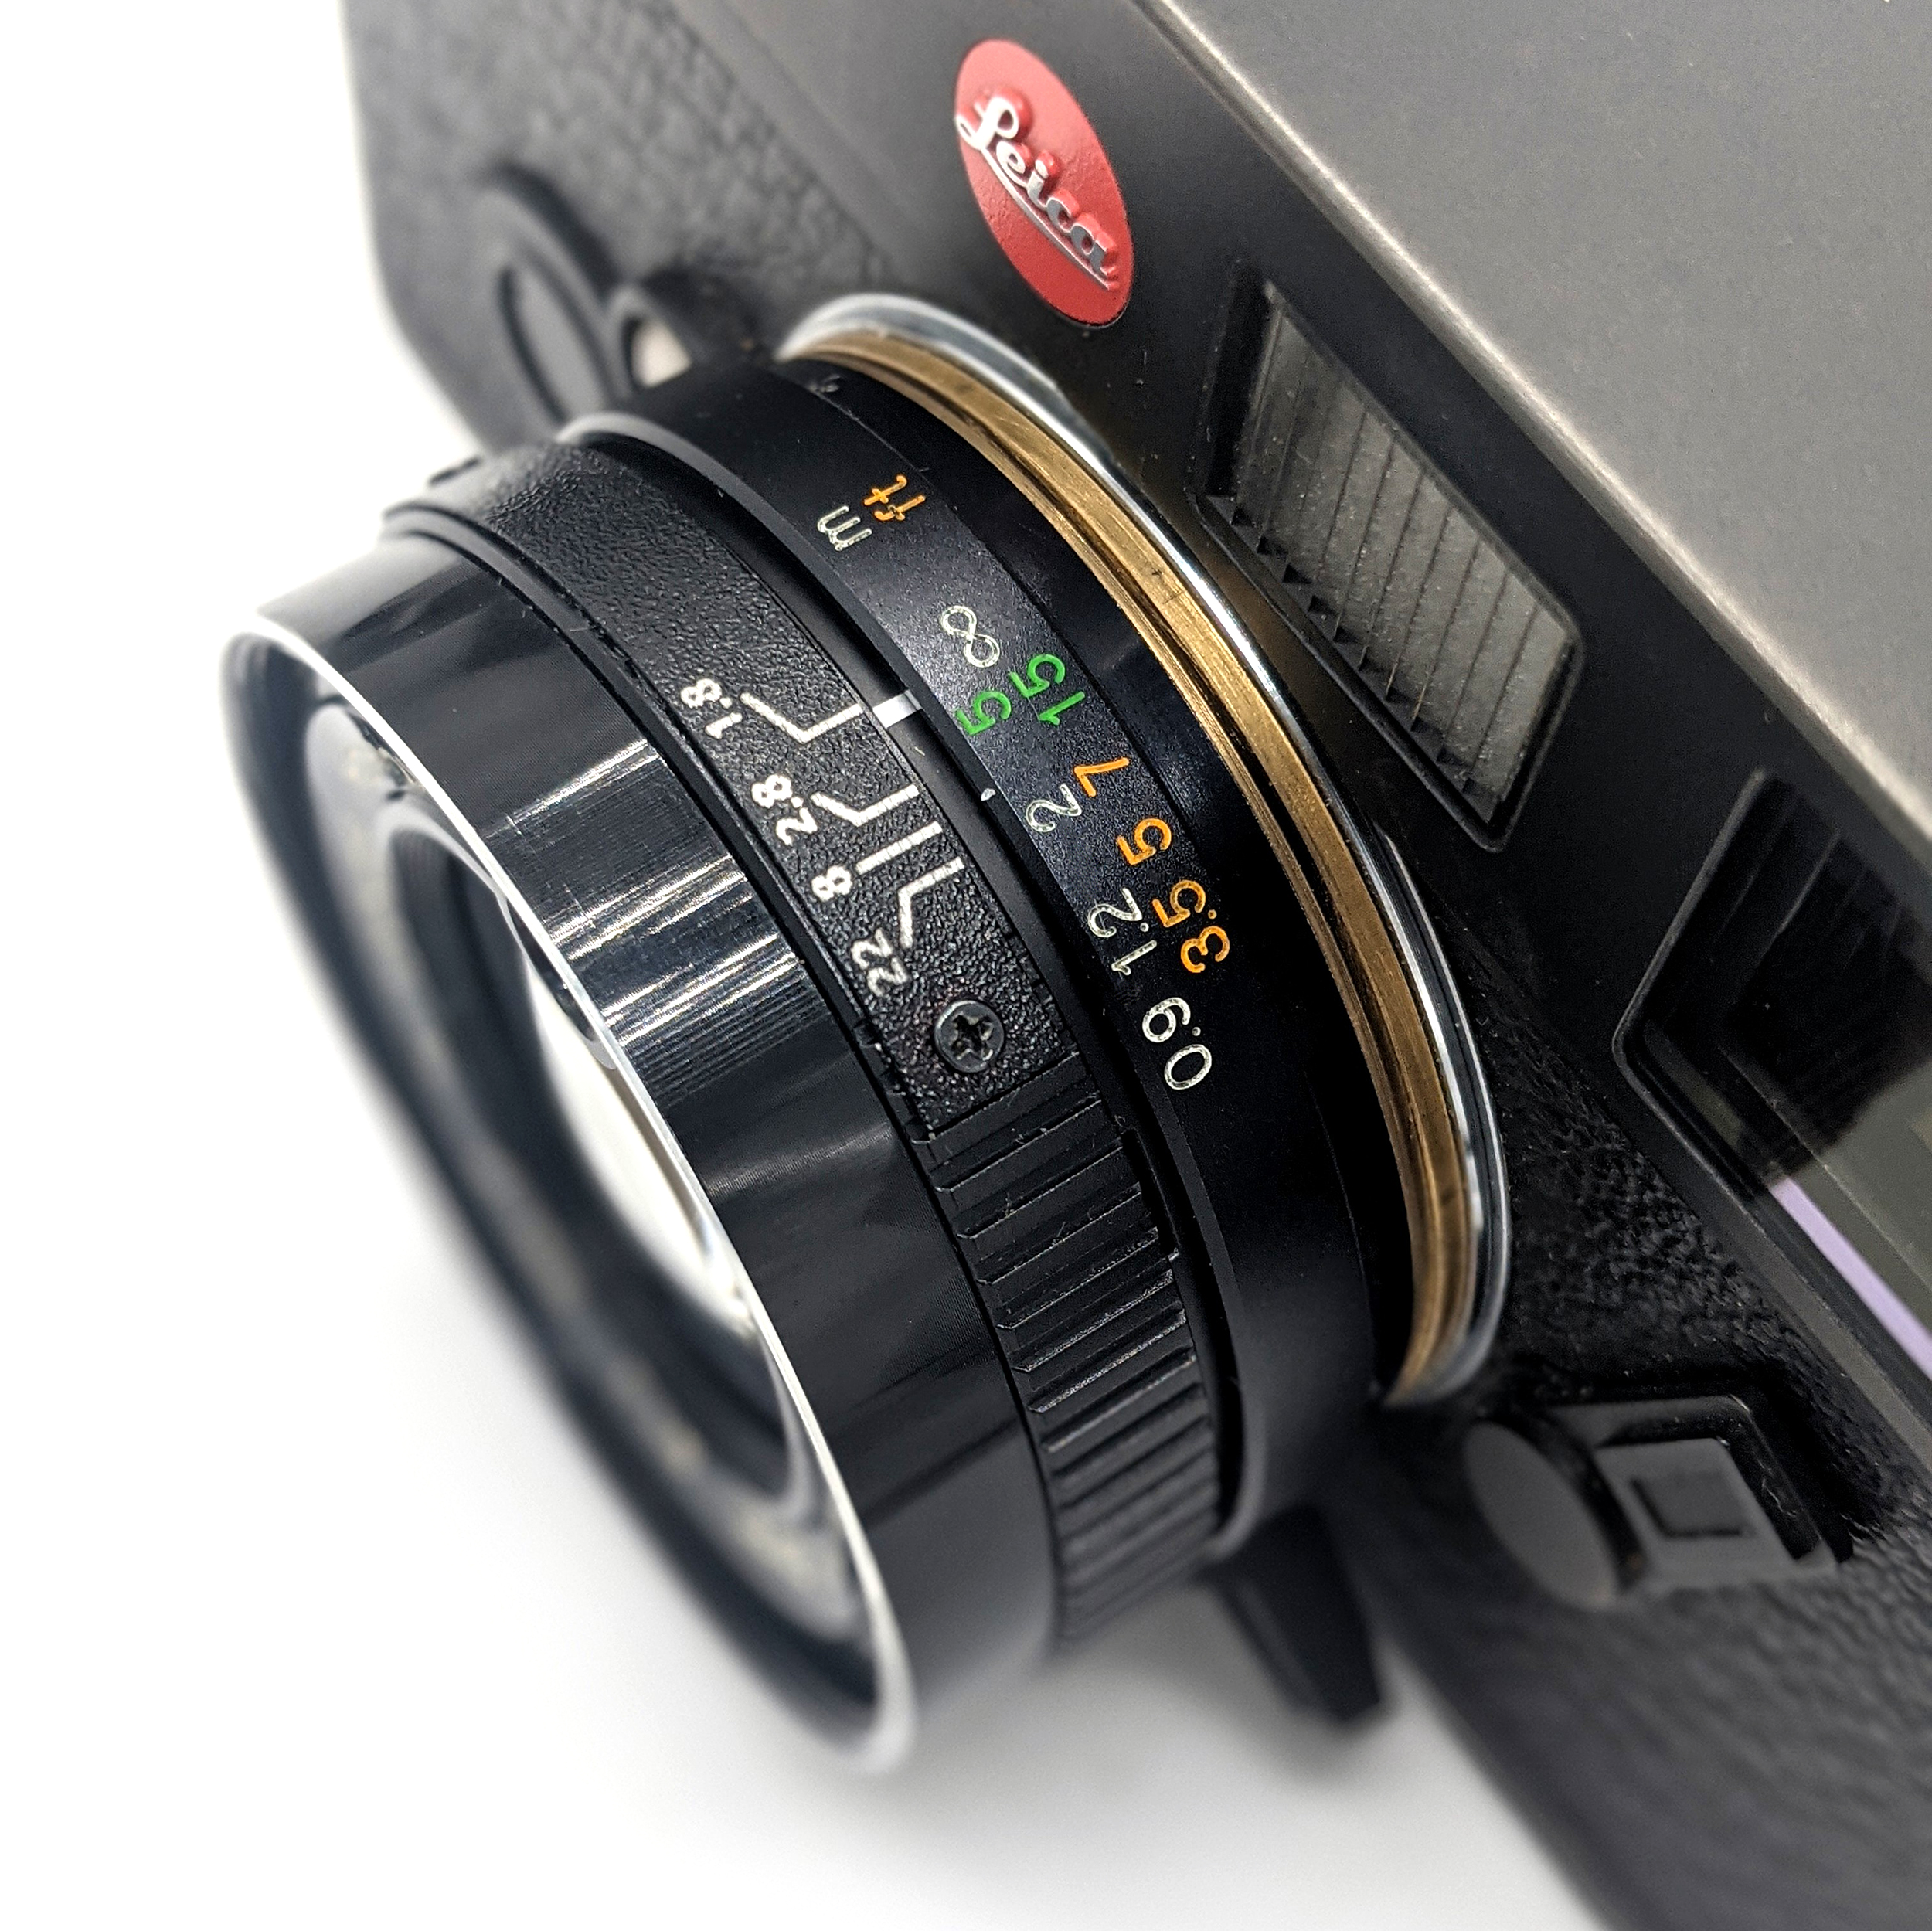
The stunning 1956 Konica IIA was the highest end model of the company’s popular 1951 “II” rangefinder series. Employing the fantastic 48mm f/2 Hexanon, a six element, five group lens with ten aperture blades, the IIA radiates the exceptional build quality and attention to detail of higher-end 35mm film cameras of the era. The largest drawbacks of the IIA include a relatively small viewfinder that lacks a frameline, a knob film advance, and the slightly cumbersome operation of the exposure settings and shutter. Otherwise, is the relatively-affordable, but slightly rare, IIA a good candidate for your meterless, standard-lens rangefinder needs? Let’s take a look.
Specifications of Konica II Models
Model
Year
Lens
Lens Design
Blades
Shutter
Speeds
Filter
II
1951
50mm f/2.8* Hexanon
Heliar Type; 5 Elements, 3 Groups
?
Konirapid-S
B, 1 sec. – 1/500
?
IIB
1955
50mm f/3.5** or f/2.8 Hexar
Tessar Type; 4 Elements, 3 Groups
?
Konirapid-S
B, 1 sec. – 1/500
?
IIF
1955
50mm f/2.8 Hexanon
Heliar Type; 5 Elements, 3 Groups
?
Konirapid-MFX
B, 1 sec. – 1/500
?
IIA
1956
48mm f/2 Hexanon***
Ultron Type; 6 Elements, 5 Groups
10
Konirapid-MFX
B, 1 sec. – 1/500
35.5mm
IIBm
1957
45mm f/3.5 Hexar
Tessar Type; 4 Elements, 3 Groups
?
Seikosha-MX
B, 1 sec. – 1/500
?
* A version of this lens was used in the 1952 Koniflex 6×6 TLR as the “85mm f/3.5 Hexanon.” ** The 50mm f/3.5 Hexar existed in a contemporary collapsible M39 version. ** The 48mm f/2 Hexanon existed in a contemporary rigid M39 version as the “50mm f/1.9 Hexanon” and was also used for the original 1956 Konica III rangefinder and initial versions of the IIIA.
Operation
The Konica II range of cameras have about 98% the same functionality, with the only notable differences among them being: (1) the lens employed; (2) whether the lens could partially collapse into the body; (3) the position of the shutter speed and aperture levers on the lens; and (4) whether camera contains the “I” / “T” switch on the front. Unlike the rest of the series, the IIBm placed the aperture dial window towards the front of the lens instead of at the 12 o’clock position near the base of the lens. The subsequent 1956 Konica III rangefinder line constituted a substantial modernization of the entire concept, including: (1) a double-stroke lever advance on the side of the lens that also cocked the shutter; (2) a larger, automatically parallax-correcting 1:1 viewfinder; (3) integrated strap lugs; (4) a modern exposure counter; (5) a folding rewind crank; (6) an external self-timer switch; and (7) a “light value” system that annoyingly couples the shutter speeds and aperture.
Film Loading, Advancing, & Rewinding: The IIA has a modern and easy-to-use film loading system via the standard swingback door and a locking mechanism on the bottom plate. Like other Konica products of the era, the pressure plate is large and does a good job keeping the film flat as possible on the focal plane. The advance knob is used to move the film along and then close the door and turn the lock on the bottom. Then advance the film two times and set the manual exposure counter at “0.” The II series has a mechanism that will lock the advance knob at the next frame so that you cannot over-advance the film. At the end of the roll, press the button on the bottom to unlock the mechanism and then use the rewind knob to respool the film.
No Strap Lugs: As with many other cameras from this era, the IIA does not have integrated strap lugs. The original camera case contained the lugs. Many good aftermarket cases exist today that will screw into the tripod amount and will allow the use of a standard camera strap. It is highly recommended to acquire and use an original or aftermarket case.
Viewfinder: While it could have been larger, the IIA’s bright and clear combined viewfinder / rangefinder is above average for an early-1950s fixed-lens camera. However, because the IIA was a mid-cycle product, Konica did not upgrade the 1951 viewfinder to conform with the world of 1956. With a slightly cool blueish tone, the viewfinder system uses a semi-transparent, triple-layer mirror that results in exceptional viewfinder brightness. When focusing, the large yellow rectangular rangefinder patch is yellow is aligned over a purplish image. The II series lacks a frameline or any parallax marks.
Lens: As an initial matter, you may have noticed that the II series does not precisely center the lens on the body, being just a little offset. The ten-bladed 48mm f/2 Hexanon is a world-class optic whose amber coatings work well for even modern color films. In 1956, it may have been the fastest lens put in a fixed-lens rangefinder camera. The six element, five group lens design is a derivative of the Voigtlander Ultron. There is no noticeable focus shift throughout the range, and the Hexanon is sharp from f/2 on. In my opinion, the 48mm Hexanon is as good as, or even better than, the best of contemporary 50mm rangefinder lenses, including the collapsible or rigid Leica 50mm f/2 Summicron. Konica would continue to deploy the 48mm f/2 in the III and initial versions of the IIIA rangefinders. I believe that the 50mm f/1.8 Hexanon found in the later IIIAs and the IIIM was a variation of this lens.
Shutter: The use of the Konirapid-MFX leaf shutter is from a brief period of time where Konica was producing its own leaf shutters (or at least contracting them out under its own name), which would then be outsourced to Seikosha later in the 1950s. It is incredibly quiet (certainly quieter than any Barnack or Leica M focal plane shutter) and quite elegant in operation. Like many cameras of the 1950s, it employs “older” style shutter speeds: 1/500, 1/250, 1/100, 1/50, 1/25, 1/10, etc. Keep the camera on the “I” setting for normal operation as “T” is for “time exposure.”
Taking a Photo: The aperture and shutter speed controls are on the lens itself. The aperture operation is really nice and has defined “click stops” at each full setting which can be viewed in a window at the 12 o’clock position when looking down onto the lens. Be sure to only change the shutter speeds with the shutter uncocked. To take a photo, advance the film with the dial until it stops. Then cock the shutter and trip the shutter (either via the top button or on the lens itself). Rinse and repeat. The focusing is performed via a knob around the lens and has a short, about 30-degree focus throw. Be careful not to wind the film and then press the shutter button before cocking the shutter.
Flash: The IIA has a PC sync port on the lens which will work with any appropriate electronic flash with a hot shoe adapter. You must move the flash indicator lever to display “X” in the cut-out window. With the leaf shutter, an electronic flash can sync at all shutter speeds.
Filters: Although Konica did produce some filters at the time (aka “Konifilters”), the IIA’s odd 35.5mm filter size is not really in use these days. The best option may be to use a step-up ring to 37mm or 39mm for a wider selection of modern multicoated filters.
Accessories: The IIA had several OEM accessories, such as a dedicated case, a Konica-branded clamp-in lens hood (the “Konihood”), and Konica-branded filters (“Konifilters”). None of these original OEM accessories are necessary as aftermarket cases, hoods, and modern multicoated filters can be used.
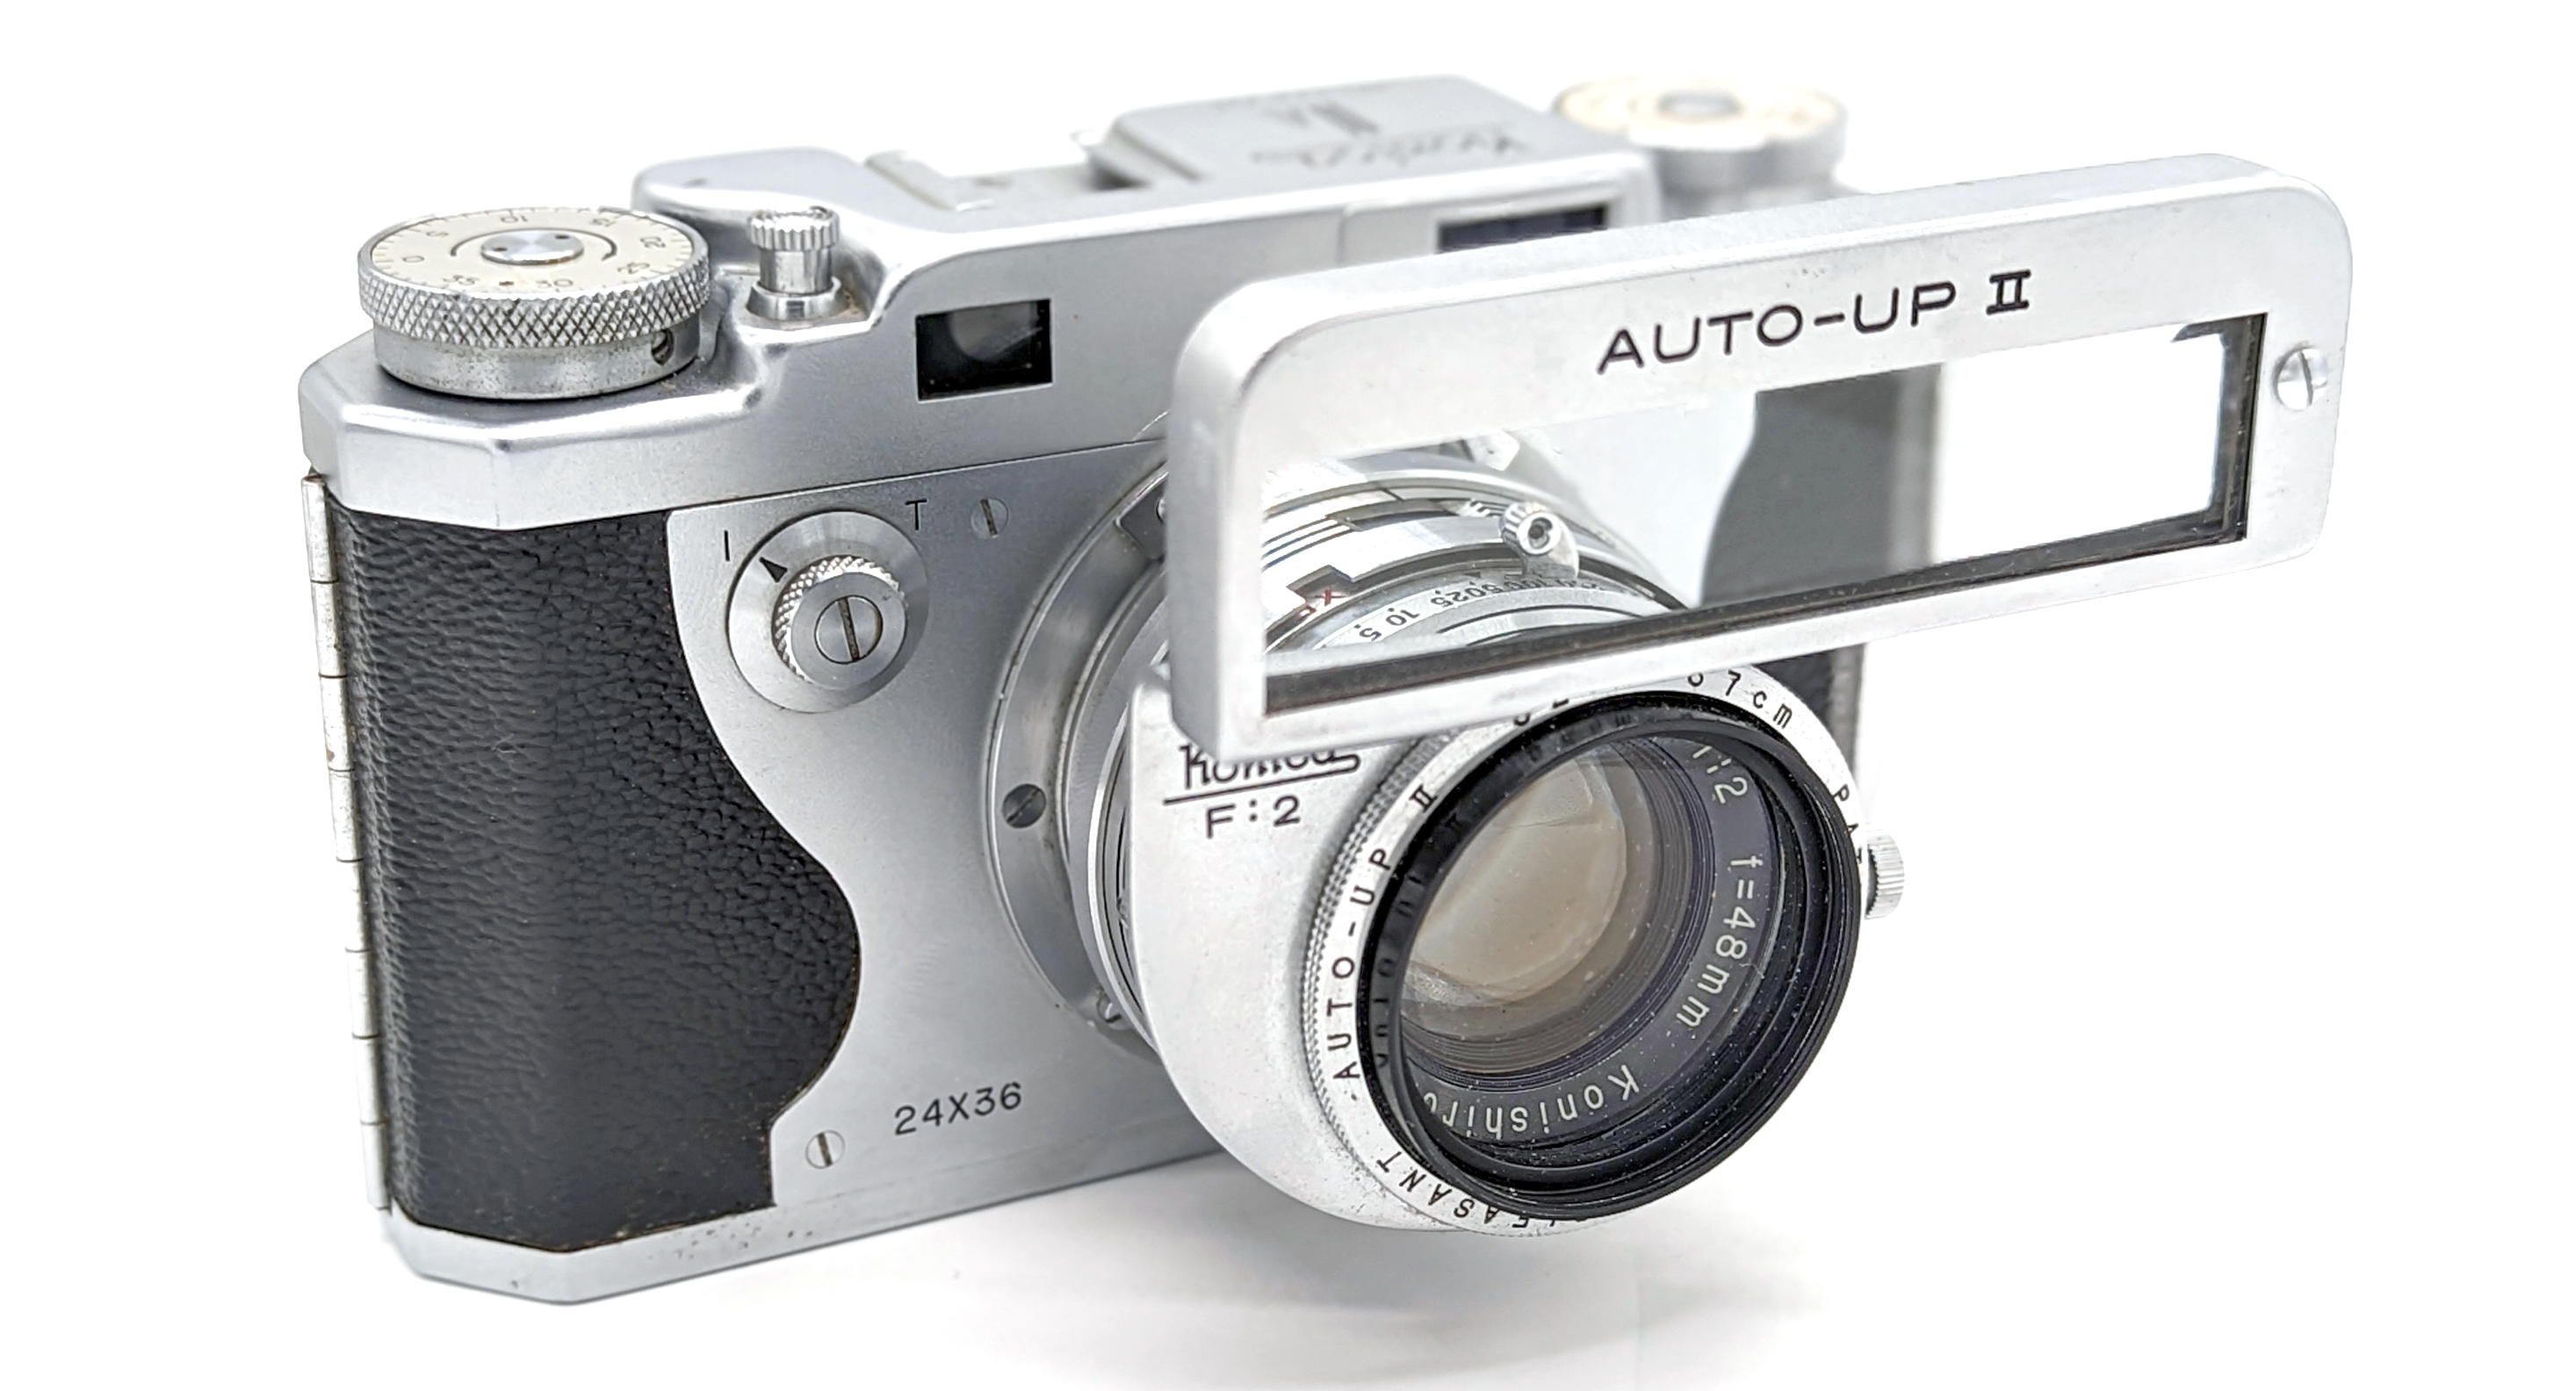
Auto Up II: A company called “Pleasant” produced an interesting accessory for the IIA that clamps onto the lens and over the rangefinder / viewfinder to permit a close focusing range of 0.52m down to 0.37m. The Auto-Up II itself has the same 35.5mm filter thread and can also be used with the Konica III rangefinder models with the same 48mm f/2 lens. The operation of the Auto Up II is somewhat inelegant as the accessory somewhat blocks the viewfinder through the middle of the frame. However, in the era before close-focusing SLR lenses, it was the best you could do.
Conclusions
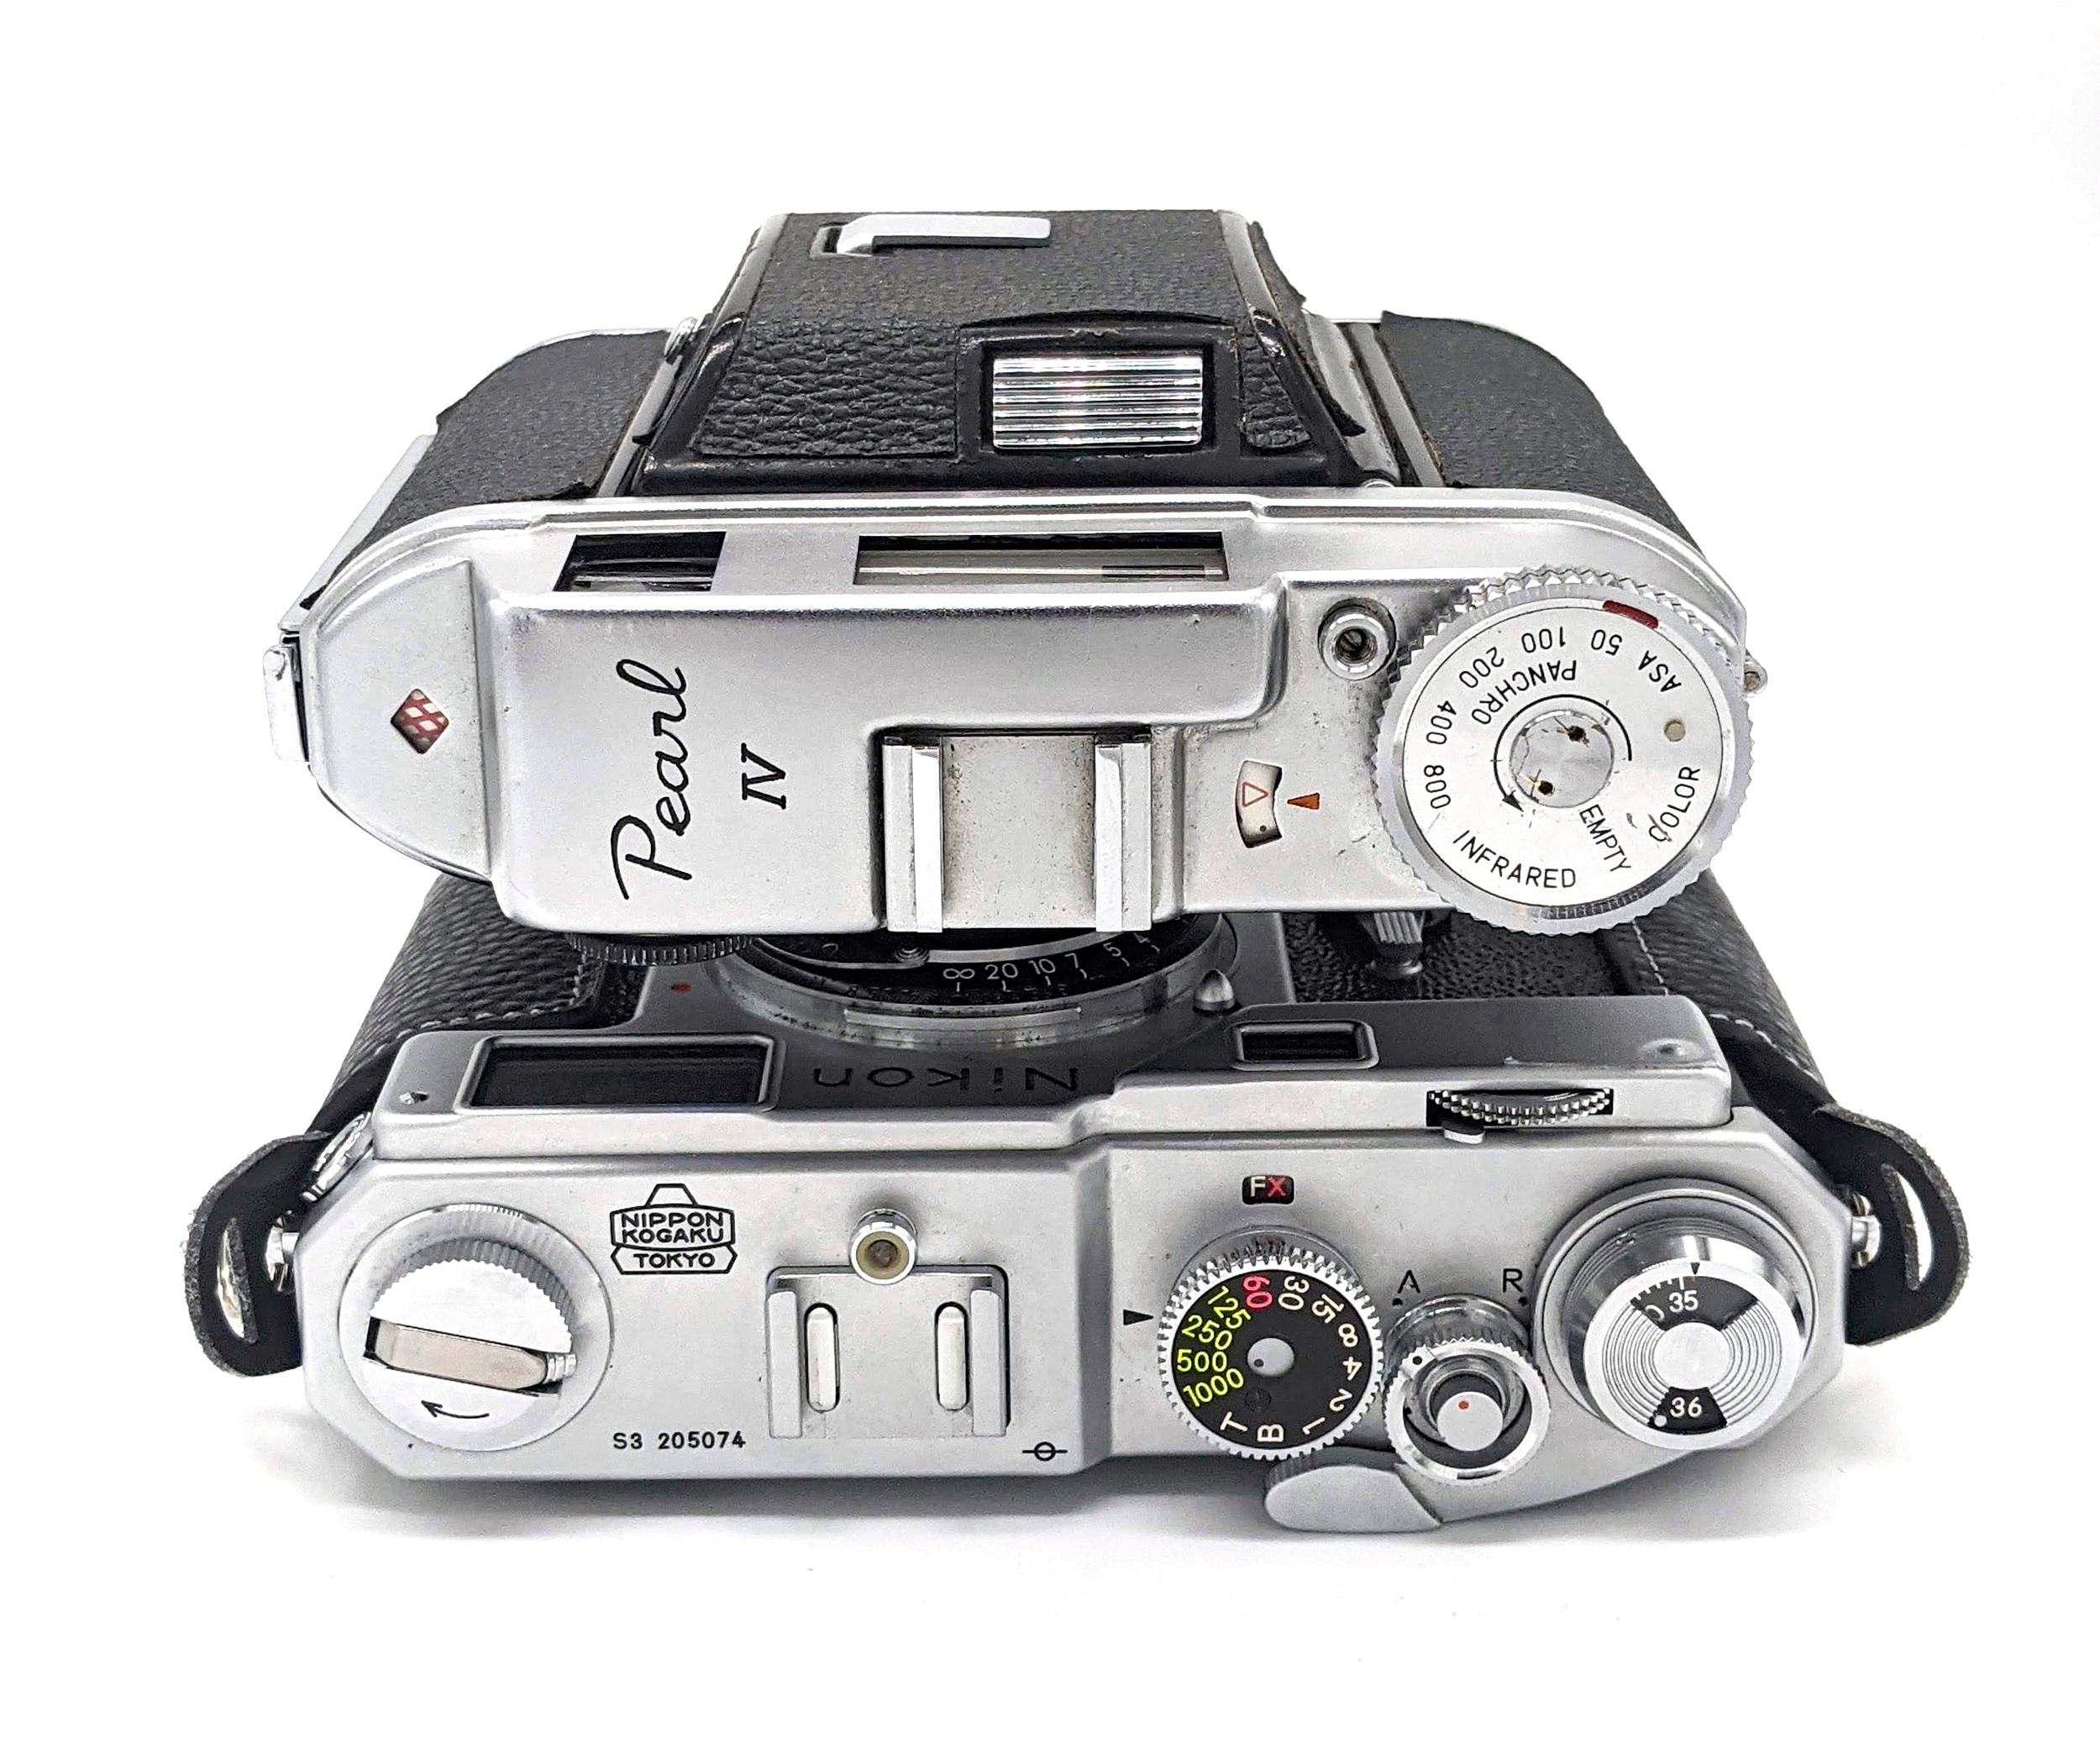
The IIA is a product from an era when Konica was arguably at its best, also producing cameras like the Koniflex, the Pearl IV, and some fantastic lenses. While the IIA certainly has some drawbacks in the form of a lack of a frameline, an archaic shutter operation, a minimum focus of only 1.00m, and the lack of lever film advance, it remains a perfectly usable camera in the 21st century. My largest gripe with the IIA is the size of the viewfinder. While clear and contrasty, it remains a little squinty.
While the IIA is certainly preferable to the Konica I and a better overall choice to the II, IIB, or IIF models as a regular shooter, the more advanced III series is an alternative. While the IIA can be seen as a kind of a combined rangefinder-viewfinder, leaf-shutter, fixed-lens, easy-to-load alternative to a Barnack-style camera sporting a 50mm lens, the III can be seen as more of a combined rangefinder-viewfinder, leaf-shutter, fixed-lens, easy-to-load version of the Leica M3. Whether one would prefer a II or III would be a matter of personal preference; but having used both, I like the IIA as it occupies a particular niche while the III has some competition for its era and class of camera.
Of course, if you already have an M39 or M-mount camera that you enjoy, a better idea over the II or III rangefinders may be to just find a Leica screw mount Konica 50mm f/1.9 Hexanon, which is the same lens.
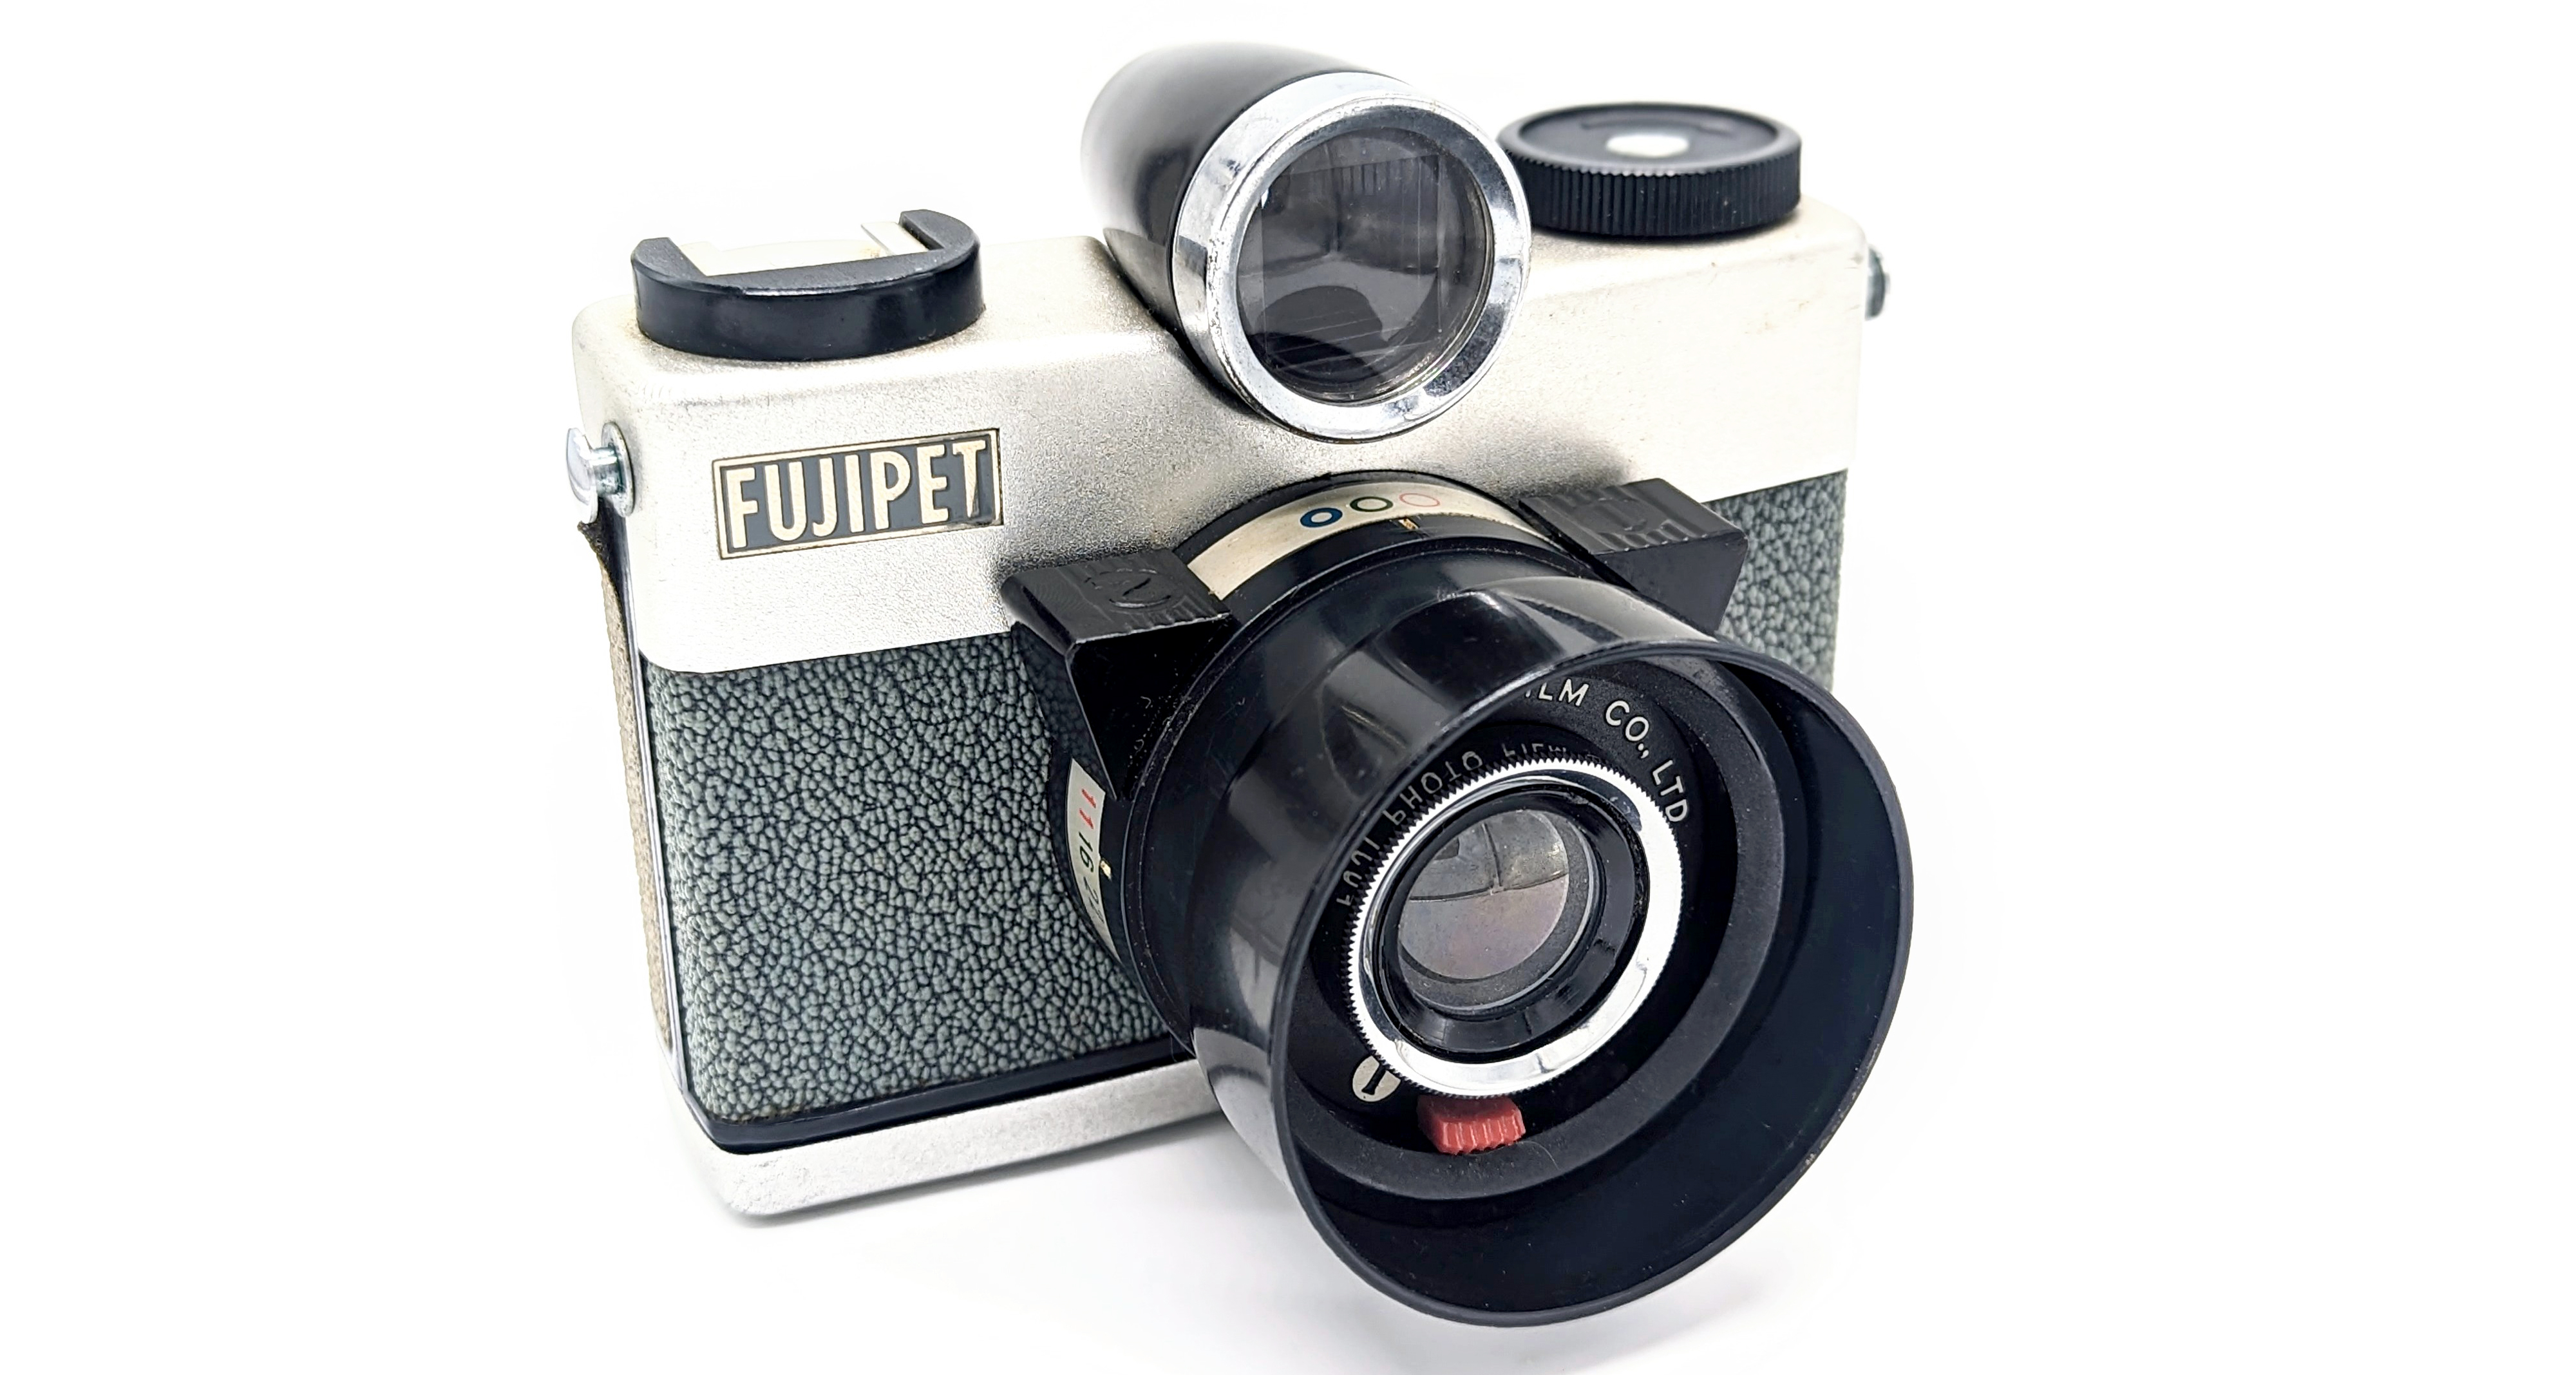
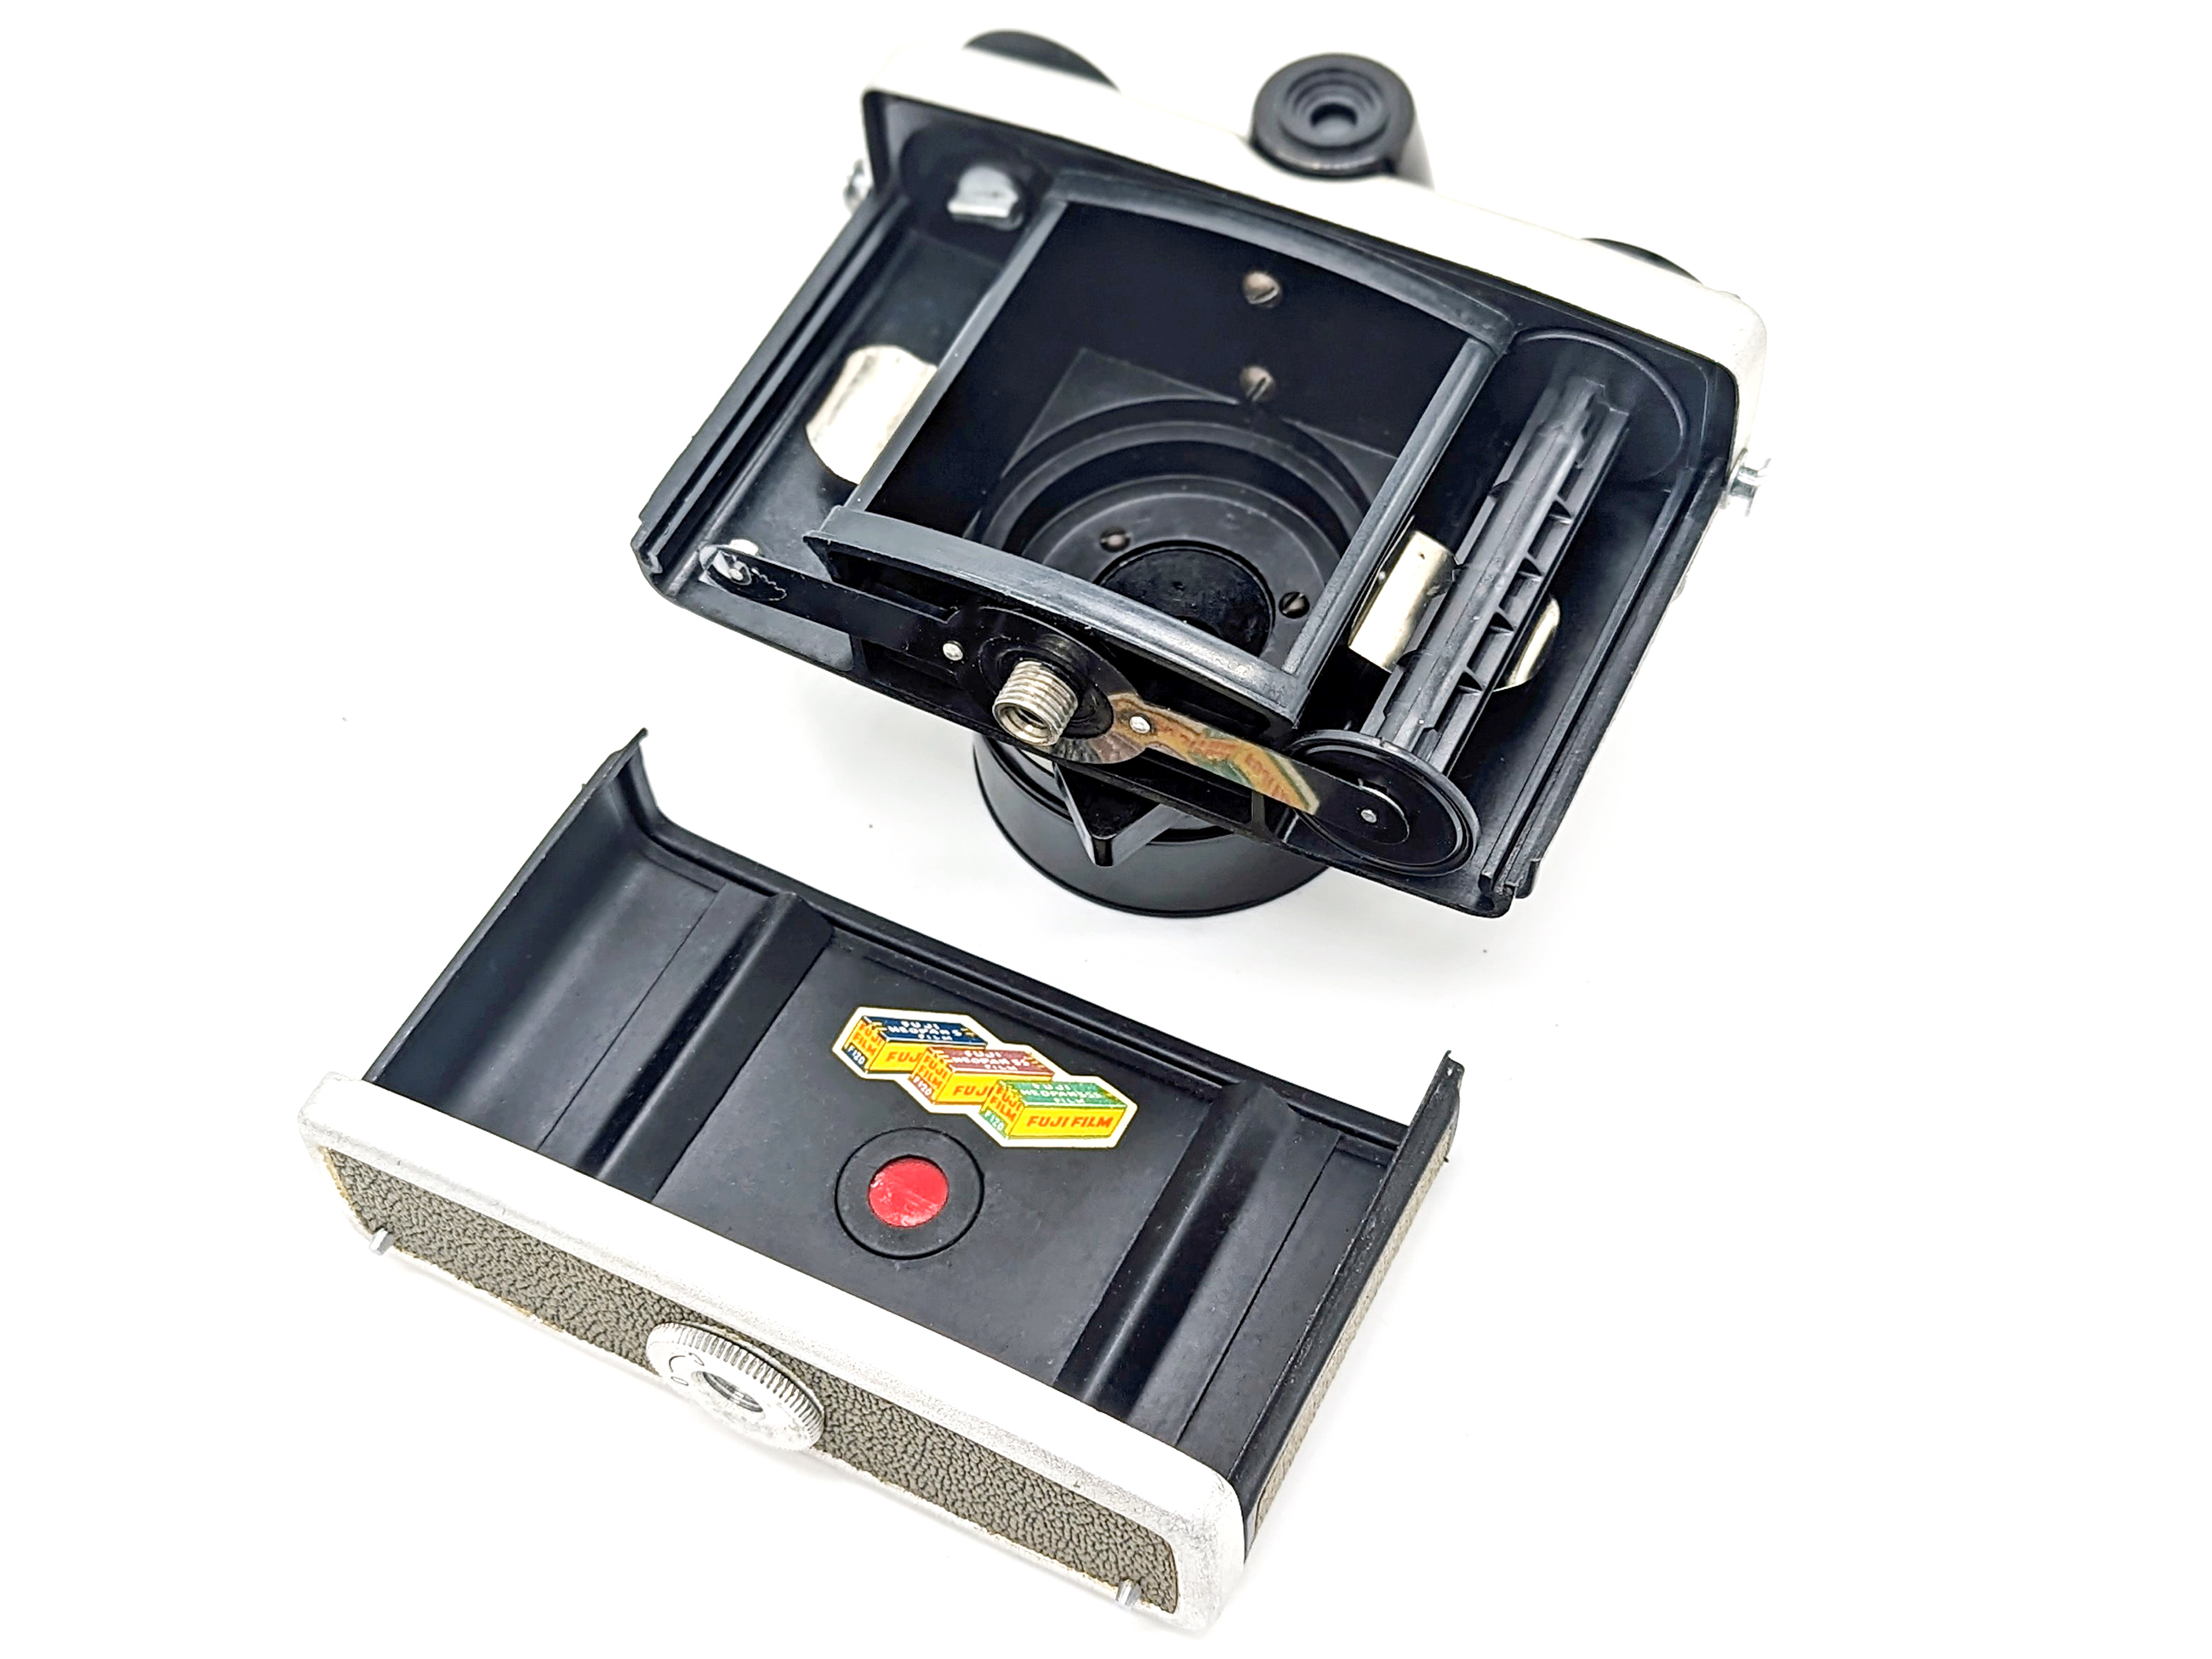
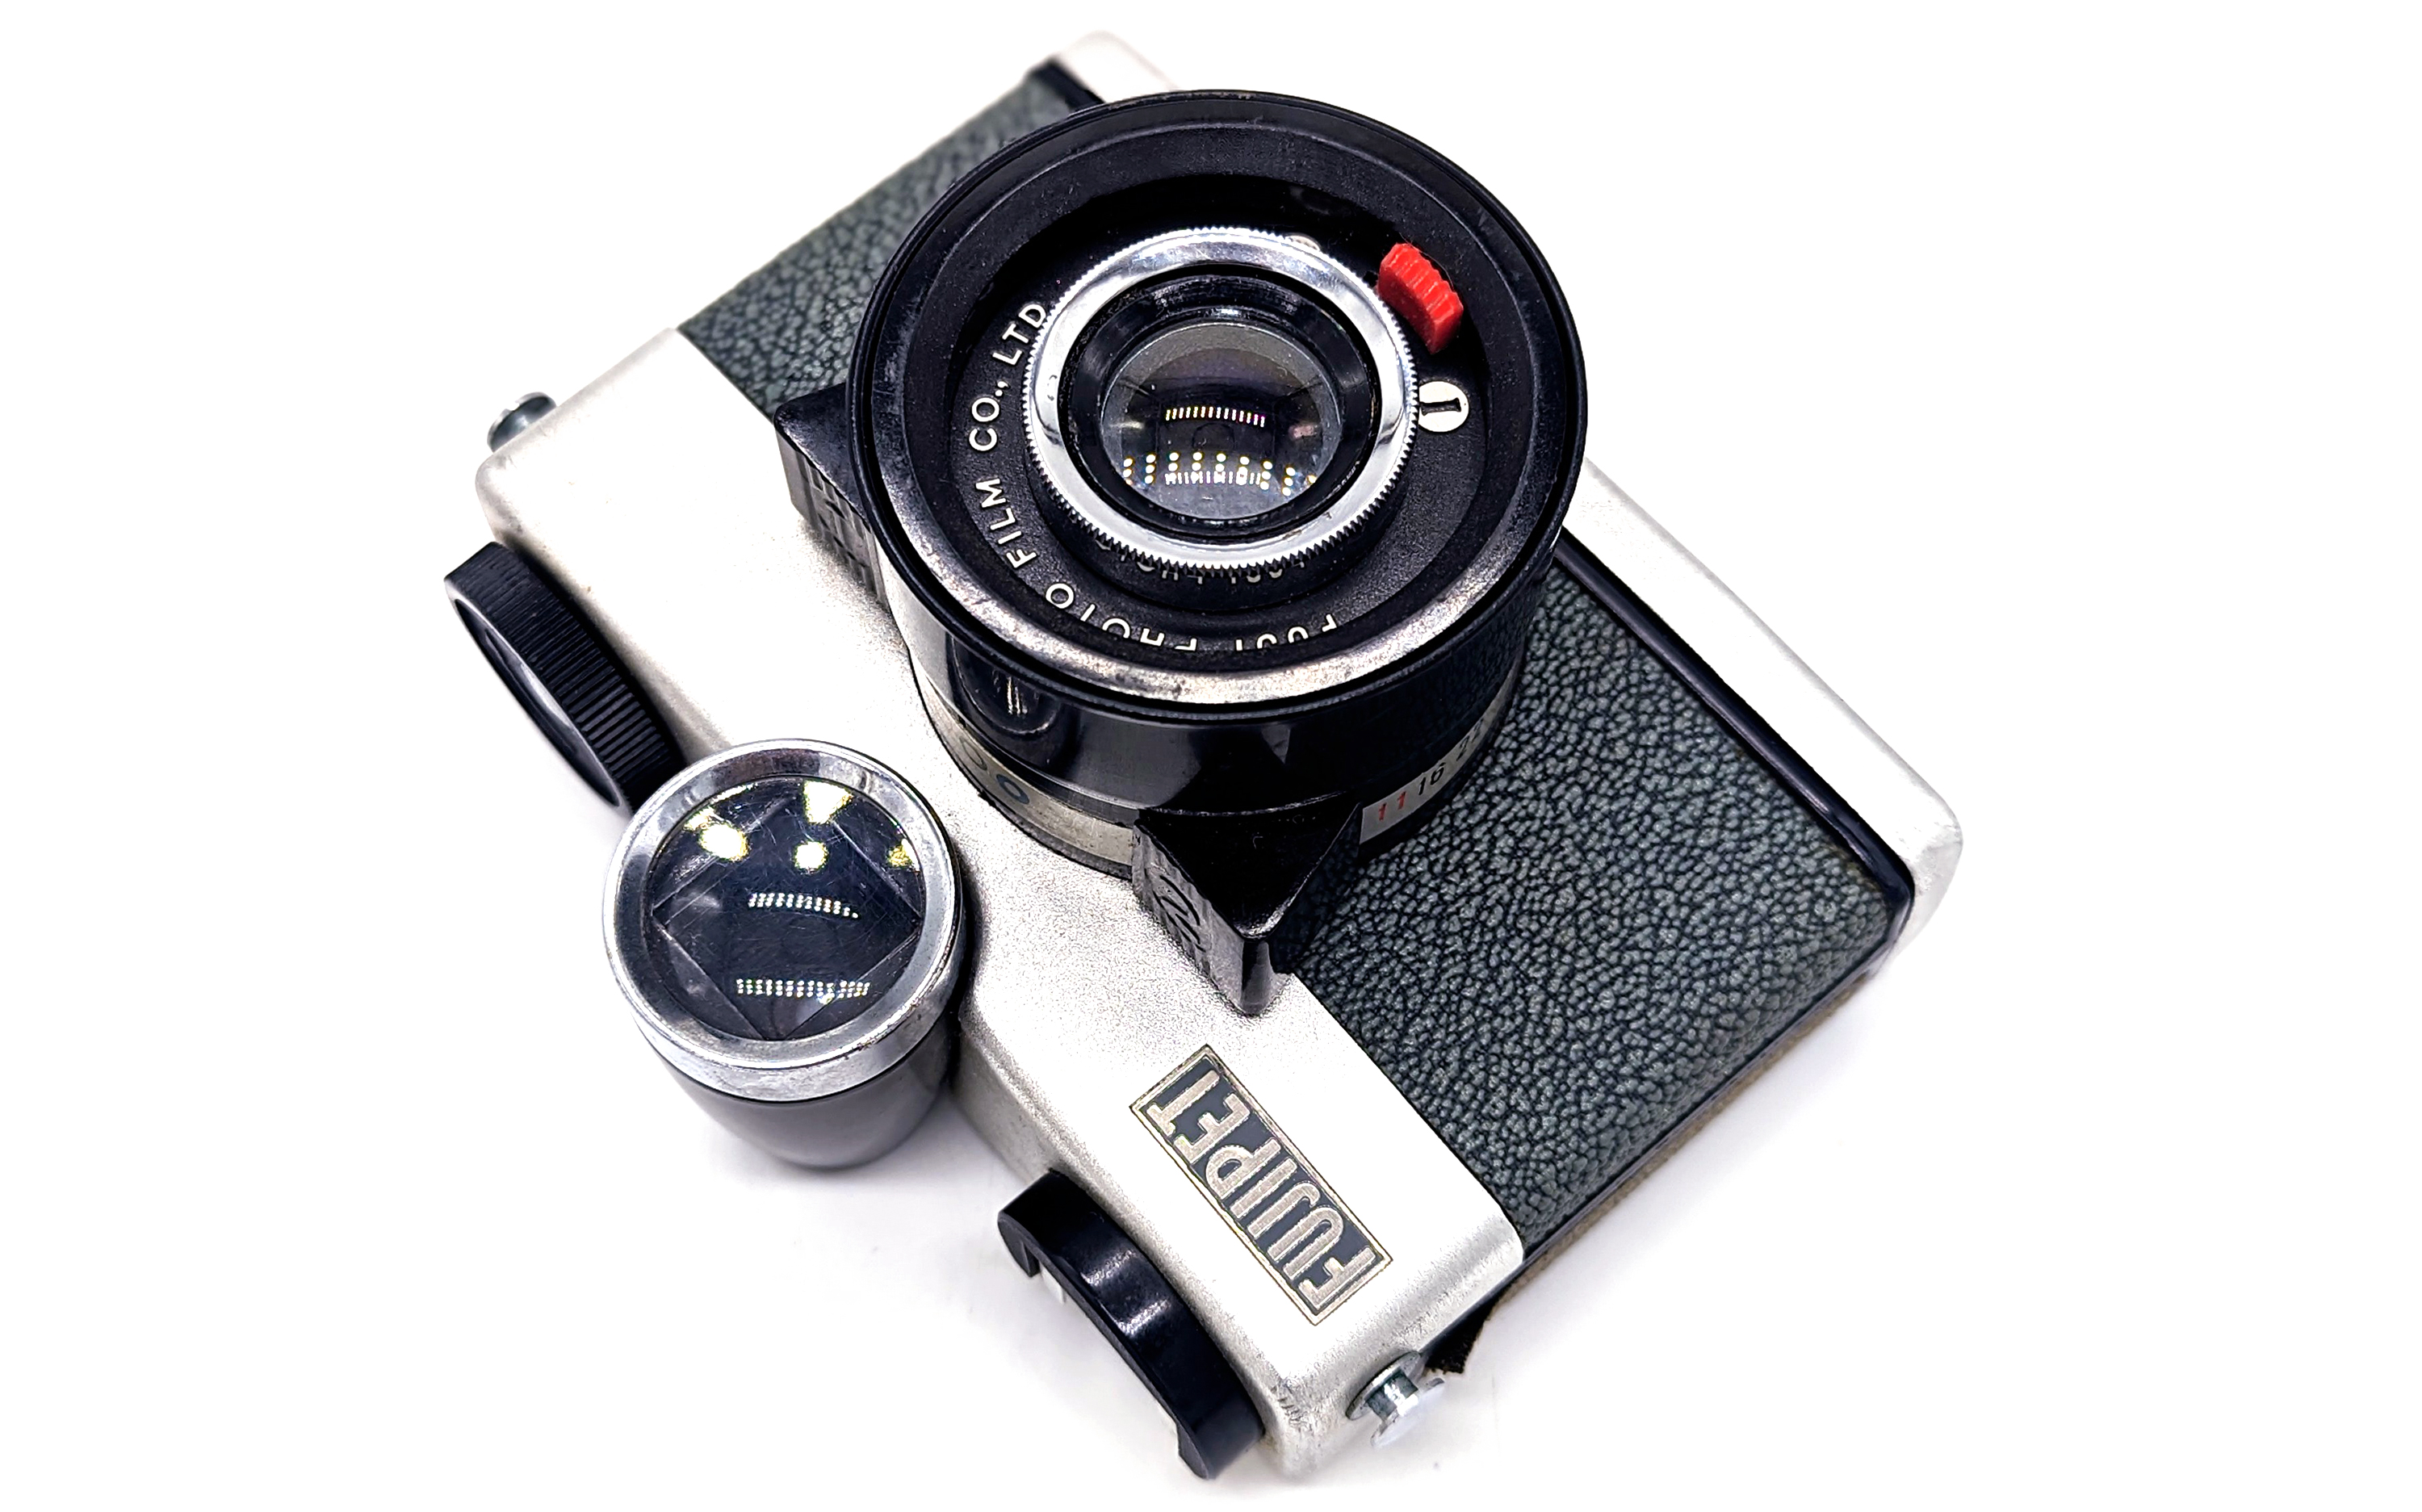
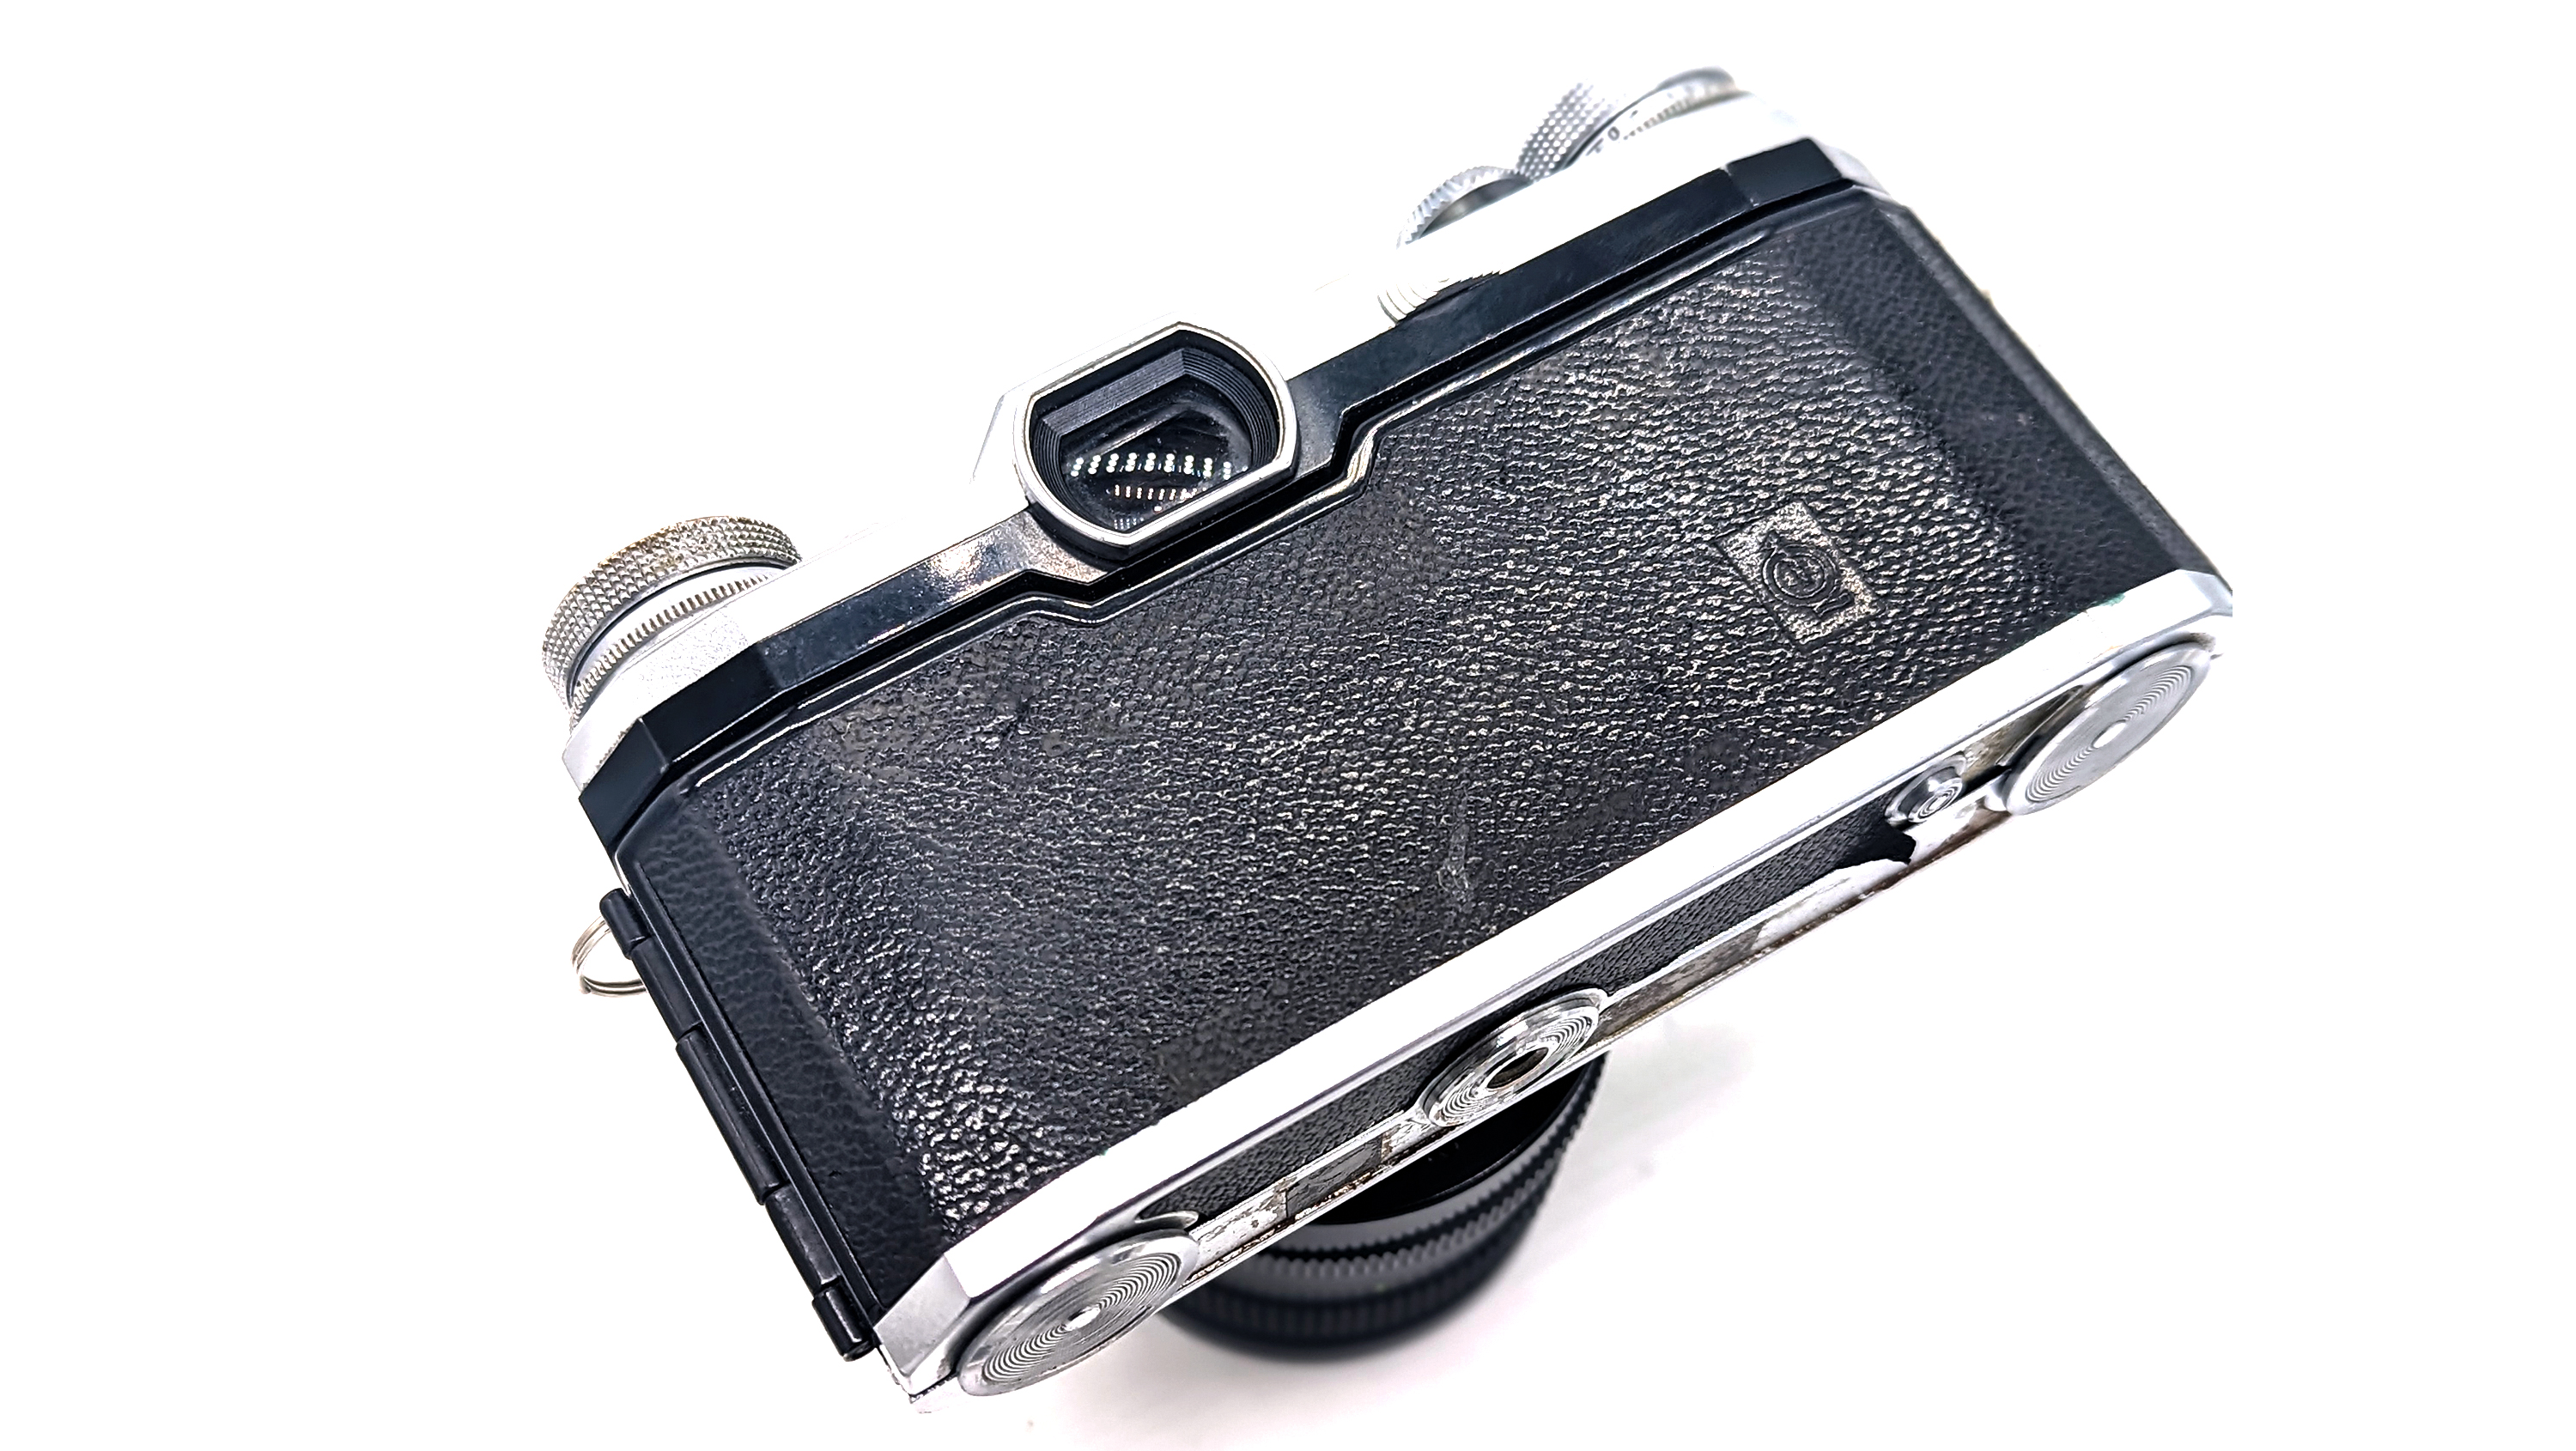
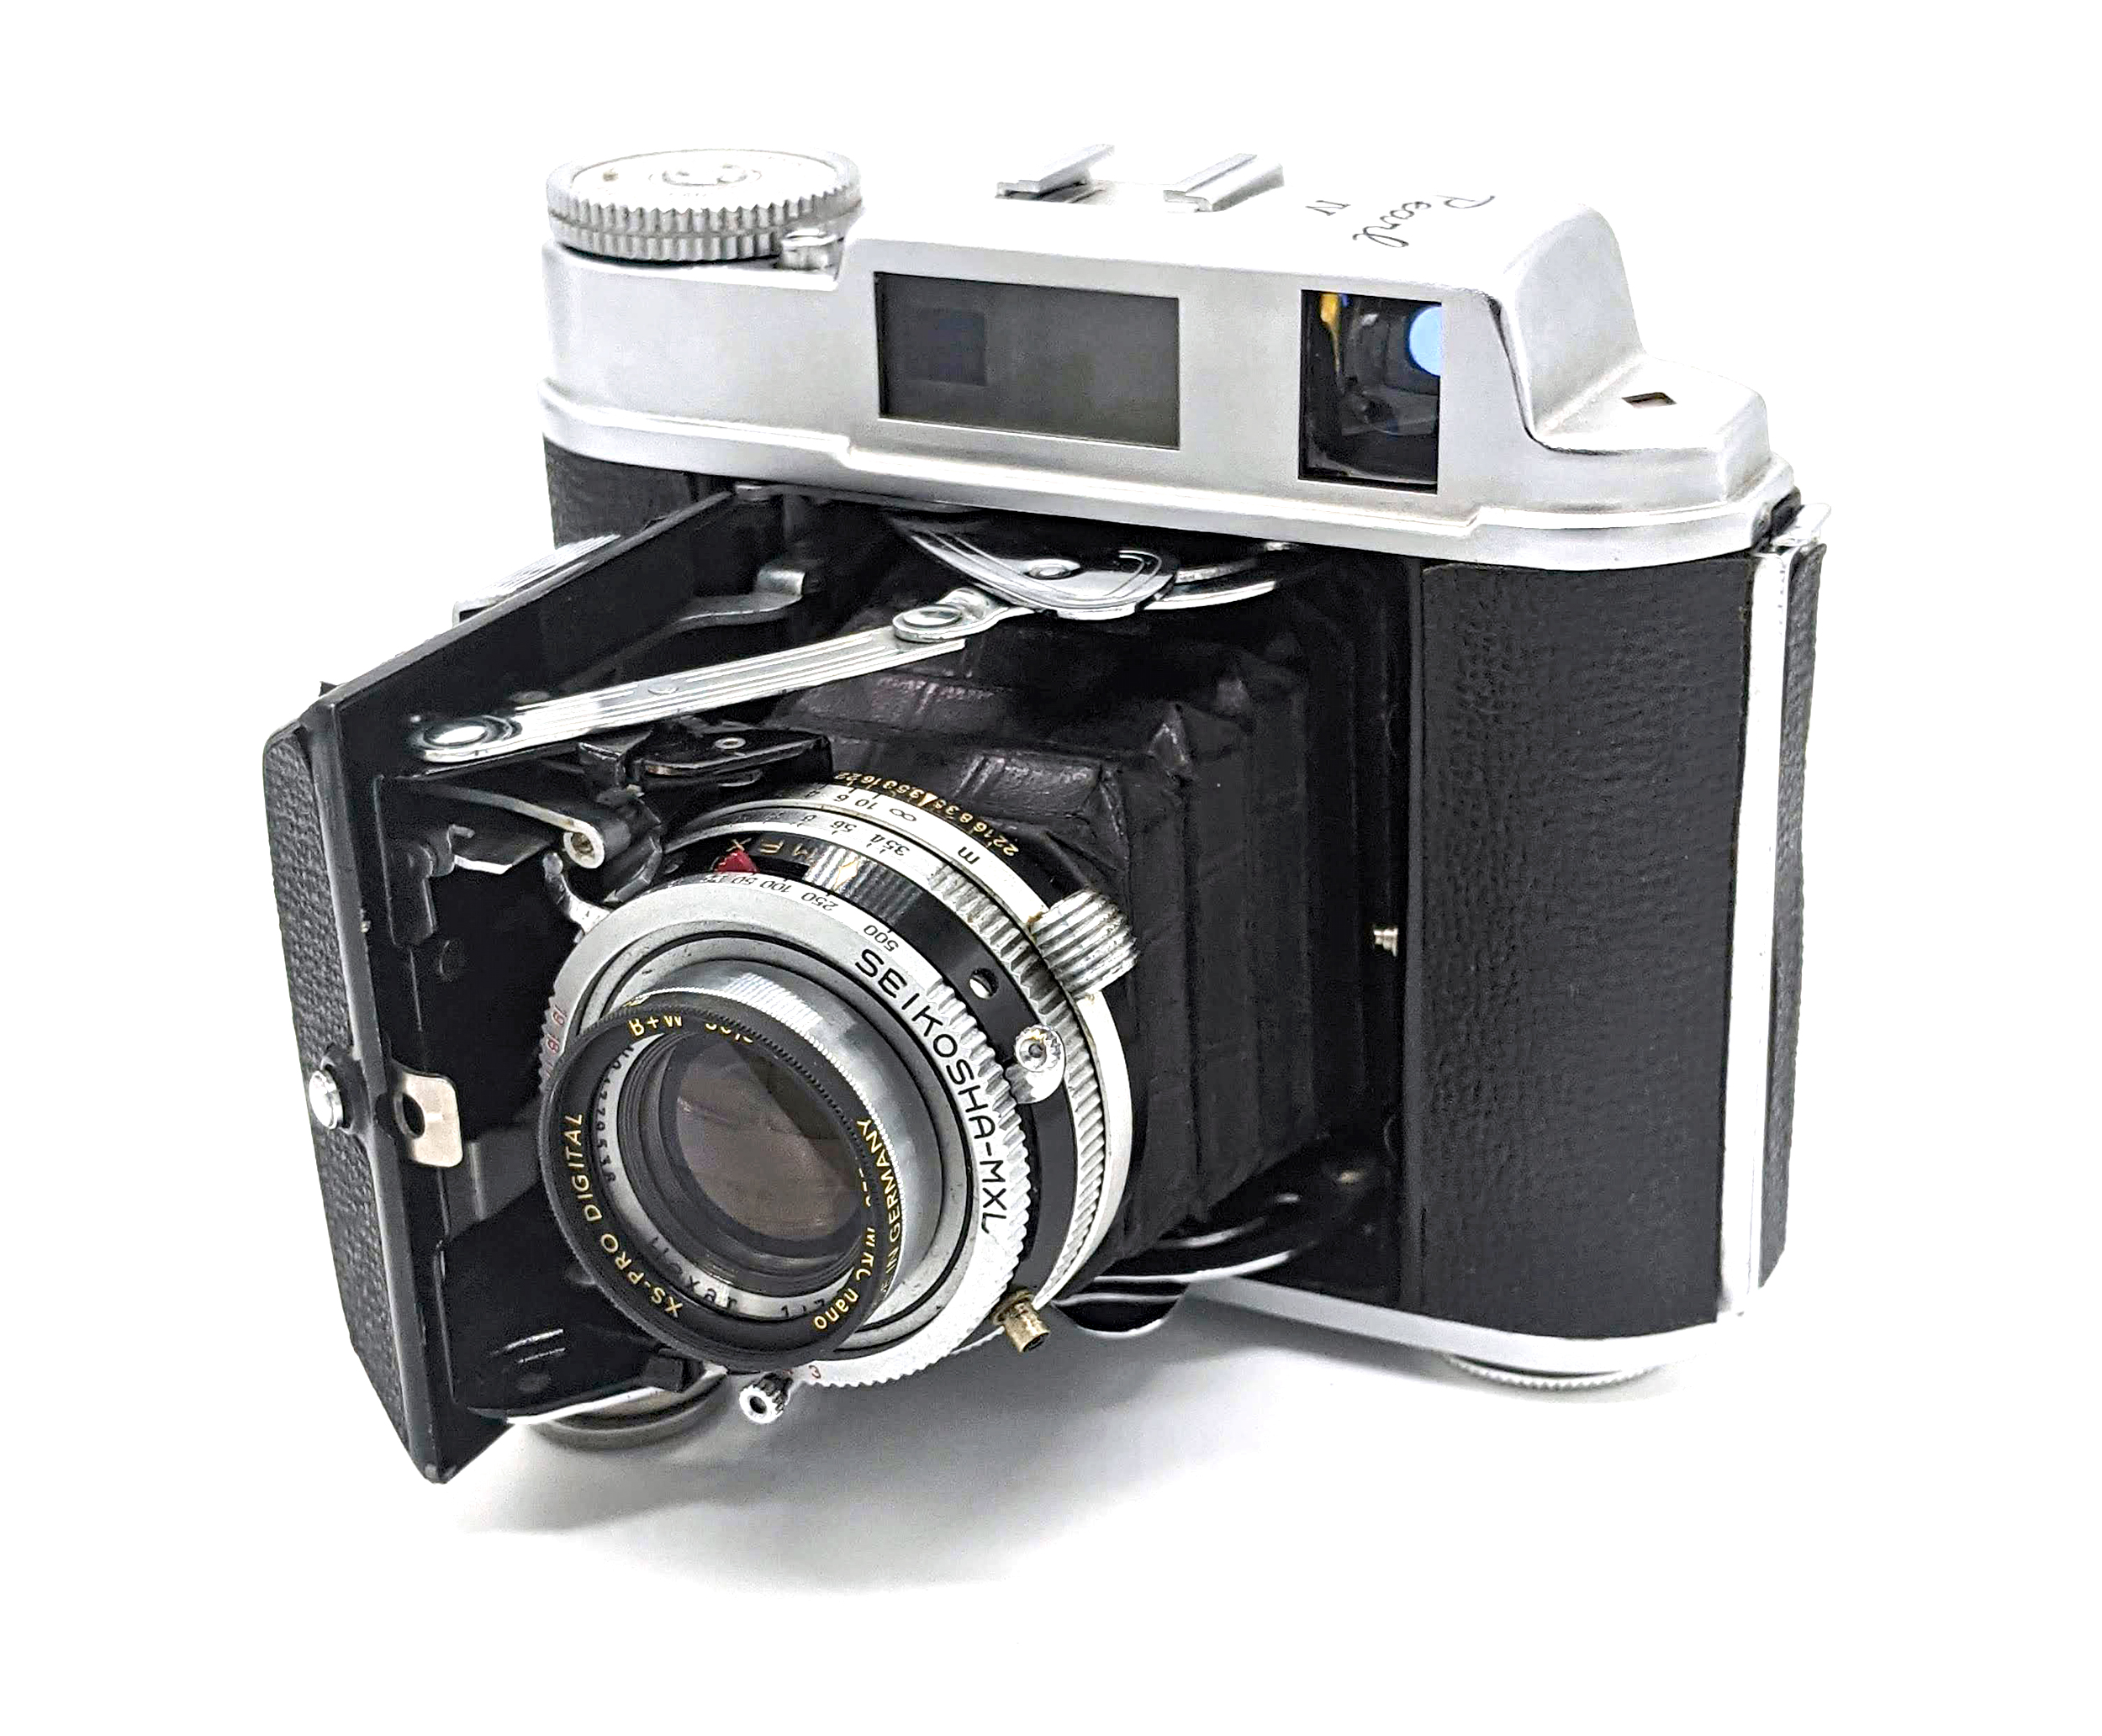
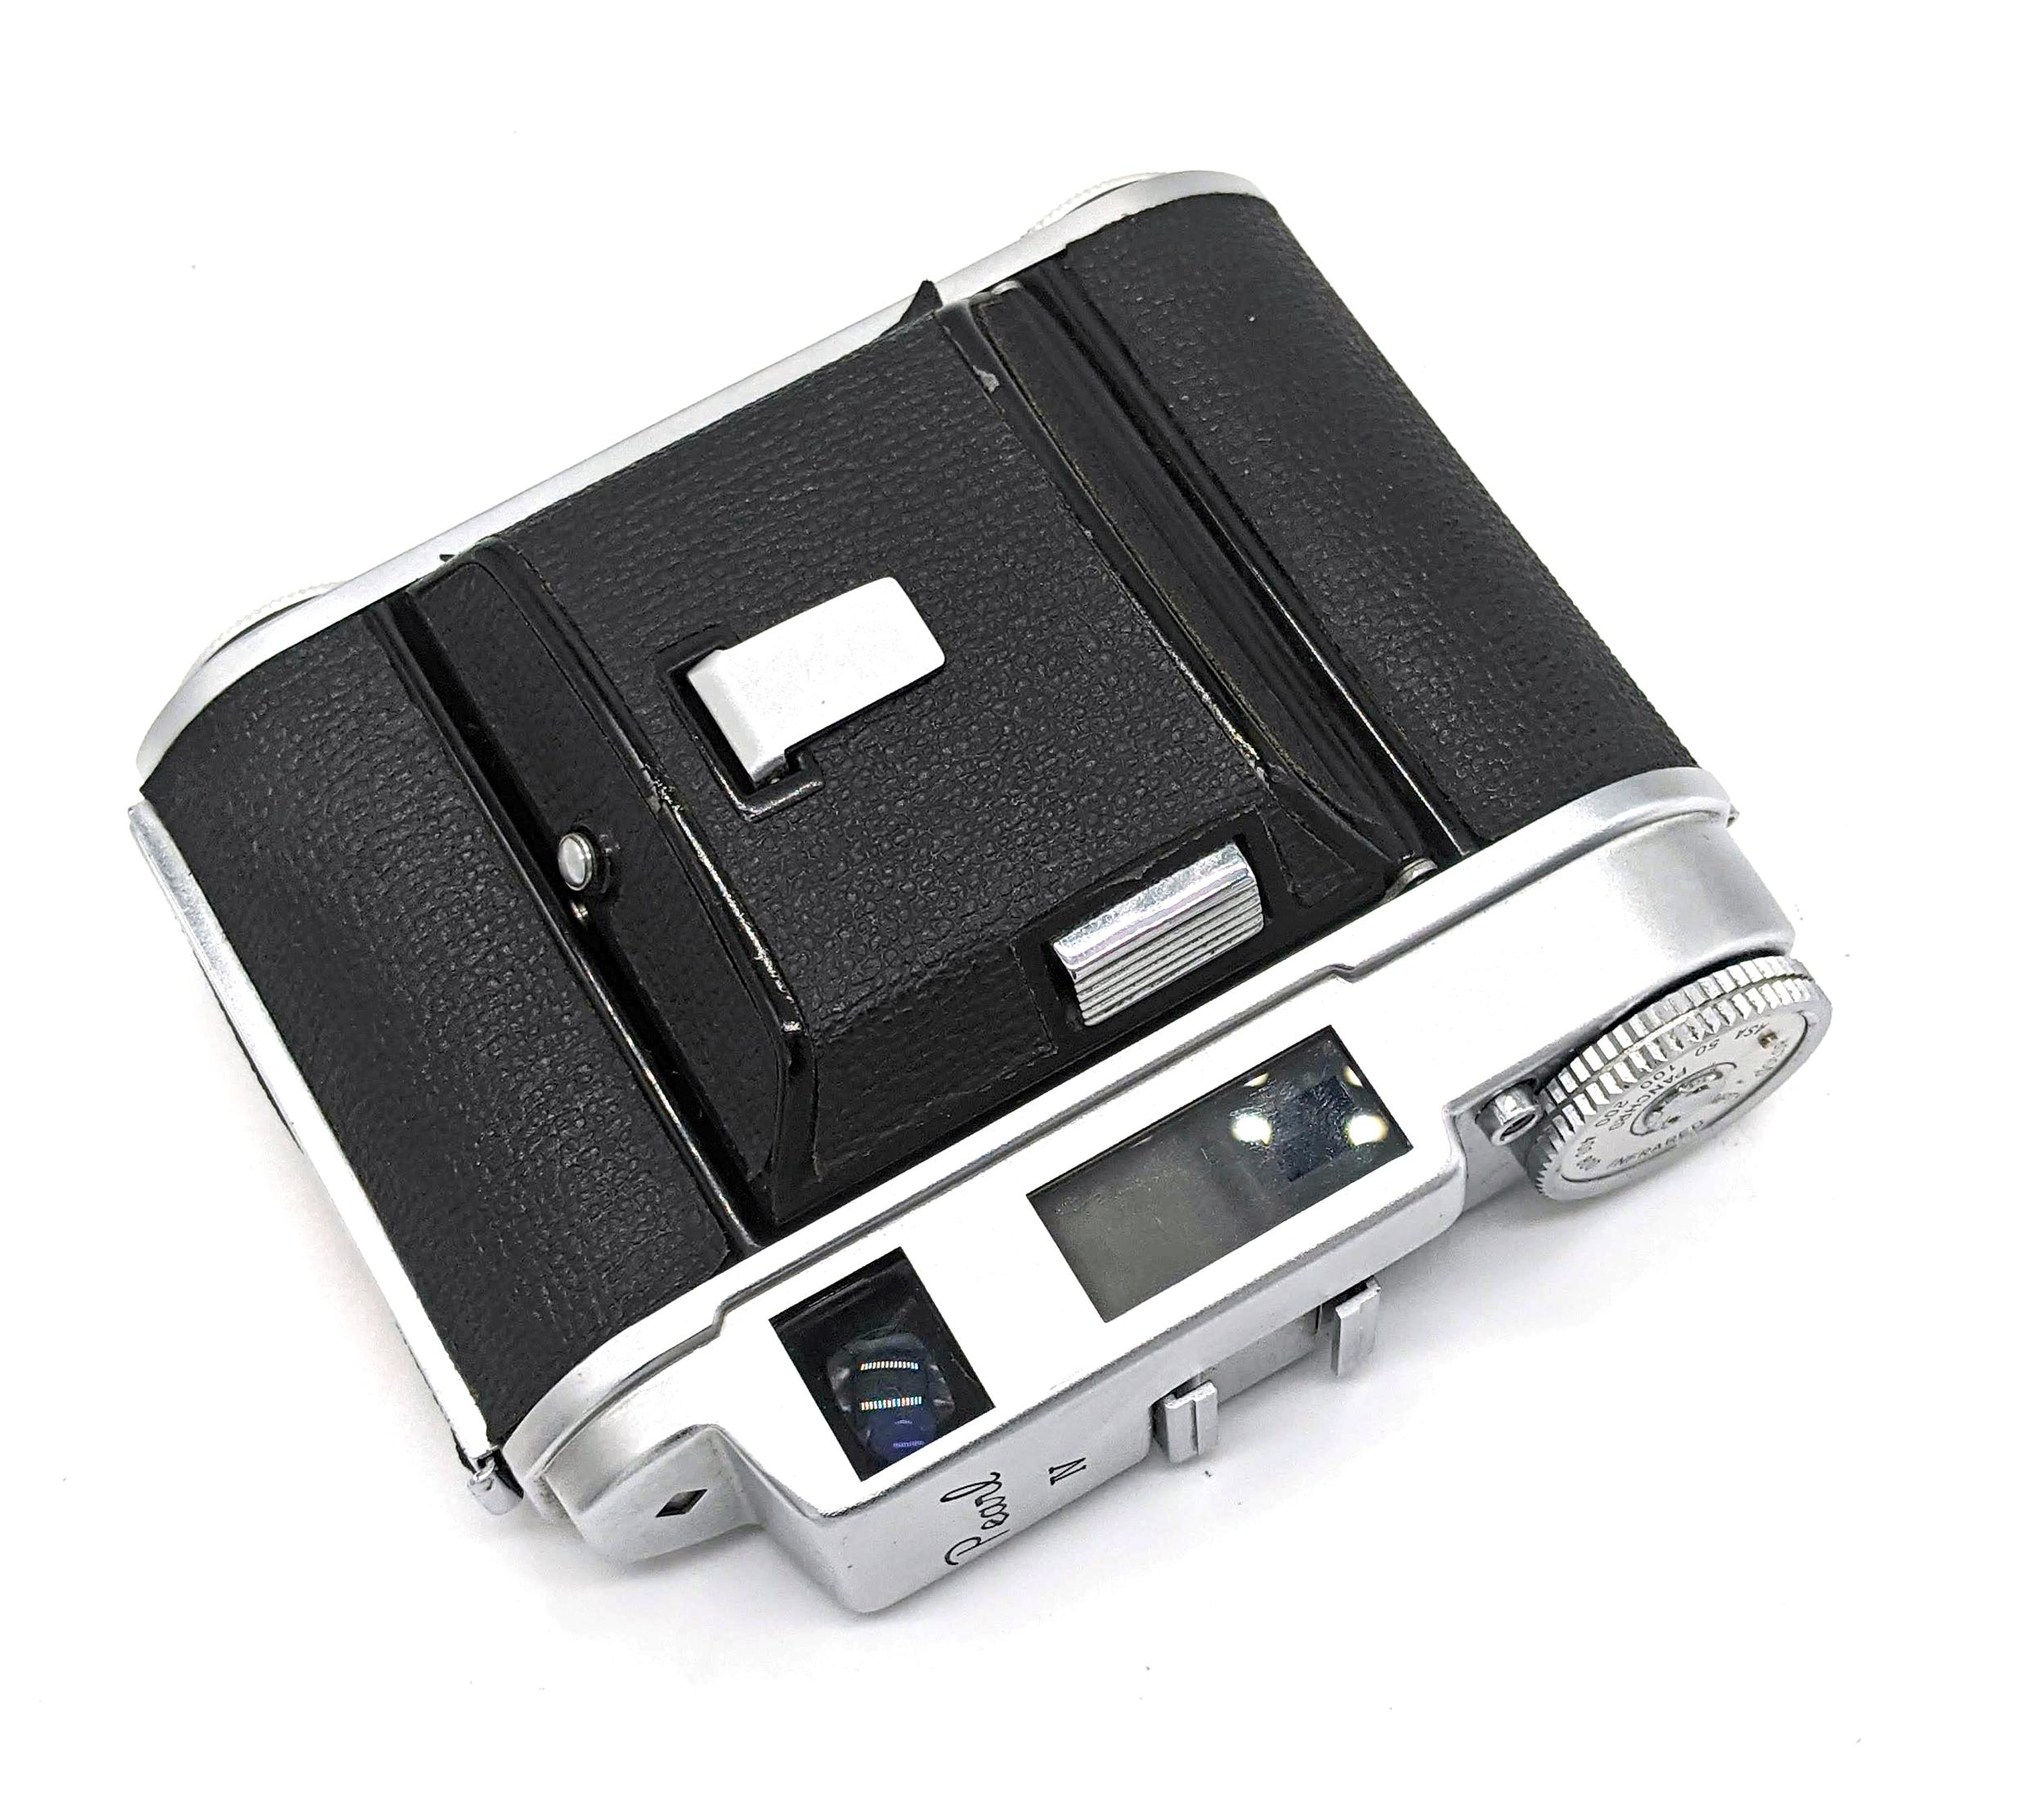
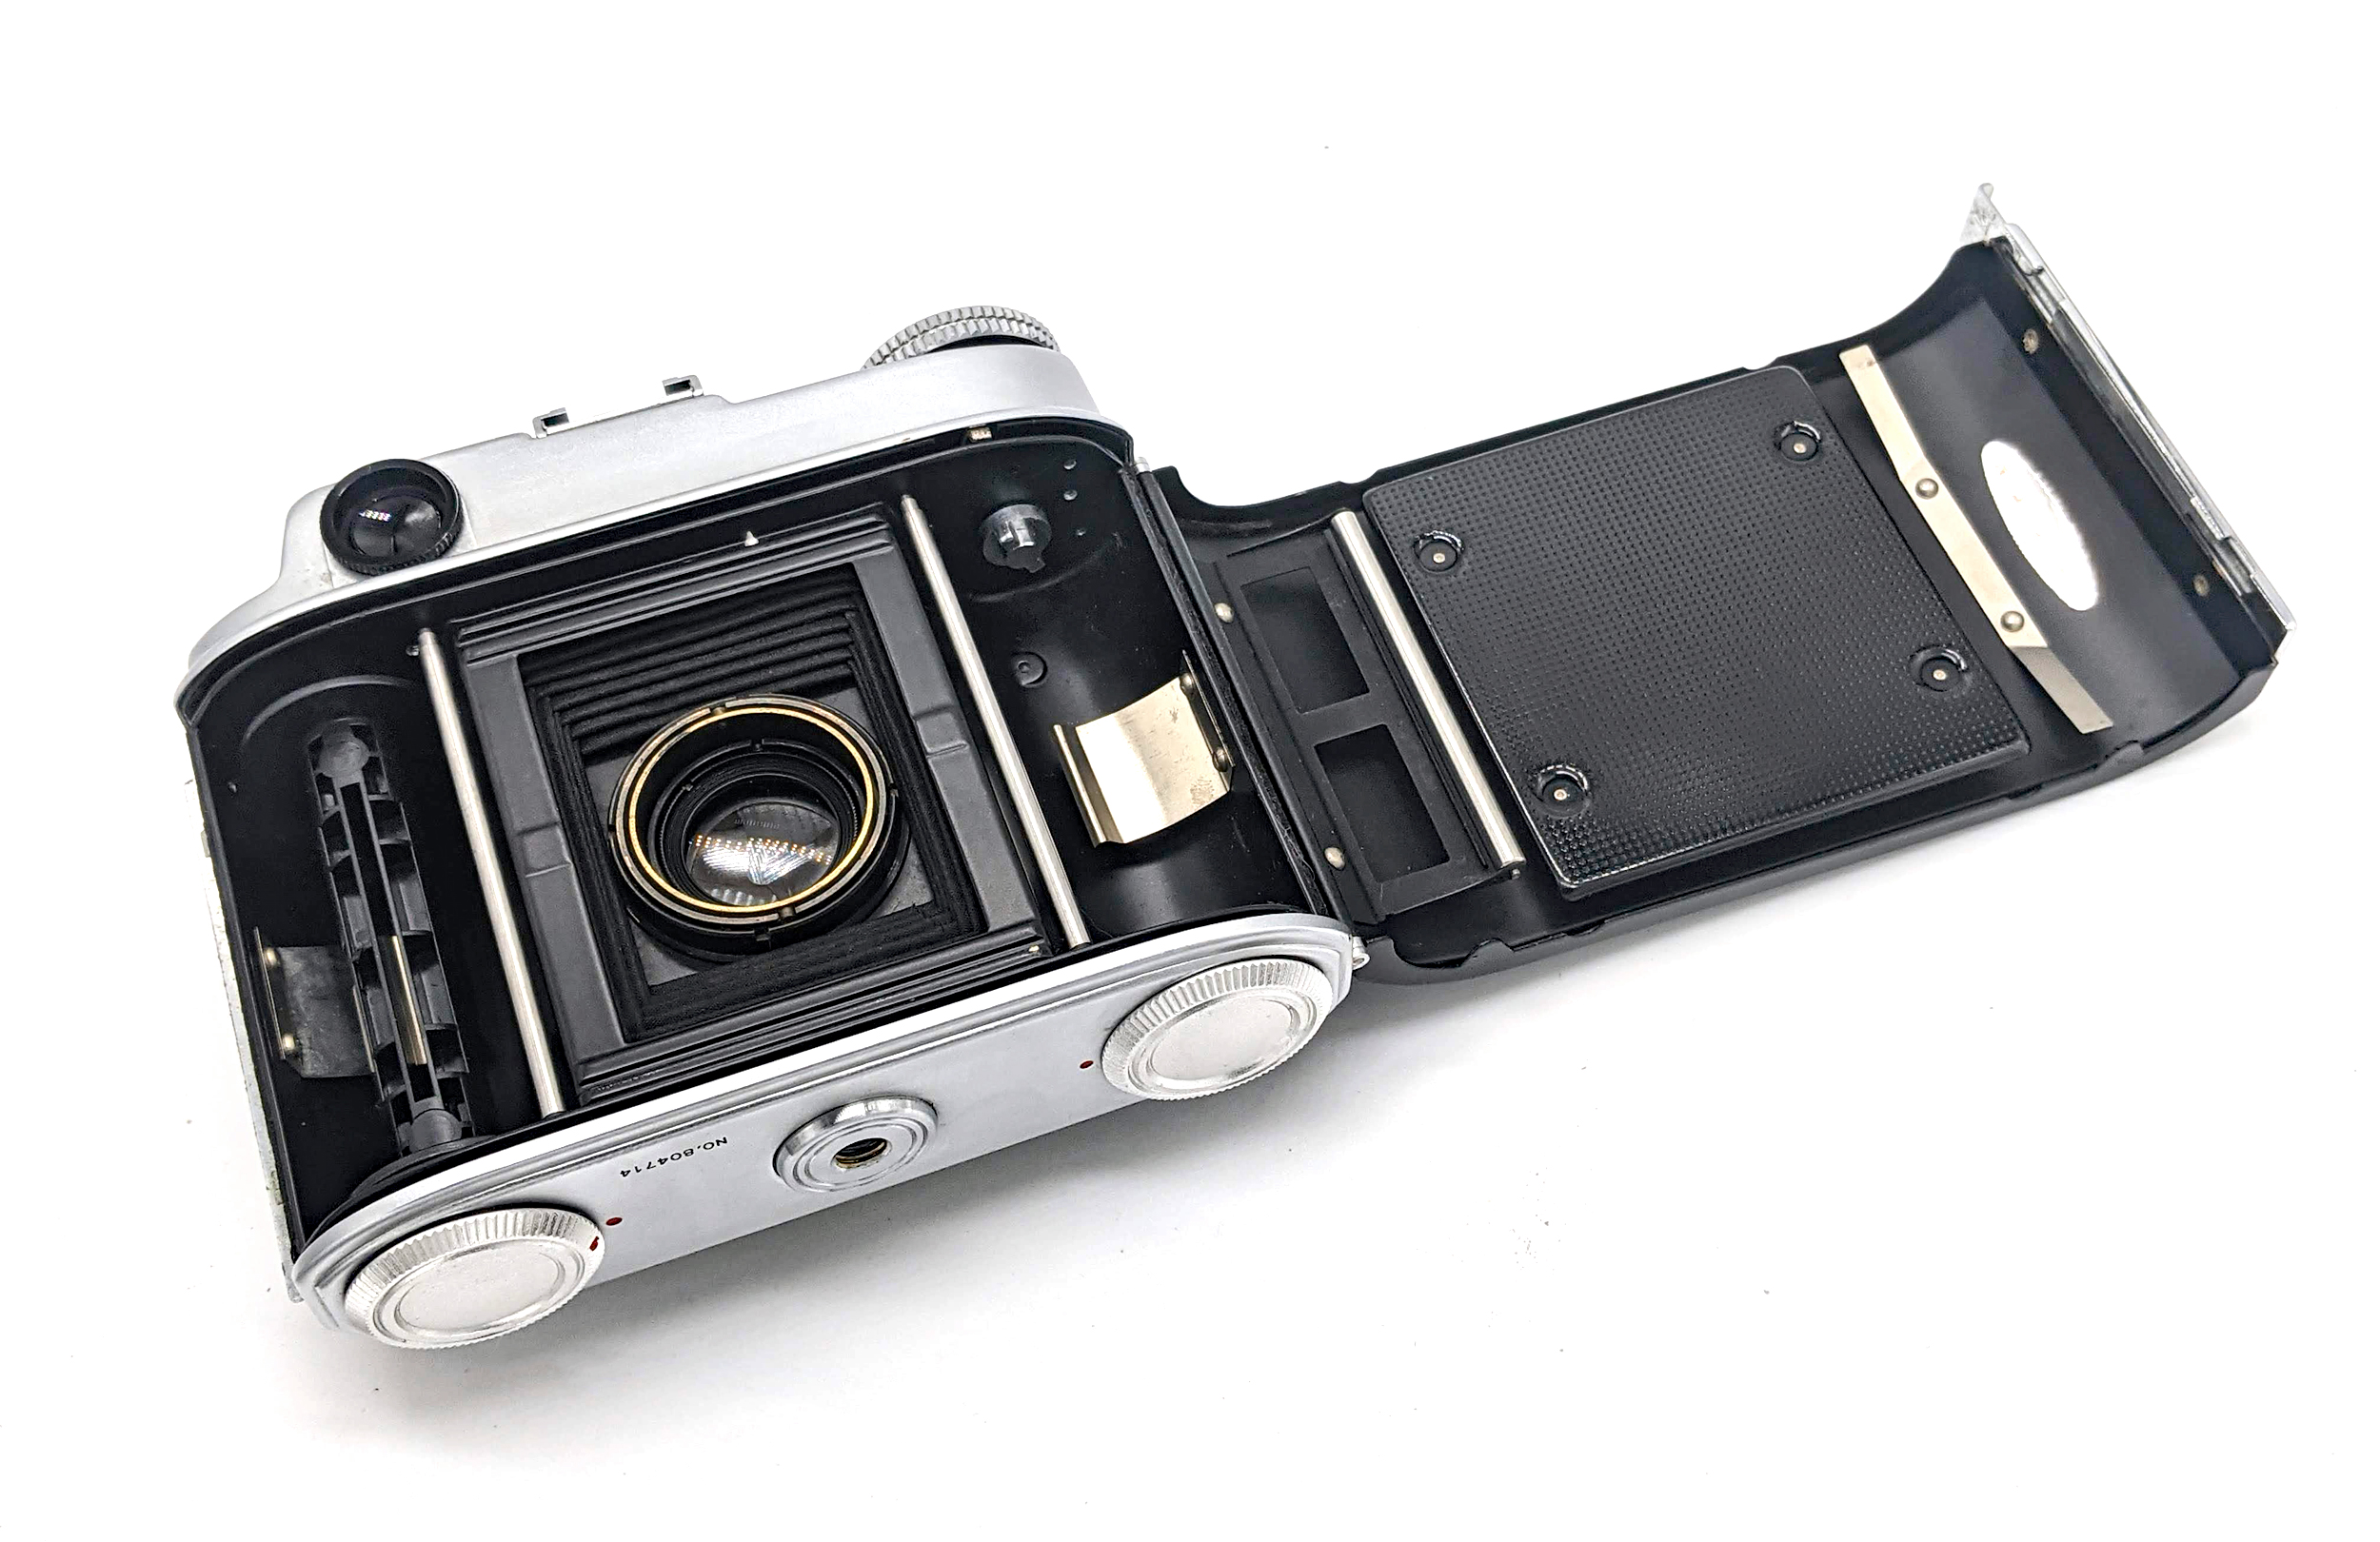
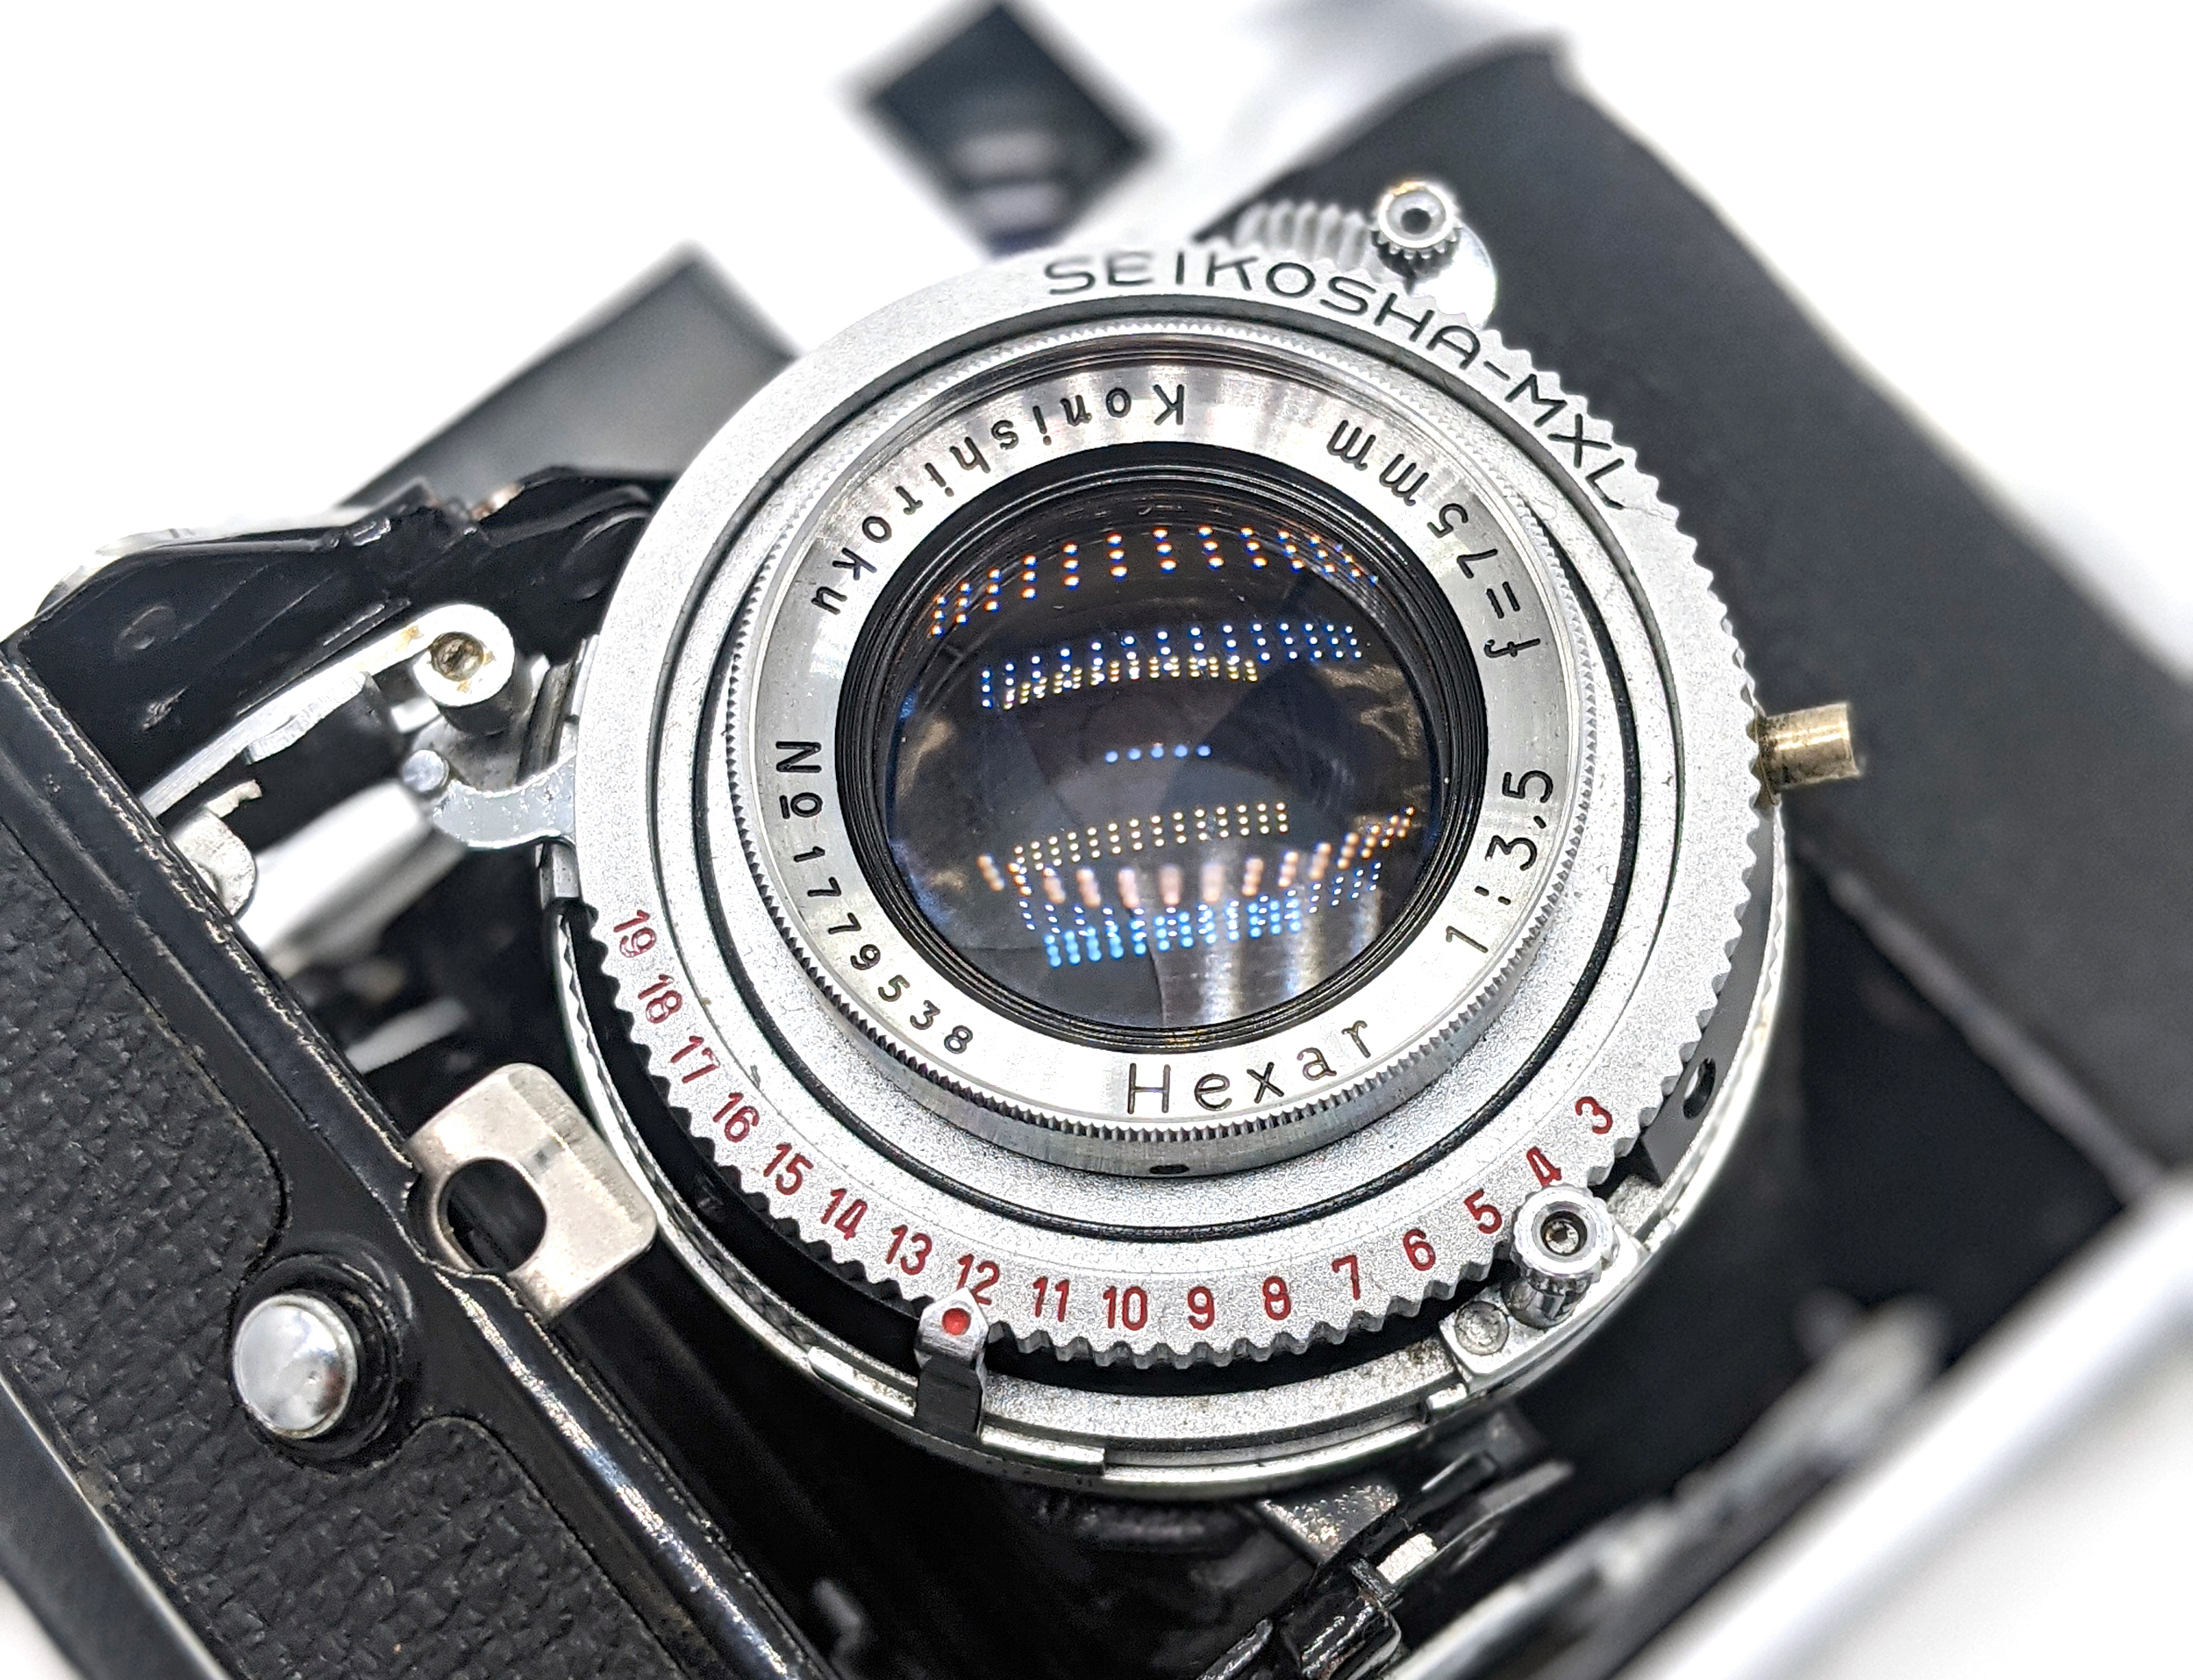
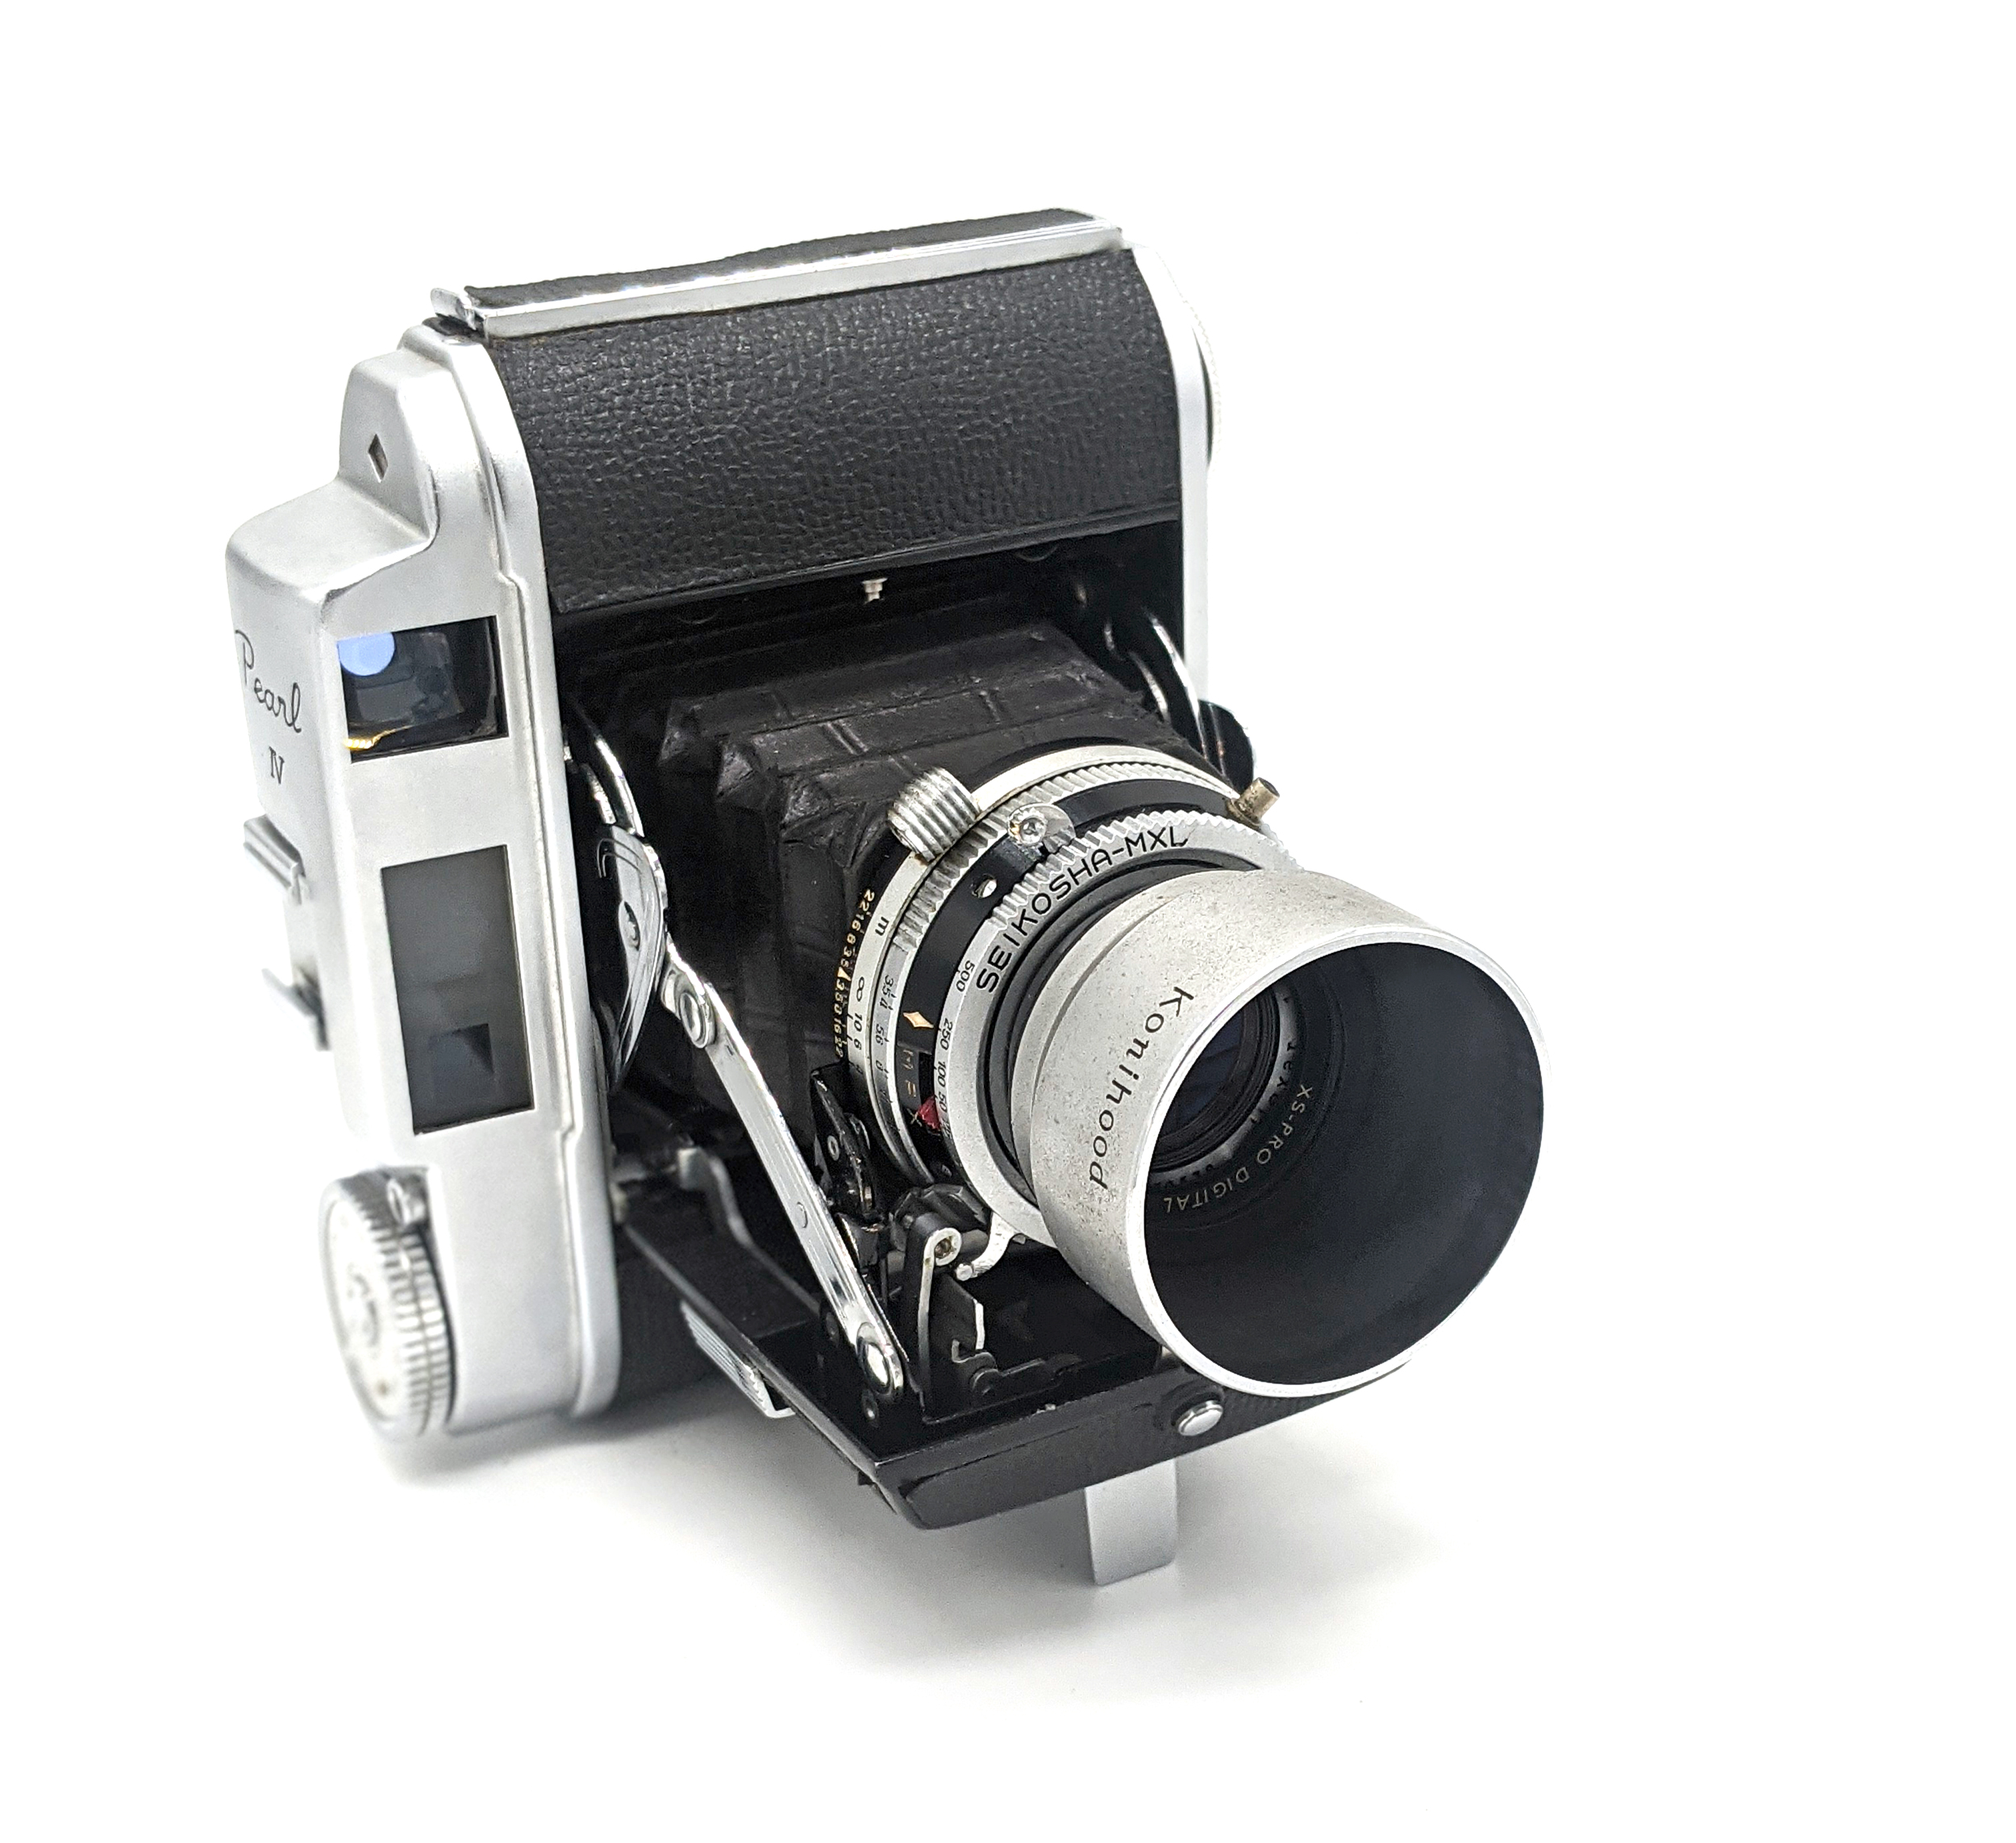
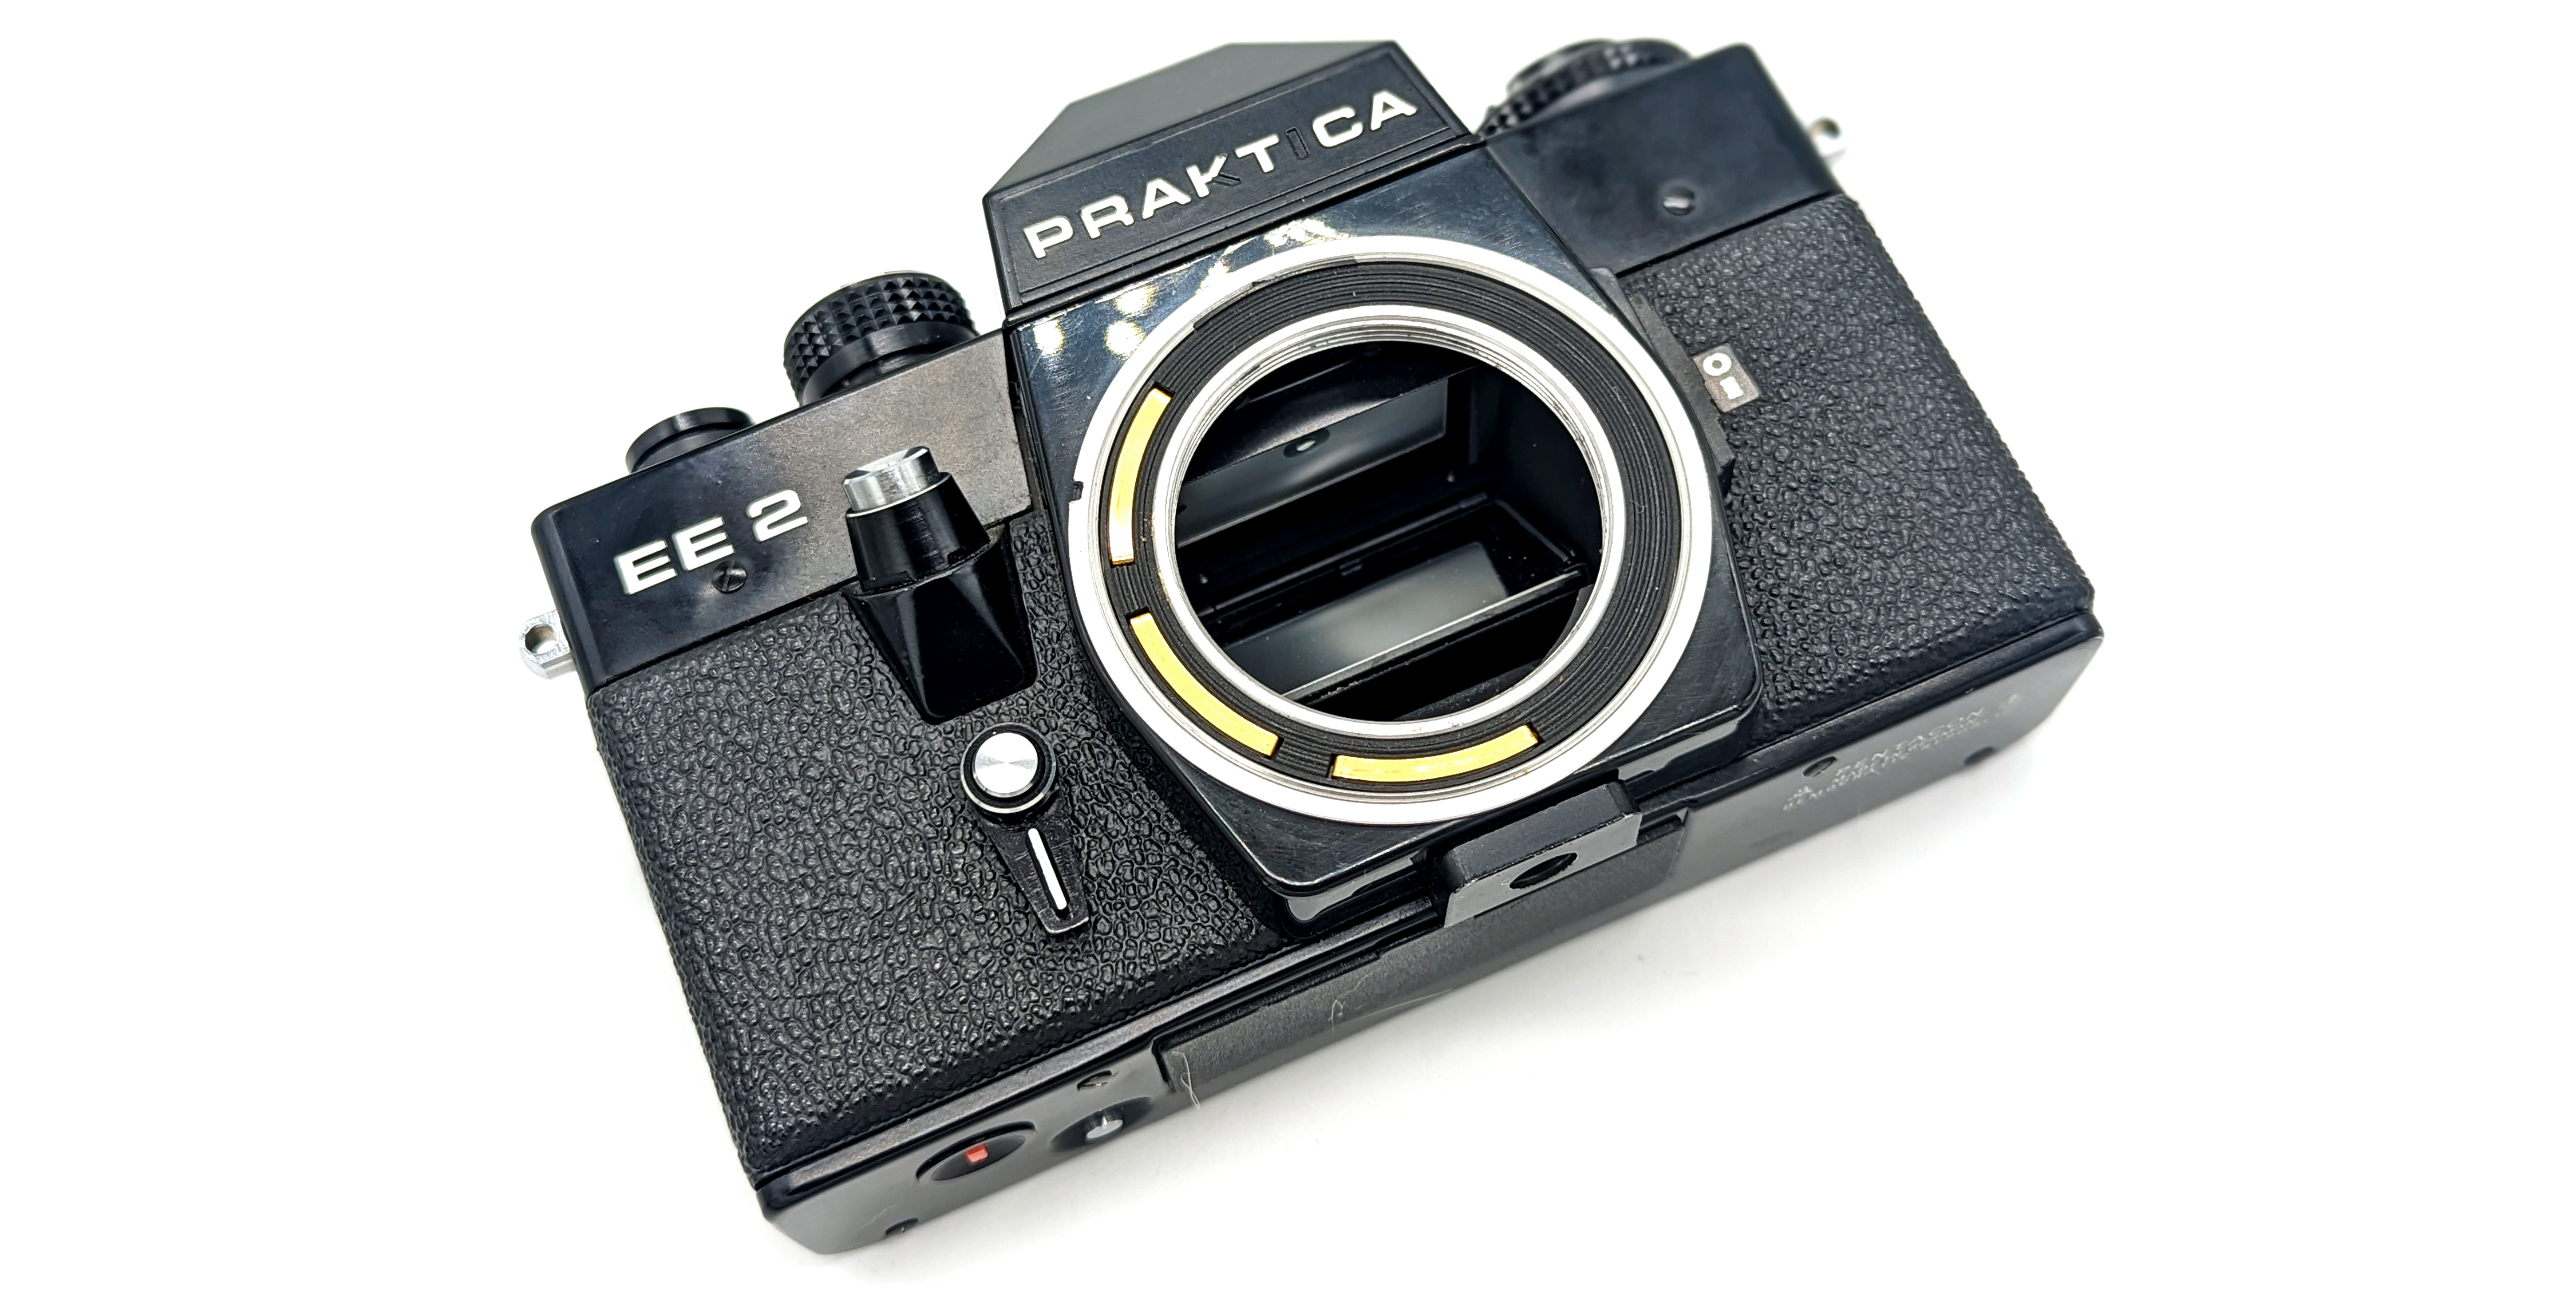
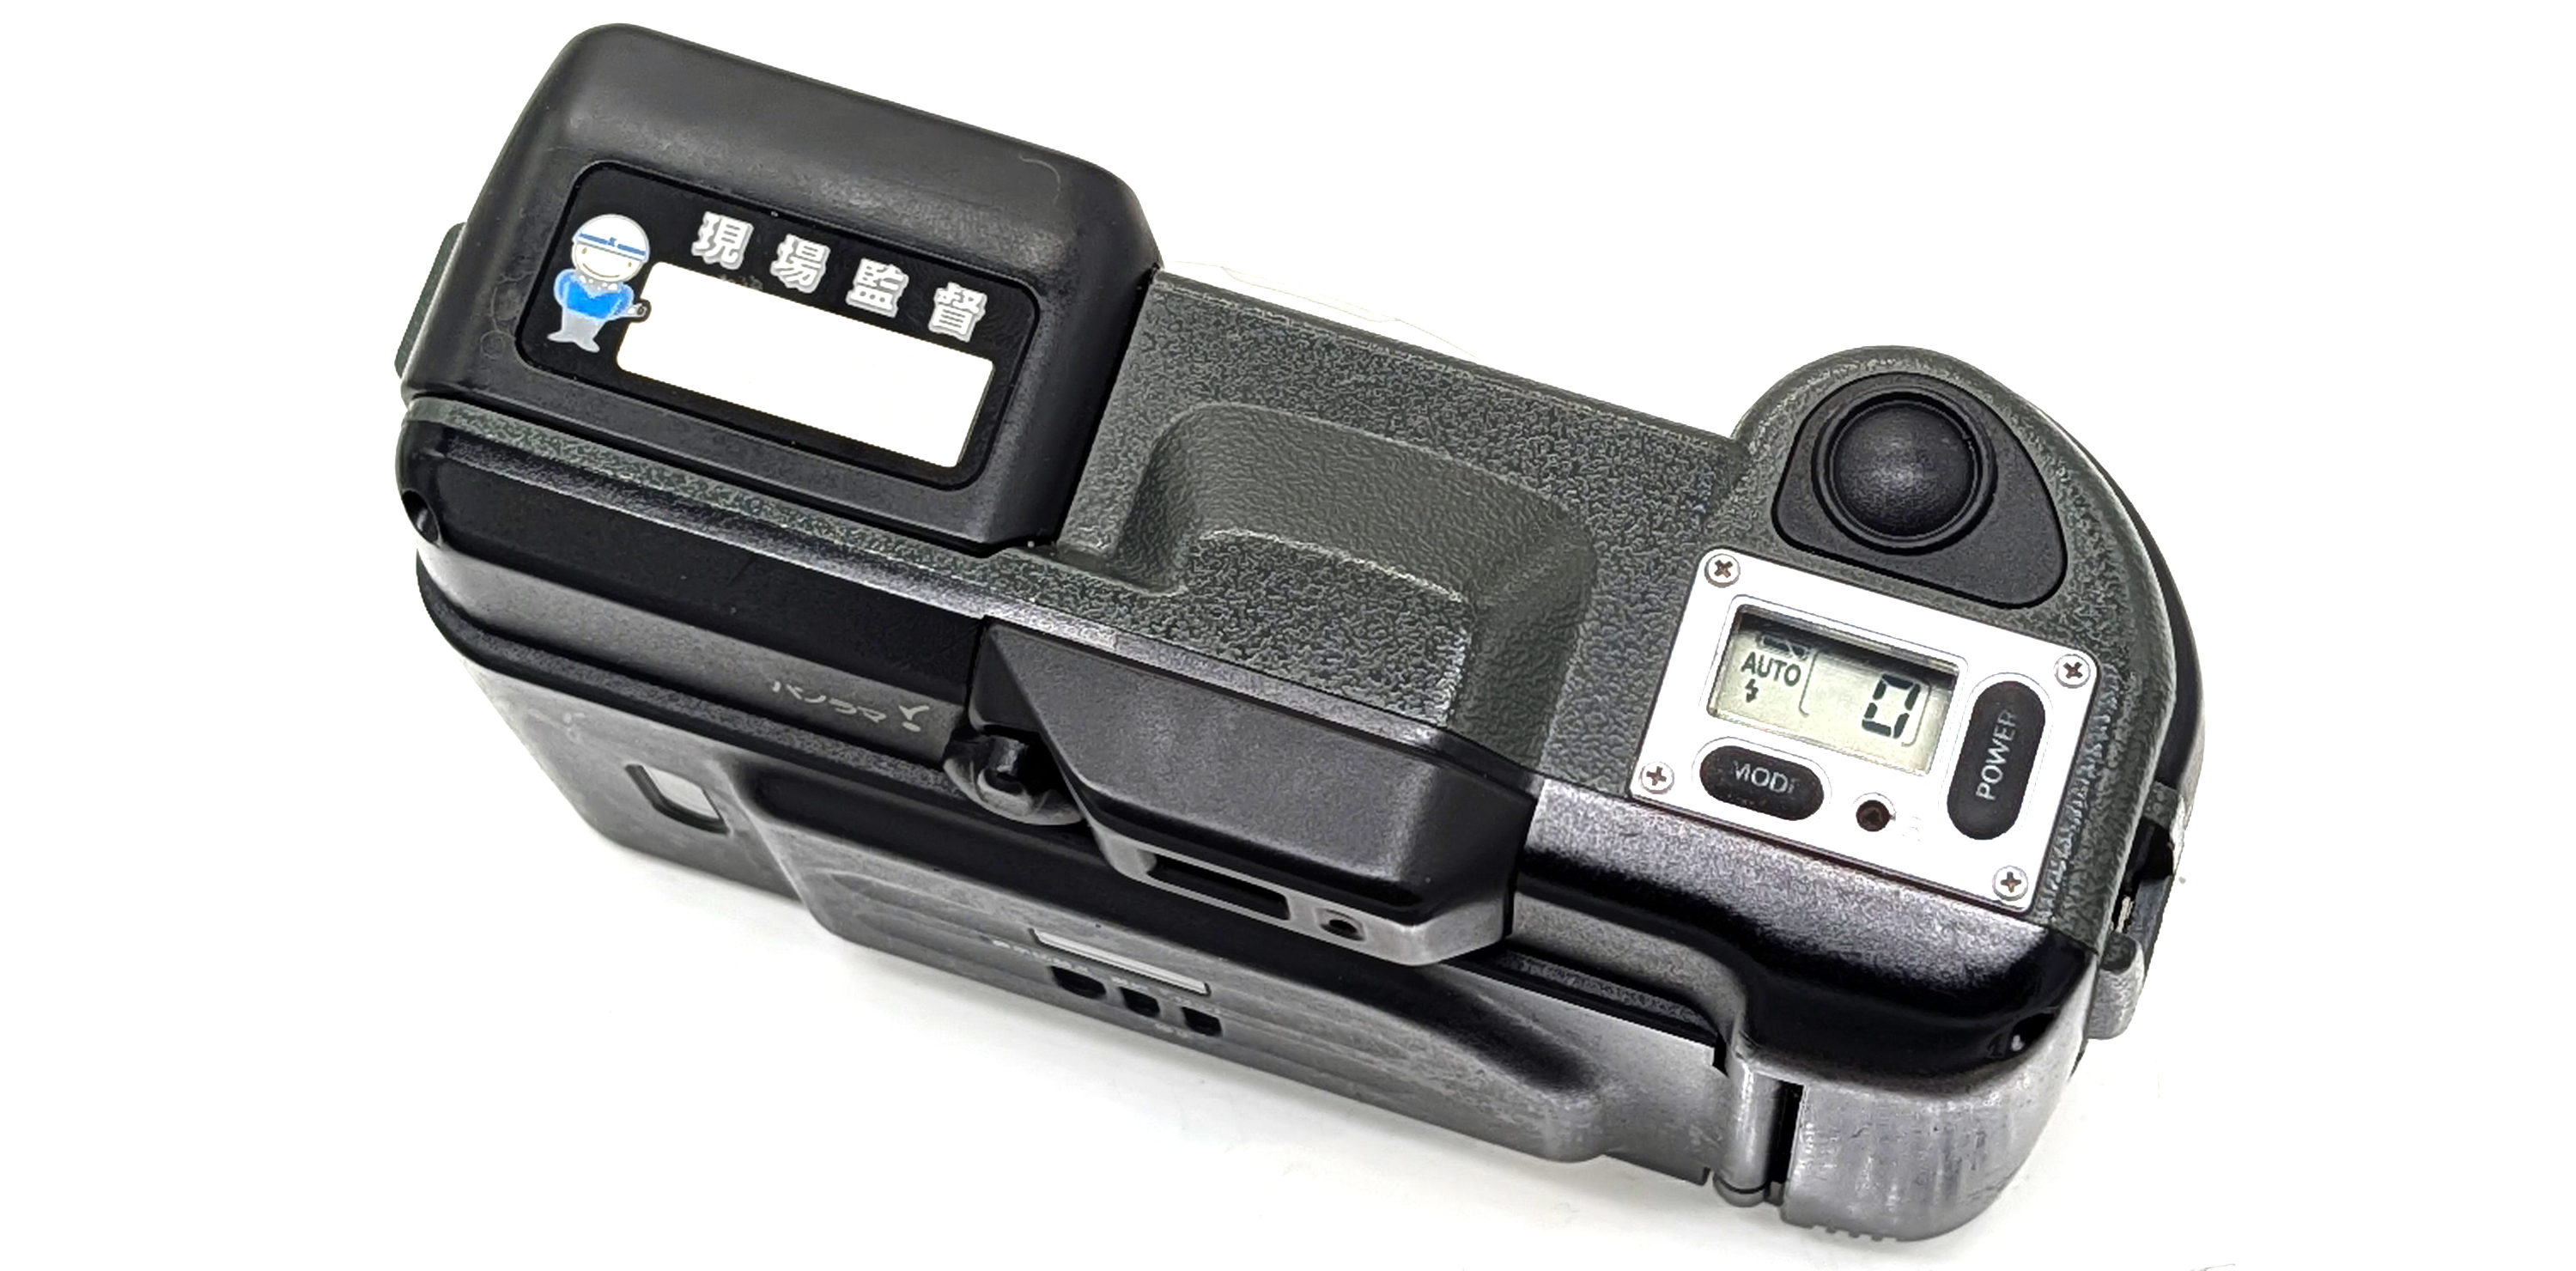
The Fuji Fujipet is a model in a fascinating series of 6×6 cameras that were sold primarily in the Japanese home market from 1957 to 1963. The original model (pictured here) has a fixed 70mm f/11 meniscus lens (with a claimed 1.00m to infinity depth of field), with user-selected aperture settings of f/11, f/16, or f/22, a leaf shutter with a fixed 1/60 (or is it 1/50?) shutter speed with a “B” setting, and a flash sync port on the lens housing. Combine those features with what appears to be an auxiliary viewfinder fused to the body and a primitive, non-locking film transport system, and you have a sort of primitive medium format point-and-shoot.
In 1961, the Fujipet underwent a major revision (the “EE”), by: (1) adding an integrated viewfinder; and (2) using an autoexposure system using a selenium meter with continuous-variable aperture between f/11 and f/22; and (3) employing just one lever that both tripped and cocked the shutter. In doing so, the EE eliminated any manual aperture control, its selenium meter was calibrated only to work with 100 speed film, and “B” mode for longer exposures was omitted. A swinging arm in the viewfinder would indicate whether the photo would be exposed correctly in the f/11-f22 range. The final Fujipet revision (the “EE-2”) added a meter sensitivity dial, presumably to accommodate different film speeds.
Subsequent cameras similar to the Fujipet have included the 1960s “Diana” and the 1980s “Holga,” both of which originated in Hong Kong. It could be argued that the Fujipet (at least the non-EE models) is as good or better than either the Diana or the Holga, as it can produce pretty acceptable images with no vignetting, albeit the field flatness and visual distortion can be a bit unpredictable given the interplay between the lens and the slightly curved film position. Although functional Fujipets are a little hard to find outside of Japan, are they worth wasting your precious 120 film on? Let’s take a look.
Operation
Exposure/Shutter: Although the Fujipet’s leaf shutter has just the single speed of 1/60 (or 1/50, it is not clear), the fact that the user can select an aperture of f/11, f/16, or f/22 via a ring around the lens, you should be able to take a well-exposed daylight photo with any film in 100 to 400 ASA range. The three aperture settings are represented as various different circles at the 12 o’clock position when looking down at the lens. There is also a “B” setting which is activated on a switch beneath the lens. Cocking and firing the shutter is accomplished via two levers on the side of the lens, marked “1” and “2.” What is nice is that if you do not click “1” then “2” after a shot, the shutter cannot trip accidentally.
Fixed-Focus Lens: The @ 70mm f/11 in the Fujipet is a simple meniscus lens, the equivalent of maybe a 45mm field of view in the 35mm format. It is not bad and has pretty good sharpness and almost no corner light fall-off. However, the interaction of the lens and the slightly curved film plane result in some pretty weird distortion given the distance to the subject and/or tilting the camera up or down from a level position. In other words, to minimize weird effects and distortion, try to keep the lens as level with the subject as possible. While Fuji claims that the depth of field spans 1.00m to infinity, it would have been nice if the lens did have a few pre-set focus positions.
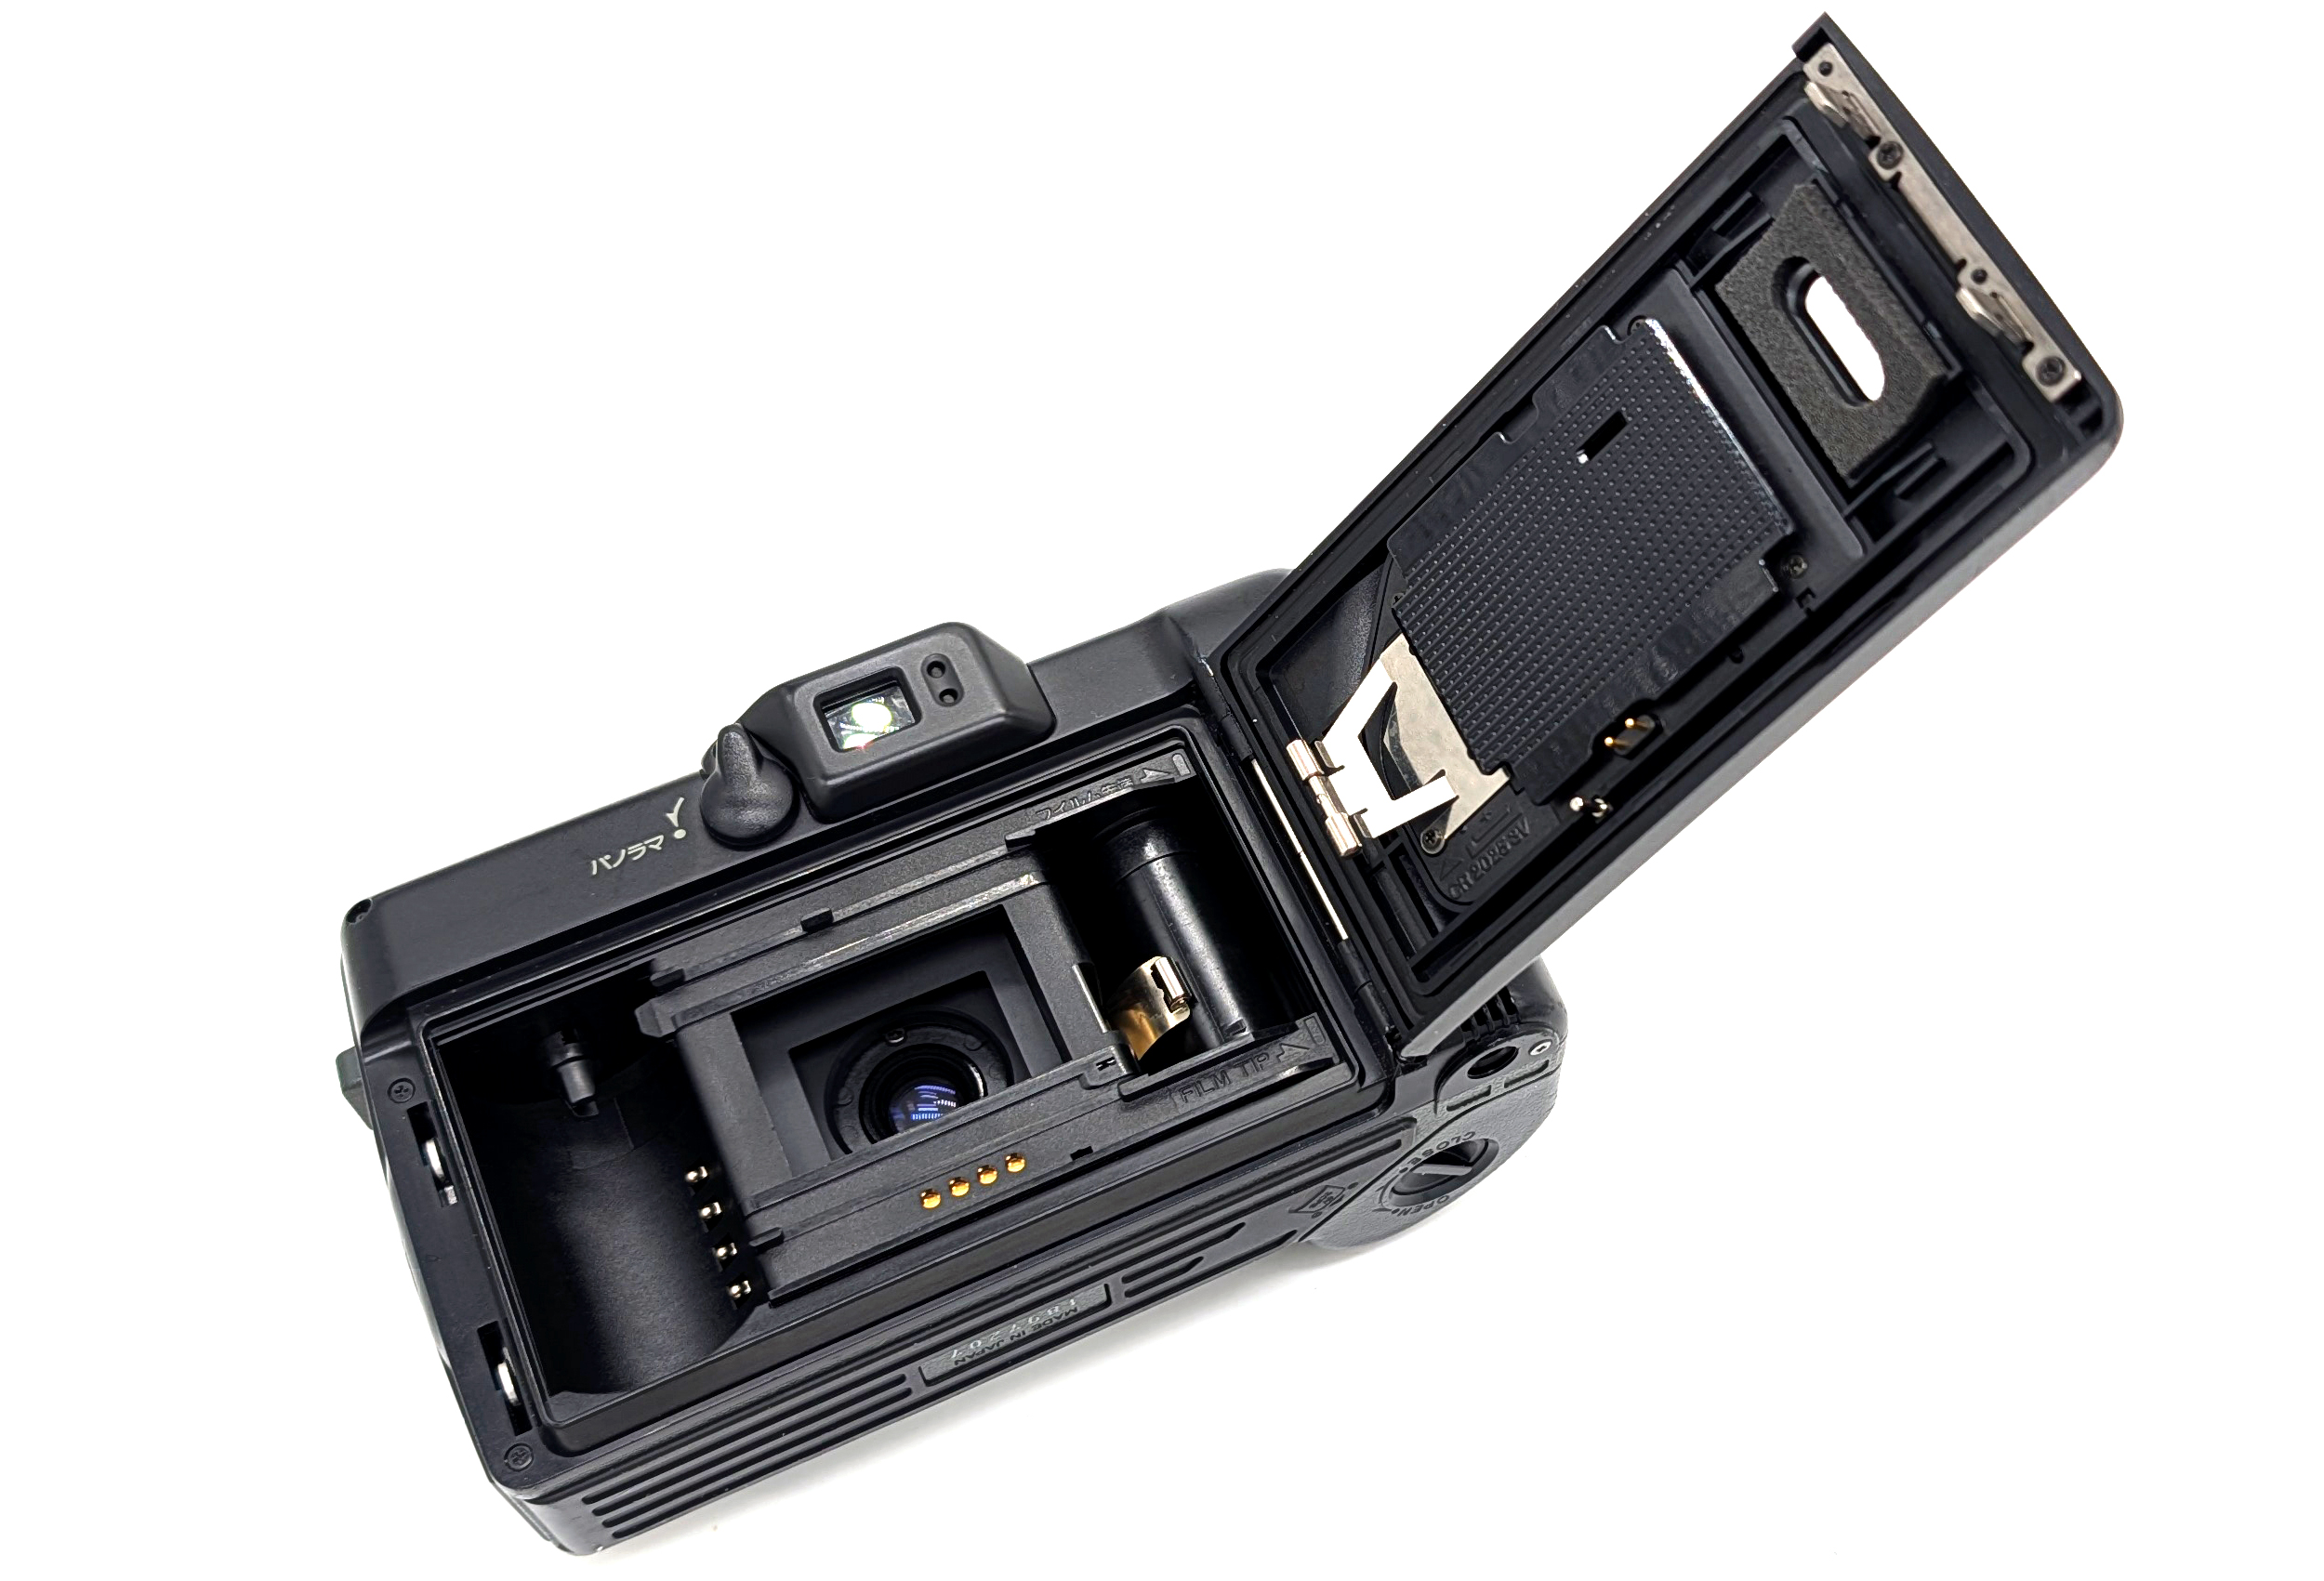
Film Transport: Loading the Fujipet is pretty easy. You unscrew the camera back via the tripod mount, and then pull it out. The film transport system is quite primitive. Using the red window on the back, you have to advance the film until the “1” on the backing paper is visible. Because the transport system does not lock the advance until the shutter is tripped, you take the photo and then have to advance the film via the knob until the “2” appears in the red window, and so on. It is quite easy to accidentally double expose if you do not remember to advance the film immediately after each shot.
Viewfinder: The viewfinder appears to be an external one just attached to the top of the camera. It is clean and clear and has no framelines. Point and shoot, my friends.
Strap Lugs: The Fujipet uses just simple dimple-type strag lugs. You will either need to get a set of those metal brackets that can fit around the round mounts to use a regular strap or a strap that has “string” ends that can be wrapped and knotted around the lugs.
Slide-Out Lens Hood: The Fujipet contains a built-in sliding lens hood, but unfortunately it does not lock into place.
Film Flatness: The Fujipet has no pressure plate to flatten the film. Instead, the film chamber and the camera back contain curved molding that when put together seem to have the effect of somewhat tensioning, flattening, and then slightly curving the film plane.
Flash: The camera has a cold shoe on the right side of the top cover. On the underside of the lens housing is a small PC port for flash, which requires the non-locking lens hood to be extended to access. While apparently engineered for flash bulbs, the sync seems to work ok with modern electronic flashes. However, because the Fujipet requires shooting at f/11-22, you may need to use a pretty powerful flash to reach beyond a few feet of coverage.
Filters: The Fujipet does not have a standard filter thread. Instead, Fuji made custom filters for the system that are very difficult to find today.
Versus the Later Models
I think the original non-EE Fujipet is the one to get. The selectable apertures and the “B” setting provide at least some user control over the exposure. The EE version depends on the operability of its selenium meter, has no user override over the exposure settings, and is limited to ASA 100 film. Also remember that simple selenium meters can be easily fooled by any strong backlight, and there is no way to override the EE’s autoexposure system. The EE-2 with its meter sensitivity lever is probably a better option than the EE, but I think it’s just easier and more accurate to take a meter reading and set the f/11-22 aperture yourself.
Conclusion
Maybe this is all lost to history, but it is not clear to me to whom the Fujipet was effectively marketed. While a primitive “point-and-shoot” camera may have appealed to all sorts of people unfamiliar with or unwilling to engage in the intricacies of film photography at the time, 120 film was certainly not cheap either to purchase or develop. If you are coming from the world of “real” photography, cameras like the Fujipet can be quite aggravating because you think of all of the ways it could have been better. However, for what it is, the Fujipet remains a very cool device. With some limited exposure control, the nice big 120 format, and the ability to use it with a flash as an indoor snapshot camera, there are certainly enjoyable ways to use it. If you want to see some sample photos, check out the #fujipet tag on the IG link above.
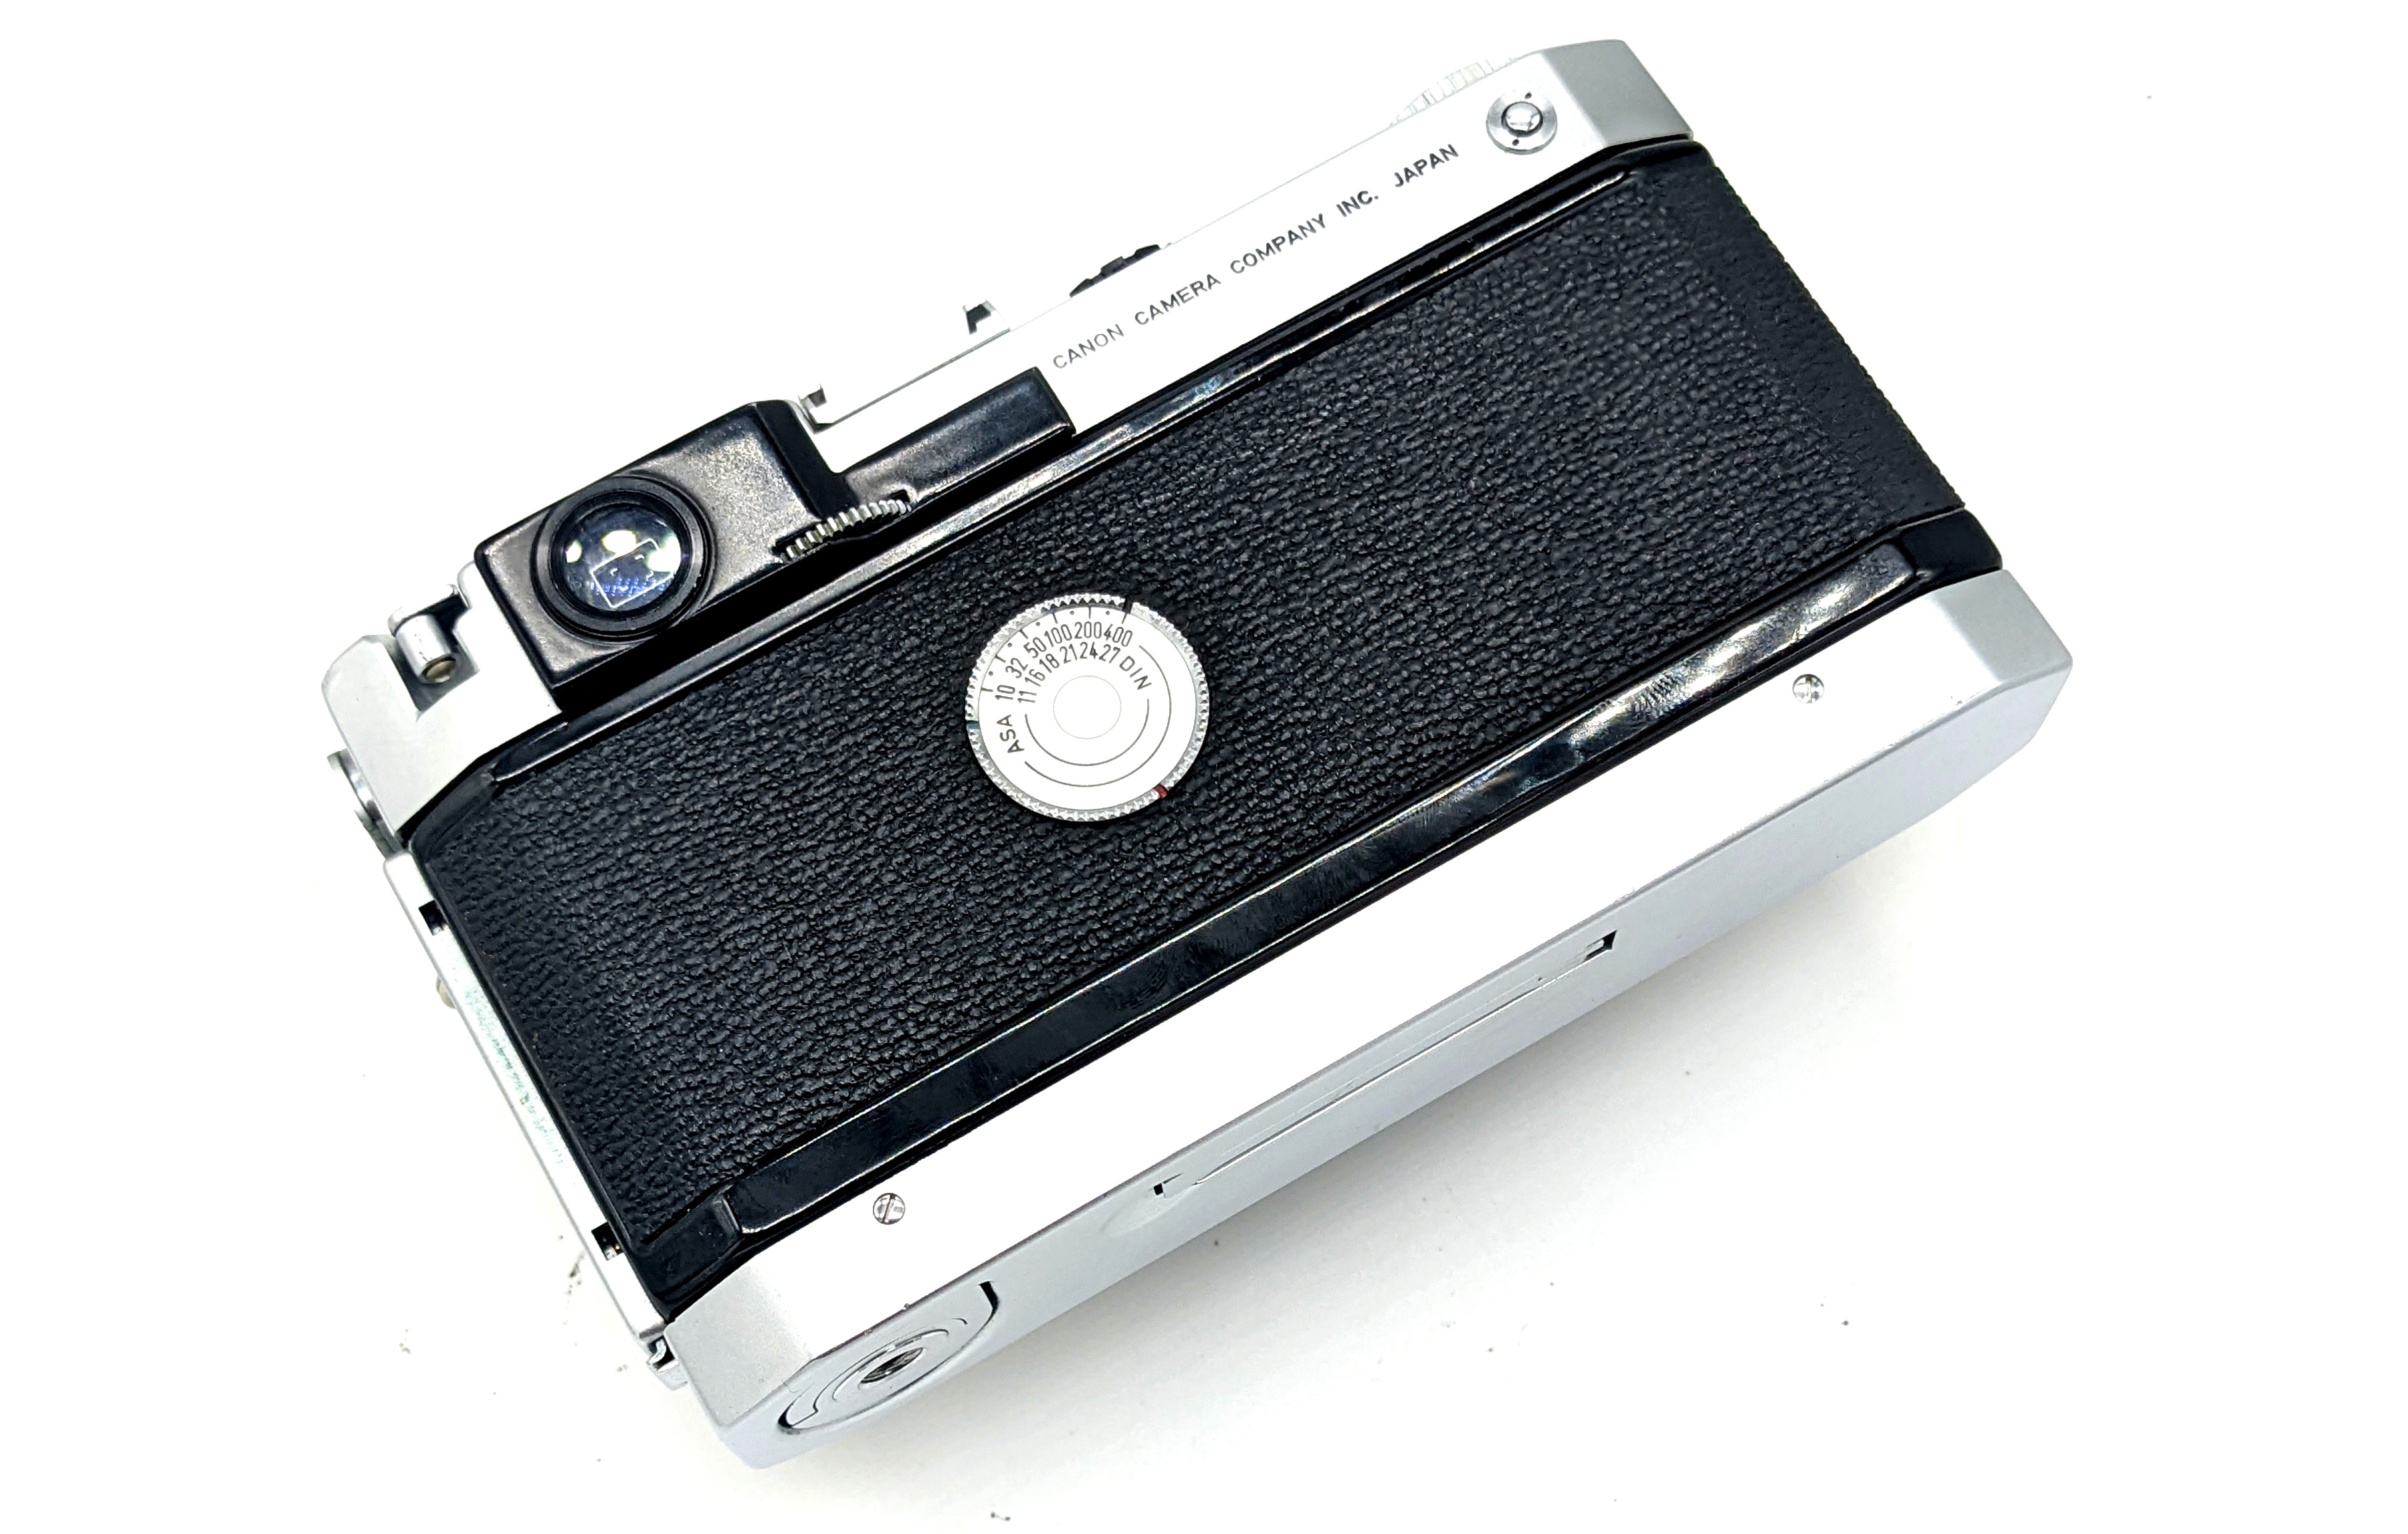
Canon’s 1958 VI-T makes a good case for being the most interesting interchangeable-lens 35mm rangefinder camera of the 1950s. Although overshadowed during the time (as well as today) by the Leica M2 & M3, the Nikon SP, and Canon’s own ubiquitous economy model, the “Populaire,” the VI-T has some functionality that all of these models lacked. Because of the VI-T’s relative rarity (only around 8,000 were produced), it remains arguably one of the better-kept secrets in the rangefinder world.
From the late 1940s through the late 1950s, various manufacturers, mostly located in Japan, flooded the market with copies of the Leica III at a cheaper price point. Although the majority of these models exhibited exceptional quality and finish, as a whole, they did little to improve substantively upon the template. The best that could be said is that a few models introduced nice features such as a lever (rather than knob) advance and swing-back film loading; but those were the exceptions rather than the rule.
For its part, Canon was one of the few companies innovating with the M39 platform beyond that provided by the Leica Barnack template. Canon’s 1946 S II was apparently the first interchangeable-lens M39 camera with a combined rangefinder and viewfinder. In 1949, Canon upped the game with its IIB, a camera that had a three-position combined rangefinder / viewfinder that could change the viewfinder magnification among approximate 50mm, 100mm, and 135mm views. The next iconic models were the 1952 IVSB and 1954 IVSB2, which not only retained the three-position finder, but also had a 1/1000 top shutter speed and an X-sync for modern electronic flashes.
In 1956, Canon responded to the M3 and Nikon’s S2 with the “VT,” with the definitive model being the 1957 VT Deluxe. The VT was a significant redesign of the IVSB series and incorporated a host of impressive features for an M39 camera: a three-position combined rangefinder / viewfinder, a bottom trigger advance, a new 50mm f/1.2 standard lens, swingback film loading, and the ability to use proprietary parallax-corrected external viewfinders that would automatically reframe as the lens focus moved. Still, the VT still left a few things to be desired. First, the rotating viewfinders did not contain any framelines. Second, it retained the Barnack-style dual high-speed / low-speed independent shutter speed dials.
Canon spent much of 1957 and 1958 producing various iterations of the VT: (1) the 1957 L2 (lever advance, 1/500 top speed, no X-sync); (2) the 1957 L1 (lever advance, no self timer); (3) the 1957 L3 (lever advance, 1/500 top speed, no flash sync); (4) the 1958 VL (a VT Deluxe with a lever wind); and (5) the 1958 VL2 (lever wind, knob rewind, 1/500 top speed).
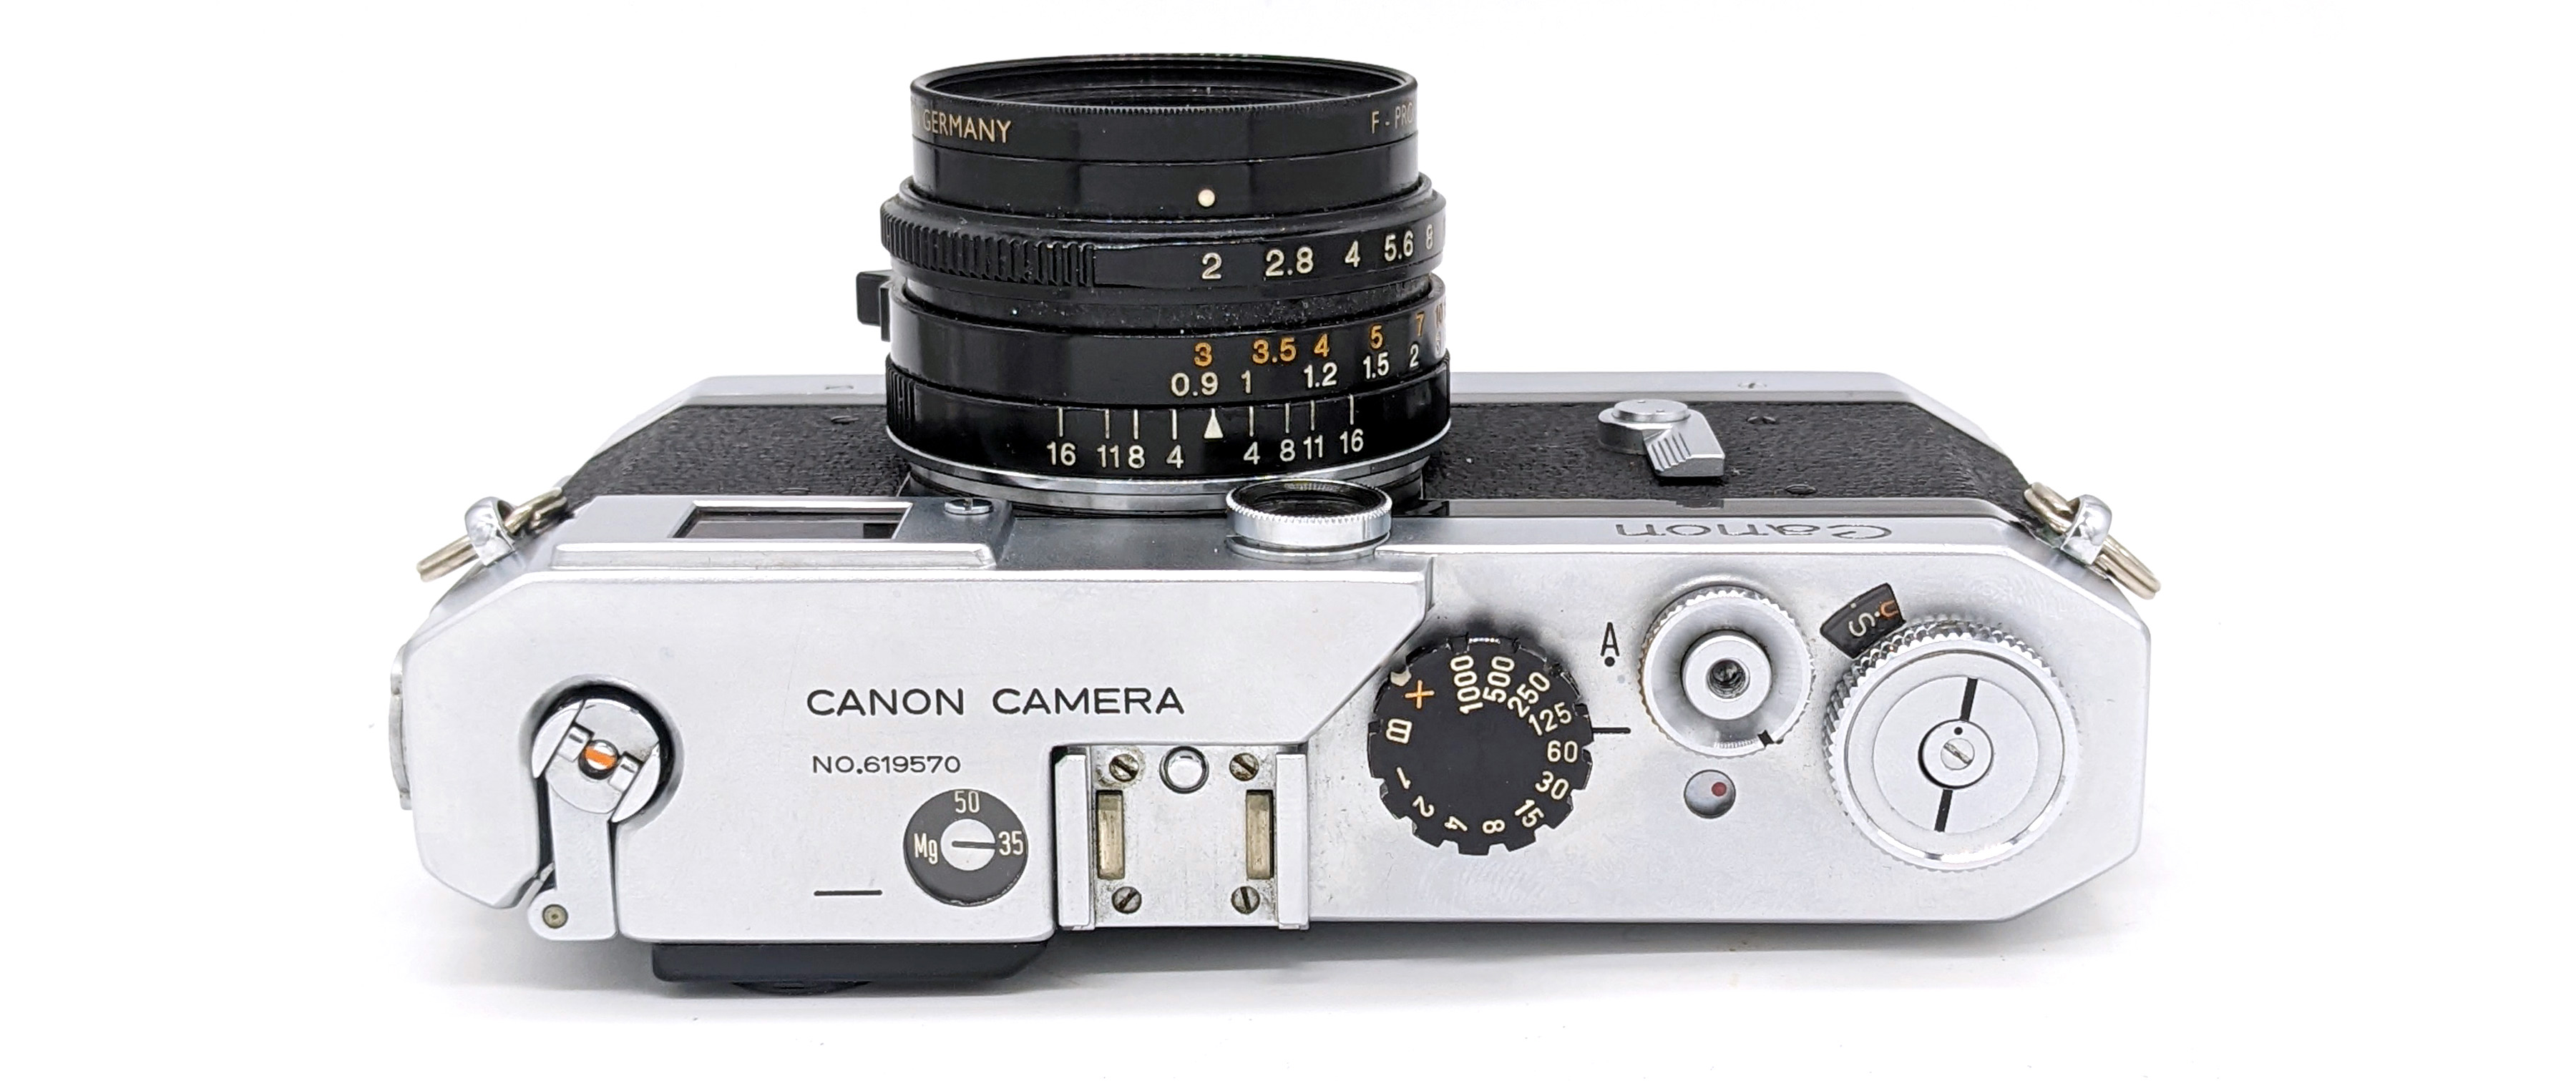
During the autumn of 1958, Canon launched a significant upgrade to the VT line in the forms of the VI-T (trigger advance) and the VI-L (lever advance). The VI was usually bundled with either the 50mm f/1.2 or 50mm f/1.8 lenses. By 1959, these models were selling for about $220 with a Canon 50mm f/1.8 lens (around $2,100 in today’s dollars), less than the $280 price for an M3 body (@ $2,600). Retaining the VT’s rotating viewfinder (0.65x, 1.00x, and 1.55x) while adding parallax-corrected framelines for 50mm and 100mm lenses, the VI series also combined the shutter speeds into a single dial. The VI-T had a built-in trigger advance, where Leica required the expensive “Leicavit” accessory. The VI series had swing-back loading, while Leica continued with its bottom-loading. The VI series also provided a demagnified view for 35mm lenses, whereas the M3 required specialized “goggled” lenses.
Despite being the most advanced Canon M39 rangefinder to date, it does not appear that the VI-T or the VI-L received much fanfare in North America. Maybe the 1958 worldwide recession had hit a little too hard, maybe the public did not see any meaningful differences between the V and the VI, and/or maybe the 35mm camera market at the time was just too overloaded. In any event, the fact that only about 19,000 examples of the VI series were produced between 1958 and 1961 explains why they are relatively rare cameras today.
Canon’s final stab at the V/VI platform was the 1959 economy model, the lever-wind “Populaire.” Most likely meant to compete with the Nikon S3, the P has a parallax-corrected, cluttered, but life-sized for 35mm lenses, viewfinder with fixed 35/50/100 framelines. Despite its slimmed-down specifications, the P was successful commercially, selling more than four times as many units as the VI series.
To be sure, during the last gasps of the Barnack era, several other Japanese manufacturers followed Canon’s lead and attempted to introduce combined viewfinder/rangefinder 35mm M39 cameras, with none of them being produced in significant quantity. These models include the Yashica YF, Leotax G, Honor SL, and Tanack V3 and VP. Most of these models are expensive collectors’ items today and in terms of features have really nothing over the Canon V or VI.
By the early 1960s, Canon was the last major, non-Eastern-bloc maker of M39 lenses. Nikon halted production of M39 lenses by early 1960s. Leica continued to make a limited number of M39 versions of some of its M lenses until about 1963, most likely to accommodate the run of its IIIg model. Although the quality of Canon’s M39 lenses varied, it did have a few winners, like the 50mm f/1.4 II, the 25mm f/3.5, the 85mm f/1.8, and the 100mm f/2 and f/3.5. Canon’s last “new” M39 lens would be its “pretty good” 1962 35mm f/2. I think the later Canon rangefinder lenses are fairly capable, but I just do not like the ergonomics of most of them. None of them could natively focus below 1.00m.
With much of the the attention focused these days on the easy-to-find and relatively-cheap VT (and its variants), P, and later 7 series, the VI appears to be a bit under-appreciated. With the VI being relatively rare and increasingly pricey, let’s take a closer look at its strengths and weaknesses and whether it can offer us a pleasant and useful rangefinder experience in the 21st century.
Specifications (Compared)
Here are the Leica M3, Leica M2, the Canon VI, the Canon P, and the Canon 7 compared:
M3
M2
VI-T
P
7
Year Introduced
1954
1957
1958
1959
1961
Weight (Body)
580g
560g
645g
650g
622g
Speeds
B, 1 – 1/1000
B, 1 – 1/1000
B, 1 – 1/1000
B, 1 – 1/1000
B, 1 – 1/1000
Shutter
Horizontal Cloth
Horizontal Cloth
Horizontal Metal
Horizontal Metal
Horizontal Metal
Framelines
50/90/135
35/50/90
35 (No Frameline); 50/100
Fixed 35/50/100
Switchable 35/50/85/100/135
Frameline
Projected
Projected
Reflected
Reflected
Projected
Parallax Corrected?
Yes
Yes
Yes
Yes
Yes
VF Mag
0.92x
0.72x
0.65x / 1.00x @ 50mm / 1.55x
1.00x @ 35mm
0.80x
Effective RF Baselength
62.3mm
49.32mm
28.7mm / 41mm / 61.5mm
41mm
47.2mm
Film Loading
Bottom
Bottom
Swing Back
Swing Back
Swing Back
Film Rewind
Knob
Knob
Crank
Crank
Crank
Film Advance
Lever
Lever
Trigger & Knob
Lever
Lever
X Sync
1/50
1/50
1/55
1/55
1/60
Parallax Pin
No
No
Yes
No
No
Functionality
The entirely-mechanical VI-T is a well-built and solid-feeling device that certainly exudes the qualities of a bygone age.
Minimum Focusing Distance: On at least the VI and the P, it appears that both can rangefinder couple down to around 0.7m (or maybe just short of that). This is somewhat interesting as Canon never made an M39 lens that could natively focus more closely than 1.00m. This minimum focus capability comes in handy if you own M39 lenses that can take advantage of close focus. As far as I know, the only classic M39 lenses than could natively focus more closely than 1.00m with rangefinder coupling was the 50mm f/1.4 Nikkor. However, many Voigtlander M39 lenses from the last 20 years can focus down to 0.7m.
Viewfinder: From 1949 until its abandonment of the concept after the VI, Canon really pushed the concept of a three-position rotating viewfinder with different magnifications. In theory, this was an excellent idea; but Canon’s execution of it left something to be desired. While the rangefinder patch is a rather faint circular type, it is fairly easy to use in practice in both daylight and low light. Not as good as Leica Ms but arguably a bit better than Nikon rangefinders.
50/100: The VT’s version of this finder position contains no framelines. Instead of the .92x magnification used on the M3, Canon chose 1.00x (life-sized) for its standard finder position at 50mm. The VI introduced the reflected 50mm and 100mm framelines that were both parallax corrected, which was a significant improvement. Whether you like the 1.00x magnification option would come down to how you prefer to take photos. In theory, this magnification was most effectively used by right-eyed shooters (without glasses) where both eyes could remain open. The visual effect is that the scene appears bright as normal life but you can also focus the rangefinder at the same time. However, a life-sized finder is not so great for left-eyed shooters, especially those with glasses. I prefer the M3 approach of a slight demagnification of the viewfinder that permits full viewing by left-eyed shooters with glasses. Similar to the contemporary Nikon S3, the P’s cluttered viewfinder would abandon the life-sized 50mm view for a life-sized 35mm view.
35: The VI retained the same 35mm viewfinder position from the VT, also with no framelines. For the 35mm focal length, parallax correction is not really necessary. This view has some barrel distortion. With glasses, the 35mm view can be pretty difficult to use.
Magnified: The VI carries over the VT’s magnified view for “critical focus.” This position would ideally be for lenses at 100mm or longer.
Rangefinder Baselength: The 41mm effective rangefinder baselength of the VI is good enough to focus with accuracy the Canon rangefinder lenses of the era. However, Nikon and Leica rangefinders both had longer effective rangefinder baselengths. Even the magnified view position of the VI (1.55x) in theory was not as accurate as the M3’s standard viewfinder at 50mm. The 7 would improve this somewhat to 47mm. The circular rangefinder patch itself is not as bright or distinct as in a Leica M, but to me it is better than Nikon rangefinders. At the 35mm position, the 28.7mm effective baselength is adequate for that wider focal length.
Shutter Speeds: The VI was the first Canon M39 rangefinder with a single shutter speed dial with equal spacing between speeds. The 1 sec to 1/1000 was par for the course for the era.
Shutter: Canon switched from cloth to metal shutter curtains with the 1958 VL and continued with this type of shutter through the 7 series. Canon’s metal rangefinder shutters have generally held up well over the decades, despite sometimes becoming crinkled from nosey fingers. The sound of the shutter is muted and pleasant.
Film Loading: The VI series employs a modern swingback film loading system with a door key on the bottom plate and a door latch at the bottom of the hinge. The film loading is performed by lifting up the rewind crank, inserting the film, lifting up the advance knob activated by a button the back of the body, and then slowly turning the knob so that the film spools on the takeup. Reset the knob, close the back, and then turn the bottom key to lock.
Film Advance: On a VI-T, advancing the film can occur in two separate ways: via the bottom fold in trigger or by engaging the advance knob and turning it until it stops. The single-stroke trigger advance is somewhat unusual but pretty great once you get the hang of it. When not in use, it folds into the bottom plate of the camera.
Film Rewinding: The film is rewound by by switching the ring around the shutter button to “*” and then rewinding the crank.
Flash Sync: The VI carried over the X-flash sync speed from the VT at 1/55. The flash sync terminal is on the side of the camera and will require the appropriate PC cable if a modern electronic flash is used.
Automatic Parallax Correction Viewfinders: One of Canon’s most innovative contributions to rangefinder technology was to create a mechanical linkage between the camera and an accessory viewfinder to automatically correct parallax error. Other manufacturers’ viewfinders would require dialing in the focus distance to the viewfinder while others had no parallax correction at all. While this system was abandoned after the VI, no other manufacturer had something like this. This capability is best suited for the use of 50mm and telephoto lenses, where parallax error can be significant, especially at closer focusing distances.
Self-Timer: The VI has a standard front switch for self-timing needs.
Double Exposures: The VI has a fairly complicated way of taking double exposures, which involves releasing the film advance, manually rewinding the film rewind crank, relocking the film advance and then advancing the film transport knob.
Accessories
Coupled Selenium Meter: Compatible only with the VI series and the P, Canon produced a shoe-mount selenium light meter that coupled directly to the shutter speed dial. Unlike most selenium meters from the time, it appears that a fair number of examples out there still work. The meter also had an accessory “incident” metering attachment as well as a “booster” for lower-light situations. To ease access to the rewind crank, Canon introduced a second version that allowed the light meter unit to pivot from the shoe mount.
Case: The VI had a two-part leather case. Using the bottom half of the case, while blocking the loading and unloading of the film, is a good idea to protect the body from unnecessary scratches.
Camera Holder: Canon offered a bracket for the VI that permitted easier operation on a tripod.
Accessory Finders: With the V and VI series, Canon’s contemporary accessory viewfinders would permit automatic parallax correction through a mechanical linkage on the hot shoe. The most interesting Canon viewfinder is the (expensive) “Twin Turret” that provided two lenses that could cover the 21-135mm range.
Pistol Grip: The V and VI could theoretically benefit from the “Pistol Grip” mounted to the tripod socket that permitted an alternate way to hold the body and utilize the trigger wind. This seems to be a rare OEM accessory.
Diopters: Perhaps the rarest rangefinder accessories of all time, Canon apparently produced a series of removable viewfinder diopters for eyesight correction so that shots can be taken without glasses. So far, very few people have actually seen one. This would be a great candidate for reproduction by some budding camera entrepreneur.
Conclusions
Given the VI’s unique design, it is somewhat difficult to make direct comparisons to other contemporary products. The VI is overall better than any Barnack camera, all Canon rangefinders that came before it, and the P. The P substitutes a more useable 35mm view for a more cluttered viewfinder. Against the 7, it is a difficult comparison. The bigger, more advanced, but not as ruggedly-built 7 adopted the Leica M philosophy of having a single viewfinder magnification with rotating projected framelines for the common focal lengths. The lower viewfinder magnification pretty much eliminated the “life-sized” right-eyed shooting technique and thus is better for those wearing glasses. The built-in, uncoupled meters on the 7 and 7s models really offer no real world advantage over using a modern shoe-mounted meter. However, the spirit of the 7 did live on with the Voigtlander Bessa M and M39 cameras. that also chose to use a switchable projected framelines system, rather than the rotating viewfinder of the V/VI. If you are shooting mostly 35/50/100, whether you prefer the 7 or the VI would come down to personal preferences.
Against the M3, the VI has a hard time. The M3 has a better viewfinder that is more resistant to flaring, a more distinct rangefinder patch, and its effective rangefinder baselength is longer at 50mm than the VI-T’s “magnified” focus setting at 1.55x magnification. However, in terms of everything else about these cameras, they function pretty much the same. The Ms and the VI-T have the same shutter speeds and similar flash sync speeds. Over the M3, the VI-T has easier film loading, faster film rewinding, a trigger film advance for faster shooting, a native ability to use 35mm lenses, and an accessory pin that allows automatic parallax correction with certain Canon viewfinders. Despite any perceived advantages, whether you would think that the M3 would simply blow a camera like the VI out of the water will probably come down again to your personal preferences and maybe wallet size.
At the end of the day, the VI remains arguably Canon’s crowning achievement in rangefinder camera design. With not many produced, a VI in serviceable condition can be a little hard to find. Because most of these cameras have been sitting on shelfs and in closets for decades, before taking one out, I would recommend a good viewfinder cleaning and a once-over on the shutter speeds and rangefinder alignment. Once working properly, these types of cameras could last forever with care and proper maintenance.
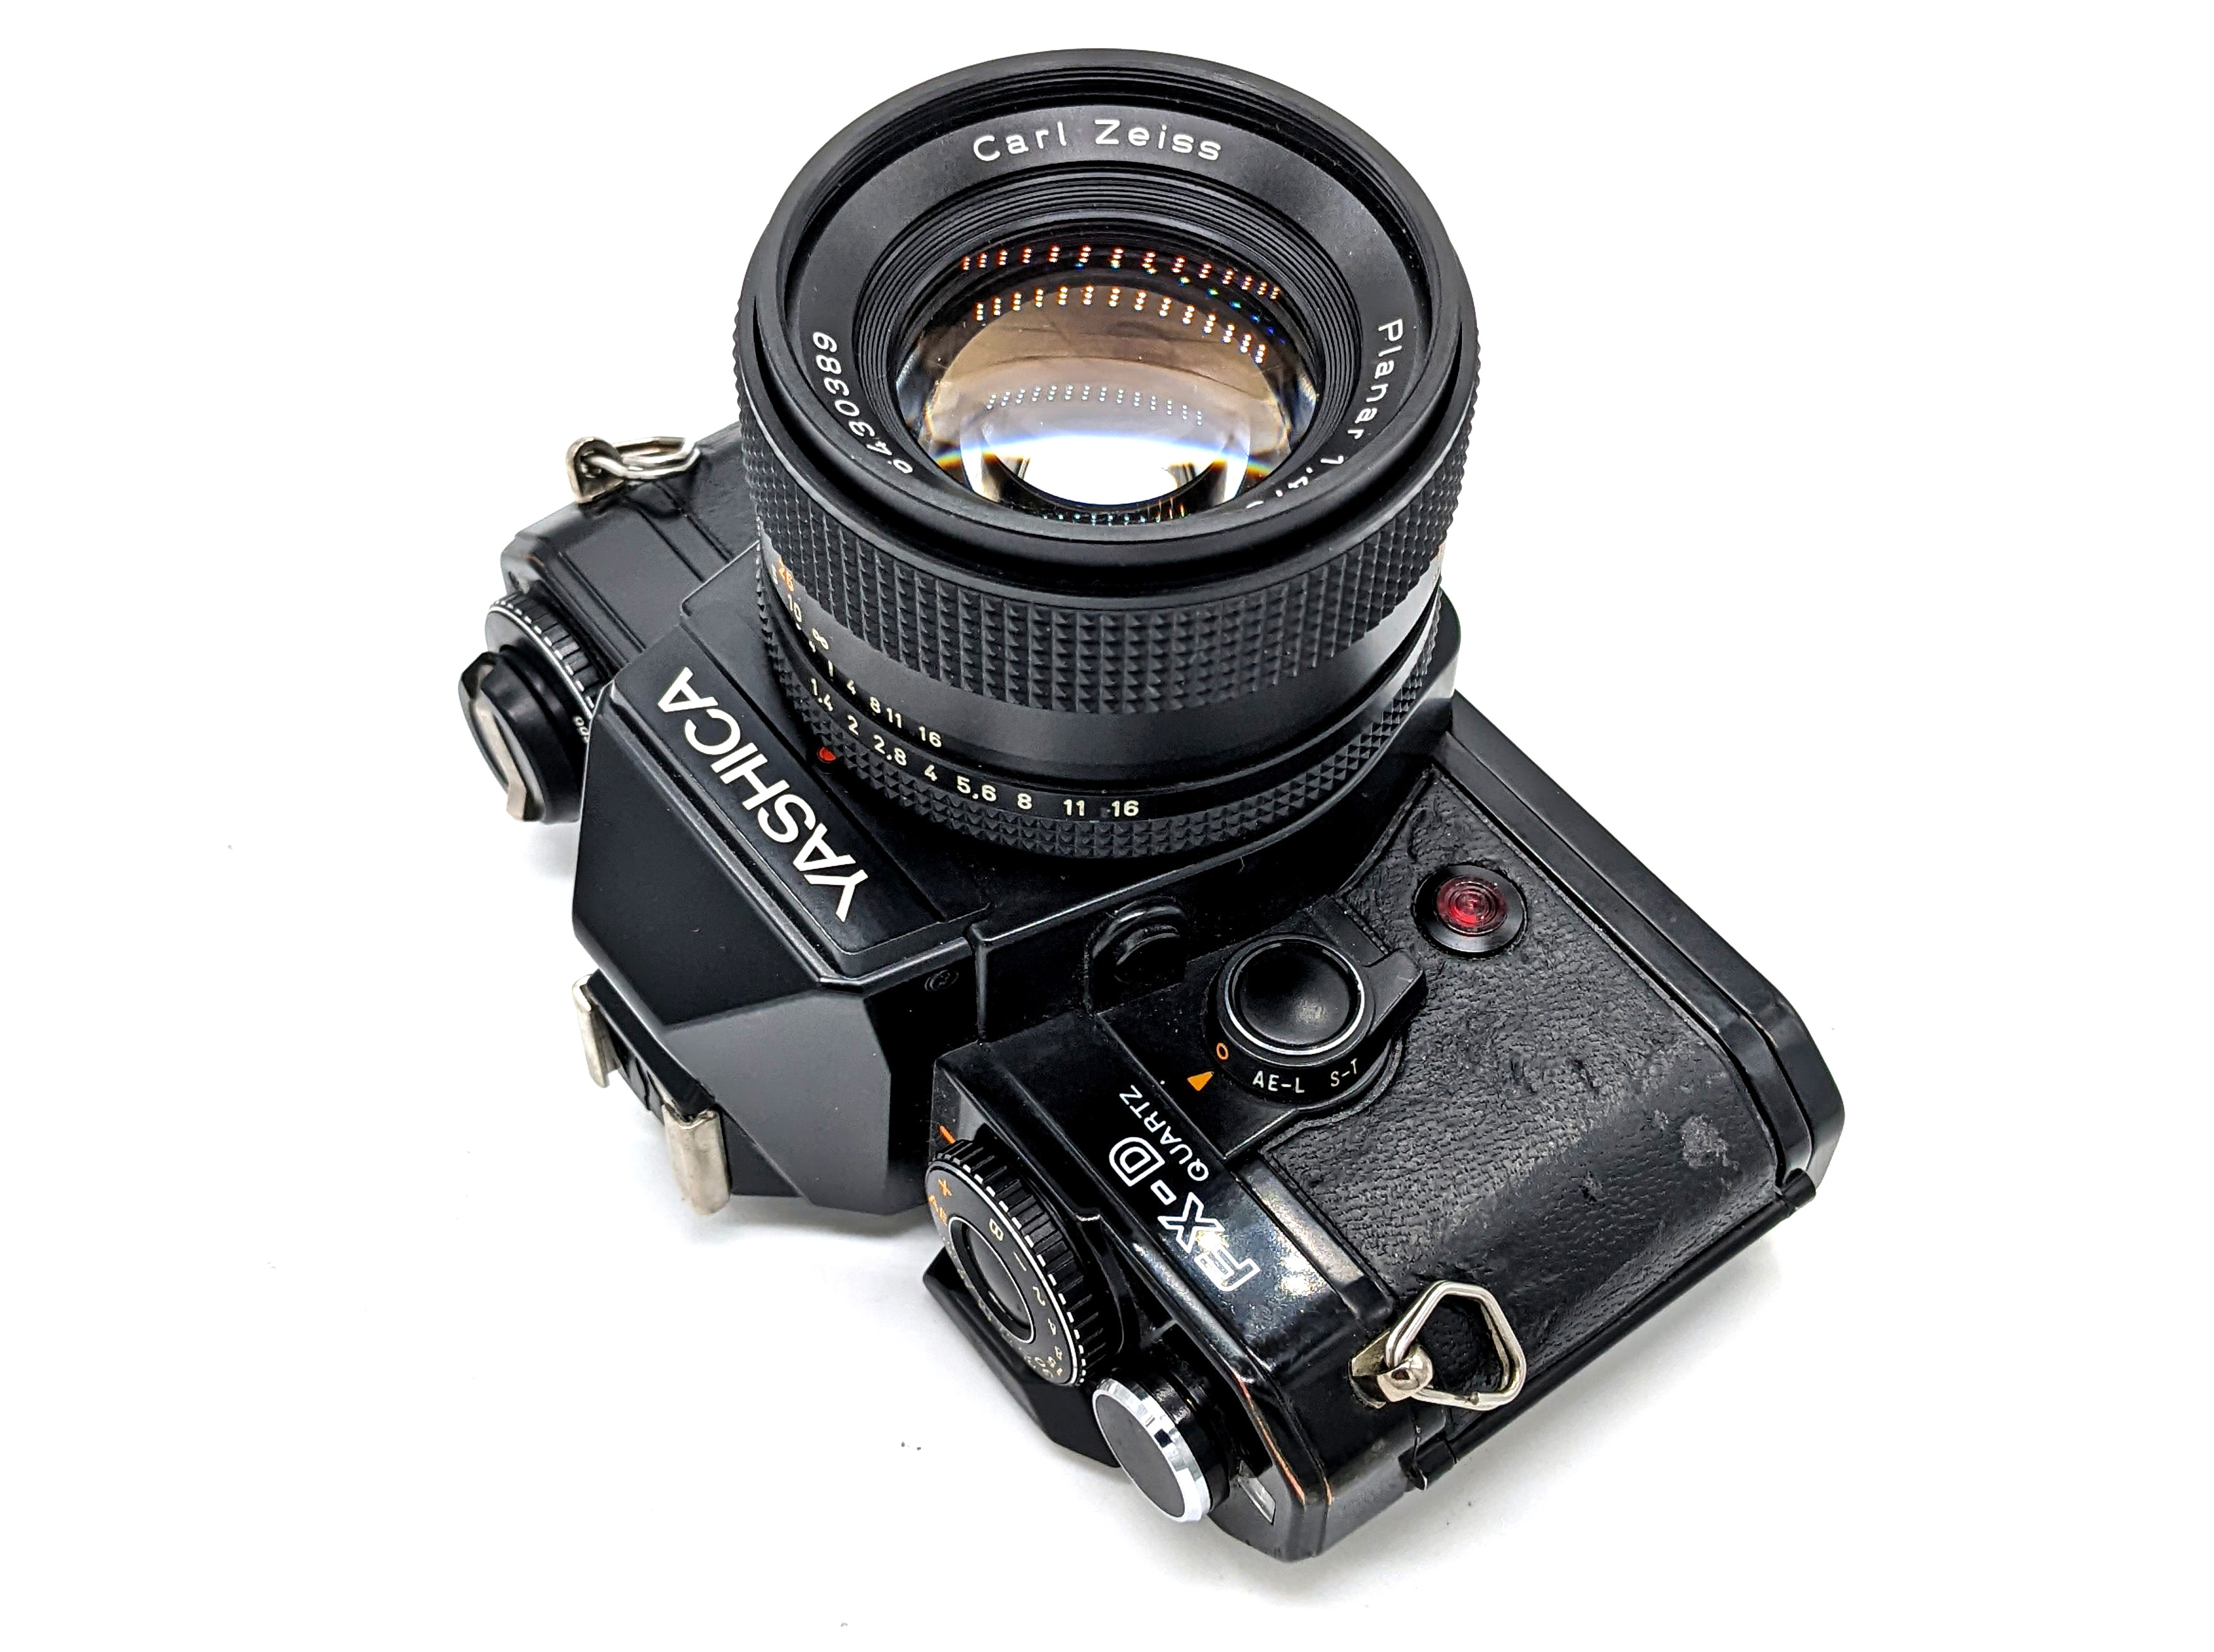
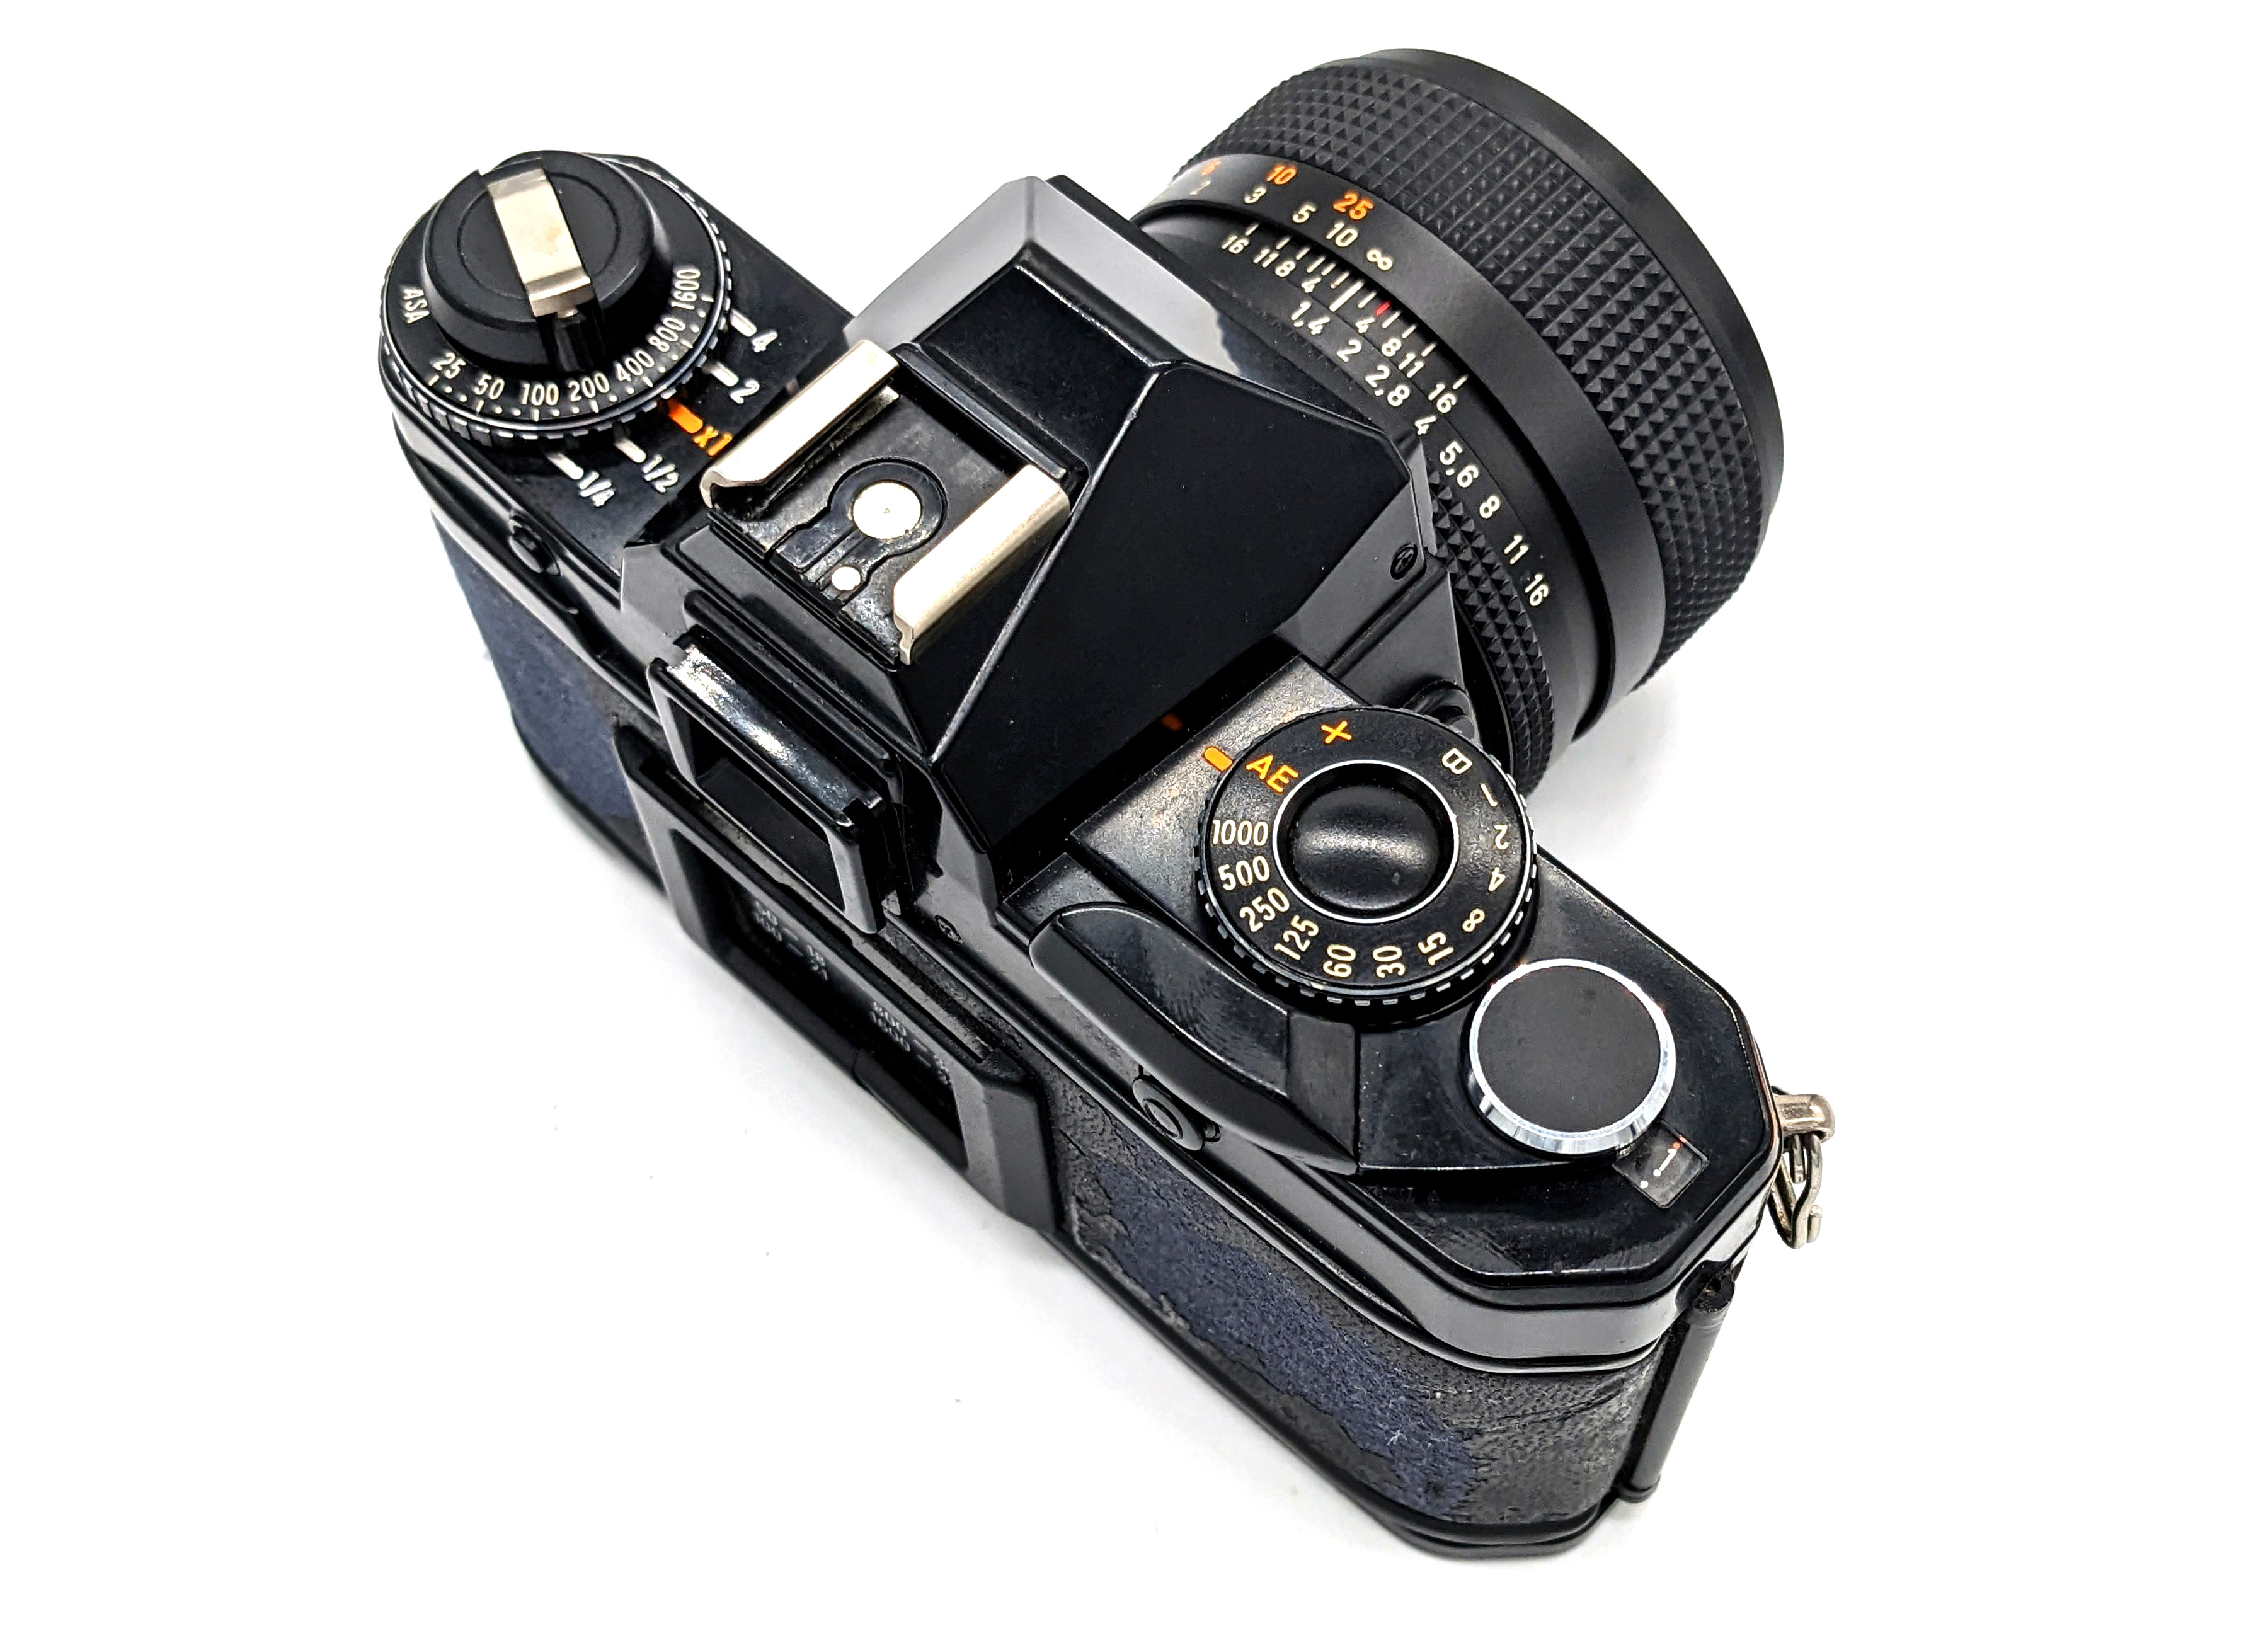
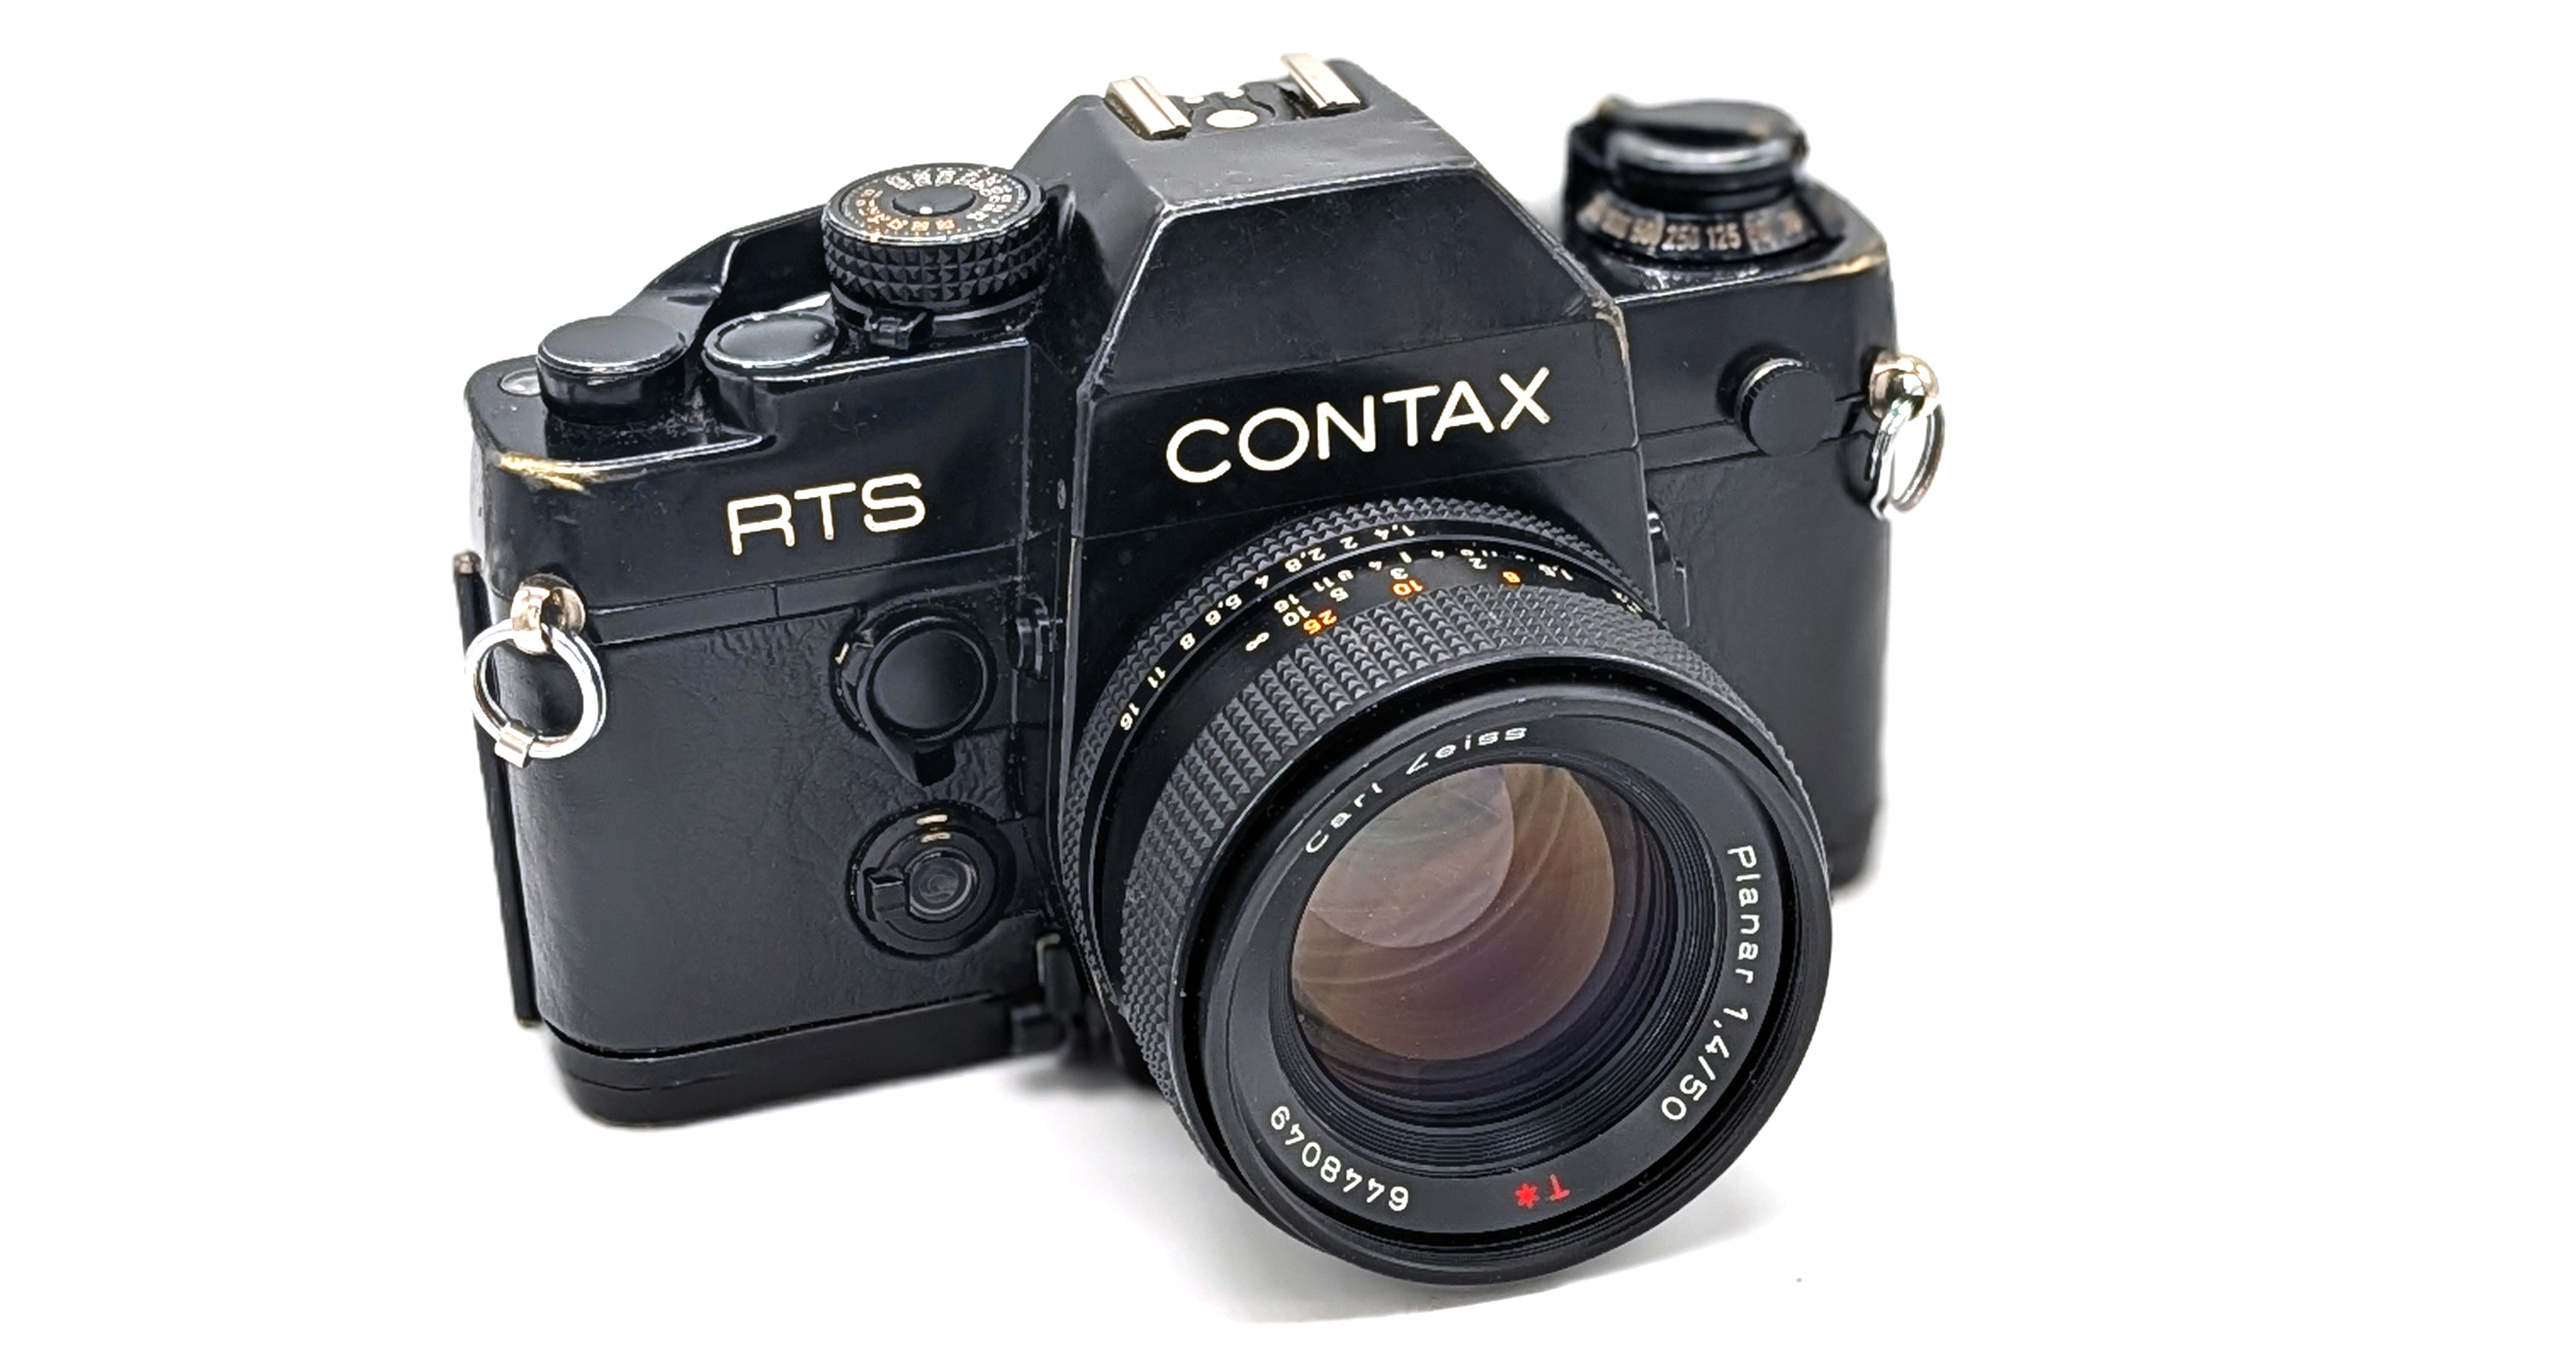
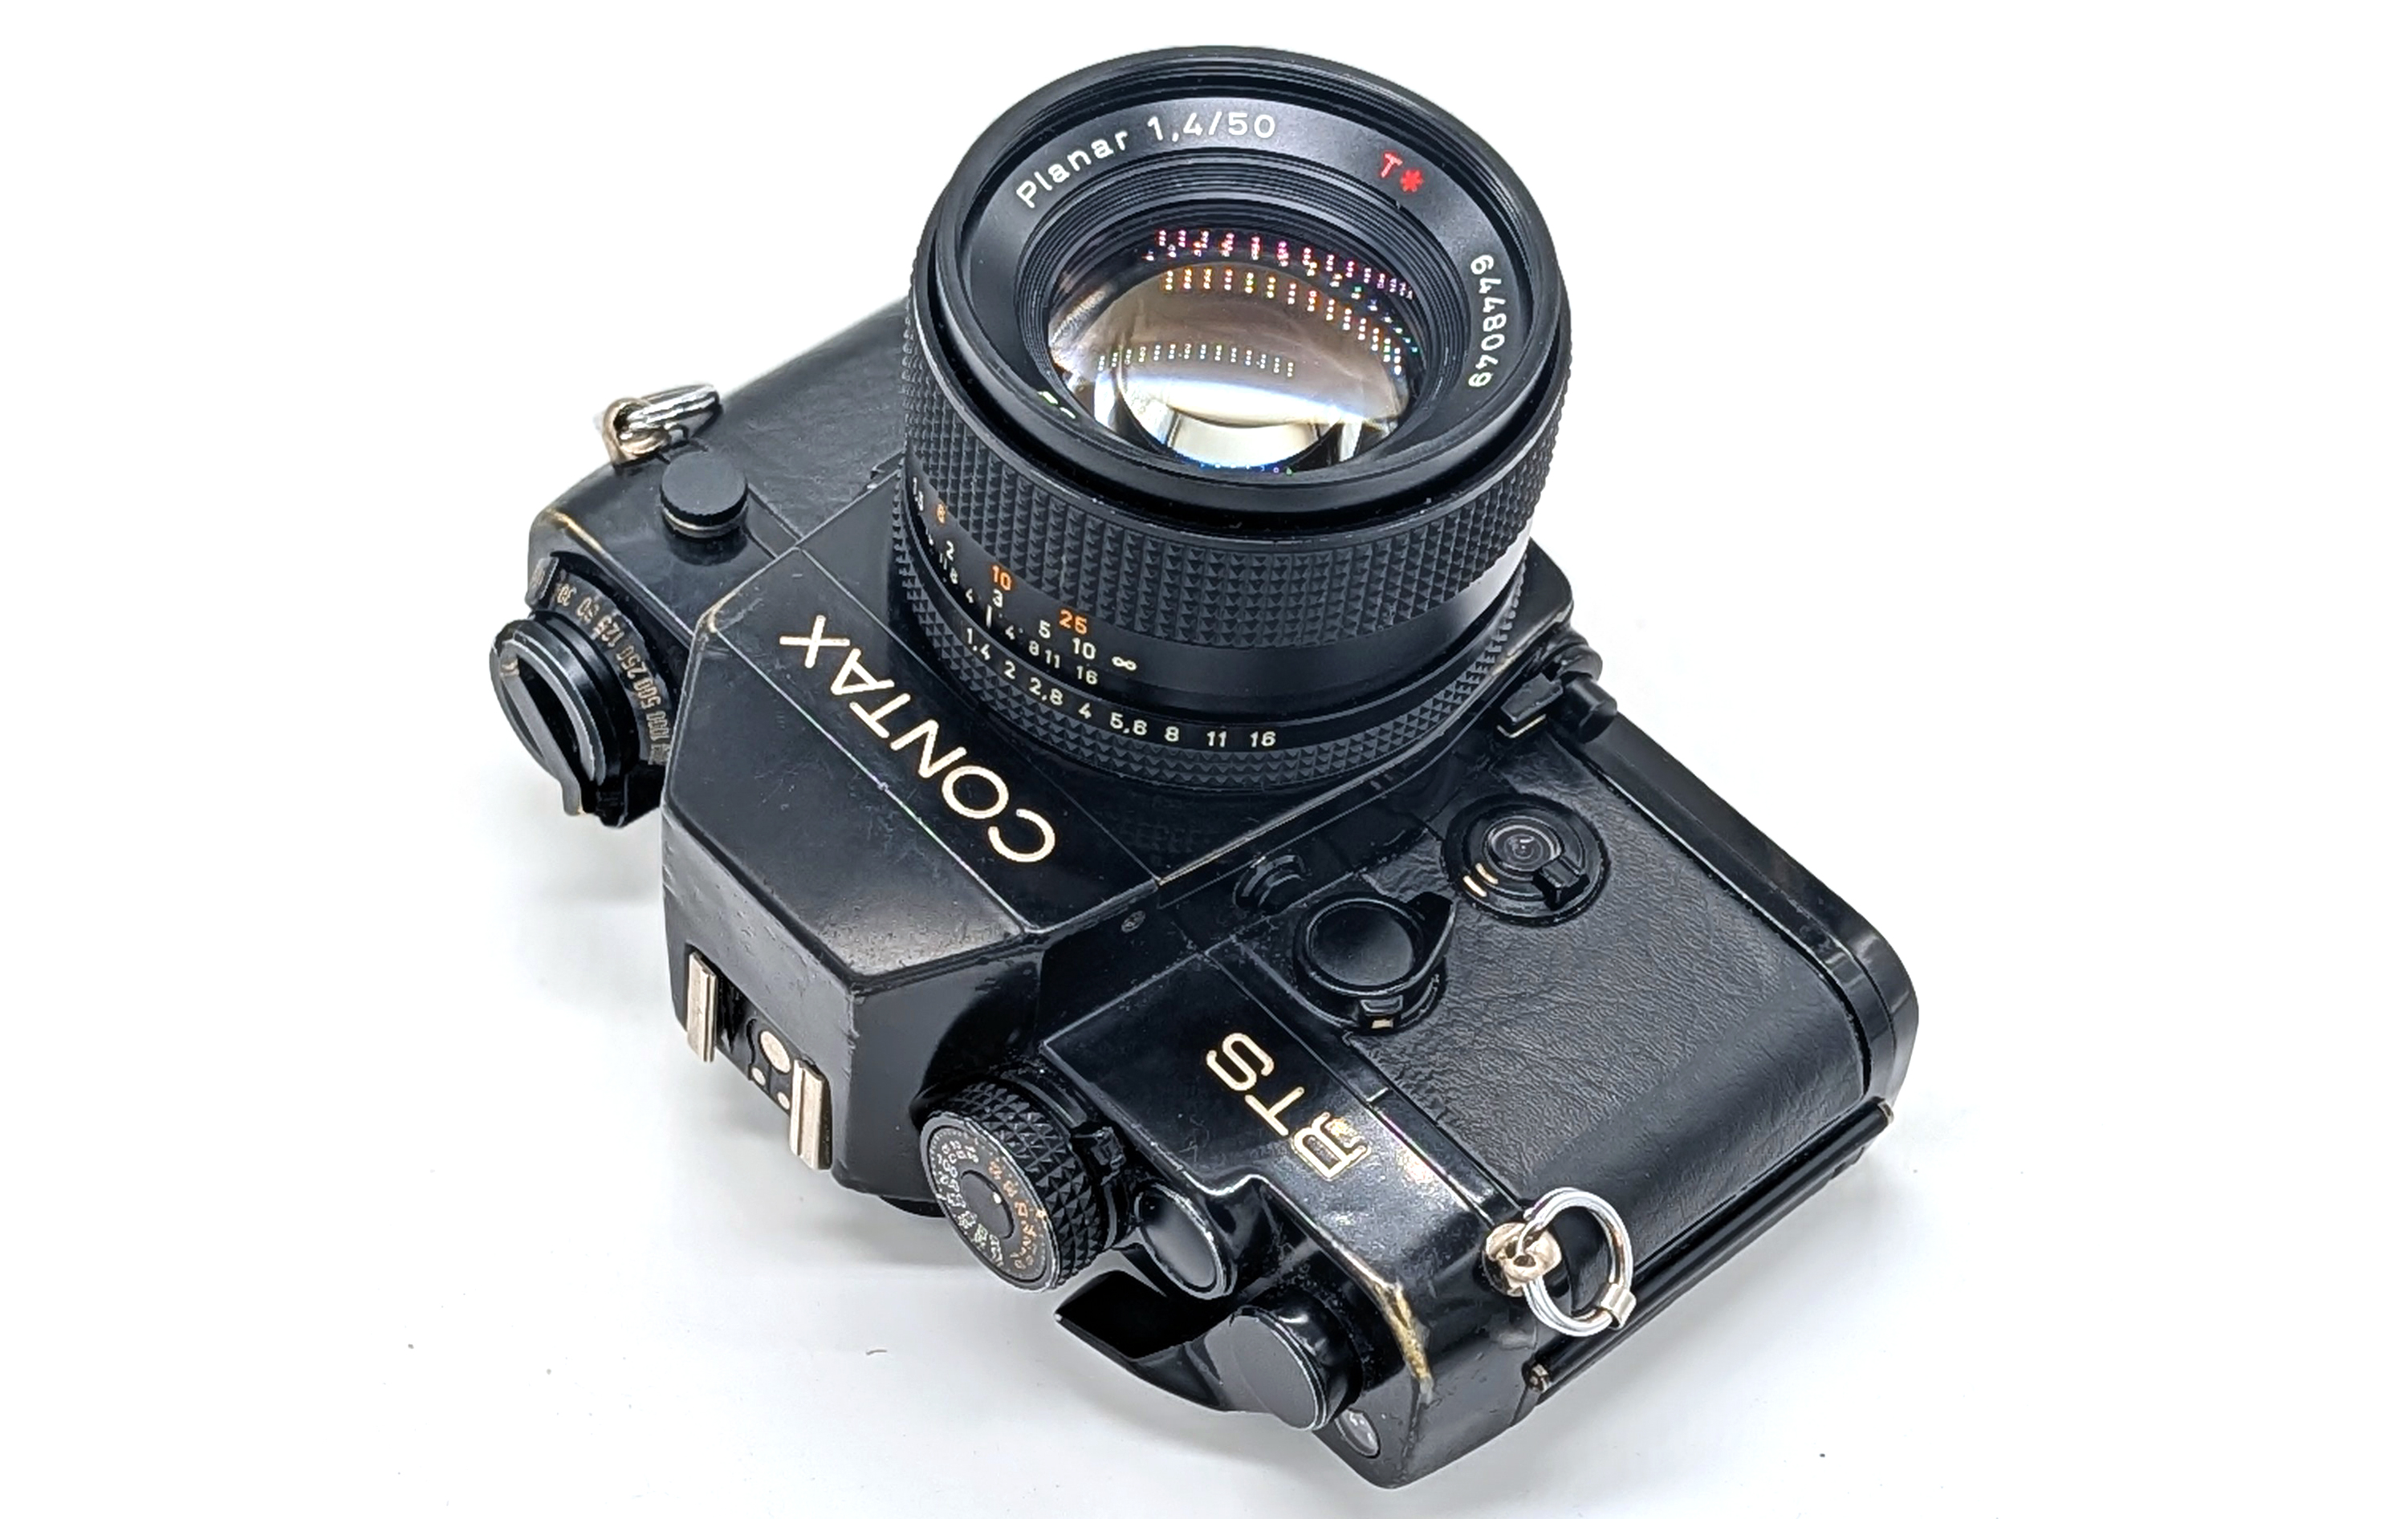
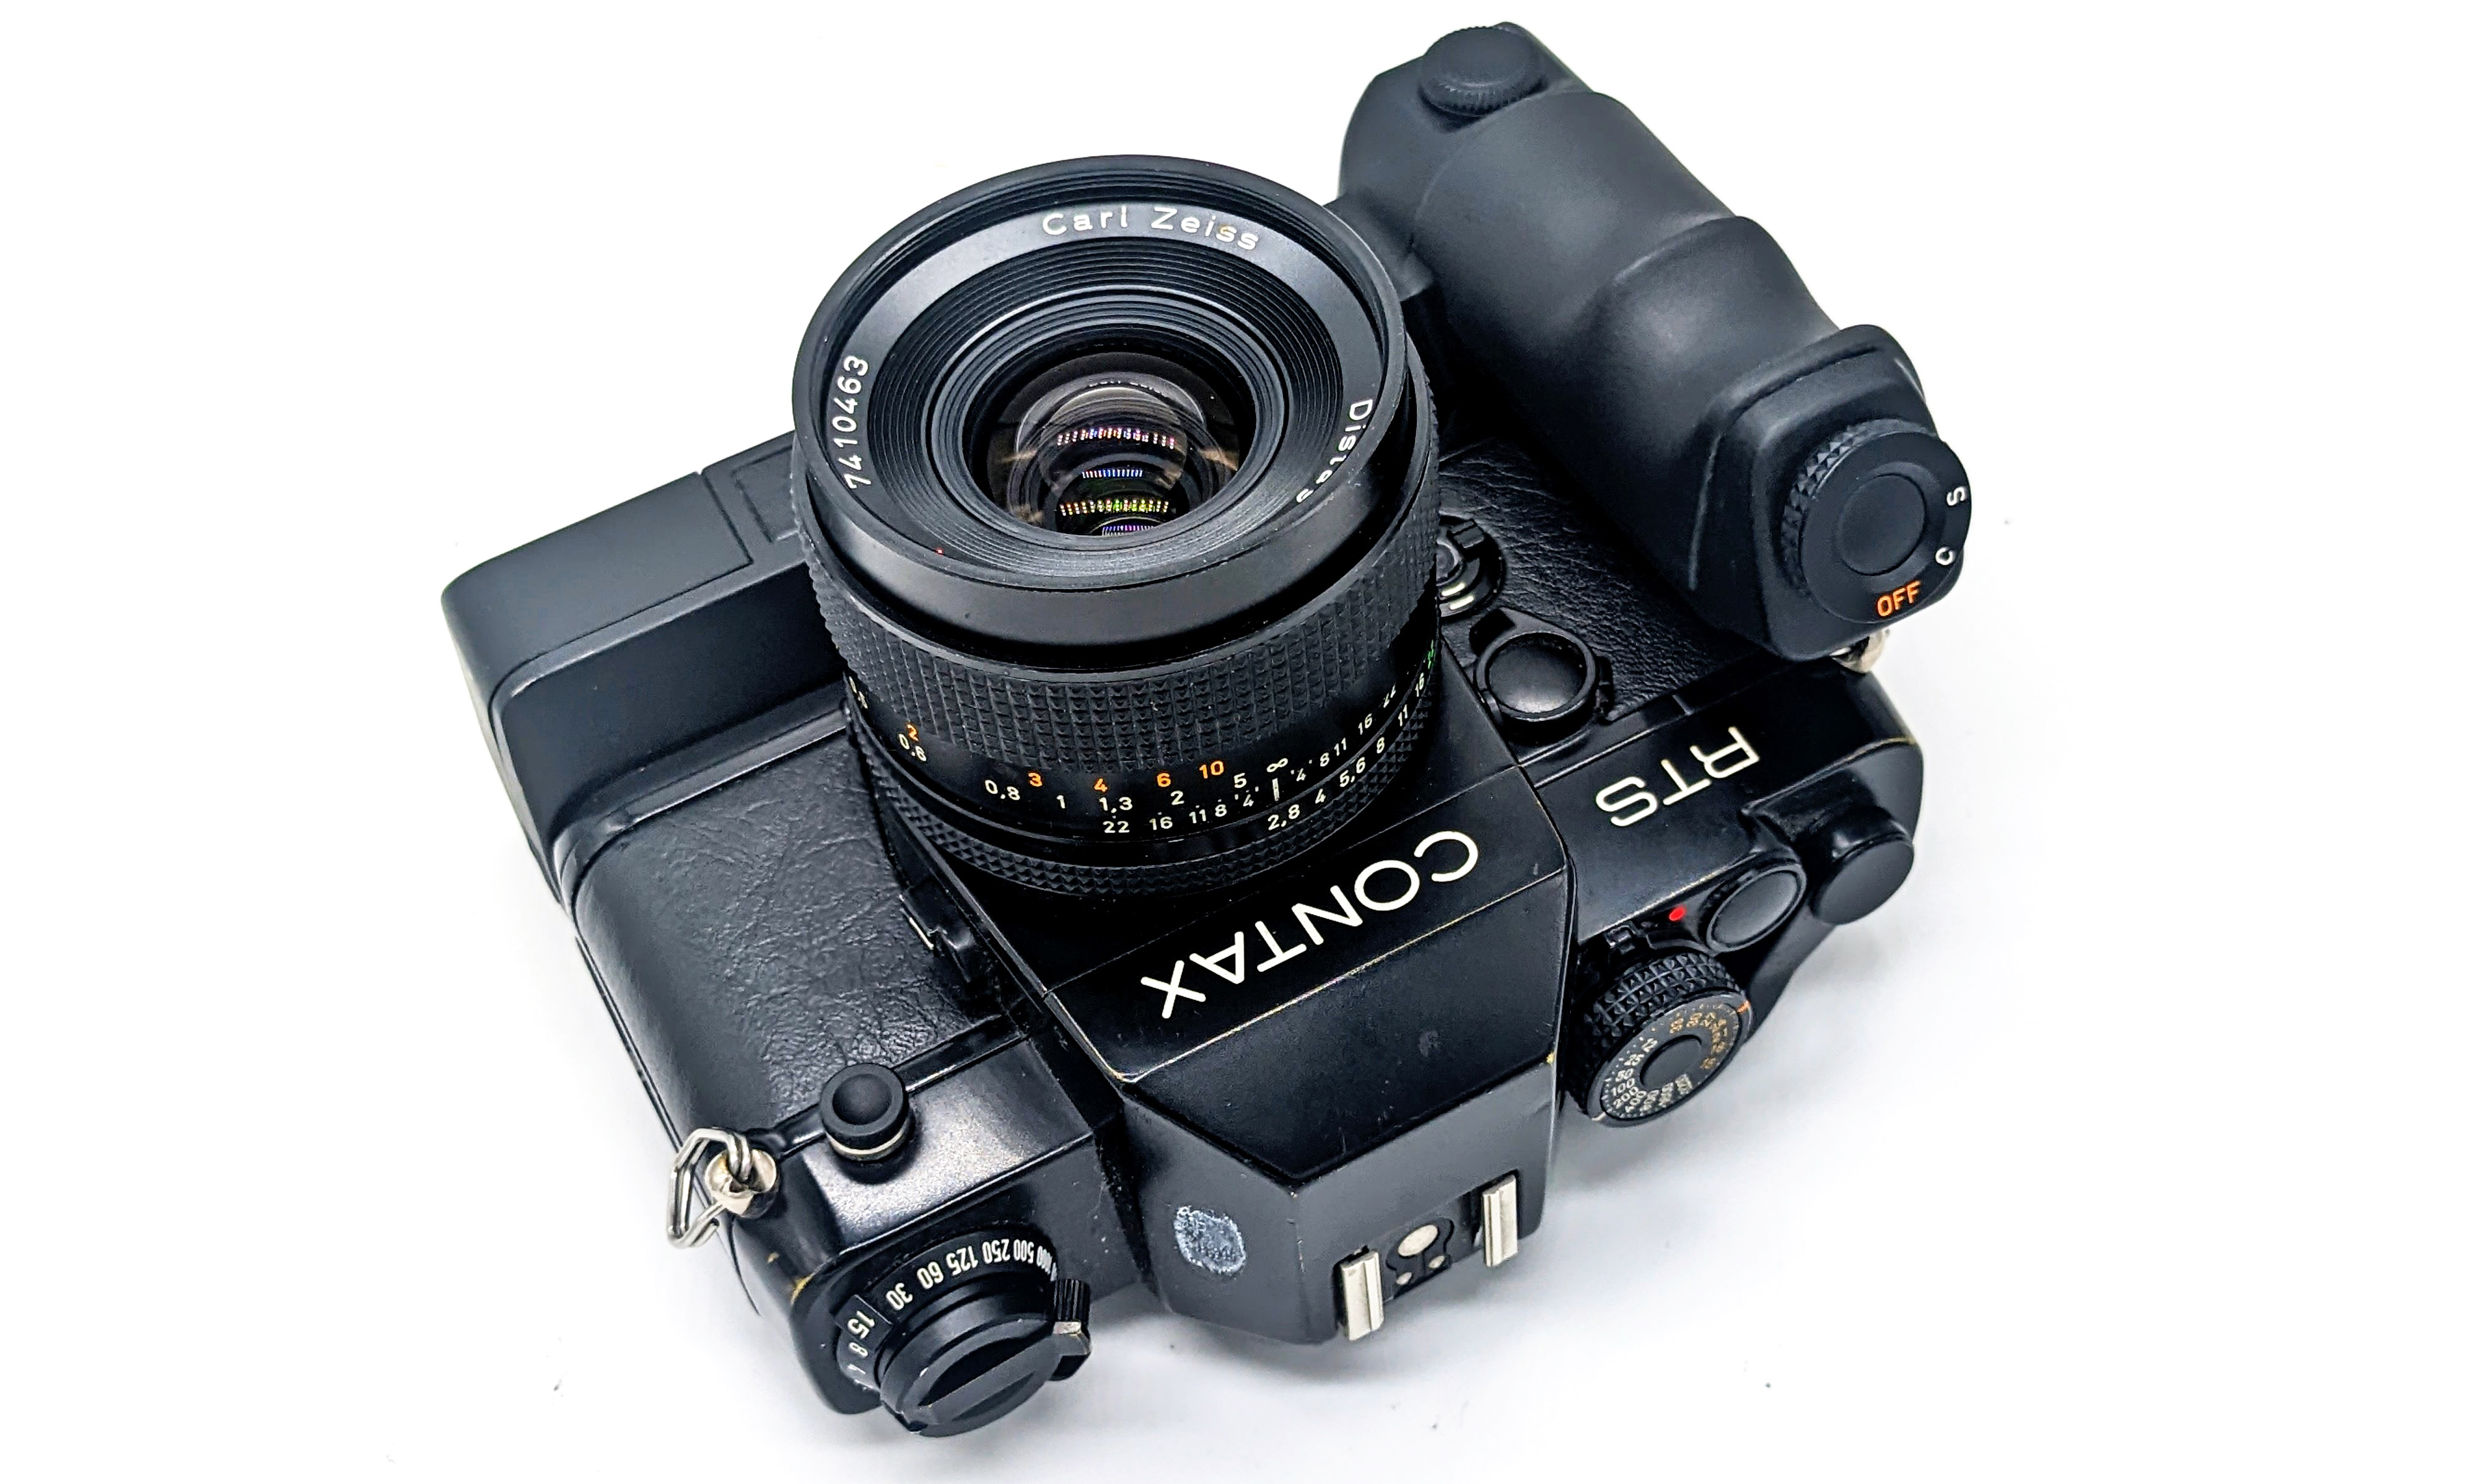
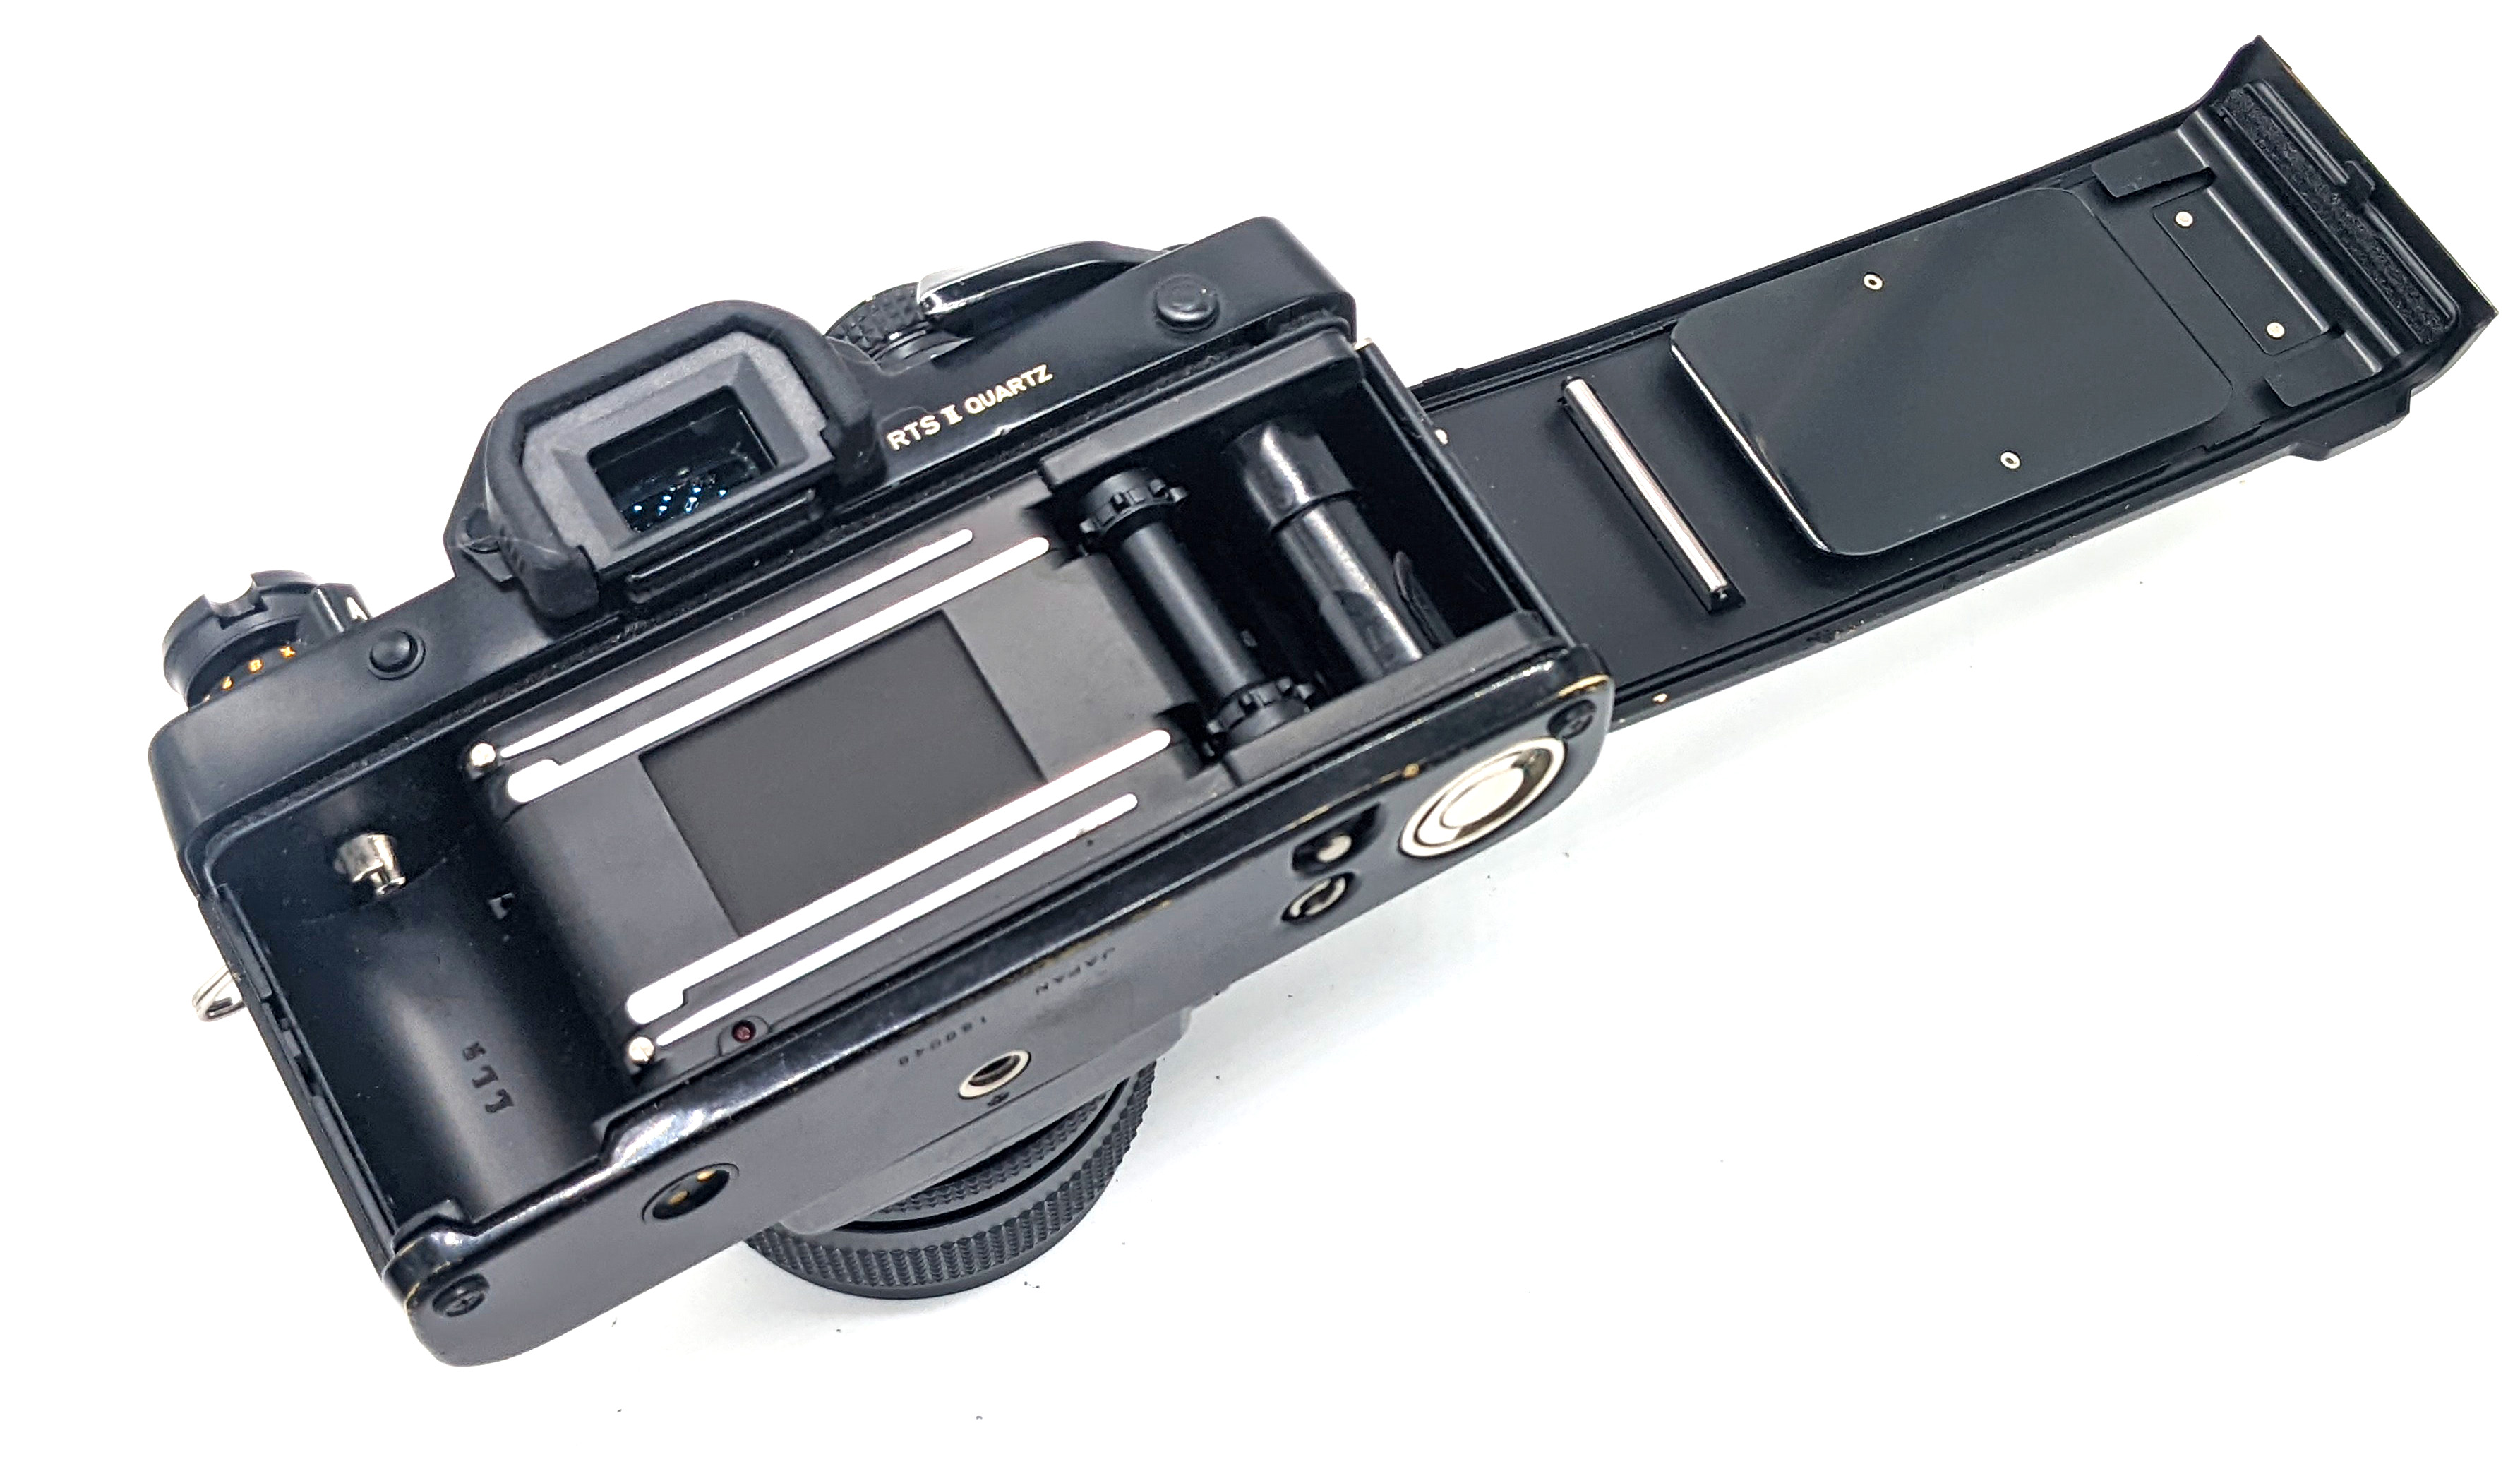
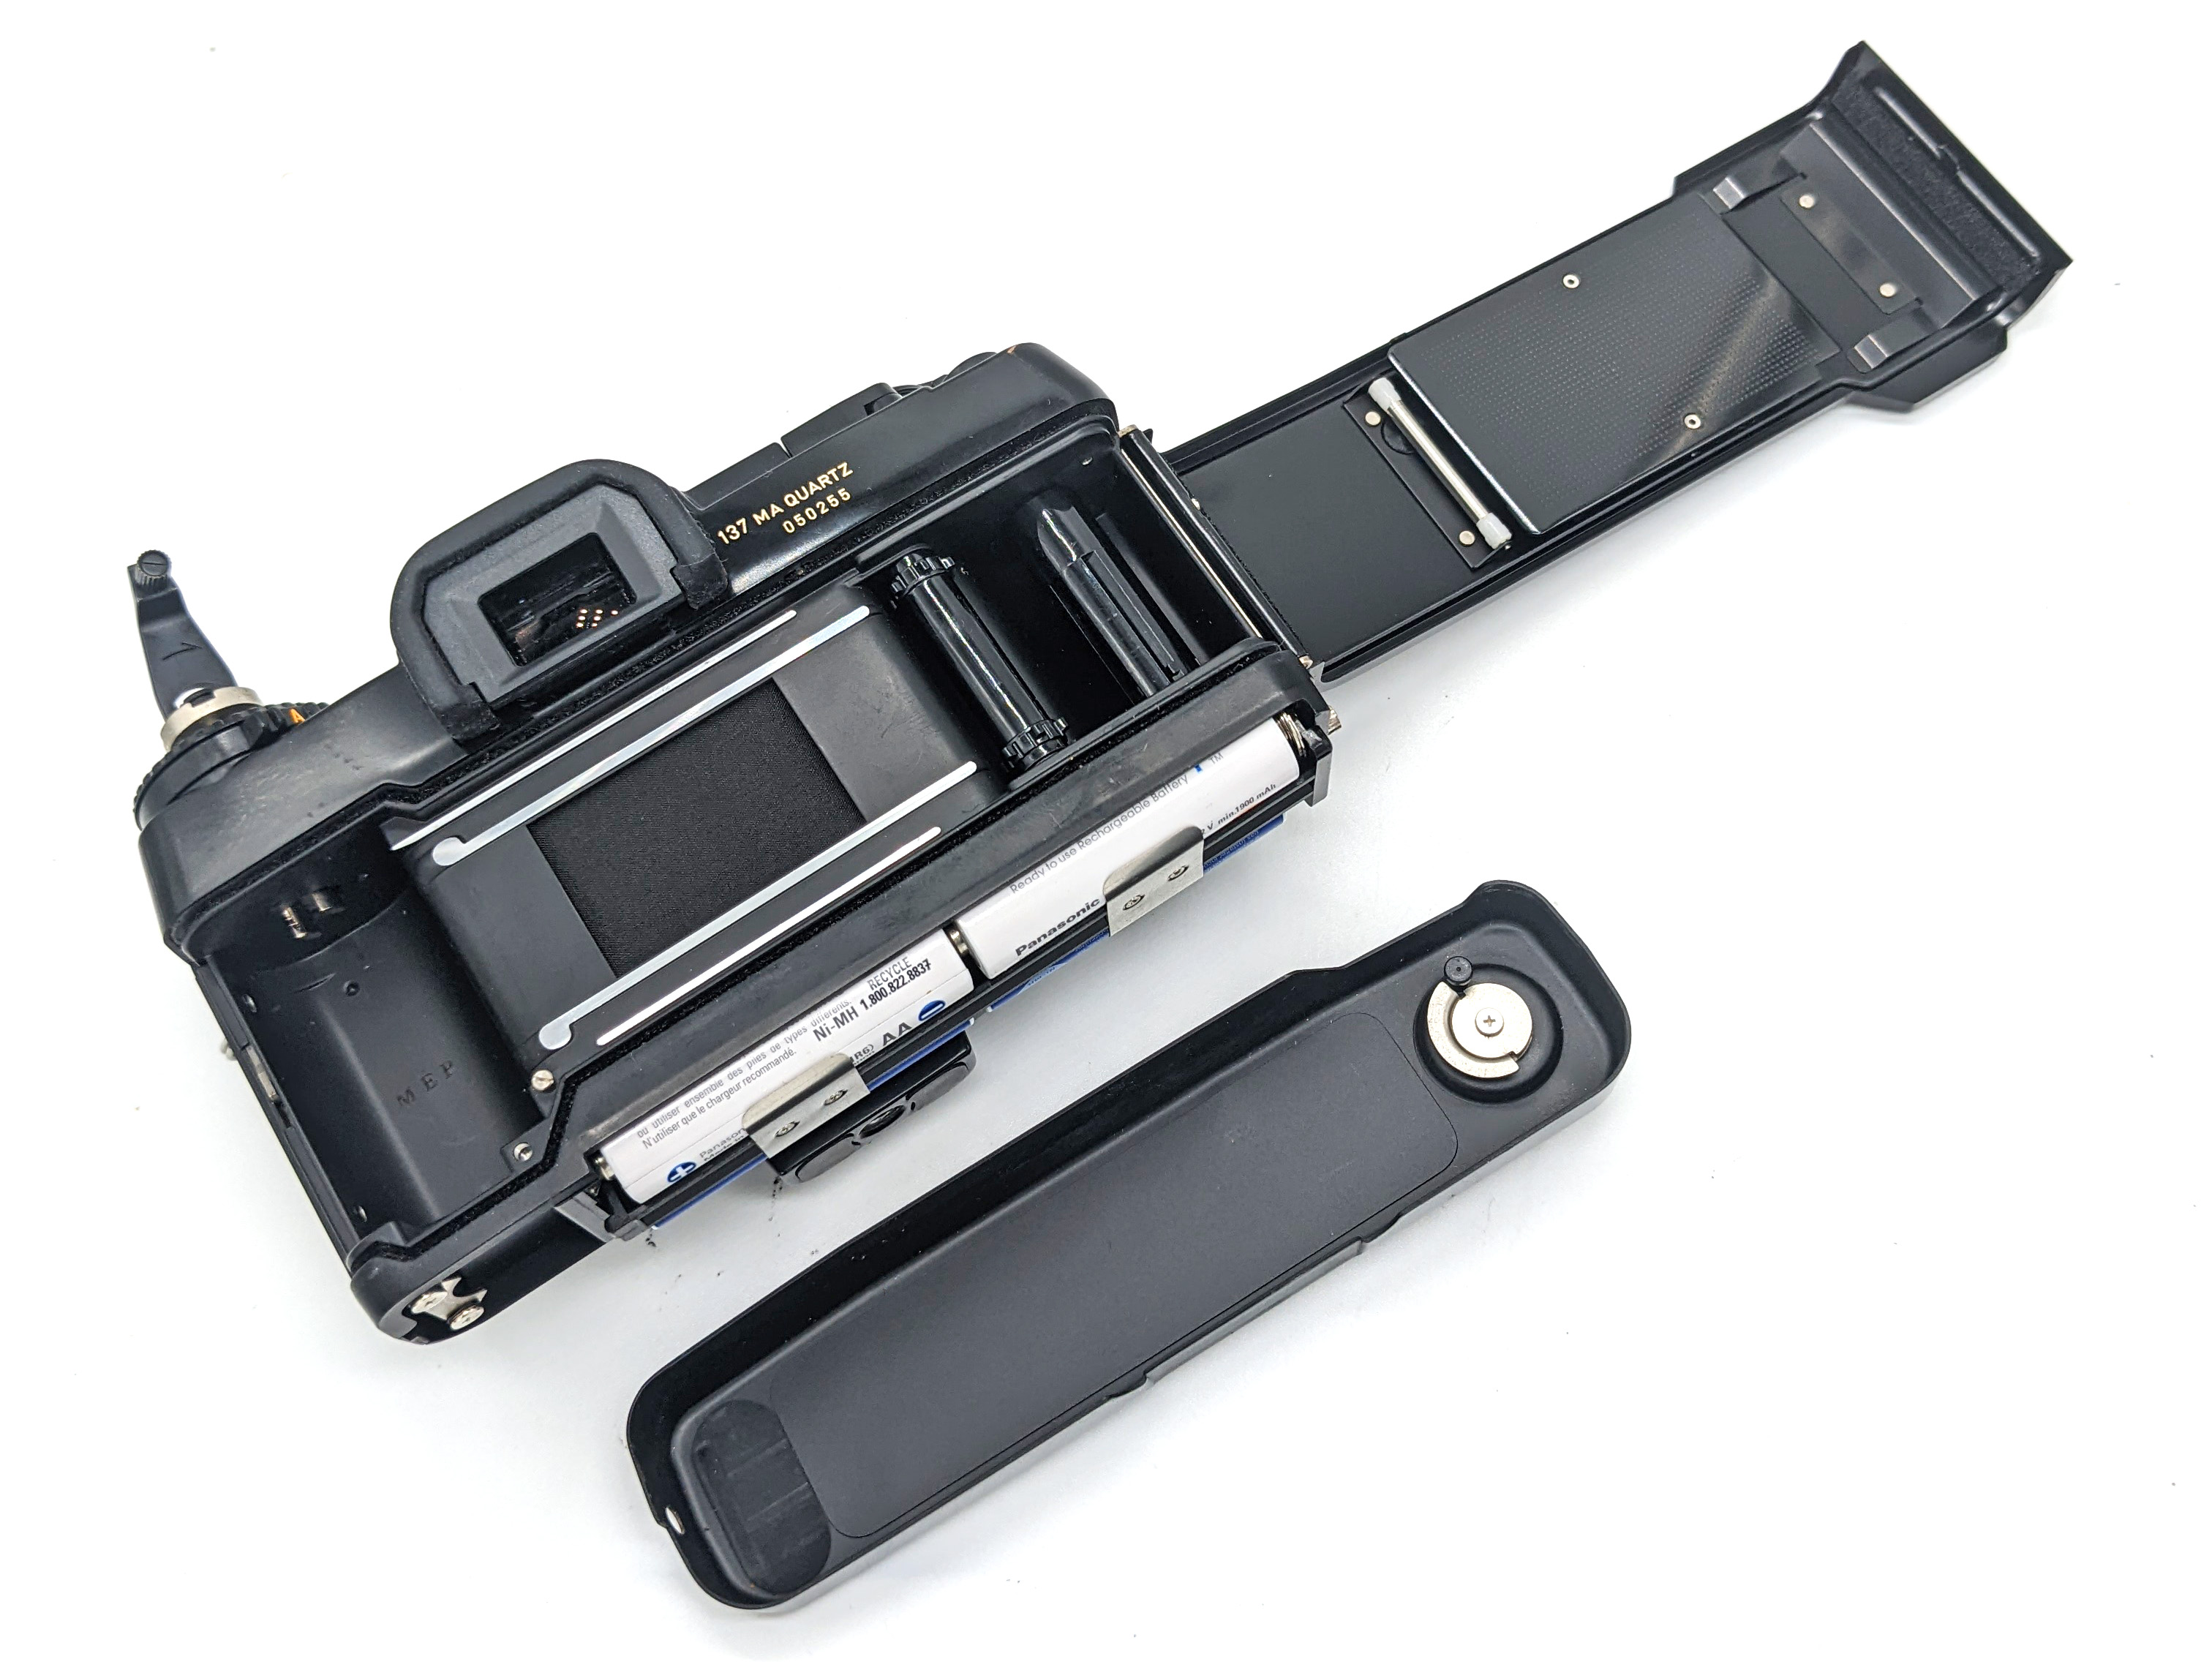
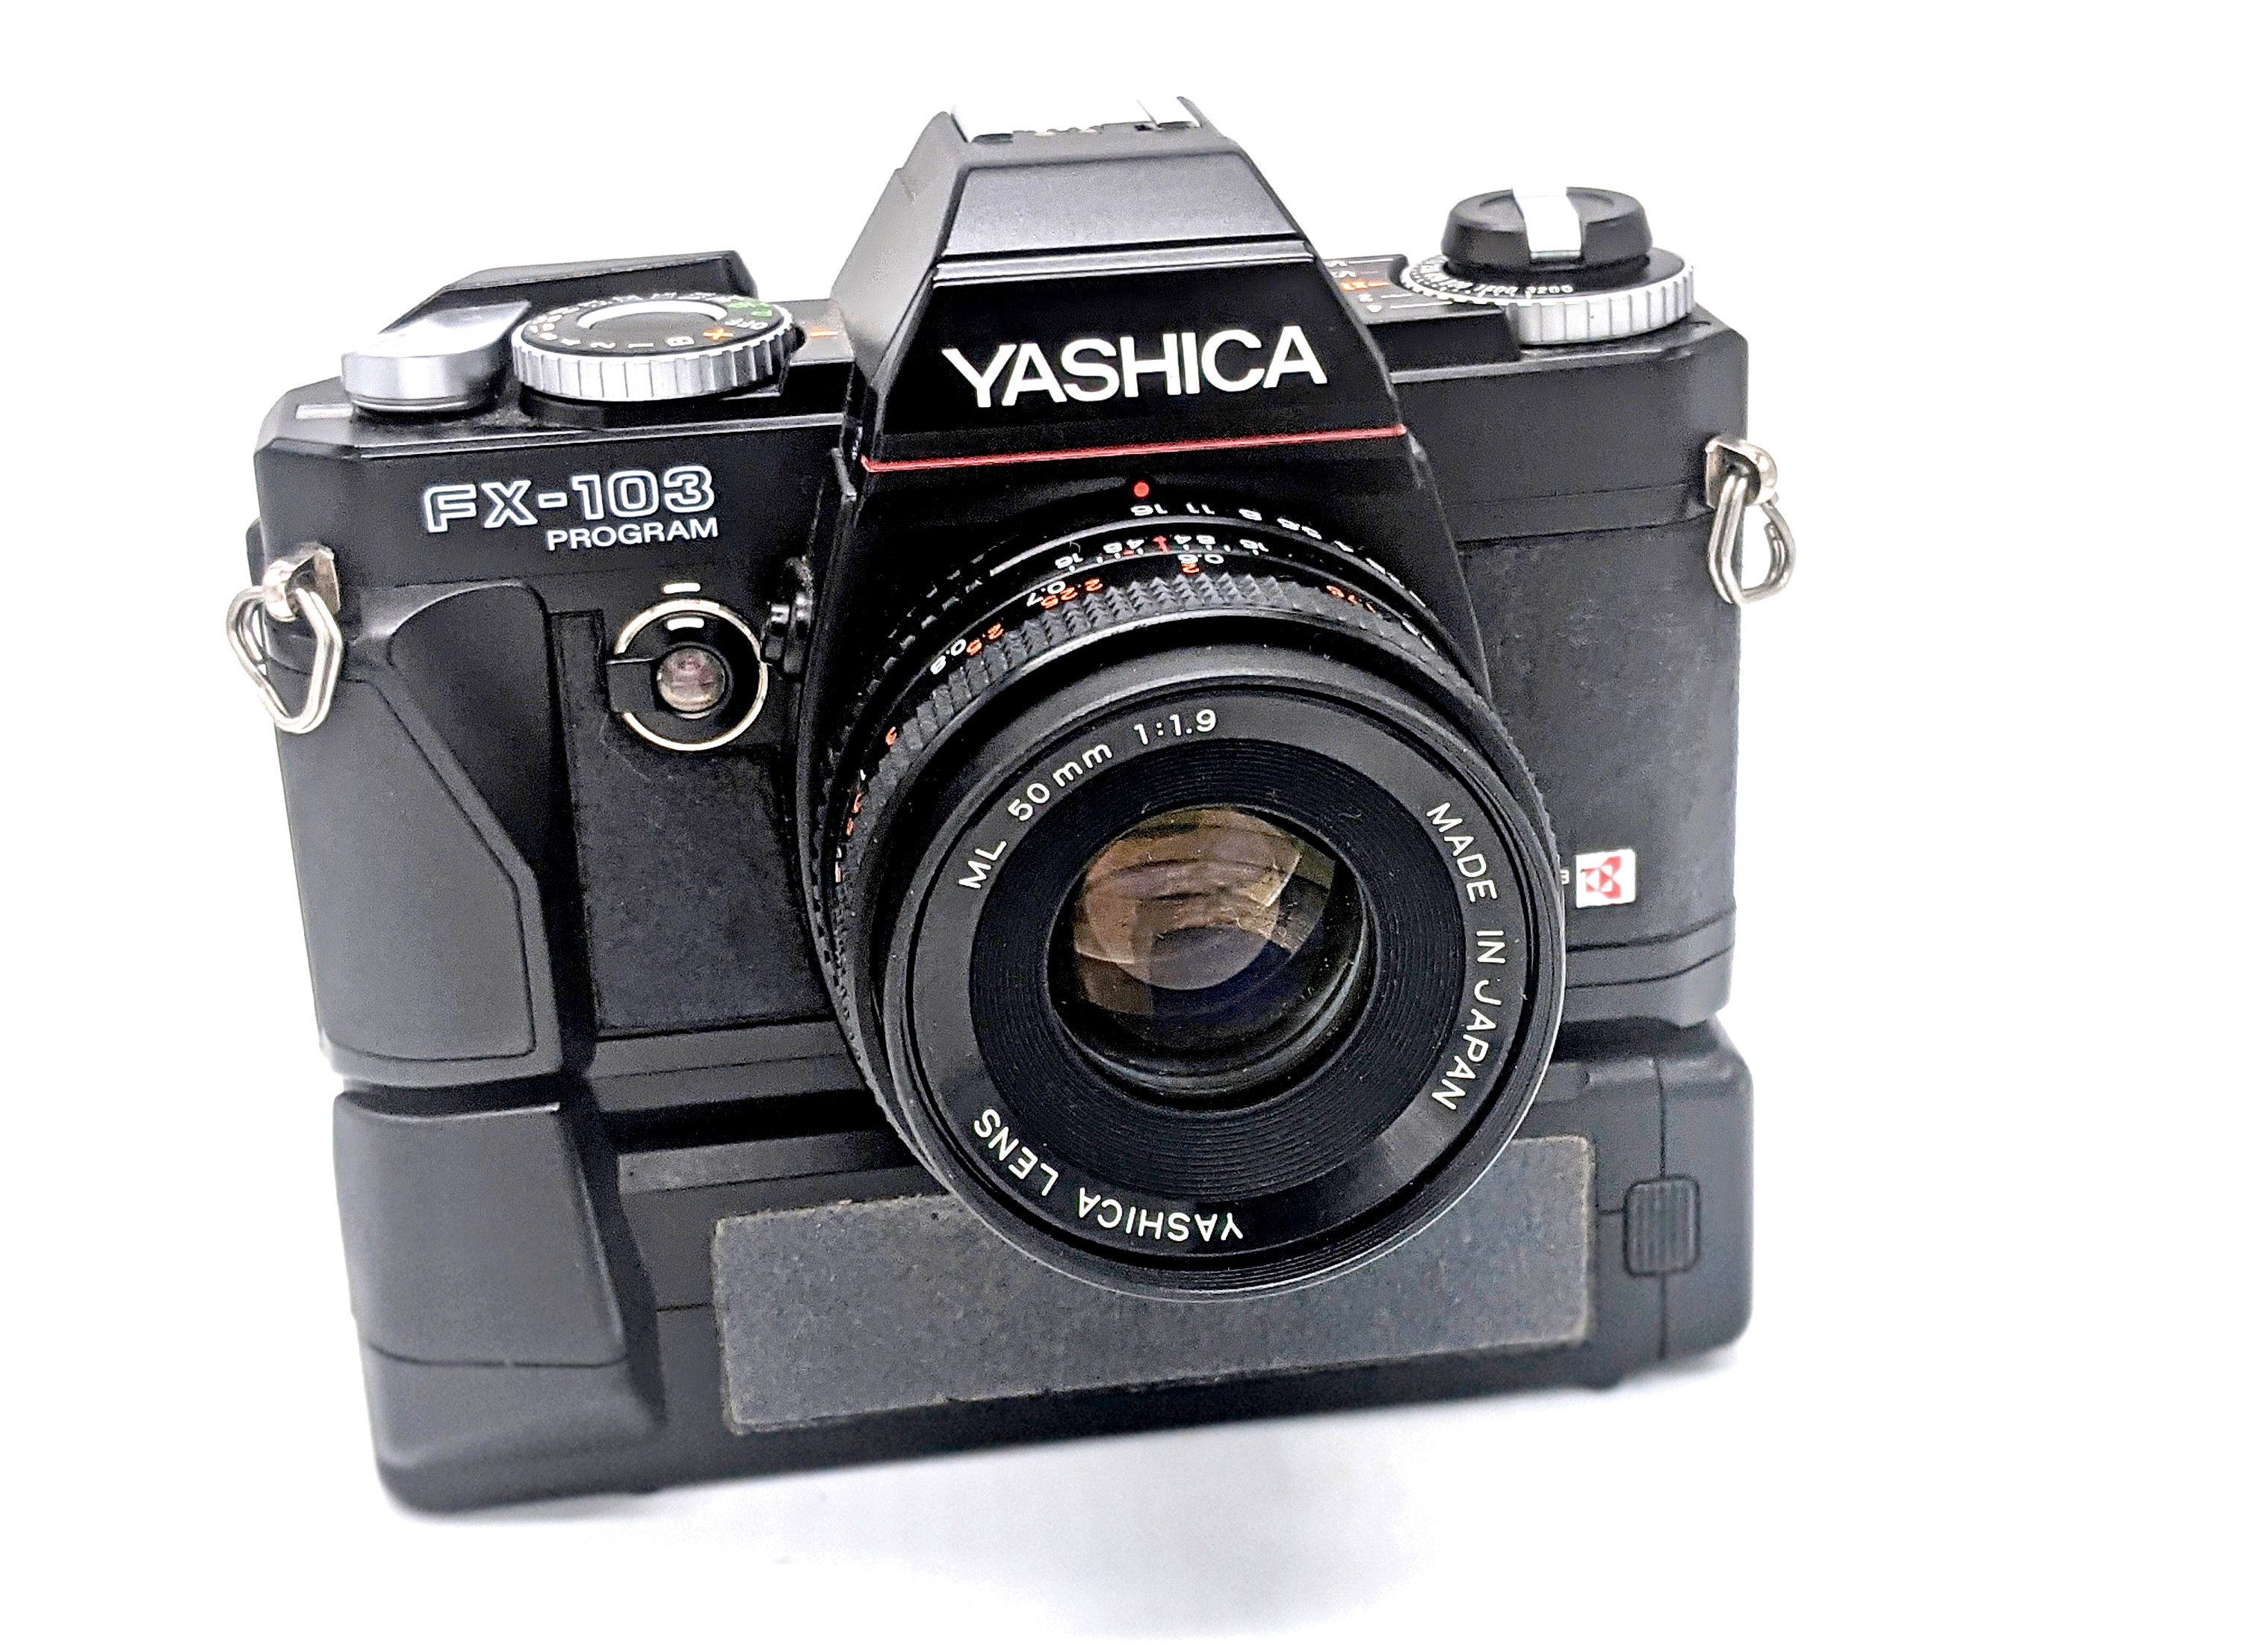
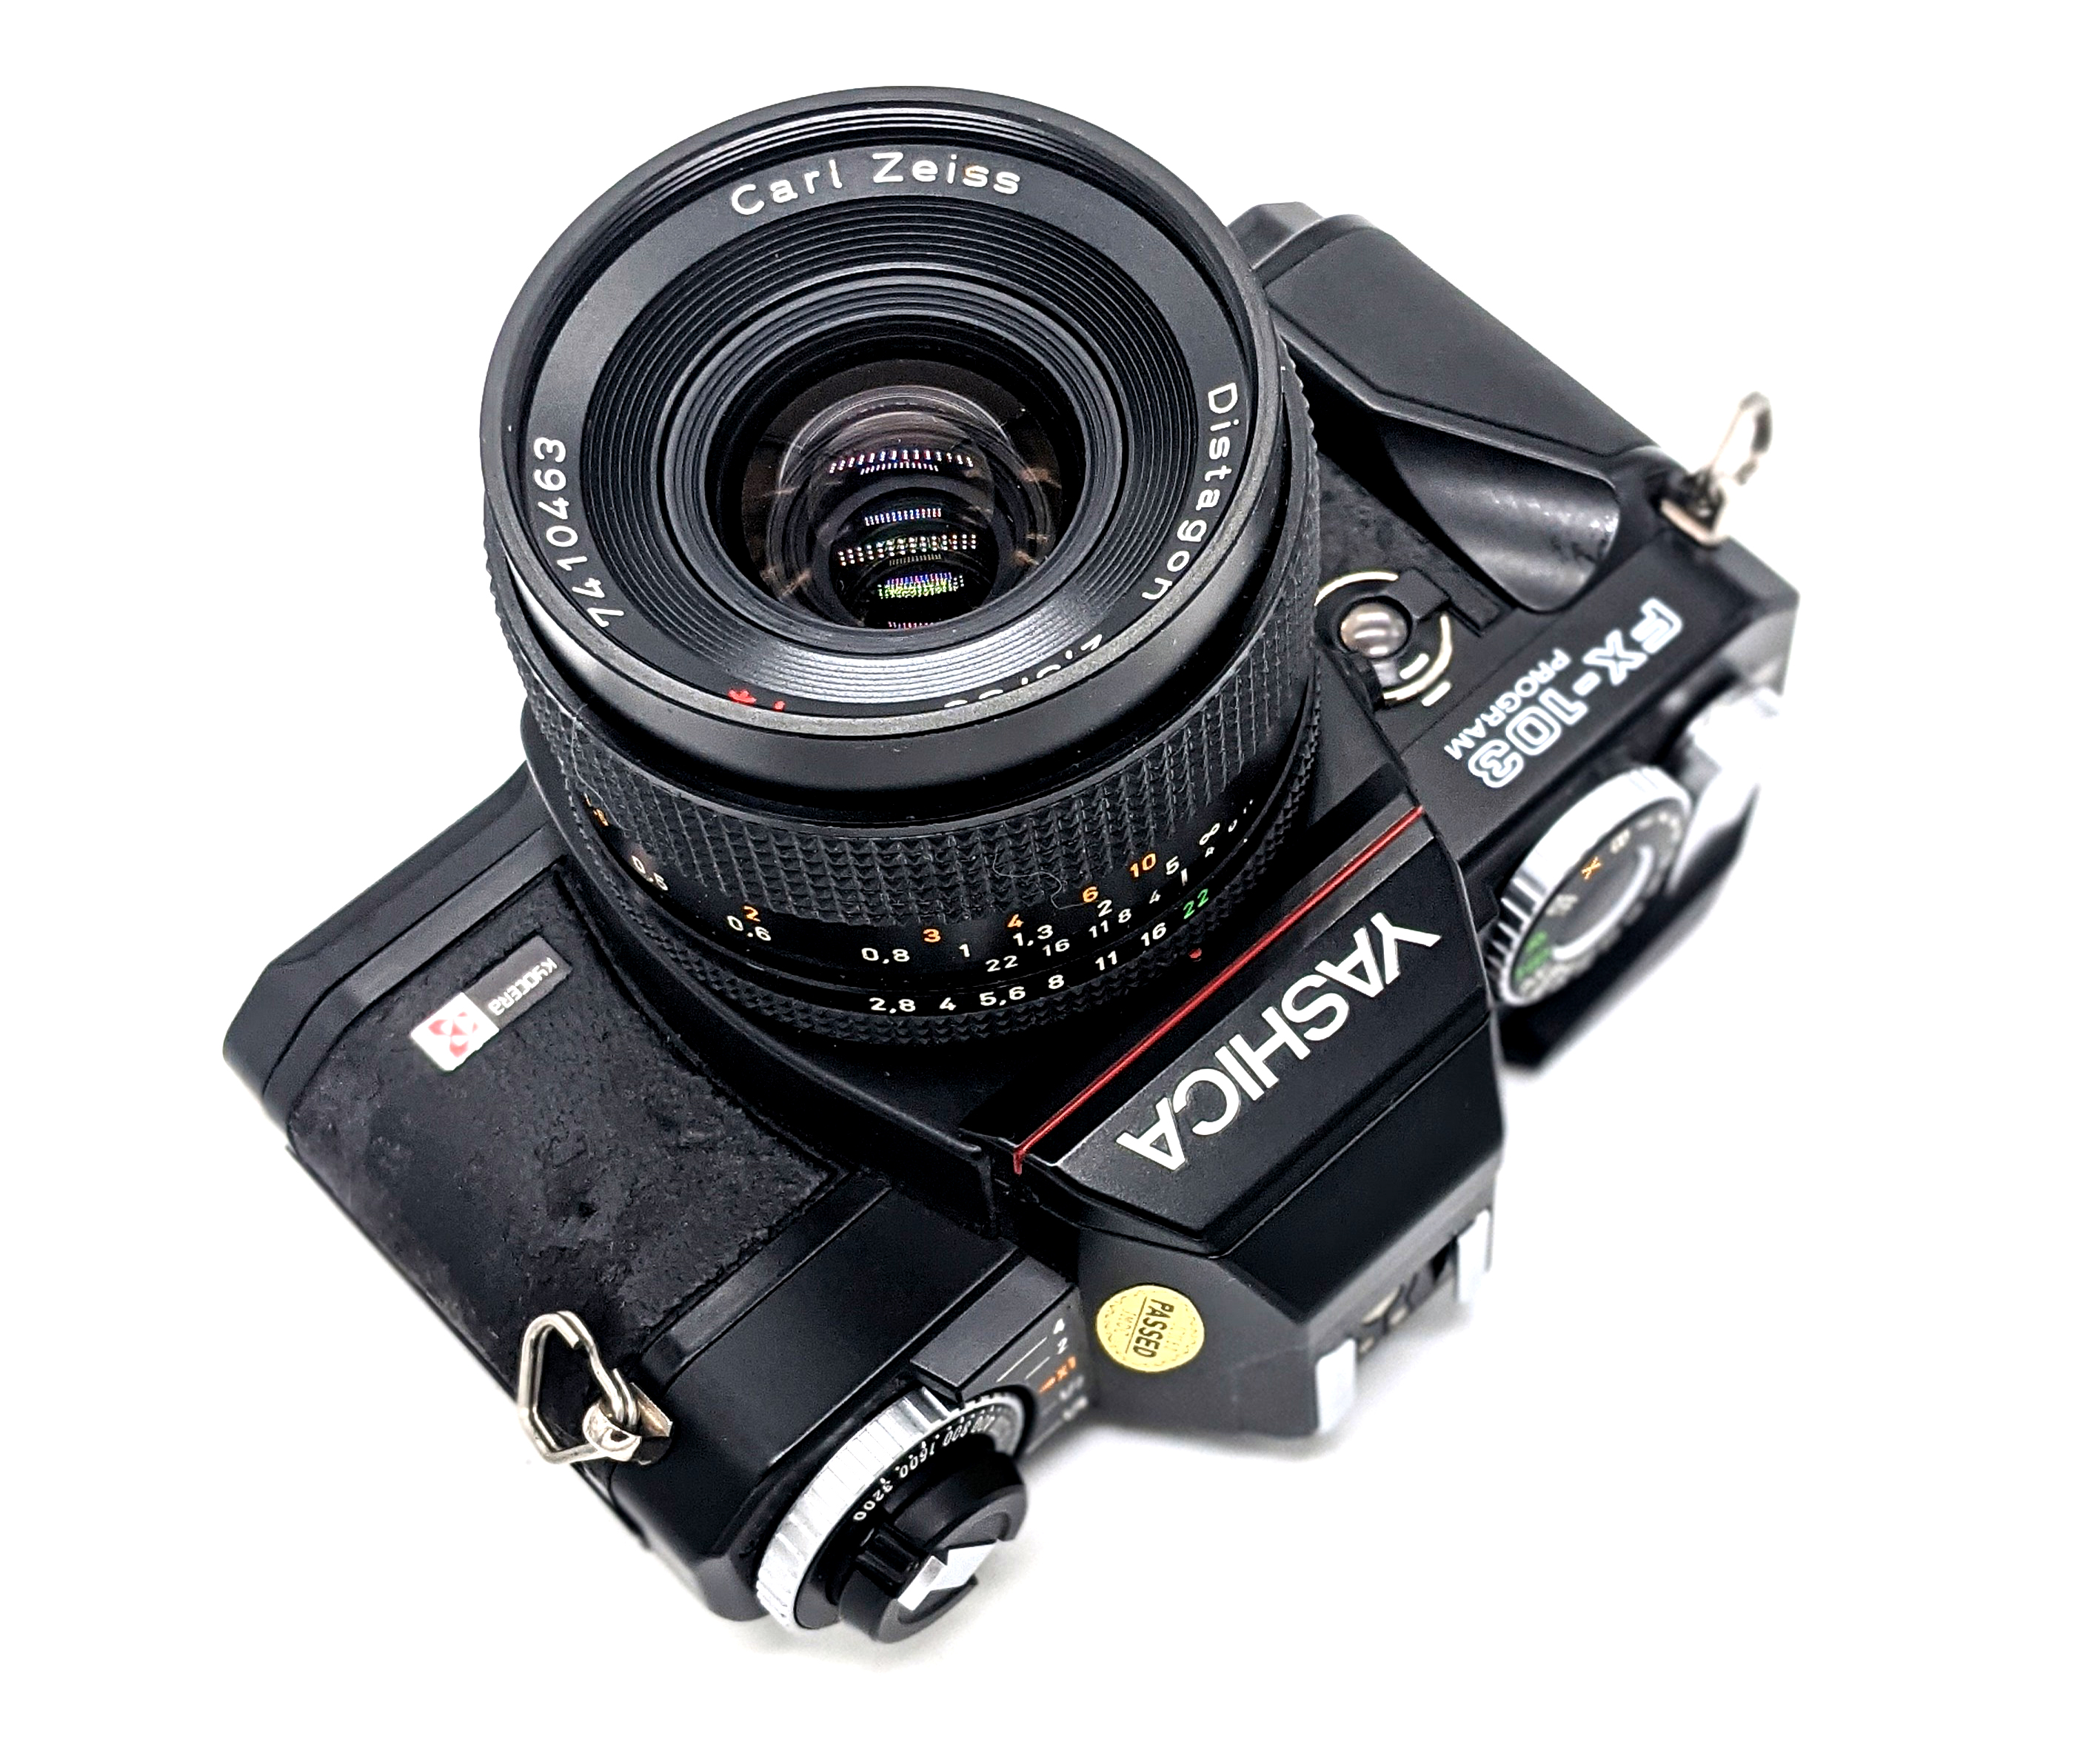
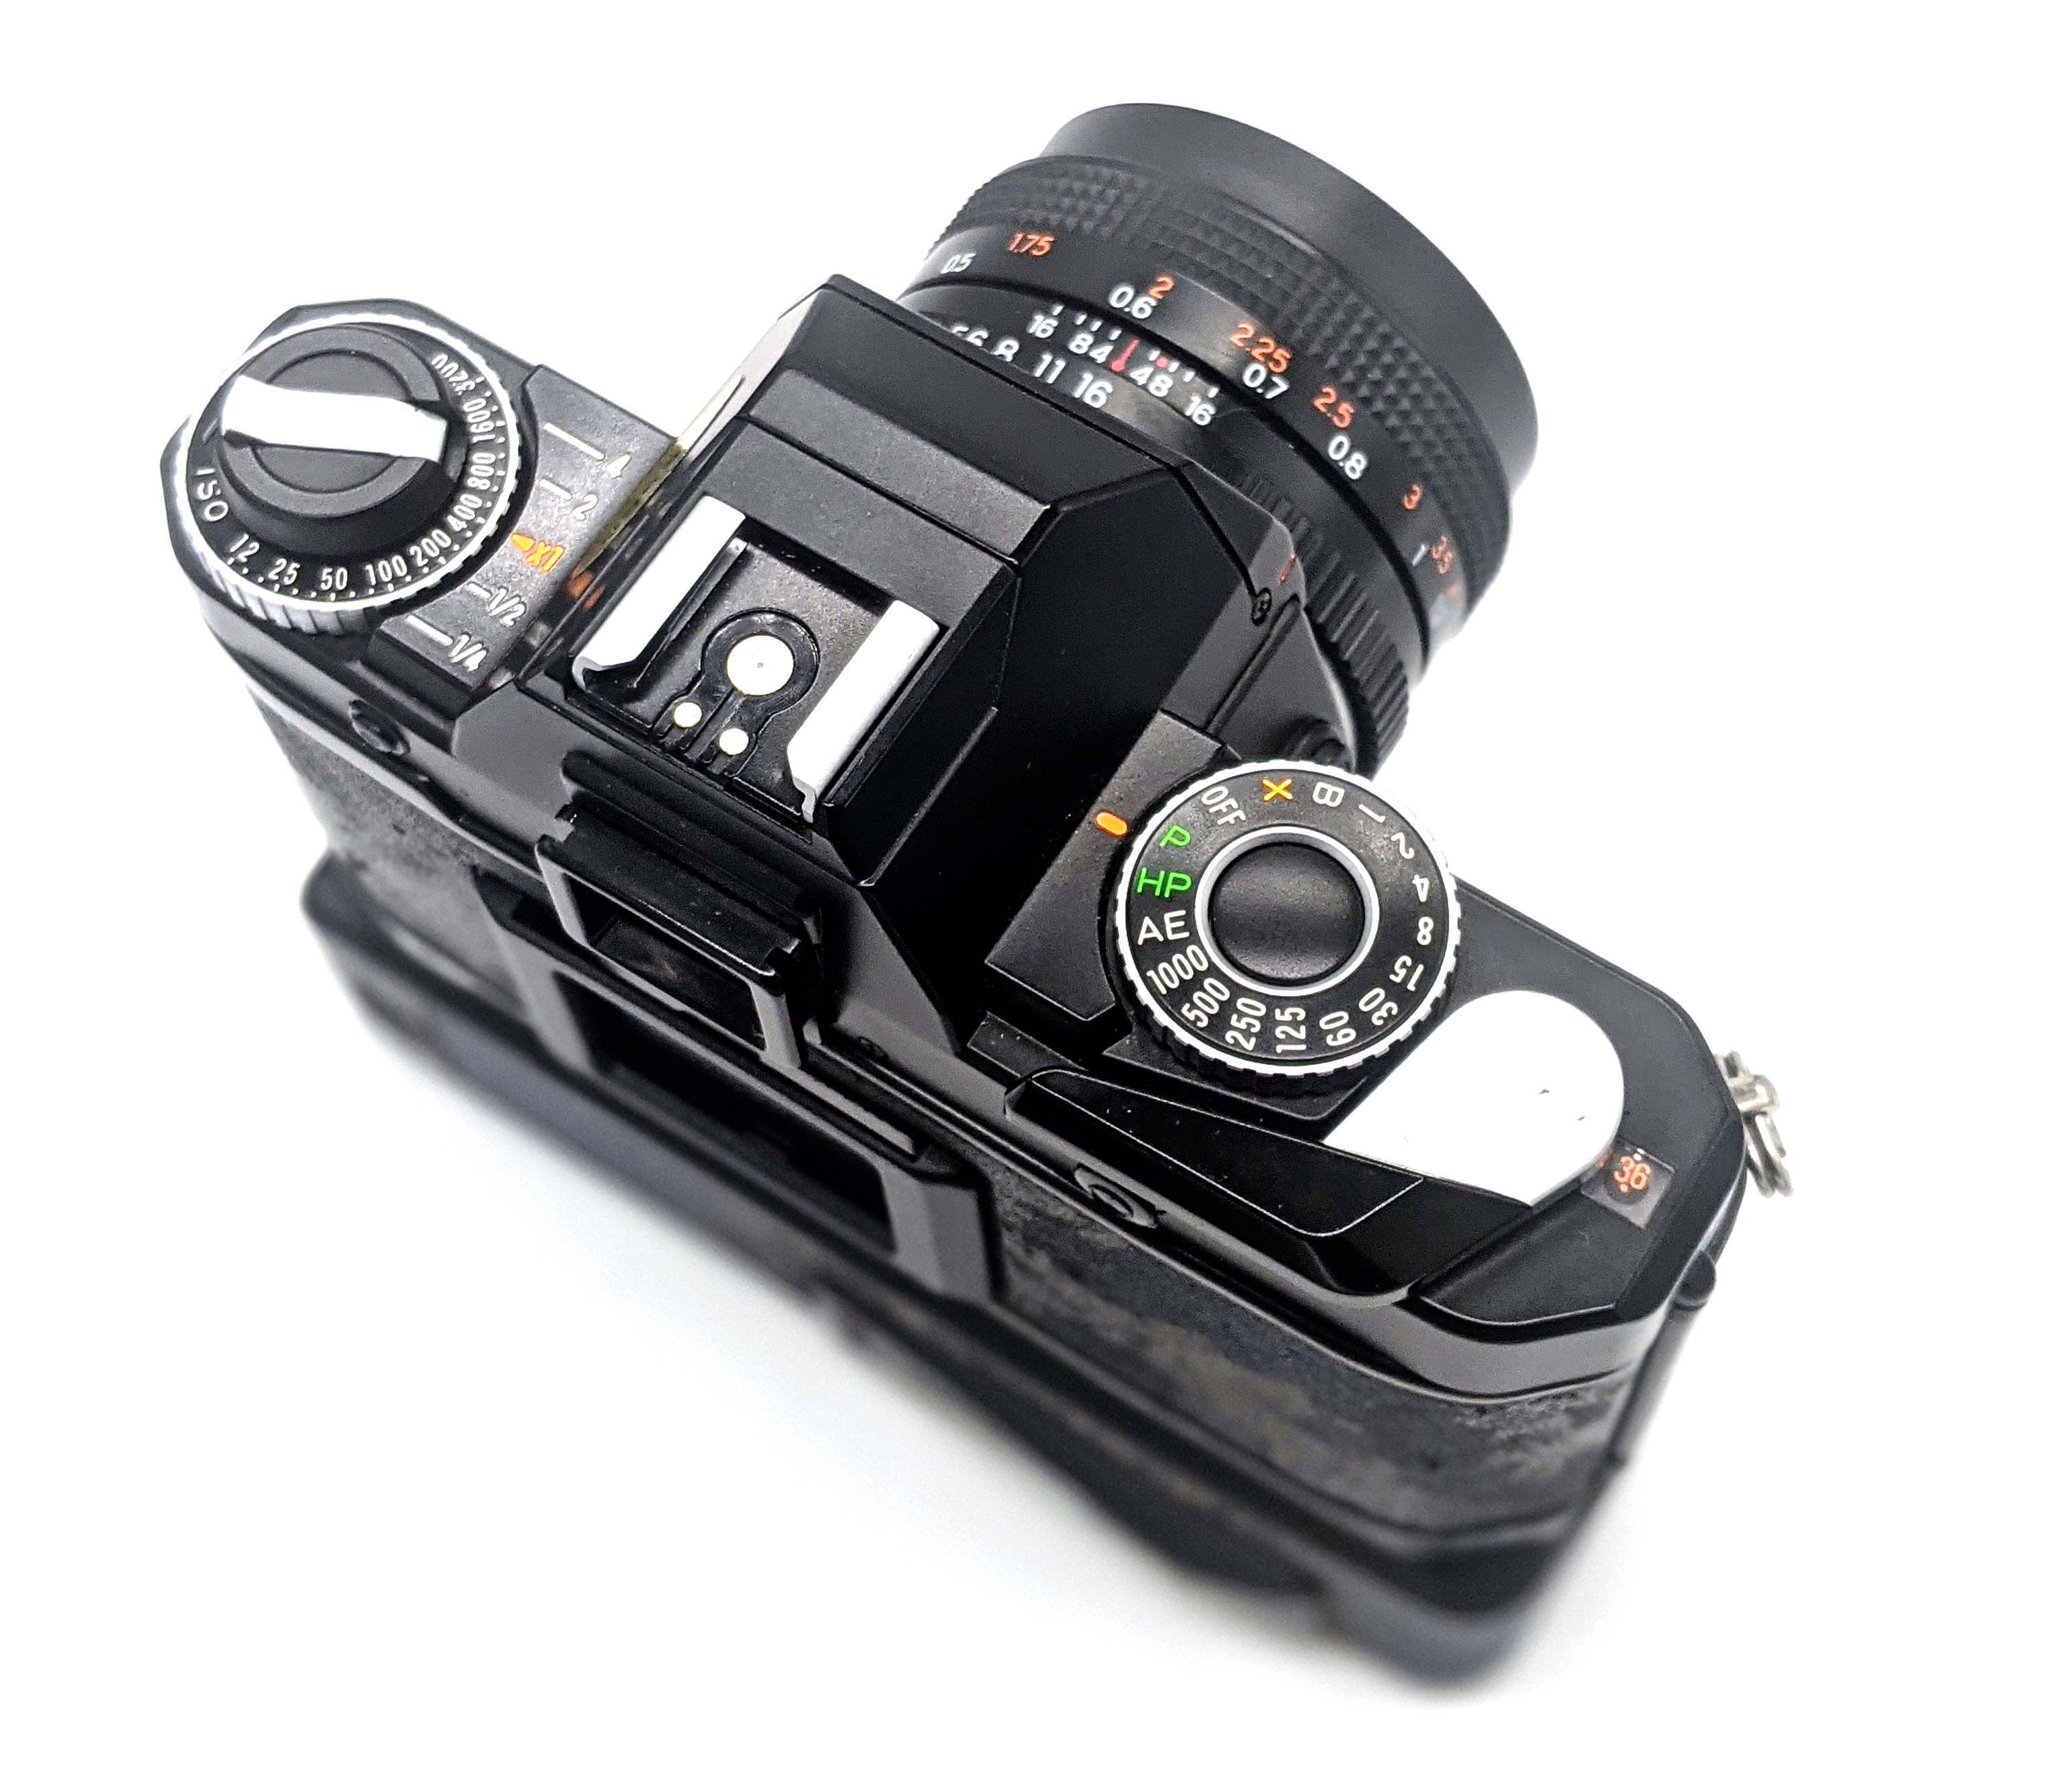
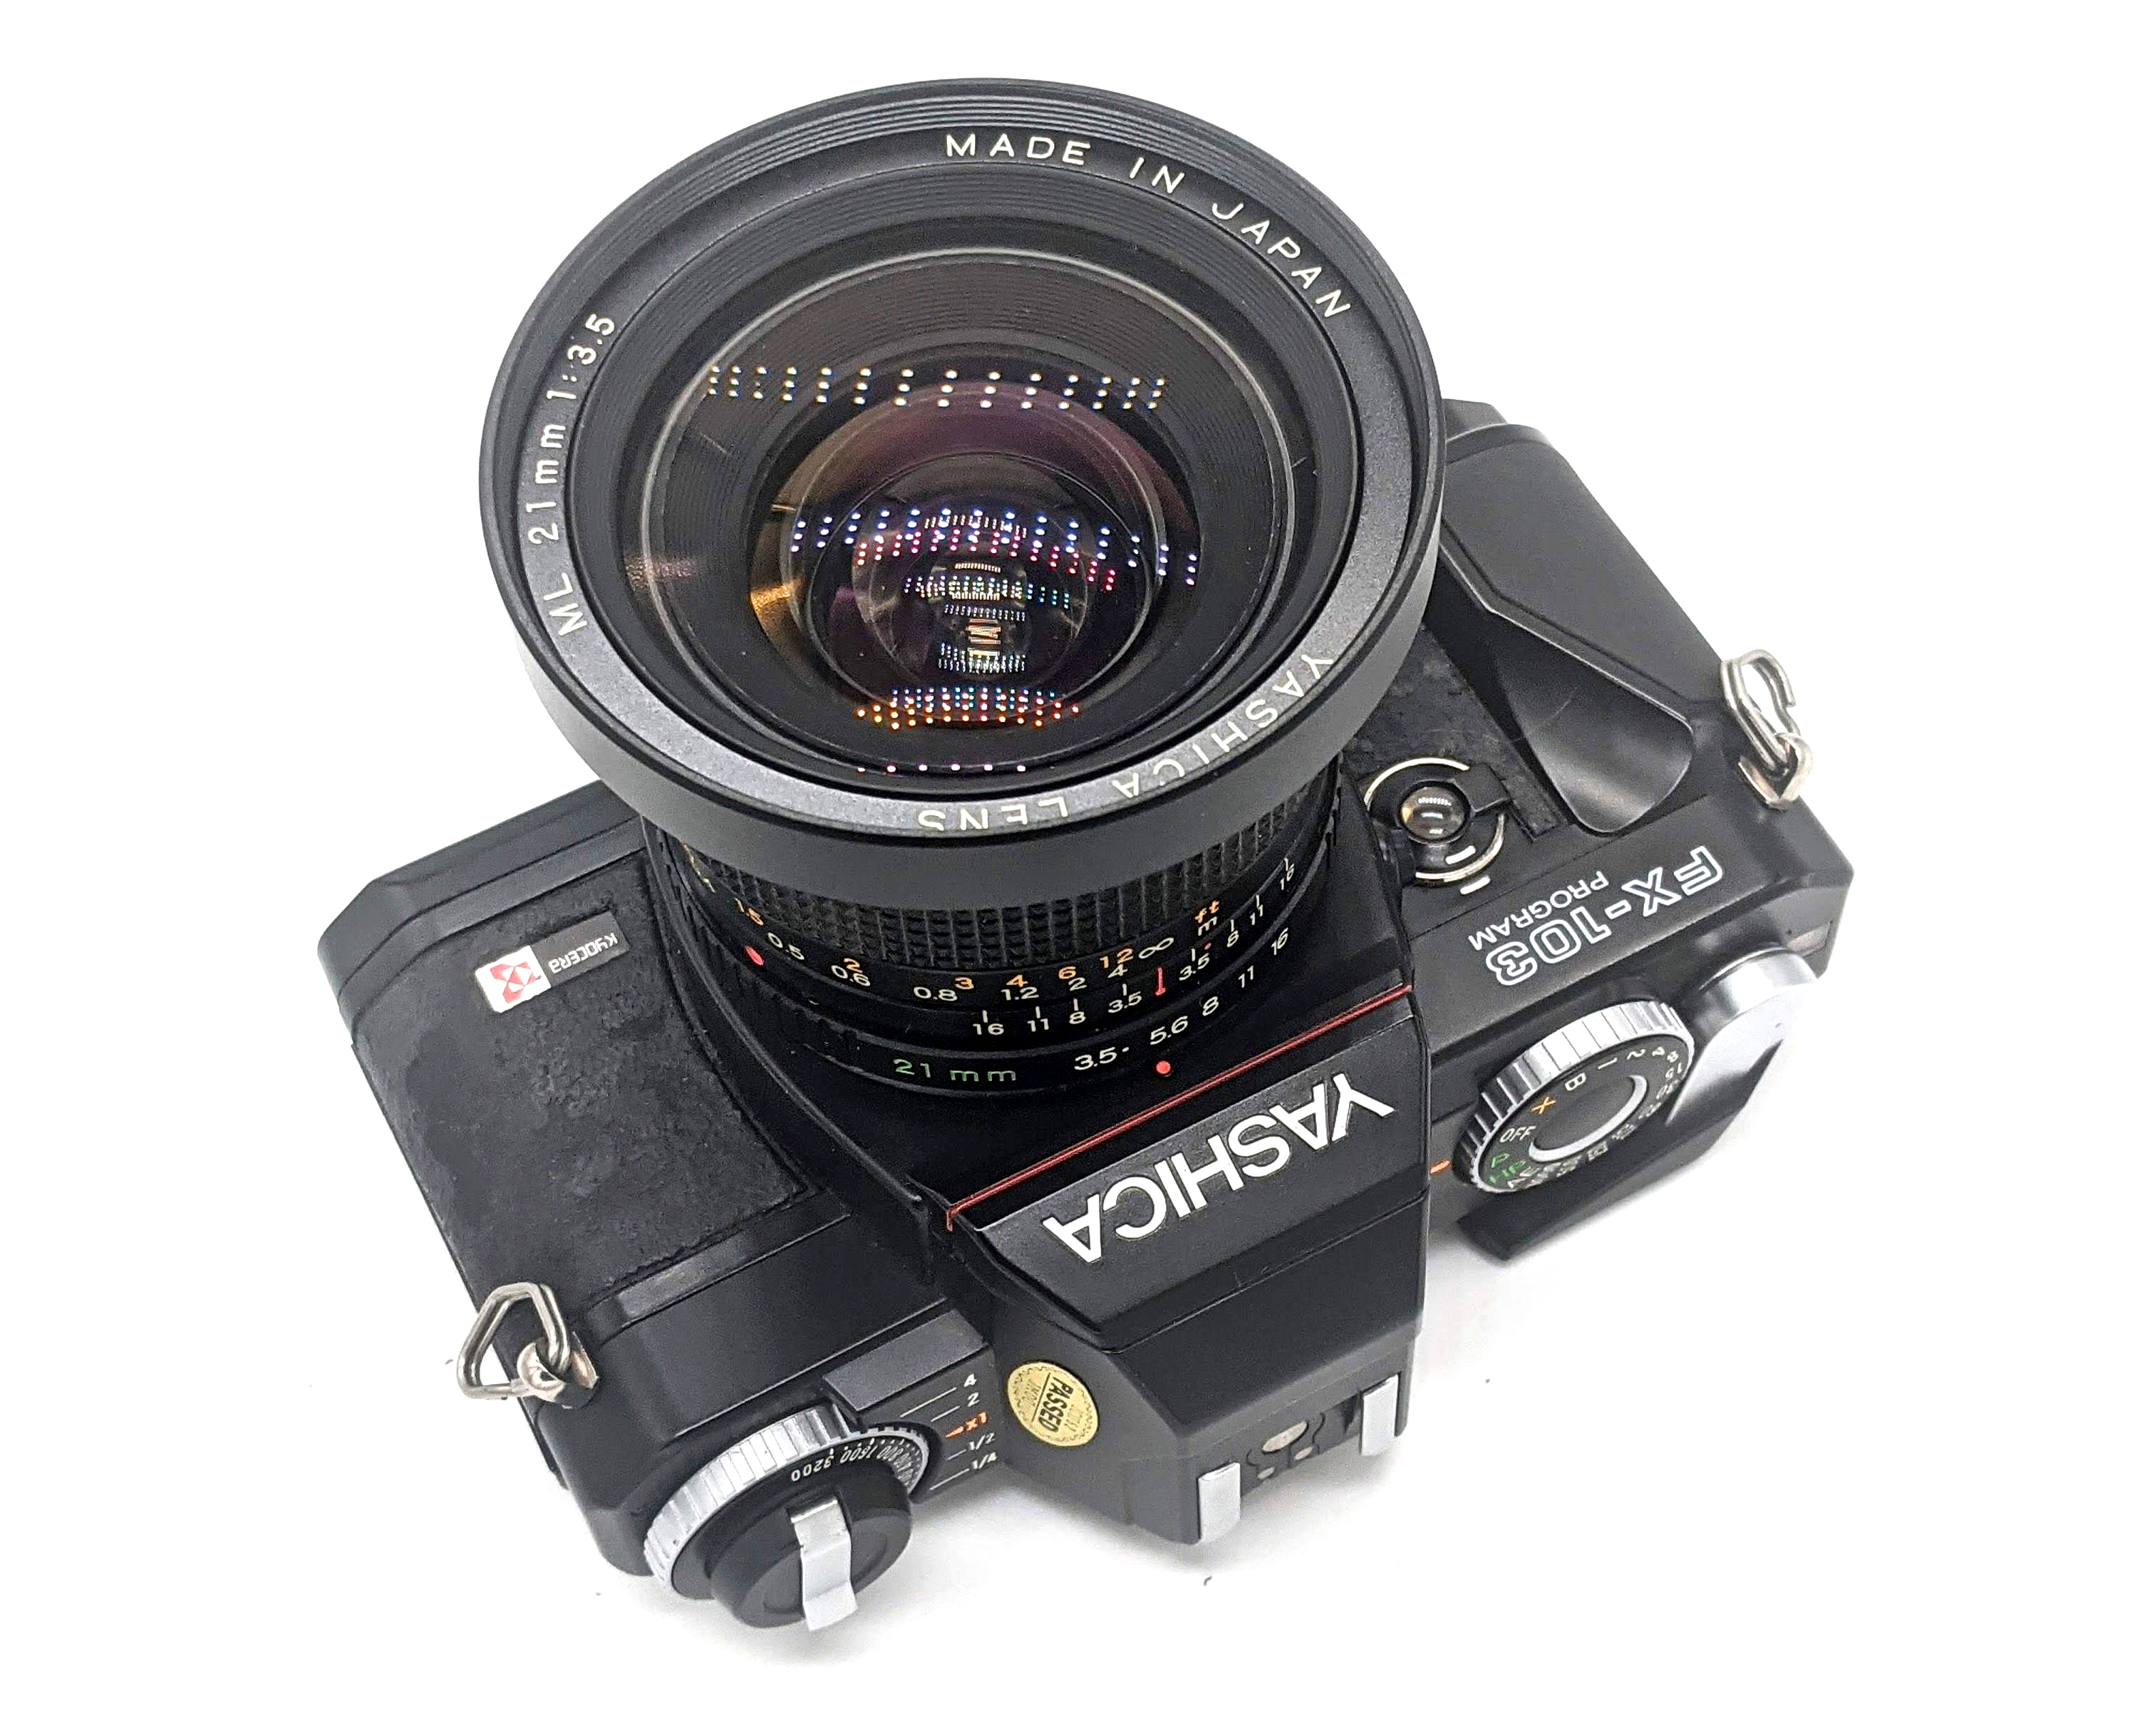
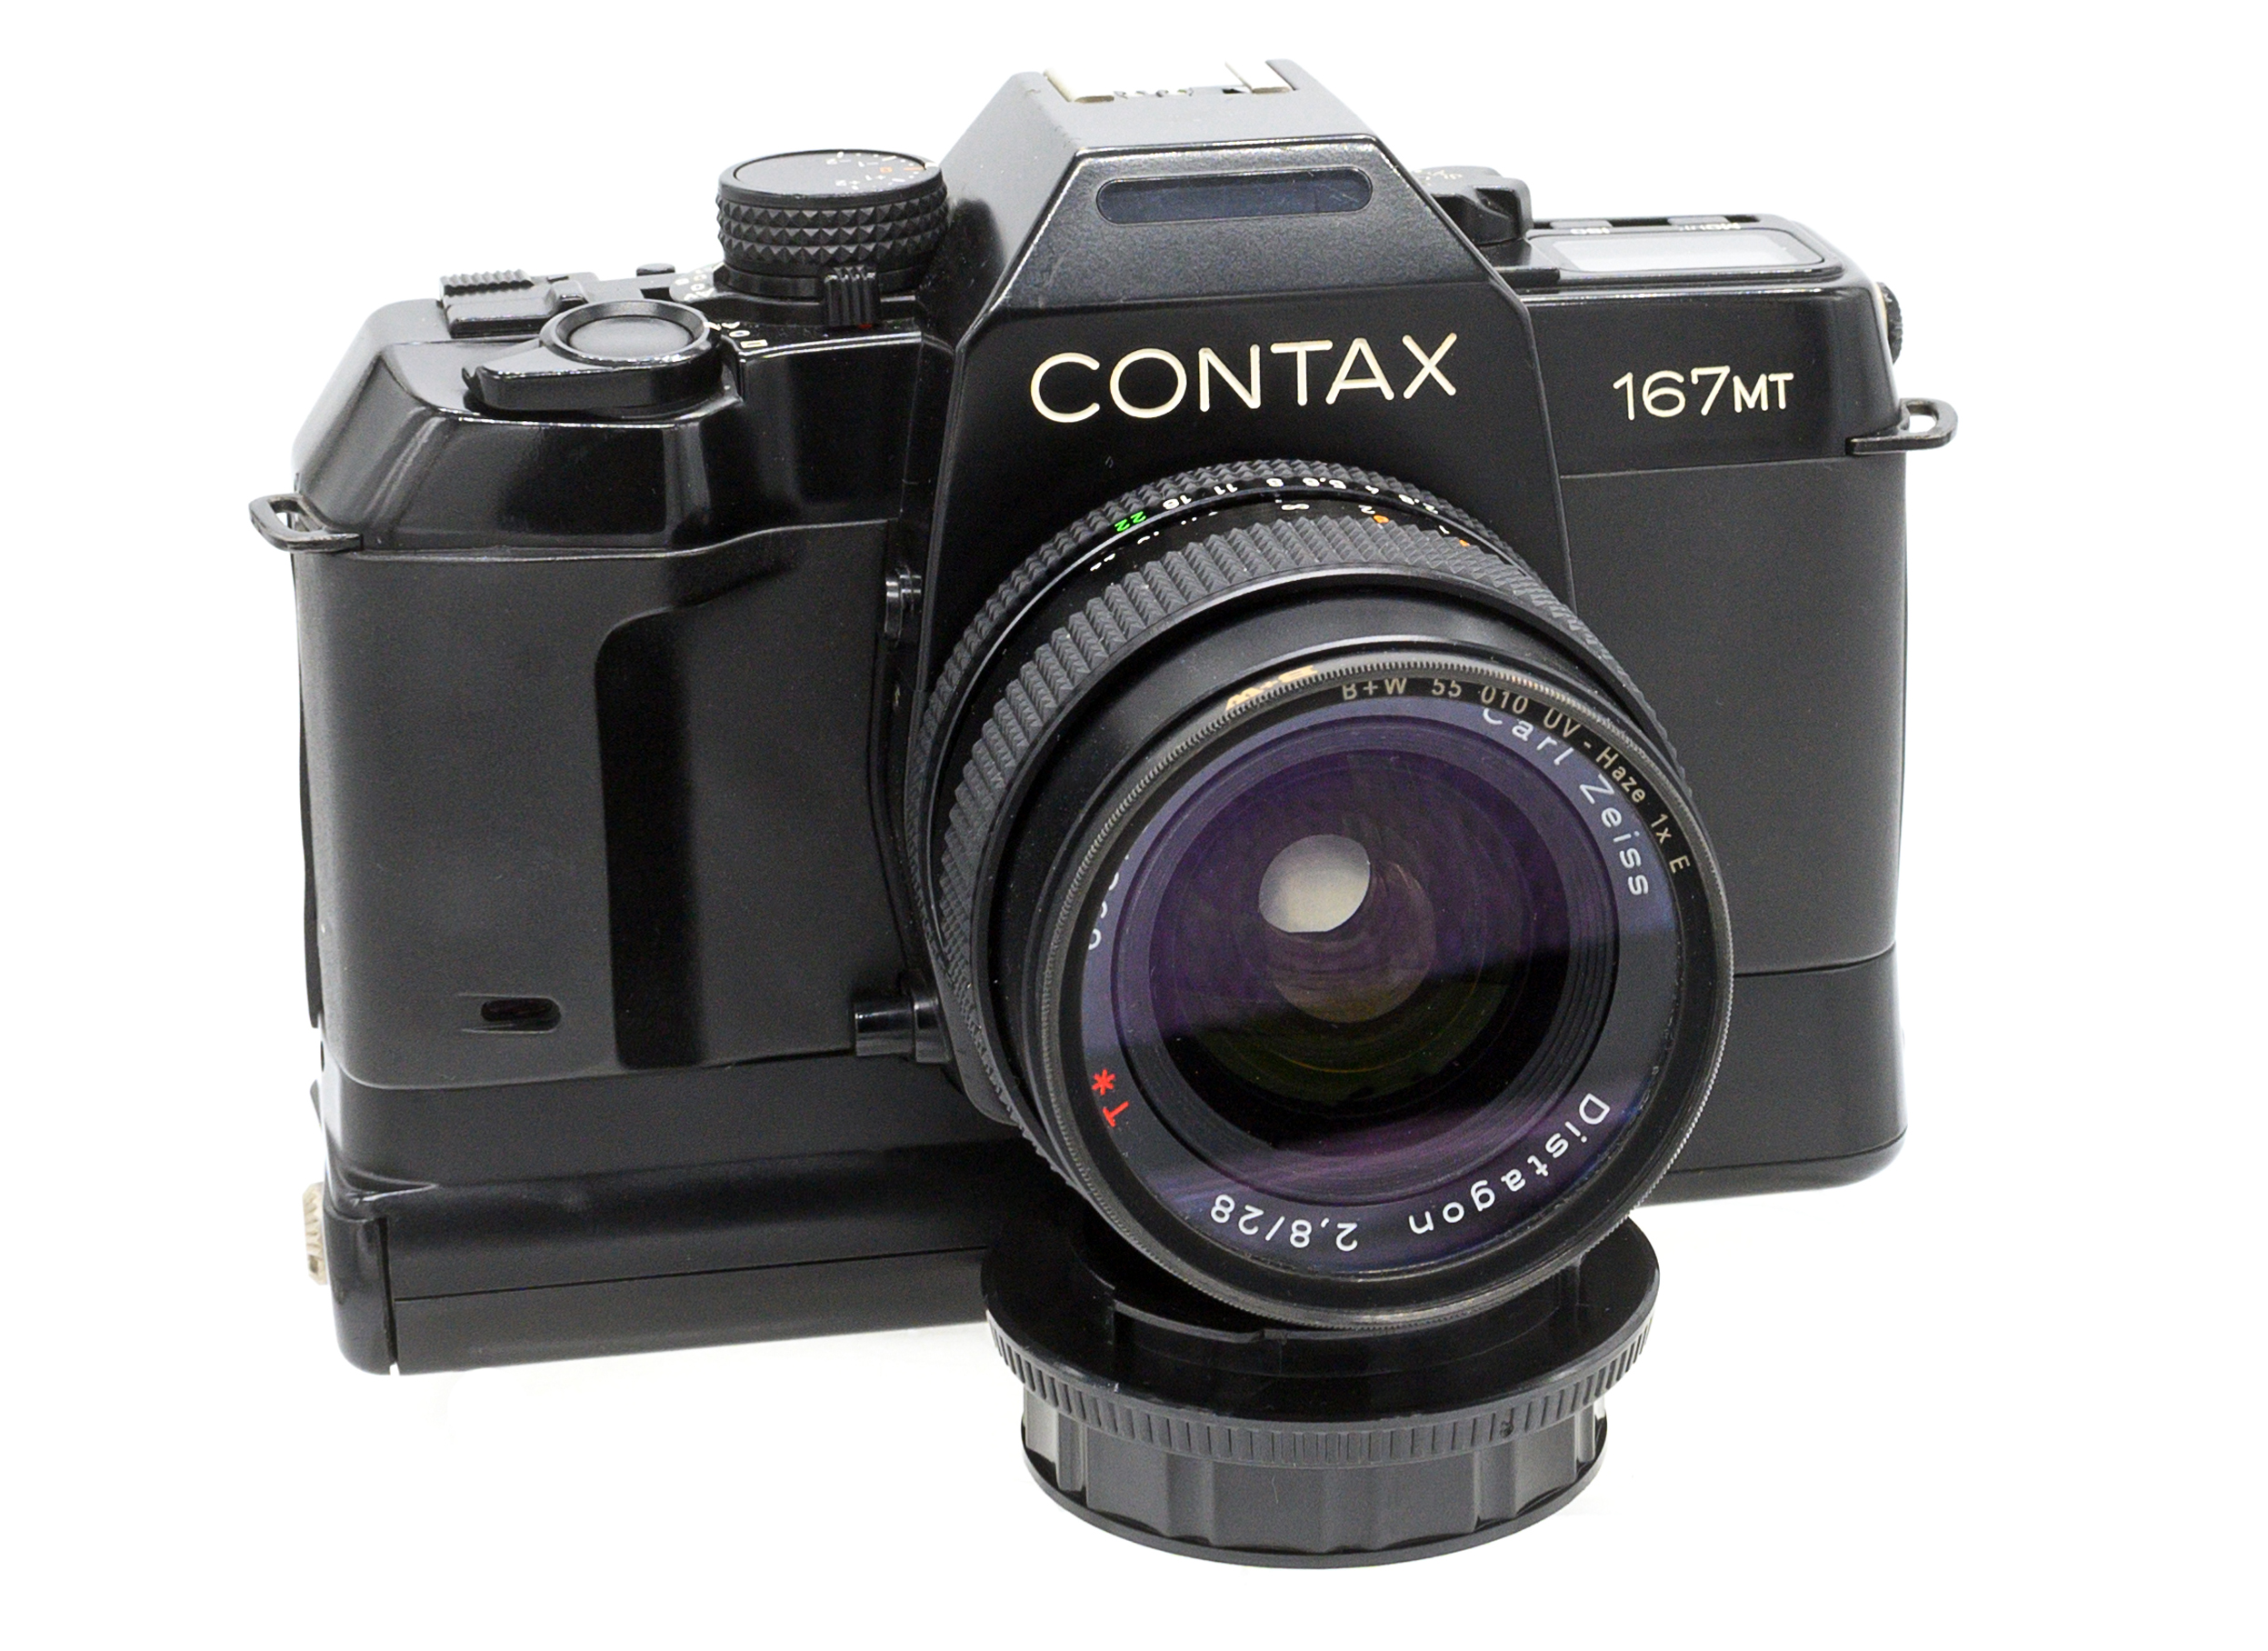
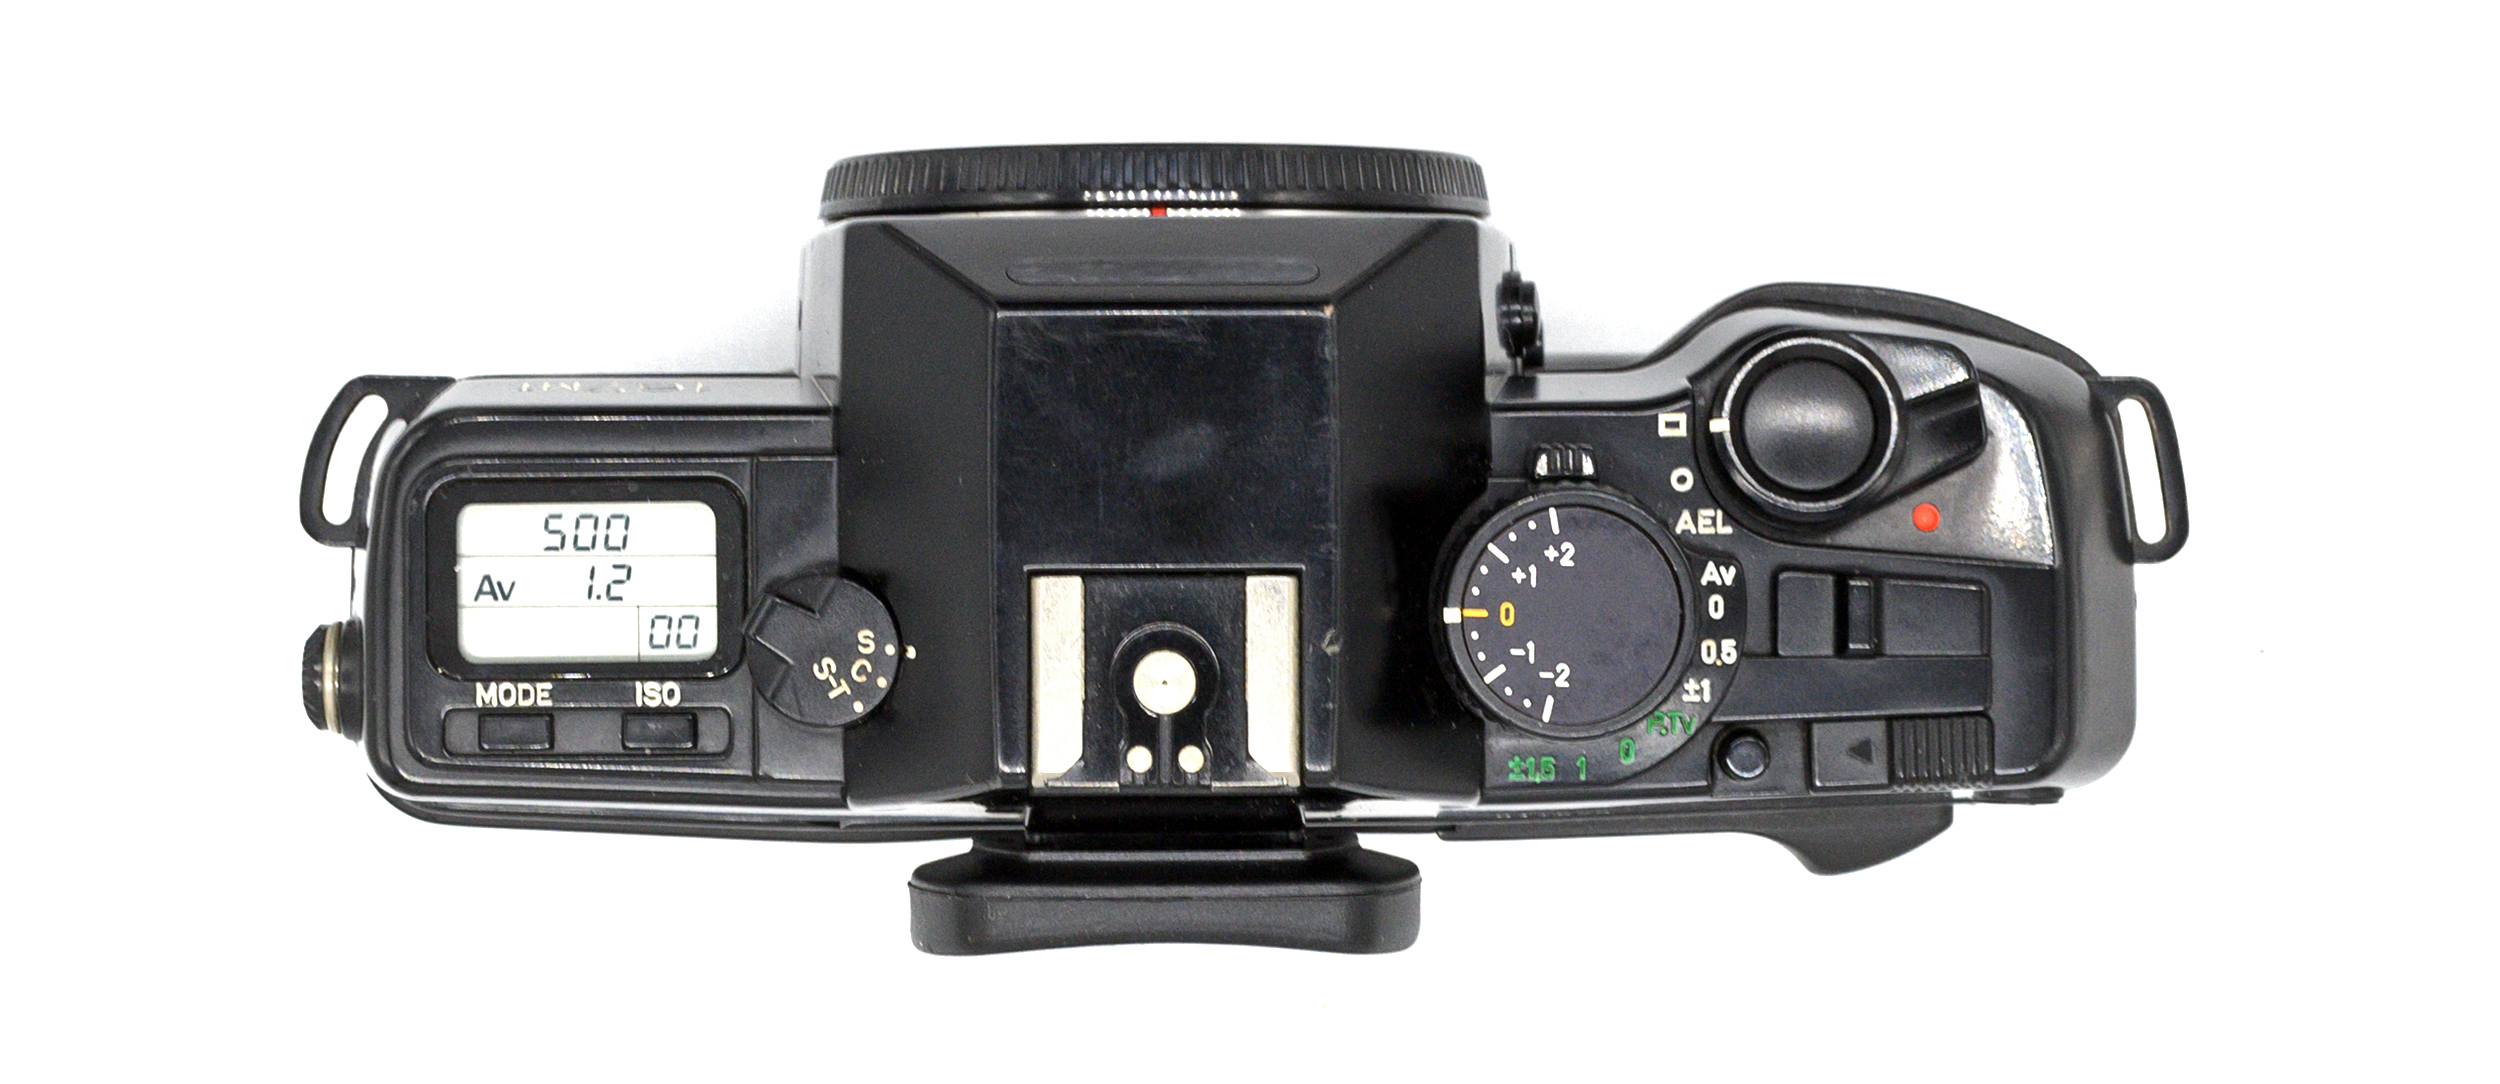
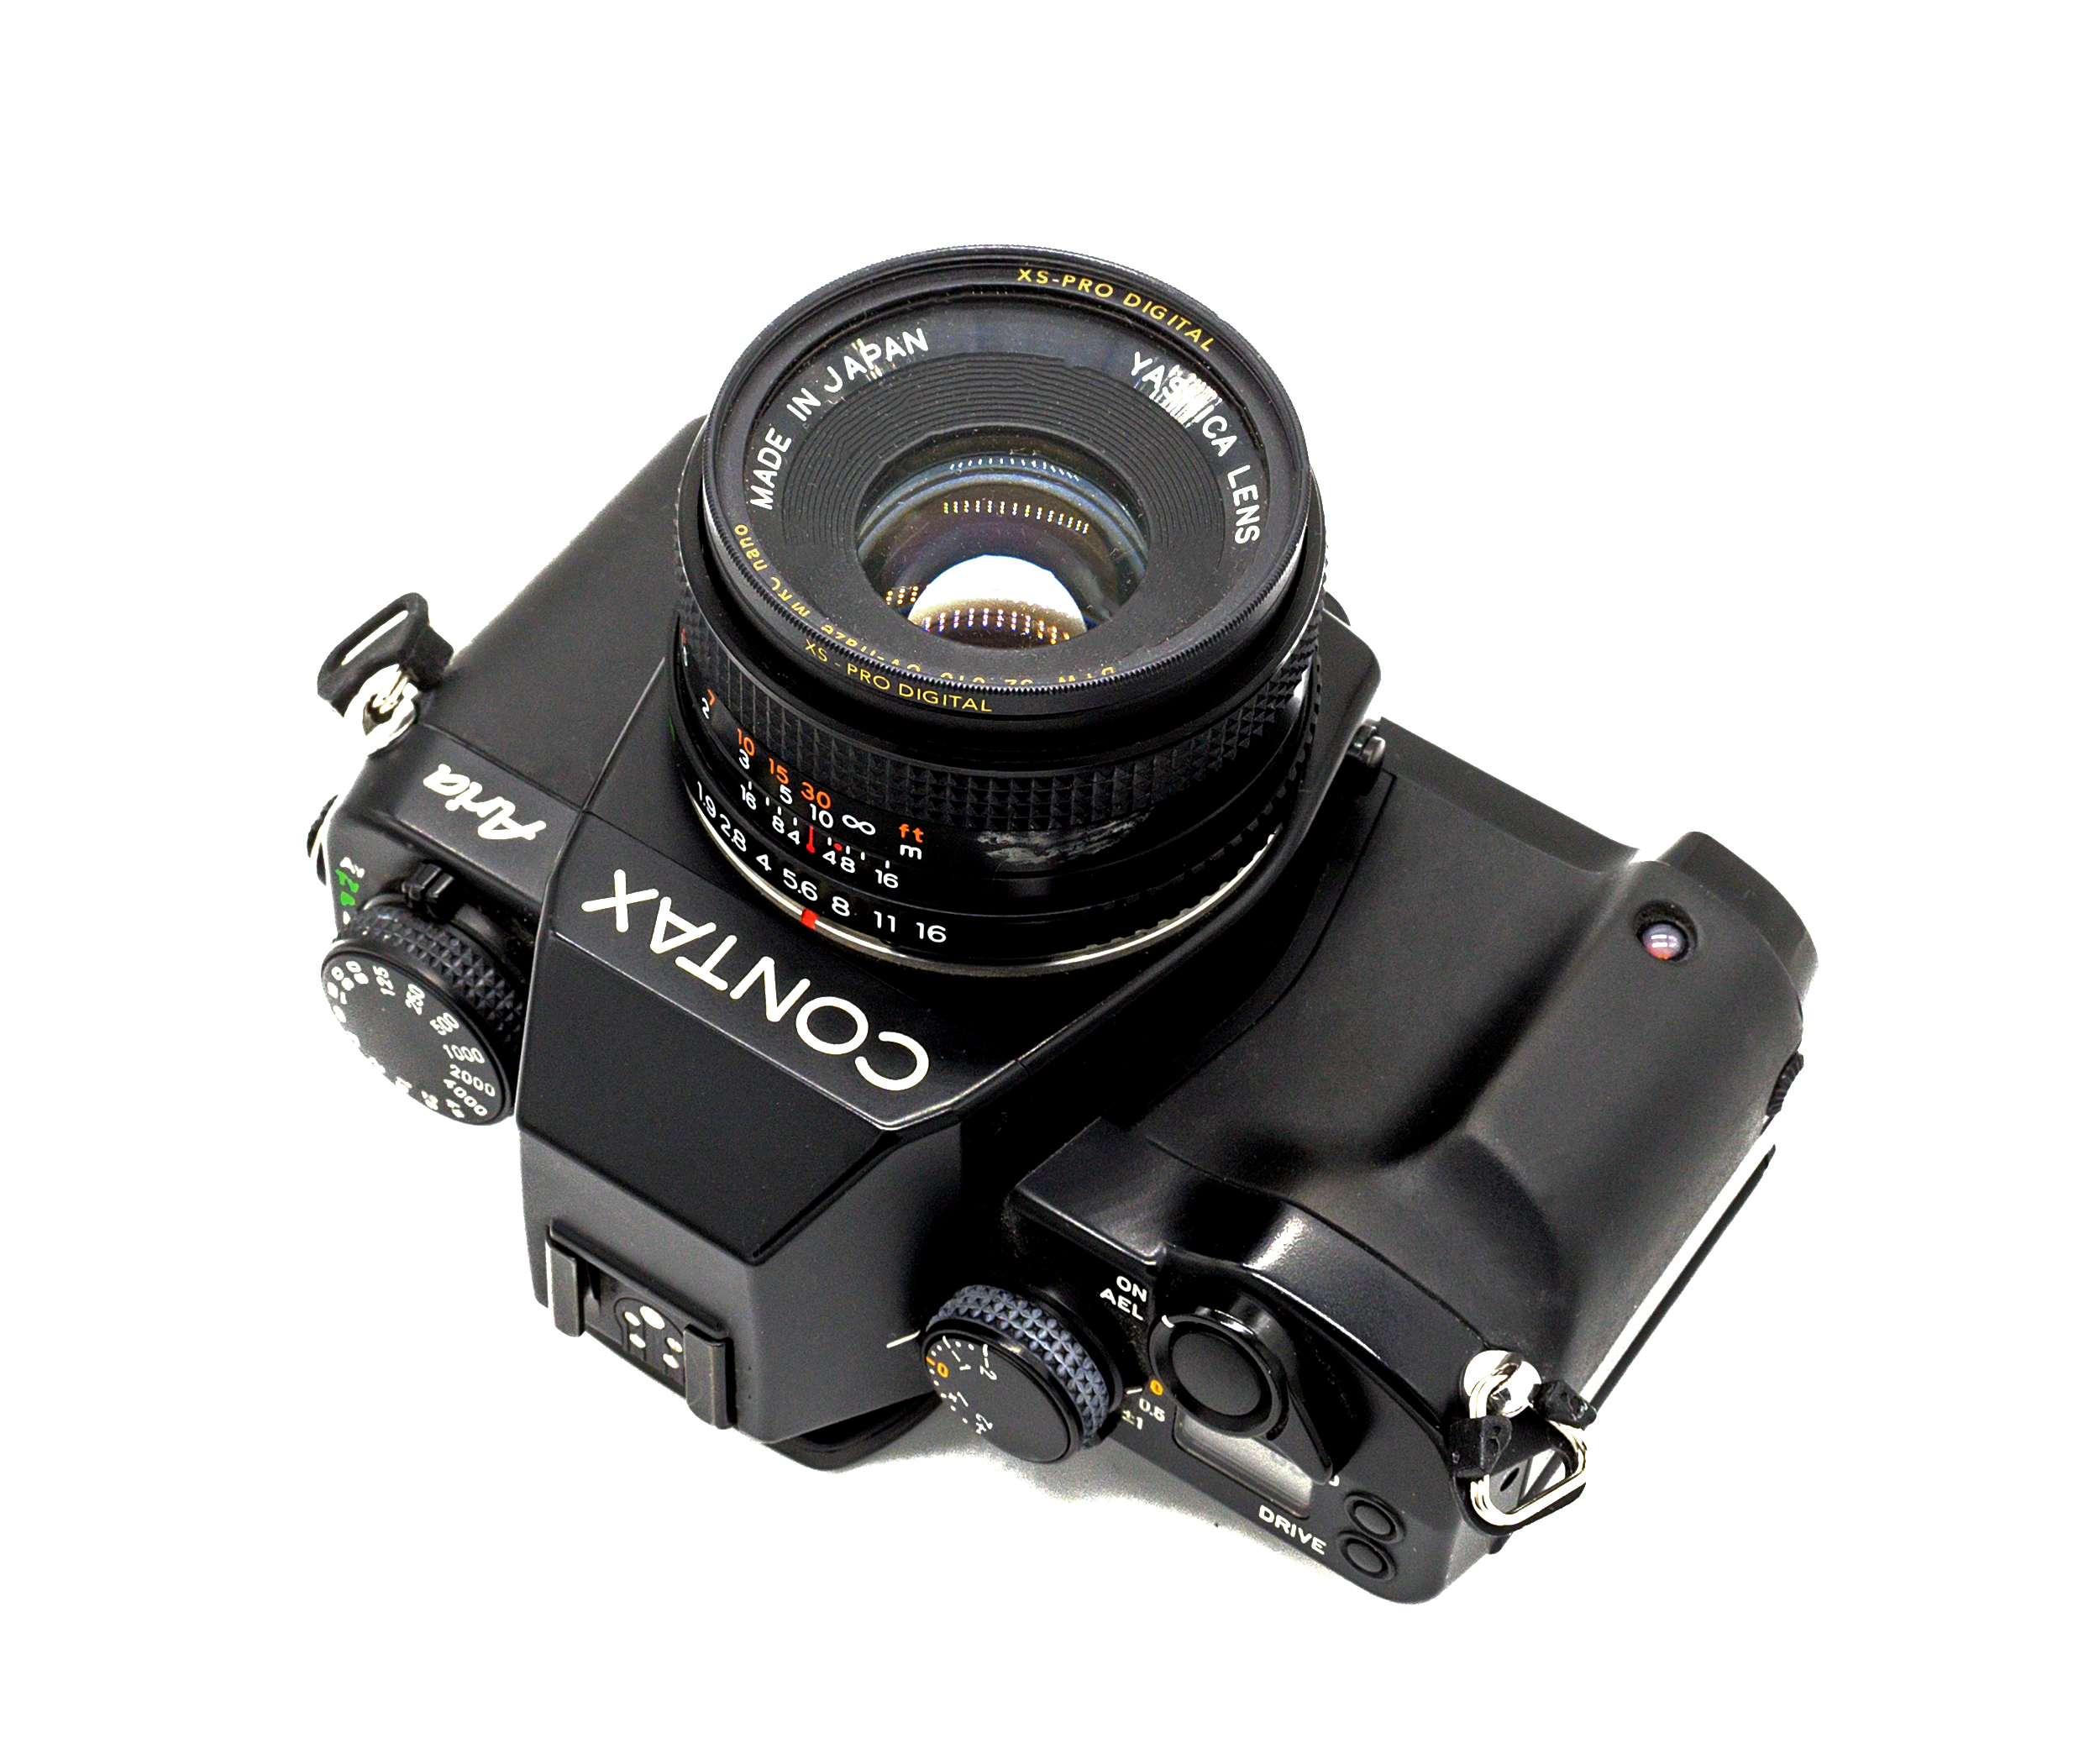
With information on this subject somewhat scattered around the public domain, this piece will quickly run down through the options for TTL flash for Contax and Yashica manual-focus 35mm SLRs. The Contax models that were capable of utilizing TTL flash were the 139, 137, RTS II, 159MM, 167MT, ST, RTS III, AX, and Aria. The only Yashica model with TTL flash capability is the FX-103. Most flash equipment from the film era is dirt cheap today.
Contax-Branded TTL Flashes
Flash
GN (100)
Weight
Battery
Bounce
Recycle (Full Power)
Coverage
Modes
Rear Curtain
TLA 20
20
180g
4 x AA
No
5 secs
Insert (24mm)
TTL / A / M
No
TLA 30
30
290g
4 x AA
Vertical
9 secs
Insert (24mm)
TTL / A / M
No
RTF 540
40
720g
Multiple Options
Vertical
Depends
Insert (24mm)
TTL / A / M
No
TLA 140
14
80g
1 X CR123
No
4.8 secs
28mm
TTL / M
No
TLA 200
20
90g
2 x CR2
No
3.5 secs
Zoom (28-90)
TTL / M
?
TLA 280
28
260g
4 x AA
Vertical
5 secs
Zoom (28-85)
TTL / M
Yes
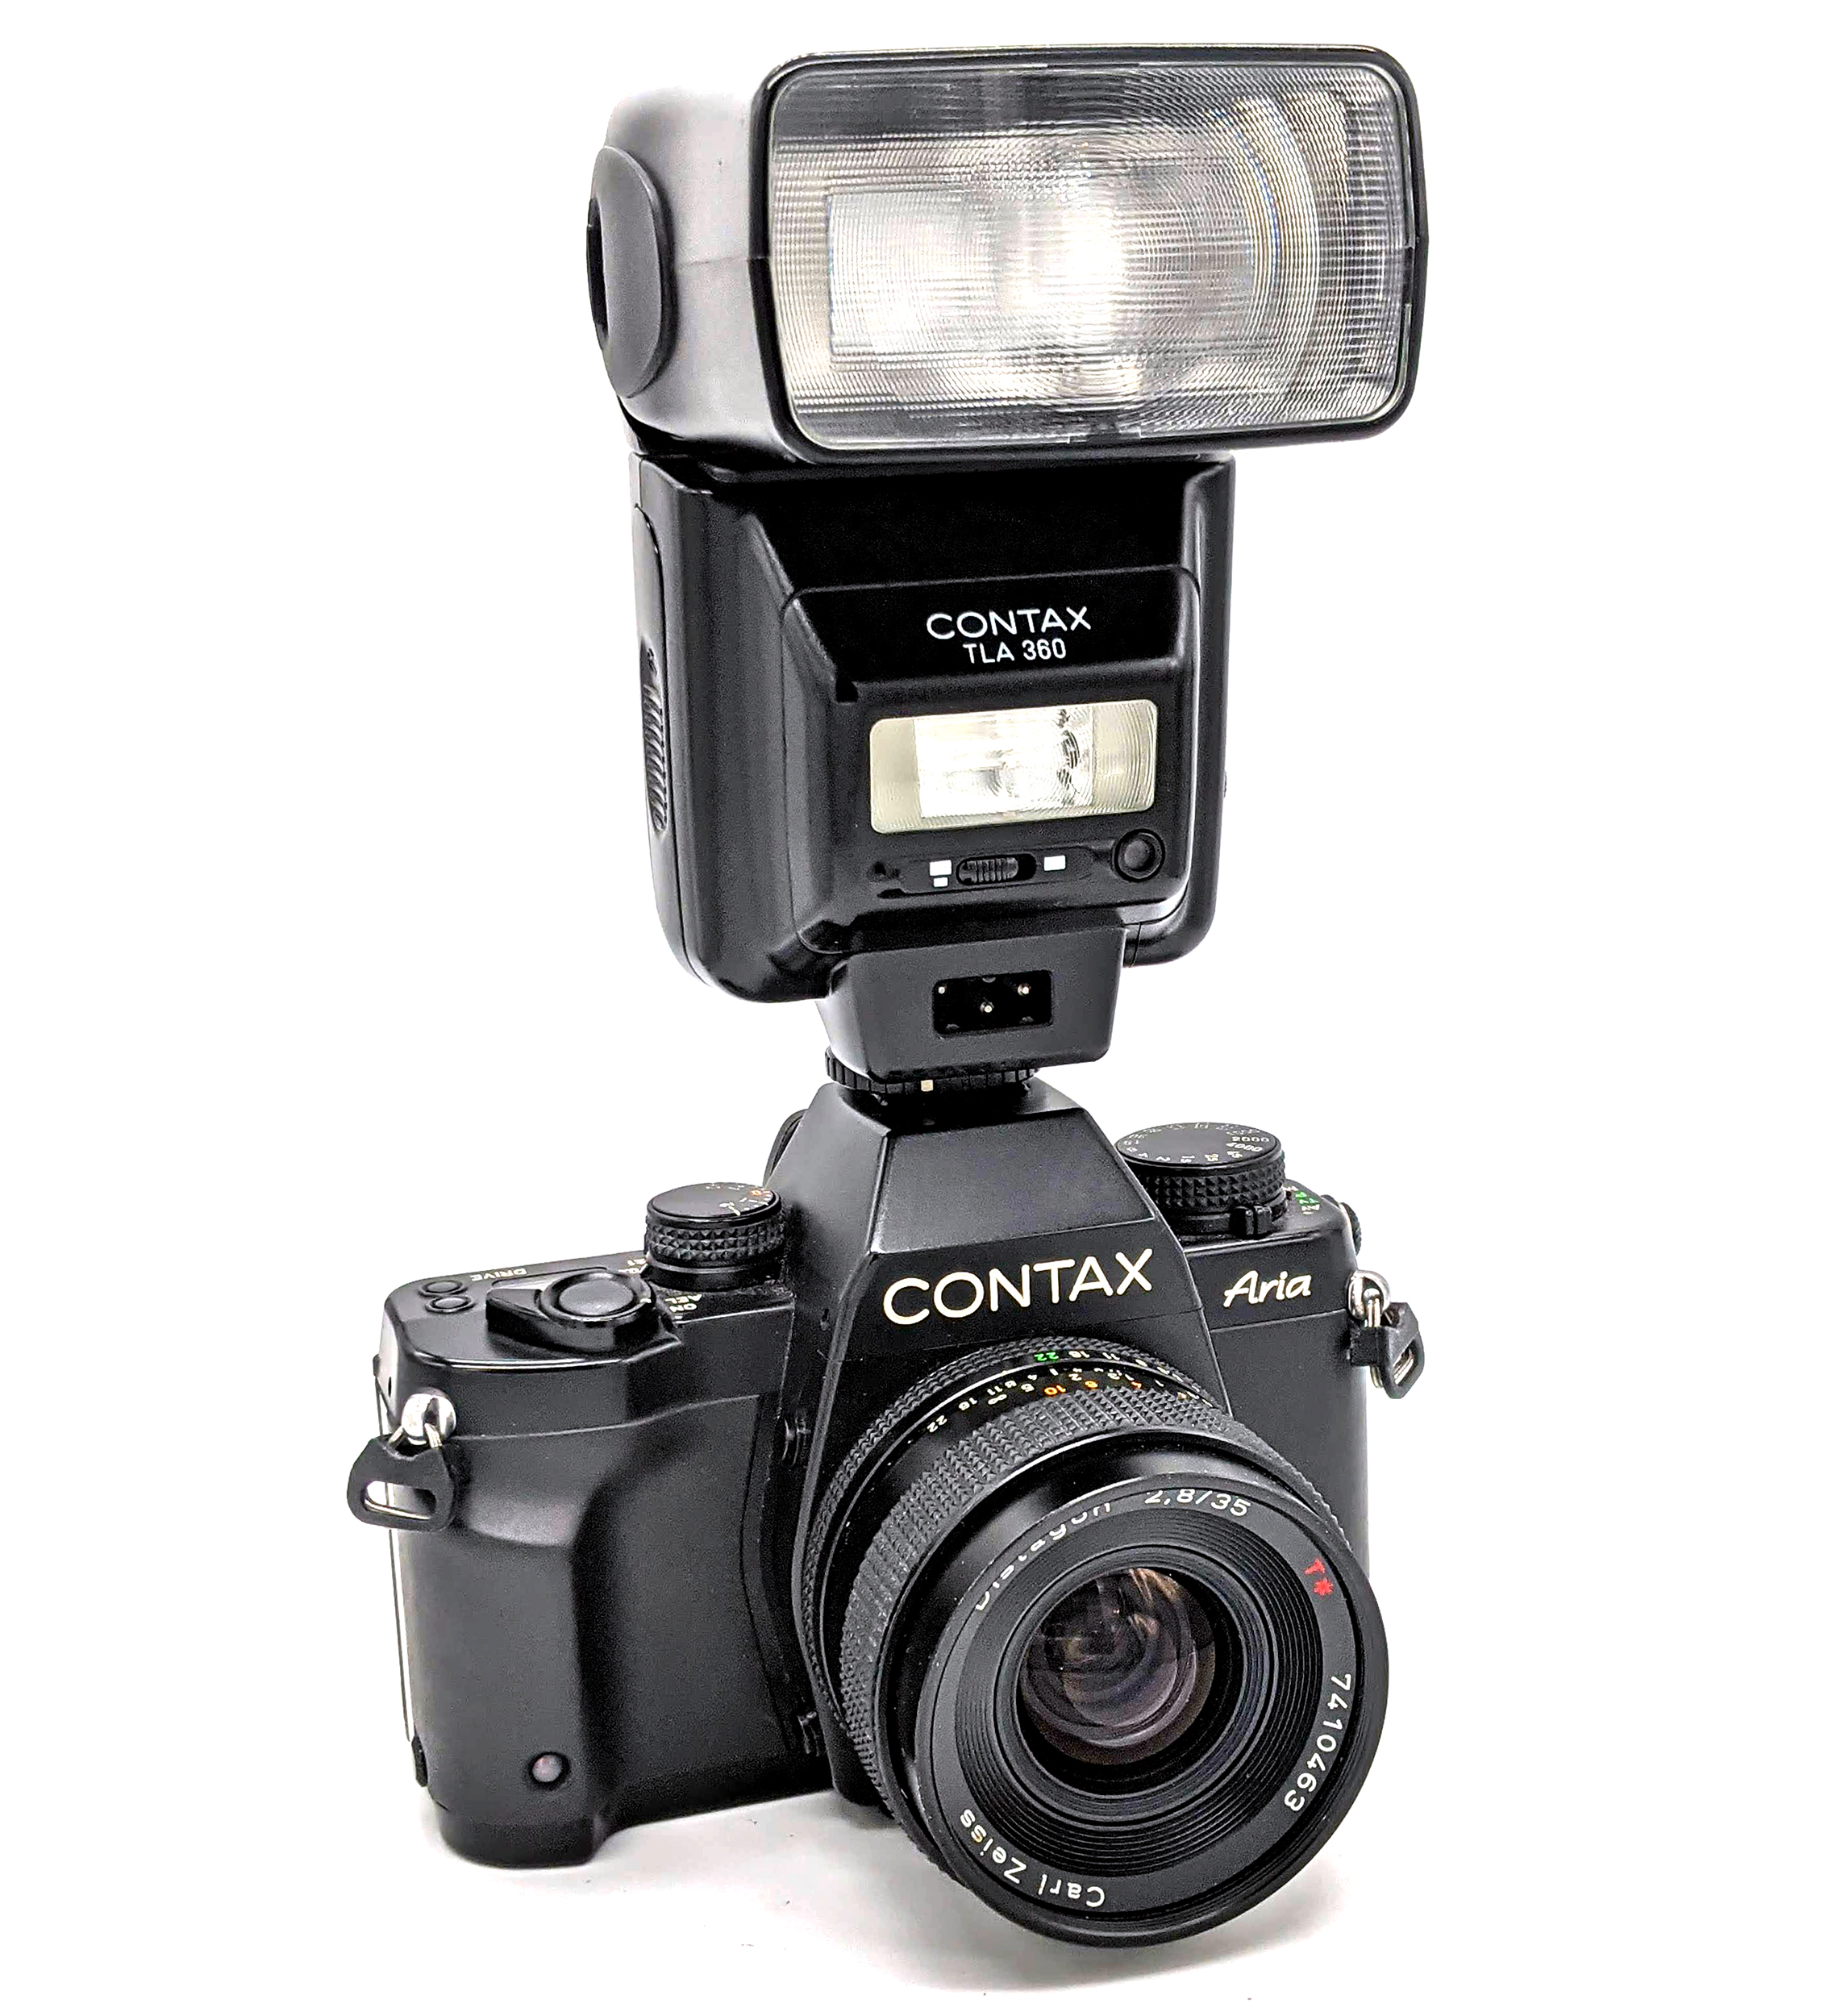
TLA 360
36
390g
4 x AA
Vertical / Horizontal
9 secs
Zoom (24-85)
TTL / A / M
Yes
TLA 480
48
830g
8 x D
Vertical / Horizontal
Depends
Insert (24mm)
TTL / A / M
Yes
The two-pin TLA 20 and TLA 30 were the flashes in existence during the era of the 139, 137, RTS II, 159MM, 167MT, and the ST. The TLA 140 and TLA 200 were designed for the Contax G1 and G2 autofocus cameras. The five-pin TLA 280, TLA 360, and TLA 480 are optimized for the later RX, AX, RTS III, and Aria. However, all TTL Contax flashes are generally compatible with all TTL-capable Contax bodies in A and P modes. For instance, a TLA 30 should fully function with the RTS III or Aria, including daylight fill flash. The TLA 360 will work on an RTS II and automatically set the shutter speed to 1/60, but the body does not “communicate” its aperture setting with the flash. Ergo, it appears that you must manually dial in the f-stop on the RTS II’s lens for proper TTL flash operation (i.e., f/4). Of course, you can alter the settings on the TLA 360 flash itself to accommodate other selected apertures when using the RTS II.
As a general rule, although the TTL flashes are generally cross-compatible across the Contax range, it would probably be best to match a TLA 30 with the 137/139/RTS II and the TLA 360 with the RX and later bodies. The TLA 30 is a really nice and affordable flash unit (f not rather large), with its capabilities for bounce flash and for shooting at all apertures to achieve a primitive daylight fill operation. The TLA 360 is a quintessential “modern” flash with all the bells and whistles one would expect and has fully communication with the later bodies when using MM lenses.
Yashica-Branded Flashes
Despite the fact that Yashica only produced one manual-focus SLR capable of employing TTL flash, it produced three flashes that should work with any TTL C/Y body.
Flash
GN (100)
Weight
Batteries
Bounce
Recycle (Full Power)
Coverage
Modes
Rear Curtain
CS-203
20
?
2 x AA
No
?
?
TTL / M
No
CS-221
22
176g
4 x AA
Vertical
5 secs
35mm
TTL / M
No
CS-250AF
27
235g
4 x AA
Vertical
6 secs
Zoom (28-85)
TTL / M
No
Aftermarket Metz Options
To broaden one’s horizons, with the proper module and sync cords, many TTL-capable Metz flash units will work perfectly Contax cameras and the FX-103. Metz made two basic lines of flashes during the film era: the 300 and 3000 series. Properly-adapted Metz TTL flashes will provide the same capabilities as a TLA flash would on your particular Contax body. The proper module for 300-series flashes is the SCA 382 (there is an older SCA 380 that will work). The proper module for 3000-series flashes is the SCA 3801. Of course, you can mix and match modules and the 300/3000 series flashes as long as you can read Metz’s complicated flow charts. Check here for the full info. Metz offers a much larger world of flashes than were ever made for Contax.
Aftermarket Sunpak Options
A competitor to Metz back in the day, Sunpak also made flashes that could be adapted to different camera TTL systems. The correct TTL module for Contax cameras is the YC-1D. The modular Sunpak flashes are dirt cheap, most even more affordable than equivalent Metz equipment. Sunpak has some fun and quirky units like the 120J and its TTL ring units.
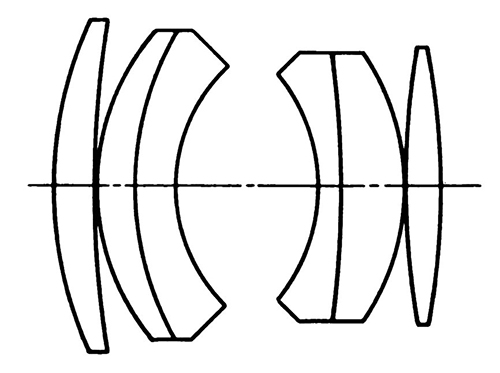
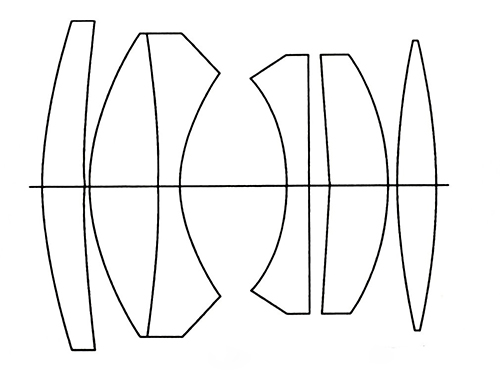
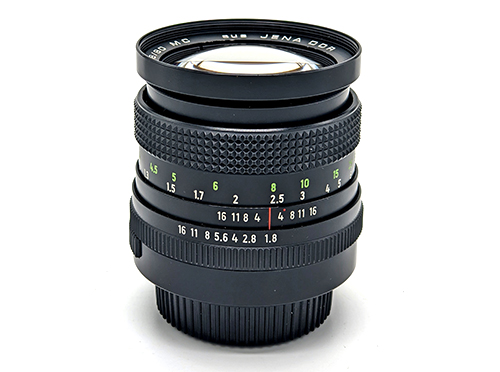
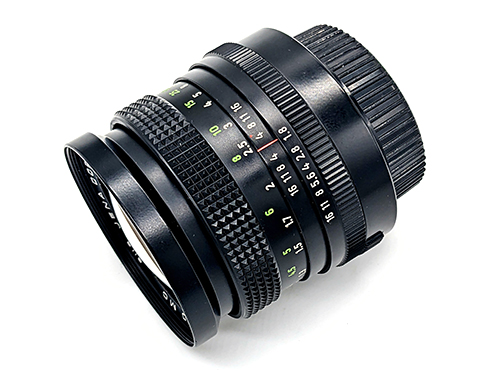
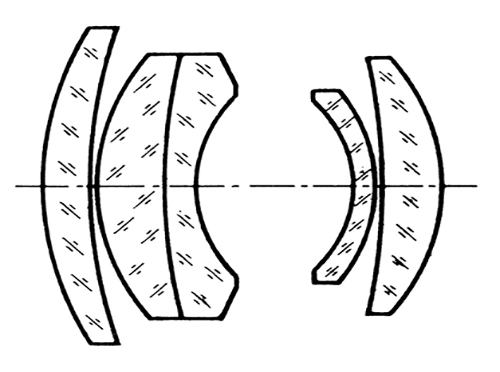
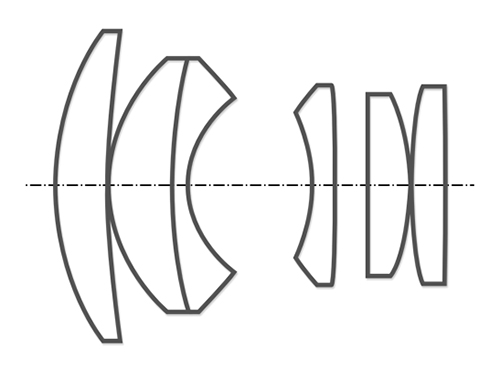
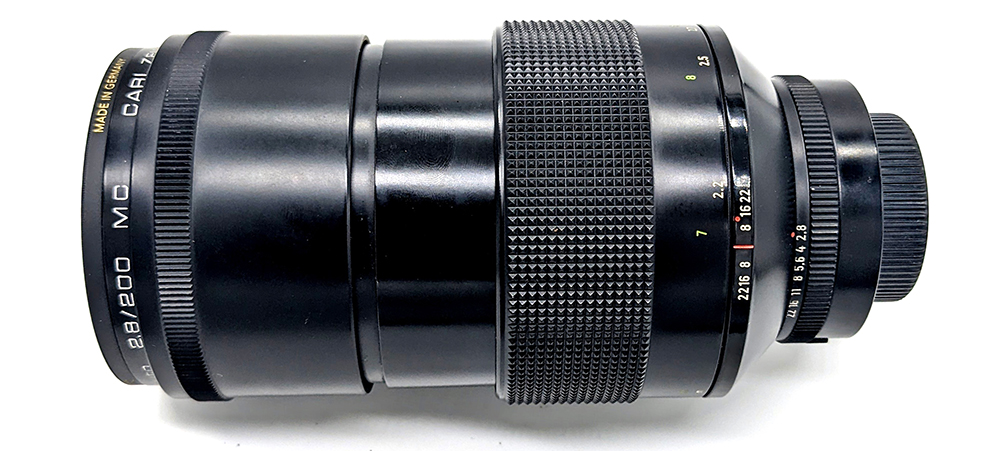
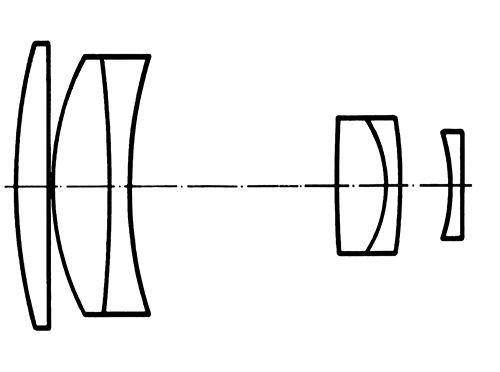
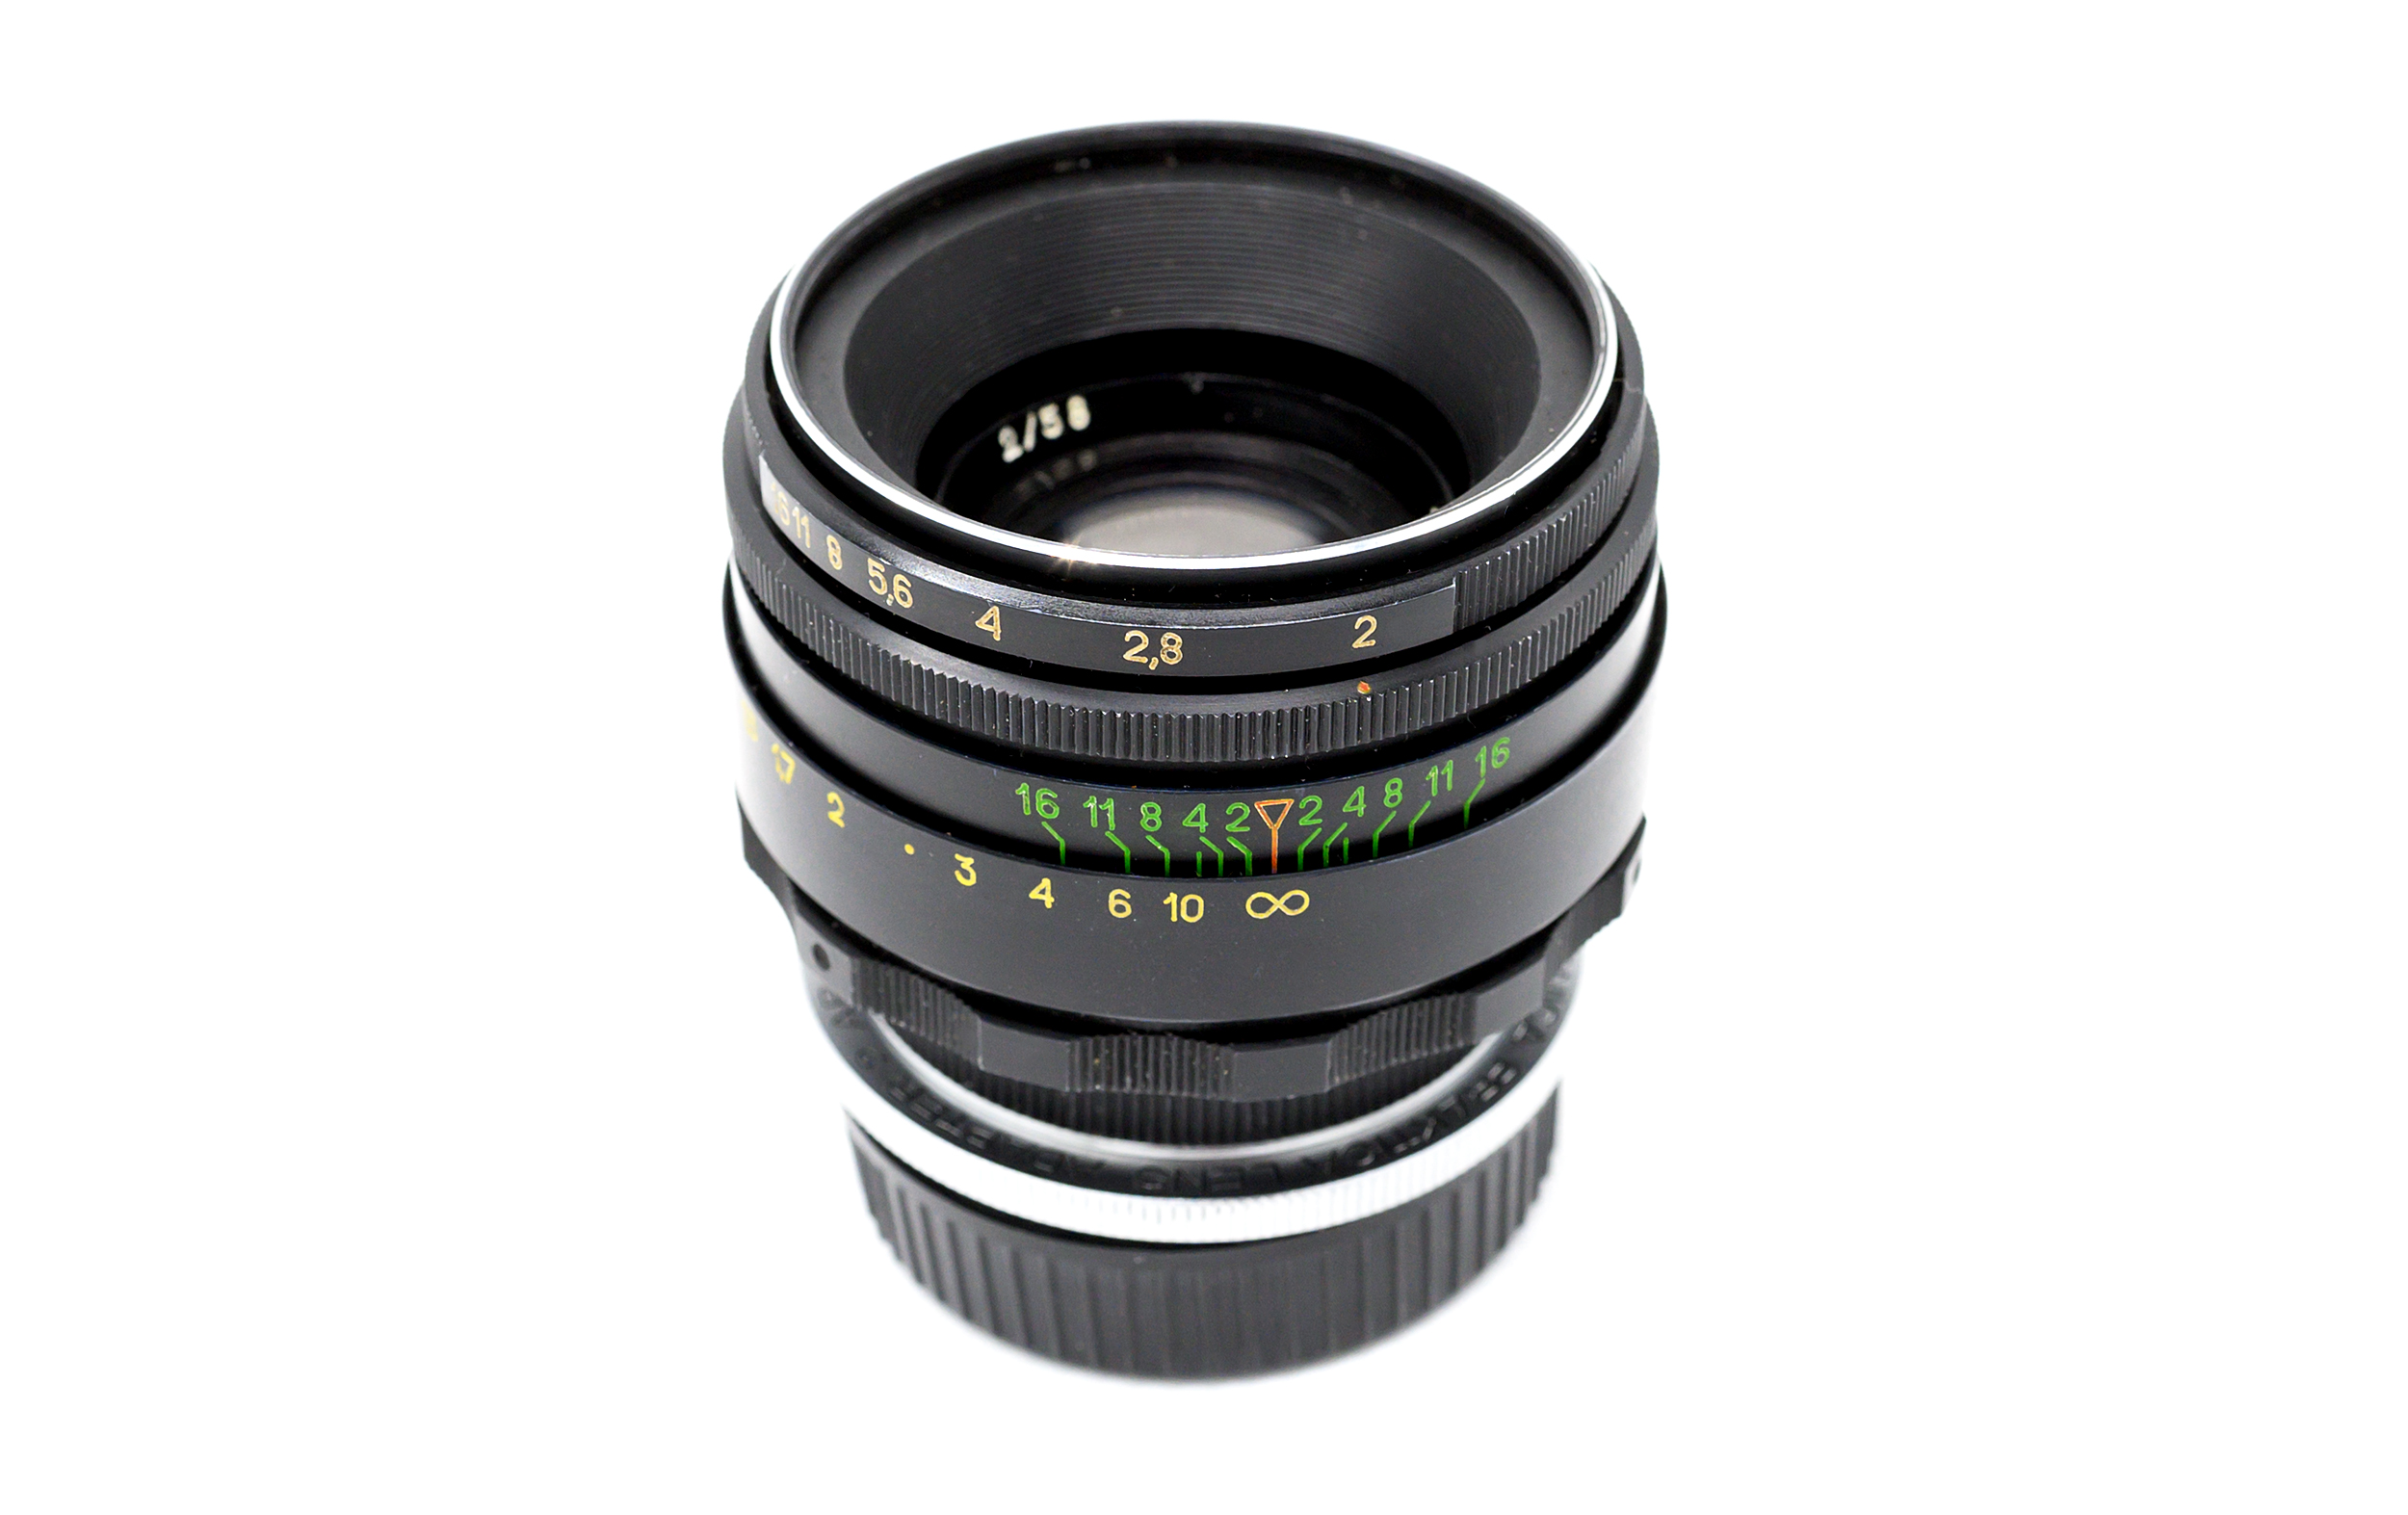
With some exceptions, VEB Carl Zeiss Jena’s (East Germany) M42 SLR lenses were generally unknown and unavailable in North America before the fall of the Eastern bloc and the rise of easy international internet transactions. Today, many agree that 1960s-80s CZJ 35mm lenses are not only outstanding compared to their contemporary competition from Europe and Japan, but also remain capable of producing unique and pleasing images not necessarily offered by today’s advanced optics.
For the most part, CZJ lenses were never cheap and thus mostly out of reach for the average citizen of the Eastern Bloc. The most widely-produced camera lenses produced by CZJ were in M42 screw mount, in Exakta mount, and for the 6×6 Pentacon. While the single-coated 1950s and 1960s versions of these lenses were fairly outstanding for the SLR technology of the time, the advent of the multicoating in the 1970s only made many of these lenses much better.
When it came to M42 cameras and lenses, Japanese manufacturers like Pentax, Yashica, Chinon, and Fujica dominated the North American market. Perhaps because of the prevailing geopolitics of the time, CZJ lenses only made a limited appearance in the United States between the 1950s and 1980s. While the full lineup of its M42 lenses was never marketed and sold in North America, one could find CZJ lenses in the following places:
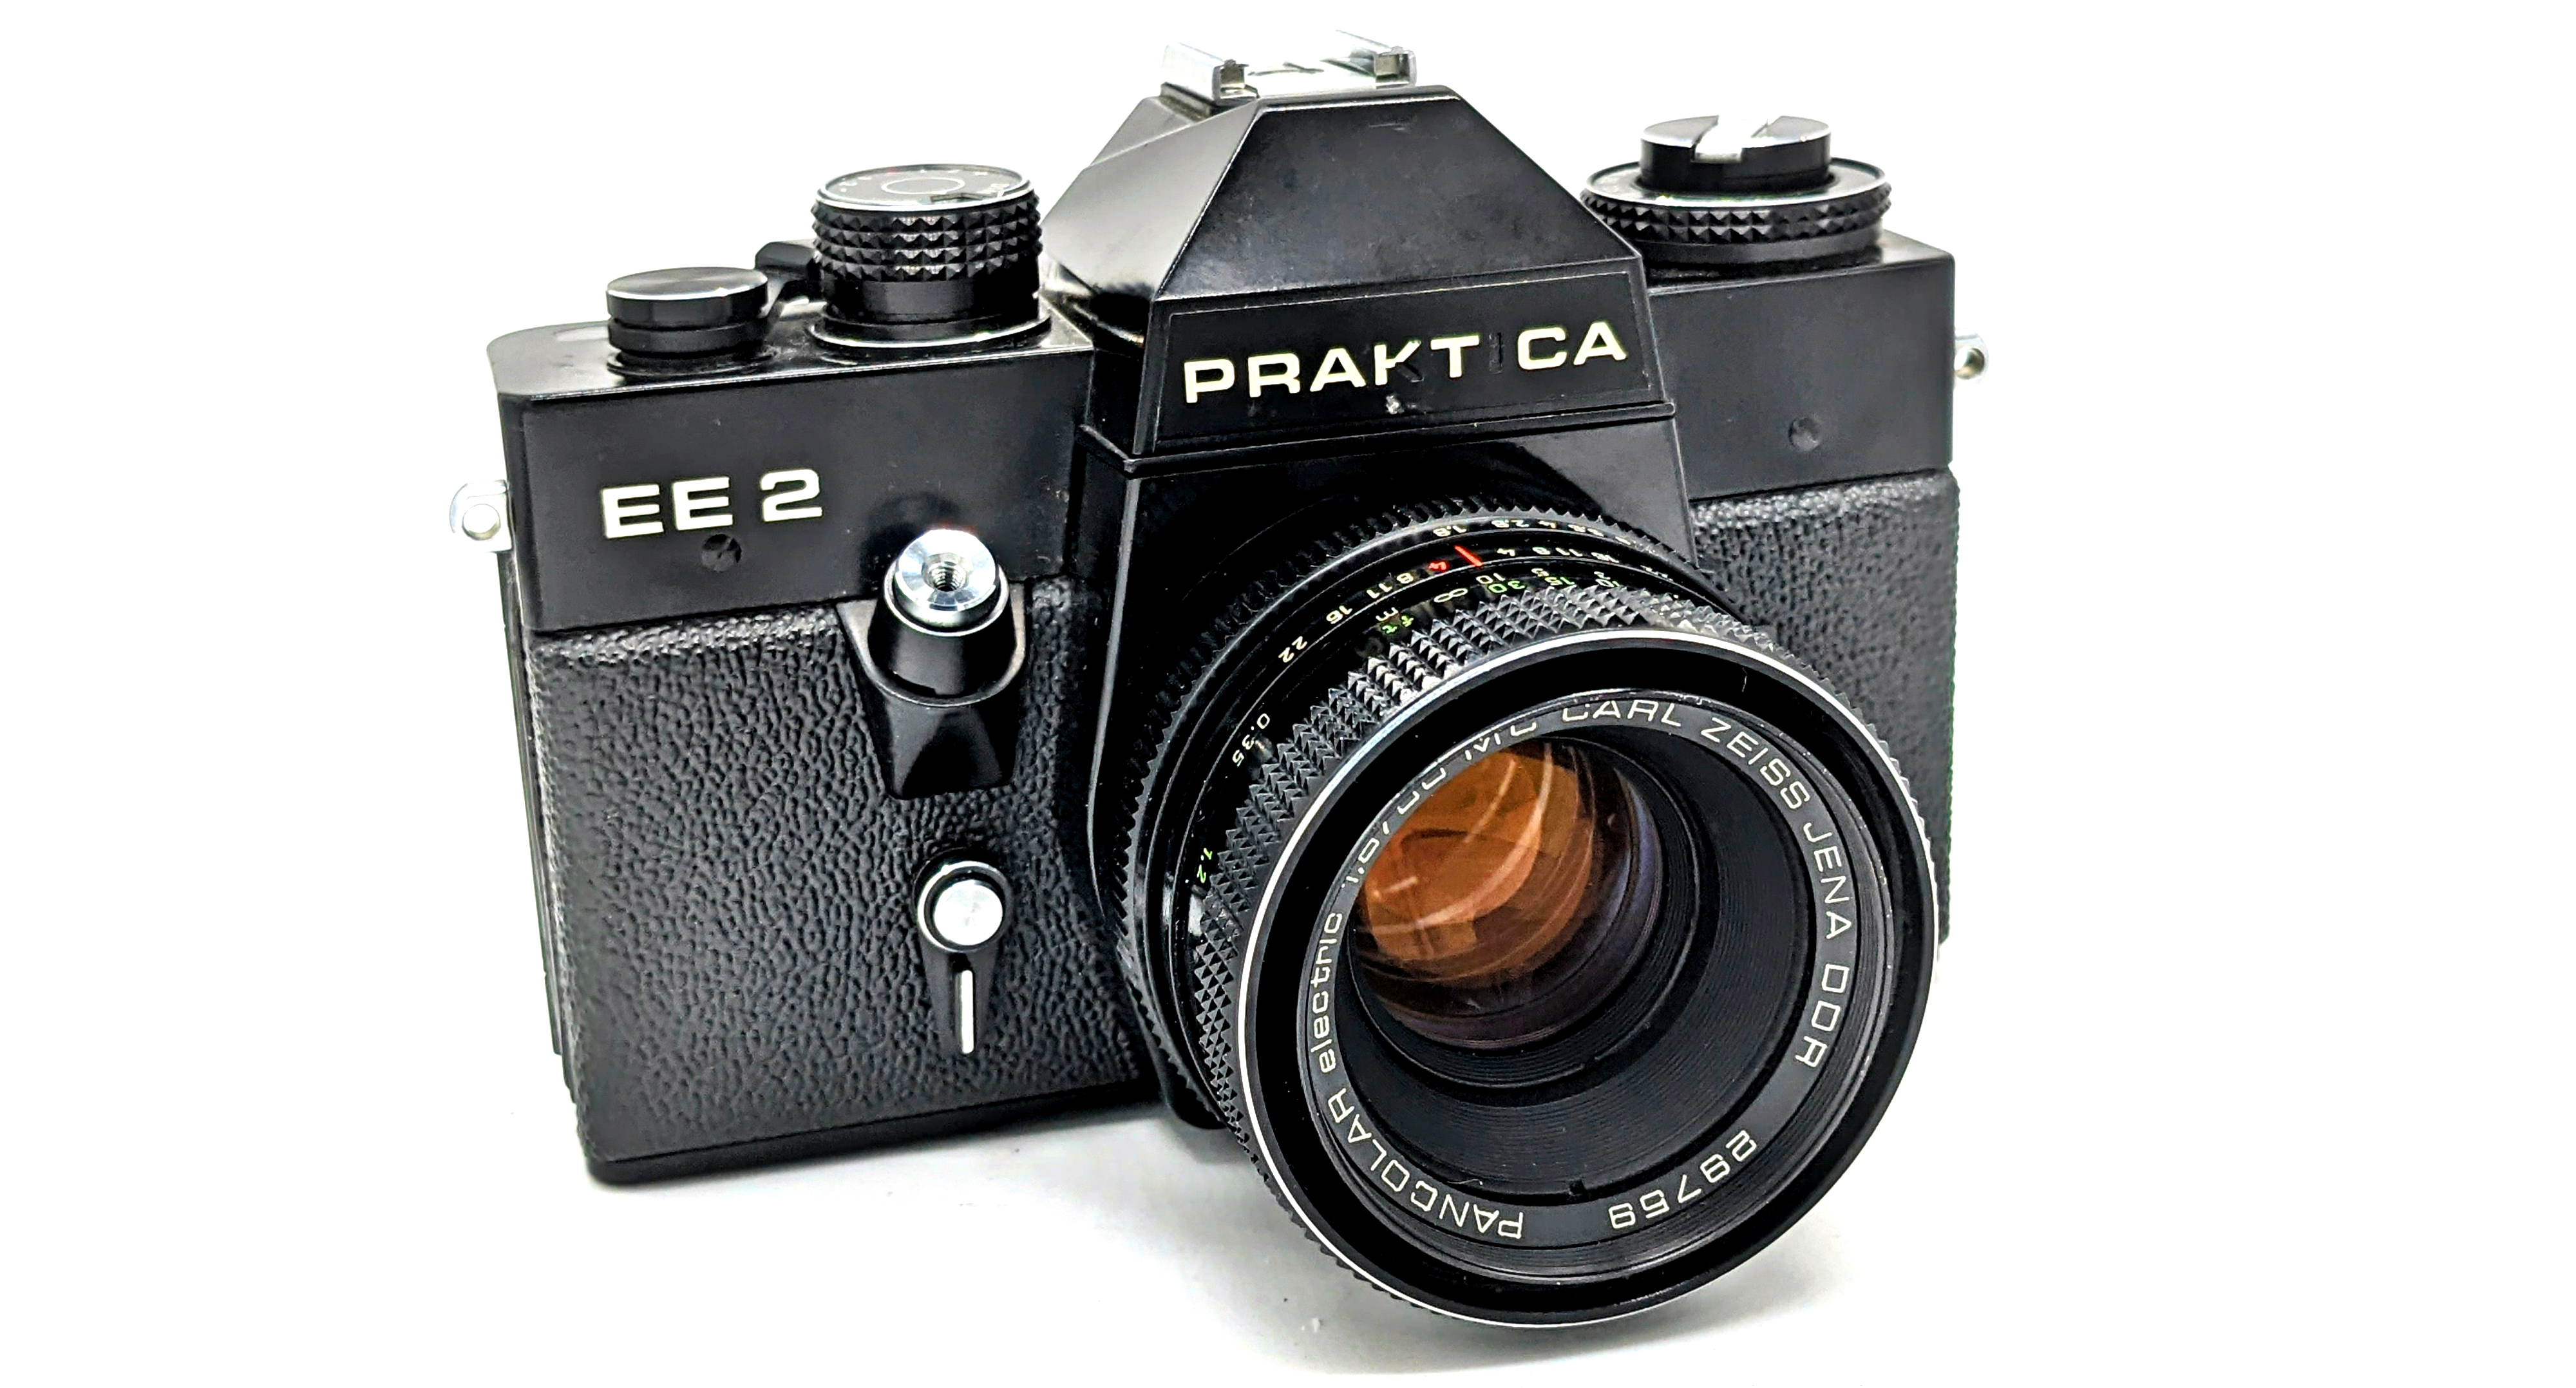
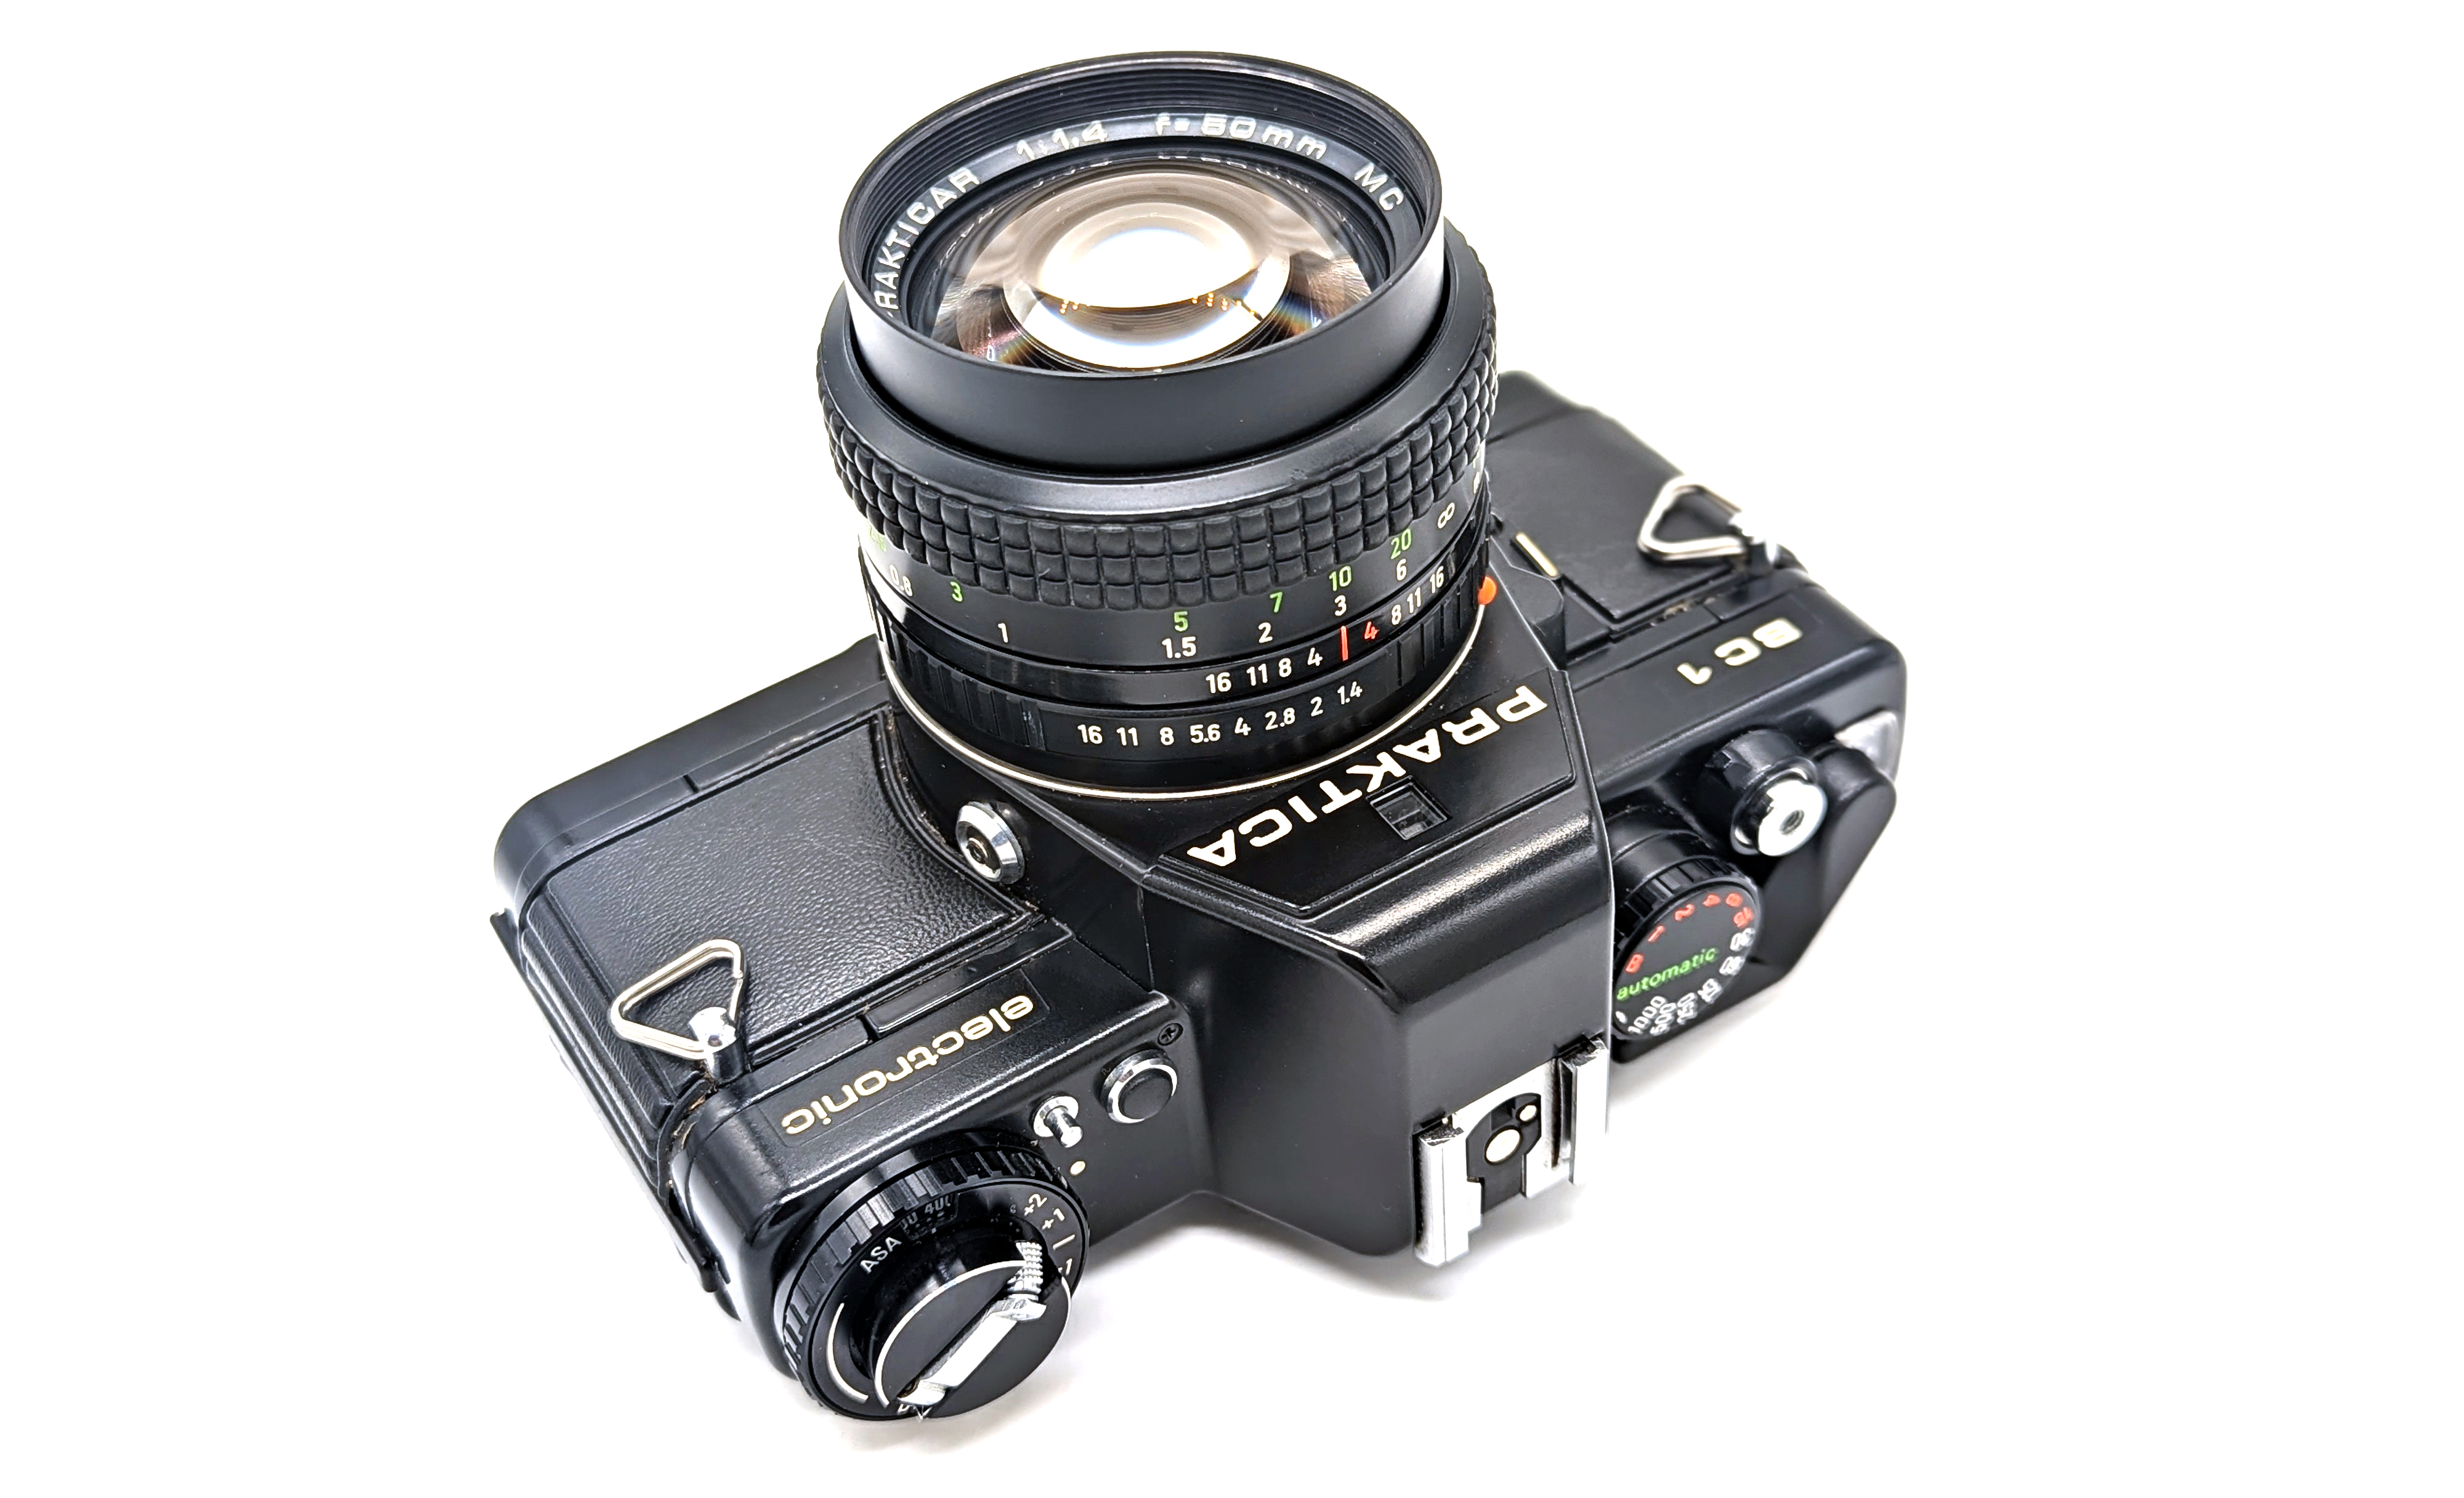
Praktina/Praktica SLRs: Certain 1950s and 1960s East German Praktina and Praktica SLRs came bundled with an M42 CZJ 50mm f/2.8 Tessar. As time went on, Praktina disappeared; and Prakticas were sold with cheaper standard lenses from other East German manufacturers like Meyer Optik and Pentacon.
Exakta: A number of the single-coated CZJ lenses were available for the Exakta camera system.
Werra: CZJ made the lenses for the “Werra” compact camera system. The Werra series did not sell very well in North America, and it seems that only the 50mm f/2.8 was readily available.
Pentacon Six: Several CZJ lenses were available for the East German Pentacon Six medium format system.
Carl Zeiss Jena Multicoated Lenses in M42 Mount
The final generation of CZJ multicoated M42 lenses, produced from the mid-1970s through the early 1980s, were not offered directly for sale in North America. It is possible that there was a way to special order these lenses, but that remains unclear. Here is a list of the primary late-model multicoated Zeiss Jena M42 lenses, excluding zooms produced for it by third parties and small batch / experimental lenses.
Lens
Replaced?
Design
Min. Focus
Filter
Weight
Availability
20mm f/2.8 Flektogon
20mm f/4
9/8
0.19m
67mm
350g
Common
28mm f/2.8 (Made in Japan)
29mm f/2.8
5/5
0.20m
49mm
180g
Common
35mm f/2.4 Flektogon
35mm f/2.8
6/6
0.20m
49mm
236g
Common
50mm f/1.8 Pancolar
50mm f/1.8
6/5
0.35m
49mm
220g
Common
80mm f/1.8 Pancolar
80mm f/2.8
6/5
0.83m
58mm
308g
Rare
135mm f/3.5 Sonnar
135mm f/3.5
4/3
0.90m
49mm
430g
Common
180mm f/2.8 Sonnar
180mm f/2.8
5/3
1.70m
86mm
1365g
Common
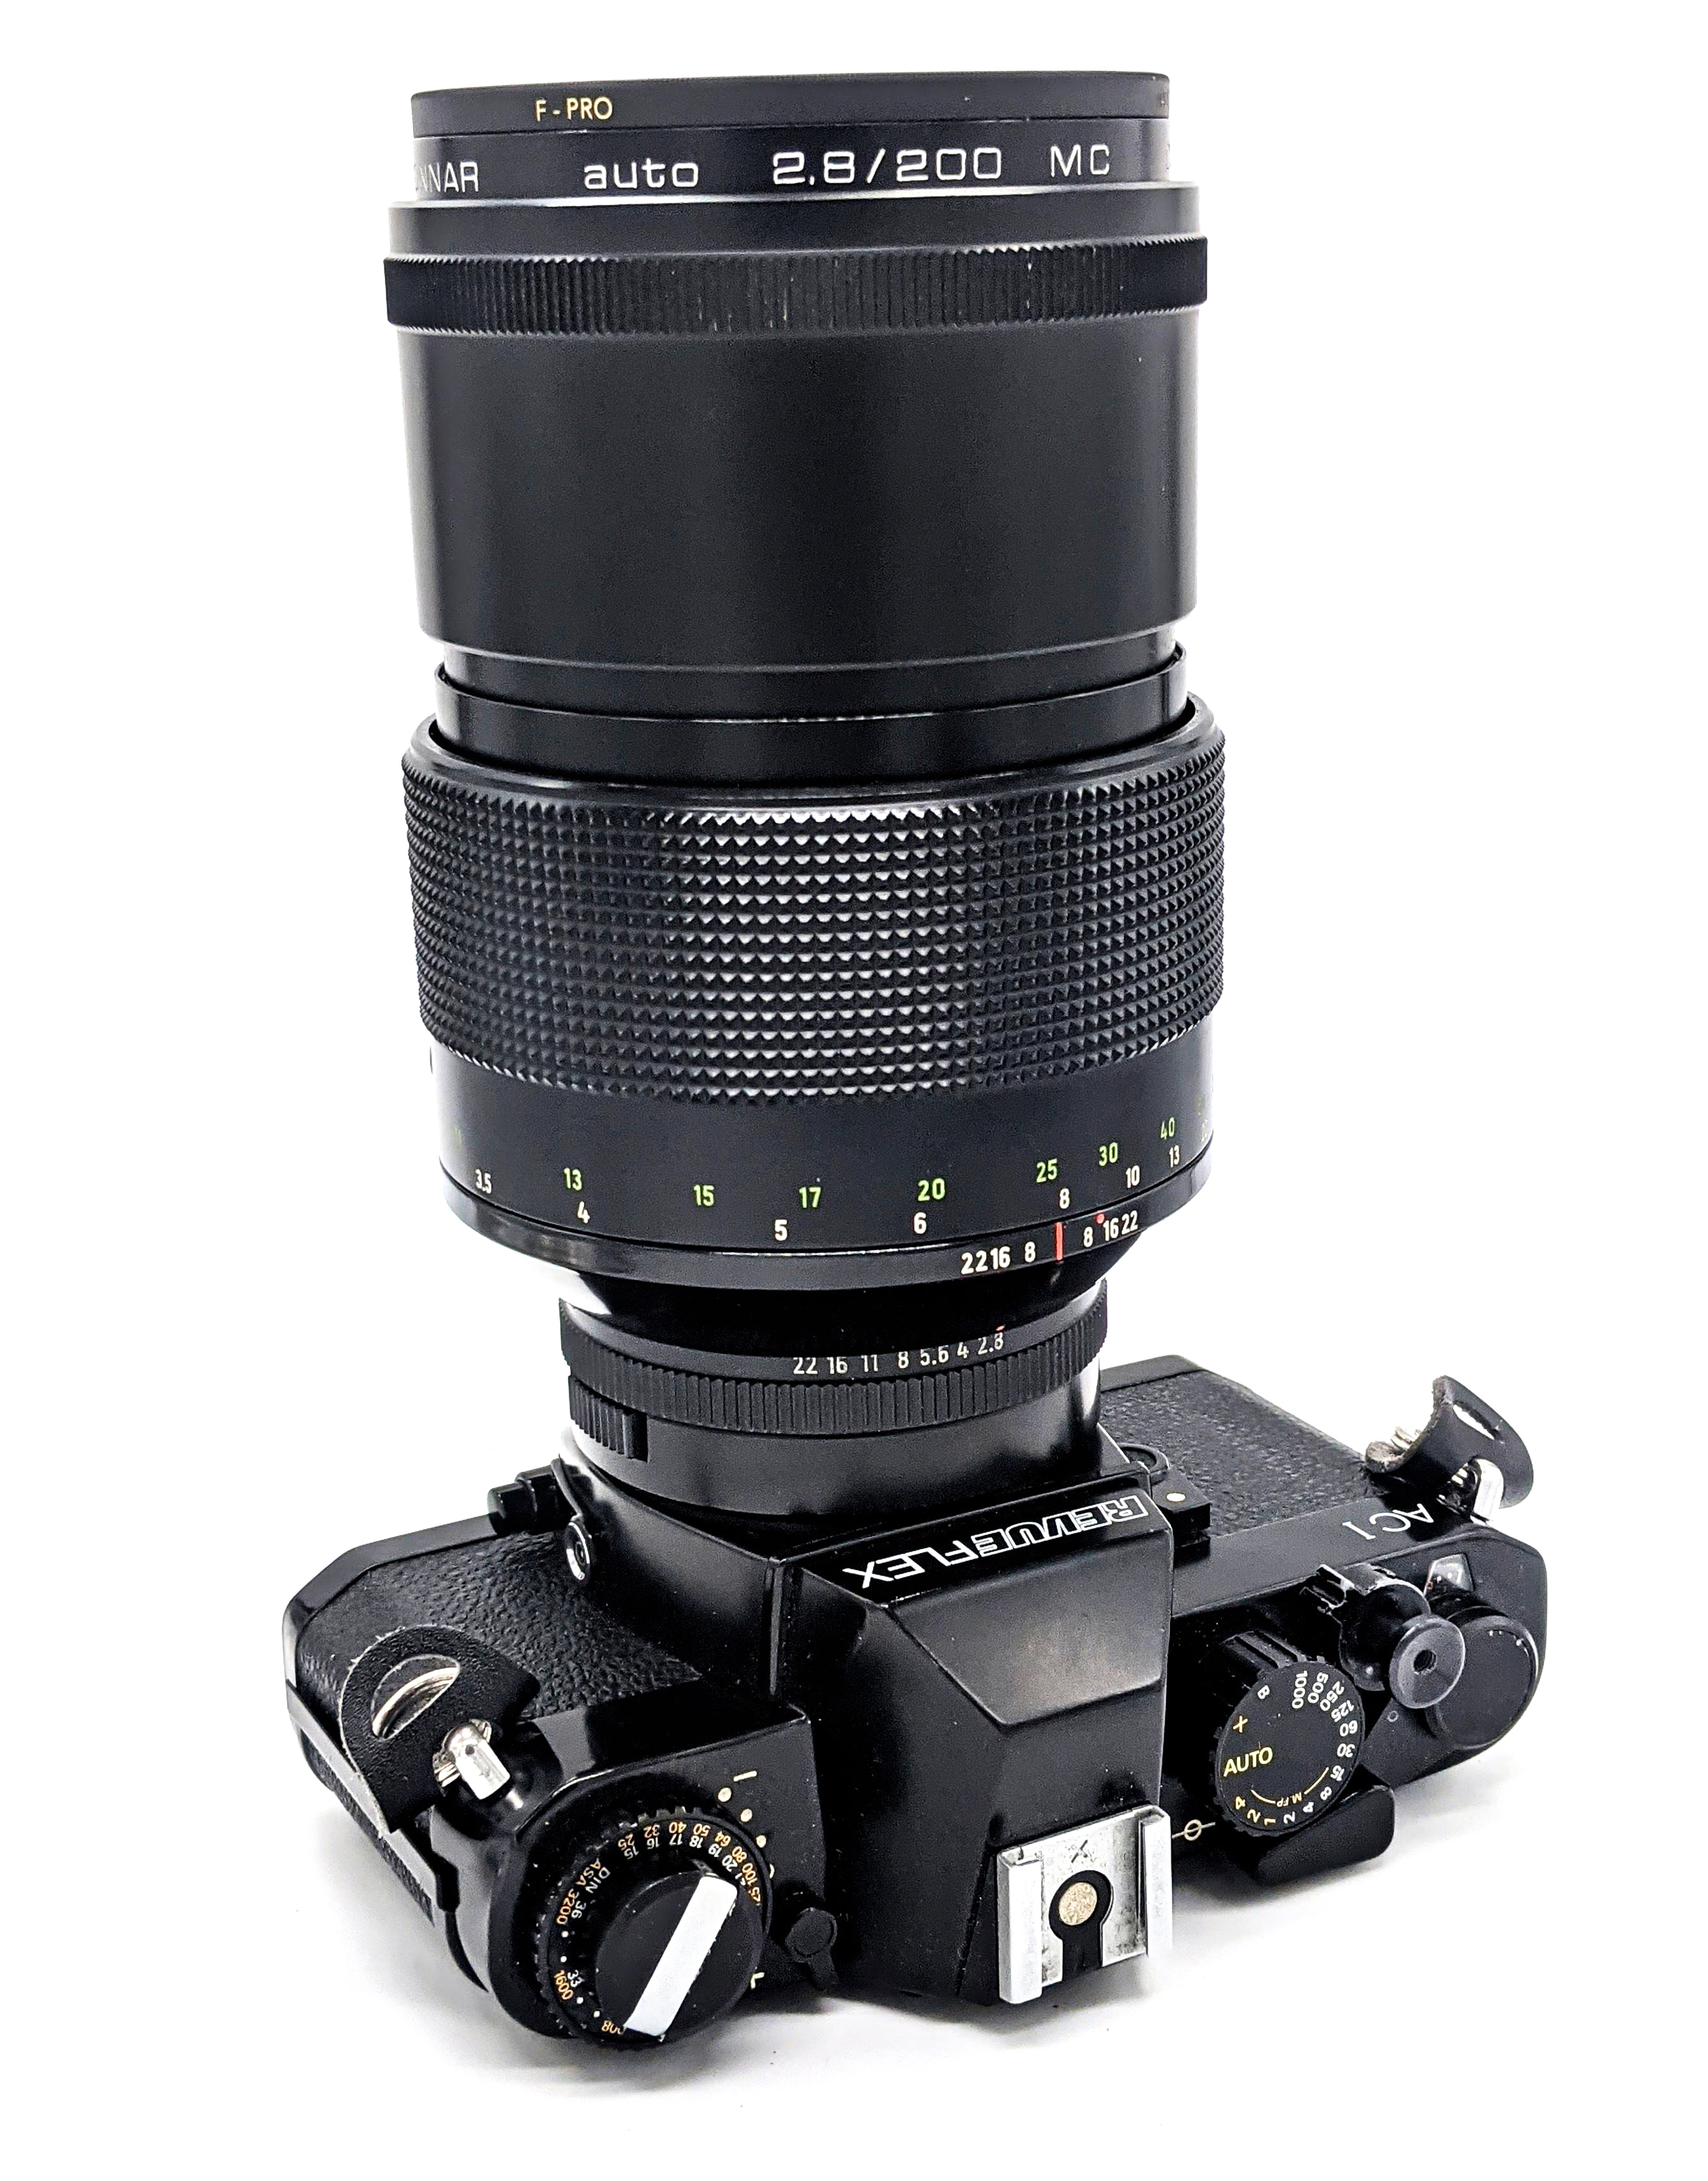
200mm f/2.8 Sonnar
—
6/4
2.20m
77mm
1200g
Rare
300mm f/4 Sonnar
300mm f/4
6/4
3.00m
86mm
2070g
Rare
500mm f/8 Fernobjentiv
—
2/1
6.00m
77mm
1743g
Very Rare
35-70mm f/2.7-3.5 Pancolar
—
9/8
0.8m
58mm
375g
Very Rare
80-200mm f/4
—
12/8
1.1m
52mm
622g
Rare
With the downfall of the M42 lens mount during the mid-to-late 1970s and Praktica’s 1979 adoption of the “B mount,” CZJ ended up producing some multicoated lenses for that system, a mix of remounted versions of their M42 lenses and a few new models. Although it had some promising prototypes floating around, CZJ was essentially out of the 35mm SLR lens business by the mid-1980s.
When we talk about any 35mm SLR lens produced from the 1960s to the 1980s, their strengths do not typically lay in their raw objective optical performance. It was not until the widespread introduction of new types of glass and the addition of aspherical elements during the 1990s that higher-end SLR lenses made a giant leap in performance. However, what is special about certain M42 lenses is that they have compelling and pleasing rendering at close and mid-range distances. The manner by which the lens can separate a subject from its background in a smooth and non-busy way remains a kind of subjective measure of objective optical performance.
Excluding lenses that are super rare and/or cost-prohibitive, building a set of CZJ lenses comes down primarily to personal preferences for certain focal lengths. In my opinion, the magic is with the 35mm f/2.4, the 80mm f/1.8, and the 200mm f/2.8. However, the 50mm f/1.8 and 135mm f/3.5 can substitute for the more expensive 80mm and 200mm. A few words about the line-up.
20mm f/2.8 MC Flektogon: I believe that the 1963 20mm f/4 Flektogon may have been the first widely-available non-mirror-lock-up SLR lens in the 20mm/21mm focal length (Leica and Nikon did not introduce their first 20/21s for a few years later). Nearly all 1960s-80s 20/21 SLR lenses use some variation of the Flektogon’s general optical design. The 2.8 Flektogon is a substantial resdesign of the original lens, but still within the same framework. However, despite the internet hubbub and its current high prices, there is nothing particularly special about the f/2.8 Flektogon lens compared to the contemporary competition. Nearly every manufacturer had a f/2.8 21mm lens by the late 1970s. I find that all of these 1960s-80s 21mm lenses tend to exhibit complicated distortion and need to be stopped down significantly to achieve their peak performance. It was not until the 1990s when 21mm lens performance began to improve dramatically. That being said, the minimum focusing distance of 0.19m is pretty incredible. In my opinion, these lenses cost too much if the 20/21 focal length is something you may only use occasionally.
20mm f/4 Flektogon
20mm f/2.8 Flektogon
28mm f/2.8 MC: CZJ did not produce this lens in-house but rather subcontracted it to a Japanese manufacturer (Cosina? Sigma?). During the 1970s, CZJ did market under its own name a “29mm f/2.8 MC” M42 lens, but it appears to have been a rebadged Pentacon or Meyer Optik product. Because the native East German lenses in this focal length do not have a particularly good reputation, it is probably a good thing that CZJ sent this one out. Because the word is out that these are not “real” CZJ lenses, they remain pretty cheap if you can find one.
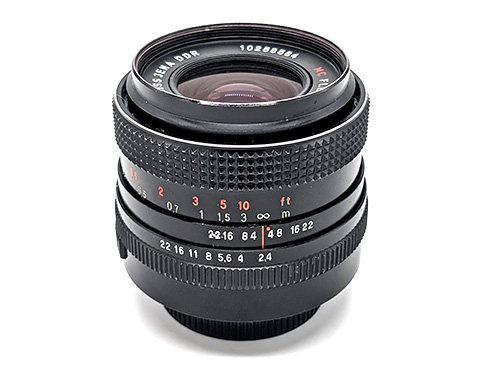
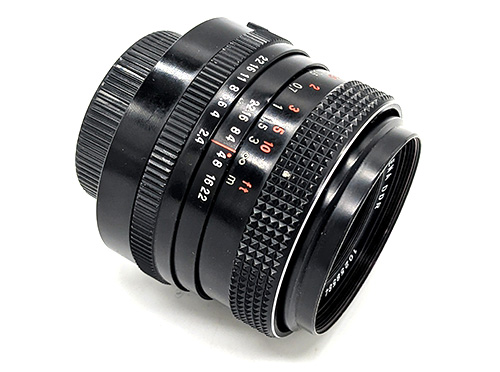
35mm f/2.4 MC Flektogon: The f/2.4 Flektogon replaced the earlier 35mm f/2.8. The 2.8 followed the conventional wisdom in the focal length at the time, a large front element with either a Tessar or Planar-type group behind it (for instance, Nikon’s first and second generation 35mm f/2.8 lenses both used this scheme). The 2.4 had a completely new design and its design is unlike contemporary designs from Japan in the 35mm focal length. While much internet hyperbole exists on this lens, it remains pretty special. Its close focusing ability alone (down to almost 1:2 macro) is probably worth the price of admission. With unique rendering and color rendition, better-than-average center sharpness and light fall-off, and good wide-open performance, if you own just one CZJ lens, I would suggest it to be this one. It is really best employed at close-to-mid distances. Watch out for barrel distortion, as it has a significant amount at certain distance/aperture combinations. When the word got out on this lens, it shot up in value and remains expensive.
35mm f/2.8 Flektogon
35mm f/2.4 Flektogon
50mm f/1.8 MC Pancolar: The 1.8 Pancolar updates the older single-coated “Zebra” version of the lens. The Pancolar’s basic lens design had not changed since 1967. The relatively-affordable Pancolar is emblematic of the CZJ character, with an emphasis on center resolution with pleasing effects to the outside of the frame and behind the subject. There is plenty of appreciation for this lens; and if you prefer the 50mm focal length, this is the East German M42 lens to get.
Pre-1967 Pancolar
Post-1967 Pancolar
80mm f/1.8 MC Pancolar: As the story goes, the 80mm was developed to plug a large gap in the CZJ lens line between 50mm and 135mm to replace the older 80mm f/2.8 Biometar (made for the Pentacon Six and often adapted to M42) and the world-famous 75mm f/1.5 Biotar (a lens that can cost thousands of dollars today if you can find one). From its schematics, the 80mm is essentially a type of 50mm lens design. The 80mm was only produced in relatively small quantities and was extremely expensive at the time. Its close focusing distance of only 0.83m is somewhat limiting. That being said, the Pancolar is arguably among the best of CZJ M42 lenses. It is very compact, sharp and useable wide open, renders gently, and does a better job of background separation than the 50mm. That being said, the current high prices demanded for the 80mm reflect more of its rarity than its raw performance. It really should be a $200-300 lens. However, it is one of those lenses you will probably never part with.
80mm f/2.8 Biometar
80mm f/1.8 Pancolar
135mm f/3.5 MC Sonnar: I do not have any direct experience with this lens and do not regularly use the 135mm focal length. The lens has a great reputation and should not disappoint. They are cheap and plentiful in the MC version.
180mm f/2.8 MC Sonnar: This ginormous lens was not designed for the M42 mount at all, but rather for the 6×6 medium format Pentacon Six. With its original design going back to the 1930s, CZJ updated this lens with MC for the 1970s. CZJ designed the 180mm to work also on M42 cameras via an adapter that retained automatic aperture operation. Given the weight and bulk of this lens, it is not ideal at all for handheld 35mm use. Otherwise, it is a stunning lens. One of the best 180mms out there for pure close and mid-range character. While they used to be relatively affordable and plentiful, prices have been creeping up.
200mm f/2.8 MC Sonnar: Perhaps realizing that its 180mm lens designed for medium format was not ideal for compact 35mm cameras, one of CZJ’s last “new” M42 designs was the 200mm f/2.8. This lens is noticeably smaller and lighter than the 180mm and can be used handheld with some effort. This lens is another true winner for close and mid distances. The maximum aperture of f/2.8 makes this lens far more versatile and easier to focus than the host of 200mm f/4 lenses out there. Like the 80mm, the prices currently demanded for the 200mm reflect its rarity rather than its performance, which has long been eclipsed by modern lenses.
180mm f/2.8
200mm f/2.8
Buying Carl Zeiss Jena M42 Lenses
As a coherent lineup in the 35mm format, it is difficult to find a better set than CZJ’s multicoated M42 lenses. With a mix of new and updated designs, it was a shame that these lenses were not generally available in North America. Because the word has been out on these lenses for a long time, and because of the insatiable appetite of the adapted digital crowd for “effects” lenses, the more desirable CZJ lenses are neither cheap nor often easy to find. If looking to purchase a CZJ from abroad through the internet, which is the easiest way to locate one currently, you should assume that the copies that were in the “best condition” have long already been sold. Many of the lenses for sale today are probably either recent discoveries or those that may have been well-used for decades. In addition to actual lens condition, many of these lenses will need a professional once-over, normally including a relubrication, if they have been sitting for decades.
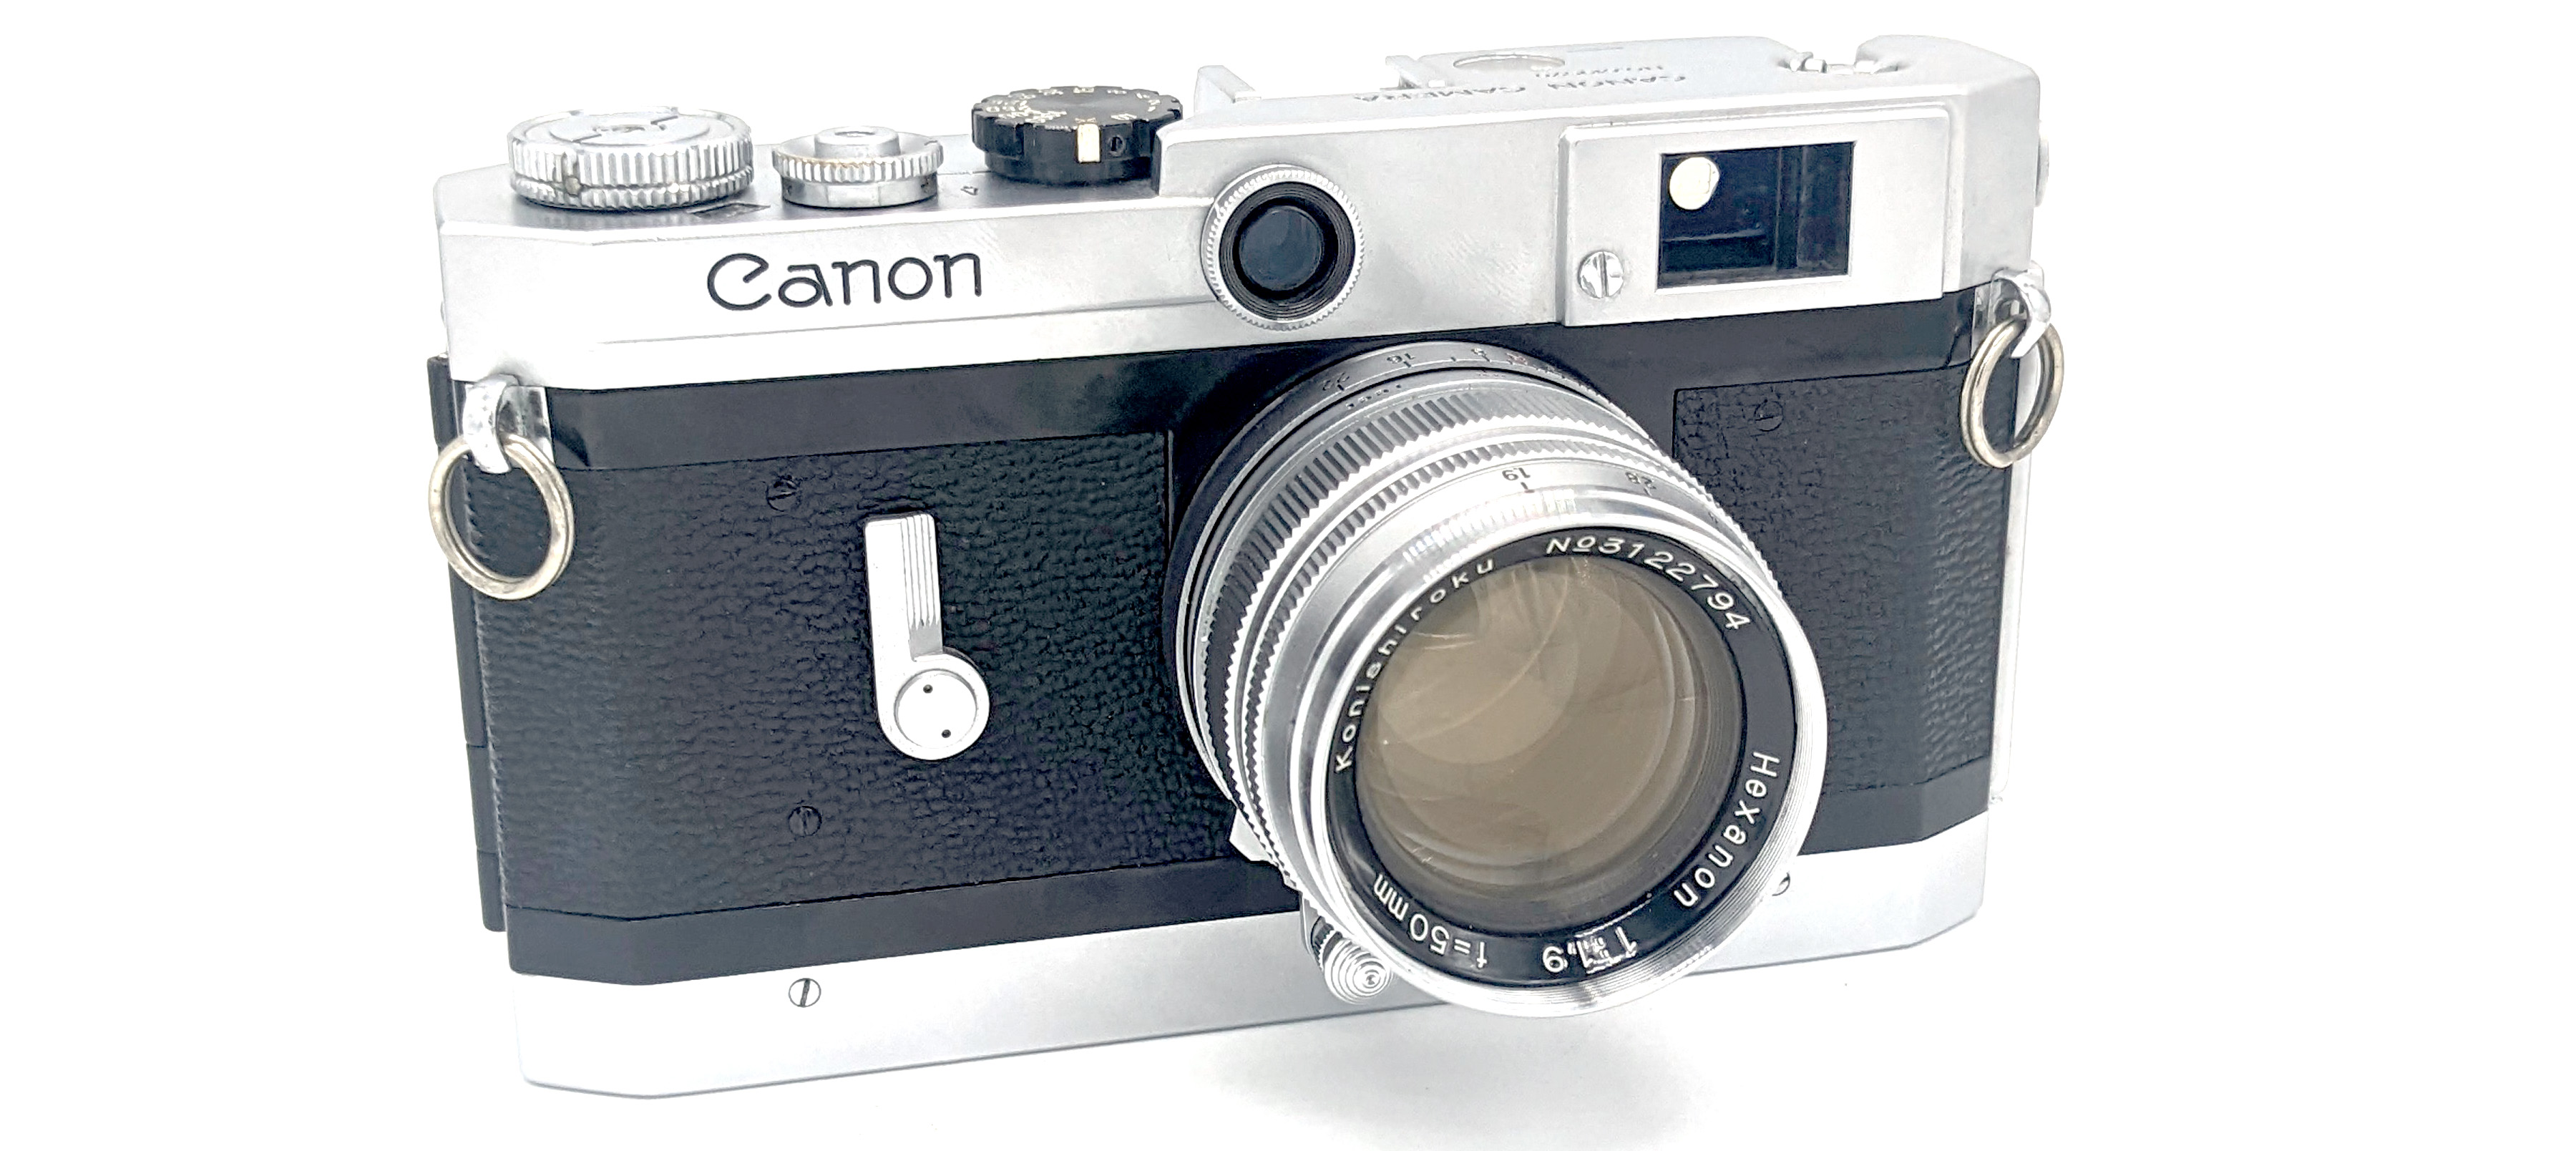
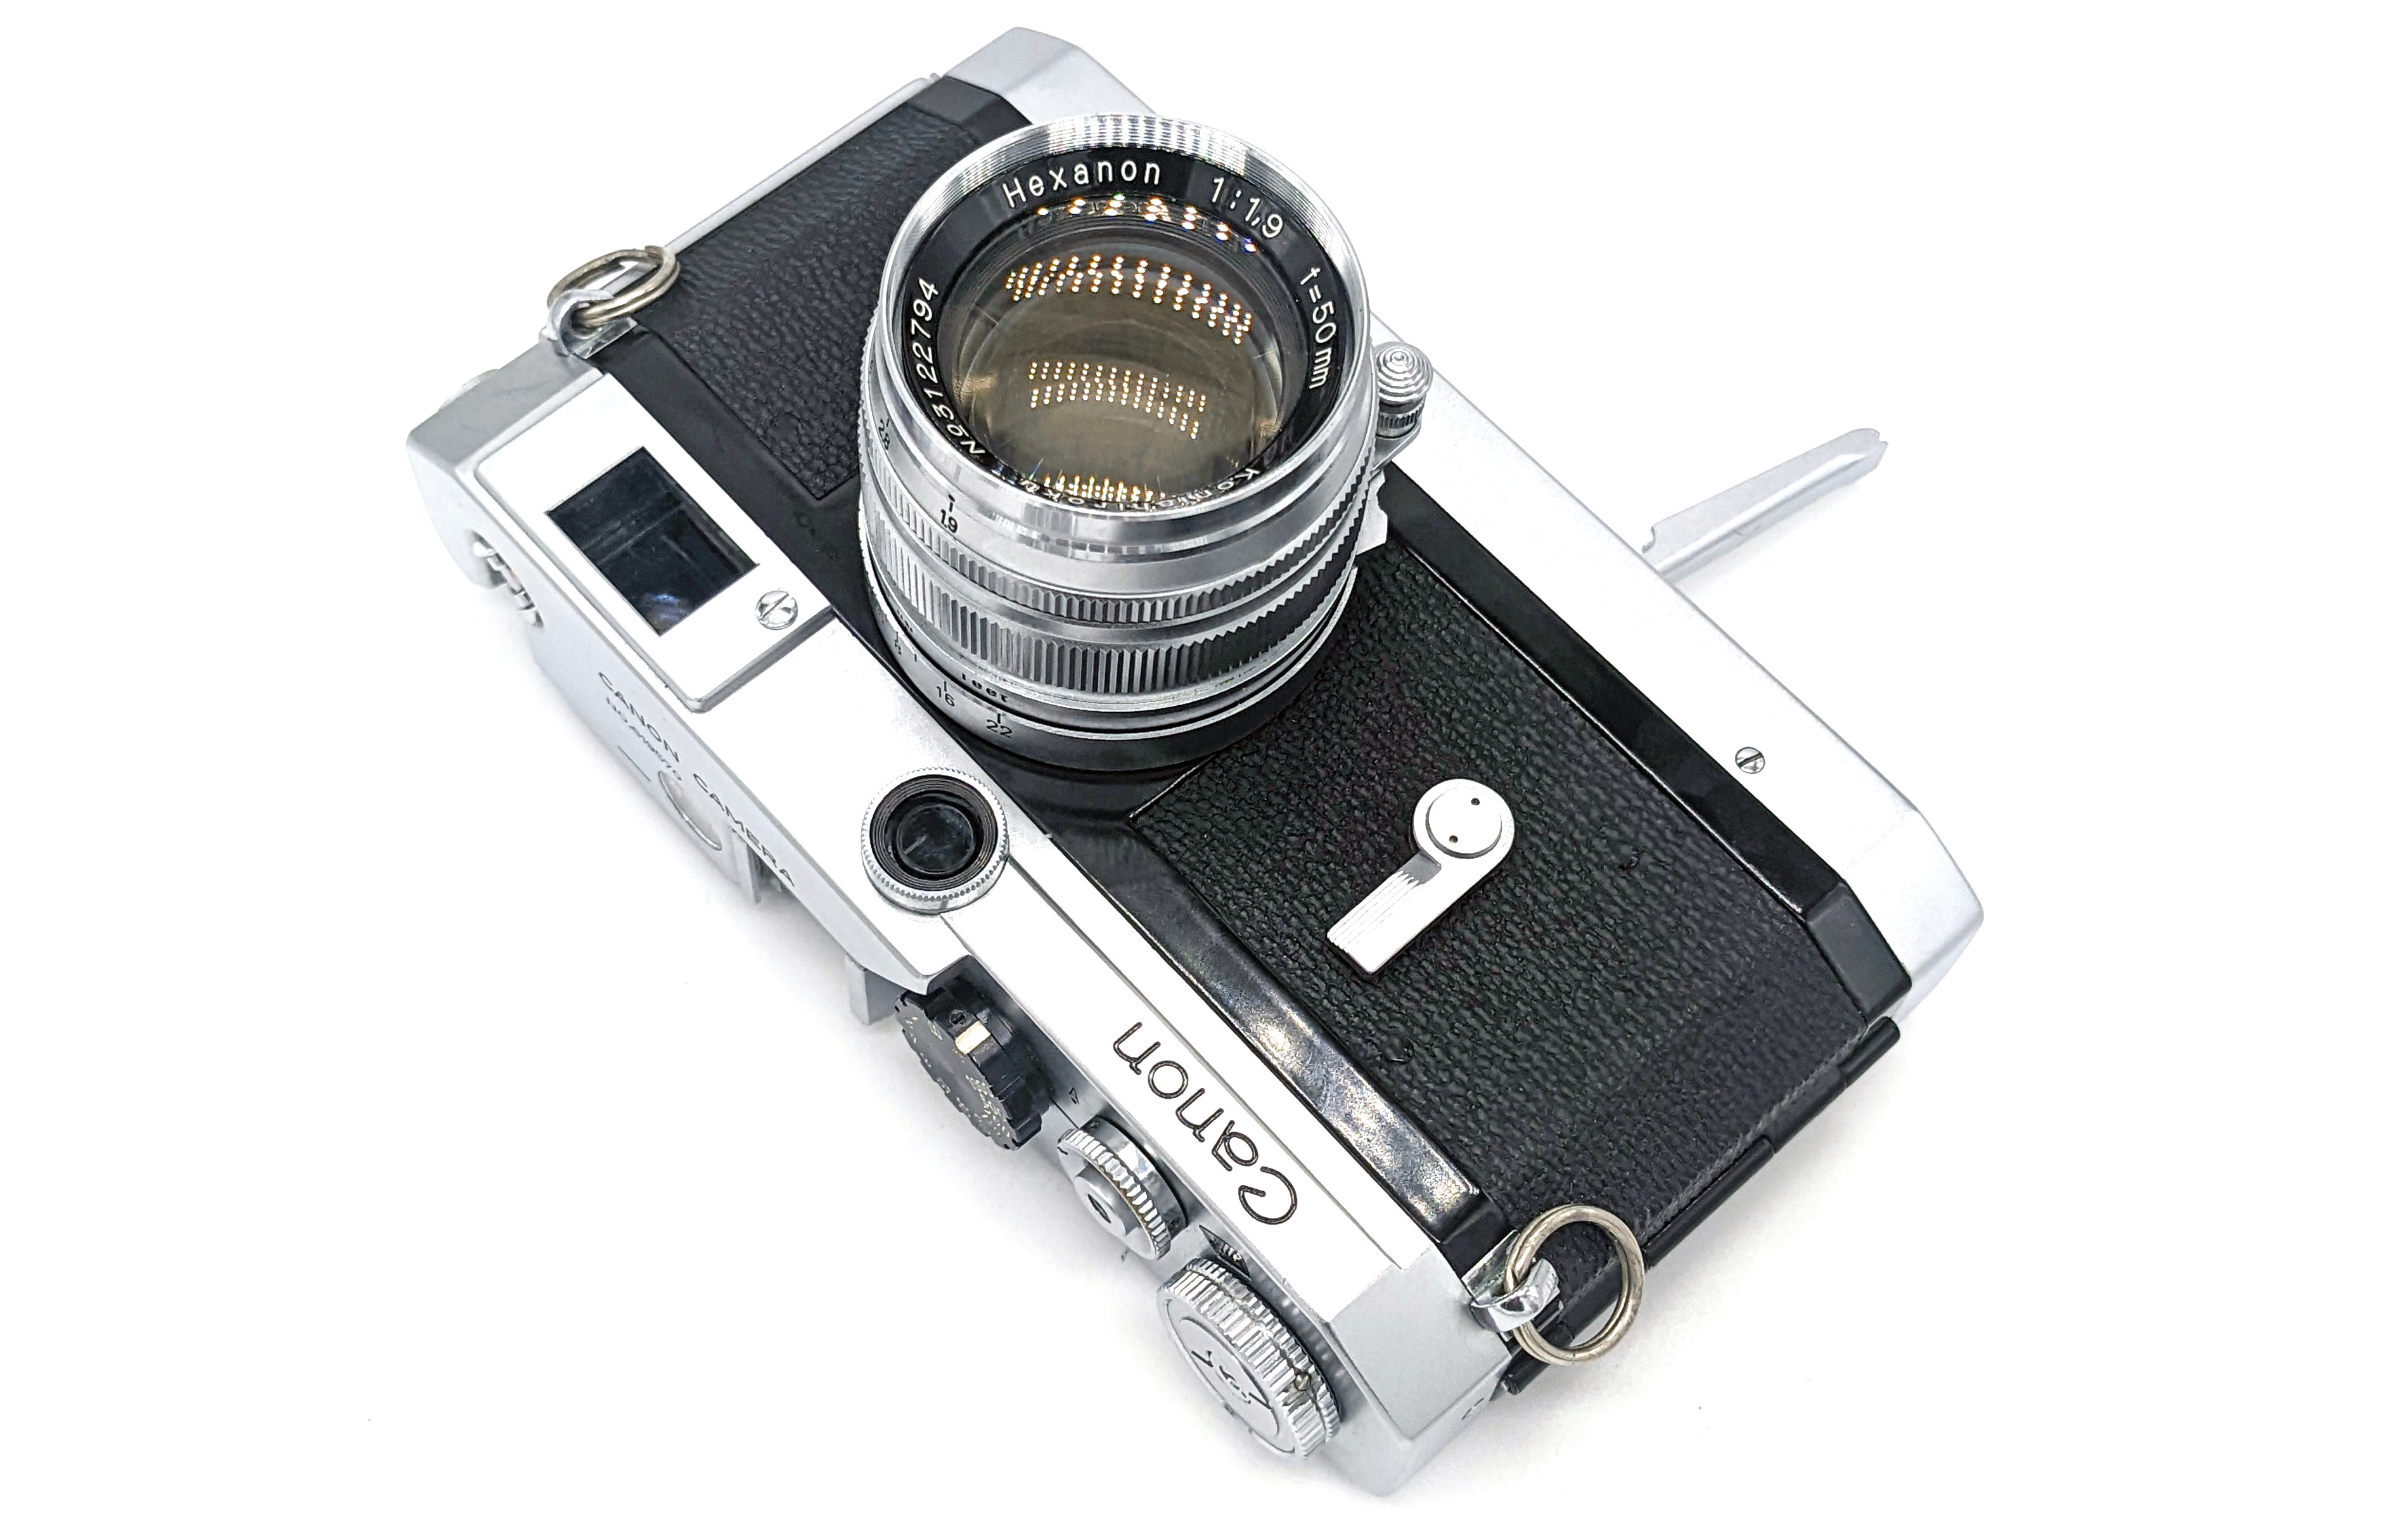
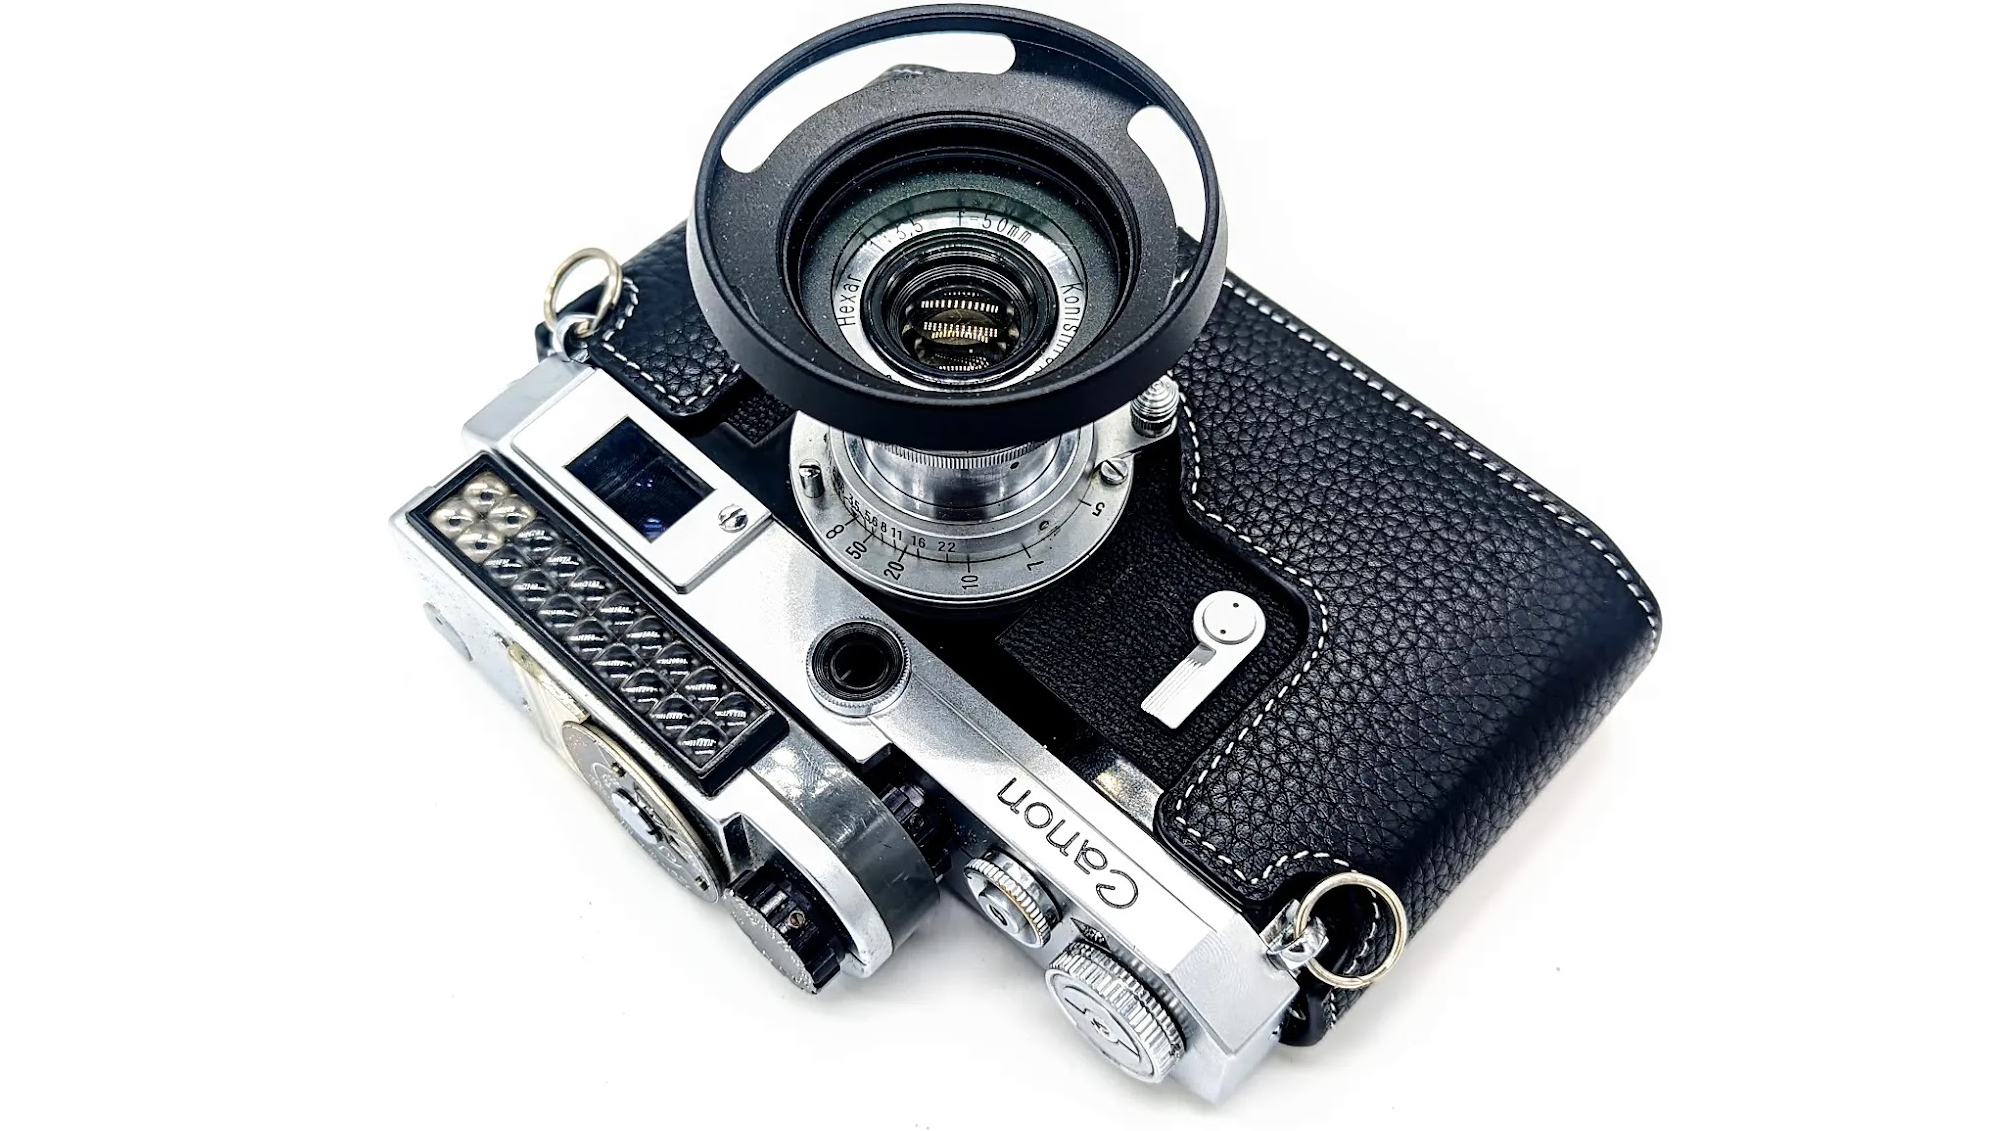
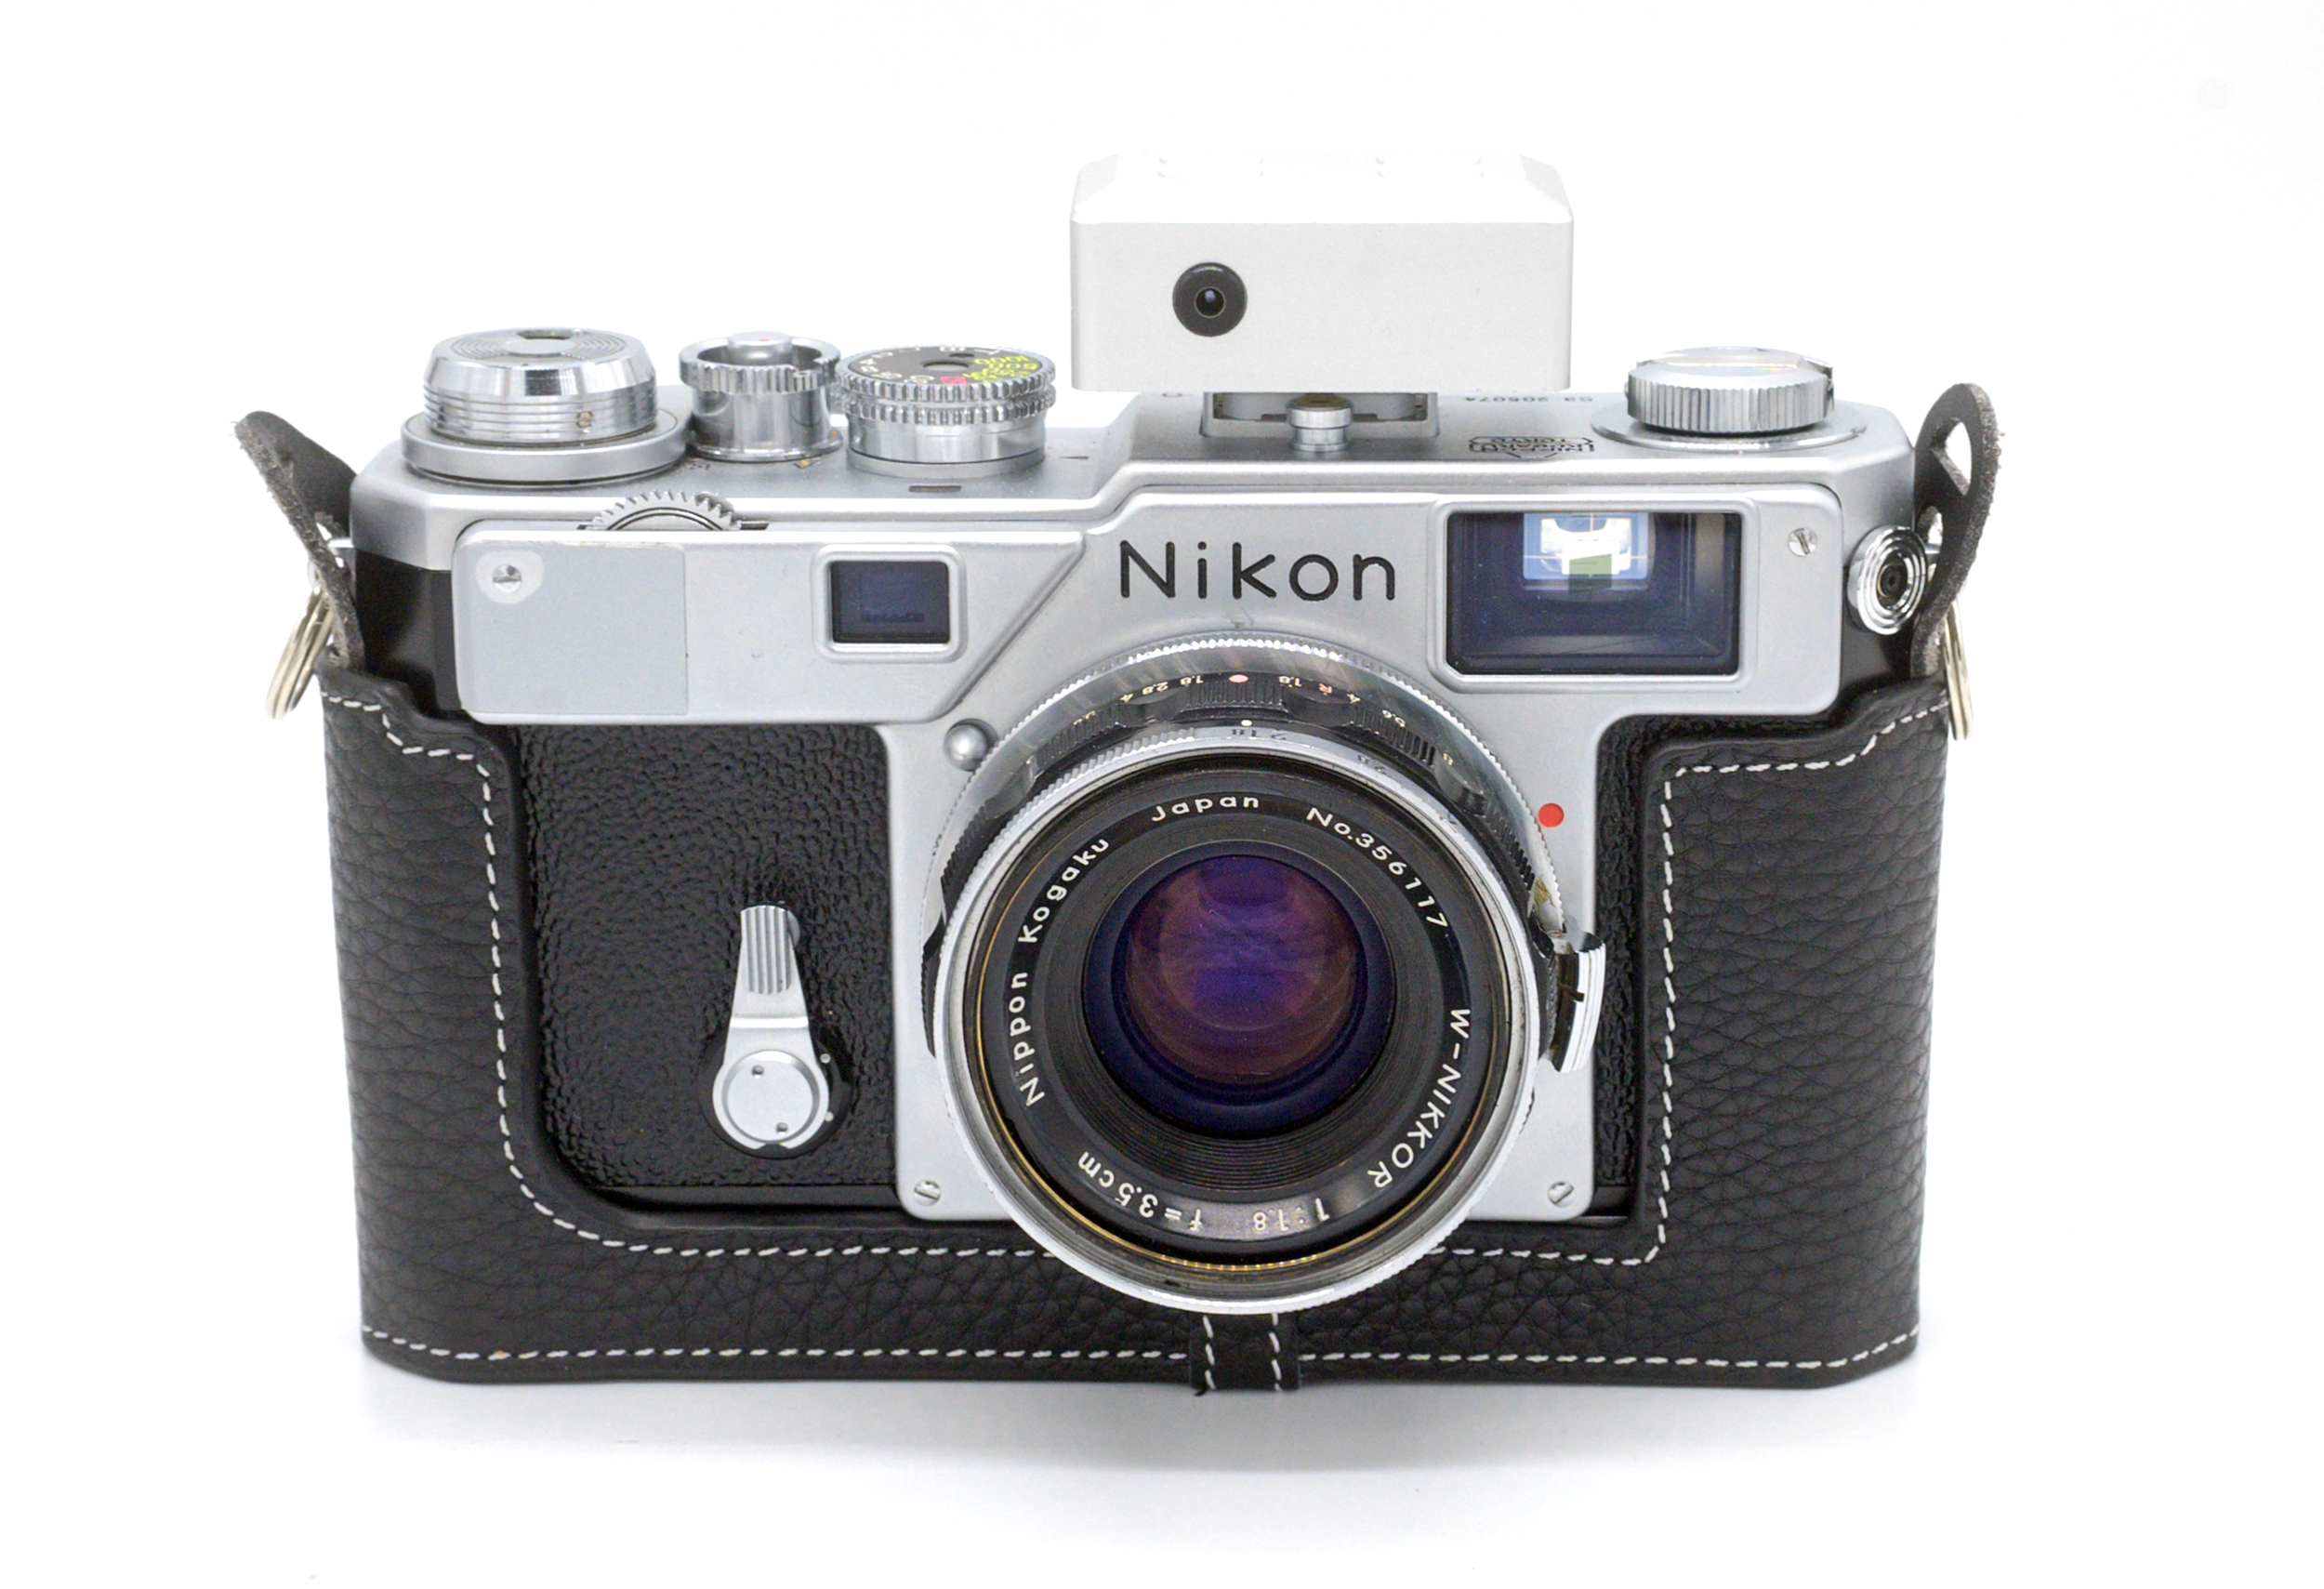
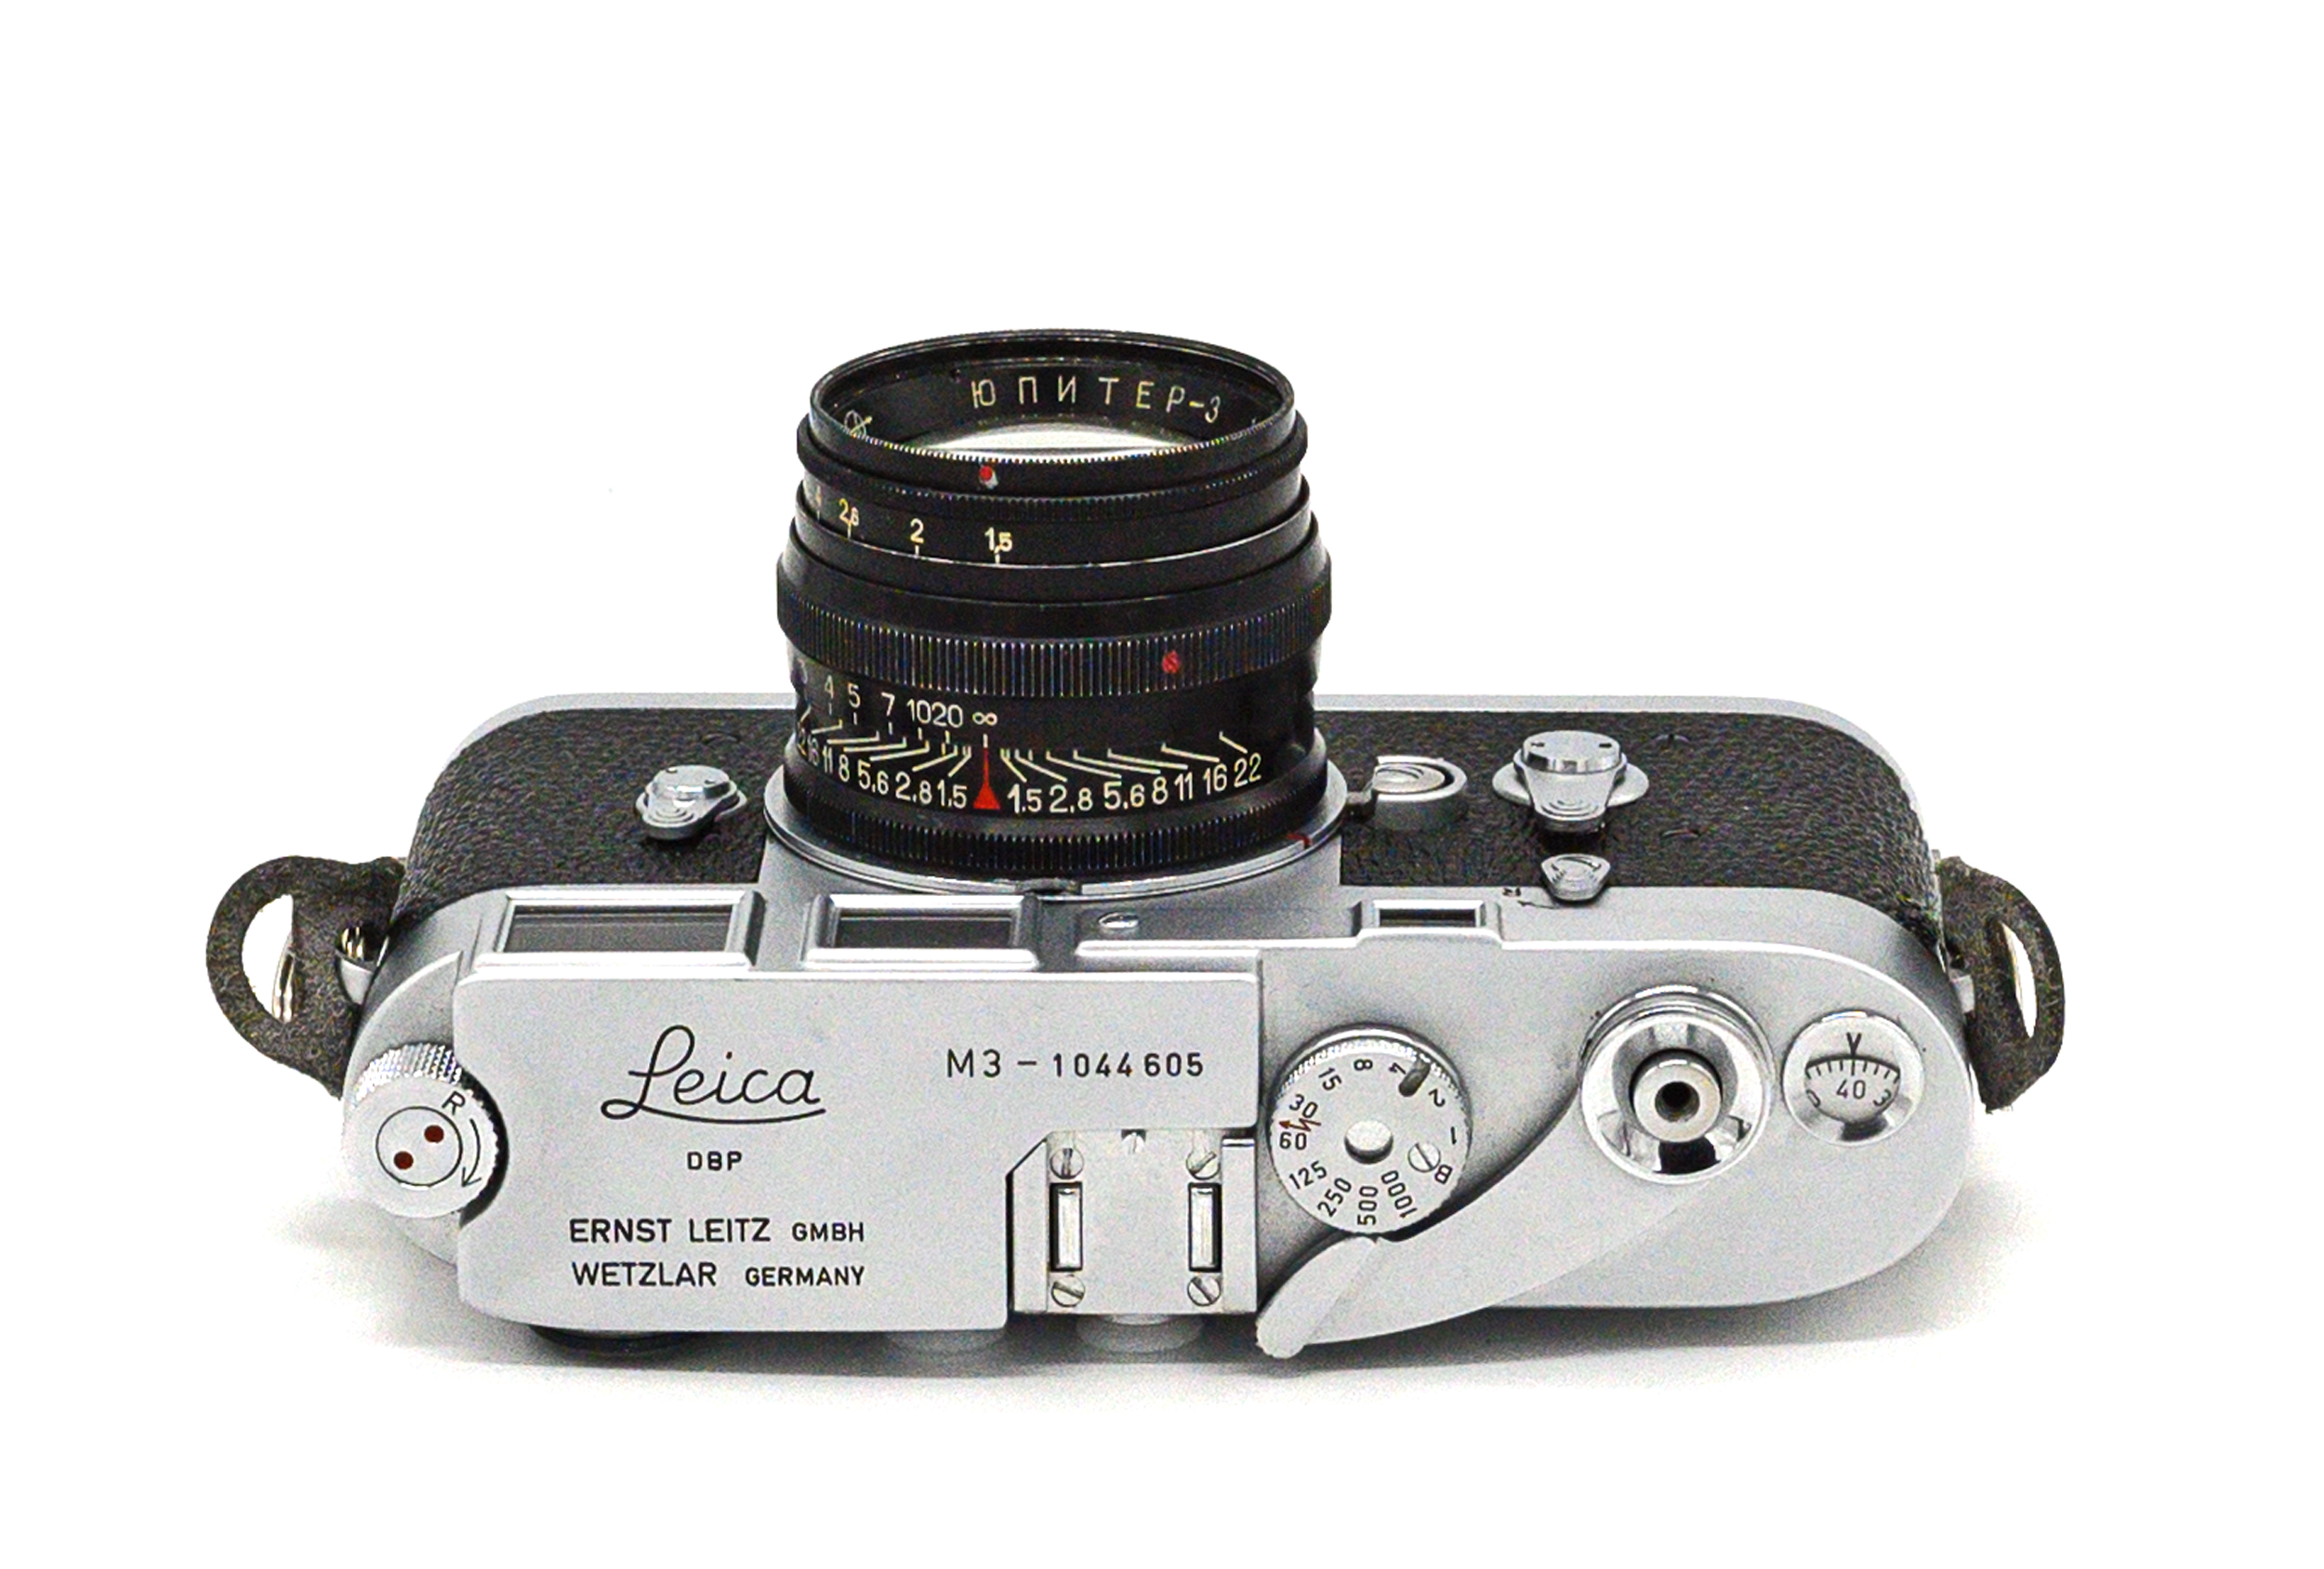
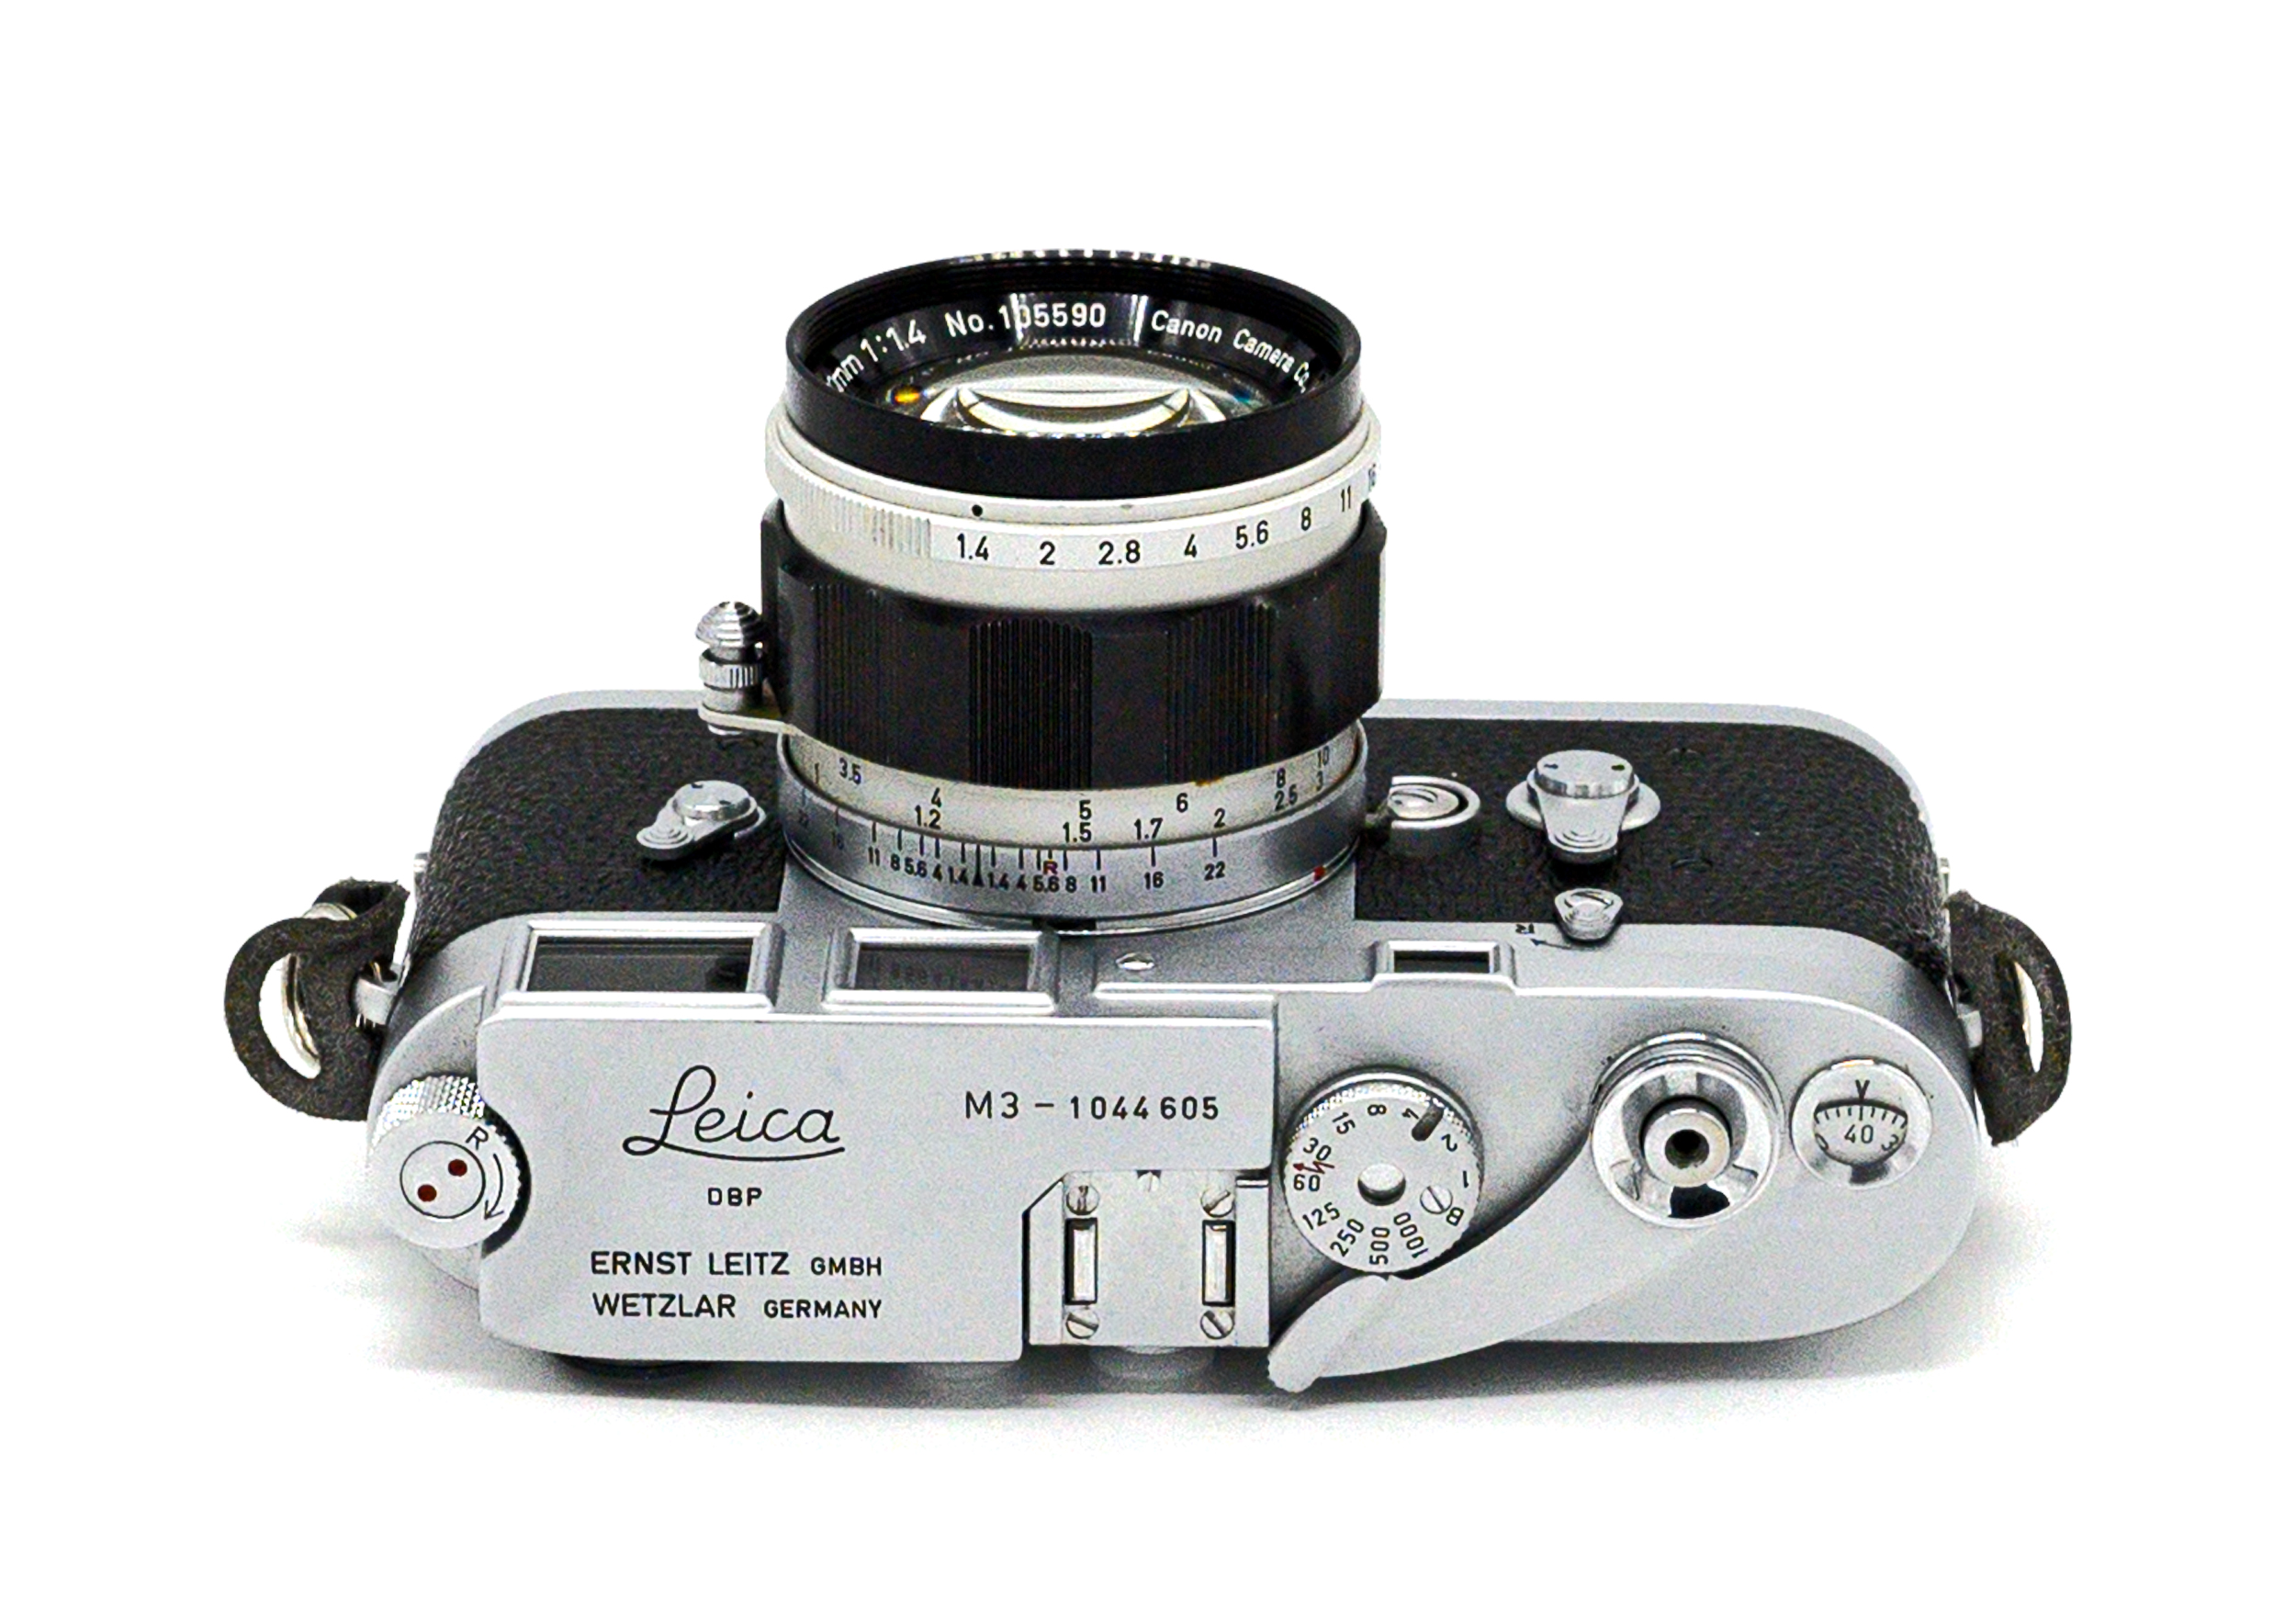
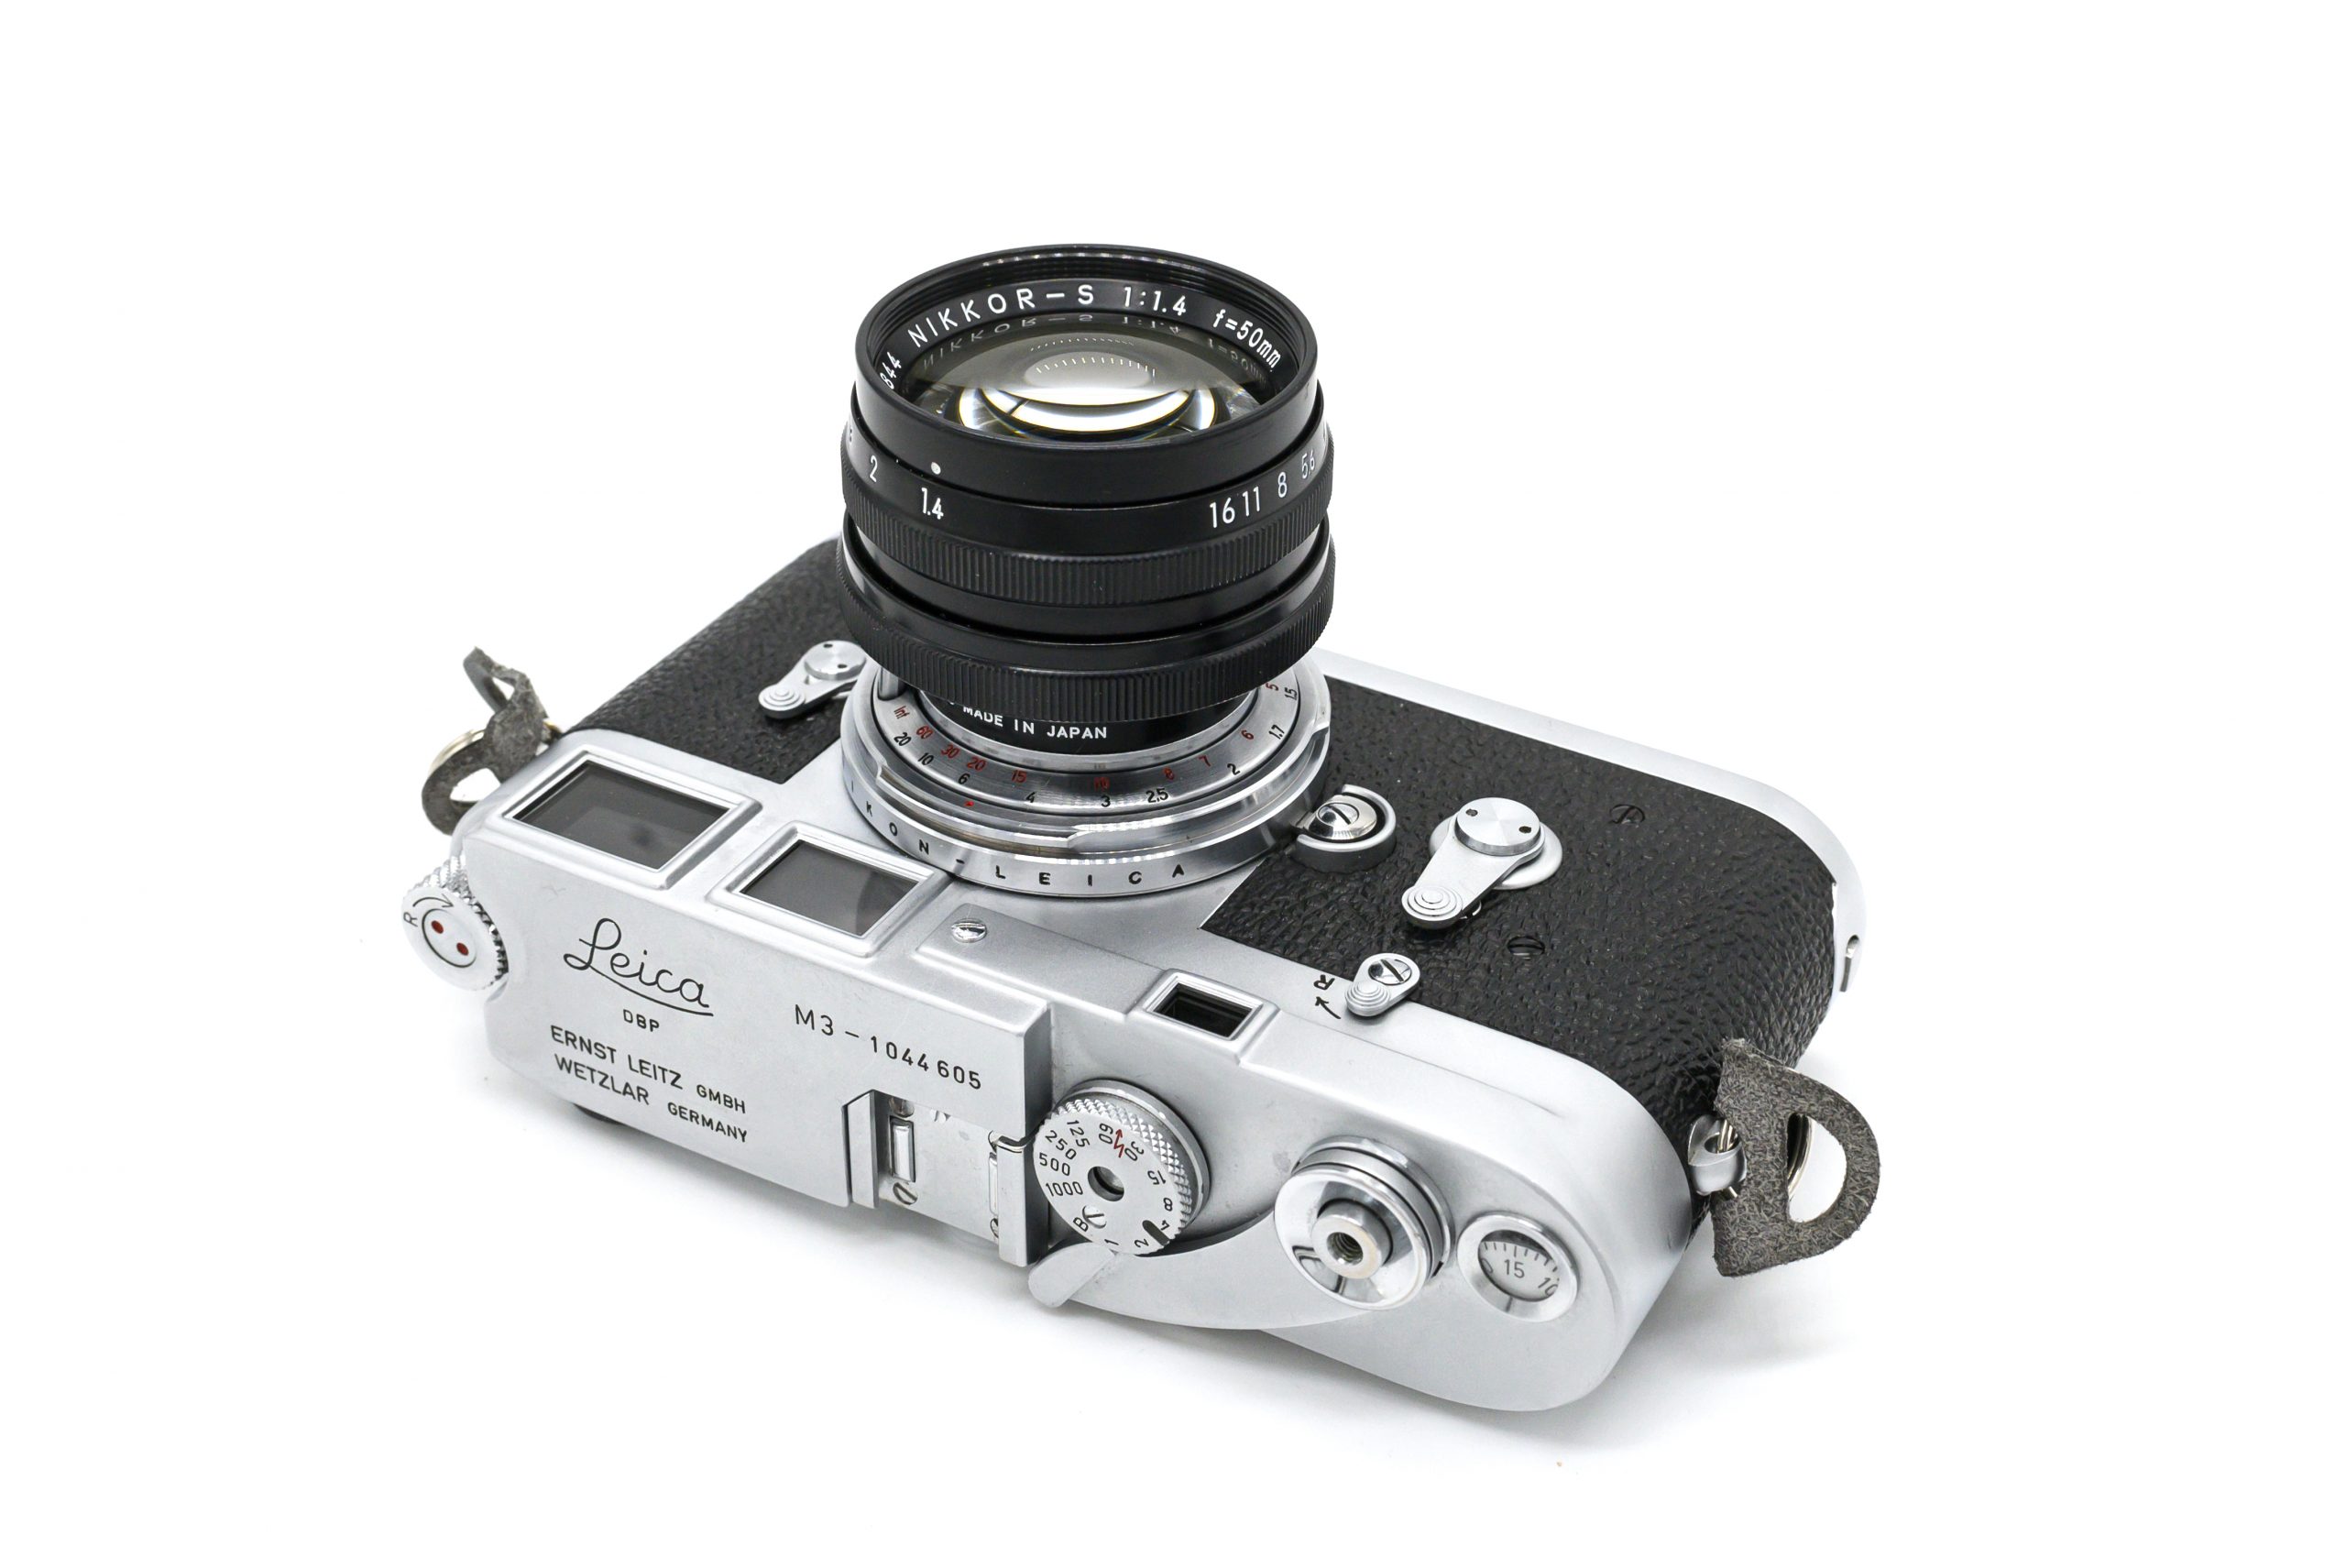
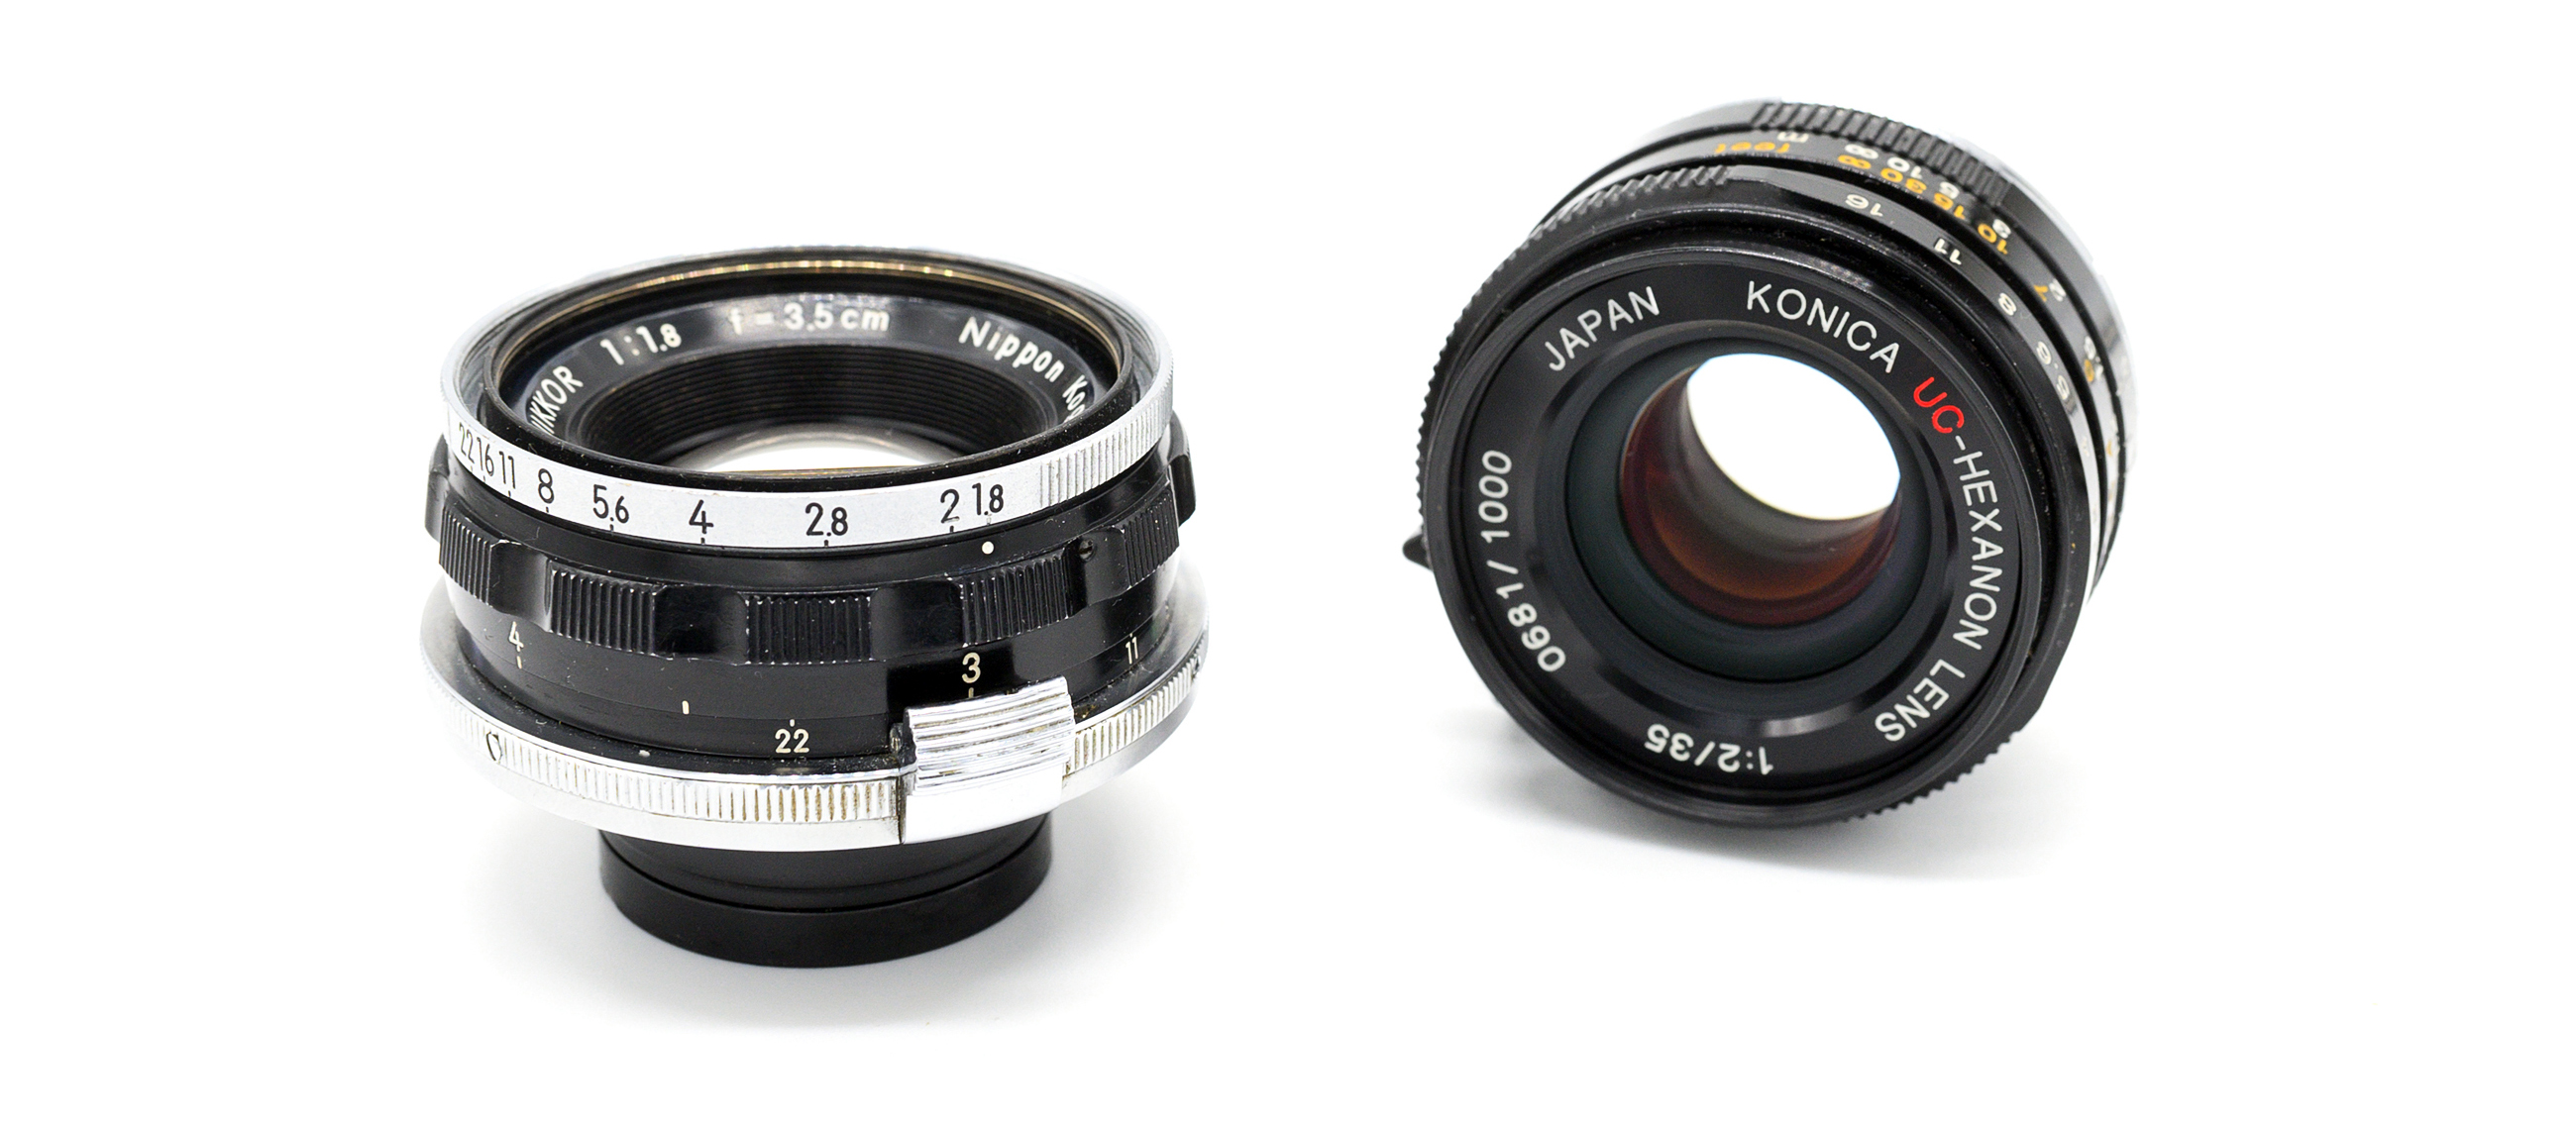
During the 1950s, Konishiroku Corporation (Konica) gained a deserved reputation for producing high-quality fixed-lens 35mm rangefinder cameras, most notably the I, II, and III series. During this era, Konica also produced in some number three Leica screw mount (M39) lenses: the collapsible 50mm f/3.5 Hexar, the rigid 50mm f/1.9 Hexanon, and the super-fast (and essentially unobtainable) 60mm f/1.2 Hexanon. The f/3.5 and f/1.9 lenses came normally bundled with several mid-1950s Japanese-market M39 cameras like the Chiyotax IIIF and Leotax models like the “F” and the “T.” However, it does not appear that either these Chiyotax or Leotax models or the standalone M39 f/3.5 and f/1.9 lenses were ever marketed in North America. A version of the f/3.5 Hexar was used in the Konica IIB and IIBm rangefinder cameras. A version of the f/1.9 Hexanon was used in the Konica IIA and III rangefinder cameras.
The 50mm f/1.9 Hexanon is a beautifully-crafted and relatively compact lens with a chrome barrel, click-stops for aperture, Konica’s trademark 1950s amber-colored single lens coating, and the standard-for-the-era infinity lock. As with most quality 1950s M39 lenses, they sure don’t make them like they used to. It is not quite clear how long the M39 Hexanon was produced. I would guess until about 1957 or 1958. By 1960, Konica’s camera division was focusing almost exclusively on developing a competitive 35mm SLR and the next generation of fixed-lens rangefinders.
Specifications
50mm f/1.9 Hexanon
50mm f/3.5 Hexar
Lens Mount
M39 (Leica Screw Mount)
M39 (Leica Screw Mount)
Aperture Range
f/1.9 – f/22 in Click Stops
f/3.5 – f/22 in Click Stops
Optical Design
6 Elements / 5 Groups
4 elements / 3 groups
Weight
260g
Filter Thread
40.5mm
34mm
Minimum Focus
1.00 meter (3.3 ft)
1.00 meter (3.3 ft)
Aperture Blades
10
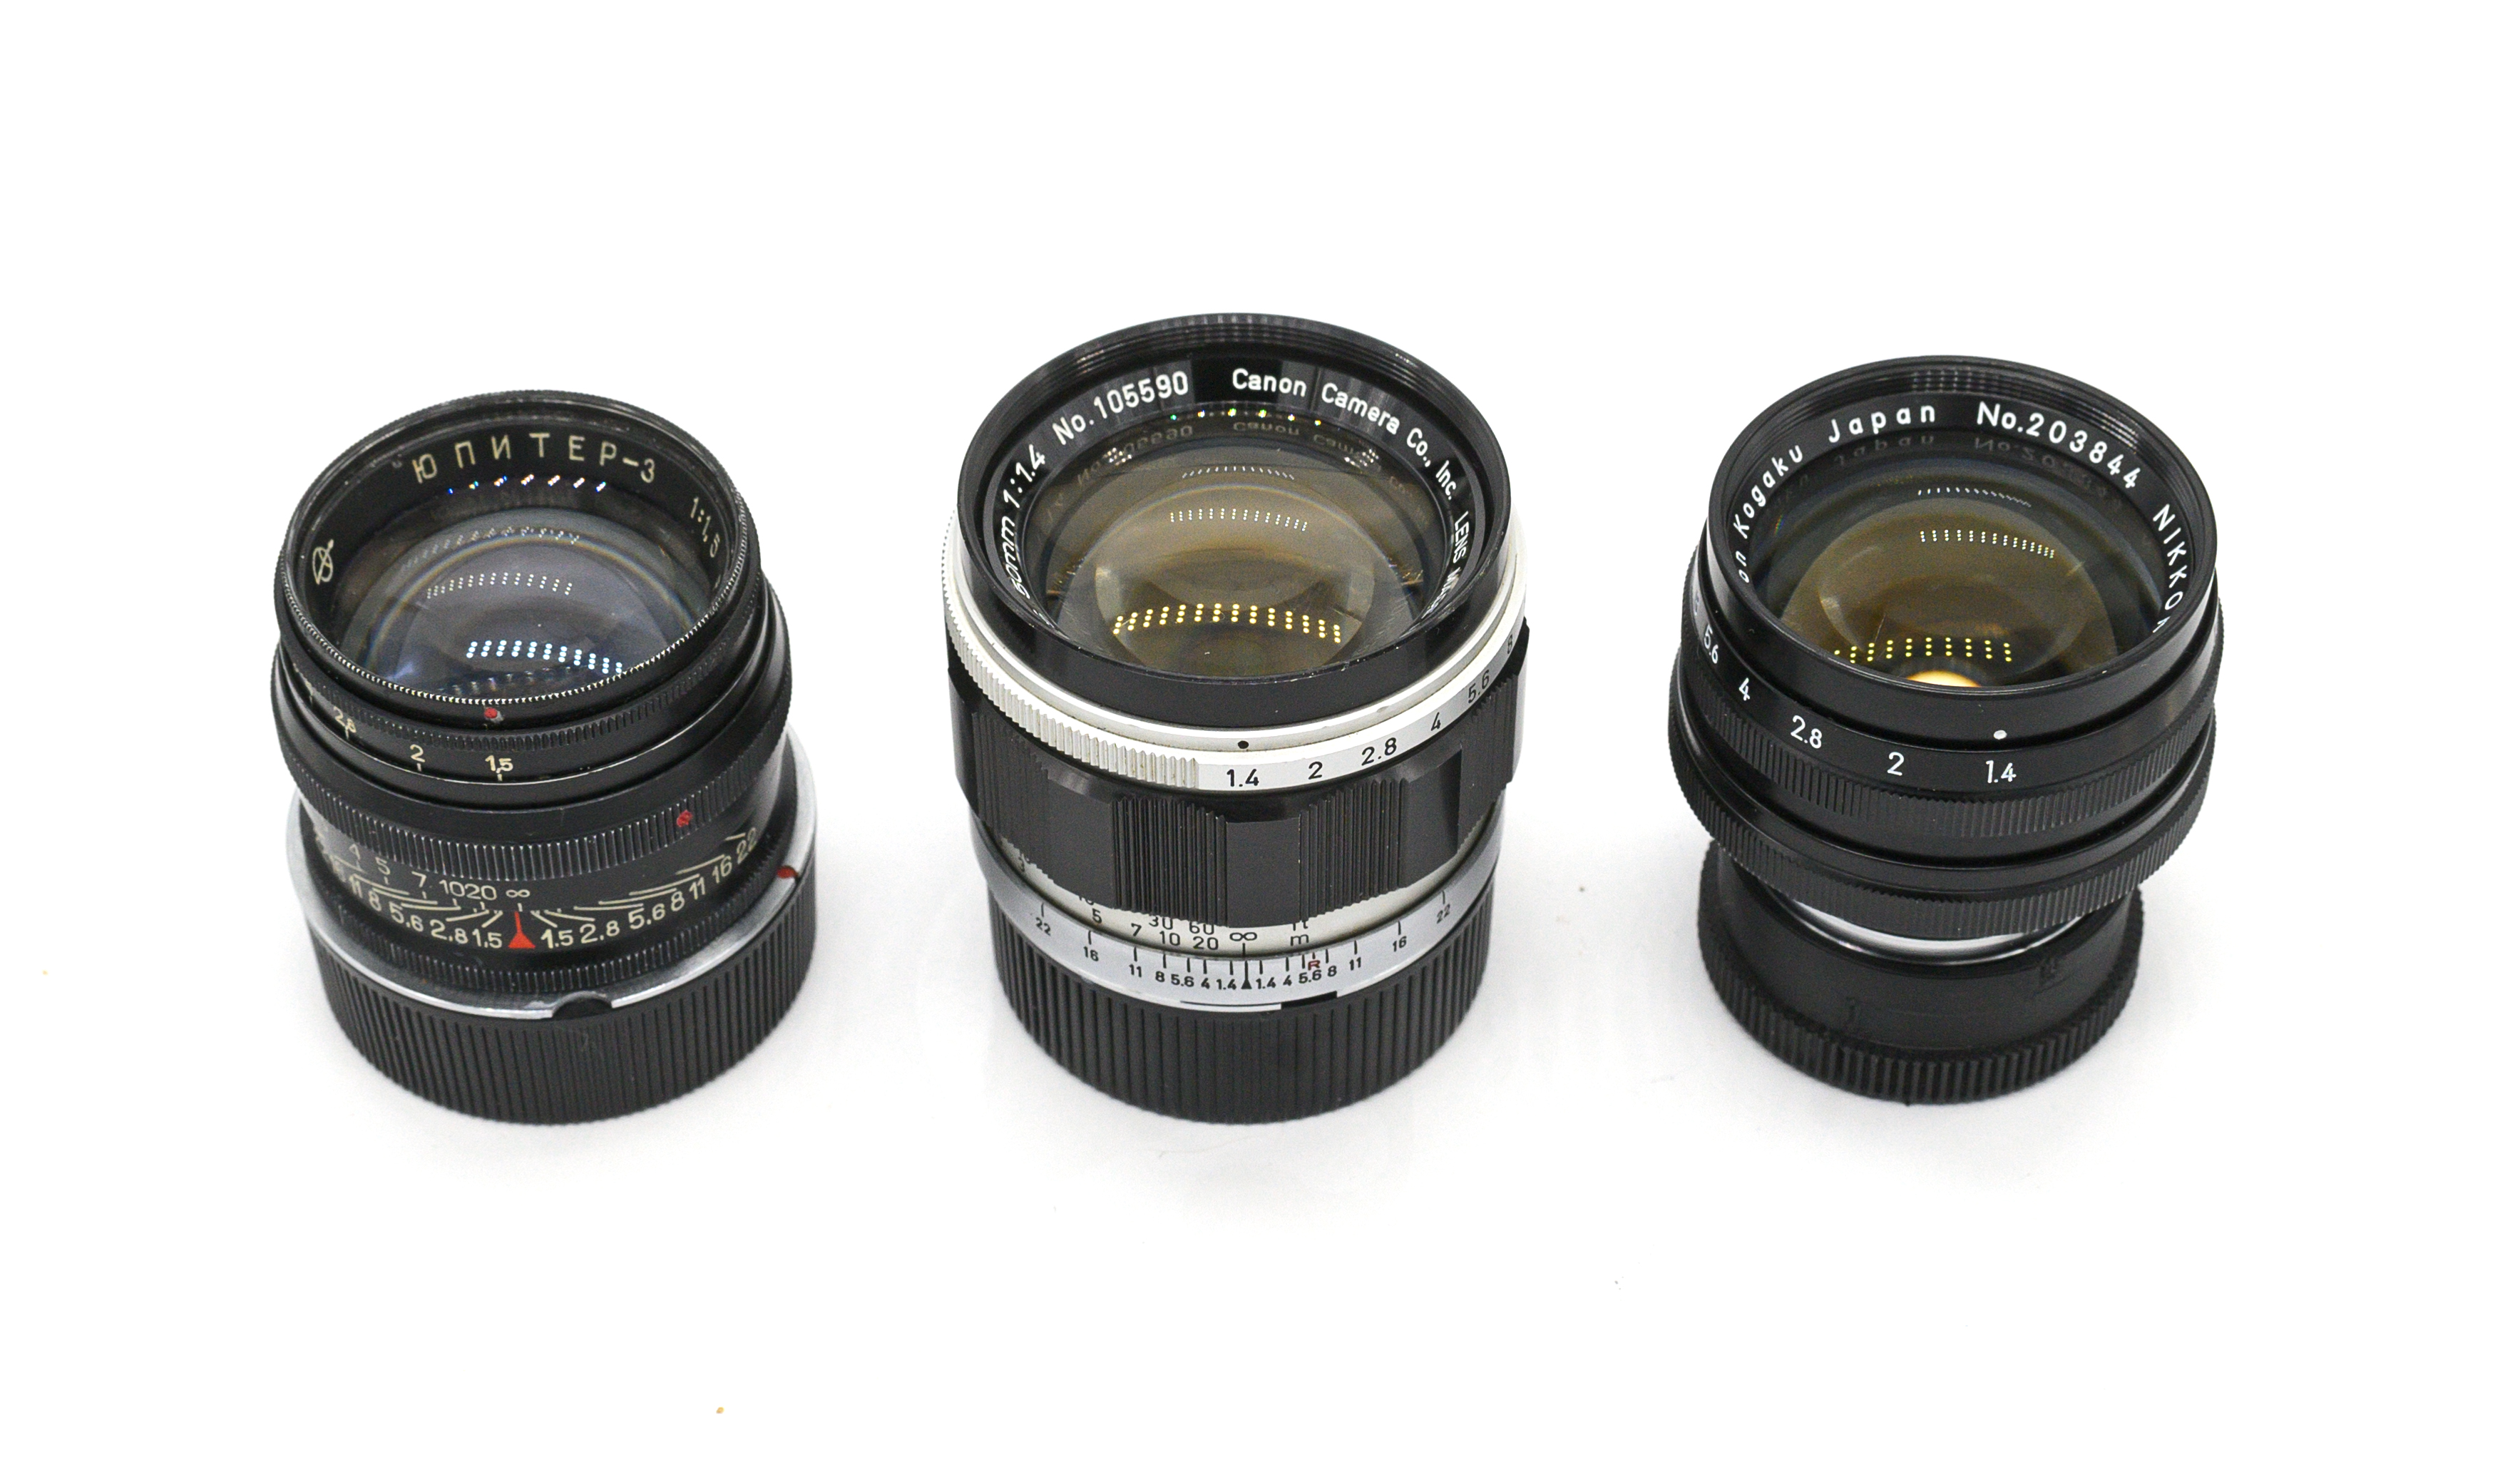
By the mid-1950s, certain Japanese companies were producing numerous different M39 screw-mount cameras based more or less on the basic Leica III design. These cameras were optimized and built around the 50mm focal length. While wider lenses existed at the dawn of the 1950s, mainly in the 28mm and 35mm focal lengths, they were initially very expensive and required users to use an external finder to frame the photo. Canon, Chiyoda (later “Minolta”), Honor, Leotax, Melcon, Nicca (a/k/a “Tower” in the USA), Tanaka, and others produced thousands of these cameras, with many, but not all, being available for export outside of Japan. At the same time, in addition to numerous European offerings, there was a mind-boggling number of different Japanese-made M39 standard lenses. Many of these lenses shared remarkable physical and optical characteristics with each other, leading one to wonder if in reality much of this production was sourced to the same subcontractors.
Here is an attempt to compile a list of known standard M39 lenses (excluding the Sonnar derivatives and some of the f/3.5 lenses) manufactured in Japan during the 1950s. This list is not exhaustive but provides a taste of how many different M39 standard lens options existed at the time.
Brand
Focal Length
Year
Lens Design
Filter
Canon
50mm f/1.2
1956
7 Elements, 5 Groups
55mm
Canon
50mm f/1.4 II
1959
6 Elements, 5 Groups
48mm
Canon
50mm f/1.9
1949
6 Elements, 4 Groups
40mm
Canon
50mm f/1.8 I
1951
6 Elements, 4 Groups
40mm
Canon
50mm f/1.8 II
1956
6 Elements, 4 Groups
40mm
Canon
50mm f/1.8 III
1959
6 Elements, 4 Groups
40mm
Canon
50mm f/2.8 I
1955
4 Elements, 3 Groups
34mm
Canon
50mm f/2.8 II
1957
4 Elements, 3 Groups
40mm
Canon
50mm f/2.8 III
1959
4 Elements, 3 Groups
40mm
Chiyoda
45mm f/2.8
1947
5 Elements, 3 Groups
34mm
Chiyoda
50mm f/1.8
1958
6 Elements, 5 Groups
46mm
Chiyoda
50mm f/2
1954
7 Elements, 6 Groups
40.5mm / 43mm
Chiyoda
50mm f/2.8
1954
5 Elements, 3 Groups
40.5mm
Honor
50mm f/1.9
1957?
?
?
Honor
50mm f/2
1958
6 Elements, 5 Groups
?
Fujinon
50mm f/1.2
1954
8 Elements, 4 Groups
58mm
Fujinon
50mm f/2
1957
6 Elements, 5 Groups
43mm
Fujinon
50mm f/2.8
?
?
?
Leotax
50mm f/2
1958
?
40.5mm
Nicca
50mm f/2.8
1957?
?
?
Nikon
50mm f/1.1
1956
8 Elements, 7 Groups
62mm
Nikon
50mm f/3.5 Micro
1956
5 Elements, 4 Groups
34.5mm
Olympus
40mm f/2.8
1950?
5 Elements, 4 Groups
?
Piotar
45mm f/1.9
1957?
6 Elements, 4 Groups
?
Tanar
50mm f/1.2
1959?
?
?
Tanar
50mm f/2.8
1955
4 Elements, 3 Groups
?
Topcor
50mm f/1.5
Topcor
50mm f/1.8
Topcor
50mm f/2
Topcor
50mm f/2.8
Yashica
50mm f/1.8
1959
6 Elements, 5 Groups
43mm
Yashica
50mm f/2.8
1959
5 Elements, 4 Groups
40.5mm
Zunow
50mm f/1.1 I
1953
9 Elements, 5 Groups
?
Zunow
50mm f/1.1 II
1955
8 Elements, 5 Groups
54.5mm
Zunow
50mm f/1.9
?
7 Elements, 4 Groups
40.5mm
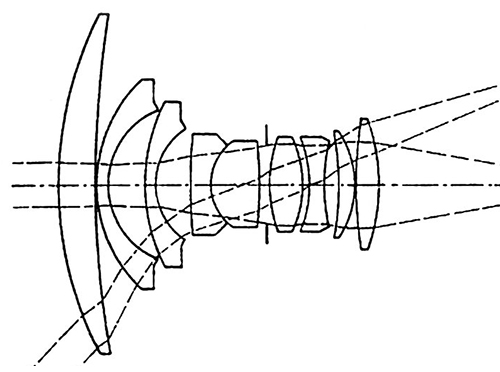
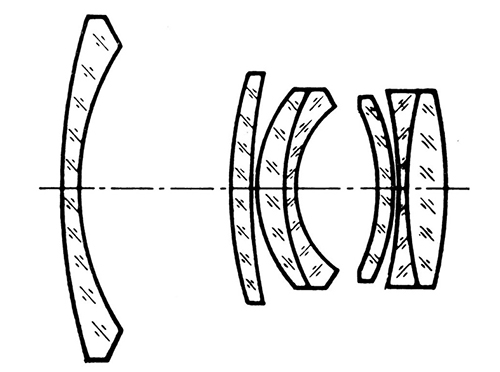
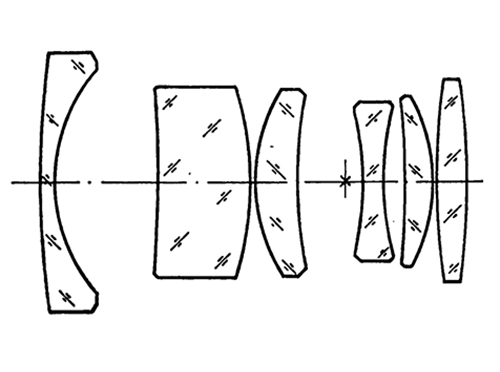
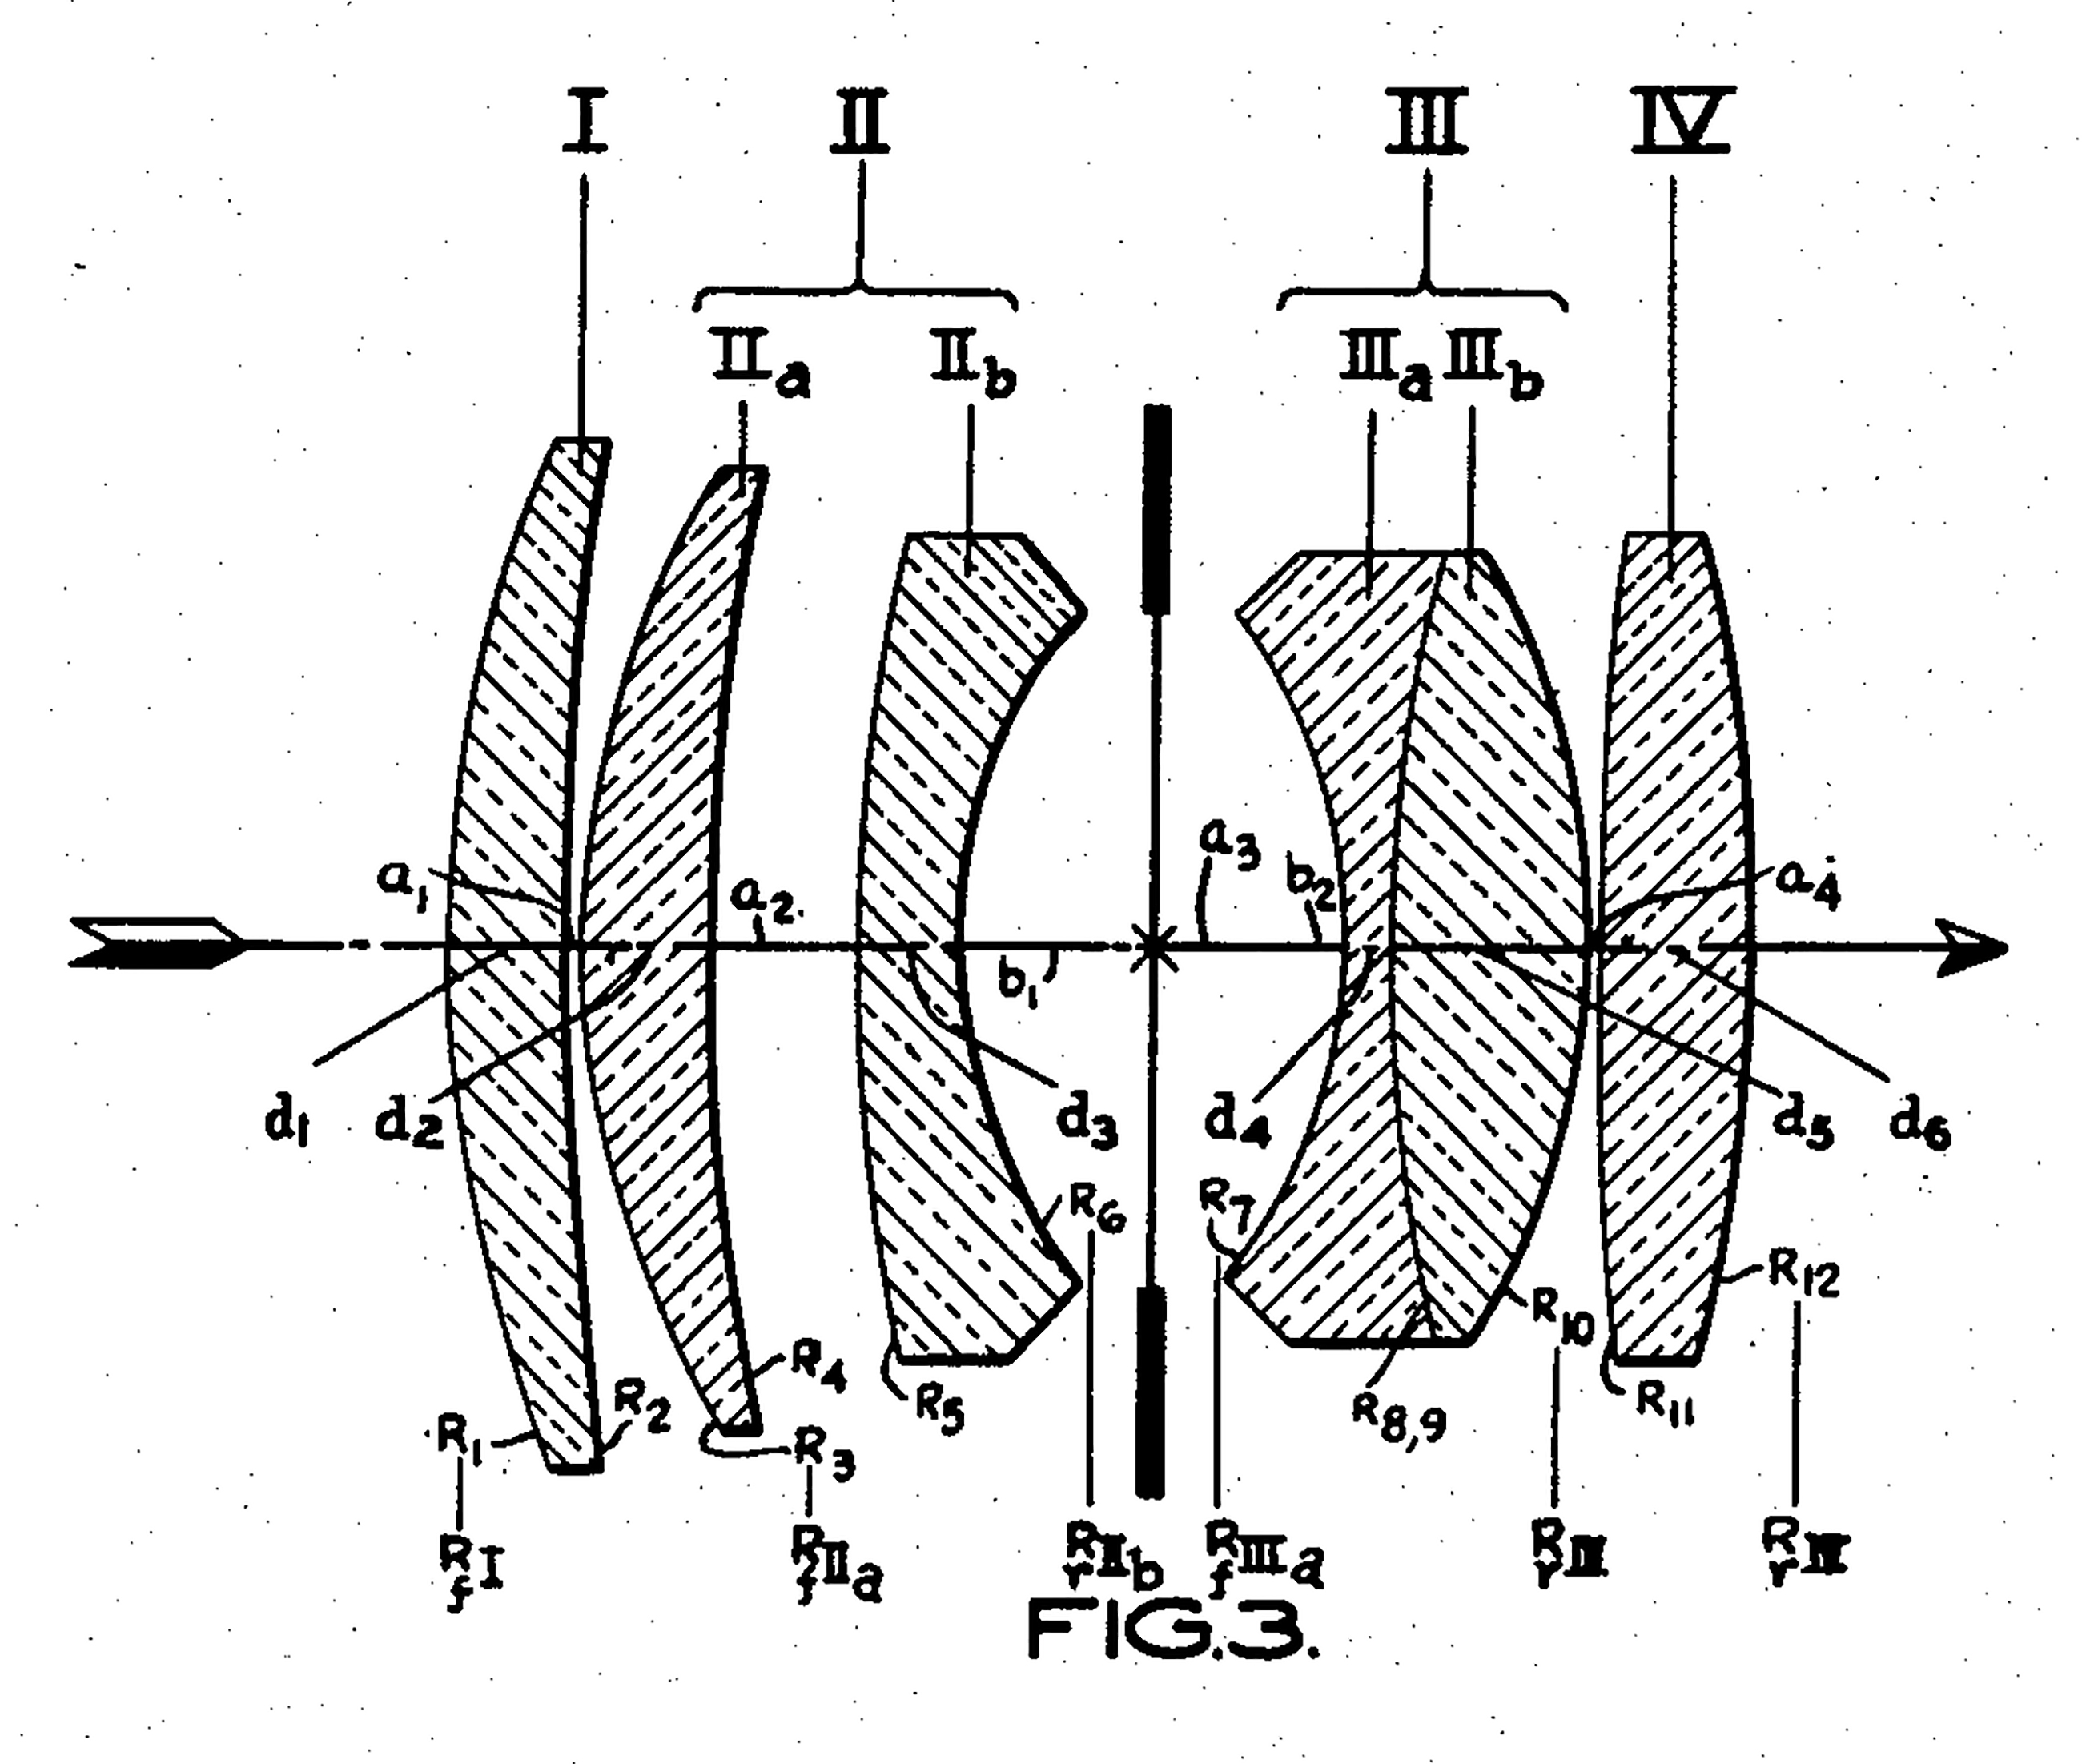
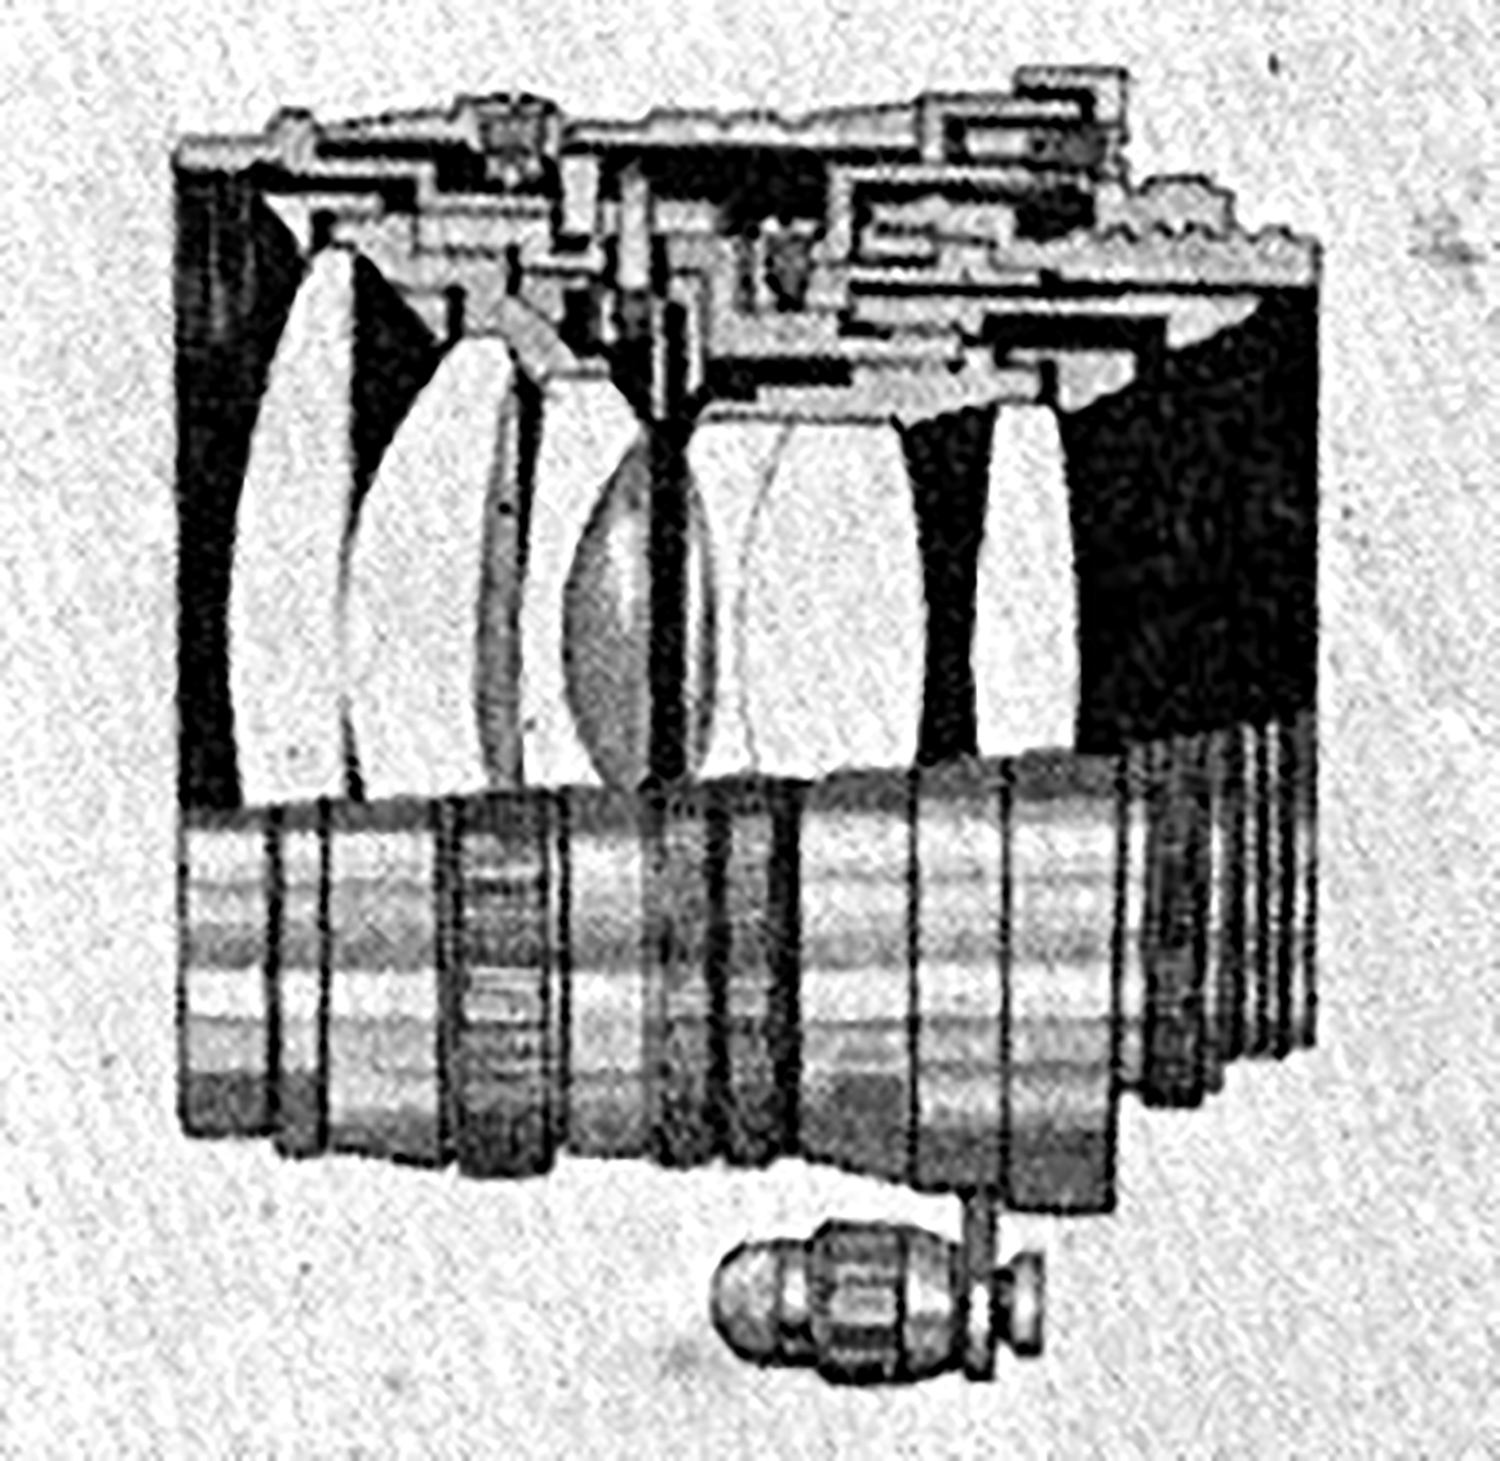
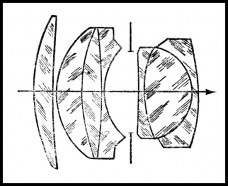
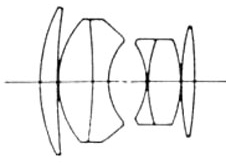
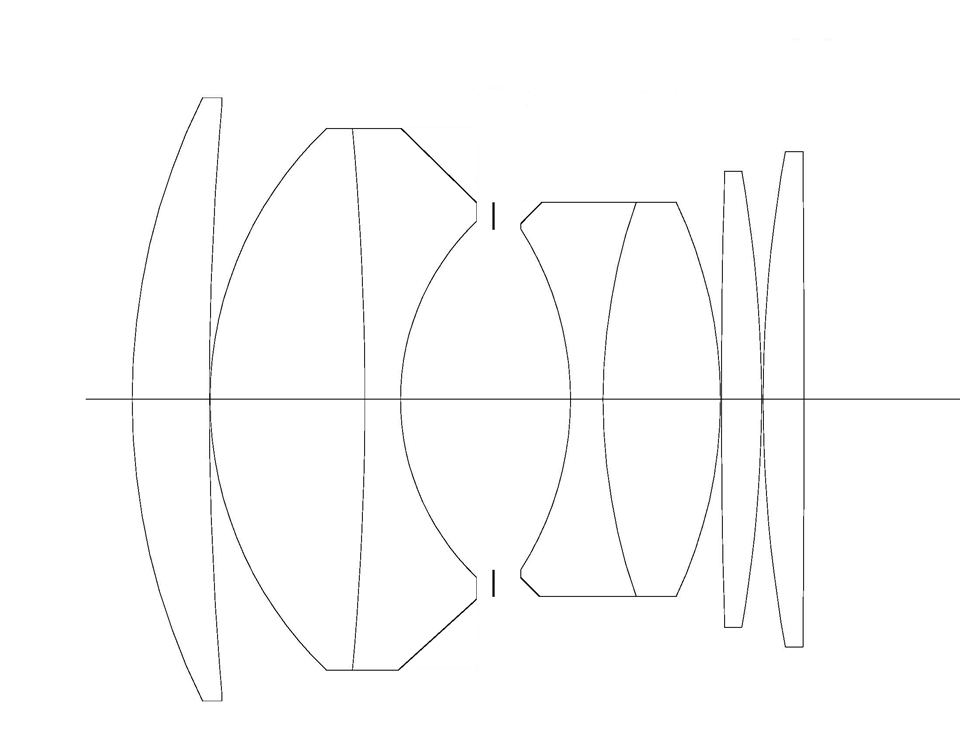
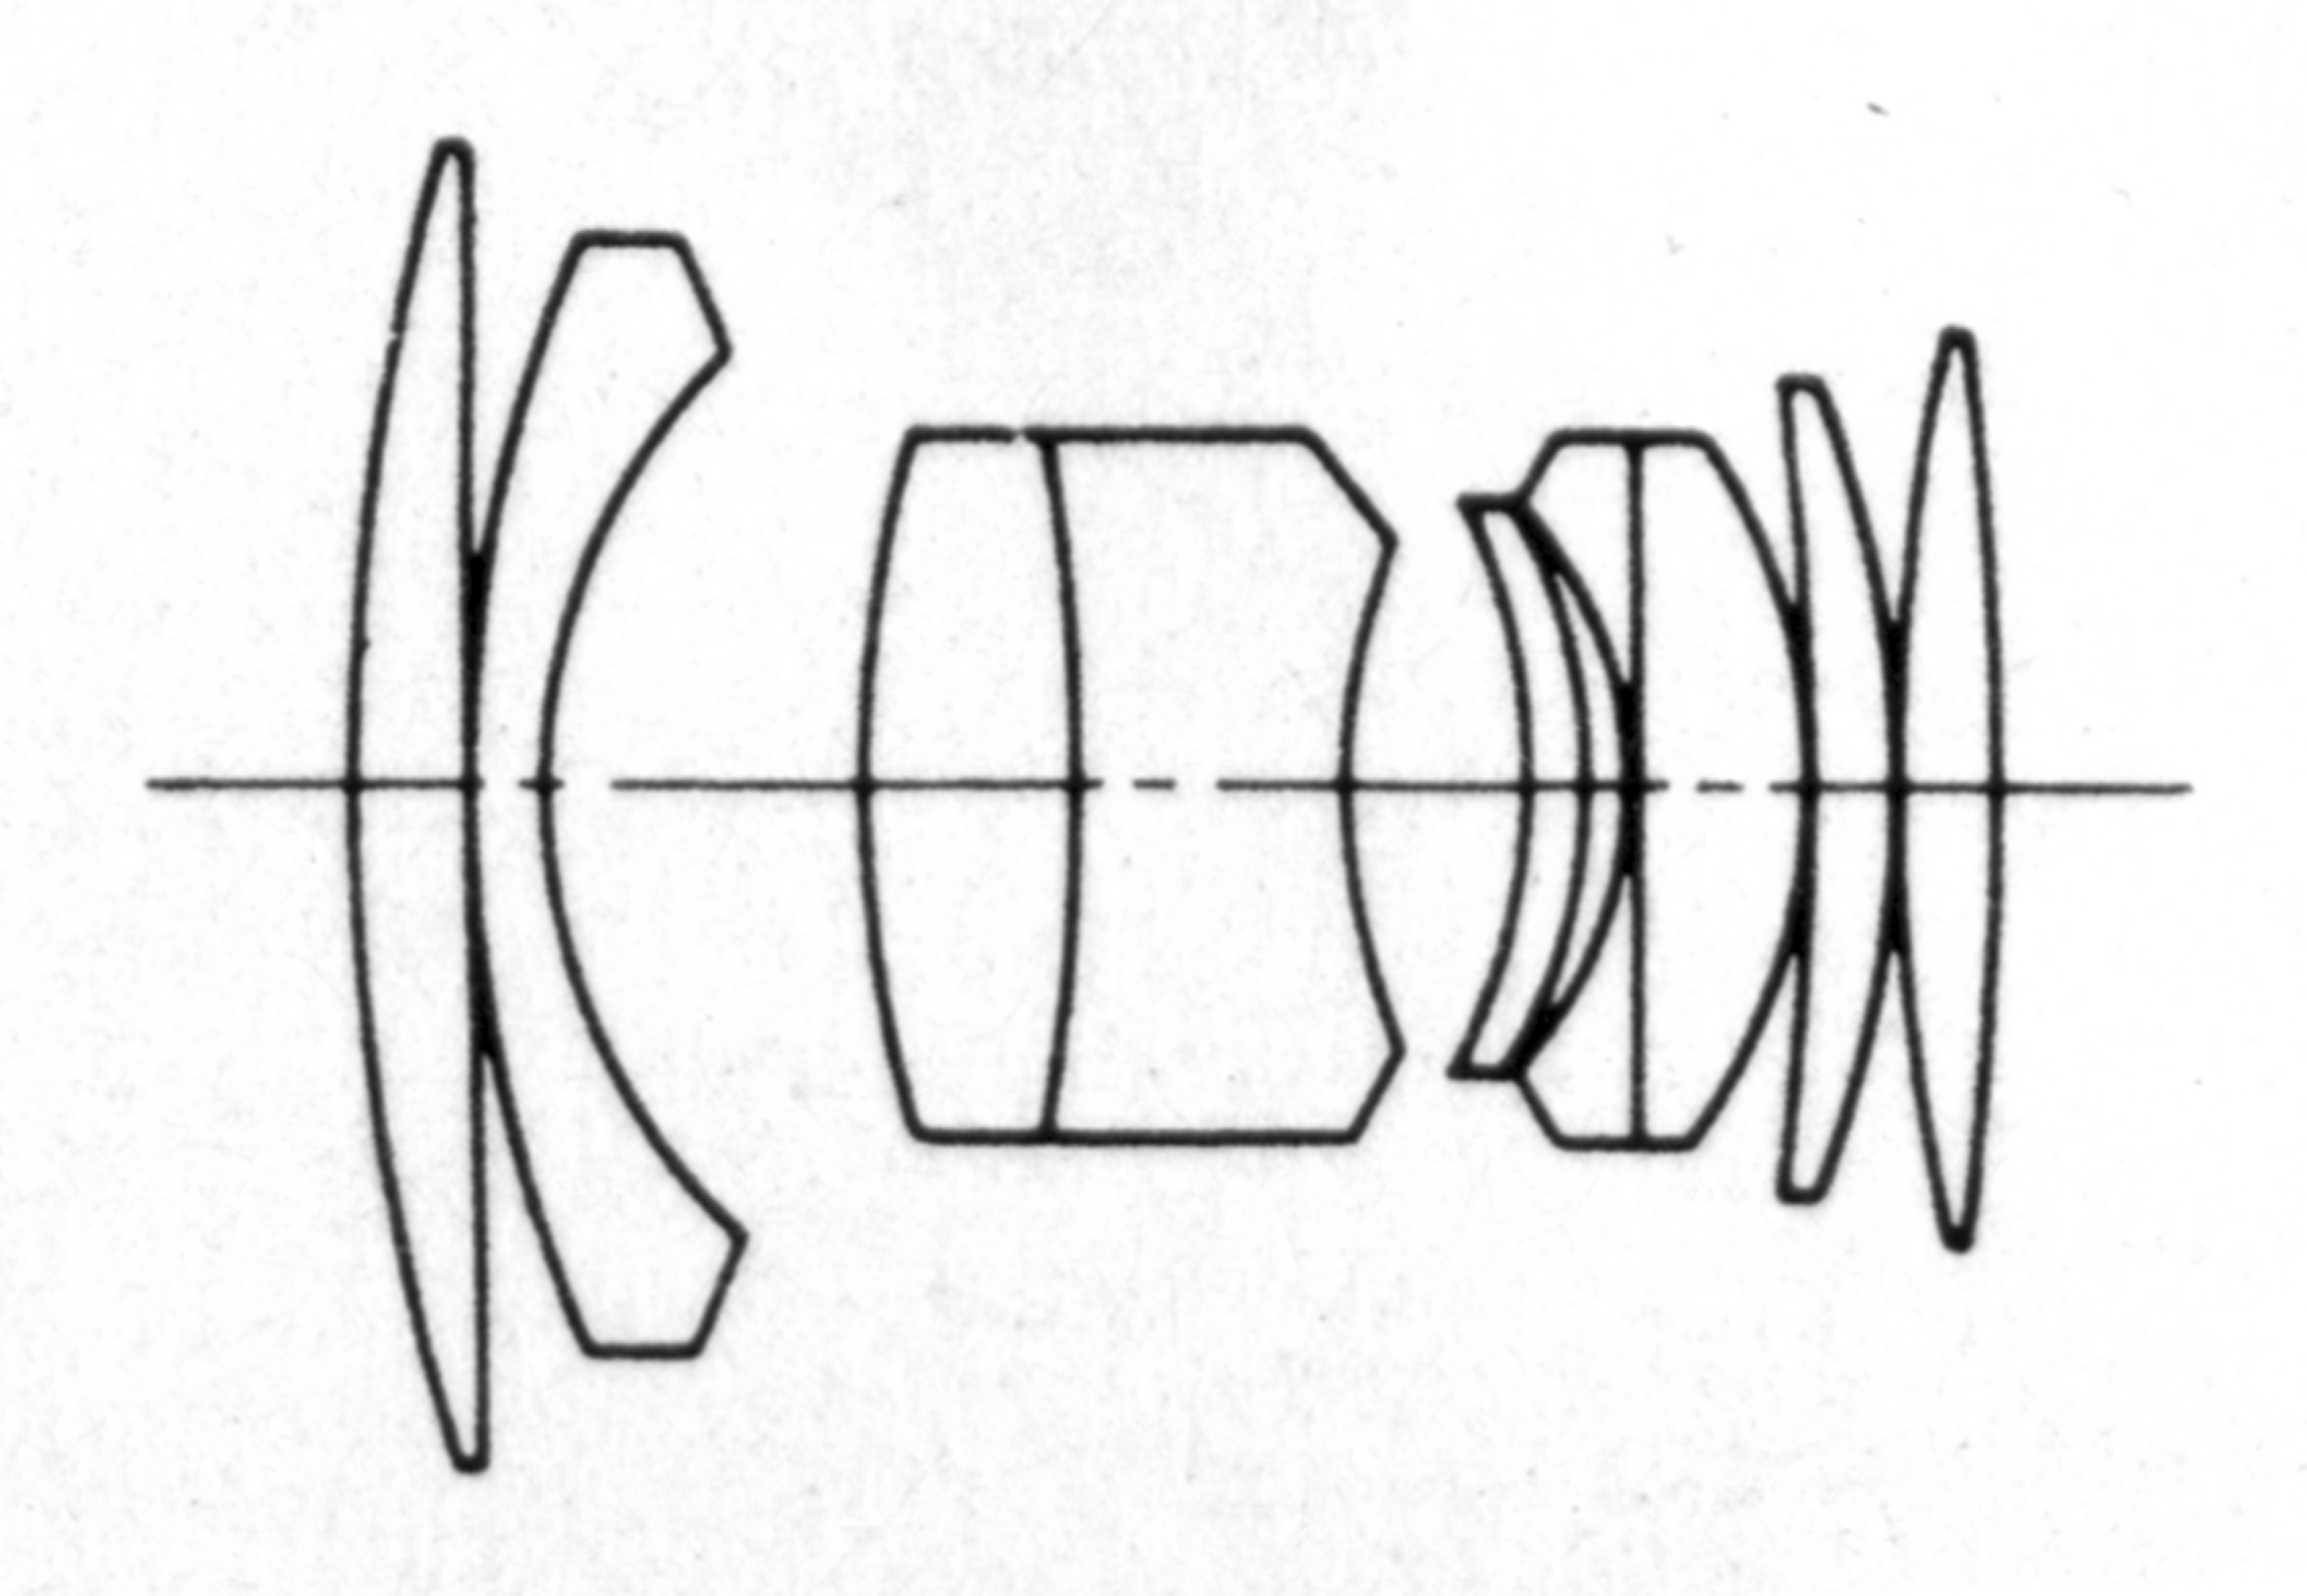
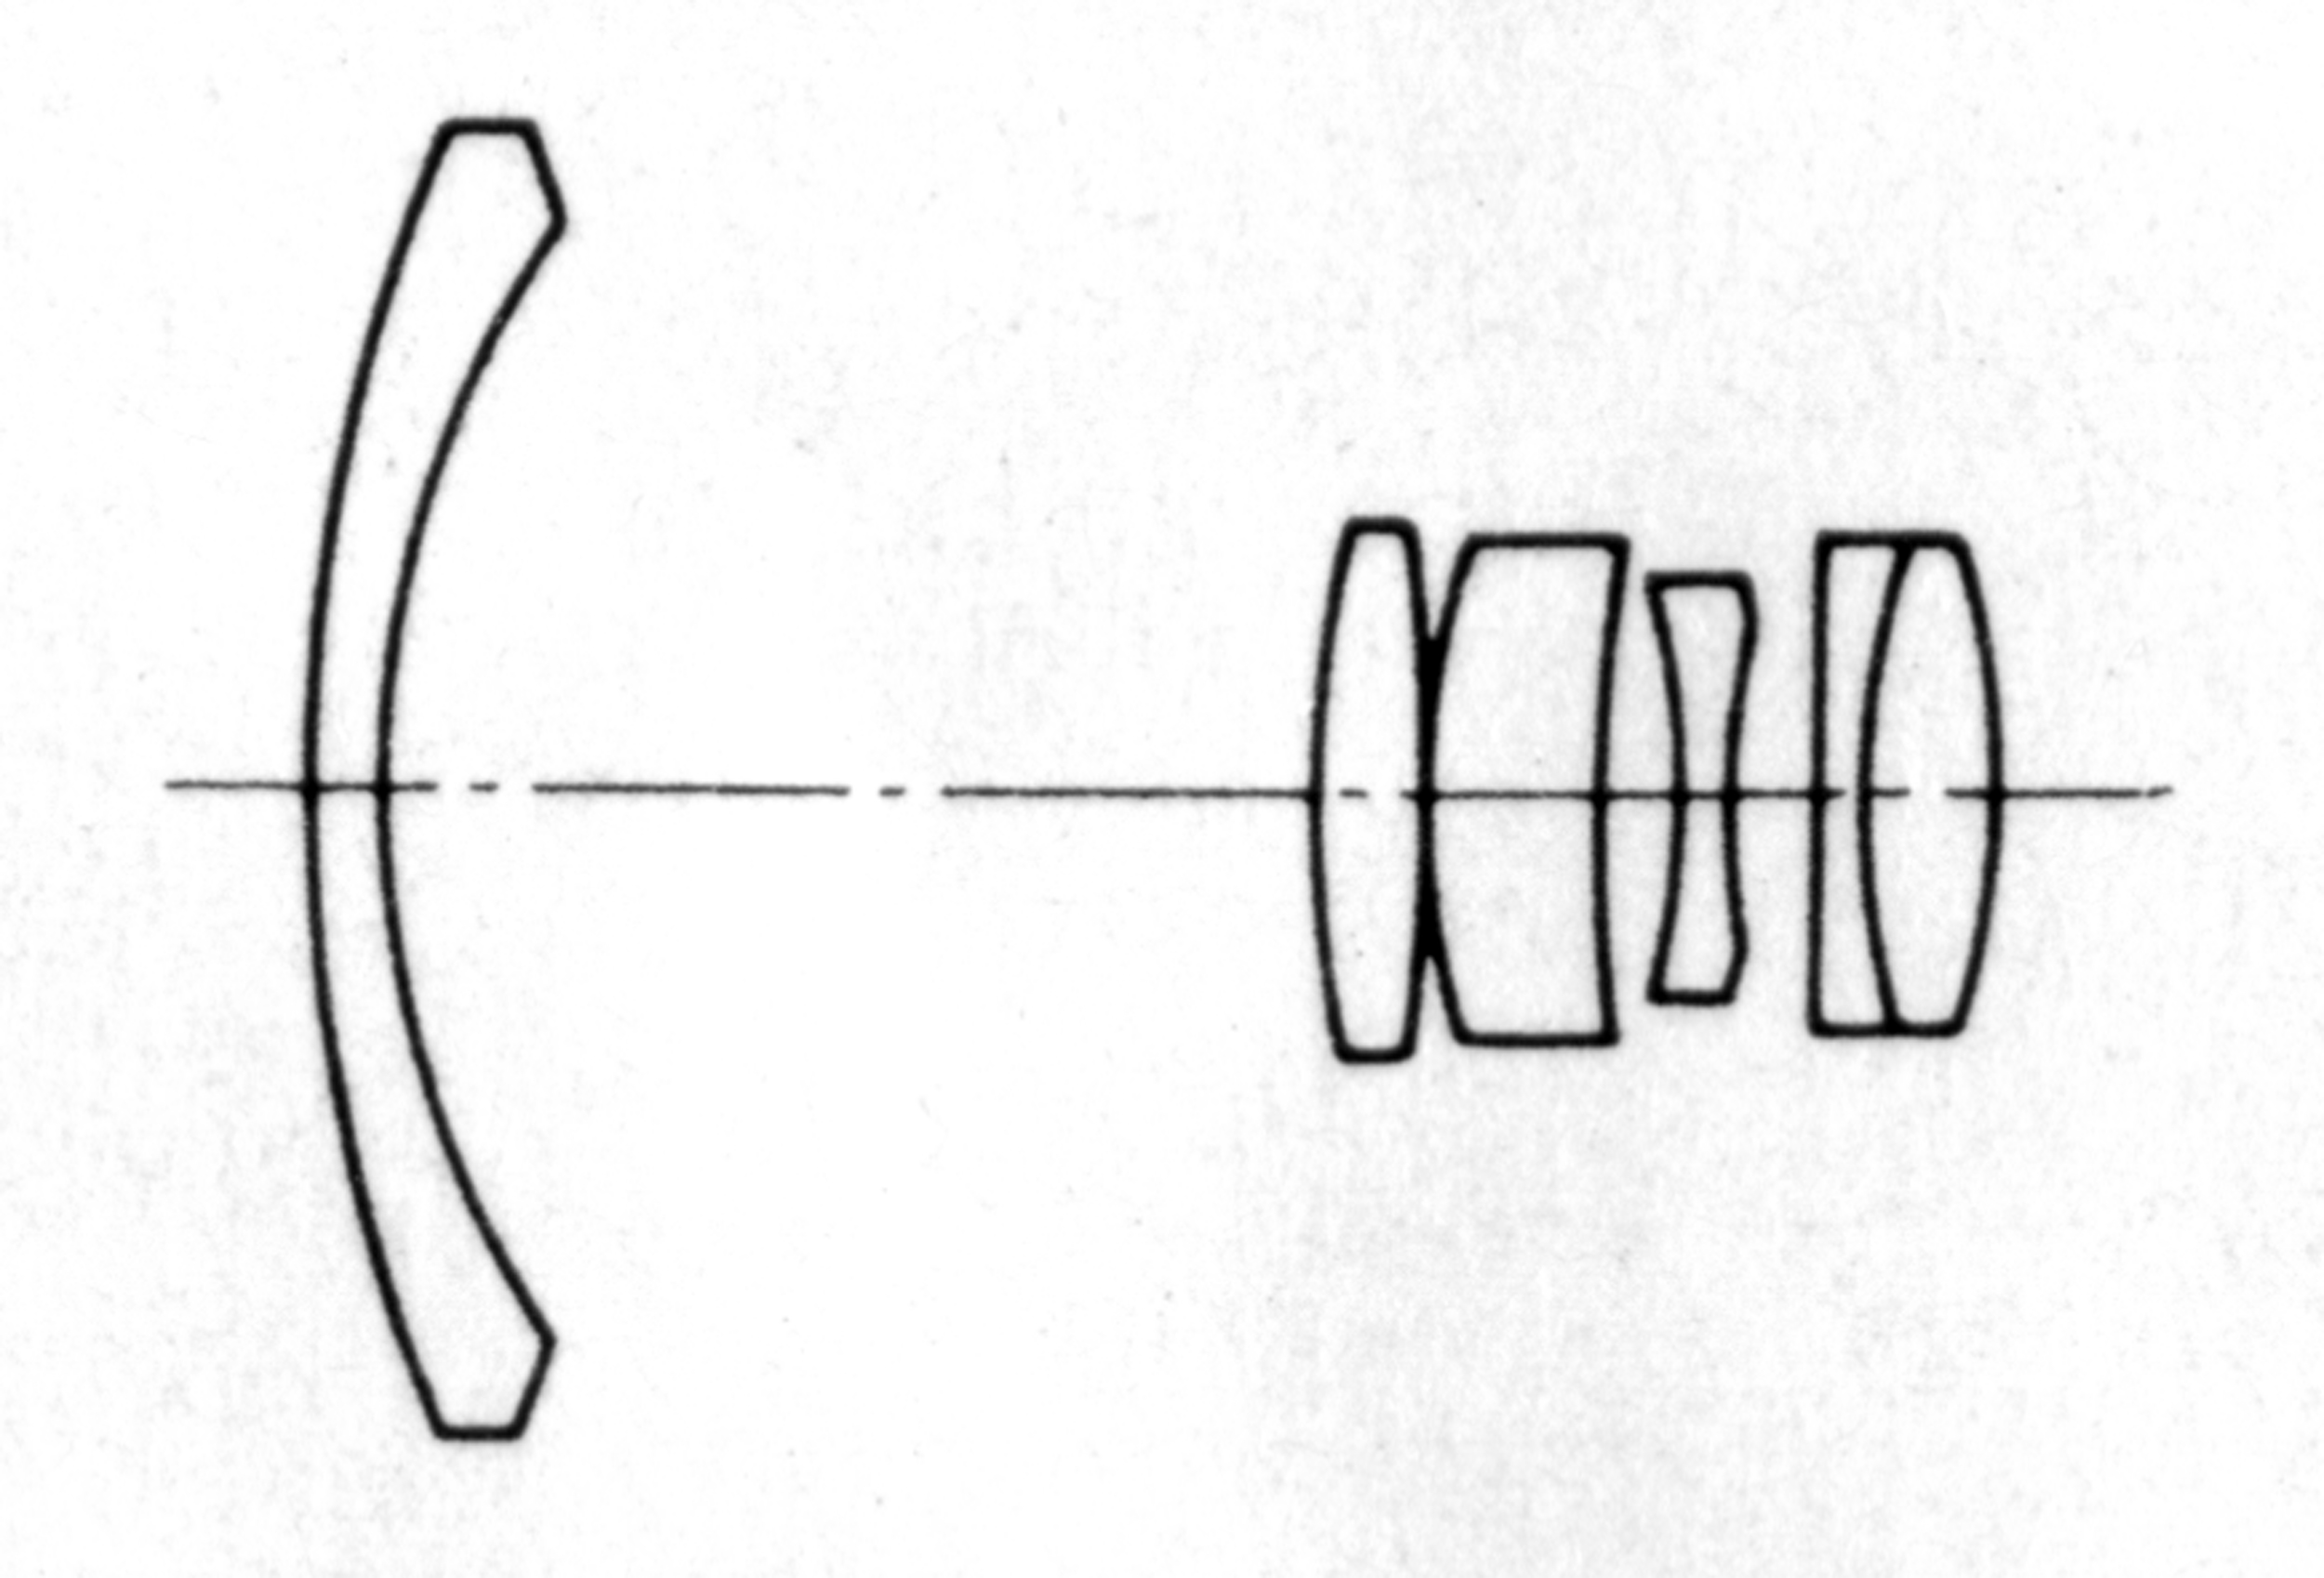
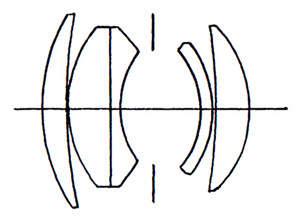
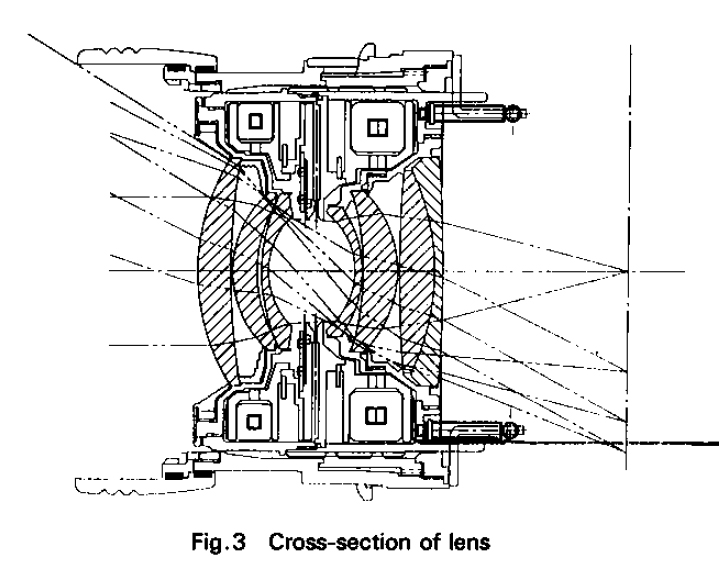
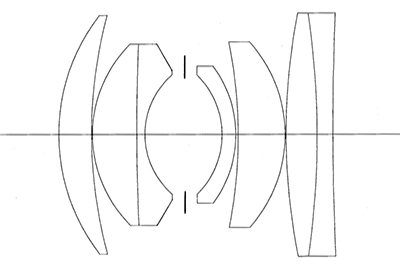
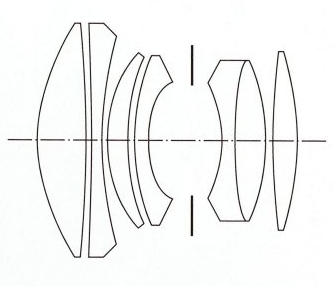
The Hexanon employed a fairly new (for the time) and complicated lens design with a six elements in five groups. The Hexanon appears to be closest to Voigtlander’s “Ultron” design. According to the 1950 Voigtlander patent, this design was a step forward for double-gauss standard lenses by minimizing coma, improving field flatness, and reducing certain aberrations in a relatively-fast lens. Konica certainly did not verbatim attempt to “copy” the Voigtlander design. The Hexanon is also of a different design than the contemporary Canon Double-Gauss lenses.
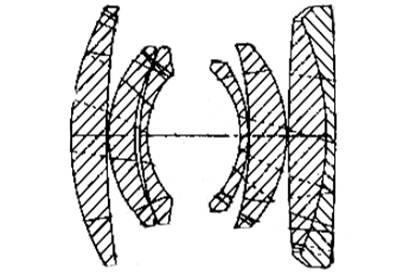
Voigtlander’s Drawing of a 50mm f/2 Ultron Lens
The Diagram of the Hexanon
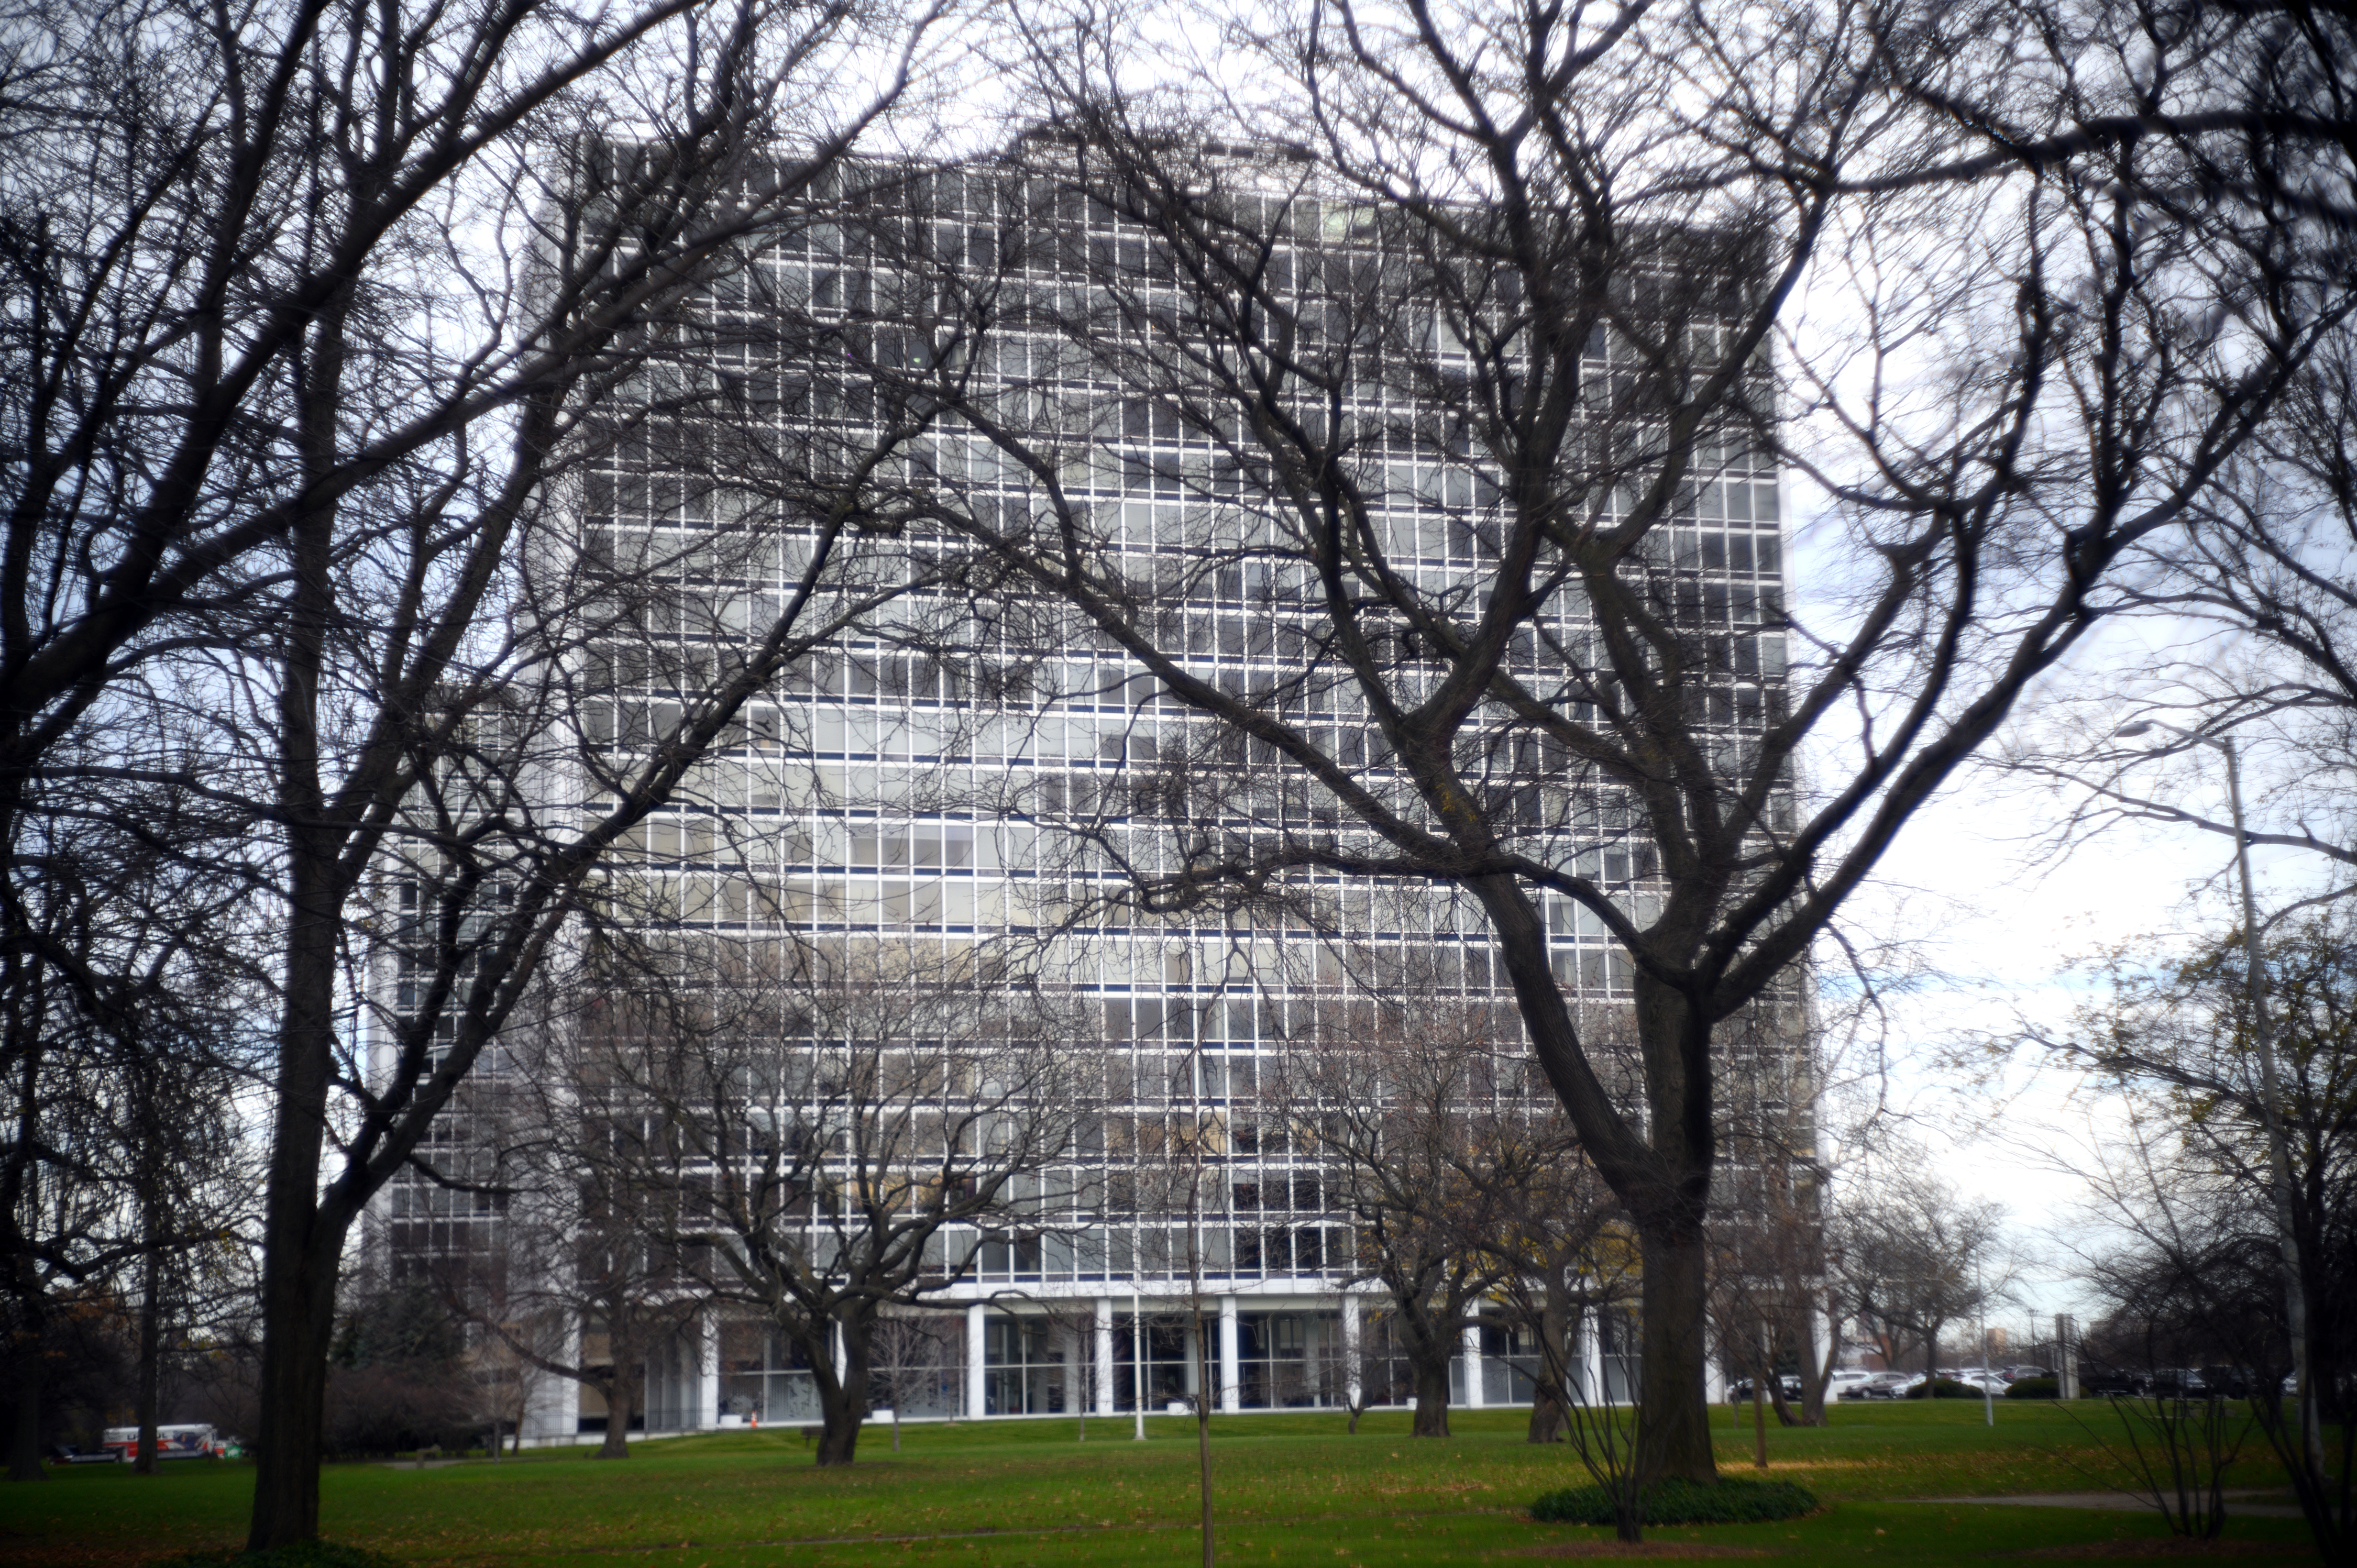
So how does the Hexanon compare to other contemporary lenses in its focal length, class, and price-point? In my opinion, the Hexanon is a capable and lovely lens, held back only by its era-standard 1.00m minimum focusing distance and more dampened focusing compared to modern lenses (which is a matter of preference for many). When using the lens on a Leica M with an adapter, there are no issues with the infinity focusing lever interfering with the lens release button or self-timer or any blocking the rangefinder window. After using modern Leica M-mount lenses for years, these 1950s lenses are real works of art in themselves.
The main downside of the Hexanon today is it has become a victim of the endemic “price-creep” on anything collectible or Leica. Fifteen years ago, a good example could be scored for around $200 or less. An even better deal might have been to buy the generic M39 camera on which the Hexanon came and then turn around and sell the body for a few bucks. However, because Hexanons are currently being marketed $500 or more, the price makes it a bit less attractive option for “screwing around.” The best case for paying the premium for the Hexanon would be for the great performance, wonderful build quality, and, let’s be honest, the chance to use a rare Leica-mount lens that was never really known in the West.
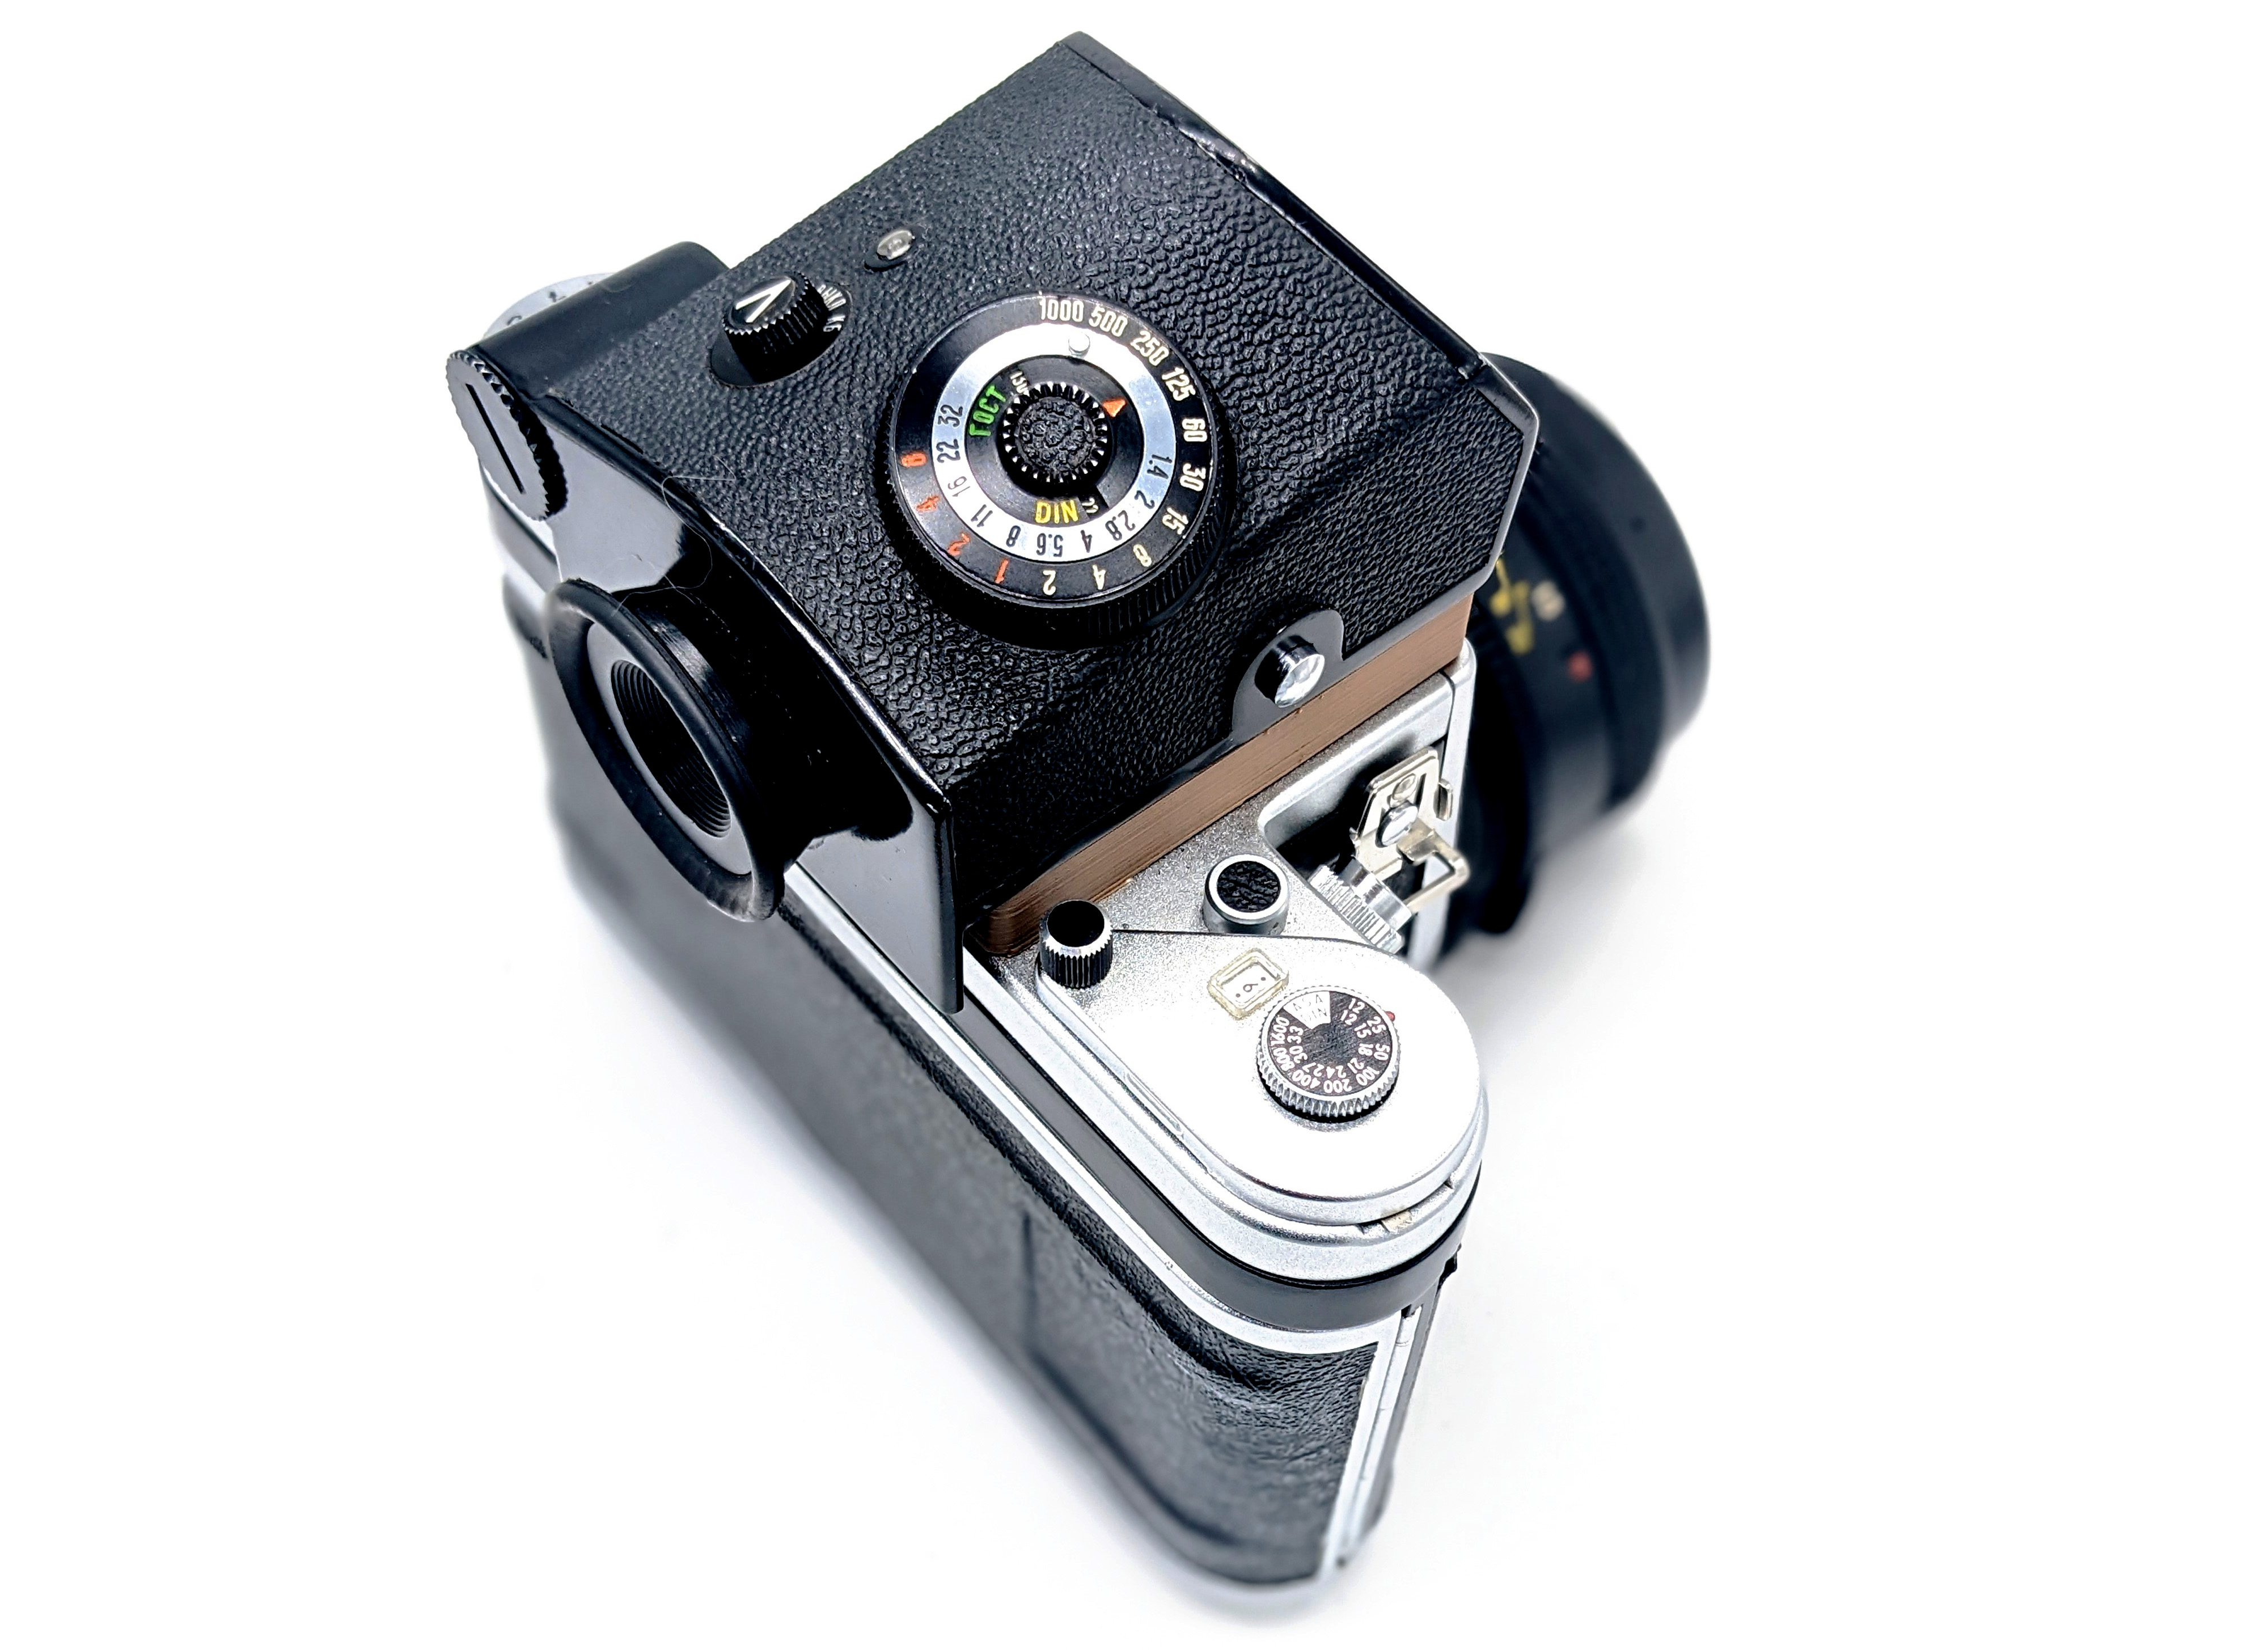
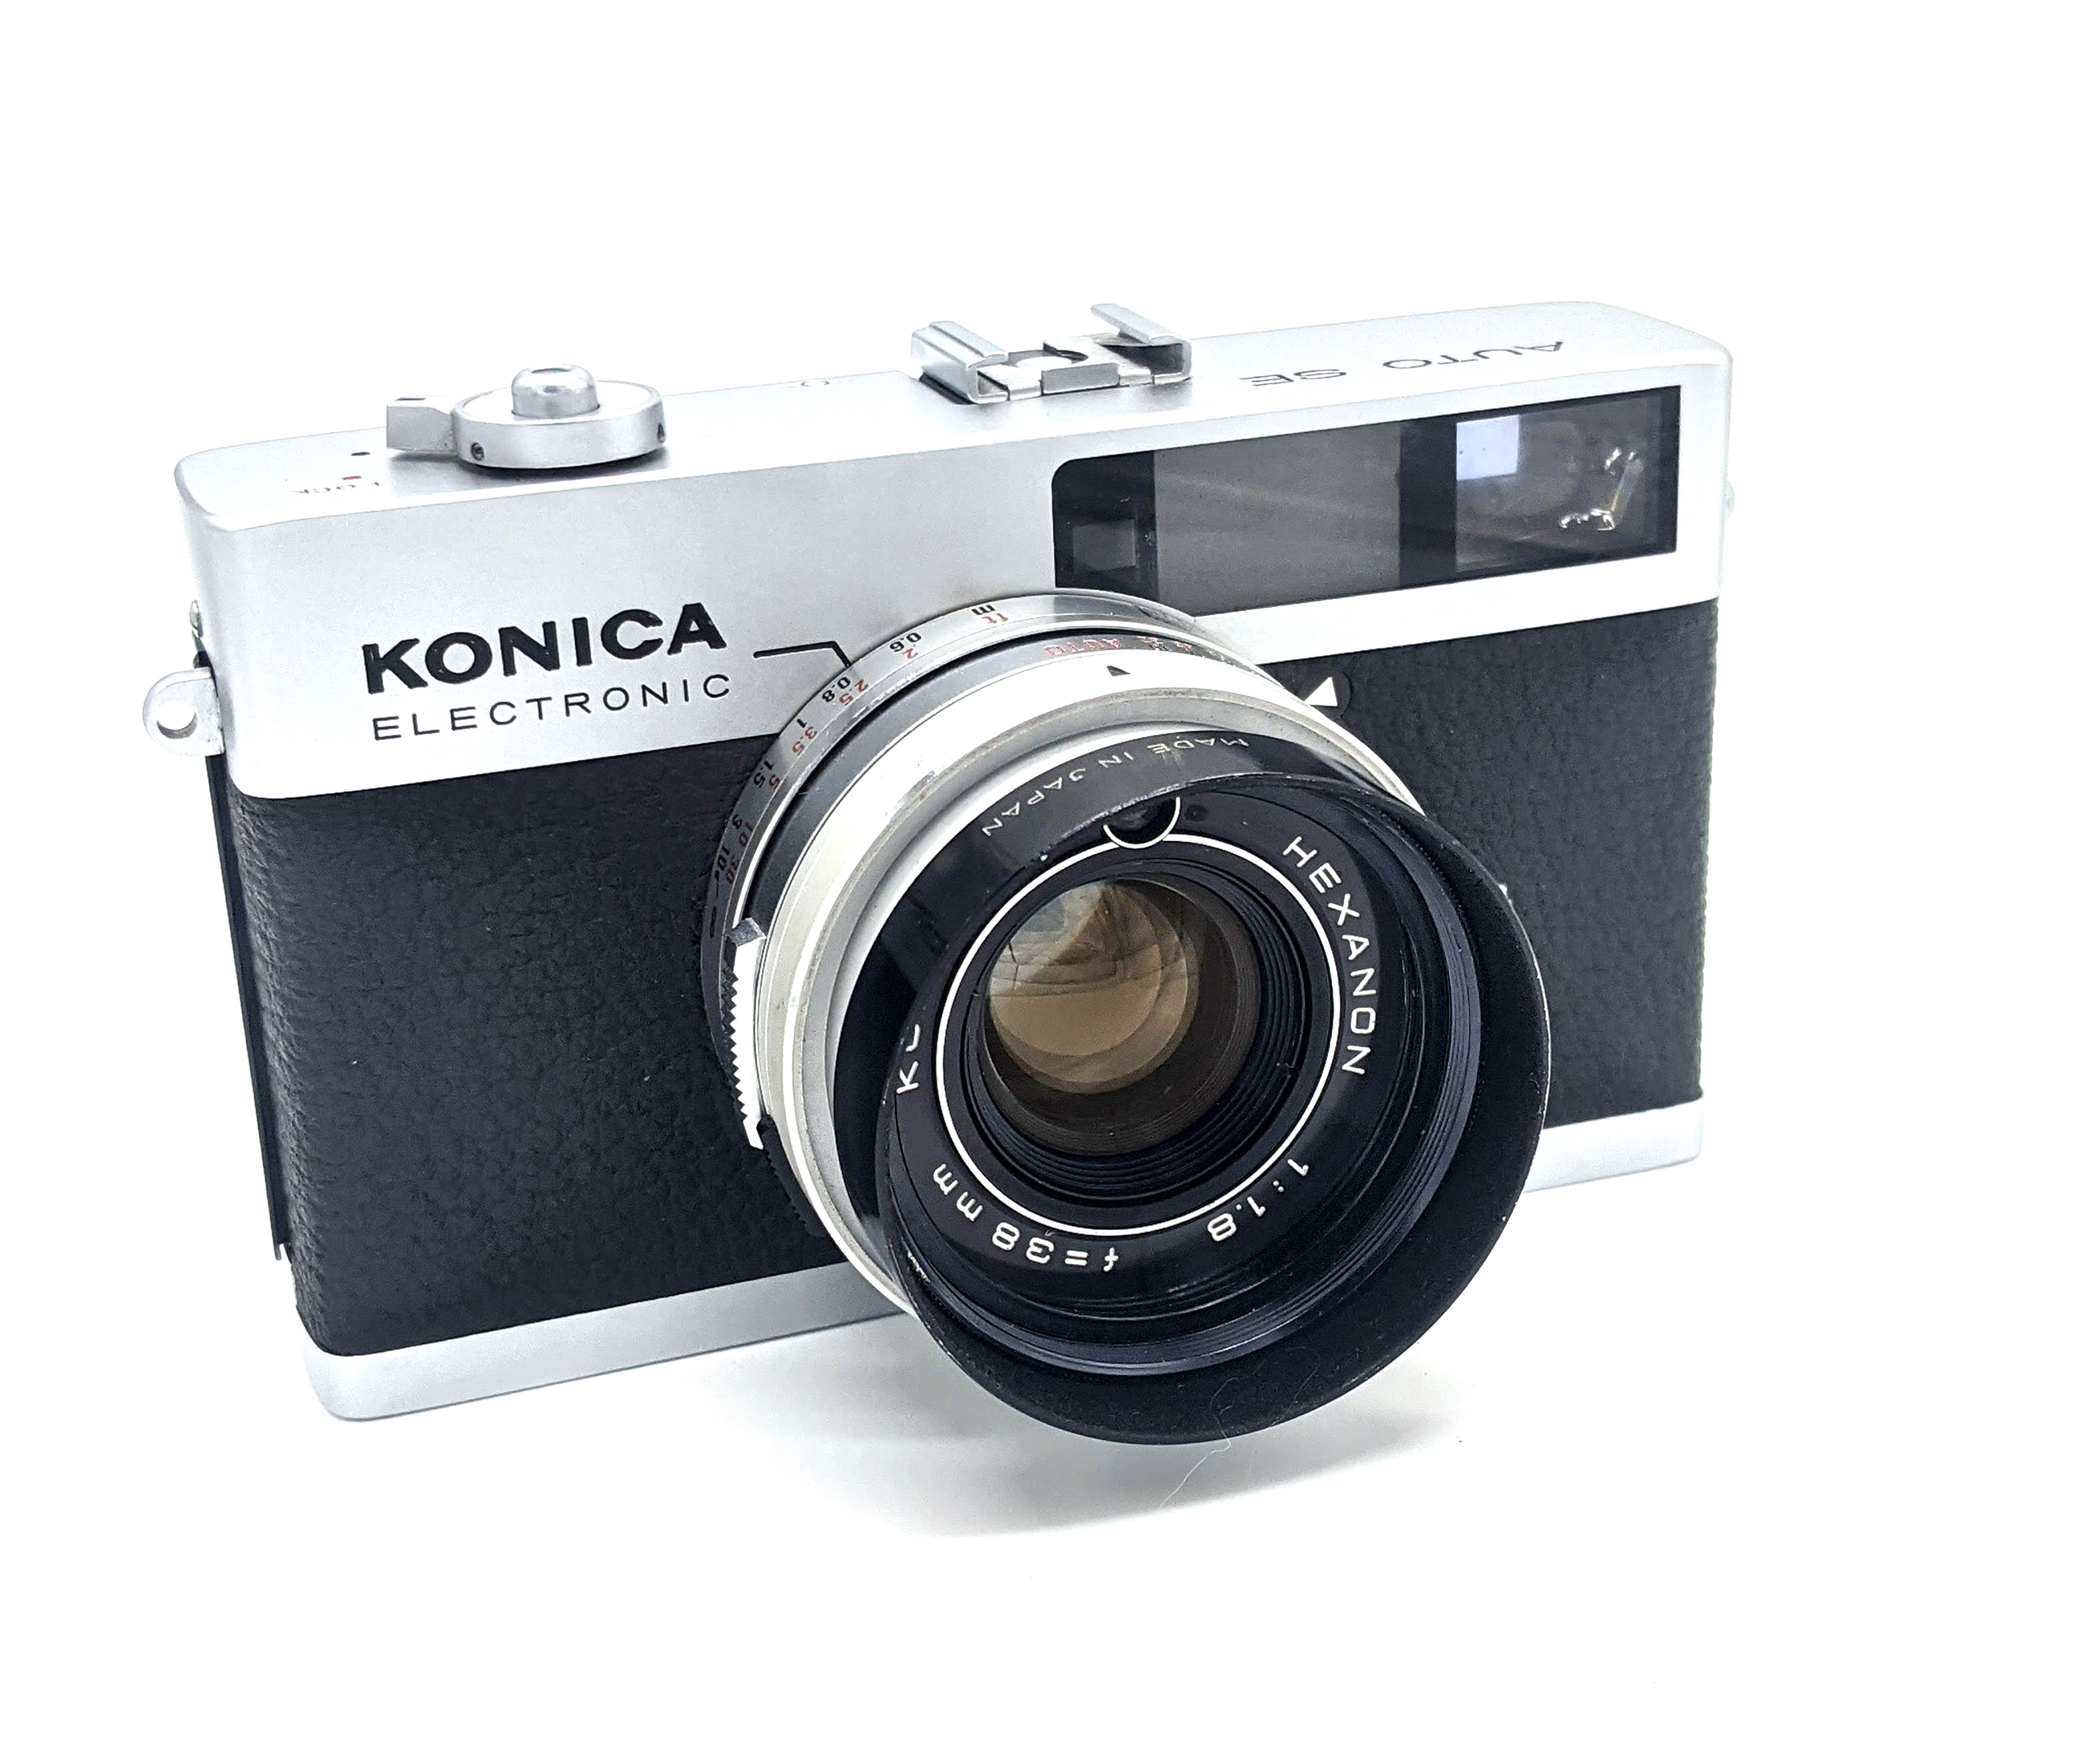
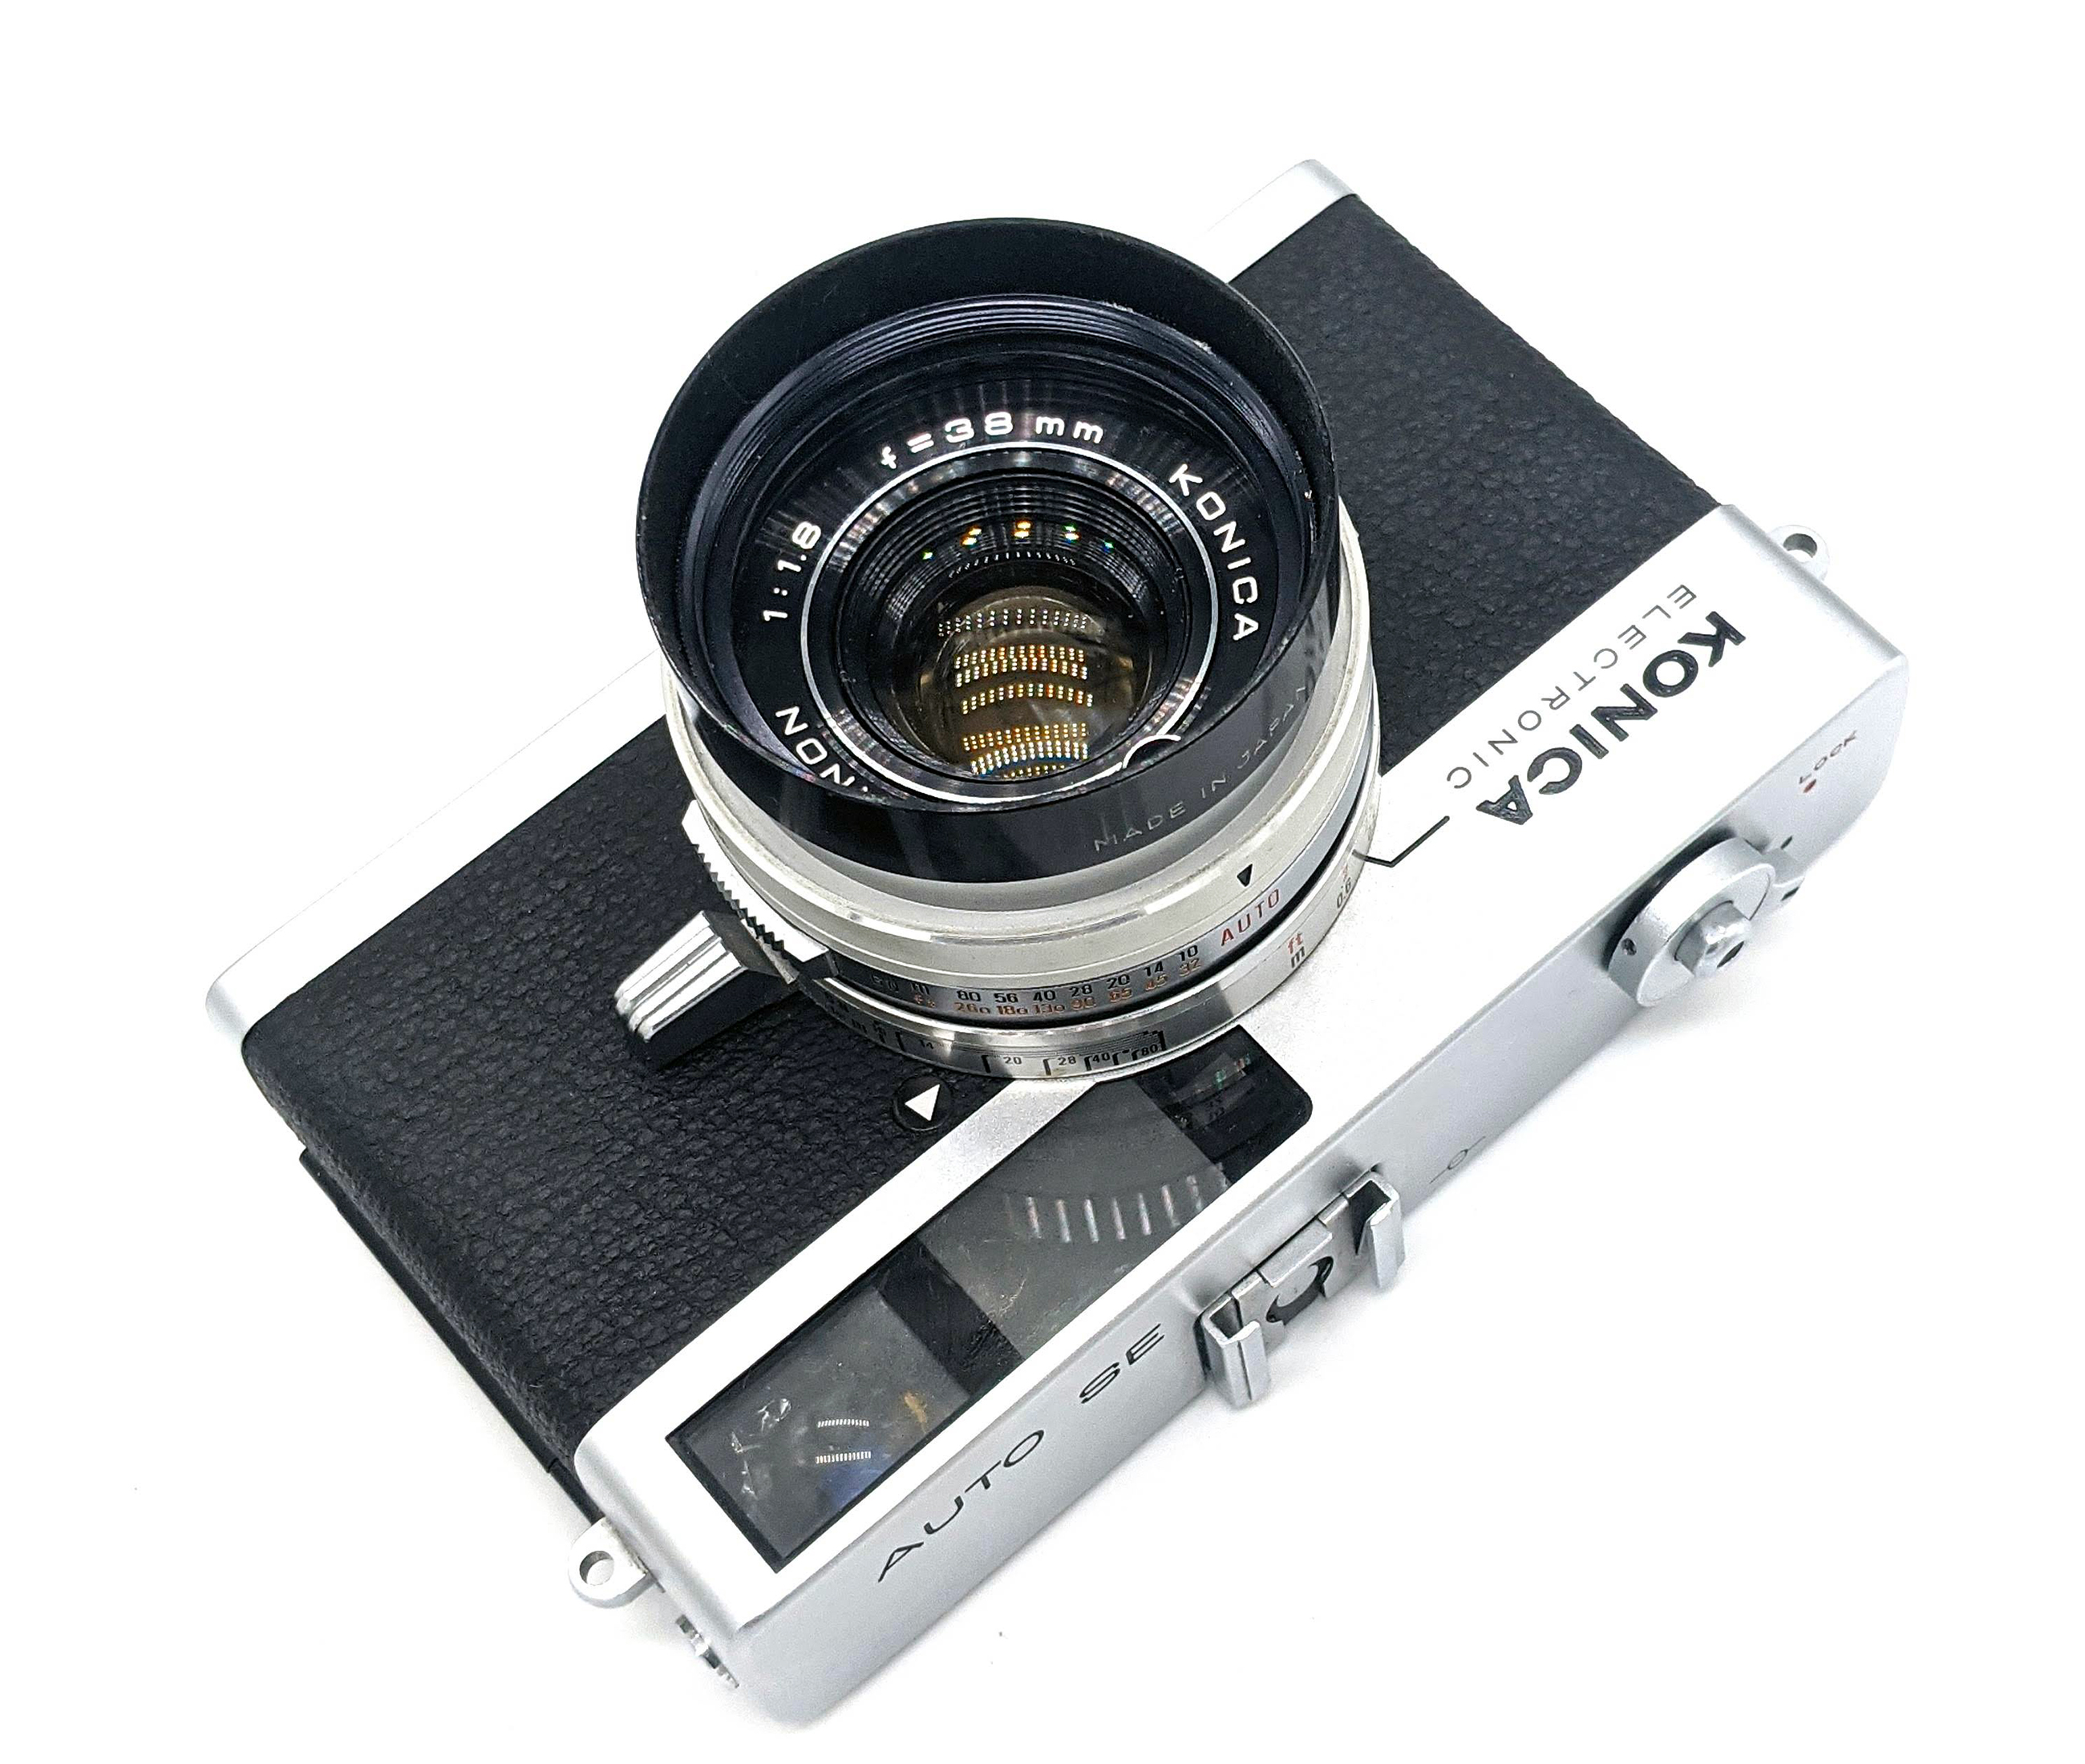
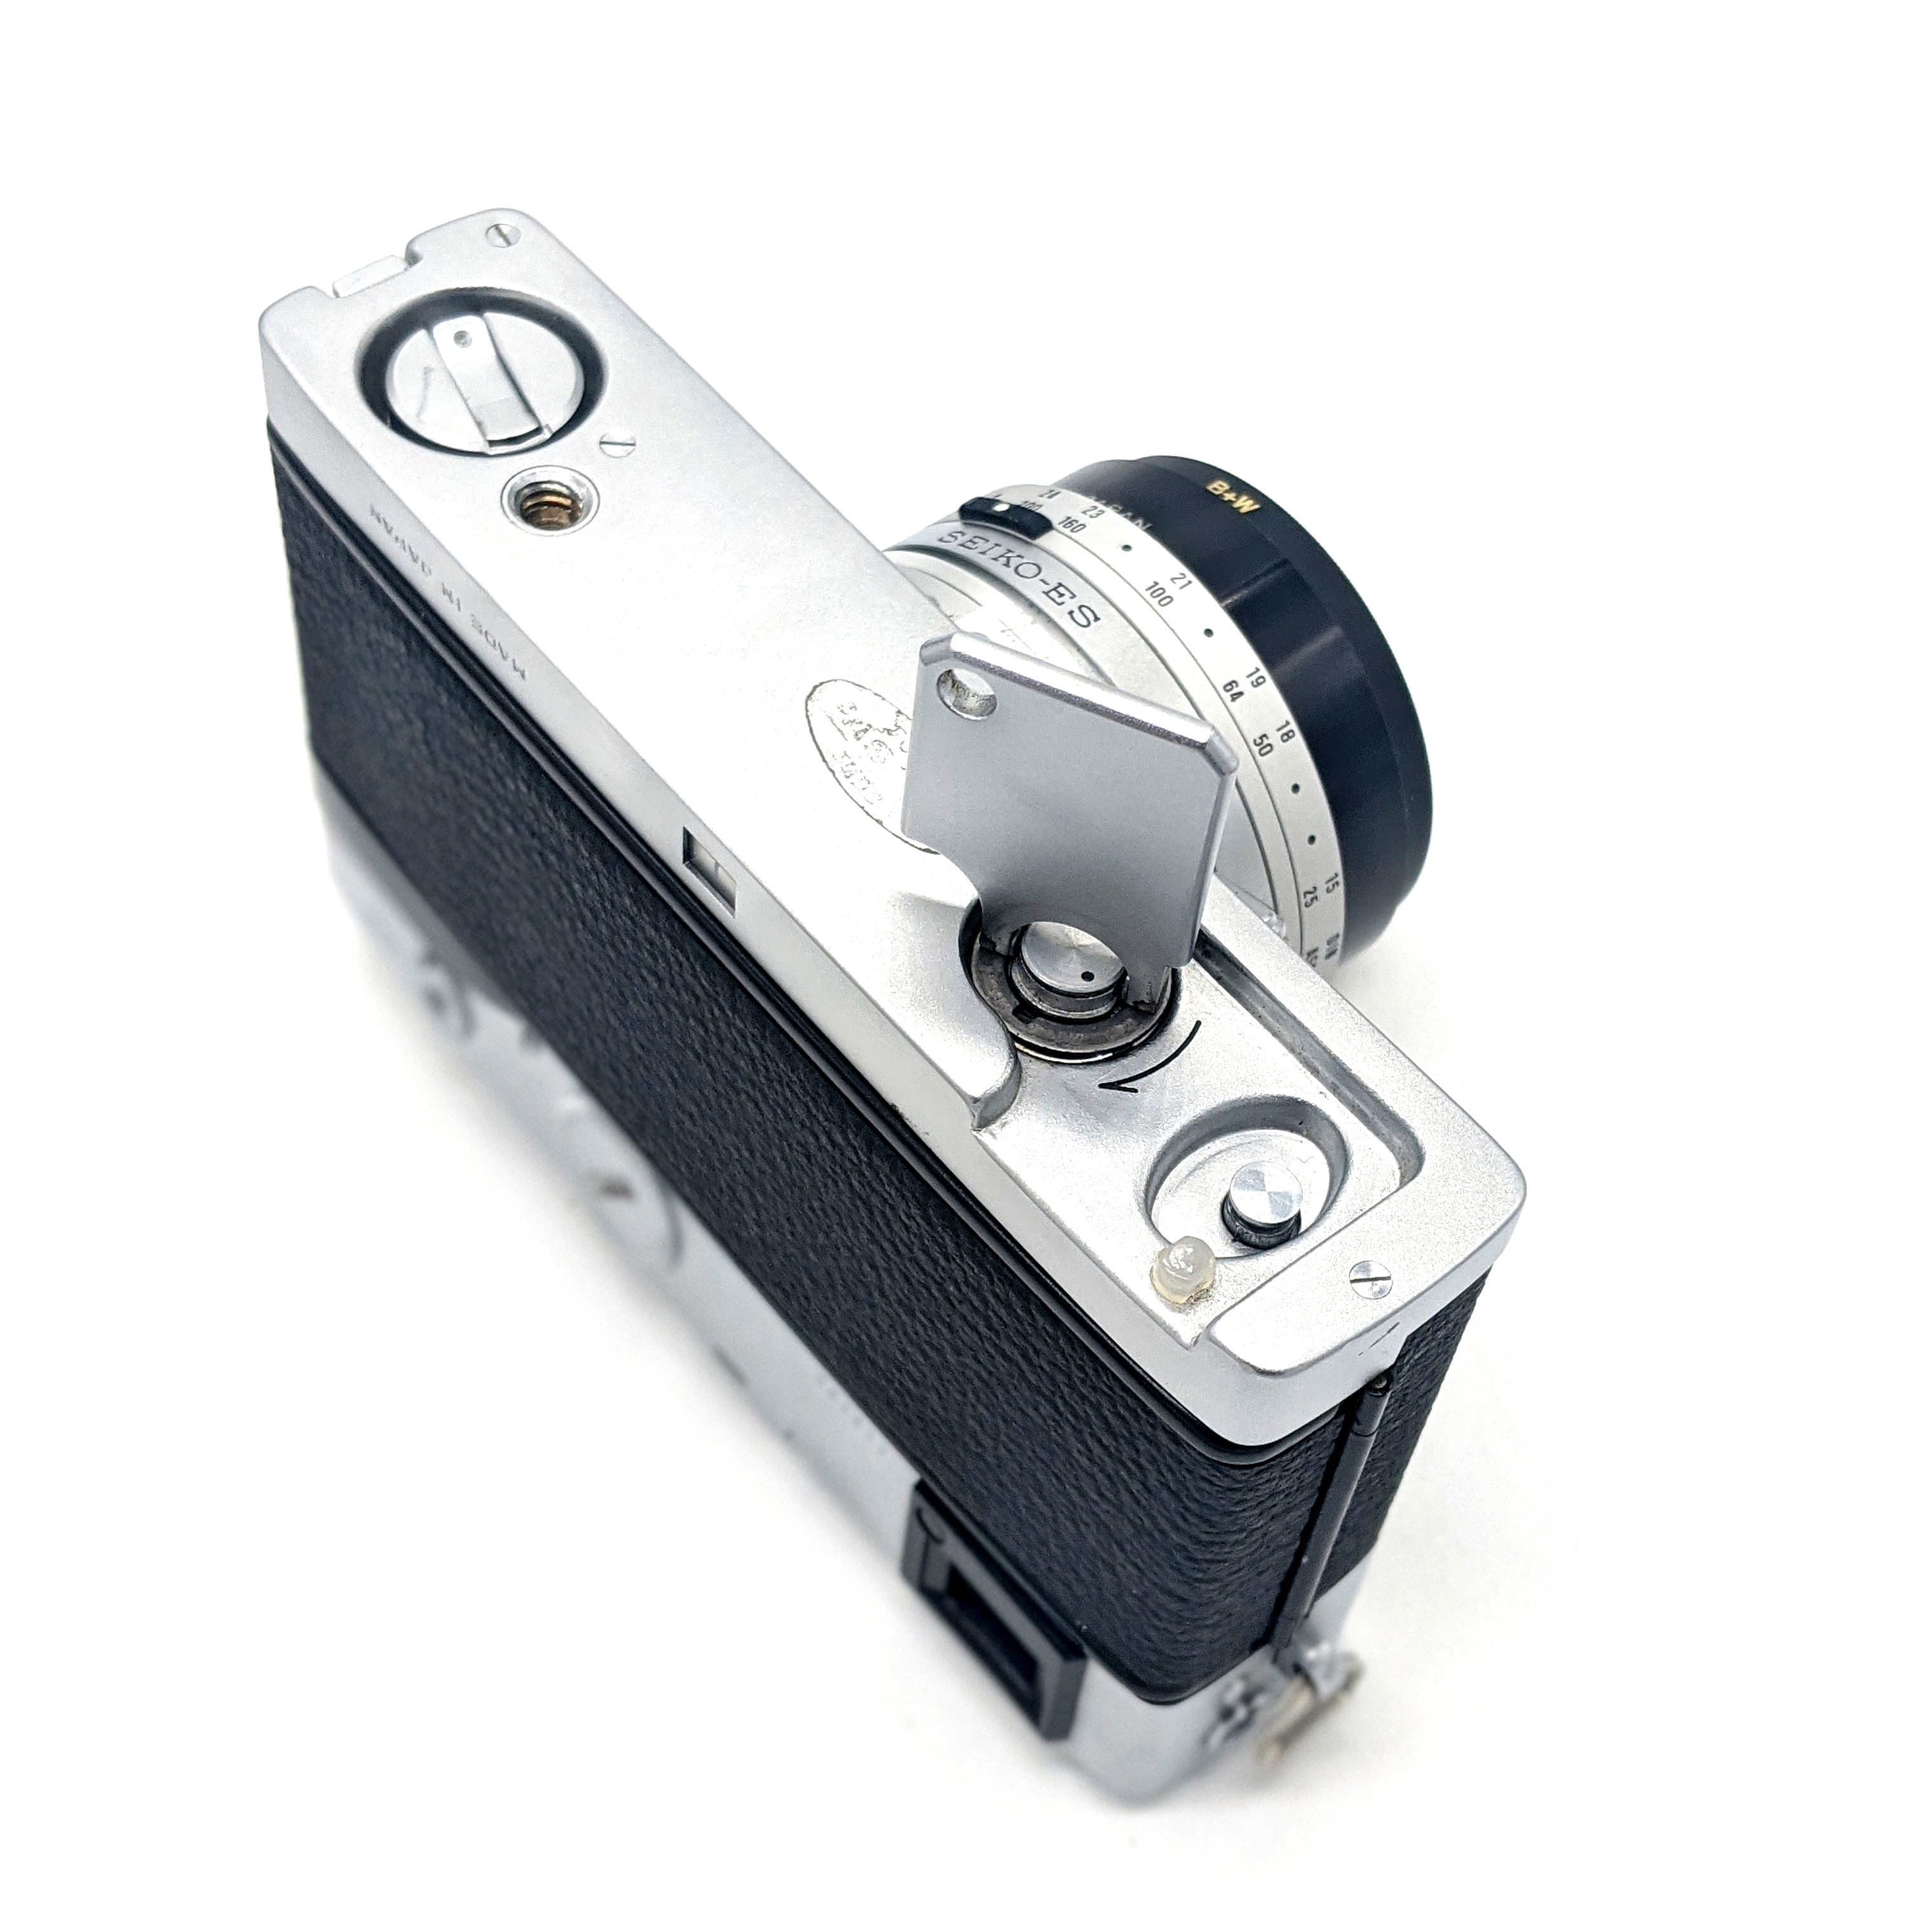
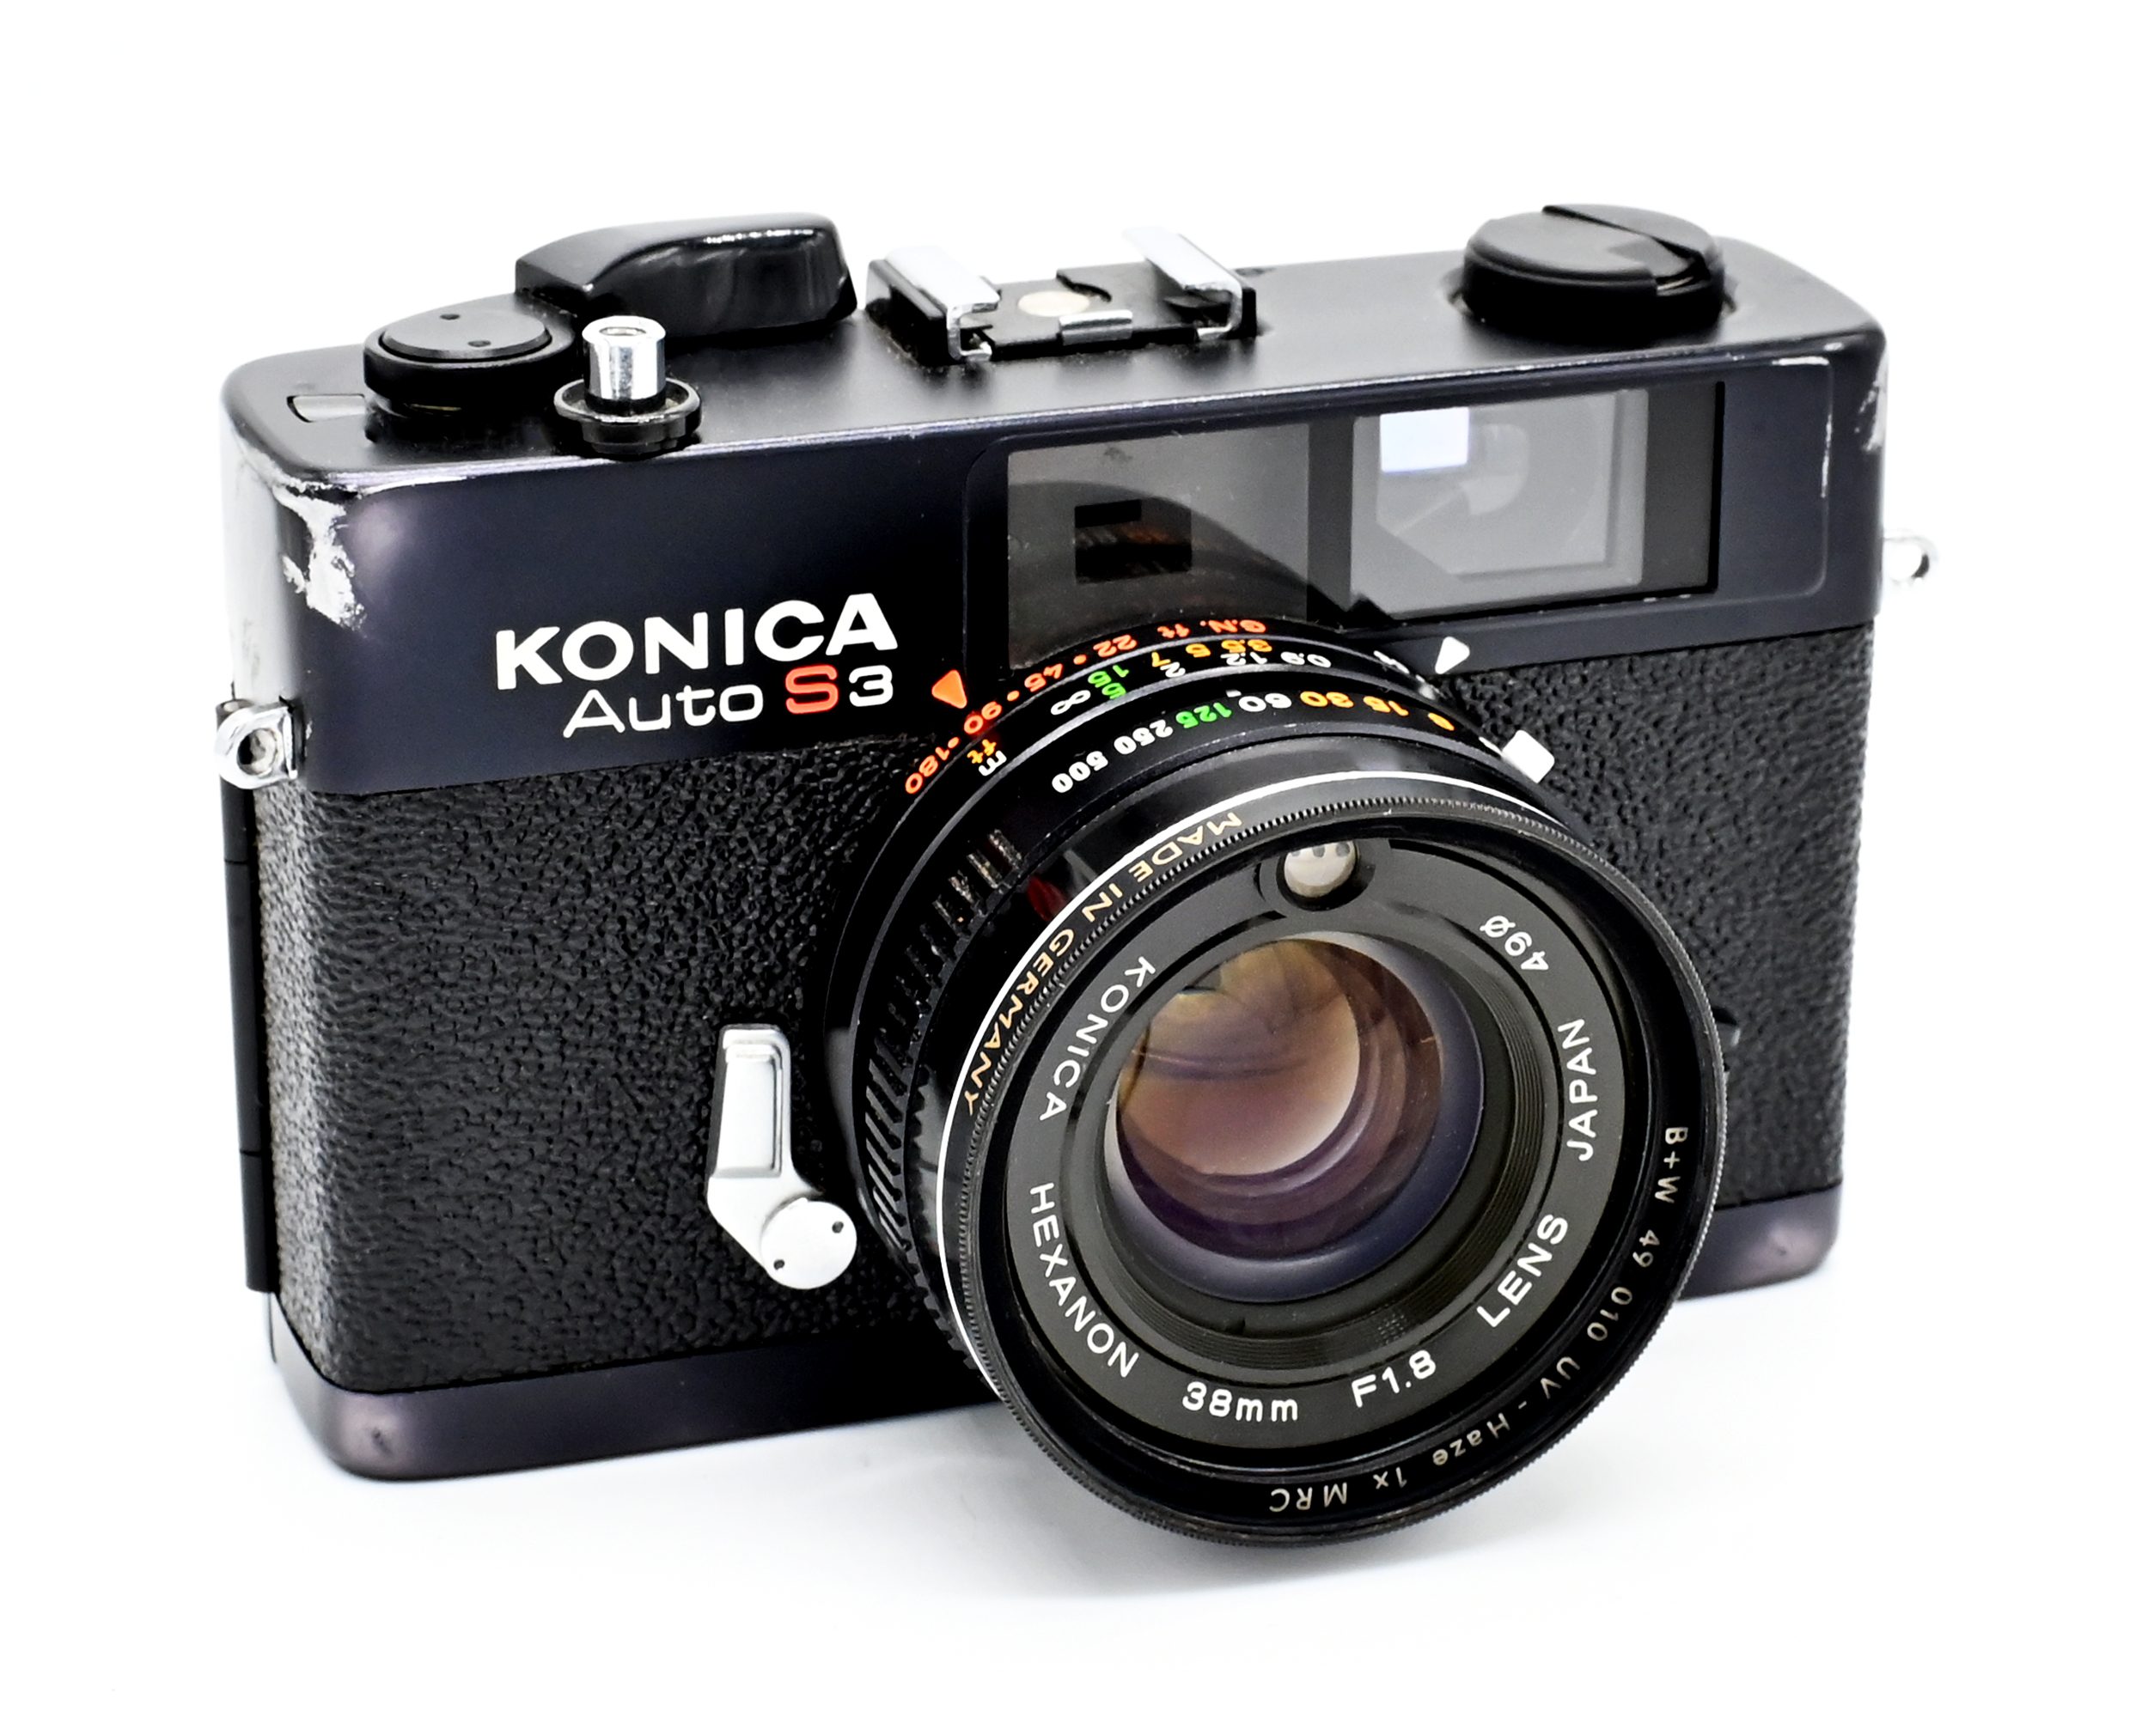
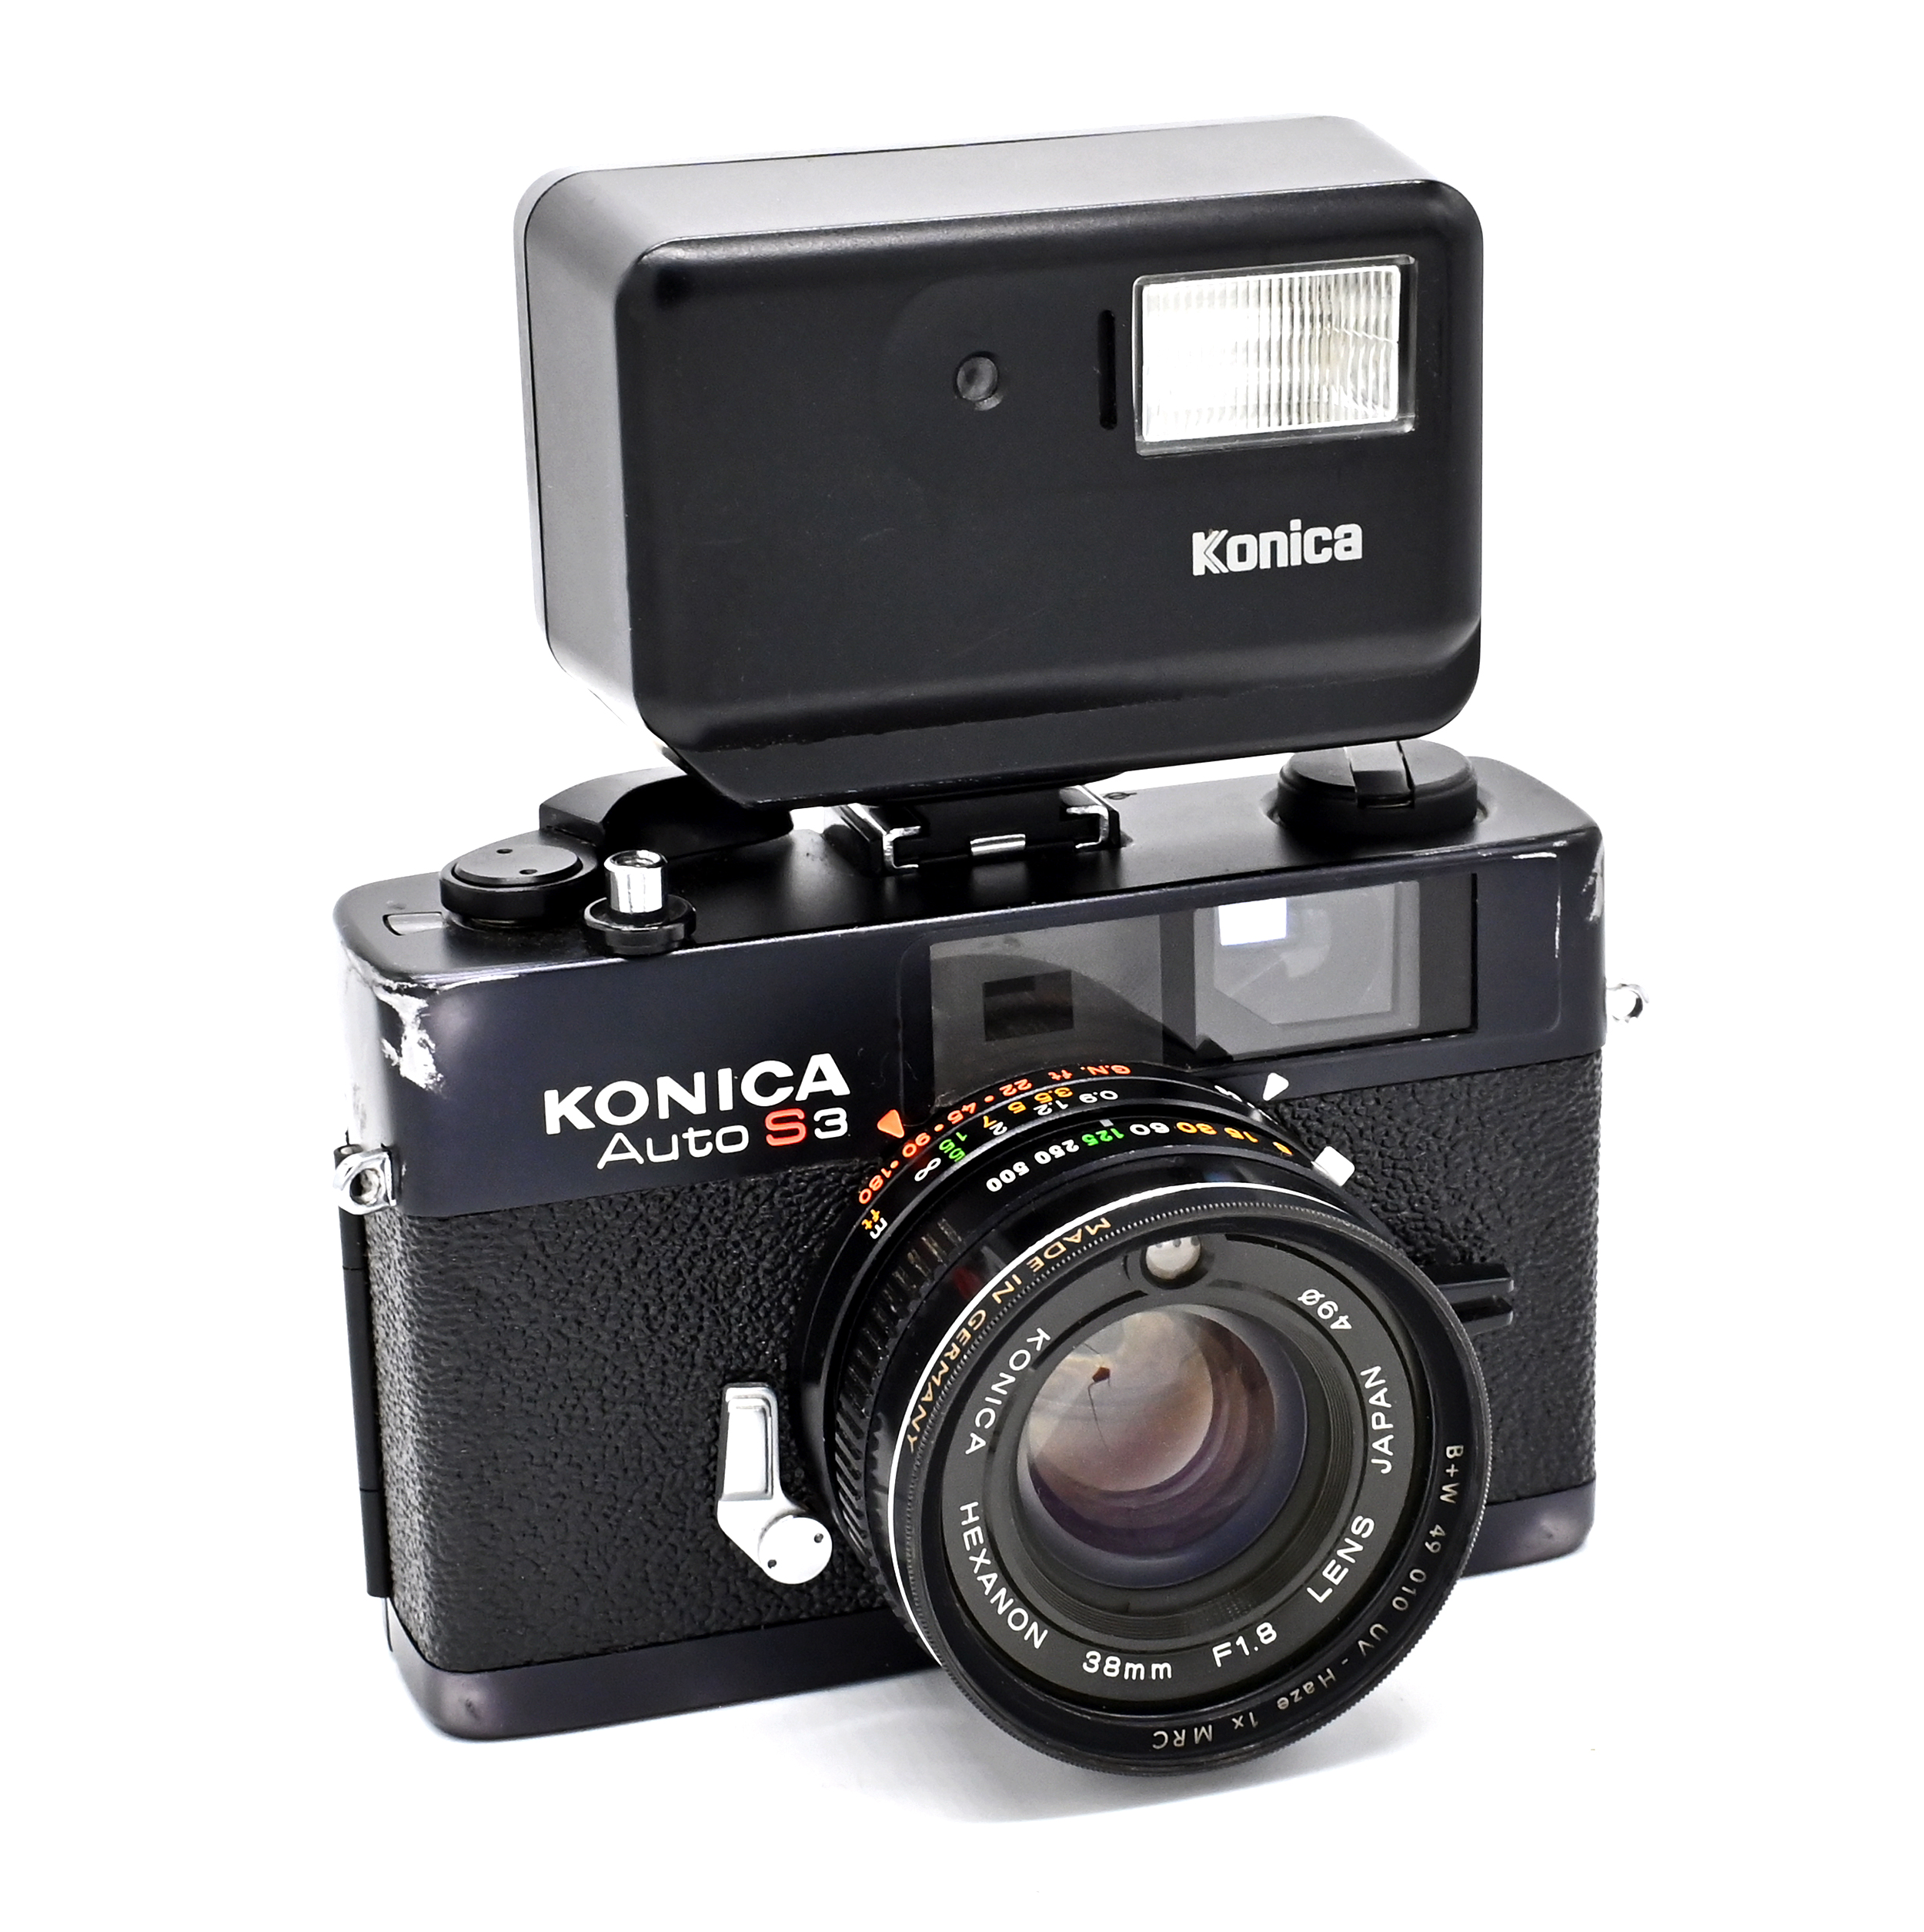
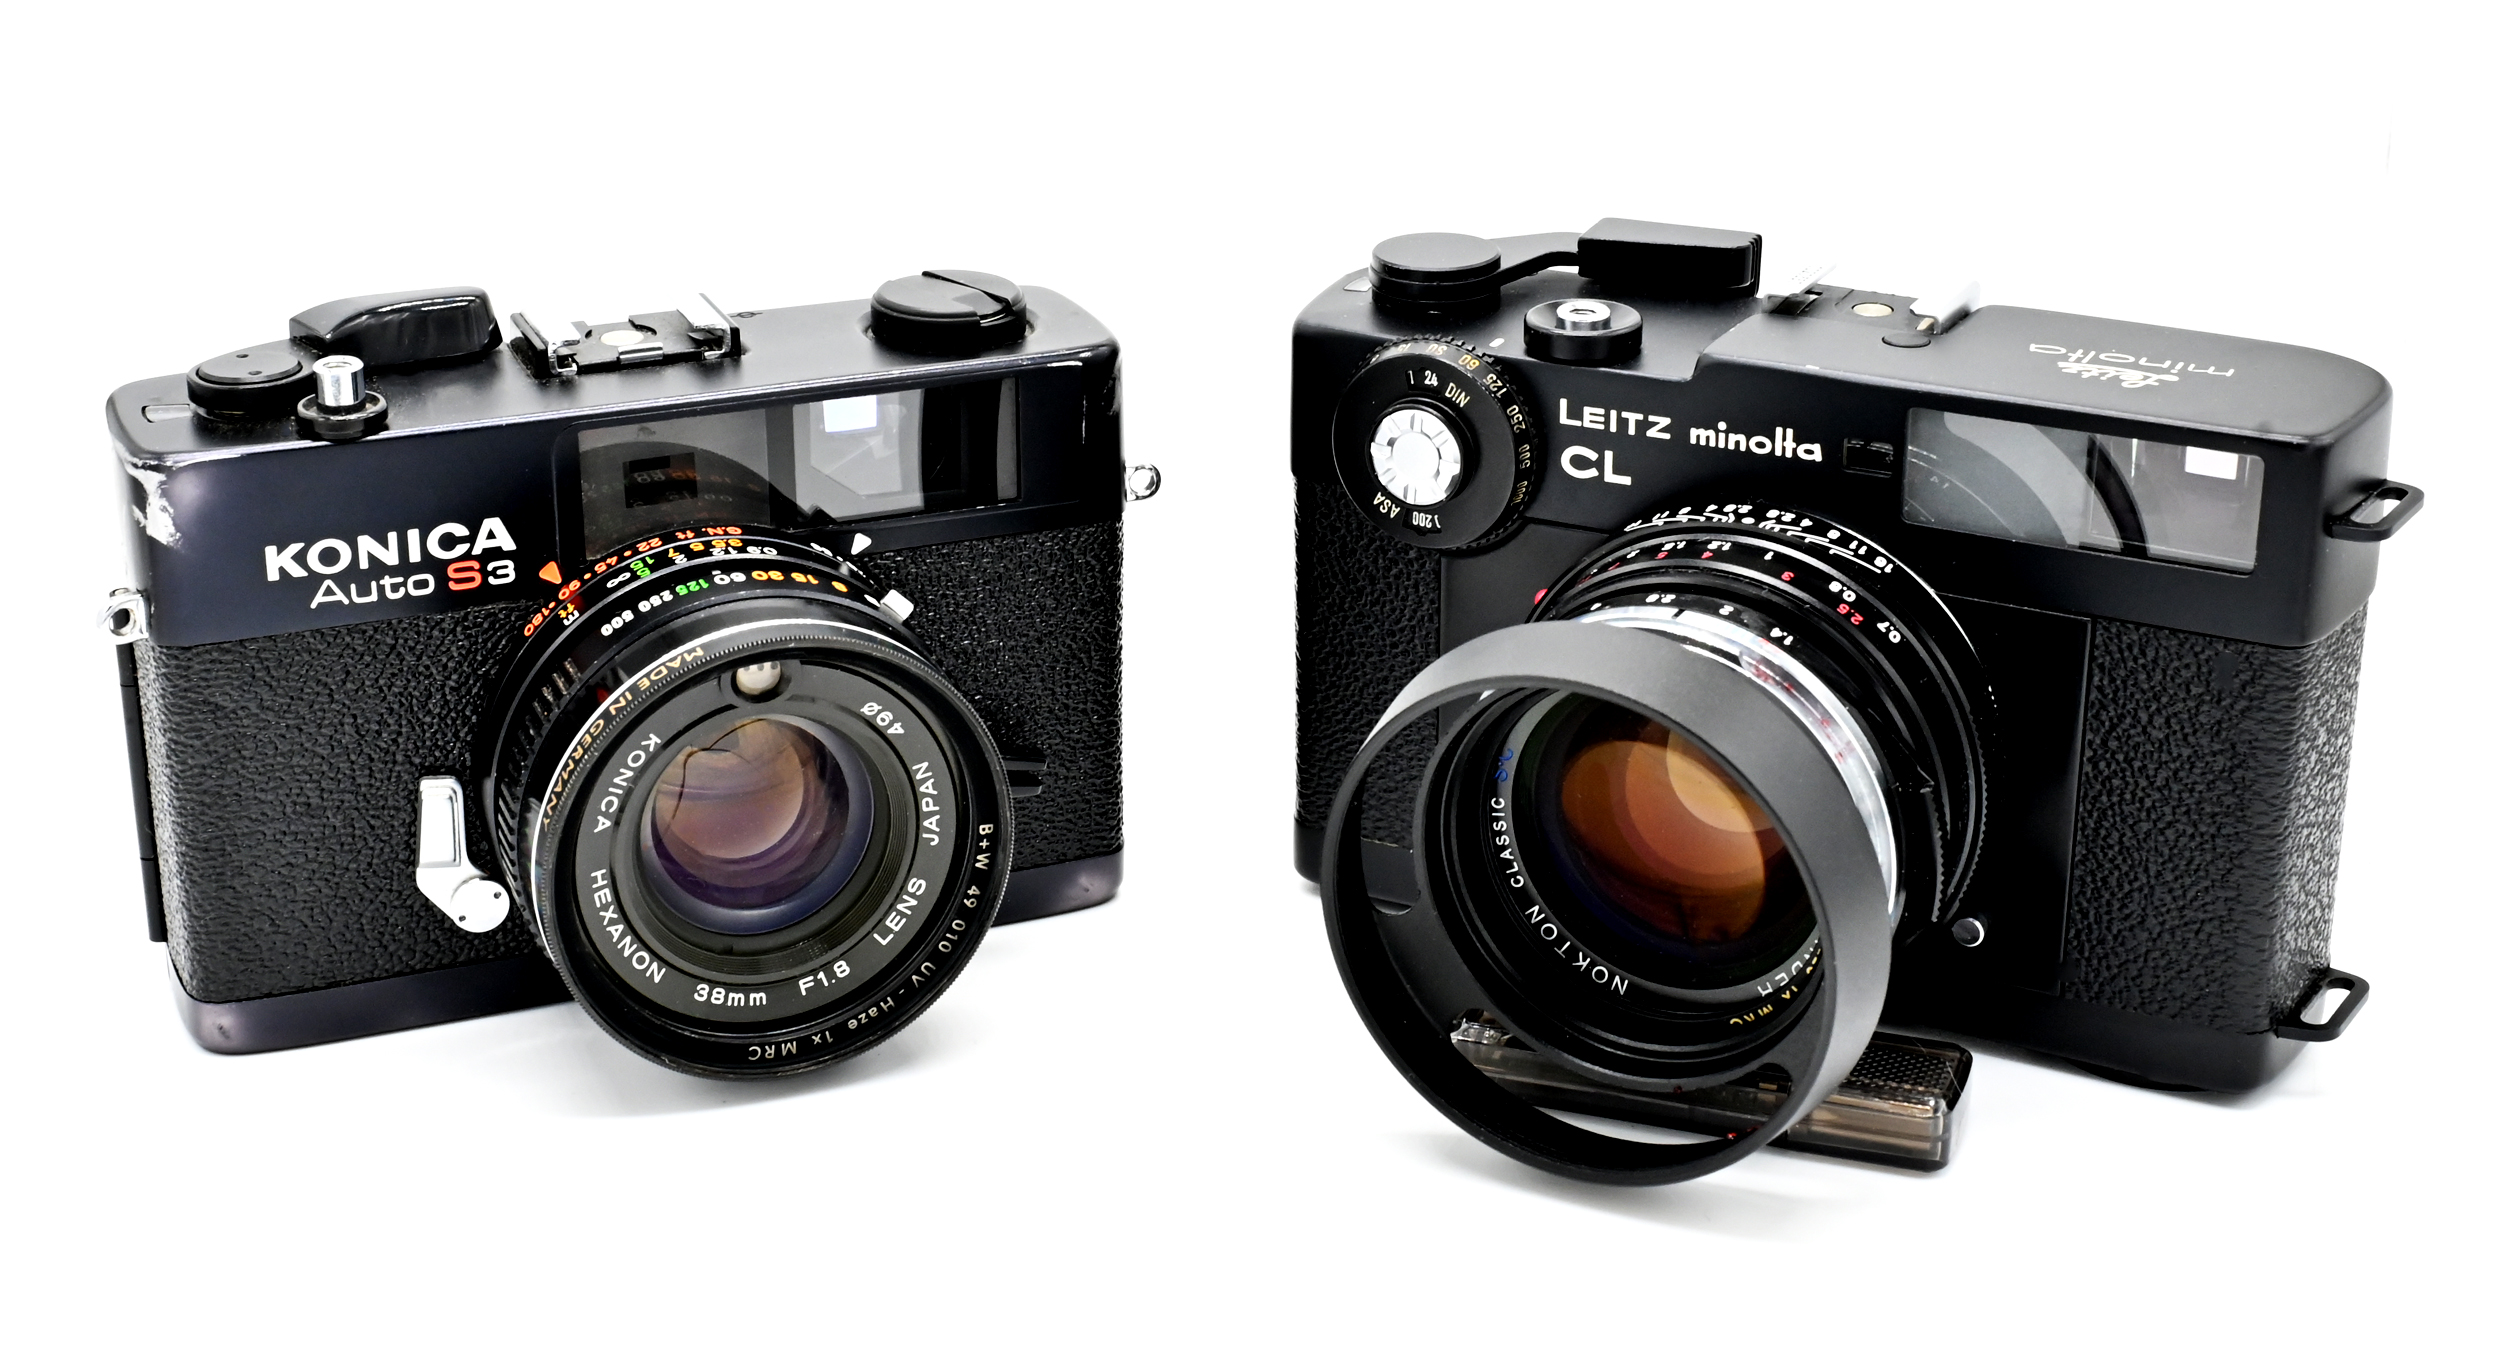
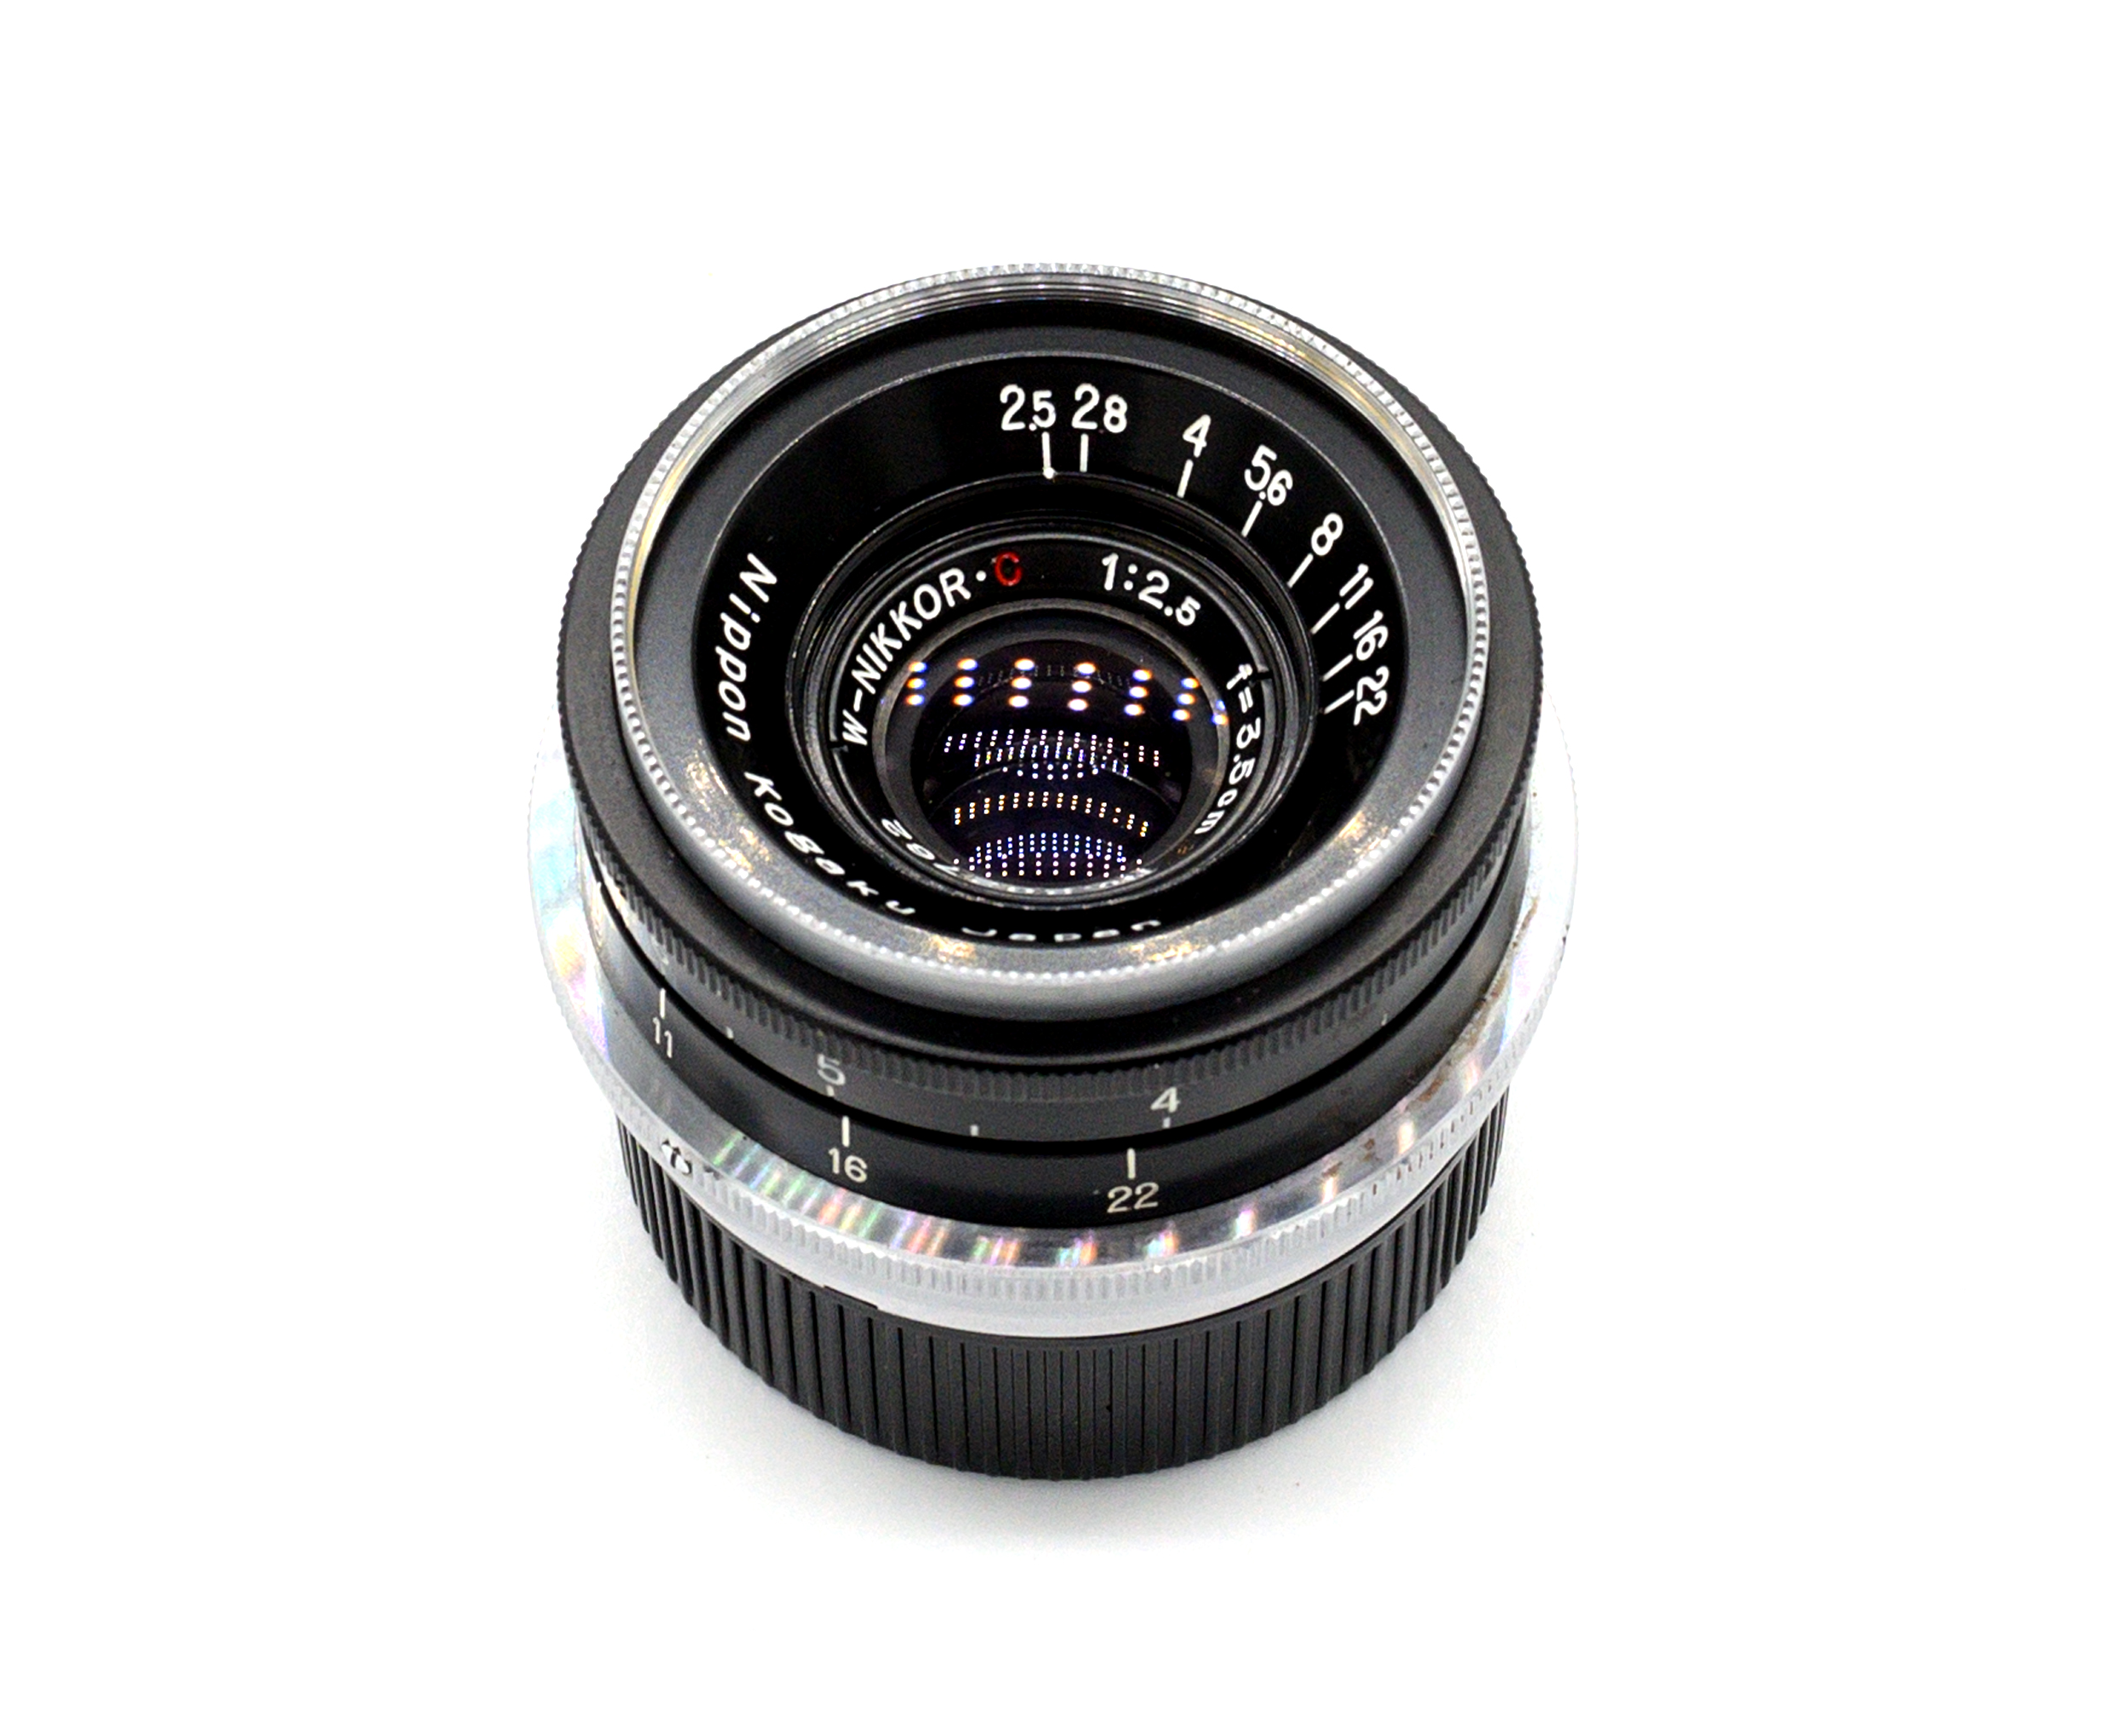
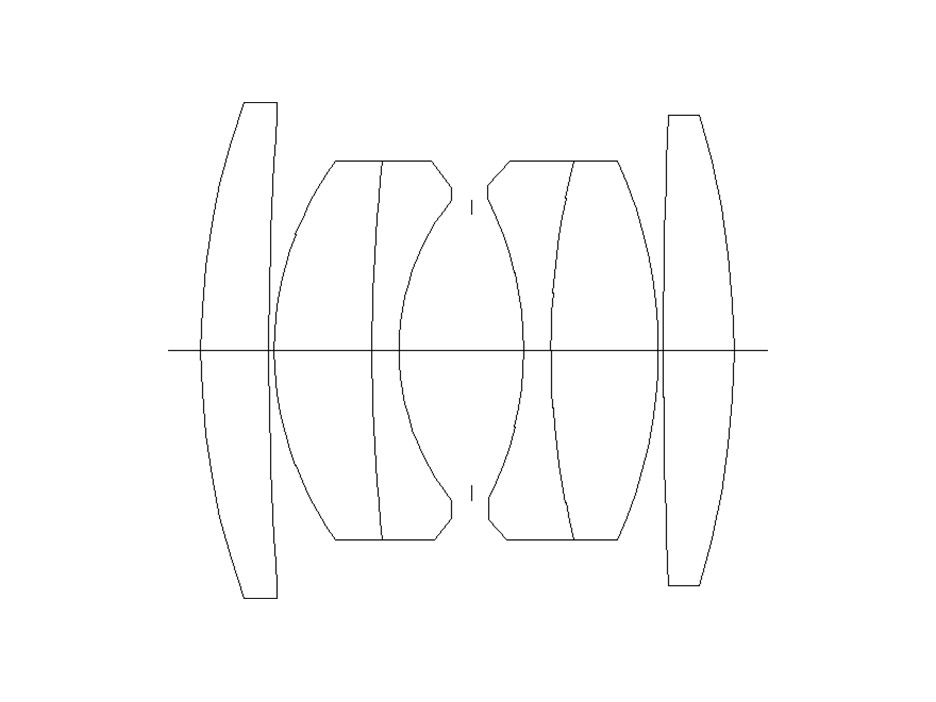
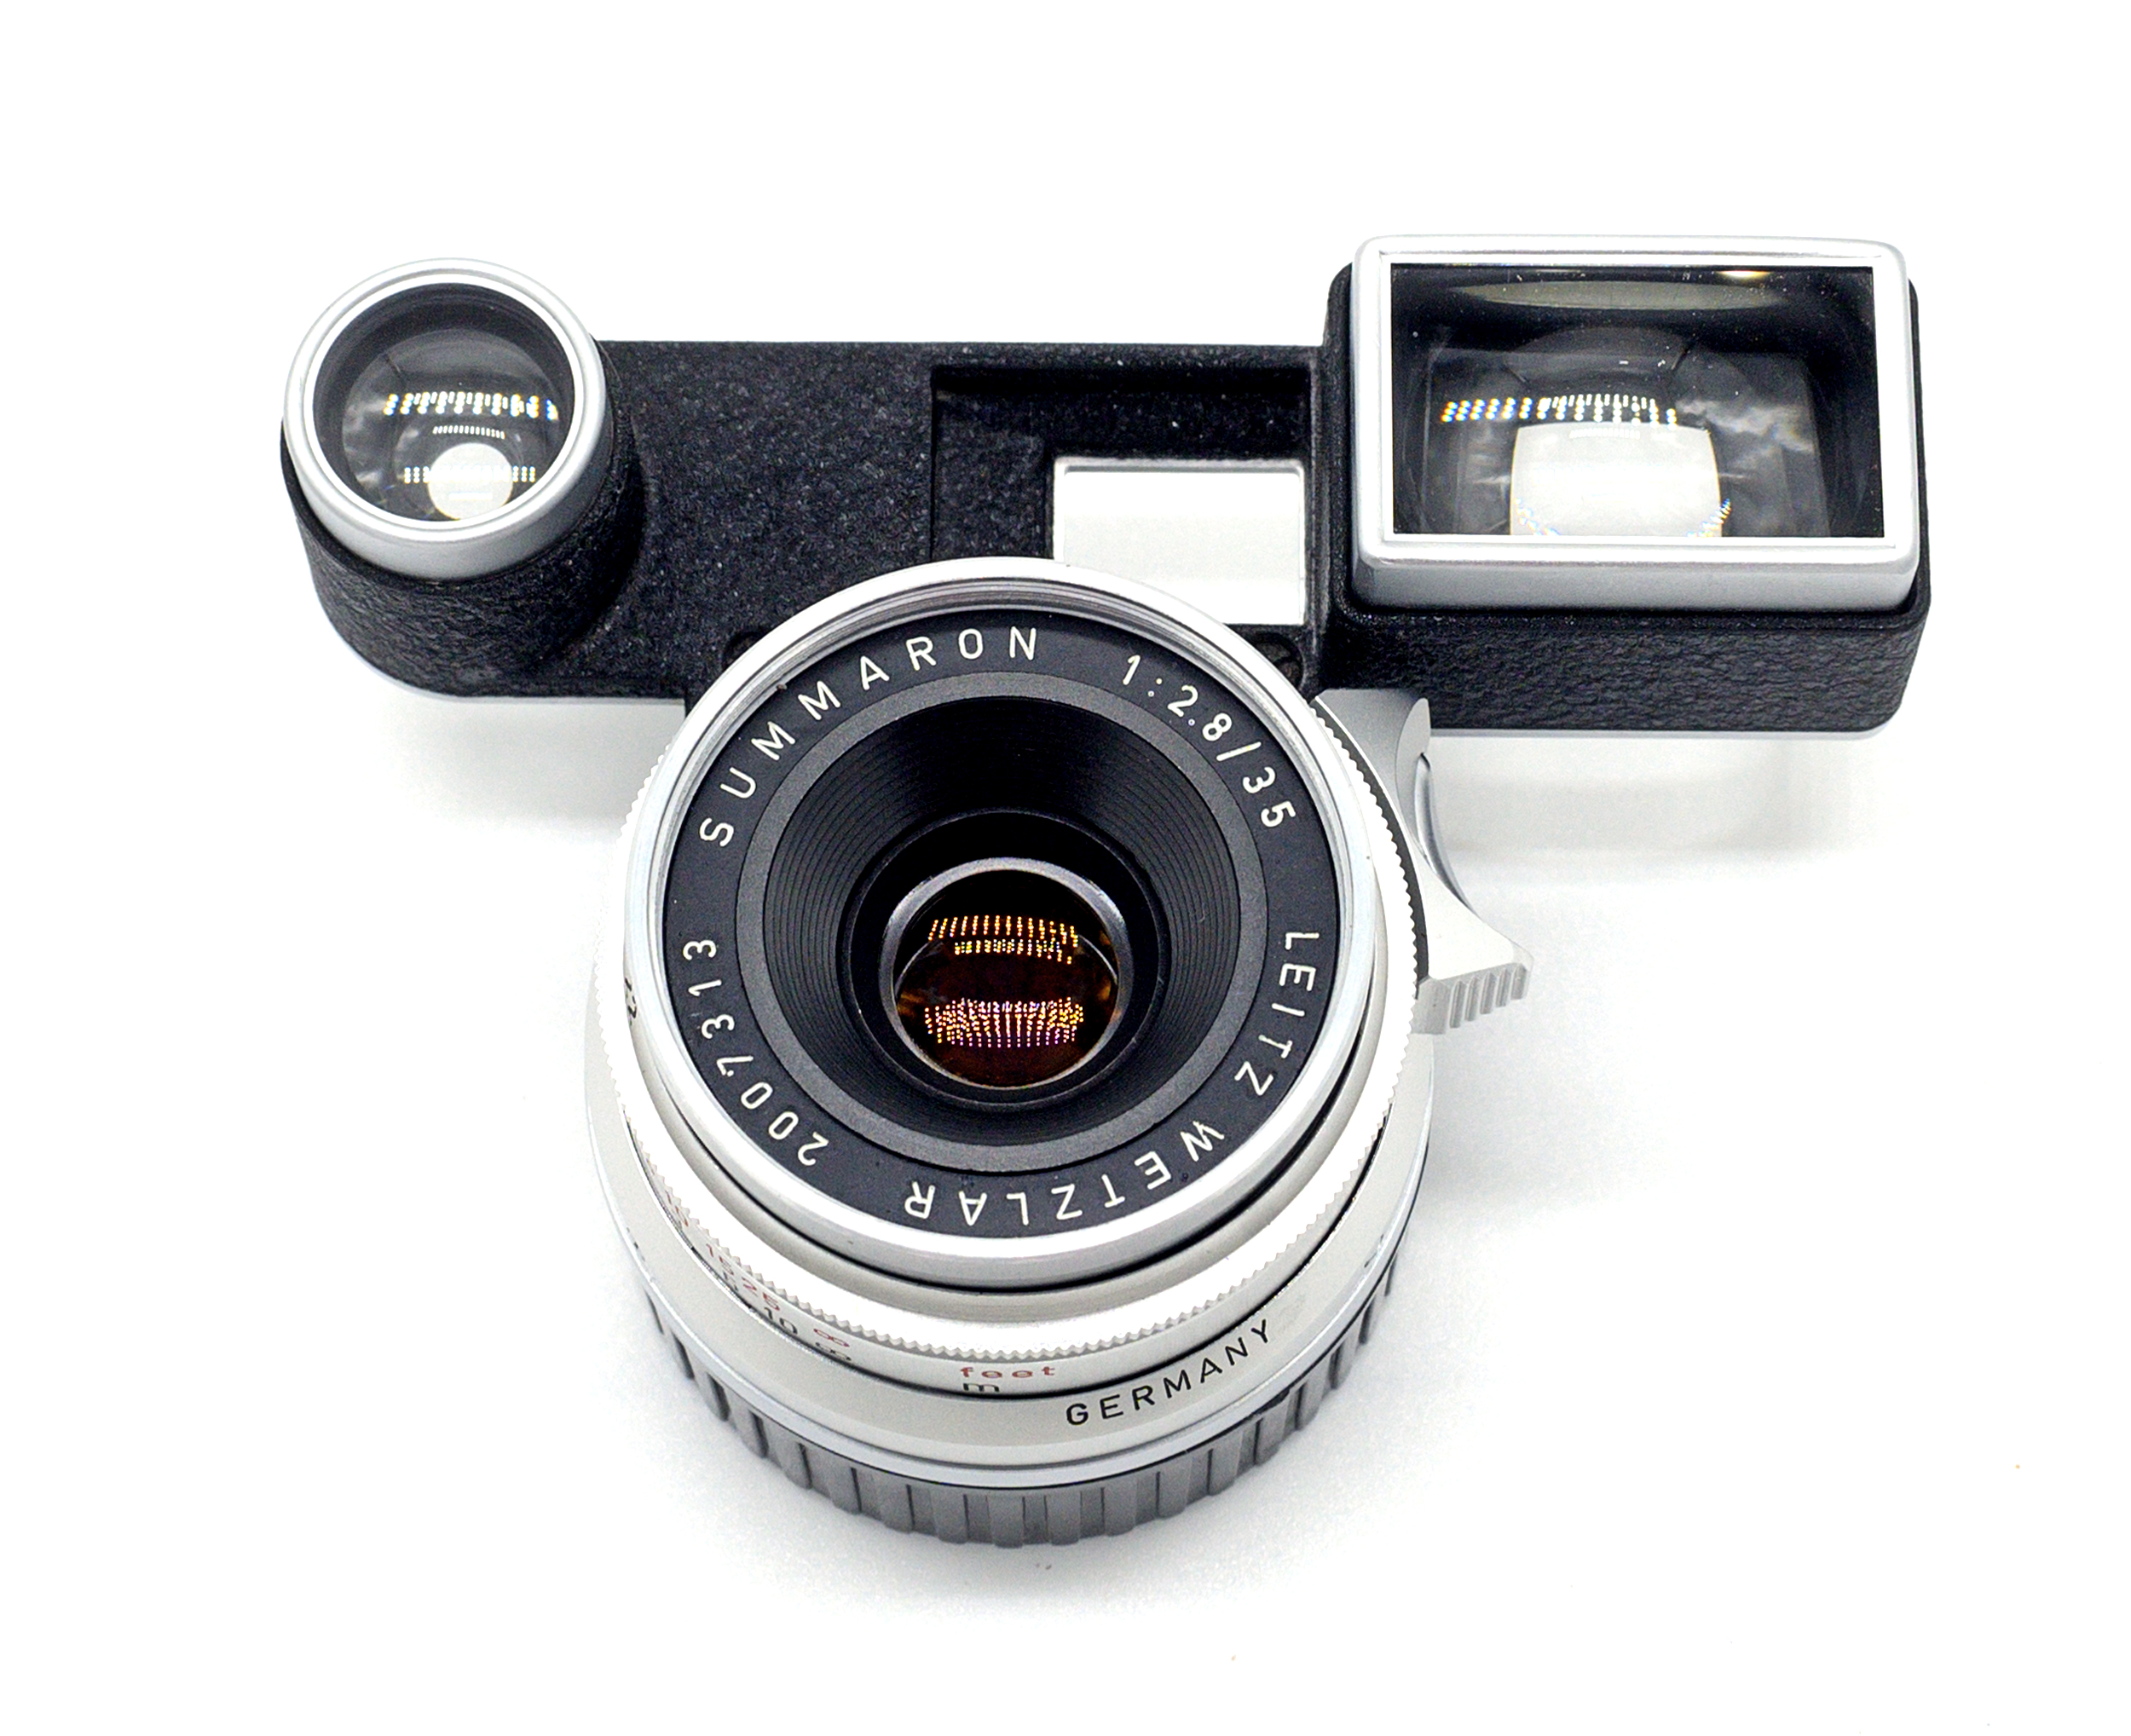
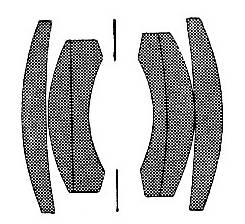
Beginning in the late 1960s and continuing through the late 1970s, most major camera manufacturers introduced a series of advanced, compact, fixed-lens rangefinder cameras. Konica’s entry into this class was the 1973-77 Auto S3. The highlight of this camera was its 38mm f/1.8 Hexanon lens. The 38mm Hexanon on the Auto S3 was not “new;” it was the optic from Konica’s 1966 Auto SE with different coatings. Although no formal Konica lens diagram exists for the lens, we can guess that its six group, four element lens was a regular symmetrical design (1-2-2-1) common during the era. By the 1960s, this type of design for a moderate wide-angle was nothing new, as famous lenses like the 1951 Nikon 35mm f/2.5 W-Nikkor and the 1958 Leica 35mm f/2.8 Summaron had used similar schema. Although the origin of the lens design is unknown, an educated guess that Konica simply “stretched” its 45mm f/1.8 used in its contemporary cameras like the the Auto S2. Unlike the Auto SE version of the 38mm Hexanon, which could focus down to an incredible 0.6m, the Auto S3 version was limited to 0.9m minimum focus, most likely because of the limitations of the camera’s short rangefinder-baselength design. Other than in the Auto SE and the Auto S3, it does not appear that Konica used this lens design again. Some have said that the later 1978 Konica 40mm f/1.8 Hexanon SLR lens may be “related” to the 38mm Hexanon, but I do not believe that to be the case. The design is different (1-2-2-1 versus 1-1-1-2-1); the 40mm’s design is similar to almost every other Planar-style SLR lens of the time; and Tokina, not Konica, produced the 40mm.
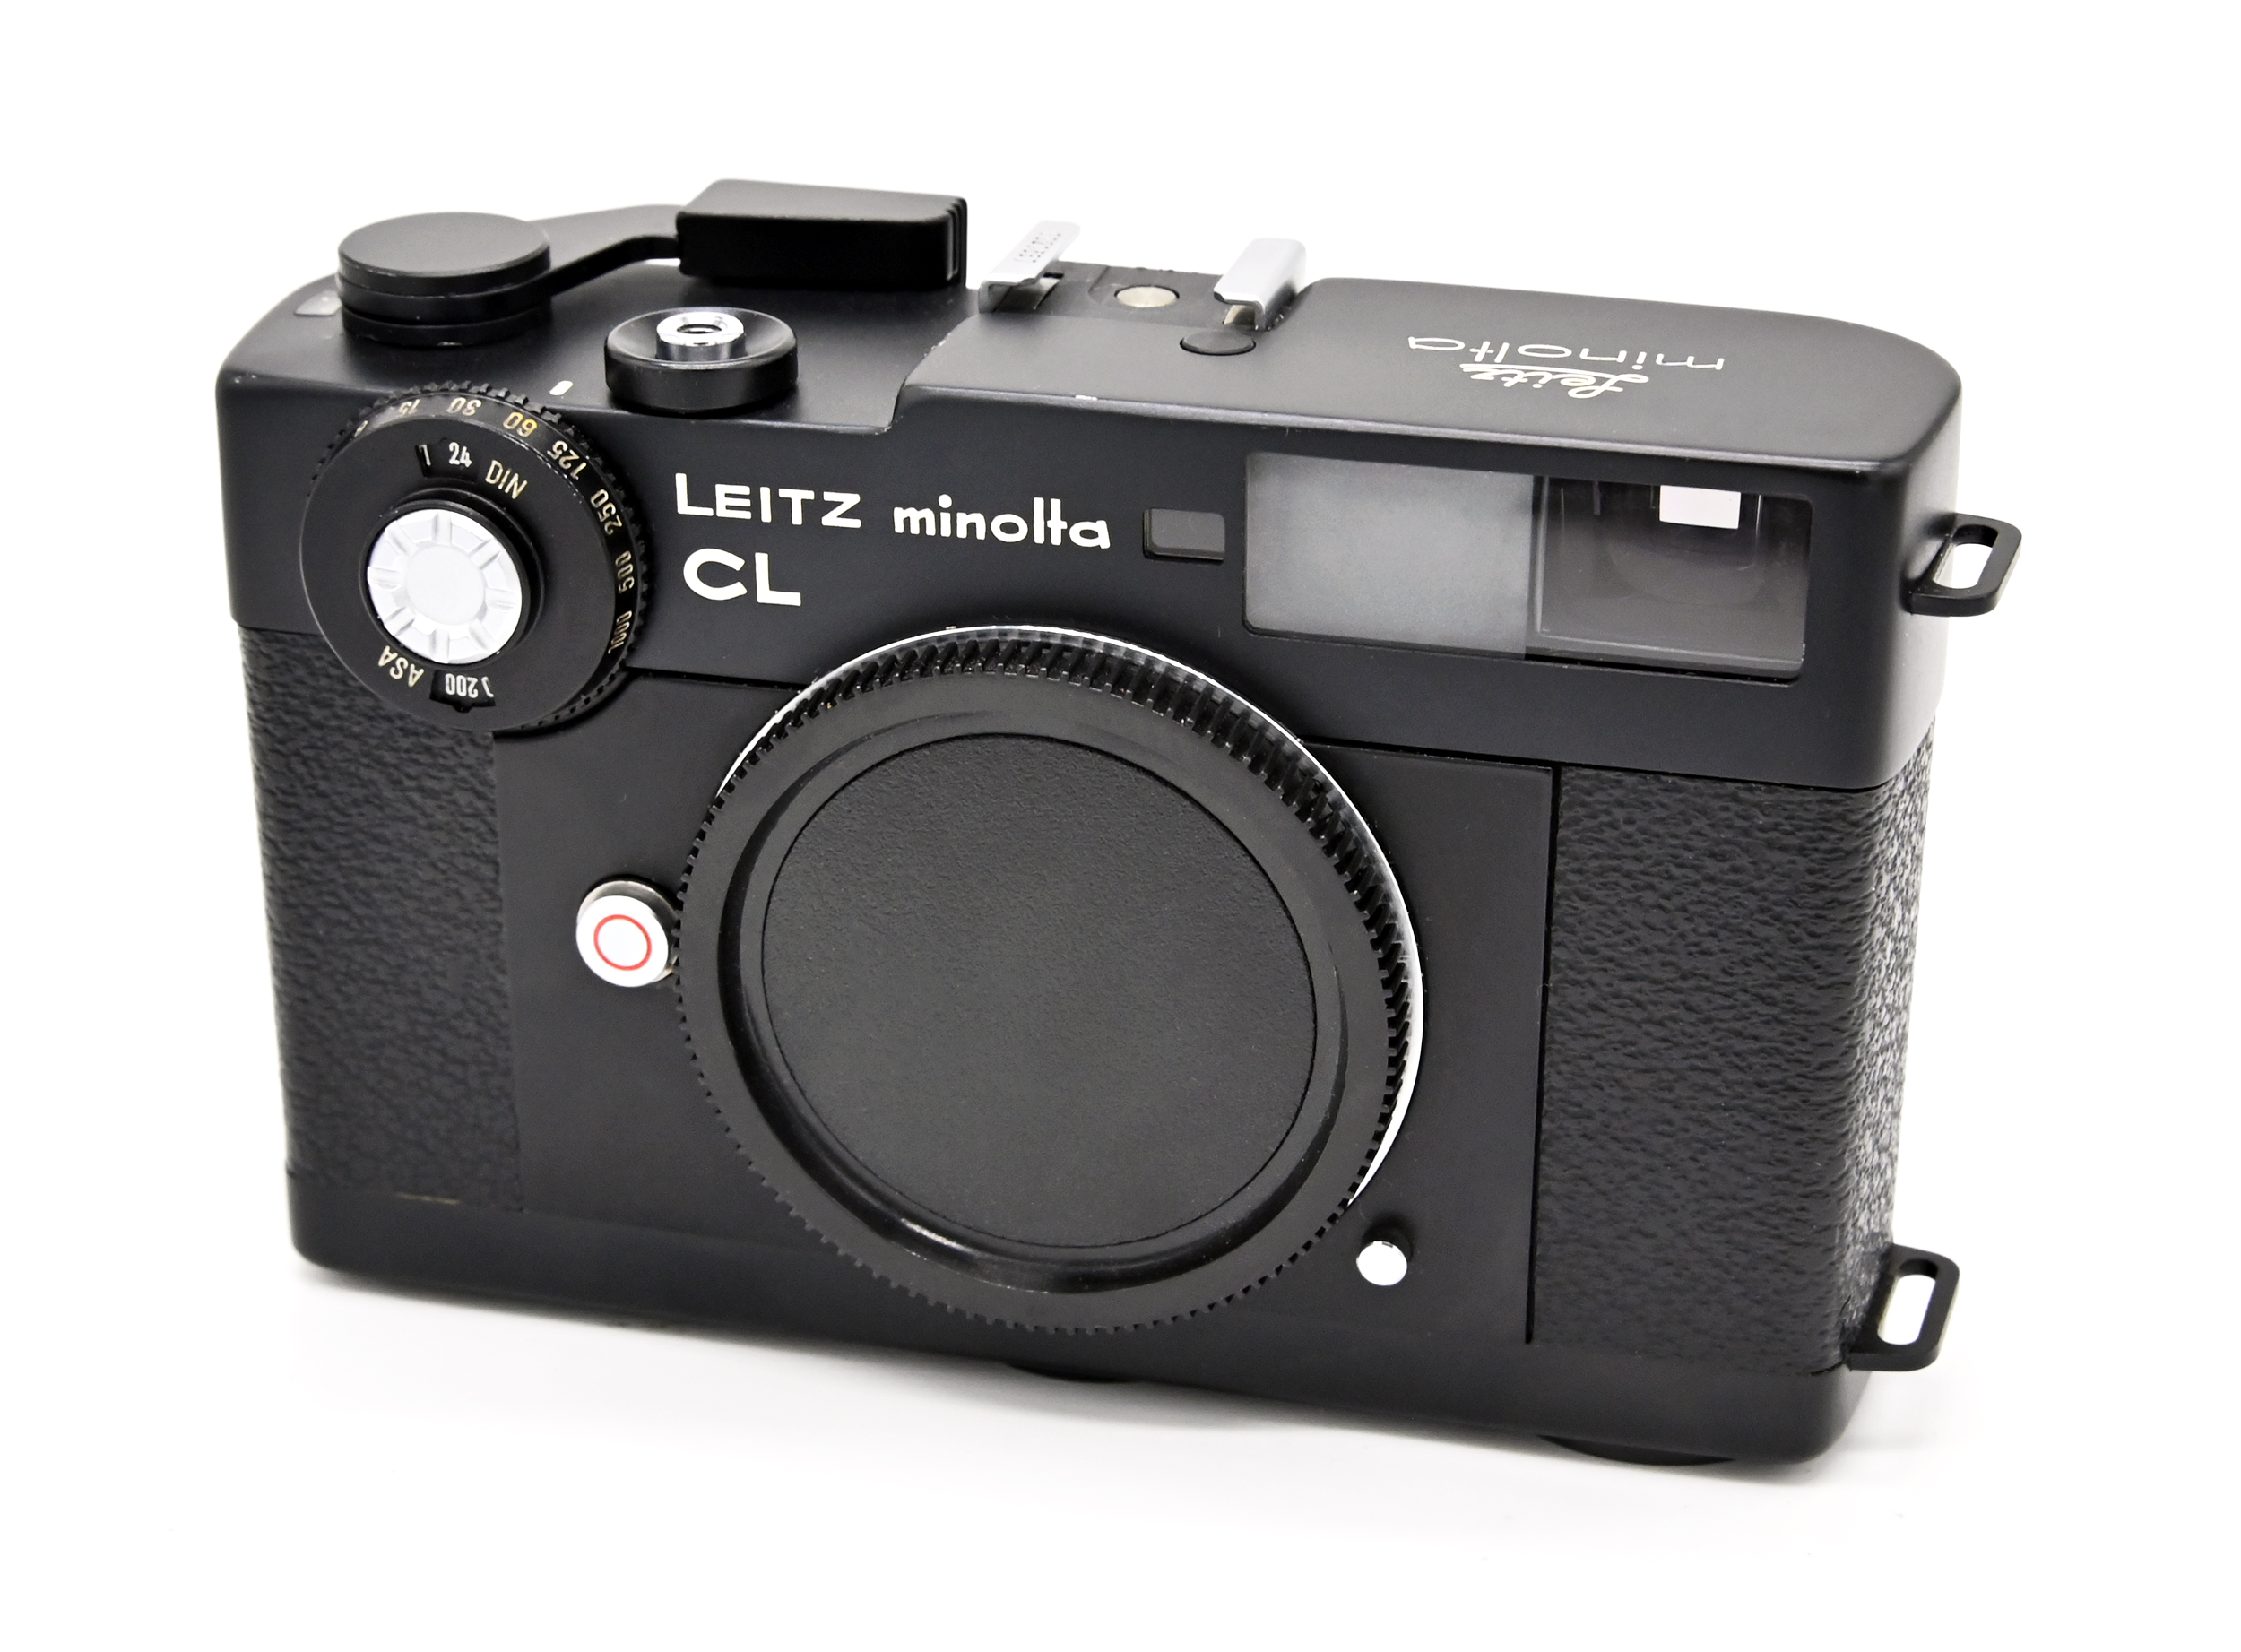
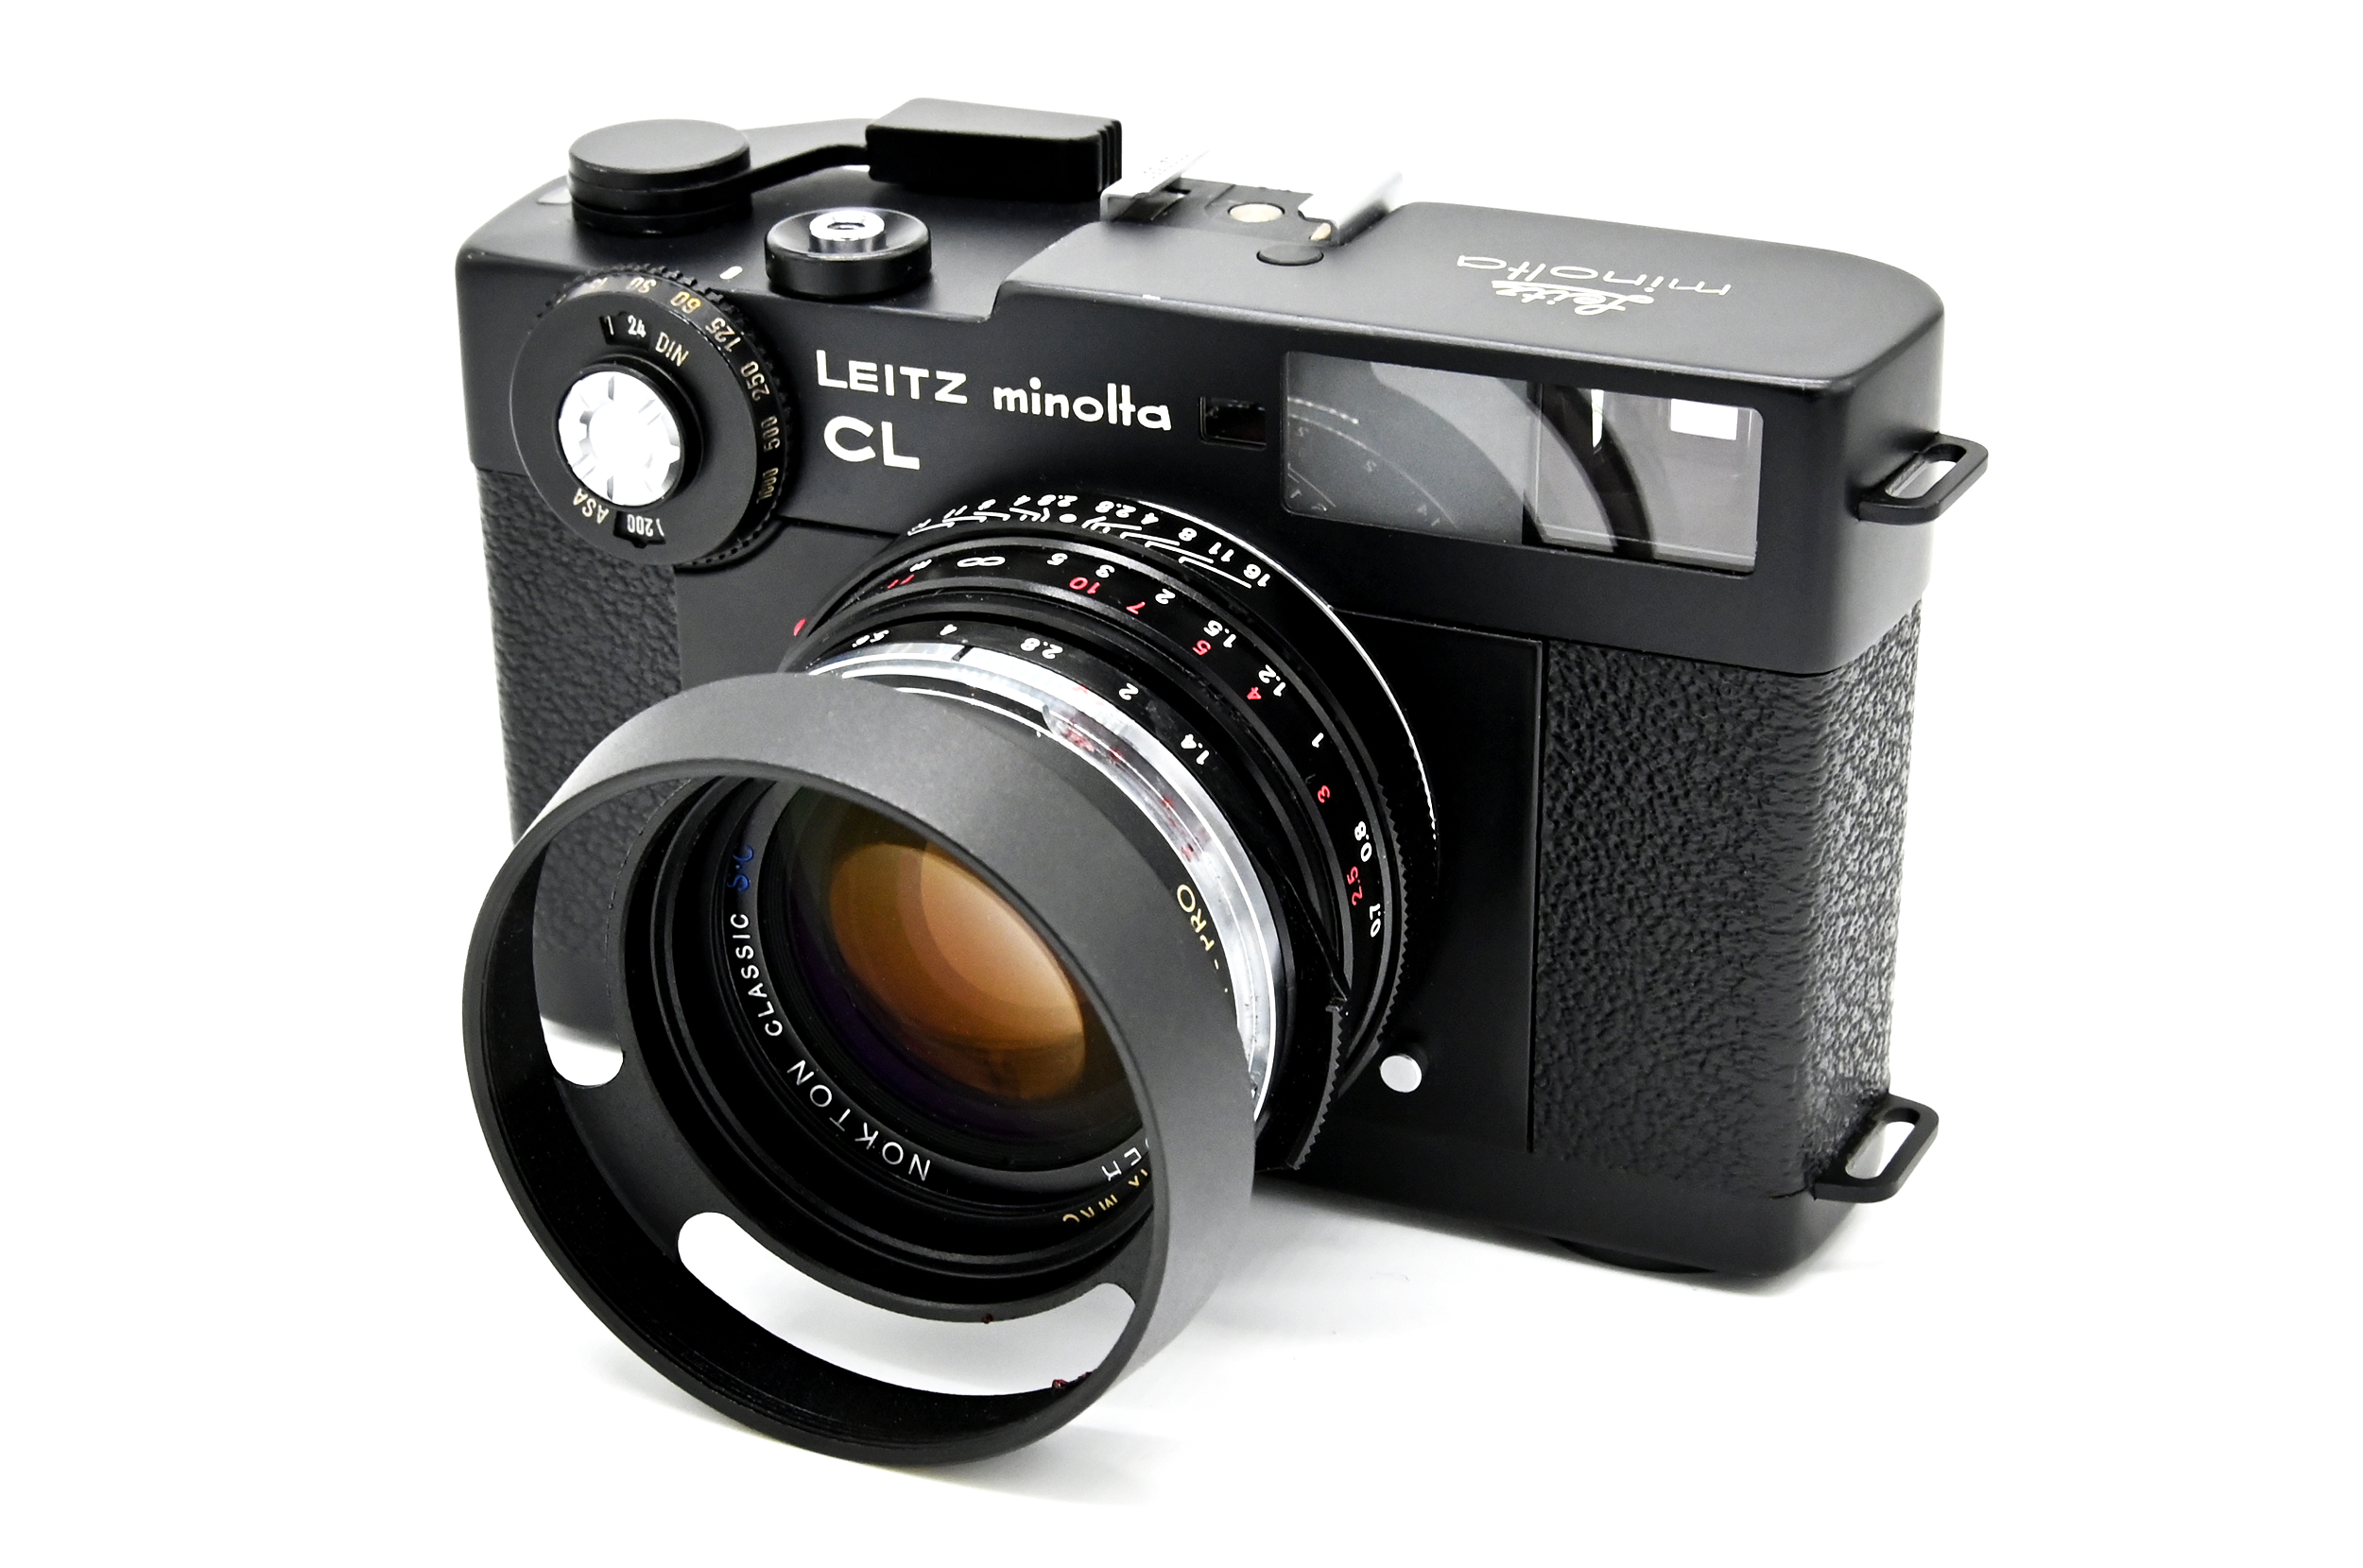
For decades, photographers have raved about the performance of the higher-end fixed-lens rangefinders of the 1970s. The standard lens for many of these cameras was a 40mm f/1.7. The 1970s Leica-Minolta collaboration also designed and produced a 40mm f/2 Leica M-mount lens for the Leica / Minolta CL. Although there is no apparent reason to doubt the favorable impressions that many had of these fixed-lens rangefinder cameras during the film era, the fact that these lenses were built-in to their camera bodies has made testing them on digital impossible, unless those lenses were surgically extracted from their bodies and re-mounted for use on a digital platform.
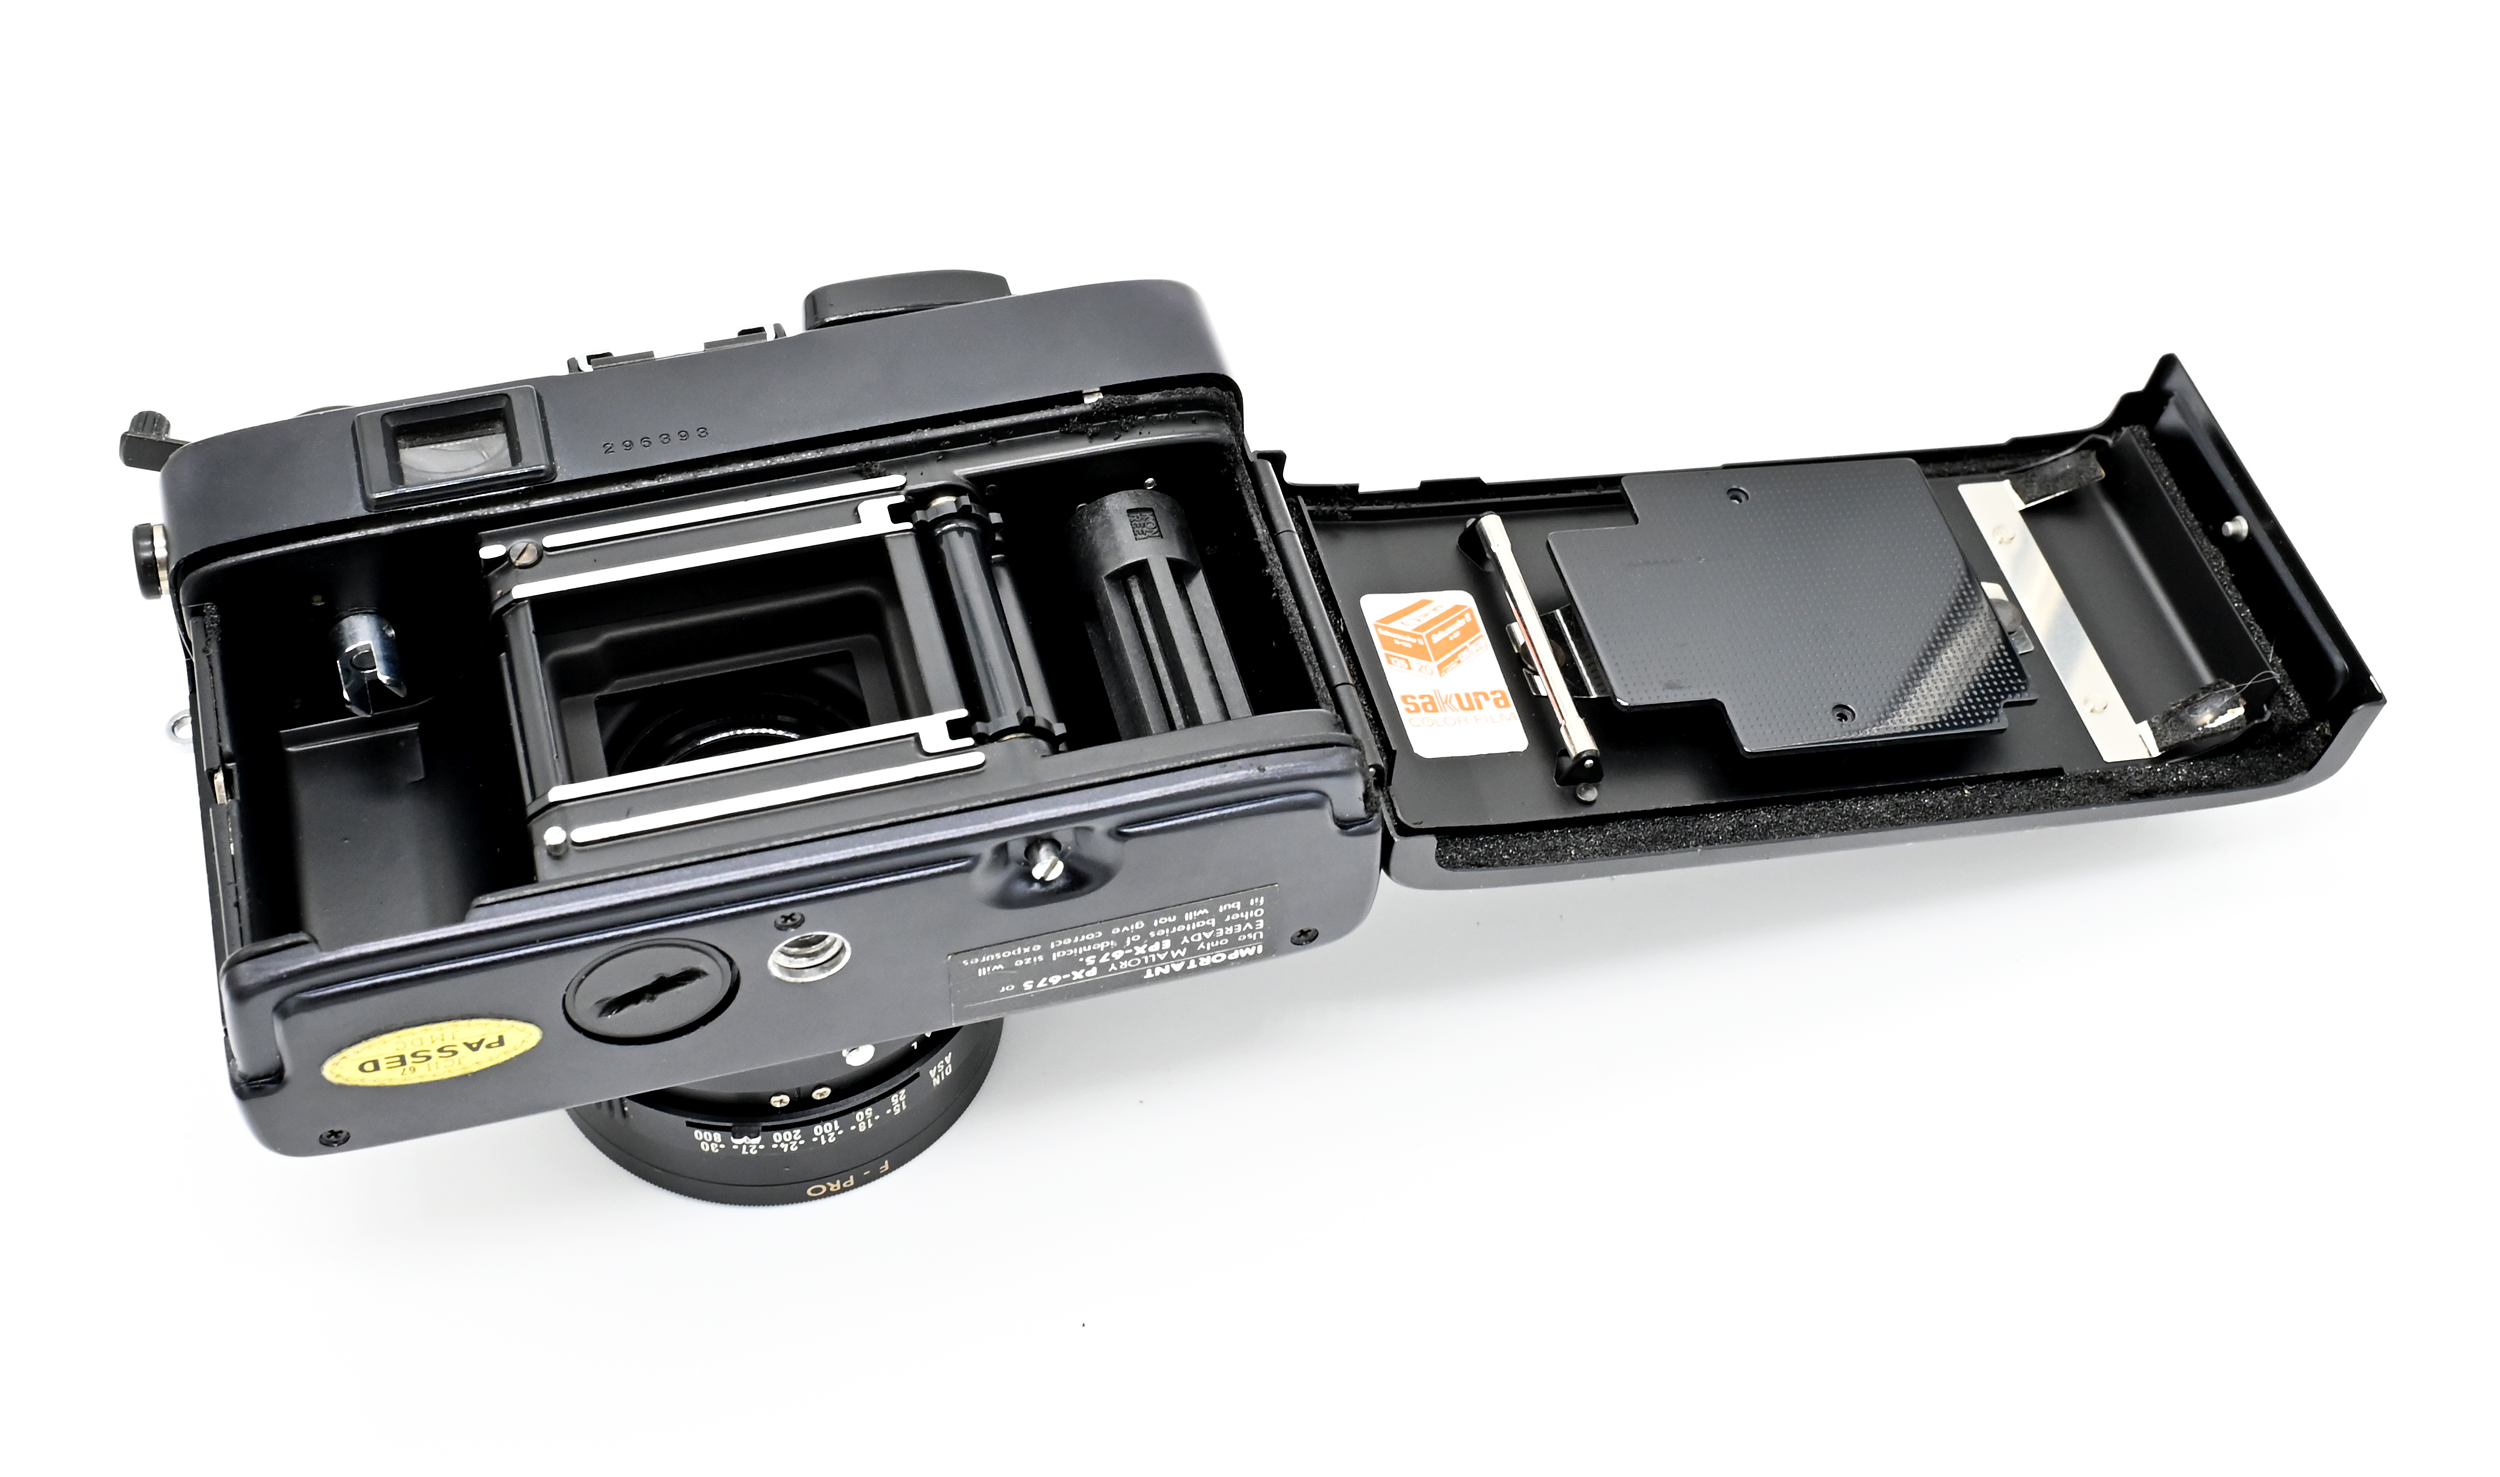
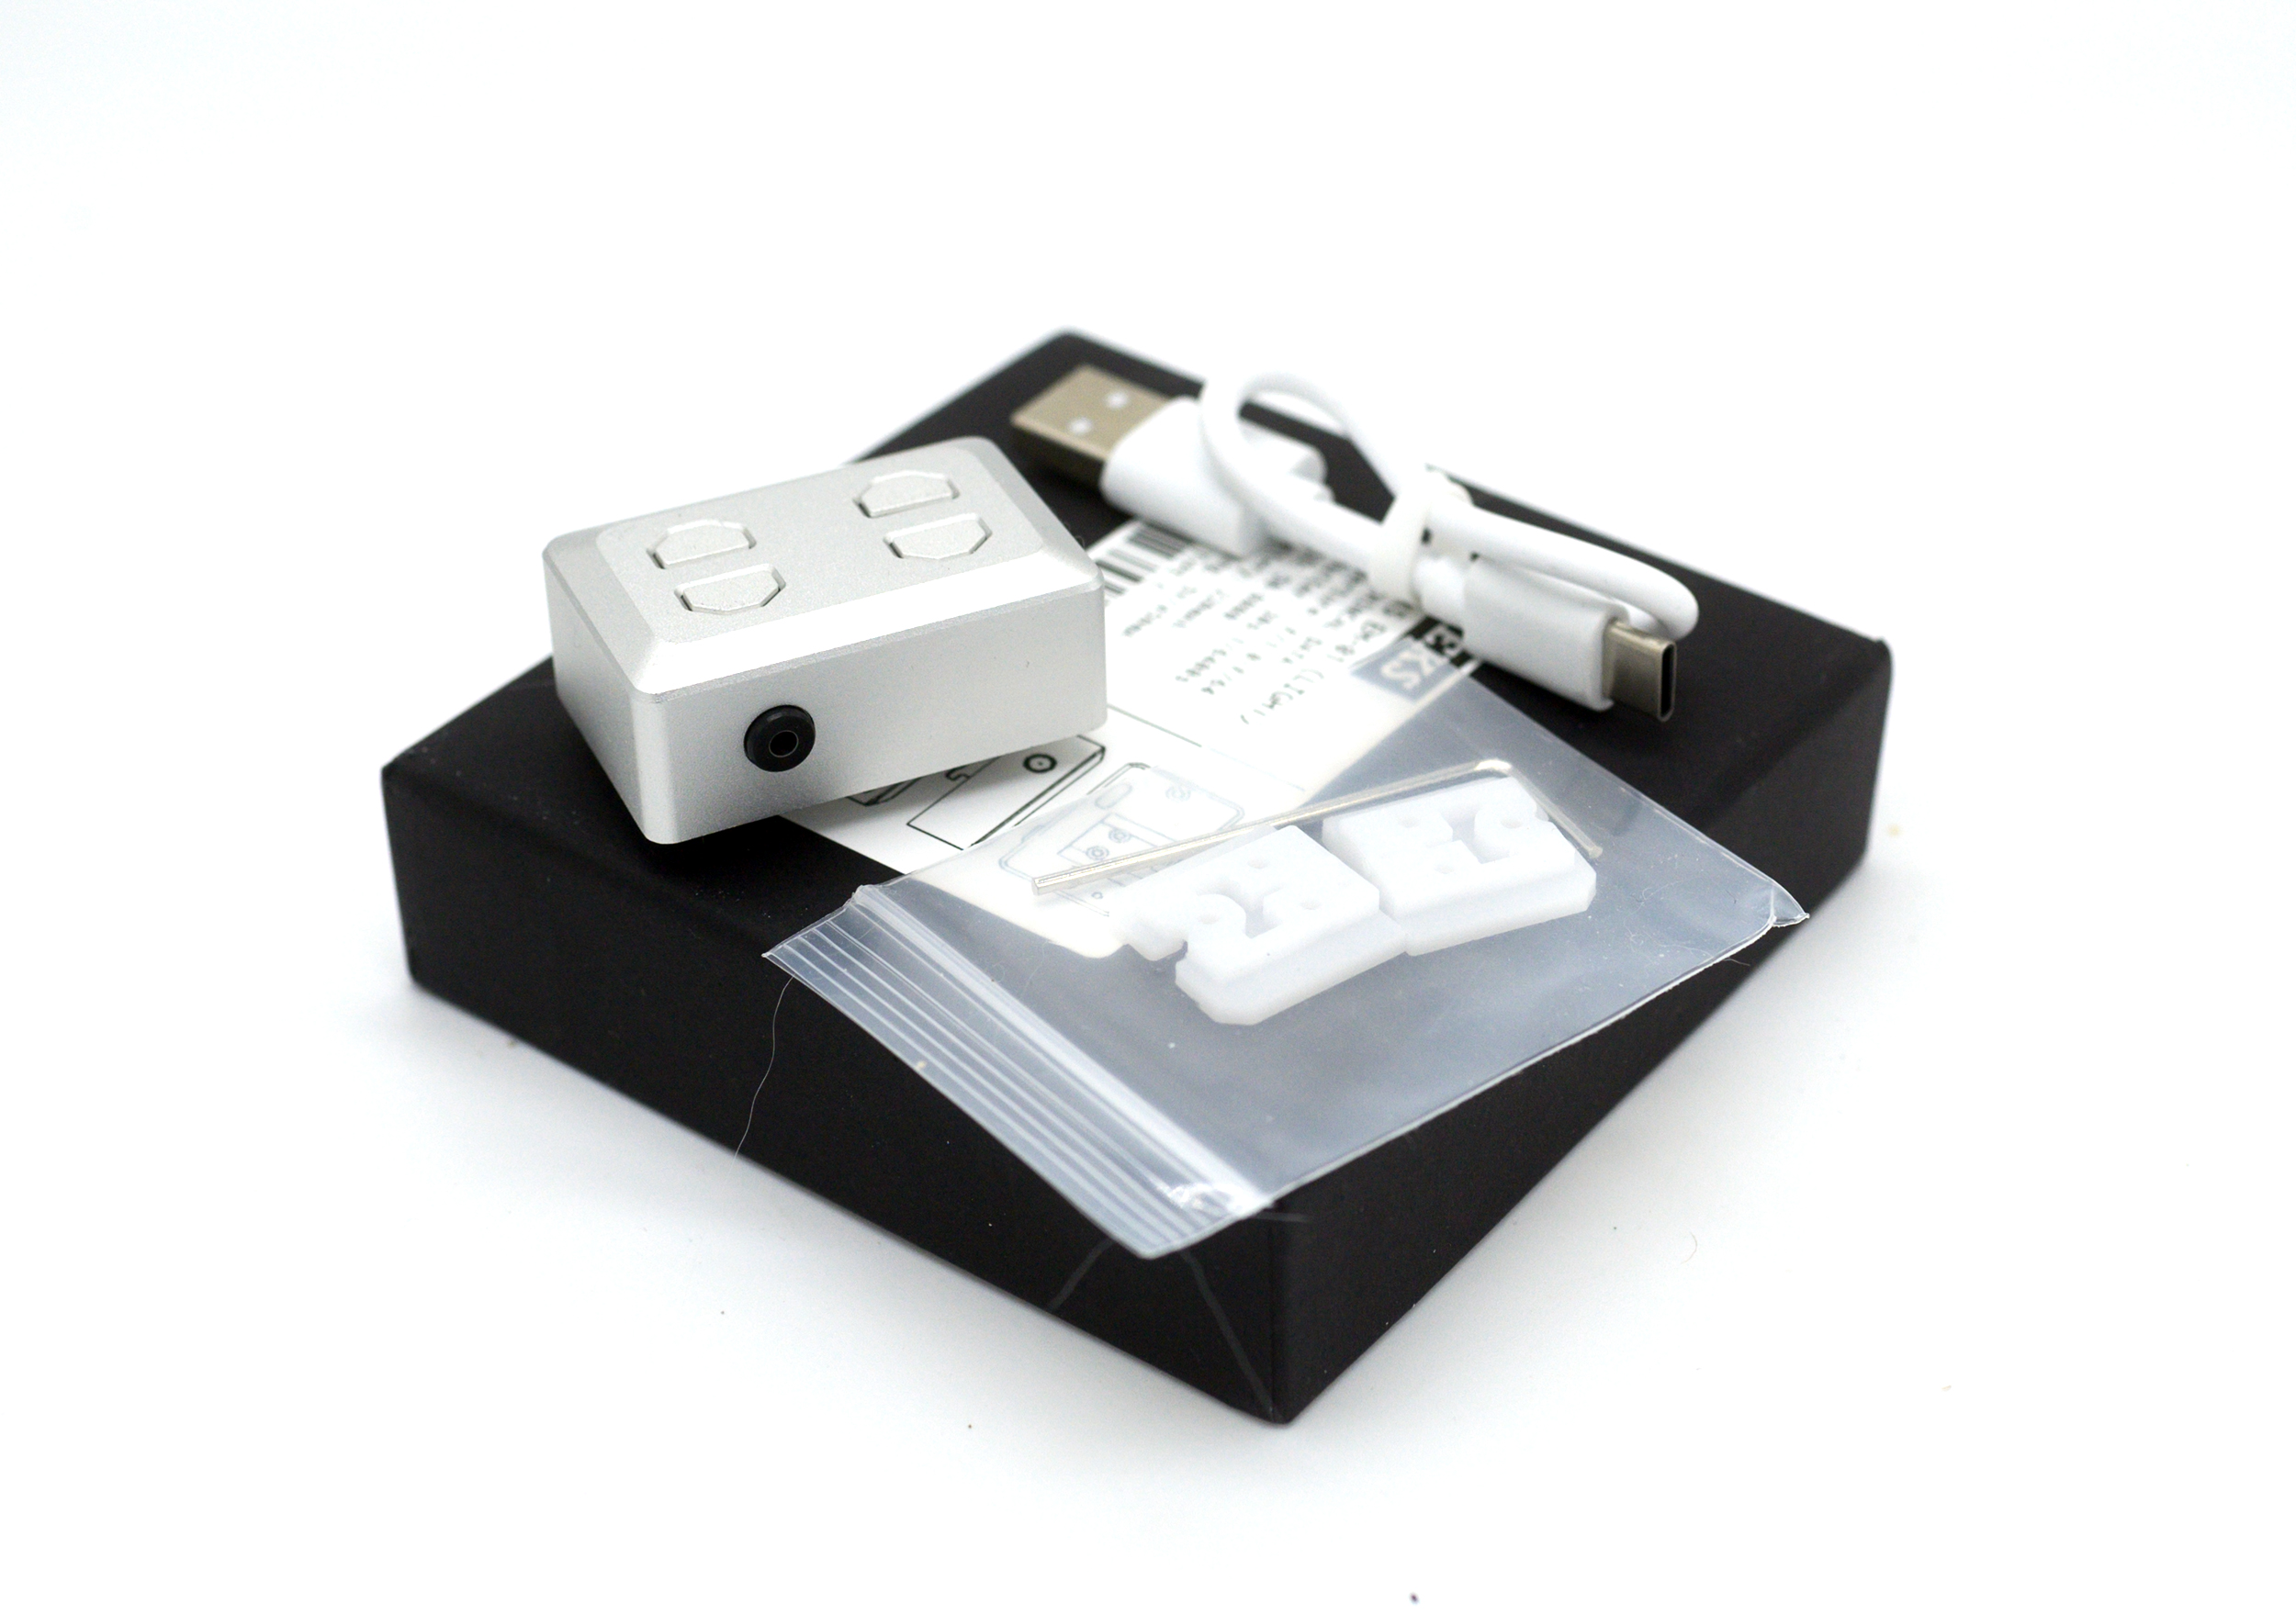
Because I had a junked Konica Auto S3 sitting around with a perfectly good lens, I reached out to Leica Spanker in Germany to see whether it would be theoretically possible to adapt the 38mm Hexanon to Leica M. A short time later, a standalone, rangefinder-coupled 38mm Hexanon landed on my doorstep. Leica Spanker not only adapted the lens to Leica spec, but also fabricated an aperture ring where none had existed before (remember the Auto S3 was a shutter-speed priority camera). I would highly recommend them.
So, the question that has been on many’s minds for nearly 50 years: how good is the 38mm Hexanon? Does it live up to the decades of hype? In short, it is a really good lens for 1966. For a lens that was never intended to compete with the top-tier of interchangeable rangefinder lenses, and selling in 1973 for around 1/3 of the asking price for a Leica CL with a 40mm f/2 lens, it remains highly-capable. While it noticeably flares wide open (old lens coatings), has just a minimal amount of barrel distortion (about +1 or sometimes +2), and has noticeable light fall-off wide open, by its optimal f/2.8-f/11 range, it is a sharp, contrasty, relatively well-corrected, and competes with any Leica, Canon, or Nikon 35mm focal-length rangefinder lenses of the 1950s-60s. Its center resolution both wide open and throughout its range is stunning for a lens of this class and price, although its corners are not top tier.
The 38mm Hexanon is perhaps most comparable in overall capability to the 35mm f/2.5 W-Nikkor or the 35mm f/2.8 Summaron, both of which have a similar 1-2-2-1 design. The 38mm Hexanon performs better overall than the W-Nikkor but not as quite as well as the Summaron. Against the 1956 35mm f/1.8 W-Nikkor, the Nikkor is clearly, but not significantly, the better lens as it has better distortion control and corner resolution (remember that the f/1.8 was a ridiculously expensive lens at the time and not many were produced). However, on a 24mp digital sensor, the 38mm Hexanon’s center sharpness is at the limits of the sensor’s ability to resolve it.
Given its general competitiveness with just about any 1960s rangefinder lens, the most significant shortcoming of the 38mm Hexanon is its 0.9m minimum focusing distance. The Auto S3’s extremely short effective rangefinder baselength most likely could not focus accurately an f/1.8 lens at any closer distance. Even at that minimum distance and at f/1.8 (where the Hexanon is capable but not at its very best), it is difficult to get in close enough to a subject for pleasant separation. If you are considering having a similar conversion done, think about doing the Auto SE version of the 38mm Hexanon instead, as it can focus down to 0.60m. Otherwise, the converted Auto S3 lens is light, comparable in size to any compact 35mm f/2 rangefinder lens, and has a very short focus throw (about 15% or so of the lens barrel radius from 0.9m to infinity). Although the lens itself is small, its barrel still requires a rather large 49mm filter. Fortunately, a standard wide-angle 49mm lens hood does not block a Leica rangefinder.
Comparisons
Here is the 38mm Hexanon’s specifications compared to 1951 35mm f/2.5 W-Nikkor, the 1956 35mm f/1.8 Nikkor, and a 1958 Leica 35mm f/2.8 Summaron.
35mm f/2.5 W-Nikkor
35mm f/1.8 W-Nikkor
35mm f/2.8 Summaron
38mm f/1.8 Hexanon
Year
1951
1956
1958
1966
Design
6 elements, 4 groups
7 elements, 5 groups
6 elements, 4 groups
6 elements, 4 groups
Min. Focus
0.9m
0.9m
0.7m
0.6 (SE) / 0.9m (S3)
Filter Size
43mm (Old Style)
43mm (Old Style)
39mm
49mm
Some Wide-Open Digital Snaps
Because I shoot film almost exclusively, I do not really use adapted lenses on mirrorless cameras for personal photography. However, because some digital snapshots may provide a better idea of how the 38mm Hexanon works in the “real world,” here are a few examples. These are all take on a Nikon Z6 at f/1.8 with some distortion and levels corrections. As you can see, the Hexanon is a flare-y at f/1.8, has noticeable light fall-off in the corners, has incredible shallow depth of field on digital wide-open, and its out-of-focus background details are occasionally a bit busy. But all of these are pretty par for the course for any 1950s-60s rangefinder lens. Otherwise, the images are perfectly pleasant with the standard corrections.
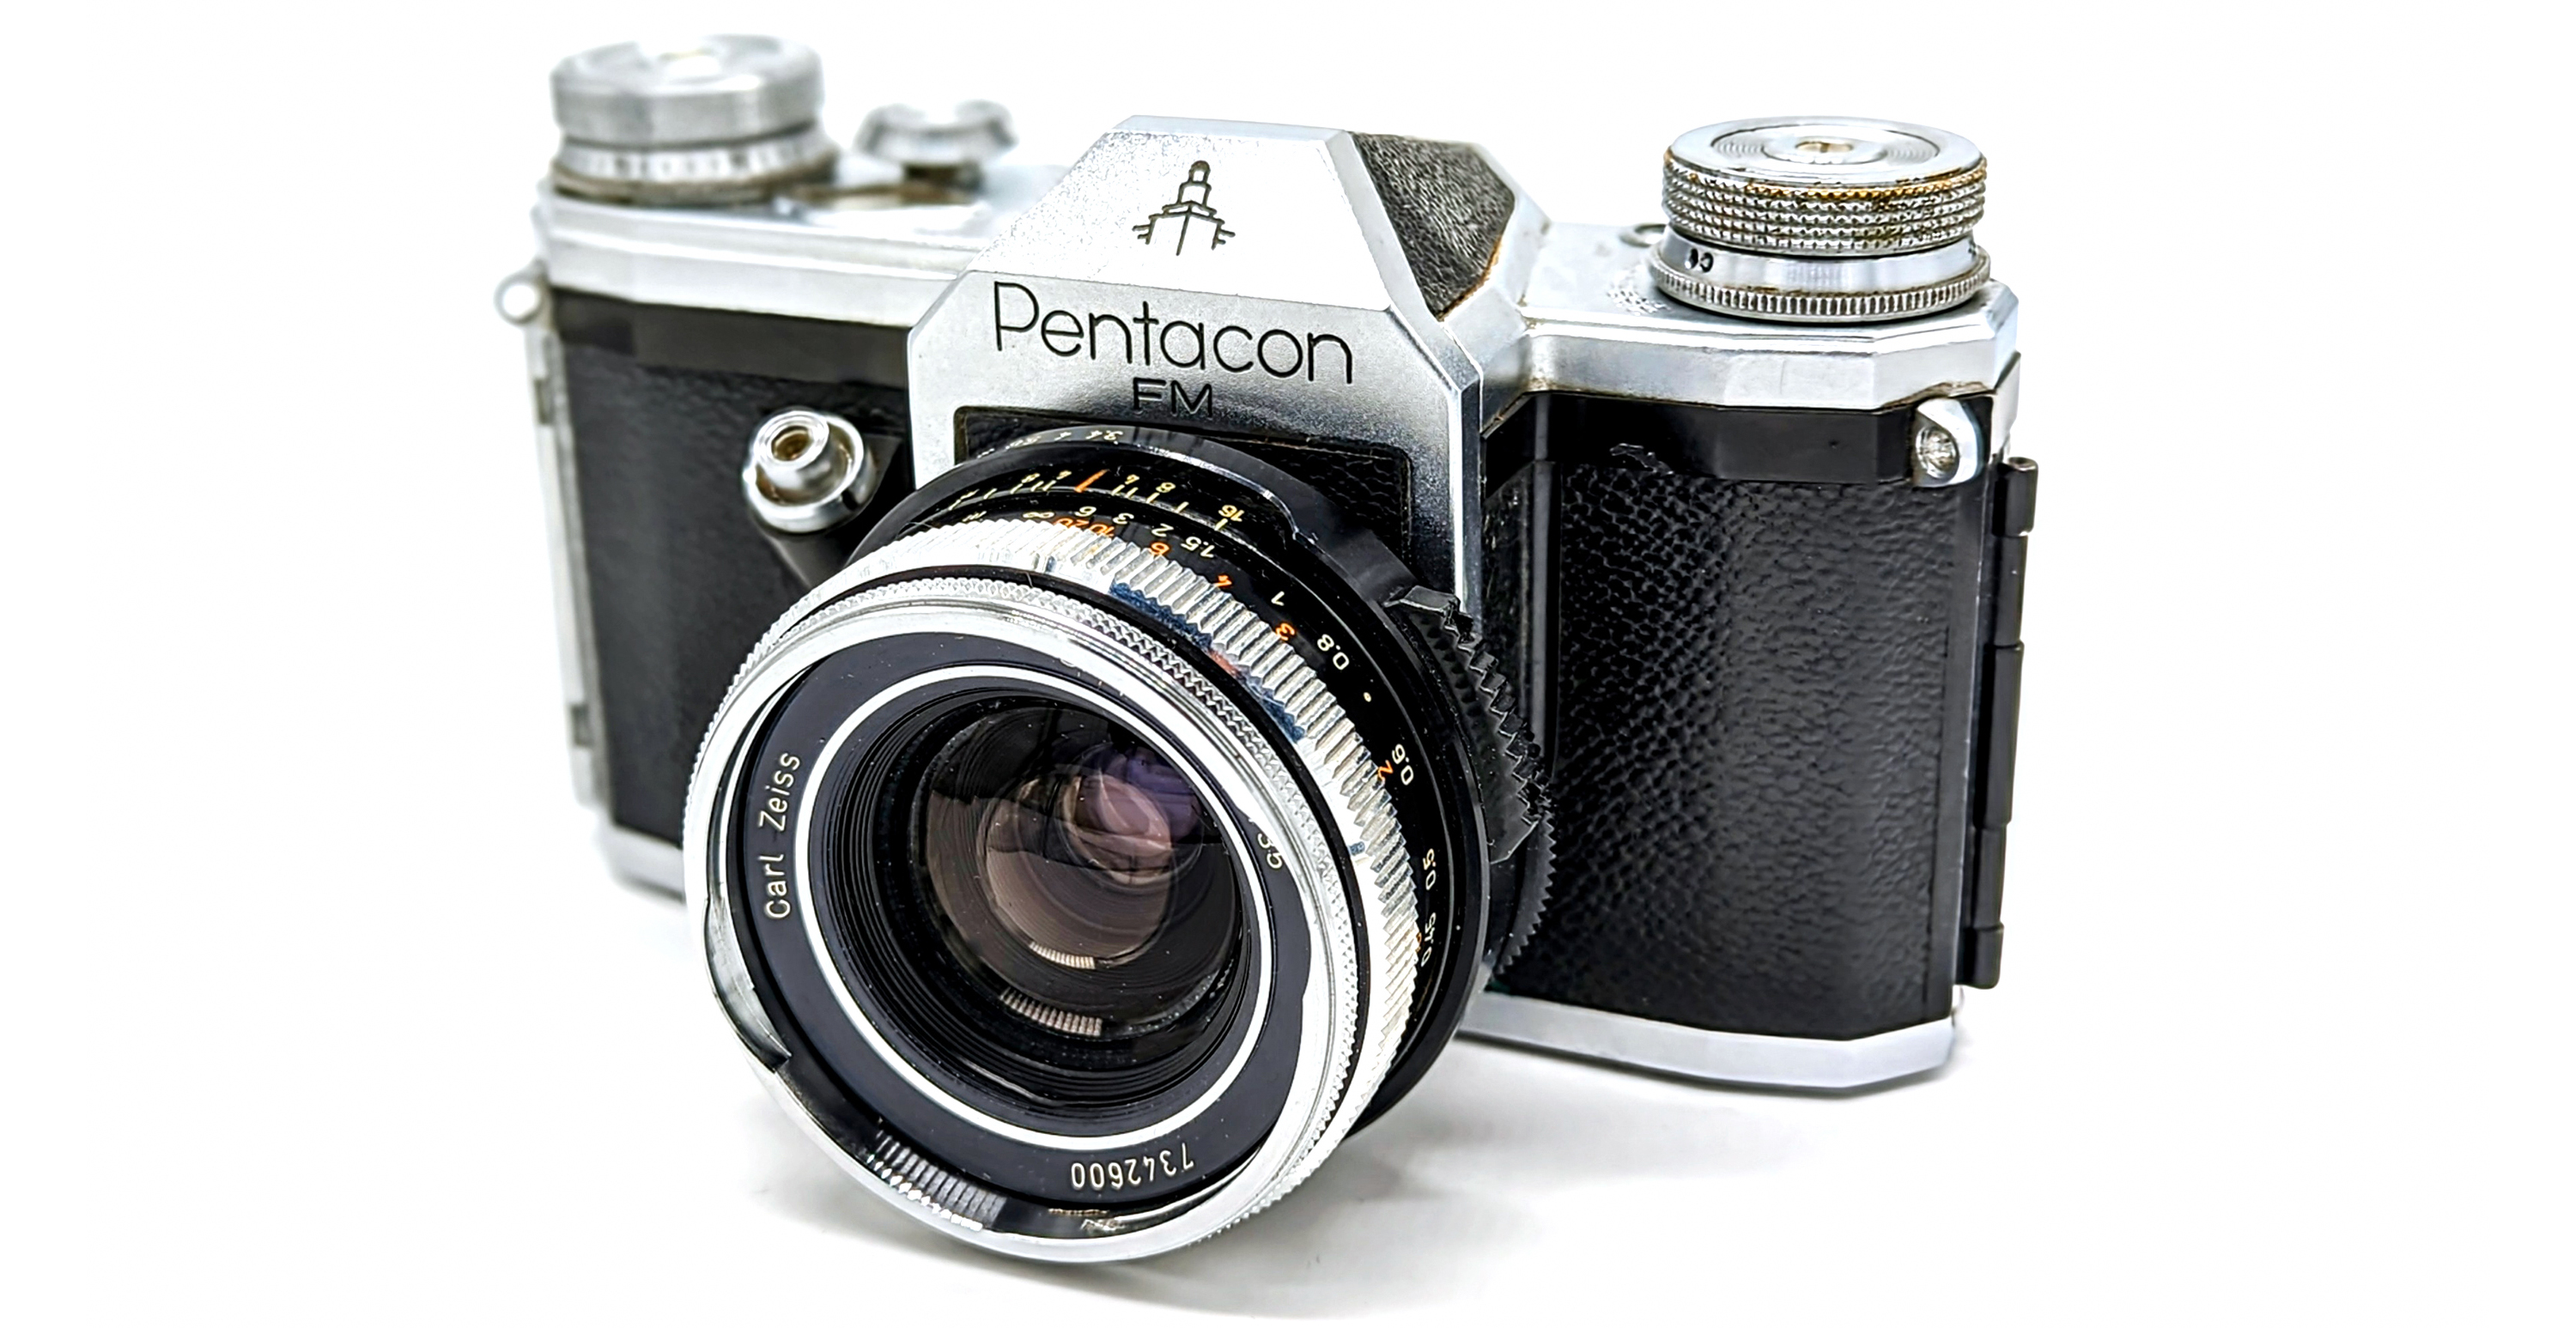
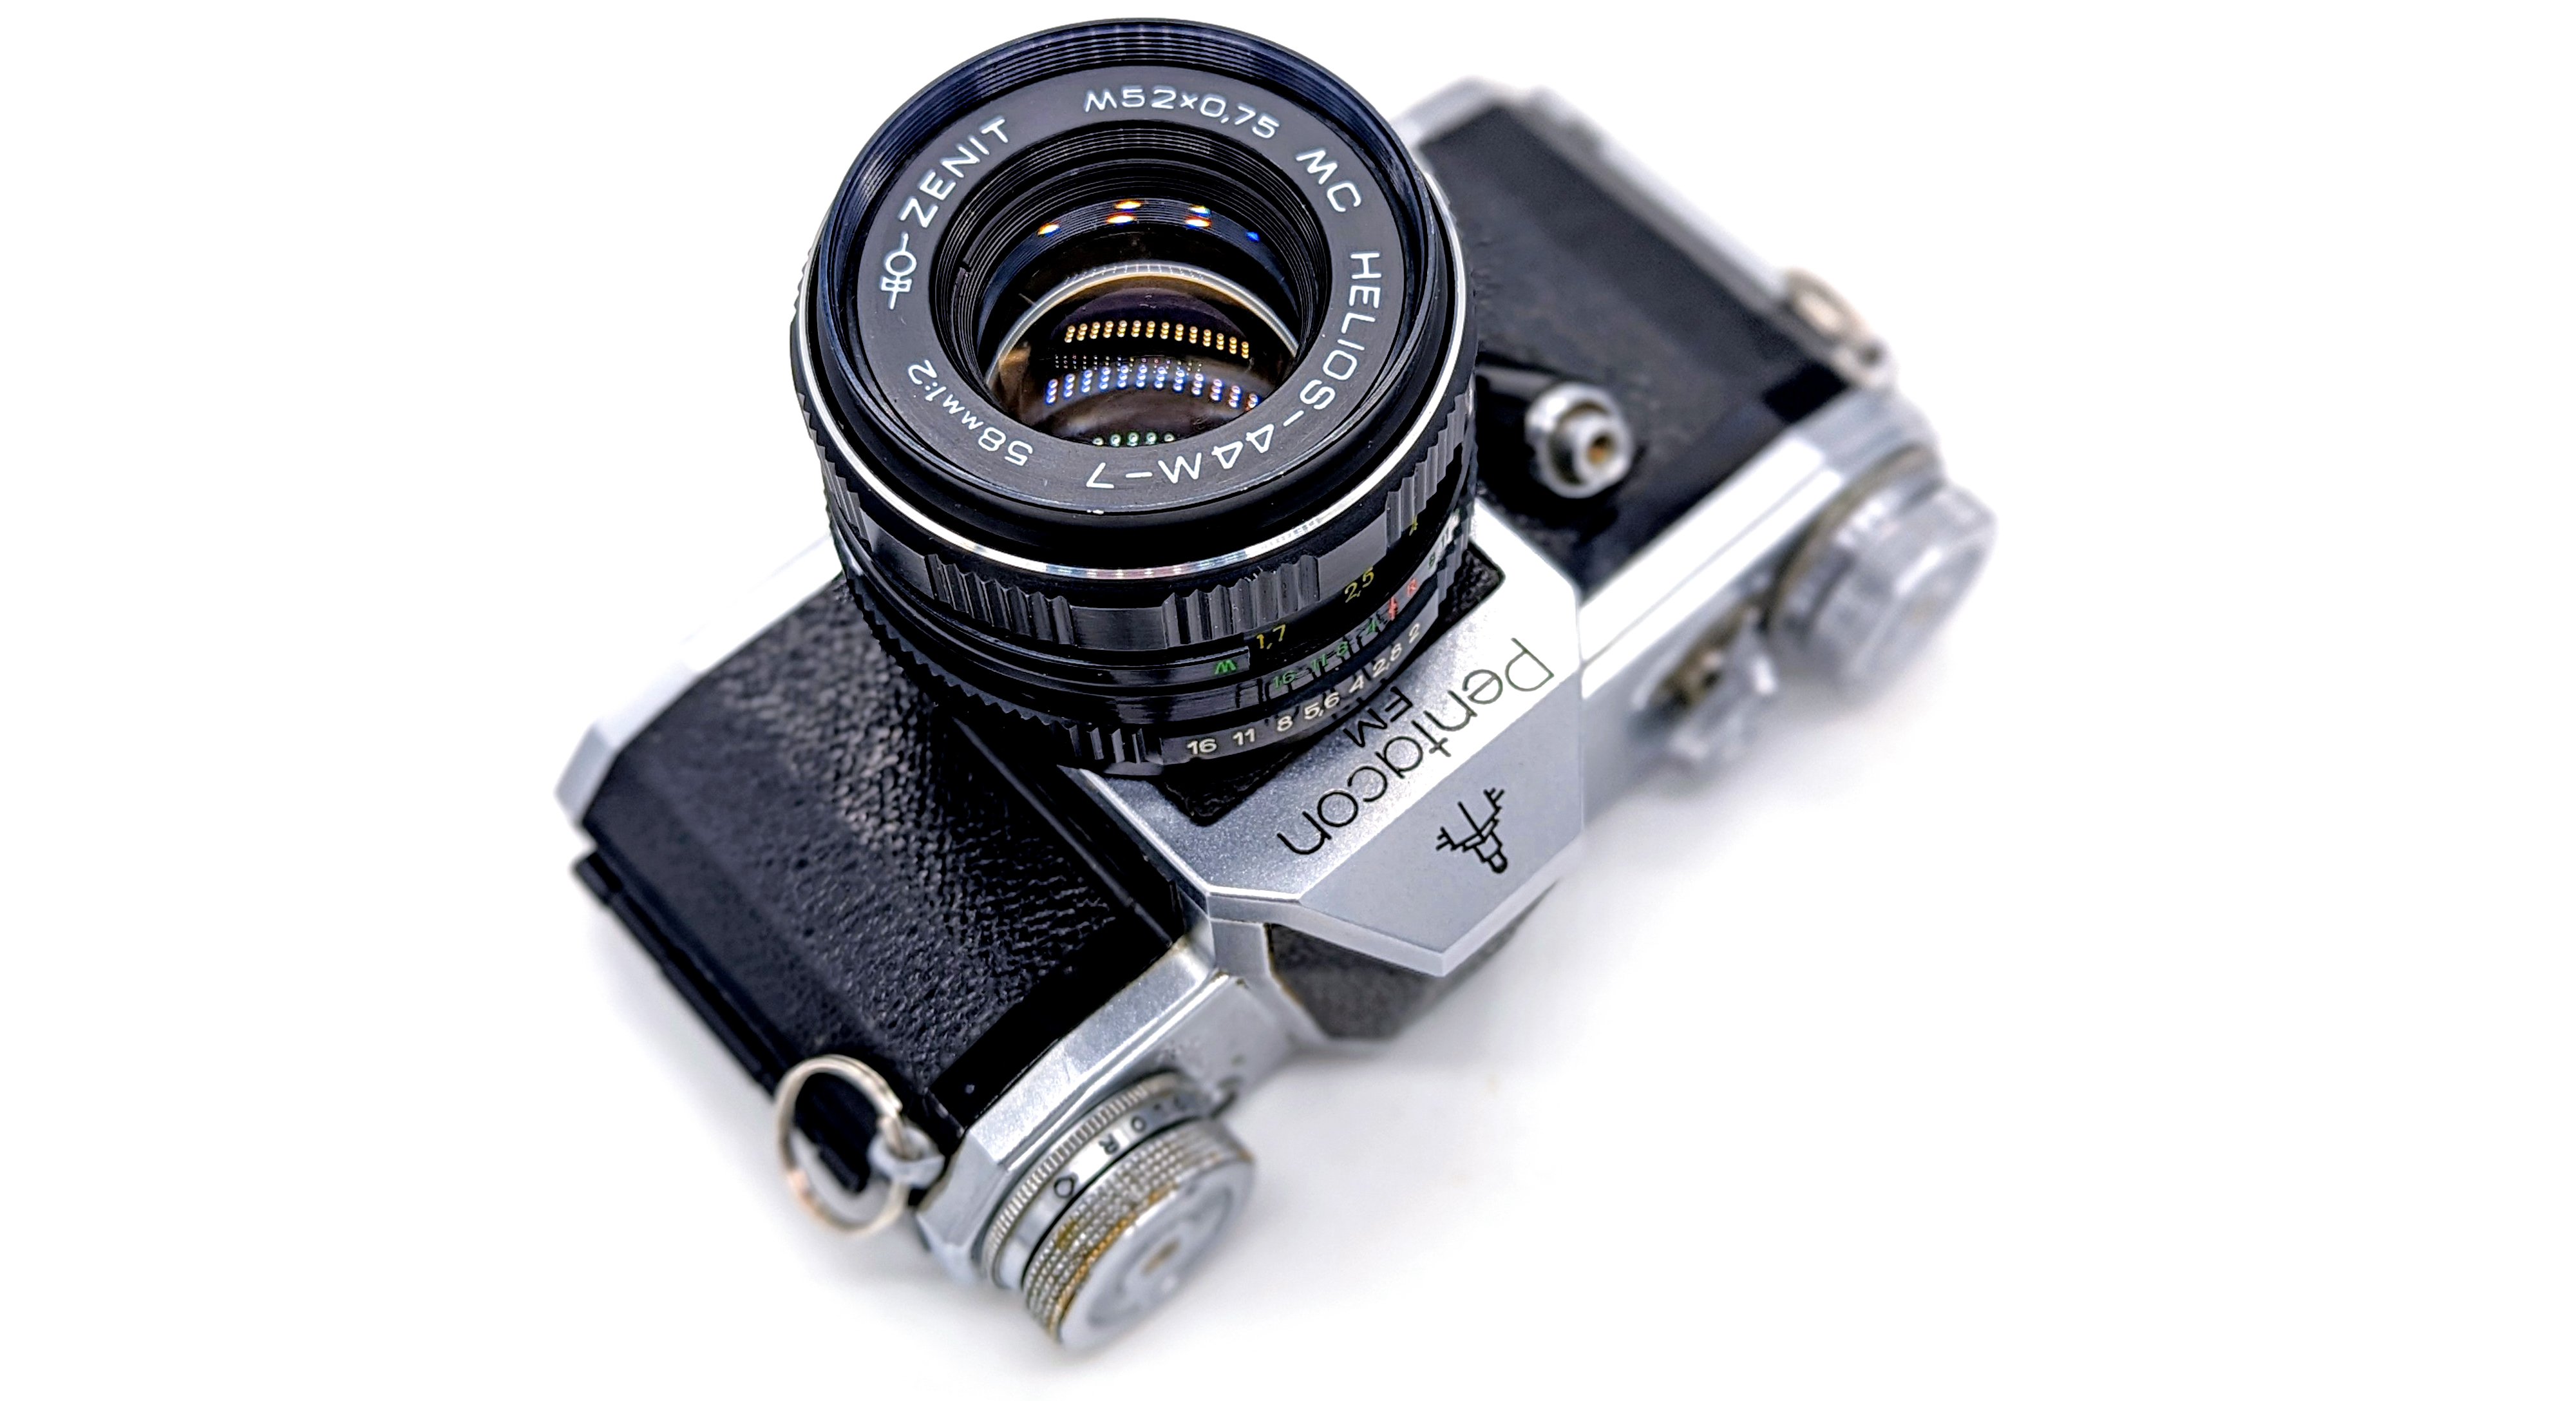
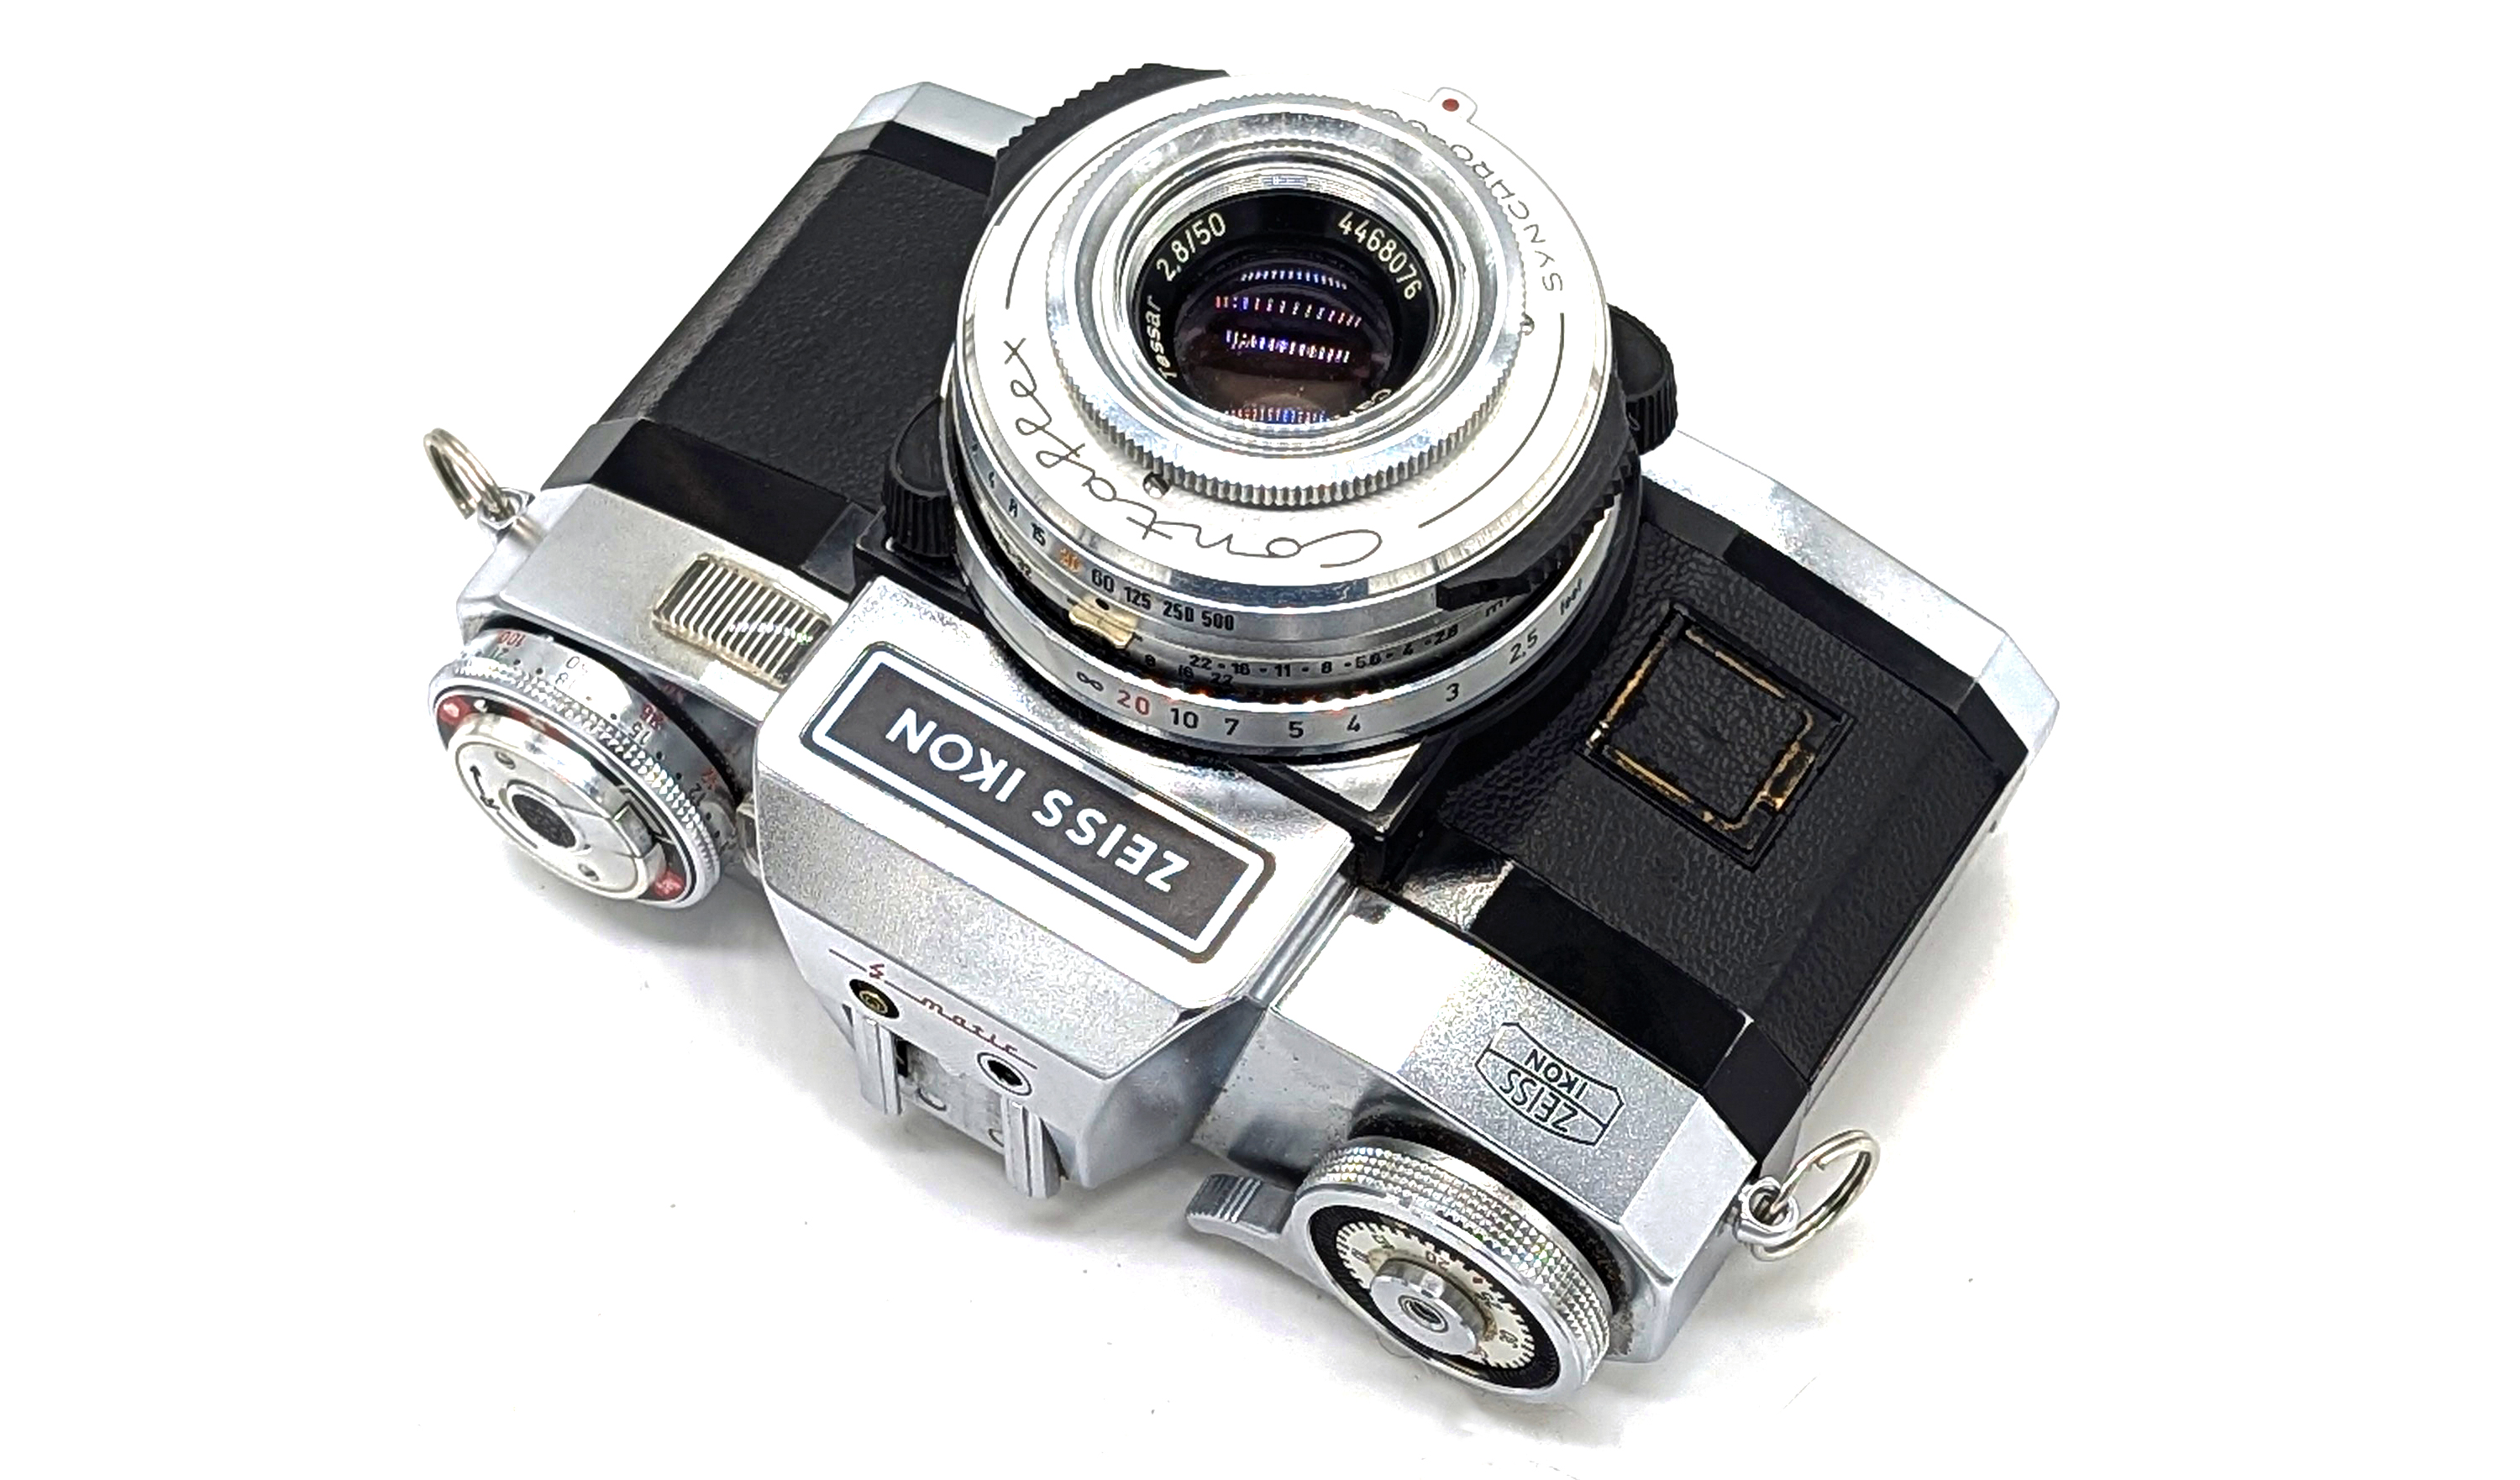
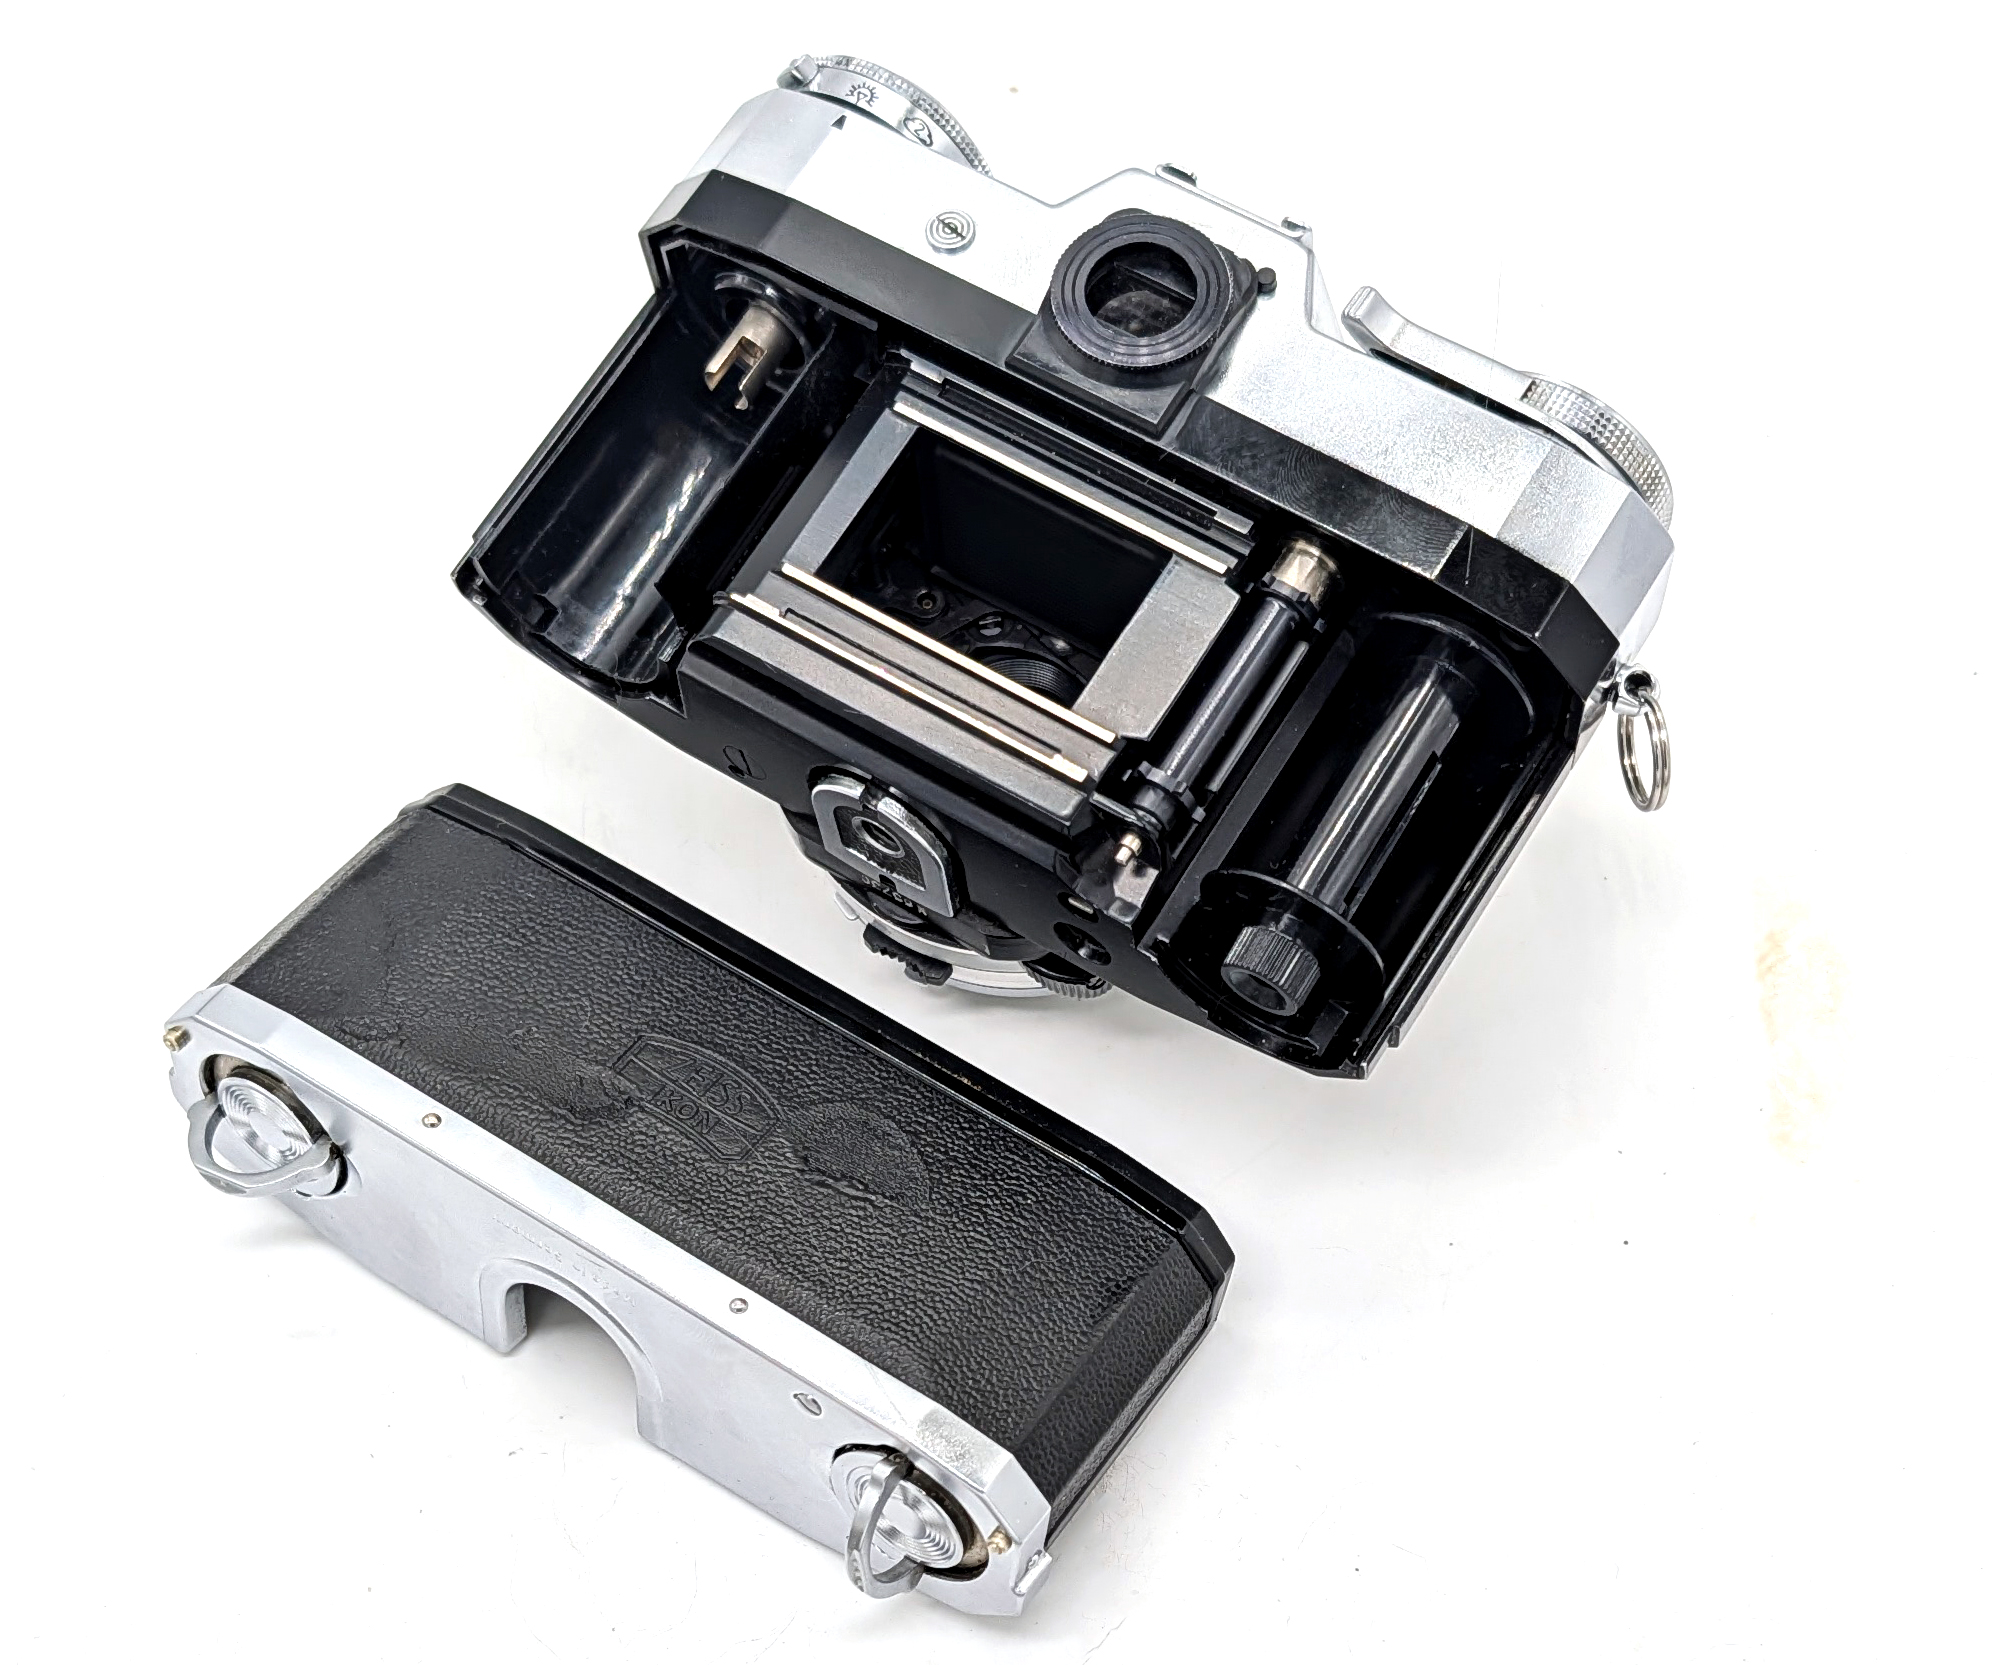
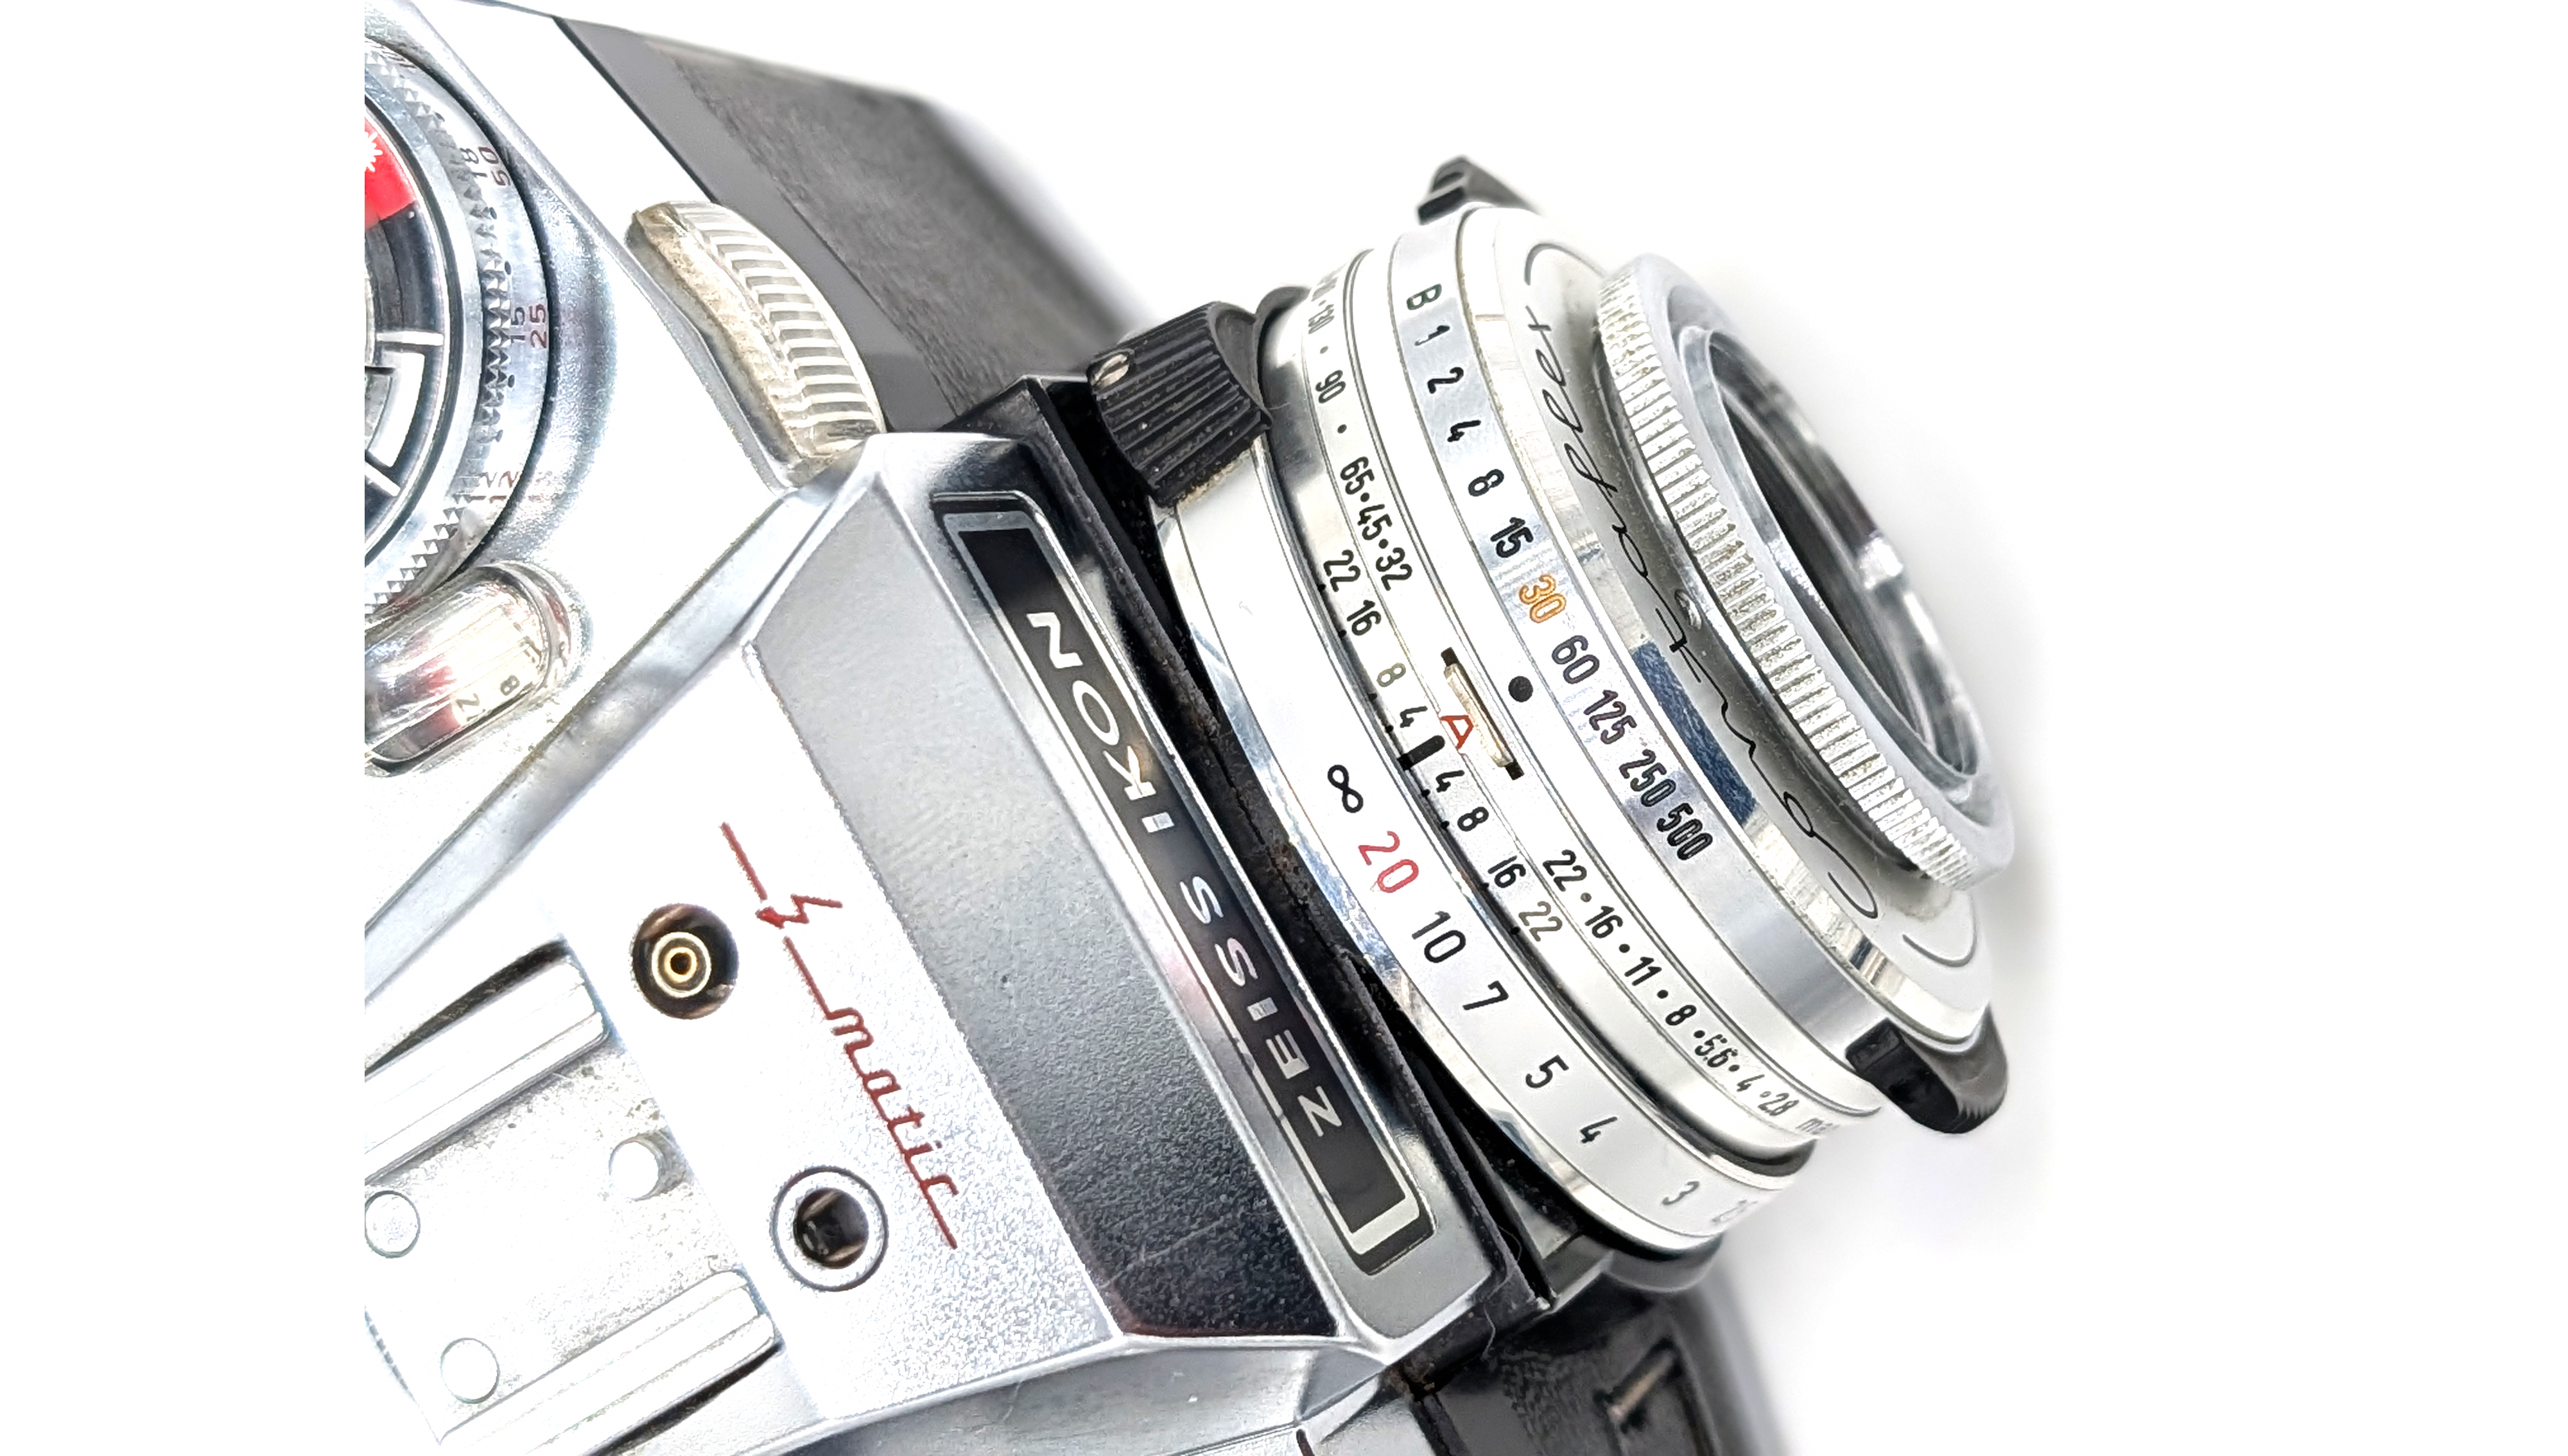
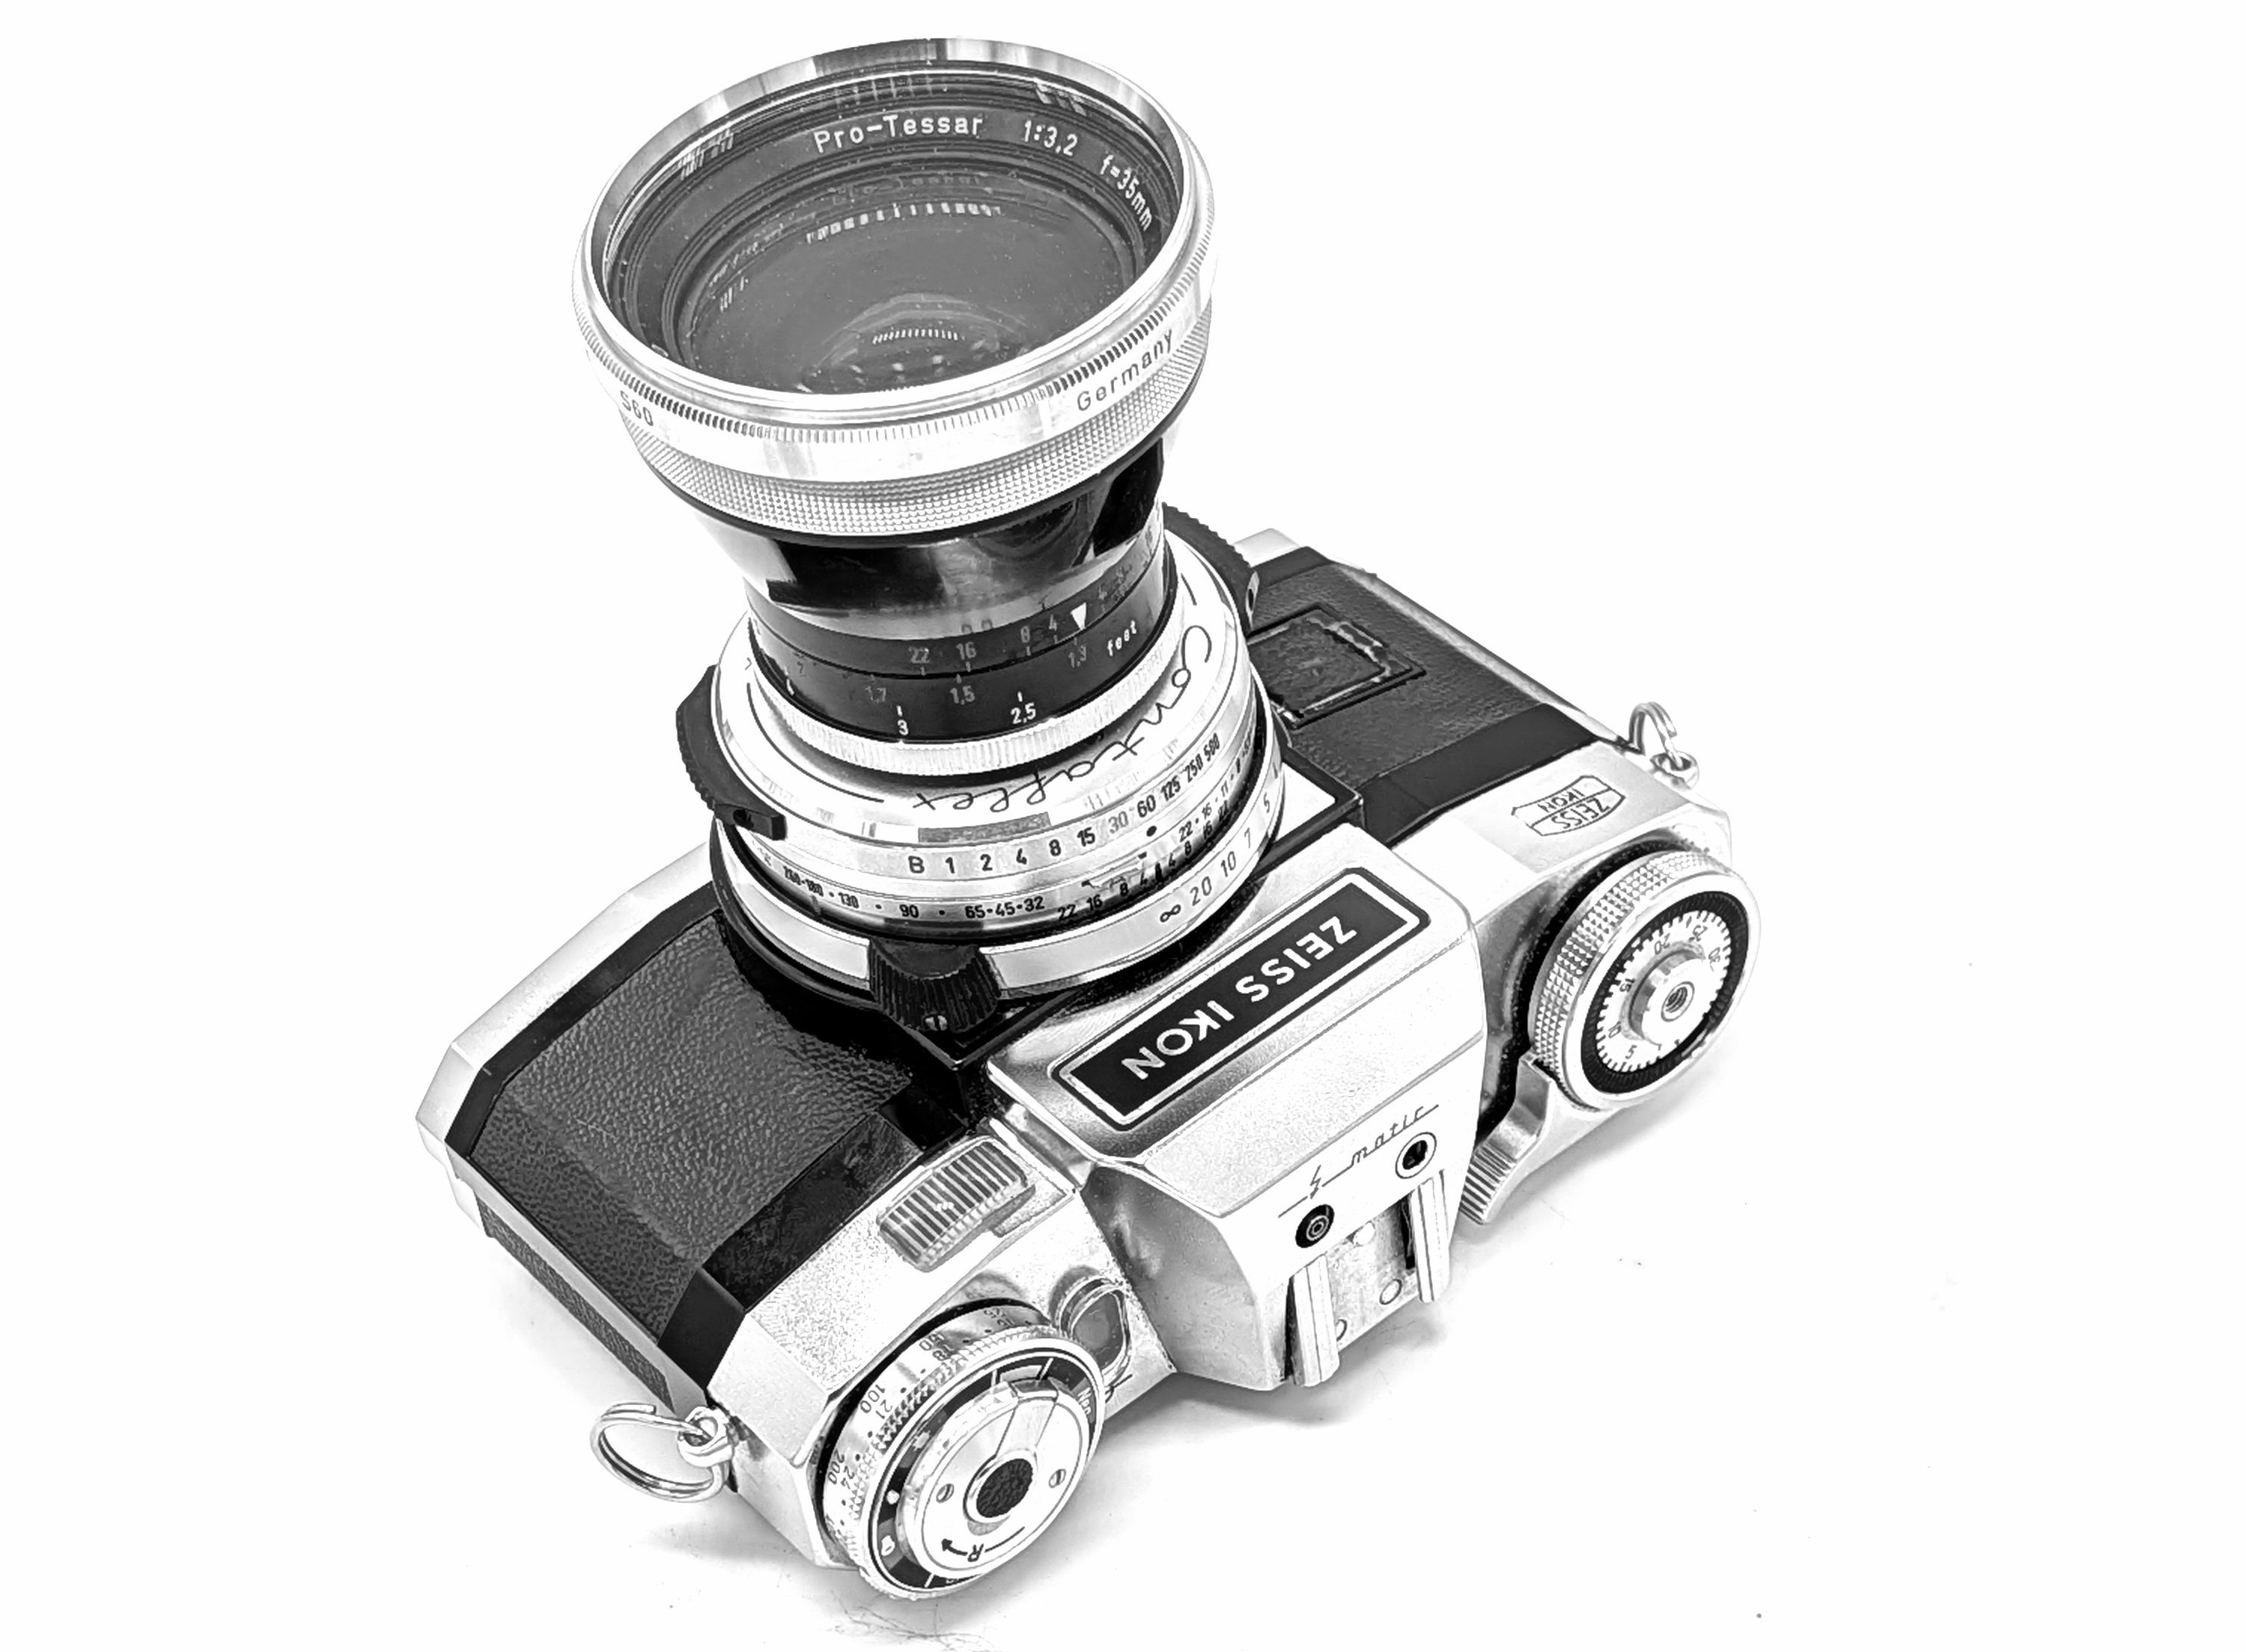
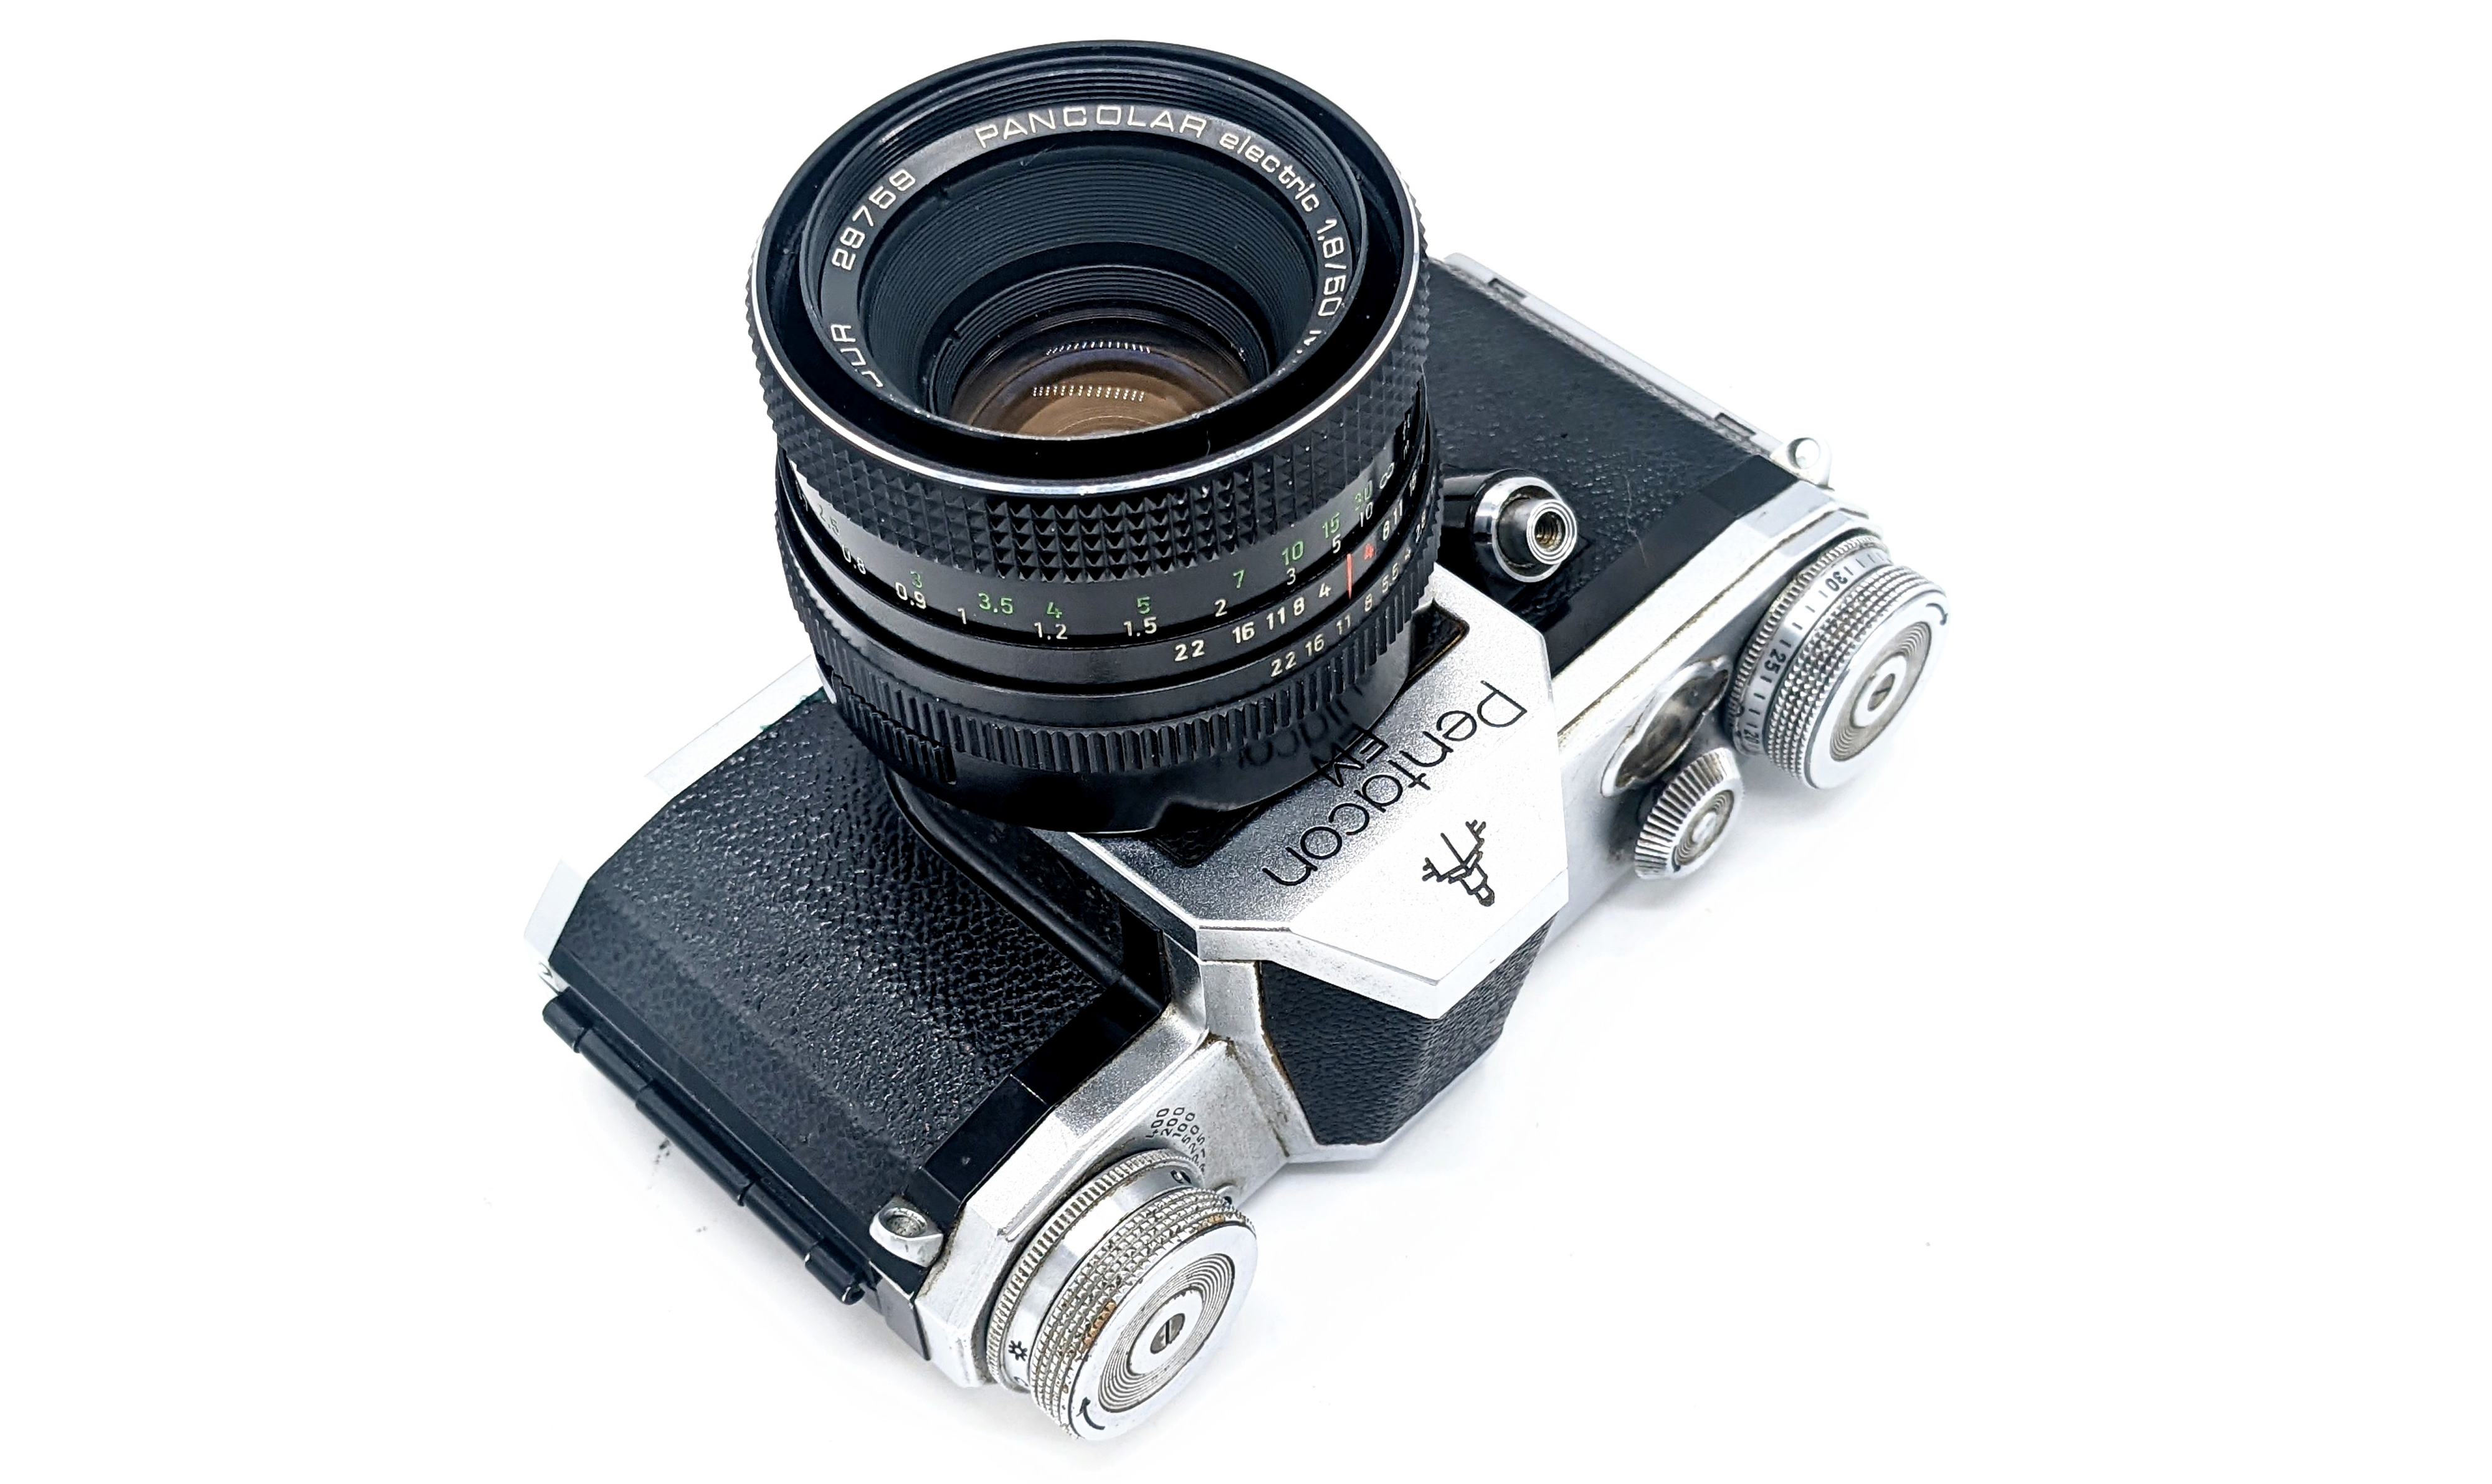
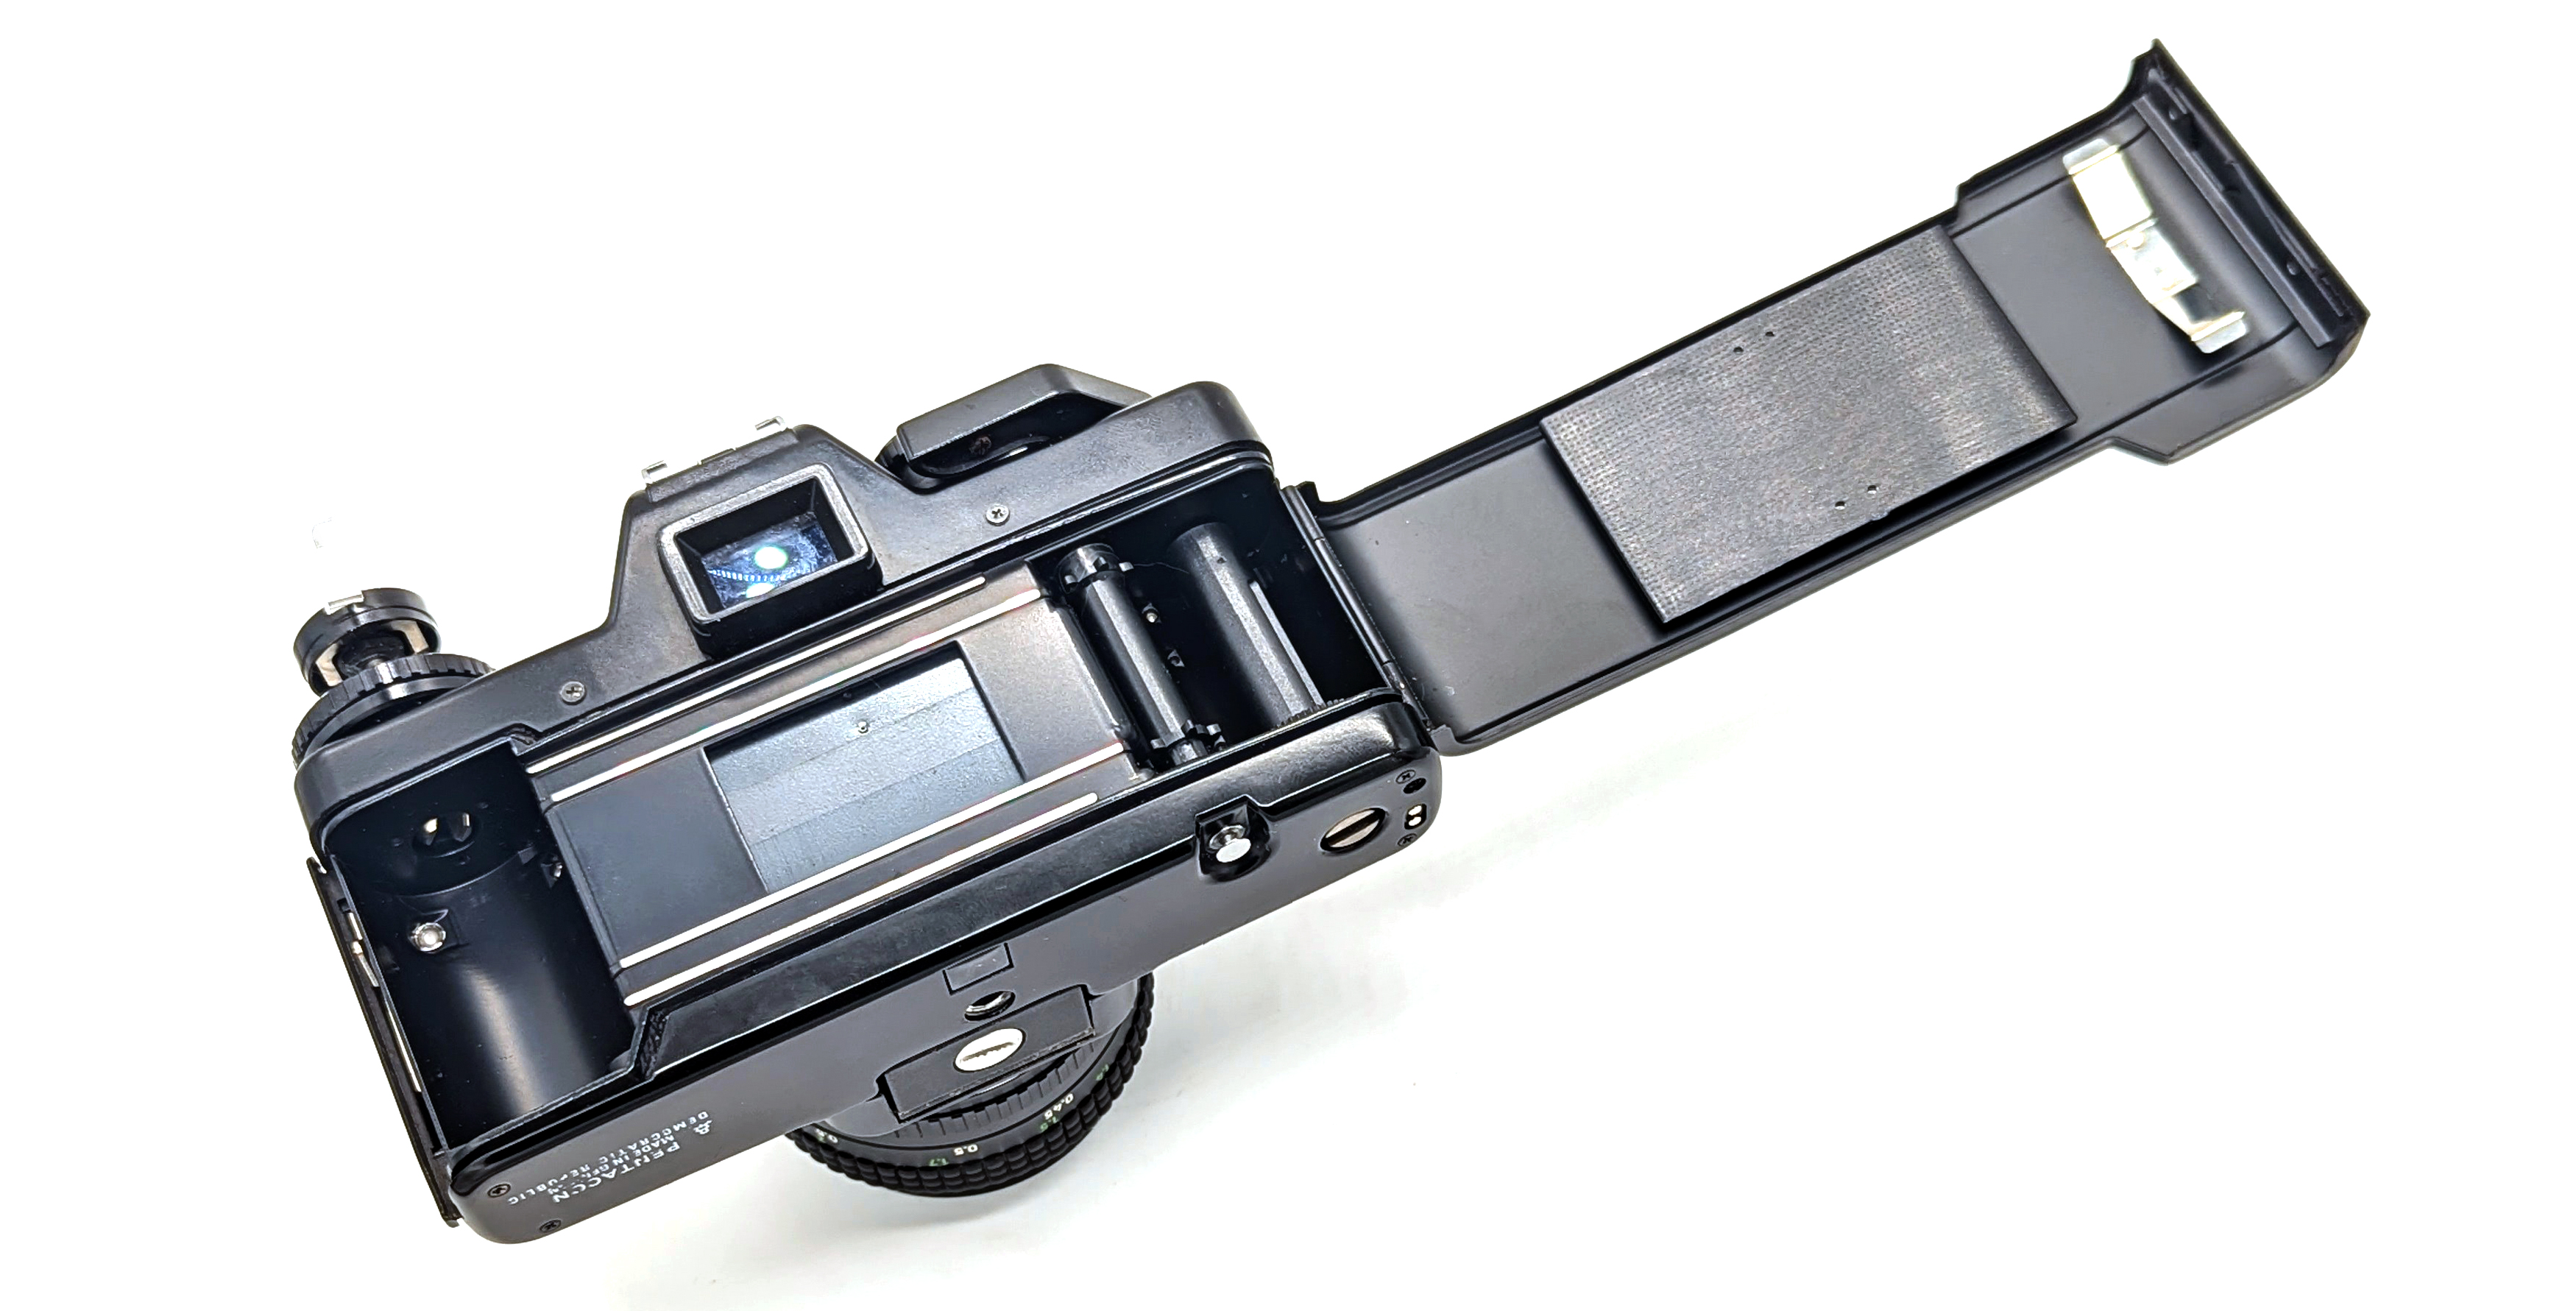
As the final model in the East German VEB Zeiss Ikon “Contax S” line, the 1958 Pentacon FM (aka the “Contax FM”) was the best of the bunch. With open aperture focusing with auto-diaphragm lenses, a nice ground-glass screen with a split-screen focusing aid, and in a relatively compact package, the FM may be the winner in the category of second generation M42 SLRs. Although the FM has some archaic operability, like a knob film advance, a non-instant-return mirror, an odd shutter speed dial, a lack of any kind of native or aftermarket provision for a cold shoe, and a front-mounted shutter button, its main draws include its size, weight, ergonomics, quality of its construction, and a fairly nice viewfinder for the time. Let’s take a look.
Not to recount unnecessarily the well-known history of the Contax S line, which is well-detailed elsewhere, let’s bring ourselves up to 1958. In 1949, Zeiss of East German introduced the “Contax S,” the first, or second depending on whom you ask, fixed pentaprism 35mm SLR. In 1952, Zeiss Ikon introduced the “Contax D,” which was successful and sold under various brand names around the world. During 1956, the “Contax E” was introduced, a “D” model with an added uncoupled selenium light meter on top of the pentaprism. Later in 1956, Zeiss Ikon introduced the “Contax F,” which was the first 35mm camera in production to allow open-aperture focusing with capable lenses, a major milestone in SLR development (to be fair, in 1956, those lenses did not really exist yet). The final variant, the 1958 “FM” would essentially be an “F” with a split-screen focusing aid. Rounding out the alphabet soup, Zeiss also produced the “FB,” an “F” with an uncoupled light meter and the “FBM,” an “FM” with an uncoupled light meter. Because of ongoing intellectual property disputes with Zeiss Ikon of West Germany, East German home market versions of these cameras were called “Contax,” while export versions were called “Pentacon.” In 1958, VEB Zeiss would become “VEB Kinowerke Dresden.” In 1959, this entity was then combined with several other East Germans companies. In 1964, this entity became “VEB Pentacon.” Thus, the Contax line ultimately was swallowed up by the company that had previously been manufacturing the competing Praktica FX series. The next major product of out this consortium was the 1959 Praktica IV, the first of the “next generation” of East German SLRs.
It would not be until about 1960 that M42 automatic diaphragm lenses would begin to hit the scene in earnest. Thus, the FM was often bundled with a “pre-set” lens, mostly the 50mm f/2.8 Tessar but could have come with a number of different East German-made standard lenses of the time. “Pre-set” lenses were a stopgap solution where you would set the minimum aperture you want on the lenses, and then another ring would allow you to switch from wide-open (for focusing) to your preferred aperture (for taking the photo). If you want my opinion, I generally prefer the later multicoated CZJ M42 lenses of the 1970s over any of the 1950s Tessars, Biotars, or whatever. Bundled with the Tessar, and if you could actually find one in North America (it appears that few were imported), the FM retailed for about $230 in 1958 but sometimes advertised as low as $160 (around $2,300 to $1,600 in today’s money).
Here are the three of the top M42 SLRs of 1958 compared:
Pentacon FM
Praktica FX3
Asahi Pentax K
Place of Manufacture
East Germany
East Germany
Japan
Lens Mount
M42
M42
M42
Shutter Speeds
B, 1 sec – 1/1000
B, 1/2 – 1/500
B, 1 sec – 1/1000
Fast/Slow Speeds
Switch Operated
Same Dial
Separate Dials
Auto-Diaphragm
Yes
Yes
Yes
Auto Return Mirror?
No
No
Yes
Prisms
Fixed Pentaprism
Interchangeable
Fixed Pentaprism
Film Advance
Knob
Knob
Lever
Stock Focusing Screen
Fresnel; Split-Screen
Ground Glass
Fresnel; Microprism
Weight
620g
620g
570g
Standard Lens
Tessar 50mm f/2.8
Tessar 50mm f/2.8
Takumar 55mm f/1.8
Shutter
Cloth Horizontal
Cloth Horizontal
Cloth Horizontal
X-Sync Speed
1/20
1/50
1/50
Price w/ Lens (1958-59)
@ $160
@ $160
@ $200
While it would have been nice to have a camera that combined the best features of these three, none of these three models clearly vanquished the competition. However, by 1958, great leaps forward in SLR technology were just a year or two in the future.
Operation
Being the final model, the FM incorporates everything good about the Contax S line and all of the upgrades that were incorporated along the way. Although much of its operation is archaic, its saving graces are the ability to use auto-diaphragm M42 lenses, a viewfinder with an incredibly bright center circle with a split-screen focusing aid, and exceptional build quality. I would say that if it were not for these three features, the FM would not be a worthwhile M42 user given the range of better alternatives. That all being said, how does it work?
Viewfinder: I was fully expecting that the viewfinder would be typical of 1950s and 1960s SLRs, quite dark even with a standard f/1.8 lens and pretty much unusable with slower aperture lenses. While the FM’s ground glass screen overall is not exceptionally bright, its center focusing spot is awesome. This makes a difference because with lenses slower than f/2, while the overall viewfinder dims significantly, the center spot remains bright. When using lenses that are f/2.8 and slower, the viewfinder outside of the center spot becomes fairly dim. While many M42 bodies do have center spot that is somewhat “brighter” than the rest of the focusing screen, they are nothing like the FM. Like the rest of the Contax S line, the focusing screens were not interchangeable. No other information is shown in the viewfinder.
Auto Diaphragm Operation: Although by the early 1960s, you could find auto-diaphragm M42 lenses in every corner drugstore, in 1958 they were a little hard to come by. The FM’s auto-diaphragm capability makes it compatible with every M42 lens from any manufacturer. The front-positioned shutter button may seem odd at first, but it is actually fairly ergonomic.
Shutter Speed Selection: Selecting the shutters speeds is another odd task. For starters, the FM uses the “old style” shutter speeds: 1/50, 1/100, 1/200, etc. That is not a big deal. To change the shutter speeds, you must first cock the shutter and then rotate a dial below the shutter speed window in the direction of the arrow. To use the slow speeds, a lever must be switched on the back and then you turn the dial for the slow speed to match the red arrow.
Shutter Sound: The FM’s shutter is fairly muted but has a slight metallic sound. The horizontal cloth shutter of the Contax S series has a fairly good reputation but remember that the material does not last forever.
Film Loading & Counter: The FM uses modern swing-back film loading. Interestingly, the Contax S series had this idea that you could use another film cartridge as a kind of take-up spool, which would eliminate the need to rewind the film into the original canister. The film counter is located on the advance knob and does not reset automatically. After loading the film, you set the film counter dial to two spots short of “0” and then shoot / wind the film until the counter reaches “1.”
Film Advance: Although adding a lever would have been easy enough, the FM sticks to a clockwise rotating knob. Because the FM does not have an automatic return mirror, rotating the knob will both lift the mirror back into position and cock the shutter for the next shot.
X-Flash Sync: 1/20 is a rather abysmal flash x-sync speed, even for the 1950s. The sync speed may not even matter anyway because there is nowhere to put a flash. The Contax S line lacked either a native or aftermarket cold shoe option.
Accessories: The FM did not have a super large range of proprietary accessories. Of note, they included a rubber eyecup, extension rings for close-up photography, an angle finder, a leather case, and a microscope adapter. None of these are essential.
Conclusion
If considering a Pentacon / Contax FM as a shooting platform for M42 lenses, rather than as a shelf queen or conversation piece, it is difficult to make a compelling case versus subsequent generations of cameras. However, despite its quirky operation, I like the FM. It is not only an elegant machine from a bygone age, but the center spot alone provides a brighter view than 98% of M42 bodies’ focusing screens (maybe all of them). The FM remains a difficult camera to find in working condition, so expect that any long-neglected body will require some repair.
The Konica Pearl IV was a short-lived, Japanese-domestic-market-only medium format folding camera of exceptional quality that was produced from late 1958 to 1959. With the precipitous decline in the popularity of folding medium format cameras during the late 1950s, it disappeared from the market along with most others brands and would be Konica’s final attempt at the 645 format. Because the Pearl IV has been generally unknown outside of Japan, and because most Konica products of the 1950s were absolutely world-class, is it possible that the IV was the best “classic” 645 medium format folding camera? It makes an extremely good case.
Although folding cameras were produced by many different manufacturers all over the world, the Zeiss Ikon Ikonta series, produced between the early 1920s and late 1950s are probably the most famous. The post-war models included the Ikonta 524/15 (6×6), the Ikonta 524/12 (6×9), the Super Ikonta III (6×6), and the Super Ikonta IV (6×6). During the 1950s, other new, rangefinder-coupled folding cameras included the Voigtlander Bessa I and II (6×9), the Agfa Super Isolette (6×6), various iterations of the Mamiya 6 (6×6), and the different versions of the Olympus Six (6×6). An endemic problem with rangefinder-coupled folders, even in their final generations, was that their viewfinders were generally abysmal.
Introduced at the sunset of the folding camera era was the December 1958 Konishiroku (Konica) Pearl IV. However, because of its relatively low production, the fact that very few examples made their way out of Japan, and the general death of the folding camera, for decades not many people outside of Japan had actually put their hands on one. It does not appear that any well-known North American photography publication even reviewed the Pearl IV when it was produced. In recent history, online sellers (mostly Japan-based) have asked a lot of money for working examples, much more than any other common vintage folding camera. For many people, for the money, there are other attractive classic and modern alternatives in the 645 and 6×6 format.
So, is the Pearl IV a fun, usable 645 camera for the 21st century, or should it be confined to the climate-controlled cabinets of the camera collector crowd? Let’s take a look.
The Pearl II & III
Konica, whose origin reaches back to the 1870s, has a long and storied history as a famous optical and camera company in Japan until its ultimate demise in 2003. Although the history gets a little fuzzy, it appears that at least by 1909, Konica was producing a folding roll film camera. The grandmother of the Pearl line was the 1938 “Semi Pearl” — a non-rangefinder coupled 645 folder that may have been inspired by the contemporary Zeiss Ikonta. The Semi Pearl was produced before the war, sporadically during the war, and then for a short time after the war. In 1948, Konica introduced the “Pearl I,” which retained much of the physical appearance of the Semi Pearl while adding an “uncoupled” rangefinder, where the distance from the rangefinder would have to be dialed in manually to the lens.
The Pearl II (1950) and Pearl III (1955) were the immediate predecessors to the IV. The Pearl II featured a coupled combined viewfinder/rangefinder, a Konica-designed shutter with a top speed of 1/500, a choice of a f/4.5 or f/3.5 lens, an off-set cold shoe, swing-back film loading, a viewfinder lacking framelines or any parallax correction lines, and an interesting top-mounted “depth of field” calculator that automatically adjusted with the selected aperture. To take a photo, the shutter speed and aperture had to be set on the lens itself, the shutter had to cocked, and then the shutter release button is positioned on the top of the door (not where you think it would be on the top plate). The Pearl II’s film advance system will seem a bit bizarre. When advancing the film, one had to look through a small glass window through the back door that would read the frame number from the backing paper of the 120 film. The Pearl II had neither “double exposure prevention” nor did the film advance “lock” when advanced to the appropriate next frame. Thus, it would have been easy to double expose a shot if you forgot to advance the film, or you could advance the film too far if not paying attention to the film window.
Faced with newer, more-featured models from companies like Zeiss and Mamiya, Konica introduced the Pearl III in 1955. The last variant of the Pearl III, the IIIL, featured a coated version of the f/3.5 Hexar lens and a new Seikosha-produced leaf shutter (the MX). Shutter speeds again went up to 1/500, M/X/F flash synch capability was added (flash syncs at all shutter speeds), an off-set cold shoe sat on top, and the smallish viewfinder/rangefinder window still lacked framelines and any parallax marks. The most “innovative,” and now controversial, feature of the Pearl III was its “automatic stop” film advance. To make a long story short, once the film was loaded and the arrows on the film were lined up with the marks on the camera, one closed the back, and then flipped a lever on the bottom of the camera, that would engage the “auto” advance mechanism. Now, the bottom-positioned advance would automatically “stop” at the appropriate frame interval. In practice during the 1950s, this probably worked ok. However, as many people have reported, modern 120 paper backing is much thinner than it was during the 1950s. As a result, the auto stop mechanism does not often work as intended, either not leaving enough space between frames or, alternatively, too much. Folks have developed workarounds. However, the IIIL still lacked a double exposure prevention system.
Released during December 1958, the Pearl IV was a complete ground-up redesign of the Pearl III, essentially retaining only the lens and the shutter of the IIIL. Because the popularity of folding cameras had fallen so drastically during the 1950s, the IV was only produced for less than a year with only 4000 – 5000 built.
Specifications
Format
6 x 4.5 (120 Film Only)
Weight
715g
Lens
75mm f/3.5 Hexar
Filter Thread
30.5mm
Minimum Focus
1.20m
Shutter
Seikosha MXL
Shutter Speeds
B to 1/500 in Click Stops
Aperture Range
f/3.5 – f/32 in Click Stops
X Flash Sync
All Speeds
Parallax Correction
Etched in Viewfinder
Operation
The IV’s most impressive upgrades over the III include a completely-redesigned brilliant viewfinder/rangefinder with actual framelines and etched parallax lines for close focusing, a far better and reliable automatic film advance mechanism, a centered cold shoe, double exposure prevention, and a traditionally-placed frame counter mechanism.
Viewfinder/Rangefinder: To me, what separates an excellent camera from the pack is the inclusion of a large, bright viewfinder. The IV does not disappoint in this regard. Indeed, there is probably no classic folder with a larger and brighter viewfinder. The projected framelines and rangefinder patch are very easy to see even in bright sunlight. Although the viewfinder is not automatically parallax-corrected (etched instead), I do not believe that any classic folder had such a feature.
Film Loading: The IV has straightforward and easy film loading that will be familiar to anyone who has used a modern medium format camera. The bottom dials rotate to “pop out” to permit placing the take-up spool and film in position. Once secured, the dials are turned to the red marks on the bottom plate to “lock” the take-up. Once you have lined up the arrows on the film paper with those on the body, close the swing back, and use the advance knob until it stops. At this point, the top frame counter will read “1.”
Operation: To take a photo with the IV, in no particular order, set the aperture and shutter speed on their respective dials on the lens assembly, focus, and cock the shutter. The shutter is tripped by pressing a rectangular button on the door. Then advance the film with the knob on the top of the camera until it stops. Repeat. The lens cannot be stowed unless it is focused at infinity. This is very, very important to remember.
Extreme Close Up of the Lens and EV Scale
Cable Release: Where one would expect a shutter release button to be, the IV has a standard cable release socket. However, all the cable release socket does is mechanically trigger the door shutter button.
EV Coupled Exposure: In a feature also found on the contemporary Konica III 35mm rangefinder series, the Seikosha MXL shutter provides an option to set the EV for a scene instead of the aperture and shutter speeds separately. Setting an EV will permit you to rotate both the aperture and shutter speed dials together in the same ratio. In fact, the Seikosha unit defaults to that operation. If you want to set the shutter speeds and aperture independently, you need to push in the EV lever to let the aperture ring move independently of the shutter speed. This may seem somewhat annoying, but learning how to use the EV actually makes things easier because now you can choose the particular speed and aperture for the EV rating at the same time. However, as with all folders, setting exposure is a little cumbersome as you have to look at the front of the camera to set the actual selected EV value, instead of looking down at just the speed and aperture.
Traditional Film Counter: Unlike the III, the IV has a film counter window on the top plate.
Advanced Film Advance: Unlike the III, the IV has a more modern film advance that is not only immune to the III’s “backing paper thickness” issue, but also prevents double exposure as it is impossible to cock the shutter if the film has not been advanced to its next hard stop.
Centered Tripod Mount: Unlike the III, the IV has a traditional centered standard tripod mount.
The Optics: The 75mm f/3.5 Hexar is a stunning optic with Konica’s trademark 1950s amber lens coating. A 75mm 645 lens is equivalent to a 45mm lens in the 35mm format. The minimum focusing distance is only 1.20 meters.
Shutter Speeds: The IV uses the “older” style shutter speeds — so 1/10 for 1/15, 1/25 for 1/30, 1/50 for 1/60, 1/100 for 1/125. However, 1/250 and 1/500 are the same. It would not be until the 1960s that shutter speeds became uniform across manufacturers. However, the small variation in speeds should not throw off any exposures. The Seikosha MX shutter has a reputation of being fairly reliable but still may require service from time to time.
Pocketable: When folded, the IV is narrower than any practically 35mm fixed-lens rangefinder camera of the era, either fixed lens or interchangeable lens, yet obviously a bit taller.
The Pearl IV and the Contemporary Nikon S3 Rangefinder
Handy Little Prop: Built-in to the lens door is a small metal hinge lever than allows the camera to prop itself up on a flat surface in its horizontal orientation. This may be useful to steady the camera for longer exposures on the fly.
Missing Features
Auto Cocking of the Shutter: Unlike the 1955 Mamiya 6 Automat, the IV did not include an “auto” shutter cocking mechanism. The 6 had a great feature that the advancing of the film also cocked the shutter for the next photo.
Traditional Shutter Button: The IV lacks a shutter button where you would expect it to be. Instead, as mentioned above, it has a cable release socket in its place. This is odd because the Konica III rangefinder series’ shutter button is nearly identical to that in the Pearl IV. It would have been easy enough to add a similar top plate shutter release.
Accessories
Case: The Pearl IV was sold with a proprietary two-part case which also doubled as the camera strap. It is highly advisable to purchase an example with the case as it is nearly impossible to find it as a standalone accessory. Because the Pearl IV lacks any strap lugs, the only other solution would be to find a strap that attaches to the bottom tripod mount.
Lens Hood: Pearl IV with a metal clamp on “Konihood” which is the same as that used on the Pearl III. However, any aftermarket 30.5mm screw-in hood will work. However, any hood must removed before collapsing the lens back into the body.
The Pearl IV on Its Built-In Perch with the Konihood
Konifilters: During the era, Konica produced a set of “Konifilters” in 30.5mm thread. However, it is always preferable to use modern multicoated filters over those from the 1950s. The plus side is that the lens can be folded in with any single filter attached.
Close Up Lenses: As with many rangefinder cameras of the era, the Pearl IV could accept two different “close up” lenses. A company called “Pleasant” produced a close-up accessory that could focus only between 1.00m and 0.5m and another that would focus between 0.6m to 0.4m. These Pleasant close up lenses, regardless of the system, are fascinating pieces as they permitted rangefinder to focus as closely as modern SLR lenses. With a medium format platform, these accessories can be very useful. Today, these are extraordinarily difficult accessories to find as they were proprietary to the IV only.
Screwed Up and Did Not Get a Case? Gordy’s Wrist Straps are a Good Option.
Flash: Konica produced a fold-up Koniflash that worked with normal flash bulbs of the time. Because no one really uses bulbs anymore, the IV works with all standard electronic flashes at all shutter speeds.
Compared
While the Pearl IV is an impressive 645 camera for the 1950s, it certainly had some competition.
Zeiss Ikon Super Ikonta IV 534/16 (6×6) (1956): The Ikonta IV has a strong claim to the title of best classic 6×6 folding camera. It checked the important boxes: a decent combined viewfinder/rangefinder, double exposure prevention, easy/conventional film loading, and the standard 75mm f/3.5 lens,. The Ikonta IV did not require that the lens be set to any particular focus point before closing. Over the Pearl IV, the Ikonta IV had a built-in primitive uncoupled selenium meter (most not working today), an 8-second delay self-timer, and a conventional shutter release on the top of camera. However, working Super Ikonta IVs are just as expensive on the used market as Pearl IVs.
Mamiya 6, Mark V (6×6 & 645) (1955): The very popular Mamiya 6s operate differently that the Ikonta IV or the Pearl IV. Instead of focusing with the actual lens, the 6 had a focusing dial on the back that moved the film plane rather than the lens assembly. Although the 6 went through a half-dozen or so versions during the 1950s, Model V appears to have been the most innovative with the ability to shoot in either 6×6 or 645 format (with an optional drop-in film mask). The 6 will impressively compensate its frame spacing to accommodate for 645. However, the 6’s viewfinder/rangefinder leaves some to be desired, it requires the installation of the pressure plate each time the film is changed.
Mamiya 6 Automat (6×6) (1955): The most impressive feature of the Automat is the ability for the camera to cock the shutter mechanically for the next shot at the end of the film advance. However, that is really the only feature that the Automat has over the Pearl IV. The Automat does not have double exposure prevention and did not have the capability to switch to 645.
Conclusions
Now that the Pearl IV has made its way out of Japan after many decades of relative obscurity, how does it compare? If you enjoy shooting the 645 format on a folding camera, the IV is clearly better than any of the pre-war folding camera models. If cost were not an option, it compares favorably with its contemporaries Its greatest selling features being the incredible viewfinder/rangefinder view, its ease of film loading, and its double exposure prevention. The IV also exhibits extremely fine craftsmanship, being solid and confidence-inspiring without being unnecessarily heavy. However, the IV is not necessarily an easy camera to use out in real life. Given the fact that the exposure settings and shutter cocking mechanism are on the lens itself, you may find yourself needing constantly to adjust the settings with changing light conditions. The lack of a shutter release in the traditional position is a little disappointing.
In the end, while relatively pricey, the IV is a wonderful 645 folding camera with solid build quality, an impressive viewfinder, and an extraordinary coated Konica lens. Despite its short list of shortcomings, I would highly recommend it if you are into the classic folding experience.
The 1964 Asahi Pentax Spotmatic SP was the first commercially-available M42 SLR that combined auto-diaphragm lens operation with TTL light metering, but in a rather cumbersome two-step process. This third generation M42 technology would be employed by countless models by numerous manufacturers from the mid 1960s through the late 1980s. Like the Nikon F before it, the SP has generated quite a lore around itself where many folks believe it was the “best” or one of the best M42 bodies ever made. Given the wide range of later and better M42 camera body alternatives, is there an objective case for the SP? Let’s find out.
The M42 lens mount standard was developed before WW2 but did not come into general commercial use until the late 1940s. In 1949, East Germany’s Contax introduced the first of its “S” line of M42 SLR cameras. Other East German products such as the “Praktica” and “Praktina” line also appeared during the late 1940s and early 1950s. For its part, Pentax also entered the race, claiming that its 1952 Asahiflex I was the first Japanese-built M42 SLR to reach market.
Throughout the 1950s, M42 camera technology rapidly developed with the East German and Pentax models being competitive with each other. During 1956, Contax announced its “F” camera that introduced “auto-diaphragm” operation with M42 lenses that contained an extra “stop down” pin that permitted the camera body to hold the lens’ aperture wide open for focusing while automatically stopping down to the selected aperture upon taking the shot. Pentax’s ultimate response was the 1958 Pentax K, an auto-diaphragm-capable camera with an integrated pentaprism and a lever film advance. In 1961, Pentax introduced the S3, which could use an optional detachable coupled light meter.
When introduced in 1964, the SP’s primary innovation was a built-in TTL light meter with a match-needle exposure system. From the outset, the Spotmatic system had broad range of professionally-oriented accessories as well as a full-range of lenses from 17mm to 1000mm. Although the SP came standard with either a 50mm f/1.4 or a 55mm f/1.8, it could function equally well with any auto-diaphragm M42 lens. Pentax continued producing the Spotmatic series in various forms until about 1975.
In 1971, Pentax introduced the first of the fifth generation” of M42 SLRs with its “ES.” The ES was the first electronic-shutter, aperture-priority autoexposure M42 camera. For the system to function properly, however, Pentax required the use of proprietary lenses that contained the necessary linkages to communicate the lens aperture to the camera.
Specifications
Year Introduced
1964
Lens Mount
M42
Shutter
Metal Focal Plane
Shutter Speeds
B, 1 sec. – 1/1000
Viewfinder Magnification
0.88x (50mm); 1.00x (55mm)
Focusing Screen
Fresnel / Microprism
ASA Range
20-1600
Weight
621g
Flash X-Sync Speed
1/60
Battery
PX400; 387S (Modern Replacement)
Operation
Like many marquee 35mm camera bodies of the 1960s, there is little question that the SP exhibits exceptional build quality and attention to detail. There is a strong case that the SP is among the best of the third generation of M42 cameras.
Operation: In 1964, the primary draw of the SP would have been its ability to use any auto-diaphragm M42 lens with true built-in TTL light metering. Remember that even the Nikon F and F2 require the use of an optional external prism for TTL metering. The SP employed a two-step procedure for it to work. Essentially, when an auto-diaphragm M42 lens is mounted, the camera body holds the aperture wide open for the purposes of easy focusing. To meter at a selected aperture, you press the switch at the side of the lens mount to turn on the meter and to stop down the lens to the taking aperture. A needle will then begin moving in the viewfinder, and you would change the aperture and shutter speed combination until the needle falls between the + and – signs. You then switch off the meter, which returns the lens to wide-open aperture. When triggering the shutter, the body automatically stops down the lens to the selected aperture. The shutter noise is not particularly quiet.
Viewfinder: The only information displayed in the viewfinder is the match-needle information on the right side of the screen. The fixed, non-interchangeable focusing screen is a fresnel / matte microprism type with a .88x magnification with the 50mm lens and 1.00x magnification with the 55mm lens. The focusing screen is not exceptionally bright, even with a f/1.8 lens, and is mostly par for the course for a 1960s camera of this type.
Lack of Flash Shoe: The SP did not come standard with either an integrated cold or hot shoe for a flash. A cold shoe adapter that fit over the camera’s viewfinder was an optional accessory. The SP has two flash sync sockets on the front of the camera for “X” and “FP.”
No Motor Drive Capability: The original SP does not have the appropriate linkages for the Pentax’s later motor drive. However, Pentax later produced in 1967 a variation of the SP called the “Spotmatic Motor Drive.” With a bottom-mounted unit, the camera could achieve 2-3 frames per second at 1/1000. Read all about this motor drive and the optional 250 frame back here.
Batteries: The SP used a single V400PX 1.35 mercury battery to power the meter. The most common alternative today would be a zinc air MRB400 1.35V battery. Many SP users claim that, unlike other 1960s cameras, the 1.55V of modern alkaline batteries will not throw off the camera’s meter. The closest alkaline equivalent that works appears to be a 387S, which is just a 394 battery with a rubber ring.
Shutter Speed / ISO Range: Typical for the era, the SP had shutters speeds of “B” and 1 second to 1/1000. No SLR camera of the 1960s, save for 1960 Konica F, the 1960 Canonflex R2000, and the 1964 Leicaflex, offered a faster shutter speed than 1/1000. ISO range is 20 to 1600.
Self-Timer: The SP has the standard mechanical front self-timer.
Exposure Lock: The SP has no external exposure lock and no manual exposure compensation.
Conclusions
In my opinion, the SP suffers a bit from “conventional wisdom” syndrome. While no doubt a quality-made and innovative SLR from an age where manufacturers placed more of a priority on aesthetics and durability, the SP has been completely eclipsed by several subsequent generations of M42 cameras. The main drawbacks for me are the cumbersome metering process and the relatively dark viewfinder with any lens slower than f/1.8, with the obscure battery thing being a secondary concern. This may be heresy to some, but if looking for a native film platform for M42 lenses, there are plenty of better options.
The 1965-71 Contaflex Super BC (aka the “Automatic S”) was the final model in a series of Zeiss Ikon-branded leaf-shutter SLRs. The Super BC’s claim to fame over prior Contaflex models was the addition of a battery-powered TTL light meter that could provide shutter-priority autoexposure. Like most Zeiss Ikon products produced at its height, the Super BC exudes exceptional build quality, impressive attention to detail, and typical West German over-engineering. Despite the fact that the Contaflex line offered only a limited number of lenses, a working Super BC is a joy to use even today.
By the close of the 1960s, Zeiss Ikon was producing under its own name three (arguably four) separate 35mm SLR camera lines: the “Contarex,” the “Contaflex,” and the “Icarex.” The Contarex was the top of the line, with a focal plane shutter and a wide range of extraordinary Zeiss-designed lenses. The Contaflex was a series of leaf-shutter SLRs first introduced in 1953. The Contaflex “Alpha / Beta / Prima” series were lower cost models that used a different shutter and its own lenses. The Icarex was a third line with focal-plane shutters and Voigtlander-designed lenses that came either in a proprietary bayonet mount or in M42. At the same time, Voigtlander was producing under its name the leaf-shutter “Bessamatics” and “Ultramatics.”
During the early 1970s, Zeiss Ikon abandoned all of these projects. In 1972, Zeiss sold the Voigtlander brand to Rollei, which continued the Icarex/SL706 line with the “Voigtlander VSL” and then the “Rollei SL” series of cameras. During 1973, Zeiss Ikon contracted with Yashica to produce a new SLR system (“Contax”) that would go on to repurpose many of the former Contarex lens designs. The Contaflex was left to die on the vine.
Leaf-shutter SLRs were fairly popular during the 1950s and early 1960s before the perfection of reliable focal-plane shutter cameras like the Nikon F. While leaf-shutter cameras have the arguable advantages of less “shutter shake,” the ability to flash sync at all shutter speeds, a relatively simple and common shutter that theoretically could be widely serviced, and more compact lens designs, they ultimately did not prevail in the 35mm marketplace (but certainly continued on in the medium and large format worlds).
The principal leaf-shutter, interchangeable-lens SLR camera systems of the era were the Zeiss Ikon Contaflex, the Voigtlander Bessamatic/Ultramatic, the Kodak Retina Reflex, and the Topcon Unirex. Other manufacturers like Kowa (SE/SE-T) and Minolta (ER) had their own models, neither of which had true interchangeable lenses (using screw-on accessories instead) nor were broadly successful. Here are some comparisons of the ultimate leaf-shutter models from the major manufacturers.
Super BC
Ultramatic CS
Bessamatic CS
Retina Reflex IV
Unirex
Years Produced
1965-71
1965-69
1967-69
1964-67
1969-73
Mount
Proprietary
DKL
DKL
DKL*
Proprietary
Autoexposure?
Shutter Priority
Shutter Priority
No
No
Shutter Priority
Metering
Internal CdS
Internal CdS
Internal CdS
External Selenium
Internal CdS (Center & Spot)
Shutter Speeds
1 sec. – 1/500
1 sec. – 1/500
1 sec. -1/500
1 sec. – 1/500
1 sec. – 1/500
Shutter
Synchro-Compur
Synchro-Compur
Synchro-Compur
Synchro-Compur
Seikosha SVL
Screen
Split & Microprism Collar
Split
Split
Split
Microprism
Viewfinder
Aperture & Shutter Speed
Aperture, Shutter Speed, Exposure Mode
Aperture & Shutter Speed
Aperture & Shutter Speed
Aperture
Auto Mirror Return?
No
No
No
No
Yes
Battery
PX625
PX625
PX625
None
PX625
* Although Voigtlander and Kodak models use a similar type “DKL” mount, the lenses are not interchangeable.
Operation
Reflecting its early 1950s design philosophy, the Contaflex is a somewhat complicated beast compared to later focal-plane SLRs. To load the film, the back of the body must first be unlocked and removed via keys on the bottom. The film speed is set by setting an arrow on a dial on the topside rewind crank. The film counter must be manually set with each roll and counts down, rather than up.
For the time, the most innovative feature of the Super BC was its internal TTL CdS light metering system to drive its shutter-priority autoexposure operation. During 1965, several other manufacturers introduced this feature on leaf-shutter cameras, notably the Kowa SE-T and the Voigtlander Ultramatic CS. By setting the ring on the lens mount to line up with an arrow, the camera will automatically set the appropriate aperture given the selected shutter speed. The camera-selected aperture will display both in the viewfinder and in a little window on the top of the camera body. If the meter reads underexposure, the body will default to the largest aperture when the shot is taken. Because there is no “exposure lock,” and to avoid possible over under-exposure, the Super BC has neat, unique feature where by moving and holding a ring to a cloud symbol (with the number “2” on it), the camera will add stops of exposure to the metered reading.
The focusing screen of the Super BC is decently bright with the standard 50mm f/2.8 lens, certainly not to any professional level, and includes a split-screen, a microprism collar, and the ground glass. The viewfinder displays the aperture range on the right side with a needle. In dark conditions, the aperture scale appears barely illuminated in the viewfinder and it is usually impossible to see the selected shutter speed. The Super BC also has a small window on the left-side top of the camera that displays the metered aperture.
Other the older-style interfaces, the Super BC operates pretty smoothly. The mirror does not automatically return upon firing the shutter and only mechanically returns when the film lever is advanced. The film advance is both dampened and has fairly long throw. Oddly, the leaf shutter is not particularly quiet as one would expect.
The Super BC uses the long-discontinued 1.35V PX625/PX13 mercury battery. To remedy his, both Wein cells and step-down voltage adapters available. I have found that the MR-9 adapter (that uses a 386 silver oxide battery) seems to work fine. It is important that when not in use to switch the meter off switching the aperture dial from the arrow. Otherwise, the meter may continuously operate.
The Contaflex uses a series of interchangeable lenses that share a common two group, three element optical configuration inside the lens mount itself. Unlike the relatively wide range of lenses available in the DKL mounts, the Contaflex has a rather limited selection: a 35mm, 45mm f/2.8 (older), 50mm f/2.8 (newer), 85mm, 115mm, and some accessory close-up lenses, including a 1:1 macro. The 35mm and 85mm came in two versions, an earlier f/4 and later f/3.2.
Here are the specifications for lenses for the system.
35mm f/4 (f/3.2)
50mm f/2.8
85mm f/4 (f/3.2)
115mm f/4
Design
8 Elements, 6 Groups
4 Elements, 3 Groups
8 Elements, 6 Groups
9 Elements, 6 Groups
Min. Focus
0.4m
0.7m
1.7m
3.0m
Filter Size
S49mm (f/4); S60 (f/3.2)
S27 or 28.5mm Push On
S60
S67
It remains very impressive that Zeiss could design a number of quality lenses in different focal lengths around a fixed 3 rear element set. Having used the 50mm and 35mm f/3.2, both lenses perform extremely well, probably nearly as good as you are going to get for that era of manual-focus SLR lenses. The 35mm has an exceptional close focus ability down to 0.4m. For a proper Contaflex set, both the 50mm and 35mm are recommended. Although some like the 85mm, the consensus seems to be that the 115mm may not be worth it.
A drawback to the system is that Contaflex lenses do not take standard screw-in filters or lens hoods. A step up ring exists that allows the use of S60 filters on the 35mm f/4. Another drawback is that modern flashes using hot shoe adapters tend to fail to trigger the X-sync on the camera. It is likely that Contaflexes are among the types of cameras that require higher trigger voltages (or at least direct PC connections from the flash). The final weak point to its operation is the crammed placement of the focusing, aperture, and shutter speed dials on the relatively thin lens mount. The focusing knob can be difficult to find with your fingers when the camera is at your eye.
Given the large universe of alternatives, Contaflexes are probably not recommended for beginners. That being said, the best models to look for are the metered Super or the Super BC. Given the facts that both remain relatively affordable and autoexposure can make your life generally easier when you need it, there is nothing particularly desirable about either the non-metered or non-coupled earlier Contaflex bodies. For what it’s worth, the Super apparently has a noticeably brighter viewfinder than the Super BC because of the lack of a TTL prism metering system.
If you are looking for the best camera in this class and from this time period, that award may arguably go to the Voigtlander Ultramatic CS. The CS matches every feature of the Super BC with the further advantages of: (1) twelve compatible lenses in the 35-350mm range, including an early zoom ; (2) a traditional swing-back film door; (3) a regular film counter that is reset automatically; and (4) an allegedly brighter focusing screen. While I do not think that the design and build of the CS is as elegant as the Super BC, that may not matter to you. If looking for a more “modern SLR style” leaf shutter camera with autoexposure, the Topcon Unirex is another option.
Introduced in 1966, the East German Pentacon Six is an SLR-style 6×6, interchangeable-lens medium format camera. With its essential architecture dating back to 1956, the P6 operates essentially as a “grown-up” version of a Praktina 35mm SLR from the same era. While arguably not what we would consider today as a “professional” system, lacking the expected range of accessories, the P6 was a successful product with many working examples floating around the world today. Being a fairly cheap camera with a good selection of 1950s-1990s German and Ukrainian lenses, is the P6 a good option for the world of 6×6 photography? For sure.
As with many other famous East German camera products, the concept of a single-lens reflex, interchangeable-lens 6×6 camera finds its origin before WWII. In 1935, a Dresden-based company named “Korelle-Werk” produced the “Reflex-Korelle,” perhaps the first 6×6 reflex-view cameras. After the war, the 1950 “Meister-Korelle” (called the “Master Reflex” in the USA) featured interchangeable lenses, a focal plane shutter, shutter speeds from 1-1/1000. The Meister-Korelle was discontinued in 1952.
Introduced at Photokina in 1956 and then to market in 1957, the “Praktisix” was a further evolution of the Meister-Korelle concept and formed the essential basis of the later P6. Produced by Kamera-Werkstatten in Dresden, perhaps most famous for its “Praktina” line of 35mm SLRs, the Praktisix was well-regarded, being produced until it was replaced by the P6. It does not appear that the Praktisix was exported in any meaningful quantity to North America until about 1962. In America, the Praktisix was fairly cheap, being advertised during 1962-63 for around $150 with its standard waist-level finder and an 80mm f/2.8 Carl Zeiss Jena lens.
During 1964, the East German camera industry consolidated further, forming the company “VEB Pentacon.” After this consolidation, Pentacon made a few tweaks to the Praktisix and introduced the “Pentacon Six ” in 1966. The notable upgrades over the last version of the Praktisix included improvement to the film transport system, the ability to use 220 film, and an automatic film counter reset. In 1968, Pentacon introduced the P6 “TL,” which coincided with the introduction of an uncoupled metered prism. It appears that the P6 with its Carl Zeiss Jena 80mm f/2.8 Biometar hit the North American market in 1968. Advertised during the early 1970s with a standard lens and case often for around $199 or less, the P6 was certainly one of the cheapest 6×6 interchangeable-lens medium format systems on the market. The P6 was also sold under the name “Haminex Praktica 66.” It is not clear how long the P6 was sold “new” in North America, but advertisements for new copies seem to have stopped around 1972. For whatever reason, at some point during the early 1970s, further new East German camera products seem to have largely disappeared from the American market.
The P6 eventually spawned three spinoffs. In 1971, Arsenal (Ukraine) introduced the “Kiev 6C,” a 6×6 camera with similar proportions, capabilities, and the same lens mount. This model was followed in 1984 by an improved, yet often-unreliable “Kiev 60.” Until very recently, a Ukrainian company called “Arax Foto” offered rebuilt and upgraded Kiev 60s and a company called Hartblei still does. The final spinoff was the “Exakta 66,” a somewhat-unreliable higher-tech 1986 West German version of the P6 that offered a number of very high quality lenses made by Schneider Kreuznach. A wonderful site to peruse regarding all things P6 is here.
Building a Pentacon Six TL
The first thing you may want to do with a P6 is build it to your preferences. Needless to say, to get the most out of the system, a stock P6 may need a little work.
Finders/Prisms
Pentacon offered three main options for finders/prisms for the P6: (1) a waist-level viewfinder; (2) a nonmetered prism; and (3) a metered prism. With the once-available aftermarket metal adapters now unavailable, the P6 could also easily use finders/prisms made for the Kiev 60 system. As of 2023, unless you can find one of the older adapters second-hand, your best bet will be to 3D print your own, like this one.
The first fork in the road is whether you prefer using the P6 like a TLR (looking down) or an SLR (a level view). Remember that the waist-level finder will present the image reversed horizontally. If taking the TLR approach, the standard waist-level finder should be fine. If you are seeking a better option, the waist-level finder for the Kiev 60 is better (with an adapter).
For prism finders, there is no question that an adapted Kiev 60 TTL metered prism is the best option. It is not only brighter than both P6 prisms but has greater coverage of the focusing screen. With an appropriate battery stack adapter, the Kiev 60 prism can be powered by three common SR44 batteries. Aftermarket focusing screens tend to throw the Kiev’s metering off, so you may have to set the maximum aperture on the prism to some point on the dial below “1.4” to get correct readings. By contrast, the native P6 prisms are a little dark and do not have full viewfinder overage. The P6 TTL prism also uses discontinued 1.35V mercury batteries, and does not cover the entirety of the focusing screen. While high-quality metal plug-and-play Kiev-to-P6 prism adapters formerly existed, they are now discontinued. Someone really should consider licensing the design from Baier Fototechnik and start making them again. Otherwise, 3-D printing is the only option for now.
Focusing Screens
After choosing a preferred viewfinder/prism, the next step is whether you want to upgrade the stock focusing screen. Despite some reports, the stock, ground-glass, focusing screen is bright enough when using a f/2.8 lens in daylight conditions. However, it is not so nice in lower light or with slower lenses.
With the original P6 screens being a little difficult to find these days. there are a few relatively-inexpensive aftermarket options, including those with a traditional SLR-style split-screen focusing aid and/or microprism collar. Current options include: (1) a screen made for the P6 by Arsenal in the Ukraine; and (2) screens made in China found on eBay. The Arsenal and Chinese screens are made out of optical plastic, rather than glass. Replacing the screen will make using the P6 far more pleasant.
It must be noted that the modern aftermarket replacement screens are far, far thinner than the original curved / thick Pentacon screens. So thin, in fact, that you cannot really re-use the original retaining wire (which were “bent” to conform to the curved shape of the OG P6 screens) and the clips are not deep enough to even anchor the retaining wire even if you could make it work. Fortunately, an aftermarket thin screen can normally work just by “sitting” in place without additional securing. Just make sure after you install an aftermarket screen that the camera is focusing perfectly at infinity.
PleaseExcuse the Tape Over the Stop Down Lever!
Standard Lens
If new to the system, it is probably a good idea to start off with a lens in the 80mm-90mm focal length, which translates to about 45mm-55mm in the 35mm format. Most of the standard lenses are fairly easy to find and affordable. These are the most common ones.
Carl Zeiss Jena 80mm f/2.8 Biometar: The Biometar was the standard lens offered with P6 models. These come in two flavors: a single-coated “zebra” edition and a later multicoated version. If your P6 came with one of these, you are all set. However, priced apart from a P6 body, standalone Biometars, especially the later multicoated versions, are getting a little spendy.
Vega-12B 90mm f/2.8: The Vega-12B was the standard lens for the Kiev 6 and Salyut-S 6×6 cameras, made at the Arsenal plant until the early 1980s. A single-coated optic, the 90mm focal length is arguably a bit better for portrait photography. Some folks prefer the rendering of the Vega to the Biometar.
Volna-3 80mm f/2.8: The Volna-3 replaced the Vega-12B as the standard lens for Kiev 60 cameras. The Volna-3 can also be found with “Arsat” branding. Where the earlier versions were single-coated optics, the later examples were multicoated. A somewhat frustrating design flaw with the Volna-3 is that the aperture stop-down lever on the side of the lens often creates a light leak at its minimum focusing distances. You could just put some black electrical tape over the lever. Unlike the P6, taping over the stop down lever is not such a big deal for the Kiev 60 because it has an independent DOF preview lever on the body.
Arax 80mm f/2.8: This Arax Foto product is the same lens as the the Volna-3, but checked, cleaned, and upgraded. Currently, you can order these any day from Arax’s site with either a metal or rubber focusing ring. If you are looking for a standard lens, want a lens that someone has already looked over, and do not want the hassle of attempting to find a good one second-hand, I would suggest going this route. It does have the same “light leak through the stop-down lever” as the Volna-3.
The design of the Biometar is derived from the old Xenotar template. The Vega-12B shares a similar design to the Biometar. The Volna-3 resembles neither and is a more traditional “50mm SLR” lens design. What is better about the Ukrainian lenses is that they focus much more closely than the Biometar. With either the Vega-12 or Volna-3, remember that they were also produced for the Kiev 88 cameras, whose lenses are not compatible with the P6. These lenses are supposed to be distinguished by letter, with “B” meaning P6 mount and “V” meaning Kiev 88 mount. Watch out as some internet sellers sometimes confuse the two.
Here are the specs of the three primary lenses compared.
Lens
Biometar 80mm f/2.8
Vega-12B 90mm f/2.8
Volna-3 80mm f/2.8
Manufacturer
Carl Zeiss Jena
Arsenal
Arsenal
Year Introduced
@ 1956 (SC); @ mid-1970s (MC)
@ 1971
@ 1984
Design
5 Elements, 4 Groups
5 Elements, 4 Groups
6 Elements, 5 Groups
Min. Focus
1.00m
0.6m
0.6m
Weight
260g
480g
420g
Coating
Multicoated
Single
Multicoated
Filter Size
58mm
58mm
62mm
Aperture Blades
8
6
6
There are also the older 1950s CZJ 80mm f/2.8 Tessar (one of the standard lenses for the earlier Praktisix) and a high-performing / expensive Schneider Kreuznach 80mm f/2.8 (produced for the later Exakta 66). If you are into something slightly wider, there are the 1960s CZJ 65mm f/2.8 Flektogon (quite rare today in decent condition), the 1970s Arsenal Mir-3B 65mm f/3.5 (reportedly an excellent, but hefty, optic), or the 1980s multicoated Arsenal Mir-38B 65mm f/3.5 (opinions vary). Whatever is clever.
Functionality
The P6 operates more or less like an 1950s SLR. There are really only two major and two minor shortcomings with the system that may or may not matter to you.
The first major issue is that there is no depth-of-field preview lever as CZJ lenses made for the system had DOF levers built-in. The second major issue there is no native mirror lock-up function, which prevents using lower shutter speeds to prevent shake.
The first minor issue (that is endemic to medium format focal plane shutter cameras), is that the X flash sync is a paltry 1/25, which effectively prevents reliable handheld electronic flash shots. The second minor issue is that there is no accessory shoe on the camera. Pentacon only offered an add-on accessory shoe that fit on its prism viewfinders.
Open Aperture Focusing: The P6 holds the aperture wide open for the purposes of framing and focusing. This is accomplished by a pin of the lens interacting with the camera body. With f/2.8 lenses and waist-level finder, the stock groundglass focusing screen is bright enough for everyday use. However, upgrading to a brighter screen that has some kind of focusing aid will make your life easier.
Focal Plane Shutter: The P6’s focal plane shutter has two separate curtains. The shutter and mirror flip noise is not as loud as you think it would be and sounds quite elegant. Advancing the film resets the mirror position and cocks the shutter for the next shot.
Weight: Although the P6 can be appear to be quite large, its stock set-up (waist level finder + 80mm lens) does not feel heavy or particularly bulky. Indeed, CZJ seems to have prioritized making its 50/65/80/120 line-up as light as possible. It is only when bolting on prisms and using the heavier and physically larger Ukrainian lenses that a P6 begins to weigh you down a bit.
Shutter Speeds: The shutter speed dial has discrete clicked positions for each speed from B to 1/1000. The speeds can be set whether the shutter is cocked or not.
120/220 Film: An upgrade over the Praktisix, the P6 can use both 120 and 220 films. No special operation is required other than releasing a lock that permits the film advance to go past 12 frames.
Loading the Film: A much discussed topic is the P6’s inability to tolerate sloppy film loading. For those familiar with medium format systems, this issue is not necessarily unique to the P6. When loading the film, make sure that the film is tight as possible as it advances (it may take more than one try to accomplish this). Also, be sure when advancing the film / cocking the shutter to ease the lever back rather than letting it “snap back.” Even if you are careful with loading and advancing, irregular frame spacing can occur. However, as long as the frames do not actually overlap or touch each other, it will be fine.
Standard Cable Release: The P6 uses a standard screw-in cable release, very useful for using the camera on a tripod or with a handle.
Camera Strap: Like many cameras, the P6’s case doubled as its camera strap. If you do not have a case or do not trust your case, special metal clips are available for purchase that attach to two points on either side of a lens, allowing the use of pretty much any standard strap.
Accessories
Besides the eye-level prisms and focusing screens, the P6 had a limited range of accessories. Of note, these included dedicated bellows, an angle finder, a “chimney” finder, an accessory tripod mount, a focusing magnifier, and extension tubes. Unless you are using the P6 for close-up / macro work, none of these accessories are essential or even exciting.
Conclusions
Despite several shortcomings, the P6 remains a worthwhile 6×6 camera system. With current market demand focusing on 6×7 systems, popular models for that format have been skyrocketing in price. While the 6×6 format is not the “traditional” rectangular perspective, it is still a large negative that can tolerate some cropping to any aspect ratio. As compared with TLRs, a focal plane 6×6 camera trades compactness for versatility. The P6 is also not that heavy and not a backbreaker to haul around all day. In my opinion, the P6 is easier and more intuitive to use with a prism finder, thus as an “SLR” rather than a “TLR.” Perhaps the most redeeming part of the system is that there are three entirely separate lens lines from which to choose, not including the Arax and Hartblei tilt/shift lenses. With the CZJ line, there is a range of relatively affordable lenses ranging from 50-500mm. With the Arsenal lenses, there is an inexpensive range from 30-500mm. Finally, for big spenders, the Schneider Kreuznach lenses made for the Exakta 66 represent professional, perhaps Hasselbad-level, products in the 55-250mm range along with several zooms.
Buying a P6 can be a little daunting as it is necessary to find one that has been recently serviced. These days, most examples for sale seem to reside east of the Elbe or south of the Danube. Find reputable sellers and ask questions about its service history.
Regarding alternatives, you probably cannot go wrong with the bigger and heavier Kiev 60. However, finding a reliable Kiev 60 can be difficult. With Arax Foto apparently no longer refurbishing / rebuilding those cameras, you still can find a nice an inexpensive kit at Hartblei. Despite its heavier weight and lower quality all around, the Kiev 60 does have a native TTL prism and a DOF preview lever. Although much pricier, the Exakta 66 may seem like a decent option, but apparently also have serious reliability and parts-availability issues and only the “Mod III” is the one you want.
Announced in 1966, but not introduced to market until some time in 1967, the Konica Auto SE Electronic is a relatively-obscure, fixed-lens, spring-loaded auto-advance, program-mode-only 35mm rangefinder camera sandwiched between the well-known Auto S2 and followed in 1969 by the similarly-program-only Electron. The Auto SE was the first implementation of Konica’s four-group, six-element 38mm f/1.8 Hexanon lens, the second and final occasion being on the 1973-77 Auto S3. Not only can the Auto SE focus down to 0.6m, quite a feat, it also was one of the very few production 35mm rangefinder cameras that incorporated a wind-up, spring-loaded automatic film advance.
My working theory is that the Auto SE was part of a collaboration with Seiko, the famous clock and watch maker. The SE contains a Seiko-branded shutter, uses an odd-sized battery that is normally used in clocks, employs a spring-loaded advance very similar to wind up clocks, and lacks any of the viewfinder information normally found in the contemporary Auto S/S2 series of cameras.
The Auto SE was not cheap and cost about $100-130 in late 1960s dollars (like @ $800 today). Although it is not known exactly how long the Auto SE was produced, it was still being advertised for sale at least as late as 1970. Other than an exterior design resemblance, the Auto SE shares little in common with Auto S2. Being lucky enough to find one that “works,” let’s take a closer look at this yunikōn.
Specifications
Lens
38mm f/1.8 Hexanon
Shutter
Seiko ES
Parallax Correction
Yes
Viewfinder Magnification
0.59x
EffectiveRangefinder Baselength
24.8mm
Shutter Speed Range
1/15 – 1/500
Aperture
f/1.8 – f/16
X Sync
1/30
Minimum Focus
0.6m
Meter
TTL CdS
Battery
PX1 / MR50 1.35V
ASA Range
25-400
Filter Size
49mm
Weight
750g
Operation
Program Mode Autoexposure: The Auto SE operates in program mode only. Because the manual does not illuminate the preferences of the programming, all we know is that the camera will automatically set a shutter speed and aperture for a particular shot. The Auto SE will most likely default down to 1/30 at f/1.8 in insufficient lighting. The CdS cell on top of the lens should automatically compensate for any colored / neutral density filters. The shutter itself makes little noise, but the auto advance sure does.
The Lens: Perhaps the primary draw to the Auto SE for most camera enthusiasts would be Konica’s first implementation of its 38mm f/1.8 Hexanon lens. Although no official design schematic seems to exist for the Auto SE (or the Auto S3), we know that the Auto SE version is a single-coated, mostly symmetrical 1-2-2-1 double-gauss design. It is entirely possible that the 38mm is simply a modified version of the 45mm f/1.8 from the Auto S2. However, in an era where nearly all fixed-lens rangefinders cameras sported lenses in the 45-50mm focal length, a 38mm lens is much more versatile. More importantly, the lens itself could focus down to 0.6m, one of the only cameras in its class that could do so. While the Auto S3’s 1973 version of the 38mm was multicoated, it could only focus down to 0.9m. The Auto SE has a relatively short focus throw like the Auto S3.
Viewfinder/Rangefinder: The viewfinder is pleasant, is fairly demagnified, is automatically parallax-corrected, and has yellow projected framelines. It has the same blueish tint as the Auto S3 and is not super flare resistant. There is no exposure information in the viewfinder. The only light that appears is a very odd yellow “star” at the bottom as an underexposure warning / battery check. Although my example may have an unknown level of normal degradation, the square rangefinder patch is visible but of course will get somewhat washed out in direct light.
Battery Check: On the back of the camera is a “battery check” button. Pressing it will illuminate the same bizarre yellow star in the viewfinder that serves as the underexposure warning.
Lens Hood: Like other 1960s Konica rangefinder models, the Auto SE has a built-in, slide-out lens hood. The Auto SE also has a removable plastic filter holder that screws into the front of the lens, Because the lens hood does not have much travel, it will barely get past a 49mm filter. Any hood that exceeds the diameter of the lens itself will tend to block the rangefinder. Like the Auto S3, the screw-in hood from the Minolta 7sII or the hood from the early 1960s Konica Auto S will work, but good luck finding either.
Spring-Loaded Film Advance: The coolest design feature of the Auto SE is certainly the bottom fold-in key for spring-loading the film advance. The manual states that the system is good for 20 shots on a single full wind. Because the shutter is quiet and the drive is pretty loud, you can snap a photo, keep your finger on the shutter, and then walk away. The film release and rewind crank is also on the bottom of the camera.
Film Loading & Unloading: The Auto SE will not operate without film loaded and will not even fire the shutter. It is not quite clear how the camera knows there is no film loaded, but there must be some kind of communication between the winding mechanism and the shutter (perhaps to avoid double exposures?). The Auto SE loads film the opposite way than a traditional camera. Insert the film leader into the take-up and then use the key on the bottom to advance the film. Once you close the back, you fold out turn the key until it automatically switches over from “loading mode” to “winding mode.” Very cool. The film counter is bottom center below the film door. To unload the film, you have to pull out the key and hit the button underneath it, which will release all of the tension on the film advance to permit the rewinding of the film on the tucked-in knob on the opposite side of the base plate.
Self-Timer/Shutter Lock: Another interesting design feature of the Auto SE is the self-timer and shutter lock. The self-timer is activated by moving the switch around the shutter button down and then pressing the shutter activates it. You can also lock the shutter entirely by sliding the switch up.
Metering/Battery: The Auto SE appears to use the same CdS metering system as the Auto S2, which uses a single sensor placed above the lens. The Auto SE takes a single and unusual mercury PX1/MR50 1.35V battery, inserted on the back of the camera to the right of the viewfinder. Because PX1/MR50 batteries are no longer made, the available substitutes include modern 1.5V LR50/A1PX alkaline batteries. There is also a rather pricey MR50-sized step down converter to 1.35V, which I could not get to work at all with the Auto SE. As a side note, MR50s were most commonly used in desk clocks back in the day.
ASA Range: The Auto SE only permits ASA selection from 25 to 400 via a switch on the bottom of the lens.
Hot Shoe/Flash: The Auto SE may have been the first Konica camera product to come equipped with a hot shoe for a flash. For flash exposure, the Auto SE uses a “guide number” system, which essentially means that given the flash’s rated power in manual mode, the camera will automatically adjust the shutter speed and aperture automatically to account for both the focusing distance and available ambient light. After mounting an electronic flash, you have to turn the lens dial to the appropriate guide number on the lens and then take the photo. For instance, if you mount a flash with a guide number of 14 (GNs are usually for 100 ASA), put the flash on full power (not “auto mode”) and then turn the lens dial to “14.” While the Auto SE will default the X-sync flash speed to 1/30, the camera will set the appropriate aperture given the focused distance to the subject. The Auto S3’s concept is the same, but works a little differently. The Auto S2 had a more conventional flash system where with an electronic flash’s auto mode, you manually selected a shutter speed of 1/60 or below and the appropriate aperture.
Shutter: The Auto SE appears to be the only Konica fixed-lens rangefinder camera of the 1960s to use a Seikosha electronic shutter. Of course, Seikosha had supplied a variety of leaf shutters for Konica’s 1950s products, including the III series as well as many of the medium format folding Pearls. The only other popular 35mm rangefinder at the time to use the Seikosha ES shutter was the 1965 Canon QL19.
Construction/Size: Small and light may not be suitable adjectives for the Auto SE. What is striking about the Auto SE is how well it is made, sturdy, well-finished, and functional (but minimal) design. Regarding both design and ergonomics, the Auto SE is real winner.
Versus Contemporary Competitors
There is no other fixed-lens rangefinder camera that has the same combination of features as the Auto SE. While the SE may not have been “first-to-market” with many of its features, it remains unique in combining them. Although a spring-loaded drive could be found on the contemporary scale-focused half-frame Fuijca Drive and Canon Dial cameras as well as full-frame cameras like the Kodak Motormatic, the “Robot Royal,” and the obscure Soviet “Leningrad” rangefinder cameras, none were quite as advanced or shared a similar combination of features as the Auto SE. By 1966, a coupled fixed-lens rangefinder camera wider than 40mm could be found on a variety of cameras produced during the late 1950s and early 1960s, like the Ricoh Wide (35mm f/2.4) and Kowa Wide F (35mm f/2.8) but none had a built-in CdS meter or were as fast at f/1.8. During the 1960s, only a small handful of fixed-lens rangefinder models could focus down to 0.7m (the Auto S2 could only focus down to 0.9m), like the 1967 Fujica Compact Deluxe and the 1969 “New” Canon QL17. However, the “New” QL17 is not a good comparison because it was arguably part of the next generation of compacts. The 1965 QL19 would have been the comparable Canon product to the Auto SE.
Because there was no obvious direct “competitor” to the Auto SE, I would imagine the combination of the close-focusing wider lens, rangefinder coupling, and the “point-and-shoot” CdS autoexposure system would have been the main draws. By 1969, the next generation of camera products were starting hit the market that would have dethroned the Auto SE from any technological advantages it may have briefly enjoyed.
Versus Other Konica Rangefinders
Auto S2
Auto SE
Auto 1.6
Electron
Auto S3
Year
1965
1966
1967
1969
1973
Lens
45mm f/1.8
38mm f/1.8
45mm f/1.6
45mm f/1.8
38mm f/1.8
Min. Focus
0.9m
0.6m
1.00m
0.9m
0.9m
Shutter Speed Range
B – 1/500
1/15 – 1/500
B – 1/500
?
B – 1/500
Exposure
Shutter / Manual
Program
Shutter / Manual
Aperture
Shutter
Weight
750g
750g
783g
?
410g
Film Advance
Lever
Spring
Lever
Lever
Lever
Filter Thread
55mm
49mm
55mm?
?
49mm
Metering
CdS
CdS
CdS
Dual CdS
CdS
Parallax Correction
Yes
Yes
Yes
Yes
Etched
ASA Range
25-400
25-400
25-400
25-400
25-800
Shutter
Copal SVA
Seiko SE
Copal SVA
Copal
Copal Leaf
X Sync Speed
All
1/30
All
?
All
Hot Shoe
No
Yes
Yes
No
Yes
VF Magnification
0.65x
0.59x
0.65x?
?
0.55x
Original Battery
PX625
PX1 / MR50
PX625
PX32
PX675
Some Maintenance Tips
Adjusting Horizontal RF Alignment: Like many other 1960s Konica rangefinders, the horizontal rangefinder adjustment is a pretty “easy” task. On the plastic viewfinder piece on the back of the camera, you will see a small plastic screw cover with two tiny holes. With a pair of sharp-pointed tweezers, rotate that screw CCW and take it out. You will then expose a hole that will lead to the horizontal adjustment. Although you will not be able to see what you are doing, stick a small flathead screwdriver into the hole, find the groove in the screw, and turn it appropriately until the rangefinder is aligned.
Cleaning the Viewfinder: This is fairly straightforward. The top plate is held on by six screws — three tiny screws on the shutter lever and three around the top plate. Loosen but DO NOT REMOVE the three tiny screws on the shutter lever until you can lift the lever itself straight off. Then go onto the easier screws around the body. Be careful with the soldered wires to the top plate because those are very easy to break. The viewfinder windows are then very easy to get to.
Conclusion
While the iconic Auto S2 was and remains Konica’s premiere fixed-lens 1960s rangefinder, the more obscure Auto SE incorporates a variety of features that sets it apart. Despite having almost no ability to override its automatic exposure system, the Auto SE’s close-focusing wider lens, its automatic mechanical film advance, and its relatively-advanced flash system more than make up for it. The Auto SE makes an interesting case as a competitor to the Auto S3. Although both share the same lens, the Auto SE focuses significantly closer, has a larger viewfinder, has an automatic film advance, and does not constantly drain the battery by running the meter whenever the lens cap is removed. The Auto S3 on the other hand is smaller/lighter, has shutter-priority exposure control, and has an exposure lock. If you can live with program-only autoexposure, the Auto SE is a real winner in the 1960s fixed-lens rangefinder category in every other respect.
Manual
Because the Auto SE manual is not otherwise online anywhere, here it is for your reference.
The 1973 Konica Auto S3 is an advanced compact fixed-lens rangefinder camera whose primary selling point is its exceptional 38mm f/1.8 lens. The Auto S3 descends from two prior Konica rangefinder products, combining the 38mm Hexanon lens from the 1966 Auto SE and the general design and ergonomics of the 1968 C35. With a good, but not perfect, combination of features, the Auto S3 still remains one of the iconic pocketable fixed-lens rangefinder cameras.
During the 1950s, Konica produced a series of high-quality fixed-lens rangefinders in the form of the I, II, and III series. With the market demanding cameras with coupled light meters, starting in 1959, Konica produced a series of excellent fixed-lens rangefinder cameras, which ultimately culminated in the 1973 Auto S3. Here is a brief recap.
Konica S Series (1959-63): Starting in 1959, Konica introduced the first of three cameras in the “S” series, which combined a sharp and rangefinder-coupled lens, a coupled selenium light meter (match needle), a Copal SV shutter (max 1/500 shutter speed), and a parallax-corrected viewfinder. The primary differences between Models 1, 2, and 3 were the lenses. The S came with a 45mm f/2.8 lens, the S-II with a 48mm f/2 lens, and the rare S-III with a 47mm f/1.9 lens. The independent aperture and shutter speed controls were placed on the lens itself.
Konica Auto S Series (1963-66): During 1963, Konica introduced the next generation of its fixed-lens rangefinder camera in its Auto S camera. Using the same 47mm f/1.9 lens from the contemporary Konica S III, the Auto S added an off-lens coupled CdS metering system powered by a single PX625 1.3V battery, a Copal SVA shutter, a dual range exposure system that permitted an “auto mode” for shutter speed priority operation or match needle operation for aperture priority, a parallax-corrected viewfinder, and a pull out lens hood. It was a superb (and expensive) camera for the time. In 1965, Konica released a major update to the platform in the form of the Auto S2 with a the 45mm f/1.8 lens. The major difference from the Auto S was the relocation of the CdS meter cell to inside the ring of the lens (allowing for automatic exposure compensation when using filters).
Side-by-side with the production of the Auto S2, Konica announced the Auto SE Electronic in 1966. The Auto SE featured a brand new, wider 38mm f/1.8 lens, a wind-up auto film advance mechanism, and automatically parallax-corrected viewfinder. The Auto SE was a “program-only” camera, whose only exposure input was the film speed, with the camera doing the rest.
Konica C35 (1968): In 1968, Konica introduced its perhaps most iconic rangefinder camera. The C35 was a major departure from the Auto S series line. The C35 had a coupled rangefinder, a four-element 38mm f/2.8 lens and a Copal B shutter. The C35 was a completely automatic camera, with no manual override for either shutter or aperture settings. The CdS meter transmitted both the shutter speed and aperture settings to the viewfinder. The auto shutter operated from 1/30 to 1/650. The camera also introduced a neat automatic flash system that set that automatically set the shutter speed to 1/25. Konica sold a ton of these cameras. The C35 lived on through the 1970s in various configurations, using the same 38mm f/2.8 lens.
Konica Auto S3
The Auto S3 combines the general ergonomics of the C35 with its excellent 38mm f/1.8 lens from the Auto SE. Other than the lens, the Auto S3’s highlights included shutter speed priority autoexposure, an exposure lock capability, and a further implementation of the guide number flash system that synced at all shutter speeds. Although the production of the Auto S3 ceased around 1977, Minolta and Vivitar introduced very similar products immediately thereafter: the 7sII and the 35ES.
Specifications
Construction
Anodized Aluminum Body
Shutter Speeds
B, 1/8 to 1/500
X-Flash Sync
All Speeds
Aperture Range
f/1.8 to f/16
ASA Range
25-800
Shutter
Copal (Leaf)
Battery
PX675
Filter Thread
49mm
RF Baselength
14.2mm
Minimum Focus
0.9m
1973 Price
$199
Years of Production
1973-77
Operation
38mm Lens: The multicoated, six-element, four-group 38mm f/1.8 lens on the Auto S3 is carried over from the single coated version in the prior Auto SE (which could focus down to 0.6m). The 38mm Hexanon is a fantastic lens with (I am pretty sure) a 1-2-2-1 symmetrical design and. In my opinion, the Hexanon rivals lenses like the similarly-designed 35mm f/2.8 Leica Summaron and the 35mm f/2.5 W-Nikkor. There is a little vignetting wide open but the resolution and color rendition are top-notch for a non-professional lens. I like the Hexanon so much that I had one modified to rangefinder-coupled Leica M mount.
Viewfinder: The Auto S3 has a relatively small but bright viewfinder and displays along the right side the aperture reading that would correspond to the selected shutter speed. There is no automatic parallax correction, only marks in the etched frameline for closer distances. The rangefinder patch is adequate for most situations.
Focusing: The primary shortcomings of the Auto S3 are that body’s capabilities are not commensurate with the lens performance. The combination of having a short effective rangefinder baselength, a short focusing throw, and a minimum focusing of only 0.9m limit the camera’s potential.
Exposure & Exposure Lock: The Auto S3 uses shutter-priority autoexposure. This means that the camera automatically sets the appropriate aperture at the shutter speed selected on the lens. Light metering is achieved via a CdS cell above the lens. A really nice feature on the Auto S3 is an exposure lock that is activated by a half-press of the shutter button.
Film Speed: The ASA 25-800 range was pretty good for 1973. The film speed is selected via a lever at the bottom of the lens.
Guide Number Flash System: Like the Auto SE before it, the S3 has an interesting daylight fill flash feature, that was originally designed for the Konica X-14 and X-20 flashes but will work with any flash that has a manual mode. The way it works is that you place the flash into the hotshoe and then adjust the flash guide number ring to match the flash’s guide number. With the flash attached, a dark bar appears along the aperture readings in the viewfinder. You focus and then meter the scene and then adjust the shutter speed until the aperture lines up with the black bar. Thus, this system takes into account the flash’s maximum power, the distance to the subject, and the ambient light. The Auto S3’s pre-set guide numbers (at ASA 80/125 in meters) are 7, 14, 28, and 56.
Battery: The Auto S3 requires one PX675 battery to operate. The camera will still fire with no batteries, but the aperture will be stuck wide open at f/1.8 and shutter speed at 1/30. Although PX675 mercury batteries of the correct voltage are no longer produced, there are adequate replacements (1) a zinc-air 675 replacement; or (2) an MR44 step down adapter, you can use a cheap 392 silver oxide battery.
Lens Hood: Konica never produced an OEM lens hood for the Auto S3. Almost all aftermarket 49mm lens hoods partially block the viewfinder, with some vented hoods actually also partially blocking the rangefinder as well. Per the helpful comment below, there are several workarounds. The first is the lens hood from the Minolta 7sII, which also has a 49mm filter thread. The second is the original hood from the 1959 Konica S.
Always On Light Meter: The light meter remains always on as long as the lens is uncovered. This is a major design flaw given the fact that either a switch or half-cocking the film advance could act as an “on” switch.
Compared to Contemporary Alternatives
During the 1970s, a variety of manufacturers made similar compact, fixed-lens rangefinders. Here are a few of the more popular ones compared. Aside from a slightly-wider lens and an exposure lock, the Auto S3’s specifications are, on paper, similar to its competitors.
Konica S3
Vivitar 35ES
Olympus 35RD
Yashica 35GX
Minolta 7sII
Year Introduced
1973
1978
1975
1975
1977
Lens
38mm f/1.8
40mm f/1.7
40mm f/1.7
40mm f/1.7
40mm f/1.7
Min. Focus
0.9m
0.9m
0.85m
0.8m
0.9m
Shutter Range
B – 1/500
B – 1/500
B – 1/500
B – 1/500
B – 1/500
Exposure Modes
Shutter
Shutter
Shutter/Manual
Aperture
Shutter/Manual
Weight
410g
465g
490g
580g
460g
Filter Thread
49mm
49mm
49mm
52mm
49mm
Metering
CdS
CdS
CdS
Silicon Diode
CdS
Parallax Correction
Etched
Etched
Etched
Yes
Etched
ASA Range
25-800
25-800
25-800
25-800
25-800
Shutter
Copal
?
Seiko
?
Copal
X-Sync
All
All
All
Proprietary Flash
All
VF Mag.
0.55x
?
0.60x
0.62x
?
RF Baselength
14.2mm
?
?
?
?
Battery
PX675
PX675
PX625
2 x PX640
PX675
Exposure Lock
Yes
No
No
No
Yes
Accessories
The Auto S3 had two main accessories: (1) a two-part case; and (2) a close up lens called the “Auto Up 3.” Because the Auto S3’s lack of close focusing, I have been keeping an eye out for the close up lens but they seem to come up very rarely.
Conclusions
There is no doubt that the Auto S3 is fine camera. Building upon the success of the C35, and incorporating the excellent wider lens from the Auto SE, the Auto S3 makes the case for being one of the better and more versatile consumer fixed-lens rangefinders on the market in 1973. Despite much internet enthusiasm for the Auto S3, it has some downsides that are mostly shared across its class of cameras. The fact that the meter continuously runs without a lens cap and drains the battery is a bummer. The minimum focusing distance of 0.9m limits its versatility. Because other manufacturers followed suit with similar products with similar capabilities, the Auto S3 does not monopolize any particularly useful feature in its class, except for perhaps exposure lock. Unless you are focused on the Auto S3 in particular, any of the other better cameras in its class (listed above) should similarly be considered. I would suggest that: (1) the Minolta 7sII would be considered as the true “successor” of the Auto S3; (2) the Yashica 35GX is more useful for those who prefer aperture-priority operation; and (3) the 1972 Canon QL17 G-III is perhaps the best of the bunch.
Produced from 1973 to 1976, the Leitz Minolta CL was the Japanese domestic market version of the Leica CL 35mm M-Mount camera, identical in all respects except for the nameplates. The CL was produced as a part of a collaboration between Leica in West Germany and Minolta of Japan that also spawned a few M-mount lenses and other products such as some of the earlier Leica R models. A very pricey camera in 1973, the CL (and the later 1980 Minolta CLE) remain the most compact Leica M-mount film bodies produced. Is the CL a viable alternative to a “real” M camera? Or should it just be appreciated for what it is? Let’s take a look.
As the story goes, by the late 1960s, Leica was in trouble. TTL light-metered SLRs were quickly becoming the standard for professionals. In 1971, Leica made a hard departure from the 1966 M4 in the form of the M5, a camera, while interesting and capable, never caught on. Leica’s answer to the Nikon F, the “Leicaflex” system, although advanced and still well-regarded today, never really caught on with the masses. By the early 1970s, West German camera companies generally were falling seriously behind technologically. During 1972, Leica struck up a partnership with Minolta, a collaboration that would lead initially to the Leica CL (manufactured in Japan) and the 1976 Leica R3 (manufactured in Germany). Similarly, Zeiss partnered with Yashica to produce a new generation of high-quality 35mm SLRs and lenses under the “Contax” brand name.
The early 1970s also witnessed an explosion of the automatic compact fixed-lens rangefinder camera. Although the idea of an easy-to-use, lightweight, metered, fixed-lens rangefinder had come of age in the 1960s, this next generation included cameras that were even smaller, lighter, and easier to use. Examples of these included the Canon QL17 G-III, the Yashica 35 Electro, the Konica Auto S3, and the Olympus 35RD. These cameras were extremely popular and relatively affordable.
The Auto S3 and CL
The Leica CL was likewise a small, lightweight camera with a built-in meter with the capability of using most of the world of interchangeable M-mount and M39 lenses. At launch, two brand-new Leica M-mount lenses were offered with CL system: (1) the 40mm f/2 Summicon-C (in Japan, these lenses were rebadged as the “M-Rokkor 40mm f/2”); (2) and the 90mm f/4 Elmar-C. The 40mm Summicron is a fantastic little lens.
Neither the M5 nor the CL ended up being commercial successes. Leica shut down production of the M5 in 1975 and the CL in 1976. The CL may have been a camera in search of a market and was also a terribly expensive camera at the time: listed for around $600 with the 40mm f/2 Summicron in 1973 money (around $4,000 today) but sometimes advertised as low as $400-450 ($2,700-3,000). If shopping for a high-quality compact rangefinder camera in 1973, there were plenty of cheaper options.
The CL remains a forever orphan in the Leica universe. If you are looking for a low-cost entry point into Leica rangefinder photography, is the CL a good choice? If not, is it a good “side” Leica?” I am not sure if either is the case.
Operation
Viewfinder: The CL’s bright, parallax-corrected viewfinder can display framelines for 40mm, 50mm, and 90mm lenses. The 40mm and 50mm framelines are displayed by default, and the 90mm is displayed only when that lens is mounted. In my opinion, the CL’s display of the 40 and 50 framelines at the same time clutters the viewfinder. In my opinion, it would have been preferable to display the 40mm/90mm framelines together and then the 50 by itself or just eliminate the 50mm frameline altogether.
The viewfinder magnification is .6x and its effective rangefinder base length is 18.9mm (compared to an effective baselength of 49.3mm on a modern 0.72x Leica M film body). The CL’s short rangefinder base length decreases focusing accuracy at wide apertures and at close distance. Fortunately, the camera was designed around these limitations, ensuring that the camera will focus correctly at f/2 with the 40mm and f/4 with the 90mm. Overall, other than some frameline clutter, the viewfinder of the CL is pretty good and is perhaps one of its best aspects, displaying the shutter speed that is selected along with the metering needle.
Mechanics: The CL has a par-for-the-course top shutter speed of 1/1000, like all Leica Ms at the time. The shutter speed goes down to 1/2 second and also has a “B” setting. The placement of the shutter speed dial on the front of the camera is rather ingenious , as you can hold the camera as normal and use your finger to adjust the speed. Because the shutter is mechanical, batteries are only required to power the meter. The film speeds from 25 to 1600 ASA are set manually via a dial in the middle of the shutter speed wheel. The flash sync is at 1/60 and below. The minimum focusing capability of the body is a respectable 0.8m, although many standard Leica M lenses of the era could focus down to 0.7m.
Loading Film: It would not be a Leica-designed product if film loading were easy. One must remove the bottom of the camera, lift up the pressure plate, and thread the film through the plastic take-up spool. It took me a few times to get the hang of it. A common failure point in CLs includes the white plastic take-up spool becoming brittle with time and snapping. Rewinding the film is performed by pressing a release button on the bottom of the camera and then using the lever. Unfortunately, you also cannot get to the camera’s battery unless you take the back off.
Metering & Batteries: The CL and and the contemporary Leica M5 both use a CdS metering mechanism. A small arm containing the cell is extended between the rear lens element and the shutter curtain. When activating the shutter, the arm retracts. Correct exposure is accomplished by a match needle: you move the aperture or shutter speed until the needle rests in the middle of the range on the right of the viewfinder. There is no exposure lock. As long as it is on, the camera continuously meters the scene. In lower light situations, the CL meter is not very accurate.
The CL originally used a sole PX625 1.35V mercury battery to power the meter, which is activated by slightly cocking the advance lever. There is a battery check button below the lens mount to the right (if facing the camera). Modern 625 batteries are all 1.5V, which will slightly throw off the meter. There are replacement options out there, including Wein cells and step-down voltage adapters for silver oxide batteries. Unfortunately, the meter is another fail point on the CL. Over the years, the meter’s cell degrade and become less sensitive to light. However, depending on the nature of the issue, an experienced Leica repairperson may be able to revive and/or recalibrate it for you.
Lens Compatibility: As noted above, the CL is not able to utilize the entire universe of Leica lenses. There are three types of lenses that are incompatible with the CL: (1) lenses with excessive physical length and/or width that block the actual rangefinder to prevent viewfinder focusing, which in my personal experience include the pre-aspherical 90mm f/2 Summicron and 21-35 Konica Dual Hexanon); (2) lenses with unusually large rear lens elements that could damage the metering and/or rangefinder mechanism; and (3) certain specialty lenses like the “goggled” 1950s/60s lenses. Other lenses have limited capability due to no guarantee of an accurate focus, which include lenses faster than f/2 or lenses longer than 90mm. That is not to say that you cannot give those lenses a try. The CL really works the best with compact lenses.
Accessories
The CL did not have any significant OEM accessories of note. I would highly recommend using a half-case designed for the CL (widely available on auction sites) for added protection. There are at least a few home-made grips for sale that look pretty cool.
Conclusions
After putting a bunch of film through a CL, I have mixed feelings on it. For its intended purpose, shooting a 40mm lens, it excels. Maybe think of the CL like a miniature Leica M3 for the 40mm focal length. It is also a decent platform for shooting super wides with the help of an external viewfinder. At the same time, it is really no substitute for a true Leica M, which has more framelines, more accurate focusing, and bigger and brighter viewfinders. If you are debating a CL versus any metered M-mount camera, I would go for the M.
If looking for the closest alternative, the 1980 M-mount Minolta CLE does everything a CL does and more. The CLE has aperture-priority autoexposure, uses modern batteries, adds a 28mm frameline, employs standard film loading (swing back door), and has much longer effective baselength for more accurate focusing. The only advantage that the CL has over the CLE is that the former is all-mechanical and the CLE electronics may not be able to be easily repaired if/when they fail. If I were to do it all over again, I would have chosen a CLE over a CL.
CL bodies will run about $350-$600. Paired with the body’s original lens, the Leica Summicron-C 40mm f/2 or the original single coated Minolta Rokkor 40mm f/2, add another $300 to $600. Cameras that are branded “Leitz Minolta CLs” tend to be a little cheaper than “Leica CLs” although they are the exact same camera. If buying from an auction site or a forum, be sure to pay close attention to the functionality of the meter, the alignment of the rangefinder, and the accuracy of the shutter speeds. Fortunately, except for the meter (which may be able to be repaired depending on the problem and your service person), experienced Leica repair people should be able to address many of the mechanical issues that CL may have.
The 1976 Chinon CE-II was one of a series of cameras produced by Cosina and Chinon during the 1970s that implemented an innovative method for achieving a primitive aperture-priority autoexposure with all M42 auto-diaphragm lenses, regardless of manufacturer. No other M42 camera line could do this.
While deploying TTL light metering, the post-1964 third generation of M42 camera bodies used a rather painful method to achieve it. While the camera body could hold the lens’ aperture wide open (for focusing purposes), one had to depress an external button or engage a switch to turn on the light meter. Once the switch or button is activated, the aperture of the lens stops down to the taking aperture (thus darkening the viewfinder), and from that point you can then fiddle with the shutter speeds and aperture until a needle in the viewfinder fell into the right spot. You then deactivate the switch/button, which opens the aperture all the way back up, and then you take the photo with the settings you just determined.
By the early 1970s, many manufacturers’ solution to this two-step process was to develop proprietary M42 lenses with an extra linkage that could permit the lens to “communicate” the selected aperture with the camera body so that no physical “stopping down to meter the scene” was required. Examples of these cameras included the the Praktica LLC (1969), the Olympus FTL (1971), the Fujica ST801 (1972), and the Pentax Spotmatic F (1973). These cameras did not have “autoexposure” and still required the user to fiddle with both the shutter speed and aperture to achieve an appropriate combination.
Cosina (and ultimately Chinon) took a different approach to TTL metering by combining the system shutter button and the stop down switch to achieve a kind of aperture-priority autoexposure. Essentially, after setting the shutter dial to “Auto,” a half-press of the shutter button would stop the lens down so that the camera could meter at the selected aperture (this would darken the viewfinder). Through the viewfinder, the camera would communicate to you what the shutter speed would be at that selected aperture. Once you have the right aperture setting for the shutter speed you want, you press the shutter button all the way down, which nearly-instantaneously stops down the lens and takes the photo. This operation required an electronically-controlled shutter.
The first camera body to use this system was the 1972 Cosina Hi-Lite EC. The other bodies with this autoexposure technology included the Chinon CE (1974), the Chinon CE-II (1976), the Cosina Hi-Lite ECL (1977), and the Chinon CE-3 (1978). Chinon and Cosina also made de-featured versions of these models that retained the shutter-button stop down mechanism, but did not have aperture-priority autoexposure.
The CE-II is typical of mid-1970s “normal” camera bodies: quite large and heavy, but well-built and sturdy. At release in 1976, it retailed for about $250 with a 55mm f/1.7 lens, with the optional 55mm f/1.4 being much more expensive. Besides the autoexposure system, the CE-II’s main claim to fame is having a top shutter speed of 1/2000, which was as fast as SLRs achieved during the era. Like many Cosina and Chinon products, the CE-II was rebadged and slightly modified in various forms for different markets, including the Revueflex 5000 EE, the Revueflex 5005, and the Porst Reflex M-CE.
Specifications
Lens Mount
M42
Shutter Speeds
2 sec. – 1/2000
Viewfinder Coverage
92%
Focusing Screen
Microprism / Ground Glass
Viewfinder Info
Shutter Speeds (Needle)
Shutter
Electronic Metal Vertical
Battery
S28PX / 4SR44 (6V Silver Oxide)
ASA
25-3200
Meter
TTL; Silicon Blue Cells (SBC)
Weight
760g
Self-Timer
Yes
X-Sync Speed
1/90
Battery Check?
Yes
Exposure Lock?
External Switch
Multiple Exposure?
Yes
Motor Drive?
No
Operation
While the CE-II did not have interchangeable focusing screens, motor drives, or a long list of dedicated accessories for specific tasks, it does contains nearly every feature that an advanced-amateur camera could have during the mid-1970s. Let’s run down the highlights of its functionality.
Viewfinder: The CE-II has a viewfinder of fairly average brightness with an average or slightly-below average coverage of 92%. The fixed focusing screen is a standard microprism / ground glass type. The available shutter speeds are displayed on the left side of the viewfinder. In my opinion, the CE-II’s rather ho-hum viewfinder is one of its weaker aspects.
Shooting: As noted above, the CE-II’s aperture-priority operation with all M42 auto-diaphragm and its 1/2000 top shutter speeds are its coolest features. After setting the shutter speed dial to “Auto,” a half-press of the shutter button stops the lens down to the selected aperture and the viewfinder displays the appropriate shutter speed. The exposure lock function is triggered by half-pressing the shutter button and then turning a dial on the body besides the lens. After taking a shot, you then return the dial to its original position.
In metered manual mode, you can select an aperture and a shutter speed and then half-press the shutter button. The viewfinder will display what the shutter speed should be set to given the selected aperture.
Although the shutter is electronically-controlled, the CE-II has a backup mechanical speed of 1/90, selectable as the “X” on the shutter-speed dial.
Flash Sync: 1/90 is nothing special. You must manually set the shutter speed dial to the flash sync setting. The CE-II will work with any flash with an auto mode.
Batteries: The CE-II uses a big, easily-available, non-mercury 6V battery to power its meter and electronic shutter. It also has a battery check button. The CE-II contains a nifty green light near the viewfinder that tells you with every shot whether the battery is still good.
Other Features: The CE-II has a handy shutter lock around the button. It also allows double-exposure via a switch on top of the body that allows the shutter to operate even if the film is not advanced.
Conclusions
If you enjoy using a wide variety of M42 lenses from different manufacturers, the Cosina/Chinon systems are without a doubt the most versatile for this purpose. While most manufacturers of the fourth and fifth generations of M42 bodies chose to go with proprietary lenses for the TTL light metering systems to function efficiently, the Cosina/Chinon systems act as a universal platform for all auto-diaphragm lenses, regardless of make or era. While the CE-II does have a 1/2000 top shutter speed and pretty much every other feature that existed in advanced amateur mid-1970s SLRs, other aspects such as its size/weight, the so-so viewfinder brightness, and the lack of a split-screen focusing aid dampen my enthusiasm for this particular model. I think the best overall camera of this the line is the CE-3.
The 1977 Praktica EE2 (and the “praktically”-identical 1979 EE3) was the most advanced M42 SLR camera body produced by Pentacon. The EE2’s run was ultimately cut short as Praktica introduced its next generation bayonet mount cameras in 1979. If you are a fan of East German M42 lenses and enjoy the convenience of aperture-priority autoexposure, is the EE2 a model worth considering? Maybe, but only if you primarily use East German “Electric” lenses. It is not a particular great all-around M42 lens platform.
During 1969, Praktica introduced the “LLC,” a member of the fourth generation of M42 camera bodies. These cameras no longer required a two-step “stop down” operation for TTL light metering. With extra linkages added between lens and the body, the lens could communicate the selected aperture to the camera’s meter without the lens having to physically stop down to read the lighting. In Praktica’s case, only East German “Electric” M42 lenses (those with the electrical contacts on the body) would work with this open-aperture metering system. The LLC and its direct descendants did not have true “autoexposure,” and still required the user to set both the shutter speed and aperture via a “match-needle” visual aid in the camera’s viewfinder.
During 1971, Pentax was the first M42 camera manufacturer to announce a true aperture-priority autoexposure camera. The fifth generation of M42 camera bodies also required proprietary M42 lenses. Several other companies followed with autoexposure models such as the Fujica ST901 and the Ricoh Auto TLS EE.
During 1977, Pentacon announced the Praktica EE2, its first electronic shutter camera body capable of aperture-priority autoexposure. The later 1979 EE3 would only add a split-image focusing screen. The EE2 did not hit the North American market until mid-to-late 1978 and was advertised for around $250 with a Pentacon 50mm f/1.8 lens. Besides the standard Pentacon lens, it is unclear what range of East German M42 “Electric” lenses even existed in the North American market during this time. During this time, most American retailers offered generic, Japanese-made M42 lenses in the 28mm, 135mm, and 200mm focal lengths that would require the two-step “stop down” metering to work correctly on the EE2.
These days, the EE2 is a relatively affordable and fairly capable M42 camera body. The example I acquired worked for a while then the electronics went haywire and ultimately could not be repaired. If you are a fan of 1970s East German M42 lenses, is it worth it? Let’s take a look.
Comparison With Other Contemporary Praktica Electric M42 Bodies
Here are three post-LLC “Electric” Praktica bodies compared. The later EE3, VLC3, and PLC3 were the same as their predecessors but for the addition of split-image focusing screen.
EE2
VLC2
PLC2
Years Introduced
1977
1976
1975
M42 Generation
5th
4th
4th
Shutter Speeds
B, 1 sec – 1/1000 (Stepless)
B, 1 sec – 1/1000
B, 1 sec – 1/1000
Shutter
Electronic
Mechanical
Mechanical
Battery
V21PX
V21PX
V21PX
Flash Sync Speed
1/125
1/125 (No Hot Shoe)
1/125
Prism
Fixed
Removable
Fixed
Viewfinder Information
Shutter Speeds
Match Needle
Match Needle
Focusing Screen
Microprism
Microprism
Microprism
ASA Range
12-1600
12-1600
12-1600
Autoexposure?
Yes
No
No
Exposure Compensation
+ / – 2 stops
No
No
Work Without Battery?
No
Yes
Yes
Exposure Lock?
No
No
No
East German “Electric” Lenses
The German “Electric” M42 lenses for the Praktica system included the following.
Manufacturer
Lens
Elements/Groups
Min. Focus
Filter Thread
Carl Zeiss Jena
20mm f/2.8 Flektogon
9/8
0.19m
67mm
Pentacon
29mm f/2.8
7/7
0.25m
55mm
Carl Zeiss Jena
35mm f/2.4 Flektogon
6/6
0.20m
49mm
Schneider Kreuznach
35mm f/2.8 Curtagon
6/5
0.30m
49mm
Carl Zeiss Jena
50mm f/1.8 Pancolar
6/5
0.35m
49mm
Pentacon
50mm f/1.8
6/4
0.33m
49mm
Carl Zeiss Jena
80mm f/1.8 Pancolar
6/5
0.80m
58mm
Pentacon
100mm f/2.8
5/4
1.10m
49mm
Pentacon
135mm f/2.8
5/4
1.50m
55mm
Carl Zeiss Jena
135mm f/3.5 Sonnar
4/3
1.00m
49mm
Schneider Kreuznach
135mm f/3.5 Tele Xenar
5/5
1.50m
49mm
Carl Zeiss Jena
200mm f/2.8 Sonnar
6/4
2.20m
77mm
Operation
The EE2 has decent functionality for mid-range 1977 camera body. The most important feature omitted from all M42 Praktica bodies was the lack of an exposure lock, which would not arrive on a Pentacon product until the bayonet-mount B200 in 1979.
Viewfinder: The EE2 has average viewfinder brightness for this class of camera. Although the EE2 came with a microprism focusing screen, at least some models seem to have been equipped with a split-image screen (maybe export models?). The focusing screen and prism certainly could have been much better. The shutter speeds are displayed on the right of the viewfinder screen with a needle indicating the speed at the selected aperture. A half-press of the front-mounted shutter button will turn on the meter.
Shutter Speeds: The EE2 uses a stepless, electronically-controlled shutter that requires a battery to operate. The “A” setting is for autoexposure but manual speeds can be selected. Like many Pentacon products of the era, the angled shutter button is located on the front of the camera and takes a standard cable release. The shutter noise itself is not pleasant.
“Electric” Lenses: The Praktica “Electric” system is unique for M42 open-aperture focusing/metering as it uses electrical contacts on the lens mount rather than proprietary mechanical linkages like other manufacturers. With electric lenses, the aperture is always held open for focusing but the lens will meter at the aperture selected on the lens and will stop down when a shot is taken. Via a switch on the right side of the lens mount, you can use other automatic diaphragm M42 lenses in “stop down” metering mode.
Battery: The LLC / VLC / PLC / EE series originally used a single mercury 4.5V battery which is no longer available. There are several modern solutions. The first is an alkaline A21PX. The second is a battery adapter available that permits the use of three 1.5V SR44 batteries. The EE2, like other contemporary Praktica cameras, has a noticeably flimsy plastic cover for the battery at the bottom of the camera.
Exposure Compensation: While none of the Praktica M42 camera bodies have an exposure lock function, the EE2 does permit at +/- 2 stop exposure compensation via a dial on the top of the camera.
Flash: The EE2 does not have any sophisticated flash functionality, and its flash sync is 1/125. To use the flash sync, one must manually select the lightning bolt on the shutter speed dial.
Other Functions: The EE2 has a standard self-timer lever, the stop down lever for metering with non-Electric M42 lenses, the ability to close the viewfinder to prevent the entry of stray light, a battery check button on the bottom of the camera.
Accessories
Other than a case, the EE2 did not have any significant, camera-specific accessories.
Conclusion
The EE2 was one of only a handful of M42 electronic shutter, aperture-priority autoexposure cameras produced during the 1970s. As a platform for East German “Electric” lenses, it is pretty good only to the extent that it provides aperture-priority autoexposure, but otherwise it is not an extraordinary product. As a platform for other M42 lenses, it is very average, not offering any capability or advantage over any other third or fourth generation body. When compared to other Prakticas of the era, the EE2 is certainly more advanced than the mechanical-shutter PLC, VLC, or MT series. As with any 45 year-old film camera, many EE2s may be DOA and/or may need some work. I would also suggest looking for the rarer EE3 as the former’s split-image focusing screen can be much easier to use.
Introduced to market during 1977, the Revueflex EE 303 (a rebadged “Hi Lite ECL” for a West Germany-based retailer named Foto-Quelle) was Cosina’s most advanced M42 SLR and a follow-up to its 1972 Hi Lite EC model. The Hi Lite ECL’s primary distinguishing feature included the employment of a primitive autoexposure system that works all auto-diaphragm M42 lenses. In most respects, the Hi Lite ECL mirrors the functionality of similar products, like the Hi Lite EC and the contemporary Chinon CE-II (1976). The Hi Lite ECL’s incremental improvements over the original Hi Lite EC included: (1) being somewhat lighter; (2) increasing the max ASA for the light meter from 1600 to 3200; and (3) adding an exposure lock button. Unlike the Hi Lite EC and the CE-II, which are fairly plentiful on the used market today, both the Hi Lite ECL and Revueflex EE 303 are a little hard to find today, suggesting that neither sold particularly well.
While I remain convinced that the 1978 Chinon CE-3 (aka the “Revueflex AC1”) is, overall, the most advanced and versatile M42 camera body of the film era, certain Cosina and Chinon cameras with the same or similar autoexposure system before it could achieve a slightly higher top shutter speed of 1/2000, which comes in handy from time to time. Given the alternatives, is there a case for the EE 303 / Hi Lite ECL to be your daily M42 platform? Let’s take a look.
Specifications
Lens Mount
M42
Shutter
Copal E-394 (Electronic Metal Vertical)
Shutter Speeds
2 sec. – 1/2000 (Continuously Variable)
Viewfinder
0.9x Mag. / 95% Coverage (with 55mm lens)
Focusing Screen
Fresnel Lens and Micro-Prism
X-Sync
1/125
Battery
1 x S28PX or A544 (6V)
Weight
730g
ASA Range
25-3200
Operation
The EE 303 is a well-built, all-metal, and sturdy camera, certainly a member of the upper-range of consumer 35mm film SLRs from the mid-1970s. It has quality industrial and ergonomic design, including the layout and design of the various switches and buttons. It was a fairly expensive camera in its day and was sold with a number of standard lenses, including but not limited to the Auto Revuenon 55mm f/1.4 or 55mm f/1.7 (which were also sold at the time under a variety of different names). The Chinon 50mm f/1.7 pictured here was not sold with it.
Aperture-Priority Autoexposure System: The primary draw of certain Chinon and Cosina models from the 1970s was the employment of a primitive autoexposure system that could work with any auto-diaphragm M42 lens, regardless of manufacturer. Essentially, the way it works is that a half-press of the shutter button simultaneously stops down the lens to the selected aperture, meters the scene, and automatically selects a shutter speed corresponding to the aperture. This preview ability temporarily darkens the viewfinder as the lens stops down. With the aid of the electronically-controlled shutter, a full press then trips the shutter. This saves time and effort compared to prior generations of M42 cameras that required a two-step manual stop down procedure.
Although I had assumed that the Cosina autoexposure system worked pretty much the same way as the Chinon CE-II and CE-3, it unfortunately does not. Unlike the Chinons, the Hi Lite ECL shutter button does not contain a spring that will push the lens back to wide open after you release the half-press of the shutter button. In other words, a half-press will stop down the lens to the taking aperture, but releasing the button does not re-open the aperture to wide-open. Instead, you must use an external button at the 7 o’clock position around the lens to re-open the aperture and reset the metering. The half-press allows you to change the aperture, which automatically re-meters the scene and adjusts the shutter speed accordingly (although the viewfinder will get darker and darker as you stop down). For me, the Chinon spring-loaded shutter button system is better, faster, and more intuitive.
Exposure Lock: Although the EE 303 does have an exposure lock function, it is also not as practical as the system used on the CE-3. To use it, you must first half-press the shutter to get a meter reading and then hold in a little button on the right side of the lens. However, as soon as you release the button, the AE-L disengages. The CE-3’s AE-L system locks the exposure with a press-in button that does not require continuous pressing.
Manual Metering Mode: The EE 303 also a manual metering mode. For a given aperture, you can select any shutter speed. When you meter, the viewfinder will tell you what actual shutter speed should be be chosen for the selected aperture.
Shutter: The EE 303 uses a standard Copal electronically-controlled metal shutter with continuously-variable shutter speeds from 1 second to 1/2000. The shutter noise is about average for a 1970s SLR. Although the shutter is battery-dependent, there is a manual backup speed of 1/125.
Viewfinder: The EE 303 does have a fairly nice viewfinder and focusing screen for the era, both of which seem to be carried over from the original Hi Lite EC. The match-needle shutter speeds are displayed in the left side of the viewfinder from 1 – 1/2000 with red zones above and below the scale for over and under exposure. The focusing screen is a fresnel type with a micro-prism center spot. The 0.9x magnification and 95% frame coverage are outstanding specs until you realize that they are for a 55mm lens. With a standard 50mm lens, you would have less of both.
Battery: Like some other 1970s cameras, the EE 303 uses a 6V 4xSR44-type battery that powers the center-weighted TTL light meter and controls the shutter. The silver oxide version is a S28PX and the alkaline is an A544. The battery loads into the top back of the body, rather than through the bottom. There is a neat battery check button on the top right of camera that illuminates a small adjacent orange light to show whether the battery has sufficient power.
Film Load Indicator: An interesting feature that I have not seen on too many SLRs is the EE 303’s “film load indicator.” If there is film loaded in the camera, a little window northwest of the rewind crank will display red. If there is no film loaded, no color will be shown.
Flash: The EE 303 does not have any sophisticated flash capability, having just a single contact on the shoe for electronic flashes. To the side of the lens, there are terminals for a X-sync and FP (bulbs) if you are using a flash with a cable connection. The flash sync of 1/125 is par for the course for the era.
Other Features: The EE 303 has a standard set of more mundane features, such as ASA settings from 25 to 3200, the provision for a regular cable release, a shutter button lock switch (which does not lock into place, just slides back and forth), a eyepiece light trap that prevents stray light from entering the viewfinder during longer exposures, and a self-timer of 10 seconds.
Proprietary Accessories: Other than a case, none really of note.
Conclusion
While seemingly quite rare these days on the used market, the EE 303 is a perfectly nice, high-quality M42 camera. Along with the variety of standard features, it has a nice viewfinder and a fast top shutter speed. However, because the main draw of a camera in this class is its aperture-priority autoexposure function with all auto-diaphragm M42 lenses, the Chinon CE-II and CE-3 system is preferable as it does not require an additional step to re-open the aperture for the purposes of metering and focusing. Despite not having a 1/2000 top speed, the CE-3 has a variety of advantages over the EE 303, like a split screen focusing aid, the provision for a motor drive, and an easier-to-use AE-L function. If none of that matters to you, the EE 303 / Hi Lite ECL is overall a nice platform for the use of the world of M42 lenses.
The 1978 Chinon CE-3 Memotron (aka the “Revueflex AC1”) is one of a handful of M42 camera bodies that provide a kind of primitive aperture-priority autoexposure capability with all auto-diaphragm lenses, regardless of manufacturer. Being one of the last “new” M42 bodies introduced, it is also the most advanced. In my opinion, it is the best, overall, M42 body of the film body.
By the mid-1960s, M42 camera manufacturers began working on a technical solution to eliminate the “two-step” stop-down process required for TTL light metering. In other words, the goal was to have the camera body be able to read the selected lens aperture for metering purposes while keeping the aperture wide open for focusing and composition purposes. By the early 1970s, most manufacturers solved this issue by developing proprietary mechanical or electric linkages between the lenses and bodies so that the two could “communicate.” Pentacon’s 1968 “Super” appears to have been the first to market with this fourth generation technology. Just a few years later, Pentax went in a different direction, combining an electronic shutter with its own proprietary lenses to achieve aperture-priority autoexposure in what would become the fifth generation.
Cosina and Chinon took a third approach. Instead of using a proprietary lens system, they developed a type of electronic-shutter, aperture-priority autoexposure system where the shutter button itself would act as the “stop down” metering switch. With any M42 lens with auto-diaphragm operation, you would select “Auto” on the shutter speed dial and select an aperture on the lens. When you press the shutter button half-way down, the camera stops the lens down to the selected aperture (darkening the viewfinder), and the viewfinder displays the shutter speed for the aperture selected. Pressing the shutter button all the way down would then trip the shutter.
The cameras with this “autoexposure” feature included the Cosina Hi-Lite EC (1972), the Chinon CE (1974), the Chinon CE-II (1976), the Cosina Hi-Lite ECL (1977), and the Chinon CE-3 (1978). Many of these models also were marketed (often with some minor cosmetic changes) under the Revueflex, Petri, or Porst brand names. The Hi-Lite EC, the Hi-Lite ECL, the CE, and the CE-II all had a top shutter speeds of 1/2000, which was as fast as SLRs got in the 1970s. The primary difference between the two systems was that Chinon used a spring in the shutter button that would return the lens to wide open when the half-press was released. Cosina models did not contain this spring and required the pressing of an external button to return the lens to wide open.
The CE-3 lost the top 1/2000 top speed but further improved upon the CE-II with better focusing aids in the viewfinder, better viewfinder coverage and brightness, a provision for a motor drive, the use of silver oxide 1.5V batteries instead of a 6V battery, a slightly higher flash sync, all in a smaller and lighter body. The CE-3 was often bundled for sale with, I believe, a 50mm f/1.7 or 55mm f/1.4 Chinon lens. The Revueflex AC1 is essentially the same camera as the CE-3 with some inconsequential cosmetic differences.
Specifications
Lens Mount
M42
Shutter
Seiko Electronic Vertical Metal
Shutter Speeds
4 sec. to 1/1000 (Continuously Variable)
Viewfinder Coverage
95%
Flash Sync
1/100
Exposure Lock?
Yes
ASA Range
25-3200
Meter
TTL Center-Weighted Silicon Type
Batteries
2 x SR44
Weight (Body Only)
620g
Operation
In addition to the useful autoexposure system described above, the CE-3 pretty much checks all of the boxes for what a mid-range 1970s SLR could do. It is fairly small-bodied, like contemporary cameras such as the Nikon FM.
Exposure Lock: Always a nice feature on any camera, the CE-3 has an exposure lock that operates via a button on the side of the lens. In operation, you would half-depress the shutter, push in the AE lock button, reframe and take the shot.
Exposure Compensation: Via a dial on the top left, exposure compensation can manually be inputted to +/- 1 stop in 1/3 stop increments. One of the significant differences between the AC1 and the CE-3 is found with the way this dial works. On the AC1, the dial itself has the entire range of ASA speeds, which is then rotated to a white dot for the desired film speed. On the CE-3, the ASA selection is the more traditional windowed type. With both, the main dial is rotated to the appropriate exposure compensation spot.
Viewfinder: The CE-3 has a nice, but not professional, viewfinder with 95% coverage. It uses a non-swappable focusing screen with a split image with a microprism surrounding it. Shutter speeds are displayed on the left part of the screen with match-needle operation. If the batteries are working, a green light will illuminate in the outside viewfinder frame to remind you that the batteries are working.
Shutter Lock: Via a switch around the shutter speed button, the shutter can be locked to prevent accidentally triggering.
Batteries: The CE-3 uses cheap button-style silver oxide SR44 batteries. It will also work fine with the equivalent alkalines.
Shutter: The CE-3’s stepless electronic shutter is not very quiet or dampened, par for the course with 1970s consumer SLRs.
Flash Sync Speed: 1/100 is par for the course for the era.
Self-Timer: & Flash Hot Shoe Yes.
The Motor Drive
The CE-3 has an optional “Power Winder” that uses AA batteries and screws in to the bottom of the camera. Unlike most 1970s consumer motor drives which simply permitted continuous shooting at about 1.5-2.5 frames per second (tops), the Power Winder had several different functions operated by rotating switches. First, it had a “single” versus “continuous” (2 fps) mode. Second, it had a pre-set counter which would permit the camera to continuously fire until a certain number of selected frames was reached (up to 24). Finally, there was an “interval timer” which permitted the automatic firing of the camera at up to 30 seconds apart. The Power Winder also provides a nice built-in grip for the camera as well. It was rebadged in connection with the AC1 as the “Revue Motor 35.” Both the Power Winder and the Revue Motor 35 are interchangeable. The Power Winder could also be used on the Chinon CM-3. Do not leave the drive ON when not in use as it will drain the batteries even if not actively being used.
Differences Between the CE-3 and the AC1
The CE-3 (top) and the AC1 (bottom) are not exactly the same camera. However, the only apparent differences can be found in design of the top plate and the layout of some of the controls. While the shutter dial and shutter button are the same, the film advance lever, exposure compensation dial, ASA selection, film counter window, prism shape, rewind dial, and the hot shoe are not. The rest of the camera body, including the viewfinder and electronics, are exactly the same.
Conclusions
If you enjoy using a wide variety of M42 lenses from different manufacturers with the option of aperture-priority autoexposure, in my opinion, the Chinon CE-3 is the best overall option. Other M42 cameras might surpass some of its features individually (higher shutter speed, brighter viewfinder, higher flash sync, etc.), but not as a package.
Originally developed before WWII, the M42 lens mount was, for a time, a standard shared among multiple camera body manufacturers starting during the late 1940s. By the early 1970s, this coalition began to fall apart with each major manufacturer developing their own proprietary versions of M42 lenses to work with their own open-aperture light metering systems. By the mid-1970s, with 35mm SLR camera technology rapidly advancing, M42 bodies were on their way out. Because no truly “modern” M42 camera body was ever produced, there has always been much debate about what the “best” body was or is. None of them is the “best,” but some are better than others.
M42 technology evolved in five basic generations. The first generation (1938) included simple screw-in lenses with no mechanical linkage between the lens and the camera body. The second generation (1956) introduced auto-diaphragm lens operation which permits the lens aperture to be held wide open for easier focusing and then upon tripping the shutter, the camera would automatically stop down to the taking aperture. The third generation (1964) combined the auto-diaphragm function with stop-down TTL light metering. The fourth generation (1968) employed auto-diaphragm operation but also included an extra mechanical or electrical linkage that communicated the lens aperture to the camera body for one-step TTL light metering purposes. The final generation (1971) incorporated auto-diaphragm operation, the extra linkage, and an electronic shutter that permitted aperture-priority exposure. Apart from these, during the early 1970s, Cosina and Chinon developed a separate system that permitted a primitive aperture-priority autoexposure with every auto-diaphragm M42 lens. Here is a list of most M42 camera bodies listed by generation.
First Generation: The first generation had its birth before WWII but became commercially available starting in the late 1940s. Famous cameras from this period included the Contax S (1949), the original “Praktica” (1949), the Asahiflex (1952), and the Praktina FX (1953). These cameras came in various configurations and with and without pentaprisms. Their operation was simple: M42 lenses would just screw into the body. Best practice would be to focus at the widest aperture, and then physically stop down to taking aperture to take the shot. Of course, stopping down the lens would darken the viewfinder, making it nearly impossible to focus at the actual taking aperture (say, at apertures smaller than f/4).
Second Generation: During 1956, Contax of East Germany introduced the “F,” which had the ability to hold the aperture wide open regardless of the aperture set on the lens. However, this ability required the use of not-yet-to-market “auto-diaphragm” M42 lenses that contained a “stop-down” pin. Other notable cameras in this generation included the Asahi Pentax K and the Praktica FX3.
The 1958 Pentacon (Contax) FM
Third Generation: This generation fully adopted auto-diaphragm operation and combined it with TTL light metering. However, M42 camera manufacturers created an awkward, two-step procedure for bodies to combine the two concepts. Because the lenses could not communicate the selected aperture with the camera’s light meter, an external button or switch was added to the camera body that, while pressed, temporarily “stopped down” the lens so that the body could take a light meter reading at the actual taking aperture. You then fiddle with the aperture and/or shutter speed until the “match-needle” in the viewfinder was in the correct spot. After releasing the external button or switch, the light meter would shut off and the aperture would return to wide open so you can frame and re-focus if necessary. Every major M42 SLR manufacturer (Pentax, Yashica, Praktica, Fujica, Chinon, Zenit, etc.) produced zillions of these cameras from the mid-1960s to the late 1970s (with certain models produced into the late 1980s), which now litter closets, drawers, and second-hand stores all over the world. In addition to their cumbersome operation, most of these cameras were generally heavier, had fairly dark viewfinders even with faster lenses, and used now-obsolete batteries.
The 1964 Pentax Spotmatic
During 2003, Voigtlander (Cosina) introduced a final “third generation” M42 camera body, the Bessaflex TM. In conjunction with the Bessaflex, Zeiss produced in M42 mount (“ZS” lenses) some of its excellent contemporary manual-focus lenses it was also making in Nikon and Canon mounts and Voigtlander introduced a nice redesigned 58mm f/1.4 inspired by the legendary 1960s Topcon lens. The mechanical-shutter Bessaflex had some nice features, like a beautifully-bright viewfinder and a top shutter speed of 1/2000. Like other third-generation M42 bodies, the Bessaflex requires the activation of an external stop-down switch to activate the TTL light meter and has no autoexposure capability.
The Pentacon Super: During the mid-1960s, after an unusually long development period, East German engineers developed a solution for open-aperture metering with M42 lenses without a manual stop-down step in the form of the 1968 Pentacon Super. Pentacon’s solution to open-aperture metering at different f-stops was to introduce a new line of M42 lenses that contained a second pin towards the outside of the lens that would interact with a curved piece of metal around the body’s lens mount. With the use of a removable, battery-powered prism (kind of like the Pentacon Six), the body could hold the lens wide-open and then meter the scene at the actual selected f-stop through a match needle system in the viewfinder. The Super’s metered prism could also display both the selected shutter speed and aperture in the viewfinder. Unfortunately, the Super was an extremely expensive camera at the time, could only be used to its full potential with a handful of specially-designed Carl Zeiss Jena lenses, and was ultimately produced in relatively small numbers.
Fourth Generation: Like the Pentacon Super, the fourth generation used extra linkages that would permit the lens to communicate the selected aperture for the purposes of light metering without the lens having to physically stop down. Besides the Super, the first to market with this technology was the 1969 “Praktica LLC.” Praktica used electrical, rather than mechanical, contacts to accomplish the extra lens-camera connection. This system was not “autoexposure” as it still required the manipulation of the both shutter speed and aperture so that a needle in the viewfinder sat in the correct place. Other examples of this generation include the 1971 Zeiss Ikon SL706, the 1972 Fujica ST-801, and the 1973 Pentax Spotmatic F. Most of these cameras also included a stop-down lever or switch so that you could use any manufacturer’s auto-diaphragm lenses in “third generation” mode.
Fifth Generation: During 1971, Pentax was first to market in the final generation of M42 cameras with its electronic-shutter “ES,” the first M42 camera capable of aperture-priority autoexposure, which of course means that you set the aperture and the camera can automatically set the appropriate shutter speed. This required the use of a “Super-Multi-Coated” Pentax lens with an “open aperture reading pin.” Other fifth generation aperture-priority models included the 1973 Pentax ES II, the 1974 Fujica ST-901 and the 1977 Praktica EE2. There were other models from this generation that employed shutter-speed priority autoexposure, like the 1976 Ricoh Auto TLS and the 1978 Exakta FE 2000. Again, each system required proprietary lenses for the autoexposure to operate in either aperture or shutter priority modes.
The 1977 Praktica EE2
The Cosina/Chinon System: During the early 1970s, Cosina and Chinon introduced an interesting alternative system that allowed a primitive aperture-priority autoexposure with all auto-diaphragm M42 lenses, regardless of manufacturer. The technical solution was clever, but not necessarily revolutionary, and did not require the addition of any proprietary connections between the body and the lens. When mounting an M42 lens set to “A” on the diaphragm, the camera could be focused at an open aperture. When taking a photo, if the shutter button itself were pushed half-way down, the camera would stop the lens down to the taking aperture to meter the scene (thus darkening the viewfinder temporarily while the shutter button is half-depressed). The viewfinder would then display the shutter speed that would be automatically used if that aperture were selected. To take the photo, a full depress would instantaneously stop the lens down to the selected aperture and fire the shutter. The resulting stop down action happens so quickly that you don’t even notice it. Essentially, the bodies combined the traditional second-generation metering switch and shutter button into the same mechanism. The models equipped with this technology included the Cosina Hi-Lite EC (1972), the Cosina High Lite ECL (1976), the Chinon CE-II (1976), and the Chinon CE-3 (1978). Cosina, Chinon, and Zenit also used this shutter-button “stop-down” mechanism for a variety non-AE cameras.
So, what is the “best” M42 SLR camera body? The true answer is a bit complicated because it depends on how much work you want to do to take a 35mm photo and what kind of M42 lenses you want to use. I am generally not a fan of any of the first, second, or third generation of M42 bodies because the Cosina/Chinon system and the fifth generation systems are just easier to use. If you want a M42 camera to operate like a swiss army knife, to have full functionality with all auto-diaphragm M42 lenses, to have the option of aperture-priority autoexposure, to display the shutter speeds in the viewfinder, to use common modern batteries, to have an exposure lock function, and to be able to use a motor drive, my answer would be the Chinon CE-3. If you do not mind throwing real money at a camera body with the brightest M42 camera viewfinder, a good top shutter speed, and third generation metering technology, go with the Bessaflex. Otherwise, the fifth generation systems are great but limit full functionality to a smaller world of proprietary lenses. There is no right answer, but there are probably plenty of wrong ones.
Aftermarket Options
Given the fact that no truly great M42 body was ever produced,, many folks decide to skip them altogether and adapt the lenses to more modern and capable cameras. While M42 lenses can easily be adapted to any modern mirrorless digital system, they cannot be fully adapted with full infinity focus to many film SLR mounts. The popular mounts that can be used with full infinity focusing include: (1) Konica Autoreflex; (2) Praktica PB; (3) Pentax K; (4) Canon EF and FD; and (5) Contax C/Y. None of these cameras permit “true” aperture-priority autoexposure with M42 lenses as they cannot couple to the lenses’ aperture pin. However, aperture-priority operation is still possible, the camera will just not know what aperture the lens is set at and the viewfinder will darken as the lens is stopped down. For those looking for a non-native film camera body to use M42 lenses, there are many alternatives.
Konica Autoreflex: Konica produced an OEM adapter for M42 lenses, labeled “for Praktica.” However, there are several reasons why Konica AR bodies are not ideal platforms. First, most Konica bodies do not have the brightest viewfinders. Second, the Konica’s shutter-speed priority operation makes metering M42 lenses are bit more difficult. To take a metered shot on an AR body, you first have to focus with the aperture set wide open on the lens. Then, you must stop the lens down and set the appropriate shutter speed to have the Konica body’s metering needle or LED to reach a certain blank spot in the viewfinder above the largest aperture. This operation is necessary because Konica bodies show the aperture in the viewfinder and not the shutter speed. Third, Konica bodies are all limited to a 1/1000 top speed and center-weighted metering. While M42 lenses will work on Konica AR bodies, it is not an ideal second marriage.
Praktica PB: When Praktica switched over from M42 to its bayonet “PB Mount” in 1979, an OEM adapter was initially offered that offered a kind of stop-down aperture-priority metering operation. The higher-end models of Praktica’s PB cameras (like the B200, BC1, and BX20) are actually pretty nice, with brighter focusing screens and better focusing aids than most any other classic 1970s M42 body. The catch is that there is only one available adapter which is fairly rare but not really expensive. The OEM adapter has the correct electrical contact as a Praktica PB camera will not meter a lens that cannot make that contact with the body.
Pentax K: There are few lens mounts as iconic as the Pentax K. Like the Praktica B, an OEM adapter from M42 to K mount was offered to attract the legacy users of the older system. However, no communication between the body and the lens existed, requiring aperture priority, stop-down operation. With so many K-mount cameras produced under so many brands in multiple countries, let’s just pick up the LX as an example. The LX has a top shutter speed of 1/2000, a center-weighted meter, and a bright viewfinder, basically Pentax’s equivalent of the Nikon F3. However, there really is no reason to use Japanese M42 lenses on a Pentax K mount camera because Pentax K-mount lenses are generally regarded as superior to its M42 lenses. At the same time, a camera like the Pentax LX may be a good platform for East German and Soviet lenses, as many of these are sufficiently distinguishable from Pentax lenses to produce different results.
Canon FD/EF: As someone who normally does not use Canon SLR products, I have no firsthand experiences to share. However, there is literally almost 20 years now of internet discussions now about using M42 lenses on Canon digital SLRs. There are certainly some super advanced Canon film SLRs in EF mount that will be able to use M42 lenses at fast shutter speeds, with great viewfinders, motor drives, etc. A quick internet search will reveal dozens of sites and thousands of internet forum postings with useful information if you are looking to go the Canon route.
Contax C/Y: With bright viewfinders, multiple metering modes, top shutter speeds of 1/4000 (up to 1/8000 on the RTS III), relatively quiet shutters, and integrated motor drives, Contax may make the best case (along with Canon) for a non-native M42 lens platform. Various third-party companies make reasonably-priced generic adapters that seem to all operate in the same manner (and all have a little focus slop). Using M42 lenses on Contax bodies is a delight and certainly a good alternative.
Rollei QBM: These cameras are an interesting platform because the OEM adapter allows one to use open-aperture stop down metering with auto diaphragm M42 lenses. This is the only non-native M42 camera body that can do this.
As an addendum to this article, here is a list of M42 camera bodies (post-1948) by technological generation. This is not a complete list and is an ongoing project. I am leaving out Edixa models and most rebadged bodies (Revueflex, Vivitar, Porst, Sears, etc.) for now. Where there is an exact modern silver oxide equivalent to the original battery, that is listed. Where the original battery was a mercury type without an exact silver/alkaline equivalent, the mercury is listed.
Konica’s short-lived 1978-79 Autoreflex T4 was the last of its mechanical-shutter “Autoreflex” line of 35mm SLR cameras, which has started with 1968 “Autoreflex T” (or “FTA” in Japan). The Autoreflex platform was designed for a “shutter speed priority” autoexposure operation: where the user would select a shutter speed and the camera would select the appropriate aperture given the light meter reading. In this system, each AR lens has a moveable arm whose swing opens and closes the lens’ aperture. When the lens is set to “AE” (or “EE” on older lenses), the body holds the arm to keep the lens at its wide open aperture for focusing purposes. When the internal light meter gauges the appropriate aperture given the selected shutter speed, when the shutter is tripped, the body’s arm moves to stop down to the appropriate aperture. Although the T was certainly no professional tool, it was all-metal, durable, and completely mechanical. It would not be until 1972 that Nikon would introduce its first automatic “aperture priority” camera, the Nikkormat EL, and not until the 1980 F3 that it would incorporate aperture-priority autoexposure into one of its professional cameras.
The trend during the mid-1970s was the production of smaller-bodied SLRs. The 1972 Olympus OM-1 is probably the most famous of these. Following suit in 1976, in a major departure from its bulky T/T2/T3 series, Konica introduced the consumer-oriented “TC” (or “ACOM-1” in Japan). Although the specifications of the TC were not particularly impressive, it did sport one of the newest, most durable, reliable, if not the loudest, of the Copal mechanical shutters: the Square CCS-M. The TC sold very well for the time and was produced all the way into 1982. With Konica’s flagship T3 becoming a little long in the tooth, Konica introduced the T4, incorporating the essential features of a T-series camera into the general frame of a TC. Over the TC, the T4 had a variety of additional features, such as slow speeds down to 1 second, a depth-of-field preview lever, double exposure capability, the ability to use an external motor drive, a battery check light, a brass rather than plastic baseplate, and a slightly brighter focusing screen. Because the T4 was arguably uncompetitive in 1978 with the new generation of electronic-shutter SLRs, Konica quickly replaced it with the motor-driven, electronic-shutter FS-1 in 1979, and then the more basic electronic-shutter FC-1 in 1980. The T4 was Konica’s last mechanical-shutter camera until the 1985 TC-X.
During the late 1970s, Konica began outsourcing the production of some of its final generation of SLR lenses to Tokina. These later lenses are generally identifiable by a minimum aperture of f/22 rather than f/16. Konica’s standard kit lens for the T4 was a “new” version of its 50mm f/1.7, with the Tokina-sourced 40mm f/1.8 beginning to replace it in 1979. While the 50mm f/1.7 Hexanon is perhaps one of the great standard bundled lenses of the 1970s, the 40mm f/1.8 is fairly average.
Specifications
Lens Mount
Konica AR
Minimum Aperture
f/16
Shutter
Copal Square CCS-M
Shutter Speeds
B, 1 – 1/1000
Flash Sync
1/125
Viewfinder Coverage
90% / 0.89x
ASA Range
25 – 1600
Batteries
2 x PX625
Weight
530g
Operation
Viewfinder: Although the T4 viewfinder is a little brighter than TC, it is still somewhat dim even with lenses faster than f/2. The 90% viewfinder coverage and 0.89x magnification are average for the class of camera. The non-interchangeable focusing screen is a standard split-image type. On the right hand side of the viewfinder displays apertures from f/1.7 to f/16 with a black needle indicating the correct aperture given the selected shutter speed. What is rather disappointing is that although the camera will correctly meter and expose at all apertures in a particular lens’ range, the display itself does not include f/1.4 or f/22. The manual addresses this and states for f/1.4 lenses to use part of the “red underexposure area” for lenses with apertures wider than f/1.4. The FS-1 and FC-1 would introduce a new LED viewfinder that displayed apertures from f/1.4 to f/22, and that viewfinder would continue to be used through the FT-1 (but not the TC-X).
Shutter: The Copal CCS-M shutter was brand new in the mid-1970s and was one of the most robust, accurate, and loudest mechanical shutters of the era. The T4’s top shutter speed of 1/1000 was typical of most consumer cameras at the time.
Exposure Lock: The T4 continued in the Autoreflex tradition of being able to lock the exposure through a half-depress of the shutter release. Many other cameras of the era either did not have an exposure lock, used an external button for exposure lock, or had an external “backlighting” compensation button. Exposure lock was noticeably absent from the next three Konica bodies: the FC-1, the FP-1, and the FS-1. The feature would not return until the 1983 FT-1.
Motor Drive: The T4 was the first of three Konica bodies that could use an external autowinder, the others being the FC-1 and the FP-1. The T4’s proprietary winder can only advance the film (at a slow 1.8 fps) and also adds to the significant noise that the shutter generates.
Depth of Field Preview: The T4 retains the traditional capability to evaluate the depth of field via a switch on the right side of the lens.
On/Off Switch: The T4’s “on/off” switch is activated by slightly pulling the film advance lever backwards, which turns on the meter. To turn “off” the camera, press the large and prominent button on the back of the camera, which will push the advance lever forward. Nice and simple.
Manual Operation: Because the batteries only power the meter/autoexposure system, the camera will operate at all shutter speeds mechanically.
Battery Check: The T4 has a very prominent battery check button with a large red light on the back of the camera that will turn bright red if the batteries are still good. The light is a little overkill for its purpose, but it is better than not having it, I guess.
Flash-Sync: The T4 has a respectable X-sync flash speed of 1/125. The later electronic-shutter FC-1 and FT-1 have a maximum flash sync of only 1/60 with non-proprietary flashes.
Bad Leatherette: With the TC and T4, Konica used some sub-par leatherette that shrank throughout the decades. It looks really bad. Best bet is to scrape it all off and buy one the aftermarket covering for them.
Mercury Batteries: By 1978, most major manufacturers had already discontinued the use of mercury batteries for cameras. The T4, like the TC before it, requires two PX625 1.35V mercury batteries for accurate metering. Although there are multiple ways to substitute the PX625s (Wein cells, MR-9 adapter for silver oxide batteries, wiring in a diode, etc.), none of them are particularly pleasant.
Smallish: While the T4 is noticeably smaller and lighter than the T/T2/T3, the FC-1 and FT-1 are also around the same physical size.
Conclusions
As the swansong of the Autoreflex line, the short-lived T4 incorporates all of the most important features of the “T” line into the smaller frame of the TC. If you prefer smaller and lighter SLRs, or dig the TC but want more functionality, the T4 may suit your needs. Apart from the typical failings of any 1970s SLR, like the light meter, the T4’s robust mechanical shutter can last a long time. Otherwise, there is nothing particularly interesting or innovative about the T4 for the time period it was produced. For me and for those who do not mind electronic shutters, the 1983 Konica FT-1 remains the best Autoreflex-mount camera.
The 1980 FC-1 was Konica’s second electronic-shutter, shutter-speed priority 35mm SLR in the Autoreflex mount, incorporating some of the electronics technology from the 1979 FS-1, but without the integrated motor drive. The FC-1’s primary interesting feature for the time was a “semi-automatic” film loading that only required pulling the film across, closing the back, and advancing without the need to trip the shutter. At launch, the FC-1 was listed for about $200 and was initially bundled with the Konica 40mm f/1.8 Hexanon (produced by Tokina) and then later with the 50mm f/1.8 Hexanon (also produced by Tokina). A fairly basic SLR, the FC-1 has been proven to be a fairly reliable device with its only downsides being the lack of exposure lock and its profoundly average viewfinder brightness. Let’s take a look.
Specifications
Year Introduced
1980
Mount
Konica Autoreflex
Autoexposure
Shutter Speed Priority
Exposure Lock?
No
Shutter Speeds
B, 2, 1 – 1/1000
X-Sync
1/60 (1/100 with X-24)
Focusing Screen
Split Image / Microprism
ASA Range
25-1600
Battery
4 x SR44
Weight
650g
Motor Drive
External Auto-Winder F
Operation
There is nothing particularly remarkable about the FC-1’s operation. Much of its technology was carried over from the prior FS-1. It was fairly competitive in the 1980 cutthroat advanced amateur market. In 1983, both the FS-1 and FC-1 were replaced by the much better Konica FT-1.
Semi-Automatic Film Loading System: In a system modified from the motor-driven FS-1, the FC-1 advertised an “easy” film loading where it was only necessary to pull the film across the film plane to the other side, without the need for engaging the leader into the cogs of the take-up mechanism. Merely pull the film across, close the back, and advance the film to “1” without having to trip the shutter.
Flash Automatic Shutter Speed Control: In another feature carried over from the FS-1, the Konica X-24 flash could automatically set the flash-sync speed on the camera to 1/100 (over 1/60).
Viewfinder: In yet another feature from the FS-1, the FC-1’s viewfinder displayed on the left-hand side apertures from M to f/22. When used in AE mode, an red LED would illuminate next to the aperture that would be set at the shutter speed selected on the camera. There is no other information displayed, such as frame count. While the viewfinder does have a split-screen / microprism focusing aids, the focusing screen itself is not very bright.
AE and Manual Exposure Control: The FC-1 does not have an exposure lock or any exposure compensation dial. With Autoreflex AE or EE lenses, simply choose a shutter speed on the dial and the camera will automatically select the appropriate aperture. Over or underexposure are indicated if the red LED blinks at the top or bottom of the aperture display in the viewfinder. Correct metered manual exposure is achieved by manipulating the aperture on the lens and the shutter speed on the camera until the LED lights up in the blank between the “M” and “f/1.4” settings.
Motor Drive: The FC-1 could employ the external “Auto-Winder F,” which could theoretically achieve 1.5 frames per second with an optional “continuous mode.” The Auto-Winder F is pretty loud. It also illuminates a red light when the roll is at its end.
Conclusions
There is not much to say about the rather basic FC-1. As one of four electronic-shutter Konica Autoreflex models (FS-1, FP-1, and FT-1 being the others), it is probably the second best of the bunch. While proving to be a more reliable platform than the FS-1, it cannot hold a candle to the later FT-1. For me, the lack of exposure lock or exposure compensation and the below-average viewfinder brightness make this not the best choice if looking for a Konica Autoreflex film platform. My advice would be to hold out for a working FT-1.
For 1979-80, the Zeiss-Yashica partnership introduced three new advanced-amateur 35mm film cameras for its C/Y lens mount: the Contax 139 Quartz, the Contax 137 MD, and the Yashica FX-D. The 139 was a completely new product, representing Contax’s attempt to slot a camera under its 1975 flagship, the RTS. The hefty 137 MD was also a new design, being one of the first 35mm SLR cameras with an integrated motor drive (the 1979 Konica FS-1 was the first).
Although not built on the same chassis, the FX-D is properly considered as a “de-featured” version of the 139, but not by much. During early 1981, typical advertised pricing for the three models with a standard lens was about $400 for the 137, $350 for the 139, and $250 for the FX-D. The FX-D was a commercial success during its 1981-85 run and certainly competitive with all contemporary advanced amateur models offered by the major manufacturers. The FX-D was ultimately replaced in 1985 by the FX-103, a camera built on the same frame but having a noticeably brighter viewfinder, the addition of program-mode operation, and the capability for TTL flash.
Today, FX-Ds are plentiful, cheap, and easy to find on the used market. While it is certainly no substitute for a Contax-branded product, the FX-D does offer pretty much all of the essential features that a good manual focus 35mm camera should have, and its reliability seems to have held up fairly well during the past 40 years. Let’s take a look.
Specifications
Here are the three contemporary Contax-Yashica products compared.
Contax 139Q
Yashica FX-D
Contax 137 MD
Viewfinder Coverage
95% / 0.86x
95% / 0.86x
95% / 0.86x
Focusing Screen
Split / Microprism
Split / Microprism
Split / Microprism
Shutter Speeds
11 sec. – 1/1000
1 sec -1/1000
11 sec – 1/1000
Autoexposure Modes
Aperture
Aperture
Aperture
Exposure Lock?
Yes
Yes
Yes
Metering
TTL Center-Weighted
TTL Center-Weighted
TTL Center-Weighted
Viewfinder Info
Aperture; Shutter Speed
Shutter Speed
Aperture; Shutter Speed
Shutter
Metal Vertical
Metal Vertical
Horizontal Cloth
X-Sync
1/100
1/100
1/60
TTL Flash?
Yes
No
Yes
ASA Range
12-3200
25-1600
12-3200
Batteries
2 x SR44
2 x SR44
4 x AA
Battery Check
Yes
Yes
Yes
Winder?
External
External
Integrated
Exposure Comp.
+/- 2 EV
+/- 2 EV
+/- 2 EV
Weight
500g
460g
600g
Standard Lens
Contax AE 50mm f/1.7
Yashica 50mm f/2 ML
Contax AE 50mm f/1.7
Operation
Viewfinder: The FX-D has the standard split-screen / microprism collar focusing screen with a good 95% coverage and an average 0.86x magnification. It displays only the shutter speed information in the viewfinder via a LED light scale on the right side of the viewfinder (whereas the 139 and 137 also display the selected aperture just outside the frame). The brightness of the FX-D’s viewfinder is about average for its class of camera and era and is probably its weakest attribute. The viewfinders of the 139, 137, and FX-103 are significantly brighter than the FX-D.
Exposure Modes: The FX-D has slightly different method for metering and taking photos from the Nikons and Canons of the era. The main light meter switch is not the shutter button, but the button on the front of the camera. If the shutter is not cocked, both the shutter button and the front button will provide a metering of the scene. However, if the shutter is cocked, only the front button can provide a pre-exposure meter reading. If the shutter is cocked and you decide not to push the front button, pressing the shutter button will trigger an instantaneous reading and then take the photos. The shutter is not especially loud but lacks good dampening.
The FX-D’s metered manual mode is straightforward. The LED viewfinder will blink the correct shutter speed for the given aperture value if the selected shutter speed is incorrect.
Exposure Lock: Both the 139 and FX-D introduced a front switch that would lock the metered exposure for as long as the lever remained in that position. This switch is also used for the FX-D’s self-timer. This type of switch was also incorporated into the later 1982 RTS II.
Flash: Unlike the 139 and 137, the FX-D does not have TTL flash capability. A 1/100 flash sync is par for the course for the era and the class of camera.
Camera Covering: The FX-Ds used a vinyl-type body covering which has not stood the test of time. Nearly all have degraded pretty badly. Replacement coverings exist.
Accessories
FX Winder: The FX Winder is a standard bottom-fitting unit that could advance the film up to 2 frames per second. The Winder is loud and obviously cannot rewind the film. It does have a nice built-in handle that helps grip the set-up. The FX-D could also use the winder designed for the 139.
CS-201 Flash: While the FX-D does not have TTL flash capability, the CS-201 auto flash could set the camera automatically to its flash sync speed while the exposure is in “auto” mode.
Eyecup: While the original round rubber Contax/Yashica eyecups are difficult to find today, the cheap square rubber eyecups for the Canon EOS 100D – 1100D fit just fine.
Conclusions
The relatively compact and lightweight FX-D has pretty much all of the essential features anyone would want in a manual-focus 35mm SLR. Its main characteristics include viewfinder of so-so brightness, exposure lock capability, relatively reliable electronics, and the capability for a motor drive. Compared with its 1981 competition in the advanced amateur SLR market, the FX-D was right up there with the best. Today, FX-Ds are extremely cheap on the used market, with many sellers basically giving them away. The FX-103 is another camera to consider as it adds a better viewfinder, program modes, and TTL flash at the expense of dropping the exposure lock feature. Otherwise, all Contax bodies from the 139 onwards significantly outclass the FX-D.
The RTS II was Contax’s flagship professional SLR from 1982 until the introduction of the RTS III in 1990. With pretty much everything you would want in a manual-focus SLR and a professionally-bright viewfinder, it is an excellent native platform for C/Y-mount lenses. My favorite overall.
Sometimes, what separated a 1970s or 1980s professional 35mm SLR from an advanced amateur model was not much. However, professional cameras from this era usually have three significant upgrades over the mid-range: a brighter viewfinder with greater scene coverage and magnification, interchangeable focusing screens, and a higher top shutter speed. Other attributes could include more advanced metering modes, a manual shutter speed backup for electronic shutters, and higher-powered motor drives. With the RTS II, it was not so much that it was more materially capable than the existing prosumer 139Q or 137 MA, but it had a truly professional viewfinder, a slightly higher top shutter speed at 1/2000, interchangeable focusing screens, a manual backup shutter speed, and more robust construction all around. Some of the technology found on the RTS II had already been implemented on the 139, including the capability for TTL flash and a front-mounted exposure lock switch.
The RTS II is certainly the best of what could be considered the “second generation” of Contax-Yashica SLRs, which also included the 139, 137, and Yashica FX-D. The 1986 167MT would be a giant leap forward for Contax, introducing a 1/4000 top shutter speed, multiple program modes, multiple metering modes, integrated film advance and rewind, TTL daylight fill flash, and a number of other truly modern features. Given the fact that so many advanced post-RTS II Contax models exist, some of them remaining very affordable, perhaps there is no compelling reason for most to go “back” to a 1/2000 top speed, only center-weighted metering, and manual everything else?
Marketed as an “upgrade” to the original 1975 RTS, the RTS II retained the ability to use most of the original accessories for the former. Compared to its contemporaries, the 1980 Nikon F3 and the Canon New F-1, it was fairly competitive but not entirely. For instance, the RTS II did not have interchangeable specialized prisms, super high-speed motor drives, and its line-up of lenses was not as extensive as either Nikon or Canon. Even by the early 1980s, it appears that Contax had pegged its fortunes not to pros who did niche work like sports or wildlife, but more towards a system that focused on providing capable platforms for high-quality normal focal length (18-200mm) SLR lenses, whereas it can be argued that Nikon and Canon focused on the reverse, high-tech reliable bodies with a ton of accessories and a wider range of above-average lenses.
More than forty years after its introduction, the RTS II remains a highly worthwhile platform, delivering the Contax “experience” without any unnecessary bells and whistles. Let’s take a look.
Specifications
For reference, here are the specifications for three contemporary products: the Leica R4, Contax RTS II, and the Nikon F3.
Leica R4
Contax RTS II
Nikon F3
Year
1980
1982
1980
1983 Price (Body Only)
@ $1,000
@ $500
@ $400
Viewfinder Coverage
92% / .90x
97% / .87x
100% / .82x
Viewfinder Info
Shutter Speed / Aperture / Exposure Mode
Shutter Speed / Aperture
Shutter Speed / Aperture
Focusing Screens
Interchangeable (5)
Interchangeable (8)
Interchangeable (21)
Shutter Speeds
1 sec – 1/1000
16 sec – 1/2000
8 sec – 1/2000
Shutter Type
Vertical Metal
Horizontal Titanium Foil
Horizontal Titanium Foil
ASA Range
12-3200
12-3200
12-6400
Exposure Modes
P / A / S / M
A / M
A / M
Exposure Lock?
Yes
Yes
Yes
Metering
Center Weighted / Spot
Center Weighted
Center Weighted
X-Sync
1/100
1/60
1/80
TTL Flash?
No
Yes
Yes
DOF Preview?
Yes
Yes
Yes
Backup Speed
1/100
1/50
1/60
Winder
External
External
External
Winder Model
Motor-Winder or Motor-Drive
W-6 or W-3
MD-4
Exposure Comp.
Yes
Yes
Yes
Prisms
Fixed
Fixed
At Least 6
Batteries
2 x SR44
1 x S28PX
2 x SR44
Weight
635g
735g
715g
RTS II with the W-3 Motor Drive
Operation
Viewfinder: The RTS II uses a different viewfinder than those employed in the contemporary 139 and 137 MA (95% / 0.86x) and is also different than those used in the later 159 and 167MT. 97% viewfinder coverage with a .87x magnification is a professional specification. Curiously, the RTS II stock focusing screen is a microprism type that lacks a split screen focusing aid. The viewfinder displays both the shutter speed and aperture but lacks the frame count that was included on the 137 MA. The viewfinder is noticeably brighter that the 139 and 137 (which are both fairly bright themselves). Unlike, the 139 / 137, which displays the selected aperture at the bottom of the viewfinder via some kind of magnified reflected dial, the RTS II uses LEDs to display the aperture, even in half-stops, even with Yashica ML lenses.
Exposure Modes: The RTS II is aperture-priority, which means that the camera selects the appropriate shutter speed given the selected aperture. It also has the capability for metered manual, which means that an LED will blink at the correct shutter speed given the selected aperture. Metering and taking a shot is a little unusual and works the same way as the 139, 137, and FX-D. With the shutter not cocked, metering of the scene is performed by either pressing the shutter button or the button of the front lever. However, if the shutter is cocked, pressing the release will take a photo without any preview opportunity. If the shutter is cocked, you must use the front button to take a pre-exposure reading.
Manual Back-Up Speed: Obviously, a concession to professionals who still probably lacked confidence in batteries and electronic shutters, the 1/50 backup manual shutter speed is activated by turning a lever and then pressing the DOF preview lever.
Battery: The RTS II uses a single 6V battery The silver oxide versions include the S28PX and the 4SR44. The alkaline version is the A544.
Exposure Lock Lever: Introduced on the 139, and also used on the 137 and the Yashica FX-D but disappearing on the 159, the RTS II has a front-mounted exposure check and lock lever. Pressing in the button checks the exposure. Turning the lever will “lock” the current exposure reading indefinitely until the lever is switched back. With some practice, this system is almost as convenient as the more conventional “half-press” of the shutter speed button found on other manufacturers’ products.
Internal Improvements: Over the original RTS, other than some better technology, Contax implemented a better film pressure plate and improved the film transport system.
Film Loading: The RTS II employs a little sleeve in the spool to take up the film leader, ala the Leica M3 or Leica CL. When loading the film, the camera will automatically set itself to 1/60 for shooting the blank frames to arrive at frame 1. I have found that loading film in an RTS II can be a little finicky because the sleeves sometimes do not hold the film leader well, perhaps because over time they have lost their snugness or maybe modern film stocks are a bit thinner.
Other Functions: The RTS II has the standard series of other features which do not require any detailed explanation: a 1/2000 top shutter speed, a shutter lock switch, DOF preview, exposure compensation dial, conventional manual film loading and rewind, capability for double exposures, and self-timer.
Accessories
Flashes: The RTS II has a relatively slow flash sync speed of 1/60. Its hot shoe contains two pins and can fully utilize the entire range of Contax TTL-capable flashes. In my opinion, the RTS II pairs the best with the affordable TLA 30. While not a small unit, the TLA 30 has native bounce abilities and can use TTL flash exposure with any aperture set on the AE lens, allowing a sort of primitive daylight fill operation.
Focusing Screens: Contax produced a total of eight (8) focusing screens for the RTS II. Unfortunately, these screens are not compatible with any subsequent Contax model. The split image focusing screens are extremely hard to find these days.
Winder: Contax produced two professional winders compatible with the RTS II: the W-6 and the W-3. The hefty W-6 plus its 12-AA battery powerback was carryover from the original RTS and can shoot up to five frames per second and features some interval shooting settings. Also offered was the more compact W-3 with a three frames per second capability that took only 6 AA batteries.
D-4 Databack: Designed for some specific practical use that seems to be unknown today, the RTS II had an optional databack that could imprint the time, date, and frame number on the negative.
Eyepiece: For some reason, the OEM Contax rubber eyepieces are a little hard to come by. Fortunately, as with nearly every single Contax and Yashica SLR, the cheap replacements for various digital Canon SLRs fit just fine.
Conclusions
If looking at pre-1985 Contax SLR models, I would recommend the RTS II over any alternative (coming in second would be the 137 MA). I would also recommend sourcing a Contax 50mm f/1.4 for it, as it is pretty much essential for the experience. If looking at models like the Leica R3-R5, the problem with Leica R for film use is that the lenses have skyrocketed in price, almost absurdly so. When comparing the RTS II to the Nikon F3 or Canon New F-1, it may come down to your preference between great bodies and great lenses. When comparing the RTS II to any other pre-1985 non-professional, manual-advance camera, the RTS II will usually be the better choice.
During 1982, the Zeiss-Yashica partnership announced two new cameras: the Contax RTS II, its new professional flagship and the 137 MA, an upgraded version of the 137 MD. The 137 MA went on sale in North America during the spring of 1983. While retaining most of the same specifications as the MD, the MA included the following upgrades: (1) optional manual shutter speed control; (2) a faster integrated motor drive to 3 frames per second from 2; and (3) an improved the film transport system. At launch, camera shops often bundled the 137 MA with either the Contax 45mm f/2.8 AE Tessar (meh) or the 50mm f/1.7 AE Planar (excellent). According to advertised retail prices at the time, the 137 MA cost about $100-150 more than the Contax 139Q. The 137 MA was produced until about 1986, replaced that year by the Contax 167MT.
At bottom, the 137 MD/MA, the 139, and and Yashica FX-D have similar capabilities: (1) the same viewfinder coverage and magnification; (2) the same top shutter speed of 1/1000; (3) aperture-priority autoexposure; (4) either an internal or optional external motor drive; (5) the same or similar metering system; (6) provisions for exposure compensation; and (7) an exposure lock function. Over the FX-D, the 139 and 137 have brighter viewfinders, longer max auto shutter speeds (11 seconds versus 1 second), TTL flash capability, and display the selected aperture in the viewfinder. The 1985 Kyocera-produced Contax 159MM (the successor to the 139) and Yashica FX-103 (the successor to the FX-D) contained significant further improvements. The 159MM would add, inter alia, a top shutter speed of 1/4000; and both it and FX-103 would add program-mode autoexposure. However, the launch of the 159MM and FX-103 clearly signaled Kyocera’s intentions to push Contax upmarket and Yashica downmarket.
These days, the 139 and 137 MA remain generally inexpensive on the used market, while many sellers cannot give FX-Ds away. Although the 137 MA is quirky, its controls are all in the wrong places, and it is bulkier and heavier than many of its contemporaries, I think it is a fantastic and reasonably-priced vintage SLR. Let’s take a look.
Specifications
Year Announced
1982
Lens Mount
Contax/Yashica Bayonet
ViewfinderCoverage
95% / 0.86x
Focusing Screen
90-Degree Split Screen; Microprism Collar
Viewfinder Info
Shutter Speed, Aperture & Exposure Count
ASA Range
12-3200
Shutter
Electronic Horizontal Cloth Focal Plane
Shutter Speeds
11 sec. – 1/1000
Flash Sync
1/60
TTL Flash?
With Dedicated Contax Units
Exposure Compensation
+ / – 2 Stops
Exposure Lock
Yes; Switch on Top
Automatic Film Advance
Single; Continuous Up to 3 FPS
Batteries
4 x AA
Weight
665g (without batteries)
Operation
Viewfinder: The 137 MA’s bright viewfinder is one of its primary strengths. The 95% coverage and 0.86x magnification, the same as the 139 and FX-D, is pretty good, but not professionally-good. The non-interchangeable focusing screen is a standard 90-degree split screen with a microprism collar. The viewfinder displays the shutter speed (via LEDs) on the right of the frame, the selected aperture at the top of the frame, and the current frame count on the left of the frame. The 139 does not display the film count. The FX-D does not display either the aperture or the film count.
Autoexposure: The 137 MA utilizes aperture-priority autoexposure, via the “A” position on the shutter speed dial. The top shutter speed of 1/1000 was standard for this class of camera. While it is nice that the 137 MA has the capability to manually select the shutter speeds, it is a little awkward to use in real life given the left-hand side controls and the fact that the shutter speeds are displayed on the side of the dial and not on top. To use the 137 MA in a manual metering mode, the LED in the viewfinder will blink at the selected aperture, but will remain on at the appropriate shutter speed given the aperture. The horizontal cloth focal plane shutter on the 137 MA is an unusual attribute for a 1980s Contax camera, not used since the 1975 RTS or on any camera after, but it probably has something to do with keeping the shutter noise down and/or better syncing with the motor drive.
Film Loading / Advance: The automatic film loading on the 137 MA is still quite primitive compared with the next generation of SLRs. The film must be pulled across into the slot like a normal manual camera. Once it is in the slot, you press the shutter button which in theory should automatically spool the film onto the sprockets. The continuous mode allows shooting up to 3 frames per second, which was extraordinary for 1982. The integrated film advance is actually fairly muffled, making at kind of shew shew sound, much quieter than any external motor drive of the era. Rewinding of the film is through a regular rewind crank (auto rewind technology was still in the near future). My example seems to have a “hair trigger,” which means if you are not super careful, it is really easy to shoot two consecutive frames in “Single” mode.
Exposure Lock: It would be fair to say that Contax never took a conventional approach to exposure lock. Instead of a switch on the front of the camera like the 139 and FX-D, the 137 MA uses a switch at the top right side of the camera. The procedure is to meter the scene, switch the setting to “AE Lock,” and the camera will lock the prior shutter speed as long as the switch is on that setting. To disengage, you must switch off the AE Lock setting.
Batteries: The 137 MA is powered by four AA batteries loaded in the bottom of the camera. Easy, cheap, and convenient.
Flashes: The 137 MA can use the world of Contax-branded TTL flashes. The flash sync speed is slightly slower at 1/60 than the 1/100 for the other products. When using a Contax TTL flash, the camera will automatically set the shutter speed to 1/60 when in “A” mode. For all other flashes, the shutter speed dial must be turned to “X.”
Other Features: The 137 MA also has the slew of other common features, like a self-timer, a battery check, exposure compensation, and a depth-of-field preview.
Accessories: The 137 MA had a few accessories, like a nifty hand grip and a primitive, useless databack. As OEM eyecups are hard to find, like nearly every Contax and Yashica product, the cheap replacements that work for many Canon digital cameras fit perfectly on the 137 MA.
Conclusion
The 137 MA represents a pinnacle of the pre-Kyocera-takeover Contax-Yashica advanced amateur line. It is a high-quality (yet somewhat hefty) camera with a bright focusing view and a relatively muted automatic advance. As a platform for C/Y lenses, it will not disappoint. If considering acquiring a pre-1985 Contax SLR, I would still recommend the RTS II overall as it has a higher top shutter speed and a professionally-bright viewfinder, but the 137 MA is certainly not far behind. While the 137 MA cannot really compete with the 167MT and later Contax cameras in terms of overall functionality, it does provide pretty much everything you would need in a non-professional manual-focus SLR.
Although not the last new 35mm film SLR introduced by Konica (that would be the 1985 TC-X), the 1983-87 FT-1 was its best. Fixing most of the shortcomings of the abortive 1979 FS-1, the FT-1 incorporated almost all of the features of the better pre-autofocus advanced-amateur cameras of the early 1980s: an integrated motor drive, auto film loading, exposure lock, a relatively bright viewfinder for its class of camera, and the ability to use a dedicated semi-automatic flash system. If looking for an Autoreflex lens mount platform, the FT-1 should be at the top of your list. None of Konica’s contemporary models — the FS-1, FC-1, FP-1, or TC-X — are competitive with it. The FT-1 exists in two versions: a silver and black model. Neither is particularly rare. During its production run, camera stores often bundled the FT-1 with a number of different standard lenses, typically with the Tokina-produced 40mm f/1.8 or 50mm f/1.8 Hexanons or the more expensive Konica-made 50mm f/1.4.
By 1983, with autofocus SLRs on the horizon but not yet to market, electronic-shutter, battery-dependent cameras had come to dominate the market. 1983 witnessed the introduction of a number of remarkable cameras such as the Nikon FE2 & FA, the Canon T50, and the Minolta X-500/570. With competition in the professional and advanced amateur markets so intense, slight differences in price or the addition/omission of a single feature could make or break a new model. The FT-1’s biggest selling points were: (1) an integrated film loading and advance (which was still quite rare in 1983); (2) an intuitive easy-to-use exposure lock located by half-depressing the shutter button (many cameras of the era either did not have AE Lock, had external switches and levers to lock the exposure, or just had an external “back-lighting” button); and (3) an ability to use dedicated, semi-automatic flashes at a slightly-higher sync speed. Otherwise, with a top speed of only 1/1000 (average for the class), and the lack of accessories like focusing screens, battery packs, and the like, the FT-1 was no professional machine.
In terms of reliability, the FT-1’s electronics have held up “fairly” well. Its primary and endemic problem is its gasket deterioration. In essence, the gaskets used between the circuit strips eventually broke down into sticky piles of goo whose residue interferes with the electrical contacts. Thankfully, dedicated camera enthusiasts have developed step-by-step tutorials for the relatively-painless (i.e., still relatively) fix, which requires some disassembly of the top of the camera, the cleaning of the old goo, and the replacement of the gaskets with common household materials. This operation will probably be necessary for nearly any FT-1 still in existence. If it helps, I am not great at camera repair, but I was able to do it.
So, with all of that, let’s take a look at the swansong of the Konica SLR line.
Specifications
Lens Mount
Autoreflex
Exposure Modes
Shutter Speed Priority / Manual
Shutter
Vertical Electronic Metal Focal Plane
X-Sync
1/100 (Dedicated Flash) or 1/60 (Other)
Viewfinder Coverage
92%
Meter
Center-Weighted Silicon Diode
ASA Range
25-3200
Shutter Speed Range
B, 2 secs – 1/1000
Weight
570g
Batteries
4 x AAA or 4 x AA
Operation
The FT-1 is a straightforward and easy-to-use camera.
Motor Drive: The number one selling point of the FT-1 at launch was its integrated film loading and advance Film loading is straightforward. Pull the film across the plane and close the film door. On the “single” shooting mode, the FT-1 may get up to 1 frame per second, but “continuous” could possibly (optimistically?) do up to 2 frames per second. The motor drive is not necessarily quiet, but significantly quieter than the external motor drives of the day.
Exposure Lock: Konica’s prior Autoreflex cameras each were able to “exposure lock” through a half-depress of the shutter button. To activate exposure lock on the FT-1, you slide the lever around the shutter button to the AE-L position and half-depress and hold the shutter button.
Shutter Speed Priority: In 1968, Konica was first-to-market with an SLR with shutter-speed priority autoexposure with its Autoreflex T. Although aperture-priority operation eventually became more popular and widespread on other manufacturers’ SLRs, shutter speed priority is no less difficult to deal with. A main advantage of shutter speed priority is to ensure that the speed is always high enough to prevent motion blur, the death-knell of any photograph. By keeping the shutter speed at a minimum of 1/60 and only moving up from there, motion blur risks are minimized. Konica bodies require the lens be set to “EE” or “AE” for the autoexposure to operate properly.
Metered Manual Mode: Like other Konica AR bodies, the FT-1 will meter in “manual mode.” In essence, you select a shutter speed and aperture and when the LED illuminates in the blank spot in the viewfinder right above f/1.4, you are at the right settings.
Flash Technology: TTL flash operation hit the market around 1980. TTL flash meant that now the camera is the device that measures the reflected light from the subject to determine the proper exposure. TTL flash operation (requiring dedicated units) began to appear on cameras like the 1981 Minolta X-700 and the 1982 Nikon FG. The FT-1 does not have TTL flash capability. However, Konica’s dedicated X-24 and X-36 flashes will automatically set the shutter speed on the FS-1, FC-1, and FT-1 to a higher X-sync (1/100 instead of 1/60) and then automatically set the lens aperture to that setting indicated on the switch of the flash. In theory, this is slightly more automated than a regular auto flash where one would have to set the shutter to 1/60 and set the appropriate aperture on the lens, the Konica flash units were not particularly versatile with the X-24 having only two aperture settings (f/5.6 and f/11). Of course, the FT-1 will work with virtually any third-party auto mode flash.
Viewfinder: The FT-1’s 92% coverage and 0.81x magnification are just about average for cameras of the class. Of course, viewfinder brightness will most always be dependent on the maximum aperture of the lens you are using. Although the viewfinder is bright, certainly good enough to easily focus indoors with lenses with a max aperture of f/2 and wider, it is certainly not “professionally” bright. However, the FT-1 is much better than all Konica AR bodies that came before it. The non-interchangeable focusing screen is a standard split image micro-diaprism. The actual display is borrowed from the FC-1 and uses LED lights that are illuminated next to the aperture selected for the shutter speed from f/1.4 to f/22. Overexposure is indicated by f/22 blinking and underexposure by a blinking light in the blank slot above f/1.4.
Batteries: The FT-1 came standard with a four-slot AAA battery pack that was advertised to be good only for about 20 rolls. The more desirable optional AA battery pack had a larger capacity for about 40 rolls. Konica warns not to use NiCad batteries in the camera. However, rechargeable NiMH batteries work just fine.
Self-Timer: The button is located on the top of the camera by the shutter speed dial.
Exposure Compensation: On the left side of the camera, the FT-1 has a dial for -2 to +2 exposure compensation in 1/3 stop increments.
Use of Exakta, M42 & Nikon Lenses: Like all Konica AR bodies, it is possible to use with full infinity focusing and metering M42, Exakta, and Nikon F lenses with the appropriate adapter. However, although AR bodies will meter these lenses, using them is a bit cumbersome.
Compared to Its Model Year 1983 Competition
When compared to its direct competition at similar price points, the FT-1 presented an attractive options. The cameras below all sold with a standard lens for about $175-225 in 1983.
Konica FT-1
Canon T50
Minolta X-570
Nikon FG
Yashica FX-70
AE Modes
Shutter
Program
Aperture
Program & Aperture
Aperture
Shutter
Electronic Metal Vertical
Electronic Metal Vertical
Electronic Metal Horizonal
Electronic Metal Vertical
Electronic Metal Vertical
Shutter Speeds
2 sec – 1/1000
2 sec – 1/1000
1 sec – 1/1000
1 sec to 1/1000
11 sec – 1/1000
Meter
Center-Weighted Silicon Diode
Center-Weighted Silicon Diode
Center-Weighted Silicon Diode
Center-Weighted Silicon Diode
Center-Weighted Silicon Diode
X-Sync
1/60 or 1/100
1/60
1/60
1/90
1/100
TTL Flash
No
No
Yes
Yes
No
Viewfinder Coverage
92% / 0.81x
92% / 0.83x
95% / 0.90x
92% / 0.84x
95% / 0.86x
ASA Range
25-3200
25-1600
12-3200
12-3200
25-1600
Motor Drive
Load / Advance
Load / Advance
Motor Drive 1
MD-14
No
Exposure Lock
Yes
No
Yes
No (Backlight Button)
Yes
Weight
570g
490g
480g
490g
435g
Batteries
4 x AAA or AA
2 x AA
2 x SR44
2 x SR44
2 x SR44
Conclusions
If you enjoy using Konica AR lenses for film photography, you are pretty much stuck with Konica bodies because of their lens’ close film-to-flange distance. In my view, the FT-1 is the best option. While many Konica aficionados would alternatively suggest the bulky and mechanical 1973 Konica Autoreflex T3, I am generally not a fan of that generation of SLRs. With the brightest viewfinder and the best feature set, the FT-1 remains Konica’s best overall SLR and is a great platform for using Autoreflex lenses on film.
The 1984 East German Praktica BC-1 was a modest update of Pentacon’s 1979 flagship B200 35mm SLR. The BC-1 also appeared as the “Jenaflex AM-1” and the “Praktica BC-3” (the latter being export versions). While nothing particularly special or innovative for the mid-1980s, the BC-1’s main appeal, as with the rest of the “PB” (Praktica Bayonet) line of cameras, is as a platform for the last generation of Carl Zeiss Jena and Pentacon 35mm SLR lenses. Because we covered some background of the Praktica bayonet cameras and lenses in the review of the 1987 BX20, here we are just going to focus on the BC-1.
Along with all other major manufacturers of M42 bodies and lenses during the late 1970s, Praktica followed suit and switched from M42 to a proprietary bayonet mount and electronically-controlled shutters for aperture-priority autoexposure operation. Starting in 1979, three “lines” of lenses were made for the PB system: (1) CZJ produced the “high end” primes and zoom, deploying a mix of repurposed M42 optics as well as some new designs; (2) Pentacon produced a few prime lenses in house, mostly M42 carryovers; and (3) Japan-based companies like Sigma and Tokina produced a few primes and a few ho-hum, slowish zooms. It appears that after 1983-84, CZJ lens production for the system fell to a trickle. After Pentacon was split up and sold, Schneider briefly resurrected the BX20 as the moderately-redesigned “BX20s” in 1992, but by that time there were no German-designed lenses made for it except for the kit Pentacon 50mm f/1.8.
While the 1979 Praktica B200 (and its export version, the “BC-X”) was a fairly competitive body at the time for the mid-range, non-professional SLR class, the 1984 BC-1 was just a slight refresh with no real additional features other than the addition of a flash ready light. With an all metal body, BC-1 is certainly a quality manual focus SLR whose only real limitation is its par-for-the-course 1/1000 top shutter speed. Praktica produced a fair number of them (along the AM-1 and BC-3), and they are plentiful and cheap on the used market (with the vast majority being in Europe). Let’s take a look.
Specifications
Shutter
Electronic Metal Vertical
Shutter Speeds
40 secs – 1/1000 (stepless)
ASA Range
12-3200
Focusing Screen
Fresnel + Triple Wedge + Microprism
Flash Sync
1/90
Viewfinder Coverage
95%
Weight (Body)
530g
Battery
1 x 6V (A544 Akaline / S28PX Silver Oxide)
Exposure Lock?
Yes
Self-Timer?
Yes
Exposure Compensation?
Yes
Motor Drive Capable?
Yes
Operation
Viewfinder/Focusing Screen: The BC-1 has a relatively nice focusing screen with three focus aids, 95% coverage, and good viewfinder brightness for this class of camera. The viewfinder displays the selected aperture at the bottom of the view using a mechanical system that links to the lens. On the right, a series of red-dot LEDs to the left side of the shutter speeds will appear. In autoexposure mode, a half-depress of the button will light up the LED next to the camera’s preferred shutter speed. In metered manual mode, the red LED will light up next to the shutter speed that should be selected for the aperture chosen on the lens. Easy and straightforward stuff.
Exposure Lock: Unlike many cameras in this class from other manufacturers, the BC-1 has a useful exposure lock button located on the top of the body. To use it, continue half-pressing the shutter button and then press the exposure lock button. As long as the shutter button is half-pressed, the exposure will be locked. When the shutter button is released, the lock disengages.
Flash: A “new” feature on the BC-1 was an extra flash shoe pin that would provide a flash charge indication in the viewfinder and adjust the shutter speed automatically to 1/90. This only works with certain Praktica-branded flashes (which were seemingly all made under contract in Japan). With any other type of flash, one must set the shutter speed dial to the “flash” setting.
Battery: Along with all other PB cameras, the BC-1 originally used a PX28, a 6V mercury battery. The Germans must have had a soft spot for this kind of battery as it was also used by the contemporary West German Contax RTS II. Fortunately, there are perfect modern replacements like A544 (alkaline), S28PX (silver oxide), a 6V lithium (I have not tried this one), or stacking four LR44s or SR44s. Plenty of options. Silver oxide is my preferred route.
Shutter: The electronically-controlled vertical metal shutter is not particularly quiet but has proven to be fairly robust in the 40 years since its production.
Other Features: The BC-1 also has the stable of standard other features one would expect from this class of camera, including an exposure compensation dial, an external depth of field preview lever, a self-timer, and a battery check button.
Accessories
B Winder: The B winder is a simple device that screws into the bottom of the camera and takes 4 x AA batteries. It is not particularly fast with “up to” two frames per second and is quite loud.
M42 Lens Adapter: Praktica made the only adapter of which I am aware that that permits the use of M42 lenses (in stop down mode only) on PB bodies. This slightly rare adapter has the required three electronic contacts that communicate with the body that a lens is attached. Because PB bodies require that contact must be made with the three connectors on the body for the metering system to work, no lenses other than M42 with the Praktica adapter (and those lenses that can adapt to M42) can be used on them.
Flashes: The BC-1’s only real “new” feature over the B200 series was a flash “ready light” that appeared in the viewfinder. This function only works with a few contemporary Praktica-branded flash units (these flashes were made in Japan) like the BC1600, BC2400, BD24, BD32, and BD36. Praktica-branded flashes are an enigma, with seemingly few popping up for sale in Europe. The later BX20 and BX20s were TTL-flash capable, using Olympus’ system.
Miscellaneous: Other than a case, the BC-1 could utilize a variety of other Praktica accessories such as an eye cup, an angle finder, bellows, extension tubes, and teleconverters.
Longevity Issues
Other than the types of general faults that may plague many electronic 35mm SLRs from the 1970s and 1980s, like frame counters failing and electronics burning out, the BC-1 appears to have been a fairly robust platform as long as it was taken care of. A common complaint is that the shutter speed dial plate falls off because of the failure of the factory adhesive. Also, if you find that with a good battery, the autoexposure is flashing “under” no matter what you do, remove the four bottom screws from the baseplate and press the white electronics terminal with your finger to see if the autoexposure then works. If this is the issue, for a decent workaround, shove some cardboard between the connector and the base plate to keep some pressure on the former and reassemble. As with nearly all old cameras, it remains important to run test rolls through any PB body as an electronic shutter can fail in ways that would not be immediately noticeable until you develop the negatives.
Conclusion
Although Praktica PB bodies as a whole were and are not that exciting, the ability to use some unique, high-end, extremely expensive for the time that noticeably stand apart from the manual focus Nikons, Canons, and Minoltas of the era, would be the main draw. in my opinion, the PB cameras are a much better platform for CZJ and Pentacon 35mm SLR lenses than any older Praktica M42 body. The BC-1’s viewfinder is nice, the autoexposure operates as intended, and the exposure lock is very useful. The only advantages of the later BX20 are its lighter weight and capability for TTL flash, although some anecdotal reports are that the BX20 may not be as reliable in the long-term as the B200/BC-1 series. My impression is that the B200 / BC-1 / BX20 series are probably equally reliable. Be sure to TEST all functions with any Praktica PB body that that you are considering acquiring.
Ca va sans dire that the accurate metering and exposure of a subject is essential for photography. Some photographers swear allegiance to the “Sunny 16 Rule” — and will let you know that they do whenever the subject comes up. Others will say that incident light meters provide the most accurate readings. For most others, the convenience and peace of mind that comes with an electronic light meter reading are essential. Currently (January 2021) coming in about $140 shipped to the USA (if bought directly from Taiwan), will the new Keks EM01 shoe-mount light meter finally encourage you to pull that old meterless camera off the shelf? There is not a whole lot to say about this wonderful little meter, but here are some impressions.
What’s In the Box?
The EM01 comes in a nice little presentation box that includes: (1) the unit itself; (2) a USB-C to USB-A cable; and (3) modular plastic shoe mounts in various thicknesses (Keks also offers optional aluminum mounts for extra). Keks warns the user not to use a USB-C to USB-C charging arrangement, or any charging mechanism that exceeds 5 volts. The standard meter comes in either silver or black.
The first thing one will want to do is determine the correct shoe for your application and use the included allen key to install it. Otherwise, the EM01 will slide right off the camera. The EM01 allows you to install the shoe mount in the center of the unit or offset (for use with multiple hot/cold shoe accessories). However, I find that even the thickest plastic shoe is not quite thick enough to fully secure the meter on certain cold shoes on older cameras. For future models of the light meter, Keks should consider going with a traditional screw-in mechanism to secure the meter to the camera.
Operation
The EM01 has a 30 degree metering angle, which is the equivalent of an 80mm lens view. By way of comparison, the old dedicated Leica MR meters have a 27 degree angle of view (90mm lens view). In regular 35mm cameras terms, 30 degrees is tighter than a traditional internal “center weighted” meter but not close to a traditional “spot” meter (which are usually around 5 degrees or less).
The specifications are impressive, if not standard, in better light meters. The ASA range is 50 to 8000. Aperture range is from f/1.0 to f/64. The shutter sped range is 30 seconds to 1/6400 second. These capabilities should be able to cover the functionality of almost any older and desirable meterless camera.
The EM01 has five unmarked buttons. The button on the back triggers the meter. The unmarked two buttons on the top left change the desired aperture, and the two unmarked buttons of the top right change the desired shutter speed. To adjust the film speed rating, hold the top left button while hitting the metering button to increase the ASA, and hold the lower left button to decrease it. The OLED display displays the f-stop, the shutter speed, ASA, the EV value, and the lumens.
Of all currently-available shoe mount light meters, the EM01 seems to “match” older cameras well from an aesthetic perspective (if such things are important to you).
Note: Like many LED displays, they are nearly impossible to see if one is wearing polarized sunglasses. Keep that in mind.
Looks Pretty Good on a Leica M3
Accuracy
Tested against a Nikon Z6 with center weighted metering (which of course evaluates a wider view than the EM01 with wide and normal lenses), the EM01 performs admirably. In uniform lighting conditions, they match almost all of the time. In mixed landscape scenes, they also generally line up. Because most films have some exposure latitude, a difference of a half-stop is not going to make or break a photo.
As with any reflected-light meter, they are not foolproof. In difficult and/or mixed lighting situations, an average 30 degree meter if pointed at the center of a scene may underexpose if there is a large portion bright sky in the frame, or overexpose if the scene is dominated by dark shades. In challenging lighting conditions, your best best is going to be moving physically closer and taking a meter reading of what portion of the scene should be correctly exposed — or use a best guess in compensating exposure manually.
Conclusions
Unlike the old days, these days, there are certainly plenty of old and new shoe mount light meters available — some cheaper, some more expensive. For older meterless Leica M, it would be hard to go wrong with a working MR or MR-4 meter as it will permit coupling directly with the shutter speed dial. Whether one or another aftermarket shoe-mounted light meter is “better” will invariably come down to personal preference. The expensive Voigtlander VC II meter has manual style knobs and lighted arrow operation. The Sekonic L-208 is rather awkward to shoe-mount, but has the capability for incident metering. The Reveni light meter has the exposure information on the top rather than on the back.
It would be nice if a manufacturer would consider recreating or redesigning the dedicated meters for Leica and Nikon rangefinders — ones that would directly couple the the camera’s shutter speed dial. However, because that day may/will never come, the EM01 remains a very nice little unit that will hopefully encourage more folks to dust off their meterless 35mm and medium format cameras.
If you enjoyed this article and/or disagree with the opinions expressed herein, please feel free to leave a comment!
By 1984, the concept of the modern point & shoot camera had begun to emerge. No longer would people be expected to set apertures, manually load film, focus lenses, or figure out how to use a flash. 35mm photography would no longer require so much technical skill, but just extraordinary vision. But does this early generation of 35mm film cameras have any place in the 21st century? Maybe?
In 1984, every major Japanese manufacturer introduced very similarly-featured point and shoot 35mm cameras with a “sliding door” to cover a diminutive lens. These cameras may be properly considered the “second generation” of modern point-and-shoots.
The high-end range of this generation included the Canon MC, the Chinon 35FA Super, the Minolta AF-C, the Pentax PC35AF-M, and the Vivitar TEC 35. Each had a 35/2.8 Tessar-style lens, a built-in or clip-on flash, a primitive autofocusing system, automatic film advance and rewind, and user-selected ASA settings from 25/50, 100, 200, 400, and 1000. Some of these manufacturers sold cheaper, de-featured versions of these cameras; but we will leave discussion of those to the recycling center of history.
We were not going to endeavor to pick up examples of all of these cameras as: (a) these former thrift-store bargains are now selling for a premium on eBay, Etsy, and online camera stores; and (b) these cameras have mostly the same features, with minor some variations. Given the slight technical differences and overall similarity in functionality in all of these cameras, it hard to say whether any of them are the “best” of the class. Of note, the Pentax focuses down to 0.7m at the trade-off of having to use DX-coded film cassettes (or otherwise default to ASA 100). It is possible that certain lenses excel over others, but that would difficult to evaluate without testing them all against each other. One could assume that despite slightly different lens designs, they probably perform pretty similarly.
WARNING: The primary drawback of all of the cameras of this class is the lack of reliable autofocus at closer distances. Although most will provide some kind of viewfinder LED indicating close, medium, and far focusing, these cameras will not indicate to you what it has actually focused on. The flash operation is equally quirky and dependent upon an accurate autofocus in the first place. None of these cameras are well-suited for any critical work – you will miss plenty of close-up photos and not realize it. The ability of point & shoots to provide accurate autofocusing feedback did not come until years later. However, as a snapshot camera for subjects within the lens’ depth-of-field, they work moderately well.
The 35FA Super was at the top tier of the 1984 gamut. The essential features were: (1) a 35/2.8 lens; (2) manual ASA settings up to 1000; (3) an underexposure warning; (4) a built-in flash; (5) automatic film loading and rewinding; (6) focus confirmation in the viewfinder (close, medium, far away); (7) a self-timer; (8) auto-focus lock; and (9) automatic daylight fill-flash. And you can open the shutter cover and take a photo far faster than you can retrieve your iPhone out of your back pocket.
Early autofocus cameras will seem bizarre to anyone used to the moving lenses of SLRs. During the 1970s, the American company Honeywell patented the first commercially-useful autofocus system. In a nutshell, two sensors on the camera would triangulate the distance to the subject (much how a rangefinder focuses) and then transmit the distance information to the camera. The lens itself does not pre-focus, it will do so in the instant after the shutter is depressed. Japanese camera manufacturers were the first to license and figure out how to build a camera around this technology – starting with the revolutionary Konica C35 AF in 1977.
The 35FA Super has impressive mid-1980s industrial design. Sliding open the lens door powers on the camera. The fixed lens trades image quality for versatility. The camera is eminently pocketable. Check out the manual here.
Loud: The 35FA has an incredibly loud shutter and film advance mechanism. And it is not a pleasant sound. This is not for your secret “street photography.”
35/2.8 Glass Lens: The modern fast Tessar lens design has its origins in 1930. In archetypal form, it is a four element, three group design. The minimum focusing distance on the 35FA Super is 1 meter — the industry standard for the time.
Bright Finder: The 35FA has a bright, non automatically parallax-corrected viewfinder. It has etched parallax correction framelines for shorter focusing distances. It would be some time before an autofocus point and shoot would have automatically-corrected framelines.
Underexposure Warning and Focusing Verification: The camera will warn you with a red LED just to the left of the viewfinder if the shot will be underexposed. The viewfinder also displays the approximate location of the focusing — close up, medium range, and infinity — in cute little icons.
Autofocus and Exposure Lock: By depressing the shutter slightly, the camera will lock both the focus point and the exposure so you can reframe. These are essential features for any useful point and shoot.
Auto-Rewind: With a switch on the base, the camera will auto-rewind the film and automatically stop when completed.
Built-in Fill Flash: A sliding lever turns on the flash. A yellow indicator will alight when the flash is charged. The camera has an “auto” daylight fill flash capability — turn on the flash for daylight shots and it will do an ok job of filling in shadows.
User-Selected ASA 50 to 1000: From ASA 50 to 400 the 35FA can adjust in 1/3 increments. This is the only camera in this class that do this. There are no increments over 400 — just straight from 400 to 1000. Also, no DX coding like later point and shoots. So if you roll your own film with generic cassettes, there is no annoyingness.
Optional Date Back Model: I have no idea why Japanese cameras were so big on date backs — a feature that imprints the current date on the negative. Many of these data backs only went up to 2019. Whomp.
Recommendation: For cameras of this class, the Chinon checks all of the boxes. The most useful feature is its fast operation. Autofocus lock and exposure lock make this camera as useful as any larger SLR. The only feature that it lacks is the 0.7m minimum focus of the Pentax. The biggest drawbacks are that it is loud and has spotty autofocus.
The 1984 Konica MG is a delightful, clam-shell, compact autofocus camera. Konica also produced an “MG/D,” which was the same camera but with a date-imprinting feature. With a fixed four group, four lement 35mm f/3.5 lens, the ability to manually set the ISO, and an auto load/advance/rewind, there is much to like about the little MG. The only real drawbacks are the loud film advance, an easily-fooled light metering system, and a primitive passive autofocus system that lacks feedback. Let’s take a closer look.
In 1975, Konica produced the first 35mm compact camera with a built-in flash: the C35 EF. In 1977, Konica produced the first commercially-available autofocus camera: the C35 AF, which licensed the “Vistronic” technology from Honeywell. The C35 AF actually had an indicator to show the distance the camera autofocused on the photo you just took, but not before you took it. The C35 AF was amazingly successful, selling over a million copies. From 1978 to 1982, Konica then produced a number of mostly-forgettable compact cameras aimed primarily at the mass market. Here they are compared.
EFP
C35AF2
EF3
EFJ (Pop)
C35MF
Year
1978
1980
1981
1982
1982
Lens
38mm f/4
38mm f/2.8
35mm f/2.8
36mm f/4
38mm f/2.8
Min. Focus
1.5m
1.1m
1.0m
1.5m
1.1m
Aperture
f/4, f/8 & f/16
f/2.8-16
f/2.8-16
f/4-16
f/2.8-22
Shutter Speeds
1/125 only
1/60-1/250
1/60-1/500
1/125 only
1/60-1/250
ASA Settings
100 & 400
25-400
25-400
100-400
25-400
Focus
Fixed
Autofocus
Zone (4 Positions)
Fixed
Autofocus
Flash?
Built-In
Built-In
Built-In
Built-In
Built-In
Batteries
2 x AA
2 x AA
2 x AA
2 x AA
2 x AA
AF Lock?
No AF
No
No AF
No AF
Yes
Underexposure?
No
Yes
Yes
Yes
Yes
Weight
300g
375g
275g
270g
440g
Konica’s MG certainly constituted a more “fully-featured” compact point & shoot. The MG was not necessarily cheap, being advertised for around $120-150 during the summer of 1984 (about $350-430 in today’s dollars). With MGs remaining fairly affordable and largely unnoticed by 21st-century influencers, is it a serious contender for one’s everyday point and shoot? Let’s take a look.
Specifications
There is no question that the MG was Konica’s then-most advanced point and shoot to date and outclasses all prior models in functionality.
Year
1984
Lens
35mm f/3.5
Lens Design
4 Elements in 4 Groups
Minimum Focus
1.1m
Aperture
f/3.5-16
Shutter Speeds
1/30-1/500
ASA Settings
50-1000
Focus
Autofocus
Flash?
Built-In
Batteries
2 x AA
AF Lock?
Yes
Exposure Lock?
No
Underexposure Warning?
Yes
Weight
288g
Operation
Auto Film Loading, Rewinding, and Advancing: The MG will automatically load the film, auto-advance, and auto-rewind. There appears to have been no attempt to muffle the sound of any of it. The auto-rewind does not automatically shut off. You will have to listen to the change in sound when the film becomes entirely rewound.
Taking Photos: The MG has pretty simple operation with almost no user override. A half-press of the shutter should “autofocus” when a green light pops up by your eye. The autofocus zone is a small square in the middle on the viewfinder. A red light by your eye means underexposure. There is no warning if you are too close to a subject to autofocus the lens. Consequently. you will need to make sure that you are physically at least 1.1 meters away from your subject. There is no confirmation in the viewfinder or thereafter how far the lens focused for a particular shot. The manual assures us that if you partially depress the shutter button, the focus will lock and then you can reframe the shot. There is a slight lag between pressing the shutter button and the camera taking the shot. Unfortunately, the built-in light meter is easily fooled by any strong backlighting in a scene, requiring some guesstimating of exposure compensation.
Automatic Aperture & Shutter Speeds: The MG has automatic shutter speeds from 1/30 to 1/500. No manual override. The 1/30 bottom shutter speed effectively prevents “shutter shake” in low-light situations.
35mm f/3.5 Lens: The MG sports a four element, four group lens. I would guess that this lens provided the template for Konica’s later A4 / Big Mini series of cameras. The f/3.5 lens performs exceptionally well, even wide open, with almost no distortion.
Manual ASA Selector: The ASA is adjustable via a switch above the lens in full steps of 50, 100, 200, 400, and 1000. Unlike later-generation point and shoots that only used DX film coding, this permits the user easily to use home-rolled film, to push/pull film at one’s leisure, or even to adjust exposure on the fly.
Parallax Correction: In the viewfinder, there is an etched line within the frameline to estimate the framing at closer focusing distances.
Pop-Up Flash: To turn on the flash, there is a gray lever on the side of the camera that pops it up. There is an orange light on the back of the camera that informs when the flash is charged. The flash recycles quite slowly. The flash will work in automatic fill-flash mode.
Auxiliary Lens Capability: At least one company made auxiliary lenses for the MG. There is a “wide angle” and a “telephoto.” The wide angle appears to decrease the view to about 28mm from 35mm. The telephoto seems to increase the view to about 50mm. Any auxiliary optics will degrade the image quality at least slightly. But they are small enough to carry around.
Now It’s a 28/3.5 Lens!
Optional Date Back Model: The MG/D model had the standard date back that would imprint the date in the corner of the frame. Still do not understand why those were a thing.
Conclusions
It is difficult not to like the MG. It has a very sleek, easy to use, and fairly inconspicuous apart from its film advance noise. The ability to select an ASA setting not only allows the use of reloadable film cassettes but also permits some degree of exposure compensation in difficult lighting situations. The primary drawbacks are the lack of useful autofocus feedback and a light meter that picks up any strong backlighting. That being said, I have been pleasantly surprised by the results. It is certainly a camera I will keep in the stable. If you are looking for a slightly “better” Konica point-and-shoot from the mid-1980s, check out the MT-11 of 1986.
Sample Shots
Please check the Instagram associated with this website at hashtag #konicamg for sample photos from the Konica MG.
The Konica MG Manual
Because the MG Manual is not otherwise available on the Internet, please enjoy!
Introduced in 1985 and discontinued in 1987, the Konica TC-X was the last of the line for the Autoreflex-mount series of cameras. Supposedly built for Konica by Cosina, the TC-X shares nothing in common with any prior Konica SLR model except for the lens mount. Despite this, the TC-X was notable from an historical perspective for two aspects: (1) it was the first 35mm SLR camera capable of reading DX-coded film cassettes; and (2) it was the first body made primarily of plastic. Other than that, there is nothing remarkable about the TC-X. With its mechanical shutter and relatively dark viewfinder, and as its name implies, the TC-X is probably best understood not as any type of step forward from the 1983 electronic-shutter Konica FT-1, but rather as a kind of spiritual successor to the 1970s Autoreflex TC.
The standard lens sold with the TC-X was a new 6 element, 5 group 50mm f/1.8 Konica Hexanon lens, which was a product of a collaboration between Konica and Tokina, which produced a number of the final generation of Konica lenses, such as the f/22 versions of 21mm f/2.8, 24mm f/2.8, 35mm f/2.8, 40mm f/1.8, and a number of unremarkable zooms. The TC-X retailed for about $149 in 1985 with the 50mm lens. Sellers also often bundled the TC-X with the Tokina 35-70mm f/3.5-4.5 Zoom.
Given that, is there any case for the TC-X? Let’s take a look.
Baltimore Sun Advertisement, June 26, 1985.
Specifications
Lens Mount
Autoreflex
Shutter Type
Vertical Metal
Auto Exposure Mode
Shutter
X-Sync
1/60
Viewfinder Coverage
92% / 0.87x
Meter
Center-Weighted
ASA Range
50-1600
Shutter Speed Range
B, 1/8 – 1/1000
Exposure Lock?
Yes
Weight
375g
Self Timer?
Yes
Batteries
1 x AAA
Operation
While functional, reliable, and relatively light, the TC-X is a very basic SLR whose design and build quality leave something to be desired. Inheriting nothing from any prior Konica body other than the lens mount, the TC-X exhibits the typical attributes of many of Cosina’s made-for-hire bodies.
Viewfinder: The TC-X has a rather dark viewfinder for this class of camera and is easily its worst attribute. The focusing screen is a standard split-screen / microprism type with the aperture settings (f/1.4-22) on the left hand of the viewfinder. Dark viewfinders mean that with lenses whose maximum apertures are f/2.8 and smaller are much more difficult to focus.
Operation: The TC-X’s shutter-speed priority autoexposure operation is straightforward. Mount an AR lens and set it to AE/EE. Turn the meter on via a switch. The viewfinder via a match needle will show what aperture is selected at the shutter speed. Fiddle with the shutter speed accordingly to arrive at the aperture you desire. The TC-X can lock the exposure by a half-press of the shutter button. The TC-X can also operate in a metered stopped-down mode. This is also very simple: set the shutter speed and aperture until the meter needle arrives at f/1.4 in the viewfinder.
Shutter: The TC-X has an abbreviated shutter speed range of 1/8 to 1/1000. The shutter is loud and undampened. The On/Off meter switch also acts as a shutter button lock.
X-Sync: The TC-X’s flash sync speed is a below-average 1/60 and must be manually set, along with the appropriate aperture, for auto flash use.
Battery: The TC-X uses a sole AAA battery which only powers the light meter. Being a mechanical-shutter camera, the TC-X will work at all shutter speeds without a battery.
DX Film Coding: As stated above, the TC-X was the first widely-available 35mm SLR that had integrated DX film reading, set on a dial around the film rewind. Fortunately, you can still manually set the film speed at anywhere from 50-1600 ASA. Film loading is actually a little bit of a pain as sometimes it is difficult to get the film leader to catch reliably into the takeup reel.
Conclusions
The good things about the TC-X are its non-battery-dependent mechanical shutter, its reliability / durability, and its useful exposure lock feature. The biggest downsides of this simple camera are its relatively dark viewfinder, its undampened shutter, and sometimes fussy film loading. While the TC-X can be seen to be a better (overall) mechanical body than the TC or the T4, my advice is go for an FT-1 and do not look back.
Kyocera-owned Yashica of Japan manufactured four program-mode, electronic-shutter, manual-focus C/Y-mount SLRs: the FX-103, 107, 108, and 109. The FX-103 was introduced during early 1985 shortly after the unveiling of the impressive Contax 159MM. At launch, retailers offered the 159MM for about $425 with a 50mm f/1.7 Contax Zeiss lens while the FX-103 was usually priced around $250 with a 50mm f/1.9 ML Yashica lens. However, camera stores often bundled the FX-103 in all sorts of configurations, with flashes, zooms, winders, and even sometimes with the Contax 50mm f/1.7.
The FX-103’s claims to fame include the fact that: (1) it was the first Yashica body that could offer three different exposure modes: program (high and regular), aperture priority, and manual; (2) it was the last Yashica manual-focus SLR that included the shutter speed information in the viewfinder; and (3) it had the best viewfinder of all Yashica bodies. However, there was one feature that the program-mode Yashicas had that no Contax camera featured: the ability to use “Program Mode” with every single lensmade in the C/Y mount. On the other hand, Contax bodies could only use post-1985 “MM” lenses in their program modes because of the way those lenses interact with the bodies’ electronics.
In terms of design, the FX-103 is direct descendant of, and shares much in common with the prior 1980 FX-D and the de-featured 1983 FX-70. The FX-103 also shares the same basic viewfinder as the Contax 137 MD/MA, the Contax 139Q, and the FX-D. The primary differences between the FX-103 and the FX-D are the the FX-103’s addition of program modes, its capability for TTL flash, its much brighter focusing screen, and the FX-D’s exposure-lock capability via a switch on the front of the camera.
Although the most “functional” 35mm Yashica camera body made up to that time, the FX-103 is really nothing special when compared with the 1985 offerings of other major manufacturers like Canon, Nikon, and Minolta. During that year, the latter companies were marketing products like the T80, the N2000, and the autofocus Maxxum 7000.
It goes without saying that the best “backup” body for your Contax is another Contax. However, if, despite all of that, you are still in the market for a Yashica film camera body, should you consider the FX-103 over models like the FX-3 Super 2000 or the FX-D? Let’s take a closer look.
Specifications
Year Introduced
1985
Weight
460g
Battery
2 x LR44
Shutter Speeds
B, 16 sec – 1/1000
Viewfinder
95% / 0.86x
TTL Flash?
Yes (Dedicated Units)
Flash Sync
1/100
Focusing Screen
Fixed Microprism / Split
ASA Range
12-3200
Motor Drive?
External
Auto Exposure Modes
Program (Regular & High) / Aperture / Manual
DOF Preview?
No
Settings In VF
Shutter Speed
Exposure Lock?
No
Exposure Compensation?
+2 to -2
Operation
While the FX-103 is significantly de-featured compared with the contemporary Contax 159MM, apart from the lower top shutter speed, it has fairly similar real-world functionality. The FX-103 is an odd mishmash of features on prior Contax/Yashica products: (1) the viewfinder of the 137/139 without the aperture information; (2) the basic body frame of the FX-D; and (3) the winder contacts of the 139/FX-D; and (4) the self-timer switch of the 139/159MM. The FX-103 is a remarkably small and light body. Here are some of the highlights and lowlights of its functionality.
Shutter: The FX-103’s top shutter speed is only 1/1000. This is a bit below par for the mid-1980s when most decent electronic-shutter SLRs could hit 1/2000 and even 1/4000. The shutter is quite pronounced and clanky because of an unusual lack of effective mirror dampening. The shutter sound is perhaps my least favorite aspect of this camera.
Viewfinder: The viewfinder is one of the best aspects of this camera. The FX-103’s viewfinder has a good 95% coverage and an average 0.86x magnification. The focusing screen is much brighter than the one in the FX-D and similar to that found on the 139/137. On the right side of the viewfinder is displayed the shutter speed range. Red LED lights illuminate to the right of each speed. There is a green “P” at the top to remind you whether the lens is set in the right position for program mode. Unfortunately, Yashica omitted the capability from the 137/139 to show the aperture setting in the viewfinder. The non-interchangeable screen is the standard split-screen microprism type.
Exposure Modes: A large improvement over the FX-D was the addition of two program modes: “regular” and “high.” As noted above, program modes will work with all C/Y lenses, unlike Contax’s limitation to “MM” lenses. All that is necessary is to set whatever lens attached to its minimum aperture setting. High program mode, in theory, is for longer lenses to ensure that the shutter speed remains high enough to prevent “camera shake.” However, the FX-103’s programming is not super aggressive in this regard, with only two (sometimes only one) shutter speeds between regular and high. The program mode has no shutter speed “floor.” In other words, the camera will set the shutter speed as low as necessary for correct exposure. The FX-103 also retains straightforward aperture-priority operation. A metered manual mode is also available by matching the LEDs in the viewfinder through the adjustment of the shutter speed and aperture.
Lack of Exposure Lock: In the only feature deleted from the FX-D, the FX-103 does not have the capability for exposure lock, lacking the front-mounted switch of the 139, FX-D, and RTS II. The FX-103 has a front-mounted switch, but it is only for a self-timer and a battery check light.
Cable Release: The FX-103 does not have a standard mechanical cable release slot. Instead, there is something called the “Cable Switch S” that will attach to a socket on the back side of the camera. This is the same cable that Contaxes use.
External Winder: There are two winders that will work with the FX-103. The first is the “Contax Winder II” designed for the 139, which has a modest 2 frames-per-second max speed and a nifty auxiliary shutter release. The second is the “Yashica FX Winder” which is basically the same unit but lacks the second shutter release. As you know, these older winders neither assist in loading or rewinding the film. These winders seems to have zero sound dampening and are quite loud.
TTL Flash: Another big improvement over the FX-D was the addition of TTL flash when using the then-new Yashica CS-203 flash as well any Contax TLA-series flash. A compatible flash will automatically change the camera’s shutter speed to 1/100.
Accessories: The FX-103 uses the standard eyecup (either the rectangular or circular one) that works on nearly all Yashica and Contax bodies. Yashica also produced a useless data back that was capable of imprinting the date directly onto the negative.
Compared
Here are the 159MM, the FX-103, and the FX-3 Super 2000 compared. As we can see, the FX-103 has several significant advantages over the FX-3 Super 2000: (1) a better viewfinder; (2) TTL flash; (3) real exposure information in the viewfinder; (4) the capability to use an motor drive; and (5) a dedicated exposure compensation dial. Of course, the FX-3 Super 2000 has a slightly higher top shutter speed.
Contax 159MM
Yashica FX-103
Yashica FX-3 2000
Year Introduced
1985
1985
1986
Weight
520g
460g
445g
Battery
2 x SR44
2 x SR44
2 x SR44
Shutter Speeds
B, 60 sec – 1/4000
B, 16 sec – 1/1000
B, 1 – 1/2000
Viewfinder
95% / 0.82x
95% / 0.86x
92% / 0.91x
TTL Flash?
Yes (Dedicated Units)
Yes (Dedicated Units)
No
Flash Sync
1/100 (Dedicated); 1/250 (Auto)
1/100
1/125
Focusing Screen
Interchangeable Microprism / Split
Fixed Microprism / Split
Fixed Microprism / Split
ASA Range
12-3200
12-3200
25-3200
Motor Drive?
External
External
No
Auto Exposure Modes
Program (3) / Aperture
Program (2) / Aperture
Metered Manual
DOF Preview?
Yes
No
No
Settings In VF
Shutter Speed / Aperture
Shutter Speed
3 x LEDs
Exposure Lock?
Yes
No
No
Exposure Compensation?
+2 to -2
+2 to -2
No
Repairs
Like any nearly 40 year-old camera, many FX-103s you may run across will most likely require a full replacement of the light seals and mirror dampener prior to serious usage. Furthermore, like many other Kyocera-produced Contaxes and Yashicas, the FX series are susceptible to “mirror slip” issue, a phenomenon where the glued-on reflex mirror starts to slip from its housing. In extreme cases, it will slip so far that the mirror may hit the back of a lens. As with any electronic cameras, there is also always a small risk that the electronics have failed over the years.
Conclusions
Kyocera was careful to ensure that no Yashica body could truly compete on features with a contemporary or prior Contax body. The FX-103 could have been a kind of “program mode” version of the Contax 139, but Kyocera decided not to do that. Although conventional thinking about Yashica C/Y bodies has traditionally focused upon the FX-3, the FX-103 is arguably a more versatile and advanced platform and has a brighter focusing screen than either. Its main achilles heel is the lack of an exposure lock. If looking for the most “advanced” Yashica SLR, that would probably be the 109 MP, which does have the 1/2000 top speed and auto film load/advance/rewind, but its lack of exposure feedback renders it yet another imperfect, “almost there” Yashica product.
Shortly after the introduction of the full-featured Contax 159MM in 1985, Kyocera followed up almost immediately with the 167MT in 1986 as a successor to the 1982 Contax 137 MA. The 167MT was an abrupt departure from the prior 137/139/159 series and was intended to compete with the next generation of 35mm SLRs like the manual-focus Canon T90, the Ricoh XR-M, and the Nikon N2000 (F-301). It was also quite expensive, about $600 for the body at the time. With Kyocera not replacing the professional 1982 Contax RTS II until 1990, cameras like the 167MT with its advanced electronics and higher shutter speeds would have to fill the void, at least temporarily. In 1992, Kyocera replaced the the 167MT with the “ST,” a camera with nearly the same functionality but with “knobs and dials” instead of LCD readouts and buttons displays, and a 1/6000 top speed instead of 1/4000.
With used 167MTs appearing to be pretty cheap entries into the Contax SLR world, they have always been somewhat popular. Is it a good option? Let’s take a look.
Specifications
Here are the 159MM, 167MT, and ST compared.
159MM
167MT
ST
Year Introduced
1985
1986
1992
VF Coverage
95% / 0.82x
95% / 0.82x
95% / 0.82x
Shutter Speeds
60 sec – 1/4000
16 sec – 1/4000
16 sec – 1/6000
Metering Modes
Center
Center / Spot
Center / Spot
Autoexposure Modes
P / A
P / A / S
P / A / S
Motor Drive
External
Advance / Load / Rewind
Advance / Load / Rewind
Advance Speed
3 FPS
3 FPS
3 FPS
TTL Flash?
Yes
Yes
Yes
Flash Sync
1/100
1/125
1/200
Viewfinder Info
Shutter Speed / Aperture
Shutter Speed / Aperture / Frame Count
Shutter Speed / Aperture / Frame Count
Batteries
2 x SR44
4 x AAA or AA (Optional)
4 x AAA or AA (Optional)
AE Lock?
Yes
Yes
Yes
ASA Range
12 – 3200
6-6400
6 – 6400
Weight
520g
620g
800g
Operation
The 167MT is an orphaned design in the Contax SLR lineup. With an LCD screen replacing some of the traditional knobs and switches and with a viewfinder LCD reminiscent of that in the Nikon F4, the 167MT takes a little getting used to. While top-mounted LCDs on SLRs were all the rage during the mid-to-late 1980s, whether they actually assist with real-world shooting is a matter of preference. Although the LCD screen certainly adds some convenience and renders settings easier to visualize, it makes using shutter speed priority and manual modes somewhat time-consuming. Otherwise, the 167MT demonstrates the quality and attention to detail that one would expect from Contax’s mid-range line of SLRs.
Lenses: There are four categories of lenses in the C/Y mount: (1) Contax AE lenses (pre-1985); (2) Contax MM lenses (post-1985); (3) Yashica ML lenses; and (4) third-party lenses made by Tokina, Cosina, and others. The 167MT can use all of these lenses but can only use the “MM” lenses with its program and shutter-speed priority modes. All other lenses can only be used in aperture-priority or manual modes.
Viewfinder: Like most all Contax bodies, the 167MT has an excellent, bright, but not quite professional viewfinder. 95% viewfinder coverage with a 0.82x magnification is just above average for the era. With the 167MT, Contax first adopted an LCD to display the exposure information (in green, no less). The LCD displays the aperture, the shutter speed, the exposure mode, and the frame count. Half-pressing the shutter button will light up the readings with a green light (still a little difficult to see in the daytime). The viewfinder does have an illuminator light for tough conditions.
Exposure Modes: The 167MT has three program modes (high, normal, and low), aperture priority, shutter speed priority, and manual. These modes are selected via a switch on the top of the camera and displayed on the top LCD screen. Contax MM lenses are required for the program and shutter speed priority modes. Program mode has the camera set the appropriate shutter speed and aperture combination for a particular shot. Program high is to maximize the aperture opening and shutter speed, and program low is to minimize the aperture opening and shutter speed. The 167MT’s exposure chart shows that the programming is fairly aggressive in this regard, with a maximum difference of five exposure stops between High and Low, exactly what you would want.
Aperture priority operation is straightforward. Choose the aperture and the camera sets the appropriate shutter speed. Manual mode is easy as well. The viewfinder will tell you by a + or – sign whether the shutter speed is too high or too law for the selected aperture.
Metering and AE-L: The 167MT has the capability for center-weighted or spot metering, adjustable via a switch on the top right of the body. The autoexposure lock setting only works with spot metering. When using AE-L, half-depress the shutter button to create a “locked exposure” value at which you can shoot away after recomposing. While the AE-L is activated, and while in aperture-priority mode, you can change the aperture and the body will automatically adjust the shutter speed according to the prior-set exposure value. However, to get out of AE-L, you have to switch it off and on again. I have always found the Contax AE-L method somewhat cumbersome compared to systems like Nikon.
Winder: The 167MT was the first Contax SLR body with integrated film load, advance, and rewind. Film loading simply requires opening the back, pulling the film across, and closing the back. The rewind is not automatic at the end of a roll. Simultaneously pushing and button and sliding the rewind switch starts the process. The 167MT has two drive modes: Single and Continuous. The continuous advance is good for up to 3 frames per second, which is very respectable for a 1986 camera.
Batteries: The 167MT uses 4 x AAA bottom-loaded batteries to power the camera and the winder. An optional bulkier battery pack allows the use of 4 x AA batteries.
DX Coding: The 167MT was also the first Contax body to be able to read DX film coding. Film speed can also be manually set via the LCD screen.
Exposure Compensation: The 167MT has the ability to correct + / – 2 EV in 1/3 stop increments. A + or – sign appears in the viewfinder to indicate that the compensation switch has been activated. In program mode, compensation changes both the shutter speed and aperture, in aperture priority just the shutter speed, and in shutter priority just the aperture. The 167MT also has an auto-bracketing feature that is activated by a switch below the exposure compensation dial. Switch that on, put the advanced on “Continuous,” and the body will shoot three photos in a row at the appropriate spread.
TTL Flash: The 167MT has the capability for TTL flash exposure with all of the Contax TLA flash units. In program mode, the body will set the shutter speed and set the appropriate aperture. In aperture priority mode, you set the desired aperture, the camera sets the shutter speed and the TTL flash does the rest. For daylight fill in program mode, there are no additional steps. However, the relatively low max flash sync speed of 1/125 will result in a rather small aperture for most faster films. For daylight fill in aperture priority mode, set the aperture and the camera will set the shutter speed. However, if the aperture is too wide, the camera will blink an overexposure warning in the viewfinder. I am not quite sure how “advanced” the daylight fill system is as later professional cameras took complex readings of the background and foreground to calculate the appropriate settings.
Accessories
The 167MT had a few accessories.
F-3 Eyecup: This rubber eyecup that slides over the viewfinder will protect your glasses.
P-5 Battery Pack: The 167MT natively uses 4 x AAA batteries. To increase the weight and size of your 167MT, the P-5 battery pack is available and takes 4 x AA batteries for increased longevity.
The D-7 Databack: The databack replaces the backdoor of your camera. During the 1980s and 1990s, many camera manufacturers offered the ability to imprint the date/time on your actual negative, like in the lower left quarter of the frame. I am not sure where the D-7 imprints the data. The D-7 databack could also be used to program interval photography.
Focusing Screens: The 167MT can accept four different focusing screens: the FU-3 (45 degree split image), FU-4 (horizontal split screen), FU-5 (matte), and FU-6 (grid).
Possible Issues
An important issue to take into account before you plunge into a 167MT is the fact that Kyocera no longer services this camera and there are no spare parts. Although still rare, the electronics on these cameras can still catastrophically fail for reasons beyond your control. I had an 167MT where the shutter, while firing seemingly correctly, was not opening correctly and was subsequently declared unfixable. The other endemic issue that plagues both Kyocera-made Contax and Yashica SLRs is the dreaded “mirror slip,” where the glued-on mirror slips out of it housing, resulting in the inability to focus correctly. Reports of 167MTs failing has made me think twice about recommending it over other competitive Contax bodies.
Conclusions
Choosing a manual-focus Contax SLR can be a little daunting because the Kyocera produced so many cameras with overlapping features. The first fork in the road is whether you are looking for a body without an integrated drive. If not, the choices are easy: the electronic-shutter 159MM or the mechanical-shutter S2b. If looking at cameras other than the professional RTS III, the RX and Aria were overall the best. Choosing between the 167MT and the ST really comes down to whether you prefer the LCD or switches/knob experience. The only other differences are that the 167MT has two additional program modes, the ST has a 1/2 stop higher maximum shutter speed, and the ST has a slightly higher flash sync speed at 1/200. In my opinion, I do not think that the 167MT competes well with the post-1986 Contax bodies and paying a little more for an ST, RX, RTS III, or Aria is well worth it.
For many of us, a high-quality fixed lens 35mm film point-and-shoot is on the bucket list – a camera that we can carry around everywhere and about which we will not get too upset if it gets lost, broken, or stolen. In deciding a camera to acquire, for me there are really only two essential inquiries: (1) is the lens relatively fast and sharp? and (2) what is the probability that the camera actually autofocused on the right thing?
The Internet has already done a pretty good job of combing over the more popular, higher-end point-and-shoot models — like the Contax T series, the Yashica T4, the Nikon 35/28ti, and the Olympus Mju. However, having a small obsession with Konica-branded cameras (my father having purchased his Autoreflex T during Vietnam War-era service), I have been attempting to track down some of its lesser-known products to see if they are any good. While Konica products like the 1968 C35, the 1990s Big Mini series, and the 1993 Konica Hexar AF are generally well-known, 1980s-era Konica compacts not so much.
35mm cameras marketed during the 1970s and before required the user to know something about photography. The 1980s saw the rise of cameras that permitted users to take good photos without such knowledge. The advent of autofocusing made photography more accessible to the masses who were not keen on learning to use / lugging around heavy SLRs.
From the introduction of the C35 rangefinder in 1968 until the unveiling of the C35AF in 1977 (the first consumer autofocus camera), Konica was on top of the compact camera game (although its SLRs were always a step or two behind). The C35AF, while impressively beating all others to market, lacked a few essential features. It lacked a focus lock mechanism for off-center subjects. The viewfinder did not communicate to you what the camera was actually focusing on (although Konica expected you to look at a distance scale on the front of the camera to confirm) or whether you were too close to the subject. The absence of these basic indications will guarantee a certain number of misfocused shots on every roll.
Other manufacturers solved these problems before Konica did. In 1983, Nikon introduced its L35AF, which pretty much has all the features you would have wanted in a point-and-shoot from the mid-1980s — a 35/2.8 lens, an integrated motor and rewind drive, focus lock, an active autofocus mechanism, a viewfinder showing four separate autofocus distances, minimum focus to 0.8 meters, a backlight compensation switch, a thread for a screw-in 46mm filter, shutters speeds from 1/8 to 1/450, and on some models manually adjusted ISO settings from 50 to 1000. Canon, Chinon, Minolta, and Pentax all introduced similar products with more or less the same material features.
Falling far behind, in 1983, Konica introduced the last of its C35 series — the “AF3.” In 1984, Konica unveiled the very slick but overly-simple MG — a kind of automated, autofocus Olympus XA. Neither of these cameras was competitive from a features perspective. During this time, Konica also made simplified versions of the C35 with only zone or fixed focus in its “EF” series — and throwaway cameras like the Pop and the Tomato. Under no circumstances should you waste any money on the C35AF, C35AF2, the Pop, the Tomato, or any Konica camera with the EF designation. We are going to ignore the 1985 Konica MR70 (a twin focal length 38/3.2 + 70/5.6) compact camera because it is not in our “fixed lens” category here and because I have never seen one.
In 1986, Konica made a clean break from the C35 series with three brand-new cameras — called in export markets the MT-7, MT-9, and MT-11. The MT series represented the totality of the Konica fixed-lens point-and-shoot line until the introduction of the next-generation A4 in 1989, followed by the first of the “Big Mini” series in 1990.
All MT cameras share some basic features like an integrated motor drive, a built-in flash, and auto rewind. The MT-7 is an extremely basic camera with a fixed-focus lens that only focused down to 1.5m, one aperture per ISO value, a fixed shutter speed of 1/125, and a rather slow 36/4 lens. Think of the MT-7 as the next-generation Konica Pop. The MT-9 was more capable, with focusing down to 1.3 meters, a focus lock option, visual icons for the auto-focusing distance, an underexposure warning indicator, a “close-focus” flash option (discussed below), and a 35/3.5 lens.
The MT-11 was the flagship, sporting a slightly faster 35/2.8 Tessar-style lens. The MT-11 sold for about $150 in 1986, about the same price as the contemporary Nikon L35AF2, which translates roughly to $350 today. Konica would not produce another true point-and-shoot with a 2.8 lens until the 1990s Big Mini F.
Specifications
The MT-11 hits most, but not all, of the benchmarks established by the Nikon L35AF.
Lens: 35/2.8, 4 elements in 3 groups, Tessar-style Motor Drive and Auto Rewind: Yes Focus Lock: Yes, by slightly depressing the shutter Autofocus Type: Passive Autofocus Confirmation: Three LED indicators (close, near, and infinity) Minimum Focus: 1.00 meter LED Warning For Exceeding Minimum Focus Distance: Yes LED Underexposure Warning: Yes Backlight Compensation Switch: No. Capability for Screw-In Filters: No. Shutter Speeds: 1/4 to 1/500. ISO Settings: DX Coded Only; No Manual Override; Defaults to ASA 100 Batteries: 2 x AA
Although a filter thread would have been nice, the biggest bummer on the list is the lack of manual override for ISO settings and the limited number of DX settings. I am still at a loss to understand why as the 1980s progressed, camera manufacturers moved to DX-coding only with only a limited range of ASA values. Seems like expanding the ISOs up to 1600 would have cost $0. But I guess if we are going to have this hypothetical debate, at a 1/500 top speed, 1600 speed film would have just overexposed all of your outdoor shots. And 800/1600 speed film may not have been a thing for regular people during the Ritz Camera era of photography.
The MT-11 has two features that the L35AF lacks: (1) automatic daylight fill flash; and (2) a bizarre flash-only close-up focusing mode that goes down to 0.45 meters (about 1.5 feet). Also interesting to note, Nikon’s subsequent L35AF2 (1985) and AF3 (1987) cameras actually had less functionality and manual control than the original L35AF.
Operation
Photos may not do the MT-11 justice. It is a really handsome, well-designed camera. Although its shell is hard plastic, there is nothing flimsy about it. Everything is intuitive. There are only a total of five buttons and switches — shutter (top), self-timer (top), flash (front), on switch (front), and rewind (bottom). The lens is protected by an door whose opening also acts as the camera’s “on” switch and prevents any shots while closed.
Although lacking in any override, the camera functions well. As stated above, the most frustrating part of point-and-shoots, unlike SLRs and rangefinders, is that you often never can be sure what the camera just focused on. The MT-11 has three autofocus confirmation lights in the viewfinder. Half depress the shutter, and you will see either a person (close), or a group of people (near), or a mountain (infinity). Depressing the shutter halfway locks the focus point. A blinking person means you are too close to the subject. A flash light will blink in the viewfinder as an underexposure warning. You can force a shot with no flash on the MT-11 by simply not activating it. Underexposure will most likely default the camera to its wide open settings (1/4 at f/2.8, I believe).
The autofocus mechanism is “passive,” and the lens does not physically move until after the shutter is tripped. The pre-shot autofocusing is completely silent. I am almost positive that MT-11 operates in “steps” to correspond to distances and aperture combinations — it is just unclear how many there are. There is a typical brief shutter lag as in all cameras of this class and the motor drive is a bit noisy (noisier than the MG). In daily practice, the autofocus works “pretty well” but you will often need to “try again” if the camera indicates “far away” when your subject should be “close.” Also, the autofocus does seem to have occasional problems focusing on uniformly-colored subjects (either light or dark). This reveals a limitation of a “passive” autofocus system that requires the scene to have at least some contrast.
The light meter appears to be somewhat primitive and can be fooled by strong backlight in a scene. If your subject is close and backlit, consider using the flash. Otherwise, just be careful.
Like in most of its advanced compact cameras since the C35, the MT-11 uses a “Tessar” lens — 4 elements in 3 groups. It is likely that the MT-11’s lens is a derivative of the C35’s optics, but that is not clear from any extant literature. The Tessar is a simple, effective design that is easy to mass-produce and can be found in almost every higher-end point-and-shoot made in Japan during the 1980s and into the 1990s. Do not expect Leica-like performance from the humble 35/2.8. It is a capable lens for your standard 1980s 4x6s and 5x7s. For internet purposes, it works just fine.
Feature No. 1: Daylight Ambient Flash
Ever since the introduction of the Konica S3 in 1973, Konica had been firmly committed to the concept of daylight fill flash. Almost all of Konica’s point-and-shoots were programmed to shoot daylight flash. (At the same time, Konica never produced an automatic daylight fill flash system for any of its SLRs). The MT-11 is no exception. The operation is simple — just turn on the flash and take a daylight photograph. I am not sure exactly the method used, but I imagine that it is a descendant of the Konica S3’s system. The built-in flash syncs at full power at all shutter speeds. The autofocus sensor sends the distance information to the camera which then adjusts the aperture and shutter speed accordingly. Fill flash from point-and-shoots is not often flattering, so consider finding some material with which to attempt to diffuse the flash a bit.
Feature No. 2: Close-Up Flash Focusing
Certainly the oddest feature on the MT-11 is this “close-up flash mode” which permits you, only with the flash on, to take a photo at a distance down to 0.45 meters (about 1.5 feet). I am not quite sure what this mode is attempting to accomplish. In any event, if you press and hold in the lever next to the lens the flash pops up and then angles. You will see that the autofocus LED will no longer flash when you are closer than 1 meter to the autofocus point. However, in this mode, the camera will not tell you if you get closer than 0.45 meters to the subject. For those who do not carry a ruler around, for a close-up subject, the idea would be to find the 1 meter minimum focusing mark and then “lean in” towards the subject slightly, but not more than 0.55 meters inwards.
Should You Buy One?
Once I started looking for an MT-11, it took quite a while to locate one for a decent price and in good condition. It is not clear whether its apparent rarity is because it never sold well in the USA, because they are sitting in people’s basements and attics, or because a strategic stockpile of them is hiding in resale shops across the country.
I wholeheartedly agree with the Internet that if you are going to acquire a film point-and-shoot camera you should go straight for the good ones. To me, the point of a point-and-shoot camera is to take it with you everywhere and not be out a rent or mortgage payment if something befalls it. Because the MT-11 checks both essential boxes — it has a good and fast lens, and it minimizes the possibility for user autofocus error — I say that you cannot go wrong with it. Other cameras to consider in the mid-1980s class would be the Nikon L35AF (the original one with the ASA up to 1000, and not the AF2 or AF3), the Chinon 35FA Super, the Pentax PC35AF, or the Minolta AF-C (no built-in motor drive). Of these other options, the L35AF still has the most features.
Sample Photos
Here are a few sample photos taken on Kodak Portra 400. As you can see, the MT-11 is more than capable as a snapshot camera (assuming you nail the focus).
Taken With the “Close-Up Flash Mode”
Instruction Manual
Because the MT-11 instruction manual is otherwise unavailable on the Internet, here you go.
21mm lenses were originally developed for the purpose of aerial photography during the 1930s. Using a 1946 Russian-patented design as a template, in 1954 Zeiss (West Germany) would introduce the first widely-produced 21mm lens for 35mm cameras.
The 21mm focal length remains a difficult medium to create compelling images. Although 21mm lenses certainly are capable of capturing plenty of context, “context” does not necessarily equal “compelling.”
21mms And Other Super Wides Are Not Real Substitutes for Perspective Control Lenses For Architecture and Landscapes. While it may seem counterintuitive, 21mm lenses actually not ideal for architecture unless you can level the lens with the subject, instead of “looking up” at the subject. When one “looks up” at a subject with a 21mm lens, a fair to great amount of vertical perspective distortion is created. Vertical perspective distortion is a combination of the focal length of the lens plus the angle of view. Because of inherent wide angle distortion, this is why “perspective control” tilt-shift lenses were developed — which for the most part are/were made in the 24-35mm focal length.
Some folks will tell you that you can use Photoshop to correct the distortion created by “looking up” at a subject. However, for this to work, you purposefully must include much more area around your subject or otherwise it will be cropped out. The less level the lens is, the more area will be cropped. Furthermore, while small tweaks are usually not a big deal, when you use software to radically correct distortion, you are really creating something that does not reflect reality and optics — the resulting image is not what the lens captured, not what your film/sensors recorded, and not what your eyes actually saw. Whether such things even matter anymore to anyone in the 21st century is another story.
Here is an example of a correction of a situation where the lens was not level to the subject.
Original Image
Corrected with Photoshop (Notice the Unfixable Crop)
21mm Lenses Can Be Really Effective When Used Extremely Close and Level to a Subject. In my opinion, 21mm lenses are really effective at getting really close and level to a subject. Not only can you isolate a close subject, much more background context can be captured than a traditional portrait lens.
Because longer lenses inherently has less vertical distortion when”looking up” (as the angle of the lens to the film/sensor plane is less extreme), a good rule of thumb is to try any wide shot with a 35mm or 28mm lens first, and only go wider if those focal lengths cannot capture the subject.
With all of that preface, in this piece, we are going to look at some old and new lenses that fairly exemplify the evolution of thought and design for 21mm lenses — the 1954 Zeiss Biogon 21mm f/4.5 (Contax rangefinder), the 1979 Yashica ML 21mm f/3.5 (C/Y), the 1979 Konica Hexanon 21mm f/2.8 (AR), the 2002 Konica M-Hexanon 21-35mm f/3.4-4 (Leica M), and the 2004 Zeiss Biogon 21mm f/4.5 (Leica M). The purpose of “testing” these lenses against each other is not to make any declarations about whether a lens is capable of delivering quality images, which is almost always an unresolvable debate, but to evaluate their strengths, weaknesses, and differences.
1954 Zeiss Biogon 21mm f/4.5
Zeiss 21mm f/4.5 Biogon Included Finder
Specifications
Mount: Contax Rangefinder Optical Design: 8 elements in 5 groups Aperture: f/4.5 – f/22 continuous Aperture Blades: 8 Minimum Focus: 1.00 meter Filter Size: 40.5mm Weight:
Lens Design
Diagram from the Original Patent
A good place to start with 21mm lenses is with the first ever mass produced — the Zeiss Biogon 21mm f/4.5 in Contax rangefinder mount. Up until the development of the 21mm, the widest available 35mm lens was the limited production 1951 East German Zeiss Jena 25mm f/4 Topogon — a pre-war design that did not reach production until after the war. The Zeiss Jena Topogon was extraordinarily expensive at the time. Both Nikon and Canon would produce their own Topogons — the 1953 W-Nikkor 25mm f/4 and the 1956 Canon 25mm f/3.5. Today, both the original 25mm Zeiss and Nikkor lenses are extremely rare collectors’ items. The Canon 25mm is still relatively affordable and more widely available.
The history of the development of the 21mm Biogon is interesting. Rather than the Russians adapting a German lens design, here the Germans took inspiration from the Russians. The short version is that in 1946, Russian optical designer Michail Rusinov finally patented a design for symmetrical super wide angle with a relatively wide aperture with excellent corner illumination. Dr. Ludwig Bertele, working for Zeiss (West Germany) at the time, used this innovative design as a blueprint for what would eventually become the Biogon.
Produced from 1954 to 1961 exclusively in Contax rangefinder mount, with an optically-identical mirror lock-up Contarex SLR version being produced well into 1960s, the Biogon was the first commercially-available 21mm lens for 35mm cameras. In 1958, Leica introduced its first generation Super Angulon 21mm f/4. Nikon would follow in 1959 with the Nikkor-O 21mm f/4 (another hopelessly rare and expensive collectors’ item). Although its date of introduction is not entirely clear, it appears that in 1956, the Soviets produced its non-rangefinder-coupled Russar 20mm f/5.6 in Leica screw mount, which was produced in various iterations into the 1990s. Recently, Lomography commissioned the re-launch of a “Russar+” (still not rangefinder-coupled), which still remains available for purchase.
Although the Biogon was designed for the Contax rangefinder system, the lens will mount and is “close enough” in focusing to use on Nikon rangefinder cameras. The Biogon has a “flare shield” loosely screwed into the rear element housing that can be removed pretty easily. The Biogon will adapt perfectly to digital mirrorless cameras with the appropriate adapter. The Biogon will also reportedly work fine on the Voigtlander Bessa R2C and R2S if the flare shield is removed. Unfortunately, the Biogon will not mount to any OEM or aftermarket Leica M camera body with any currently-available adapter — the rear element housing contacts Leica’s rangefinder mechanism and there is no present way around it.
The Biogon came with a dedicated non-parallax corrected external viewfinder. The viewfinder does not win any awards, but it works. It is not clear if a dedicated lens hood exists. The Biogon is a rather heavy, but an absolutely gorgeous lens. The MTFs are very impressive for a 1950s lens and can be found here (these are the MTFs for Contarex version but it is the same lens).
1979 Yashica ML 21mm f/3.5
Specifications
Mount: Contax C/Y Optical Design: 12 elements in 8 groups Aperture: f/3.5 – f/16 click stops Aperture Blades: 6 Minimum Focus: 0.3 meter Filter Size: 72mm Weight: 370g
Lens Design
Diagram from Lens-db.com
The first generation of 21mm lenses for SLRs was simply adapted rangefinder lenses. Because the rear lens housings of rangefinder 21mms would interfere with an SLR’s mirror, the first generation could only be used if the mirror was “locked up.” As a practical matter, because one could not use the mirror, the lenses would have to be used with external finders and scale-focused only. Examples of these mirror lock-up lenses included the Nikkor-O 21mm f/4, the Contarex 21mm f/4.5, the Minolta 21mm f/4. the Yashica 21mm f/3.3, and the first generation Leica Super Angulon 21mm f/4. There were other mirror lock-up lenses made even wider than 21mm. Needless to say, on an SLR, these lenses were not very practical at the time and are not particularly popular today.
To fully adapt super wide angle lenses to SLRs required a different type of lens design — one that would place the rear lens elements well in front of the mirror. It would not be until the mid-1960s that the second-generation “retrofocus” lenses emerged. This included the Nikkor-UD 20mm f/3.5, the Konica AR 21mm f/4, and the Leica Super Angulon-R 21mm f/4. These lenses all shared a suspiciously similar external design as well as mostly took large 72mm filters. By the late 1970s, a “third generation” of 21mm SLR lenses began to emerge — slightly faster (f/2.8), more compact, and taking the normal-sized filters for the camera system.
As the well-documented story goes, at the end of its rope with its flailing Contarex SLR line, Contax (West Germany) partnered with Yashica (Japan) early 1970s to produce a new SLR system under two brands that would share the same lens mount (“C/Y”). The first camera body produced under the joint venture would be the 1975 Contax RTS followed by the Yashica FX-1 and Yashica FR.
At launch, the RTS promised to be a full professional system. Contax offered a number of retrofocal super wides — a 15mm f/3.5, 16mm f/2.8, and a 18mm f/4 (with the 16mm and 18mm designs being carry-overs from the Contarex era). Contax would not produce a native C/Y-mount 21mm f/2.8 until the 1994, very late in the game. Needless to say, the Contax 21mm Distagon is extremely sought after today and is now often a $2,000+ lens, with well-used examples selling for far more than used modern Zeiss ZE or ZF 21mm lenses. I’m sorry, but no film-era 35mm prime SLR lens is worth $2,000 for those who shoot, rather than collect.
It would not be until 1979 that Yashica would produce a 21mm lens in C/Y mount. It has both the design and features of a “second generation” 21mm SLR lens. According to an interesting write-up, Yashica used the 1968 Leica R 21/4 Super Angulon as its inspiration. The original clamp-on rectilinear lens hood for the Yashica is difficult to find, but any of the hoods designed for the 72mm generation of 21mm lenses should work — like the HN-9 for the Nikon-UD 20mm f/3.5.
The HN-9 Nikon Hood Seems to Work Pretty Well
The ML 21mm lens has remained popular and somewhat pricey because it remains the best and only OEM alternative in native C/Y mount to the expensive Contax 21/2.8. There is also some indication that Yashica did not produce that many copies.
1979 Konica AR Hexanon 21mm f/2.8
Specifications
Mount: Konica AR Optical Design: 9 elements in 8 groups Aperture: f/2.8 – f/22 click stops Aperture Blades: 6 Minimum Focus: 0.2 meter Filter Size: 55mm Weight: 215g
Lens Design
Diagram from Tinglilin.com
During the 1960s and 1970s, Konica’s primary reputation in the photography world was as an above-average lens designer. Although Konica would never produce a truly professional 35mm camera body, its lens designs were ahead of the general curve until the late 1970s.
The 21mm f/2.8 on a Konica FC-1
One of the hardest to find Konica AR lenses is the 21mm f/2.8. Like many of the late 1970s and 1980s Hexanon lenses, the 21mm was produced for Konica by Tokina. The Hexanon can be classified as a “third generation” 21mm SLR lens, redesigned from Konica’s 1965 21mm f/4, packaged in a smaller barrel, and using Konica’s standard 55mm filter thread. What is remarkable about the Hexanon is the ability to focus down to 0.2 meters. Because of its rarity and corresponding price, not much is objectively known about the performance Hexanon other than a few glowing user perspectives.
In Case You Were Wondering How Close 0.2m Is
2002Konica M-Hexanon 21-35mm f/3.4-4 (Leica M)
Specifications
Mount: Leica M Optical Design: 11 elements in 10 groups Aperture: f/3.4 (21mm) f/4 (35mm) – f/22 click stops Aperture Blades: 10 Minimum Focus: 0.8 meter Filter Size: 62mm Weight: 295g
Lens Design
Diagram from Lens-db.com
In 1999, Konica introduced its excellent Hexar RF camera that, in a way, helped usher in the present revival of rangefinder photography. Since the discontinuation of the Canon rangefinder system in the early 1970s, the only other non-Leica rangefinder was the 1980 Minolta CLE. During the 1990s, Konica made small runs of Leica screw mount lenses — a collapsible 50mm f/2.4, a 35mm f/2, and a 60mm f/1.2. At the launch of the Hexar RF, Konica introduced three brand-new lenses in Leica M mount — a 50mm f/2, a 28mm f/2.8, and a 90mm f/2.8. It would later add a limited edition 50mm f/1.2 and a 35mm f/2. However, the Hexar RF system would not be long for the world as Konica would soon merge with Minolta and then disappear forever into a Japanese conglomerate.
The arguably premiere M-Hexanon lens most likely is the 2002 21-35mm f/3.4-4. The idea of a multi-focal length rangefinder lens has its origin with the 1998 Leica 28-35-50 f/4 Tri-Elmar. Although the Konica 21-35 did not appear to sell well during its run, folks are now appreciating how useful the lens is — perhaps the ideal travel lens. It is a wonderfully sharp lens at both 21mm and 35mm has and an advanced, complicated design. As you can see above, the middle and rear lens groups shift back and forth to effectuate the focal length shift — this is pretty much the same operation as the Leica Tri-Elmar. Focusing is completely internal, so the lens does not physically move with the focus.
The M-Hexanon is a larger lens that tends to block the viewfinder on the 35mm frameline for most Leica M rangefinder cameras. What is very interesting is that on a digital system, the lens can actually continuously zoom and focus throughout its range (although the intermediate focusing will not be accurate on using rangefinder focus). It came with a dedicated external finder displaying 21mm and 35mm framelines as well as a square bayonet-style rectilinear lens hood.
The M-Hexanon on a Voigtlander Bessa R4M
The only publicly-available MTFs for the 21-35 at 21mm and f/3.4 and 35mm and f/4 are pretty good — but not earth-shattering. However, at 35mm at f/4 the original Leica 28-35-50 Tri-Elmar clearly surpasses the Konica. At 21mm, the current Leica 16-18-21 f/4 Tri-Elmar also bests the Hexanon. However, it must be remembered that the M-Hexanon cost around $1,000 new with an included hood, finder, and cases, while a used original 28-35-50 Tri-Elmar is, on a good day, a $2,800 lens and the 2006 16-18-21 costs over $6,000 — and neither of the Leica lenses include a finder.
2004 Zeiss C Biogon T* 21mm f/4.5 (Leica M)
Specifications
Mount: Leica M Optical Design: 8 elements in 6 groups Aperture: f/4.5 – f/22 click stops Aperture Blades: Minimum Focus: 0.5 meter Filter Size: 46mm Weight: 190g
Lens Design
In 2004, Zeiss introduced a brand-new 21mm f/4.5 in Leica M mount. Although marketing it as the spiritual successor to its original 1954 Contax rangefinder lens, it has nothing in common with it from a design perspective. The 21mm f/4.5 Biogon is also a completely different design from the 1990s Contax G 21mm f/2.8 and the current ZM 21mm f/2.8.
The MTFs for the Biogon are off the charts with very, very little distortion. From the data sheets, the f/4.5 version is a better performer than current Zeiss ZM 21mm f/2.8 and the Leica 16-18-21 at 21mm. The usual internet commenters have raved about it. For digital users experiencing “color fringing,” check this out. Comparing the MTFs against the current Leica 21mm f/2.8 ASPH, the Zeiss lens has far less distortion but the Leica appears to edge out it out in overall performance — but not by much and not in a way you could notice. However, despite possibly being one of the best 21mm camera lenses ever produced, the f/4.5 version has been discontinued but remain a tremendous value on the used market.
Although the lens has the typical Zeiss provision for a bayonet-style lens hood, it does not appear that one was made. However, there are numerous quality aftermarket hoods for the 21mm Biogon. Zeiss also offers a separate 21mm accessory viewfinder — the ZL-21, which is fairly expensive. Any 21mm finder should do.
Rangefinders Versus SLRs
I prefer to use lenses wider than 28mm on SLRs rather than rangefinders. There are a few reasons for this.
SLR Lenses Can Focus More Closely: In general, SLR lenses can focus down to much closer distances than rangefinder lenses. A traditional Leica M rangefinder’s closest focusing distance is 0.7m. SLR 21mms can focus down to 0.3m and in some cases 0.2m. This makes quite a difference with how versatile a 21mm lens can be.
External Rangefinder Viewfinders Are Not Entirely Accurate: With SLRs, what you see through the viewfinder is basically what you get. With rangefinders, super side angle lenses require the use of external, shoe-mounted viewfinders. These viewfinders are not only not entirely accurate in themselves, but also sit above the actual viewing area of the lens itself — which leads to inaccurate framing. While some of these viewfinders have etched parallax lines for close focusing distances, that is not a great substitute for the real thing. External viewfinders also do not provide an accurate representation of the field curvature of the lens — for instance, the viewfinder will show a “flatter” and “closer” image than the lens will produce. Of course, the pricey Leica Universal Viewfinder can solve many of these issues — however, it still sits above the actual view of the lens. The only Leica M rangefinder camera that works “ok” with 21mm and 25mm lenses is the Voigtlander Bessa R4A and R4M — which provides parallax-corrected framing at the correct lens level.
Lens Tests
Before getting started with this, the usual caveats apply. None of these lenses were designed for digital mirrorless cameras. Film is a much different medium from a digital sensor as the former has thickness and a slight curvature. Although many people use their mirrorless cameras to evaluate film-era lenses, it still not clear that a digital sensor is an adequate gauge of performance on film. However, digital sensors definitely and accurately gauge how film lenses perform on digital.
These tests were taken on a Nikon Z6 on a tripod at either 200 or 100 ASA with all automatic corrections turned off and a quick white balance in Photoshop. Also, it is somewhat difficult to precisely focus 21mm lenses on a Z6 because the viewfinder zoom function does not get close enough to the subject and these lenses have large depths of field anyway. Thus, we are not looking for pixel-peeping sharpness so much here as for light fall-off, coma, flare, field curvature, and distortion. The Z6 can adequately gauge lenses on these metrics. Click on the images below for a 4500 pixel view.
Distortion
BiogonYashica MLKonica ARNew BiogonKonica 21-35
Biogon 21mm f/4.5: The Biogon remains an impressive optic nearly 70 years later. While relatively heavy, the Biogon is a somewhat difficult lens to use on digital because its incredibly long focus throw requires more effort to focus it precisely (which of course is not an issue for Contax and Nikon film rangefinders). The Biogon’s aperture selection is also rather cumbersome because it is on the front of the lens. True to its reputation, the Biogon has really impressive distortion control. There is a fair bit of corner light falloff at wider apertures. As with all other 1950s lenses, the Biogon’s single lens coating permits a bit of flare and resulting loss of contrast. Also, the 1.00m closer focusing distance limits its versatility. Because performance peaks at f/11, I would suggest aiming to shoot at that aperture for hyperfocal subjects.
Yashica ML 21mm f/3.5: The Yashica’s performance is about as good as it gets for an older SLR 21mm. Shots are normal apertures are as about a sharp as you need. However, the Yashica not only suffers from some barrel distortion, but more importantly, some “wavy” distortion that is not easily corrected. You can correct for the barrel distortion, but then the horizontal lines towards the edges will still bow outwards towards the viewer. There is a little color shift on digital at f/3.5, but it soon goes away.
Konica AR 21mm f/2.8: The AR performs pretty well for a f/2.8 21mm 1970s lens. It is compact, uses a smaller filter size, easy to use and to focus on digital. At f/2.8, the performance is usable but not great — there is a distinct color shift on digital and there appears to be some pretty noticeable flaring. However, at f/4, the lens is light years ahead, and by f/8-11, it is at its peak. The AR exhibits more barrel distortion than the Yashica, and also has similar “wavy” distortion.
Biogon ZM 21mm f/4.5: This Biogon is really easy to use and easy to focus on digital. The lens is sharpest of the bunch. There is very slight barrel distortion that is easily corrected and does not have any “waviness.” The modern Zeiss lens coatings control flare very well and everything is sharp. The Biogon is overall the best of the lenses looked at here.
Konica 21-35mm f/3.4-4: Although quite large for a rangefinder lens, the Konica is very easy to use and focus on a digital camera. The Konica is also a sharp modern optic. It has more barrel distortion than the new Biogon, but it is also of the easily-correctible type. However, the Konica does suffer from one phenomenon not experienced by the other lenses on the list — noticeable focus shift. While I have not noticed any obvious effect on film, this is not an issue on digital mirrorless cameras with real-time focus.
Conclusions
What separates a good from a great 21mm lens is: (1) distortion control; and (2) a close focusing ability. Even if a 21mm lens does exhibit barrel distortion, as long as it is the type that is easy to correct, it is not a big deal. While a 21mm lens is not a substitute for a perspective control lens for critical applications, it can work in a pinch. The five lenses looked at here are all very good, yet different. Like most 21mms, they all hit their peak at f/8 or f/11. They all have noticeable light fall-off at wider apertures. While the SLR lenses can focus much more closely, both the Yashica and the Konica (along with many other 21mm SLR lenses) both exhibit hard-to-correct “wavy” distortion. The Biogons both have excellent distortion correction and the Konica Dual has some barrel distortion, but is easily correctible.
21mm lenses are rarely cheap, and the prices for these lenses today do not necessarily reflect their performance, but their relative rarity: Original Biogon ($700+), Yashica ML ($300-400), Konica AR Hexanon ($300-500), Biogon ZM (@ $500-700), and the Konica Dual ($2,000+). For dual film and digital use, the ZM Biogon is probably the best bang for the buck. Of course, there are many other alternatives out there not looked at here.
From Left to Right: Jupiter-3 50/1.5, Canon 50/1.4 & Nikkor-S 50/1.4
Today, Leica, Zeiss, and Voigtlander continue to produce fantastic 50mm rangefinder lenses, and there is little doubt that the current generation is generally far better than anything that came before. While certain people will always desire the absolute newest and most expensive lenses, older lenses remain capable of taking great photos both on film and digital. In this piece, we are going to compare some older and affordable “fast” 50mm rangefinder lenses to attempt to ascertain their relative strengths and weaknesses: (1) the 1948 Jupiter-3 50/1.5; (2) the 1959 Canon 50/1.4 II; and (3) the 1962/2000 Nikkor-S 50/1.4. Comparing lenses under the same conditions can often tell us much more than looking at a single lens in a vacuum.
Jupiter-3 50/1.5 (1948)
Specifications
Optical Design: 7 elements in 3 groups. Minimum Focusing Distance: 1.00m Aperture: f/1.5 – f/22 (continuous, no click) Mount: Leica Screw Mount (M39) Filter Size: 40.5mm Weight: 140g
Image from Sovietcams.com
As the familiar story goes, as part of the “reparations” exacted from Germany after the war, the Soviet Union appropriated much of Zeiss’ intellectual and real property. Before and during the war, Zeiss had produced its fast and famous 50/1.5 “Sonnar” lens in Contax rangefinder mount with a much smaller number manufactured in Leica screw mount. After the war, Zeiss split into separate West German and East German (Jena) entities. Zeiss Jena continued to produce the 50/1.5 Sonnar in Contax rangefinder mount after the war. The Sonnar also became the basis of many longer SLR lenses designed by both West and East German Zeiss entities.
By 1947, the Soviets has prototyped their own Sonnar copy. By 1948, it was in production. Christened the “Jupiter-3,” the Soviets, in different factories over the years, produced the lens in M39 for its “Zorki” cameras and in Contax rangefinder mount for its “Kiev” cameras. With periodic variations in barrel and exterior design over the years, the Jupiter-3s were produced well into the 1980s. Lomography even managed to re-pop these lenses for a time as the “Jupiter-3+, with the newer version focusing down to 0.7m and having multicoated glass. Unfortunately, these are no longer being produced.
There has been much debate whether the Jupiter-3 in M39 were actually collimated from the factory in precise Leica specification. The consensus seems to be that most Jupiter-3s in M39 were not. If you are planning on using a Jupiter-3 on a Leica M39 or M rangefinder camera, and the history of your particular example is unknown or in doubt, you should strongly consider retaining an experienced camera repairperson who can properly adjust your Jupiter-3. The discontinued Jupiter-3+s are properly collimated for Leica out of the box.
By reputation, the Jupiter-3 is not considered to have substantially improved upon the original Sonnar’s performance. It was always a single coated optic and quality control in the various Soviet factories that produced them was not always the best. However, the Jupiter-3 has plenty of fans as the lens has traditionally been the cheapest “copy” of the Sonnar template and its wide-open performance can be used to good effect.
The first two numbers of the serial number of Soviet lenses typically indicate their year of production. This black paint example (seemingly rare for the period) appears to be from 1962 and has a purplish lens coating.
Canon 50/1.4 Type II (1959)
Specifications
Optical Design: 6 elements in 4 groups Minimum Focusing Distance: 1.00m Aperture: f/1.4 to 22 (full click stops) Mount: Leica Screw Mount Filter Size: 48mm Weight: 246g
Image from Canonrangefinder.org
In 1939, Canon produced the “Model J,” a screw-mount 35mm rangefinder camera However, the J’s lens mount was not the same thread as Leica. Because the war seriously disrupted Japan’s domestic camera industry, it was not until afterwards that Canon was able to launch a series of admirable and well-selling M39-mount lenses and cameras.
In the mid-1950s race to produce “super fast” 50mm lenses, Canon introduced its famous 50/1.2 in 1956 — the fastest commercially-available lens then produced in M39. The 50/1.2 is a very cool lens — having owned one many years ago, our impression was that its performance at f/1.2 and f/1.4 was not great.
In 1957, Canon followed the 1.2 with the “Type 1” 50/1.4. Canon slightly tweaked the 1.4 with the “Type 2” in 1959. The Canon 50/1.4 has always enjoyed a good reputation as a solid performer with “acceptable” performance at f/1.4 with much improved performance at f/2 and smaller. The functional downsides include a minimum focus of only 1.00m and a rather stiff aperture ring. It was an extremely popular lens that came as an option on numerous Canon rangefinders. Today, they are rather cheap and plentiful.
Olympic/Millennium Nikkor-S 50/1.4 (1962 & 2000)
Specifications
Optical Design: 7 elements in 5 groups Minimum Focusing Distance: 0.9m Aperture: f/1.4 to 16 Mount: Nikon S Filter Size: 43mm Weight: 178g
Nikon gained a reputation in the late 1940s and early 1950s for the production of a series of excellent rangefinder lenses made in both its own “S Mount” and in M39. One of its most popular lenses of the 1950s was the single-coated Nikkor-S.C. 50/1.4, a design based upon the Sonnar template, but not really a “copy” of the original 50mm f/1.5 Zeiss Contax lens.
By the late 1950s, the landscape had changed. The Sonnar was out, and the Gauss was in. In 1962, Nikon released its Nikkor-S 50/1.4 lens for its F SLR. Around the same time, Nikon redesigned its 50/1.4 rangefinder lens, in anticipation for a “re-release” of an black-paint Nikon S3 rangefinder. This latter variation of the 50/1.4 is now commonly known as the “Olympic” Nikkor — as it was advertised in conjunction with the 1964 Olympic Games in Tokyo. The design was closer to that of the Nikkor-S SLR lens than either the contemporary Canon or Leica Summicron design.
Fast forward to 2000 when Nikon embarked on an ambitious project to recreate from the ground up its iconic 1958 S3 rangefinder. The story of the project is fascinating and worth a read. Nikon recreated its “Olympic” Nikkor but with multi-coated (instead of the original single coated) optics and a standard modern filter size (43mm x .75). After a limited run, Nikon ended production of the new S3 in 2002. The “Millennium” Nikkor 50/1.4 is a little difficult to find as a standalone lens because it was sold as a set with the S3. Many people buy the set, put the S3 back in its box, and use the 50/1.4. Of course, with the Amedeo adapter, the Nikkor can be fully functional on your Leica M camera.
Comparisons
We are going to take these three lenses plus a Konica M-Hexanon 50/2 and take three series of shots on a Nikon Z6 mirrorless camera with all automatic corrections turned off. We are most interested in evaluating these lenses for sharpness, distortion, coma, and flare control. Click on an image below for a 4500 pixel version.
Bookshelf Test
f/1.4-1.5
Jupiter-3
Canon
Nikkor
f/2
Jupiter-3
Canon
Nikkor
Konica
f/2.8
Jupiter-3
Canon
Nikkor
Konica
f/4
Jupiter-3
Canon
Nikkor
Konica
f/5.6
Jupiter-3
Canon
Nikkor
Konica
f/8
Jupiter-3
Canon
Nikkor
Konica
Infinity Test
f/1.4-1.5
Jupiter-3
Canon
Nikkor
f/2
Jupiter-3
Canon
Nikkor
Konica
f/2.8
Jupiter-3
Canon
Nikkor
Konica
f/4
Jupiter-3
Canon
Nikkor
Konica
f/5.6
Jupiter-3
Canon
Nikkor
Konica
f/8
Jupiter-3
Canon
Nikkor
Konica
f/11
Jupiter-3
Canon
Nikkor
Konica
Outdoor Close Up Test
f/1.4-1.5
Jupiter-3
Canon
Nikkor
f/2
Jupiter-3
Canon
Nikkor
Konica
f/2.8
Jupiter-3
Canon
Nikkor
Konica
f/4
Jupiter-3
Canon
Nikkor
Konica
f/5.6
Jupiter-3
Canon
Nikkor
Konica
f/8
Jupiter-3
Canon
Nikkor
Konica
f/11
Jupiter-3
Canon
Nikkor
Konica
Assessment
So what are we seeing here?
Overall, the M-Hexanon is clearly the best “all-around” lens of the four — followed by the Nikkor-S, the Canon, and the Jupiter-3. But there are certainly plenty of nuances.
Despite center sharpness being fairly good for centered close-up subjects, the main problems with the Jupiter-3 are flare, coma, light fall-off, and weak corner performance. The flaring appears at all apertures, at its worst wide-open, but gets progressively better as the lens stops down. The light fall-off continues to about f/4-5.6. At no aperture do the outside parts of the frame resolve as well as any of the Japanese lenses. The ancient single lens coating of the Jupiter-3 is likely responsible for the flaring and coma. The emphasis on centered subjects at closer distances is characteristic of older Sonnars. Weirdly, my Jupiter-3 has trouble focusing to infinity with a standard Leica M to Nikon Z adapter — doubly weird because usually these conservatively-designed adapters permit the “overfocusing” of infinity with most lenses. The Jupiter-3 does render a “warmer” color image than the Japanese lenses. The distortion appears to be of the minor pincushion variety, but it is not that noticeable in everyday situations. To me, out of the box, the Jupiter-3 may be a “two aperture” lens — for close up shots at f/2-2.8, or for distance shots at f/8-11.
The other three lenses can be considered “all-around” 50mms — that is to say that they can shoot well throughout their range. They all have similar low-levels of barrel distortion and good field curvature control. The Canon is a far better lens than the Jupiter-3 by just about every metric. Although the Canon also flares at wider apertures, it is not as bad. The Canon also has better corner performance and better center resolution than the Jupiter-3. Light fall-off in the corners is noticeable until about f/4. The Canon really nails it at f/8. However, it is consistently behind in all major metrics to the M-Hexanon and the Nikkor-S.
The Nikkor-S and the M-Hexanon are perhaps the most similar of the bunch. While the Nikkor-S also has some flare at f/1.4-2, it pretty much is gone after f/2. The M-Hexanon is pretty much flare-free at f/2 and renders a sharper image across the entire frame. However, the Konica does seem to have some purple fringing at f/2-2.8. While the Konica certainly outpaces the Nikkor-S from f/2 to f/4, the lens performance between the two is pretty much indistinguishable at f/5.6 and smaller. At f/5.6-f/11, the performance differences generally among the Canon, the Nikkor-S, and the Konica are small, but noticeable upon a critical look.
Focus Shift
Focus shift is a phenomenon present in varying degrees in most lenses were the point of focus shifts at different apertures. Focus shift is not really an issue for mirrorless cameras because most of the time, the user is focusing a lens at the effective aperture for that shot in real time — in other words, in aperture priority mode, the user sees the actual focus point of the lens at a particular aperture. However, for film and for rangefinder use on a digital M camera, 50mm lenses have a much shallower depth of field and by their nature have less tolerance for focus shifting.
In this group of lenses, the Jupiter-3 demonstrates the most amount of focus shift — in this case, pretty extreme backfocusing at the lens is stopped down. This phenomenon exists throughout its aperture and focus range. The shift is severe enough that under a close look one would probably notice it on film. With a digital M, you should determine at what aperture your Jupiter-3 lens is focusing accurately with the rangefinder — with many Sonnars, this is going to be somewhere around f/1.5-2.8. The other three lenses have some shift, as most all lenses do, but it will be nothing to worry about on mirrorless digital or on film.
Conclusions
In a certain sense, these types of tests are silly because all four lenses are capable of delivering outstanding images — especially on film. However, the above photos reveal maybe what we should have known all along. In overall performance, the M-Hexanon 50/2 is the clear winner. In turn, the Nikkor edges out the Canon. The Jupiter-3 comes convincingly in fourth. However, remember that the M-Hexanon and the Jupiter-3 may need a collimation adjustment to work perfectly with Leica M bodies.
Besides raw optical performance, an important consideration for any of these lenses is the minimum focusing distance. Almost all modern rangefinder lenses can focus at least down to 0.7m (some even closer for digital use). Only the M-Hexanon can focus to 0.7m, while the Nikkor is only 0.9m, and the Canon and Jupiter-3 are only 1.00m. Although 0.3m may not seem like much (about one foot), it makes a big difference in how close you can get to your subject.
Although not a subject of this piece, now over 20 years old, and not an 1.4 lens, the M-Hexanon remains a really good value ($450-600); but we would imagine that many of the Zeiss and Voigtlander modern 50mms probably have surpassed it by now. The Canon ($250-350) is plentiful and cheap. The Nikkor-S is going to be a little difficult to find as a standalone lens and will require a custom adapter ($250 for an adapter any $600-800 for the lens). Jupiter-3s are everywhere, and prices fluctuate; but one can find good examples in the $100-200 range — and unless you can DIY it, most of these lenses will require the additional expense of a collimation check.
At the end of the day, any these older lenses are fun to use, capable of delivering outstanding images, and good values. However, these tests confirm the general rule, and our experiences in testing lenses, that modern lenses are almost always better “all-around” performers than “classic” lenses. Happy shooting!
If you enjoyed this article, please feel free to leave a comment below. We would love to hear your feedback.
Sometimes you do not choose a camera, a camera chooses you. This is certainly the case with my father’s well-worn and still-functional Nikon N2020 (or F-501 outside of North America). The N2020 is a pretty well-made and capable body, hobbled by a relatively dark viewfinder and a slow, loud autofocus system that does not function well in low-light conditions.
By the early 1980s, the race to develop a viable autofocus SLR was on. While Pentax technically produced the “first” example, the 1981 ME F, it was slow, clumsy, and could only use a single dedicated 35-70 lens. The following year, both Canon (AL-1) and Yashica (FX-A) introduced bodies with “focus assist,” a manual focus system where the camera’s sensors could indicate to the user when the subject in the crosshairs was in focus. In 1983, Nikon introduced its own clumsy F3AF with could autofocus only a proprietary 80mm and 200mm lens. In 1985, Minolta beat everyone to the punch with the Maxxum 7000, the first modern and functional autofocus camera sporting a top mounted LCD screen for exposure feedback. Nikon would not produce with a camera with both autofocus and an top-mounted LCD info screen until the 1988 N8008 (F-801).
During 1985, Nikon introduced the N2000 (F-301). A complete break from the prior FG series, the N2000 represented a series of firsts: (1) a body made of polycarbonate; (2) an integrated motor drive with auto film loading and advance (but no rewind); and (3) the capability to read DX-coded film cassettes. The N2000 had far more electronic functionality than any Nikon body before it, even the fabled F3 and FA. Although the FA was the first Nikon body with a “program” mode, the N2000 had two program modes (high and normal) as well as retaining an aperture priority and a manual mode.
In 1986, Nikon introduced the N2020 (F-501), essentially an N2000 with autofocus. The N2020 had the additional feature of a “dual program mode,” which switched to “program high” for lenses 135mm and longer and regular “program” mode for lenses shorter than that. The N2020 could also take three different focusing screens not available on the N2000. By the time the N2020 was discontinued in 1989, Nikon’s flagship F4 had appeared and autofocus modules were already in the next generation. For future cameras, Nikon did not retain any aspects of the N2000/N2020 design.
The N2020 is certainly an interesting interregnum camera. While it was a great leap forward from Nikon’s late 1970s and early 1980s FG/FE/EM series, it also came before the 1990s mass-plastification of consumer SLRs. While an interesting piece of Nikon history, I am not so sure if it is a good choice for a daily shooter today.
Specifications
Lens Mount
Nikon F
Shutter
Electronic Vertical Metal
FullLens Compatibility
Ai, Ai-S, AF & AF-D
Focus Modes
AF, Focus Assist & Manual
Exposure Modes
Aperture, Program & Manual
Shutter Speeds
B, 1 sec – 1/2000
ASA Range
12-3200 (Non-DX); 25-5000 (DX)
Motor Drive
Load & Advance; Up to 2.5 FPS
Flash Sync
1/125
Batteries
4 x AAA (MB-4); 4 x AA (MB-3)
Weight
604g
Operation
Lens Compatibility: While Nikon retained its “F Mount” up until its newest Z mirrorless cameras, the N2020 cannot use with full functionality the entire range. The N2020 can utilize Ai, Ai-S, Series E, AF, and AF-D lenses. After that, things get a little dicey. Screw-drive G lenses will autofocus but will only work in program mode. Modern AF-S lenses will kind of work: they will not autofocus, but in program mode only, they will meter, focus assist, and take a shot. With screw-drive G lenses or AF-S lenses, the N2020 will not be able to tell you what the shutter speed or aperture are. AF-P lenses will not work at all.
Turn Your N2020 Into a Manual Focus Point & Shoot with AF-S Lenses!
Viewfinder: The N2020 has a decent, uncluttered, and not especially bright viewfinder that displays LEDs for the shutter speed along the right side and the focusing indicators at the bottom. The camera came native with a “Type B” focusing screen but can be replaced with proprietary “Type J” (matte / fresnel with a centered microprism) or “Type E” (grid). The different screens will not affect the autofocusing and are only aids for specific uses.
Autofocus: The N2020 uses Nikon’s first-generation autofocus module that contained 96 CCDs that focused on a subject in the precise center of the frame. For reference, Nikon’s later AM200 module used in the F4 and other cameras had 200 CCDs. The N2020 was designed to use Nikon’s “screw drive” AF and AF-D lenses, where a rather-noisy motor in the camera body focuses the lens. Today, autofocus lenses are now driven by motors in the lens itself powered by the camera body. The advantage of the later cameras is far less noise and vibration. The N2020’s autofocus, while very slow compared to modern cameras, is relatively capable and definitely works better in daylight than in low light. The N2020 can “focus lock” a point but half-depressing the shutter for reframing.
The N2020 has “single” and “continuous” autofocus modes. In “single” mode, the camera will not trigger the shutter until the subject is in focus. This mode permits one to focus lock a subject while halfway depressing the shutter button for reframing. The “continuous” mode was a primitive attempt at autofocus tracking. It does not work well at all.
When used with the SB-20 Speedlight flash’s assist lighting, the N2020’s low-light autofocus abilities vastly improve.
Focus Assist: For most manual focus Nikon lenses, the N2020 can use its autofocus sensor to “assist.” Through the arrows and circle at the bottom of the viewfinder, half-pressing the shutter button will activate the sensor. When the center circle turns “green” the lens is in focus. Focus assist is really a great feature, and it made its way into most subsequent higher-end Nikon film SLRs.
Exposure Modes: The N2020 has settings for three program modes, aperture priority, and manual operation. In program modes, the viewfinder will not display the selected aperture, only the shutter speed. “Program Hi” tells the camera to set a higher shutter speed and wider aperture. “Program Dual” will set the camera to “Program Hi” if the lens is 135mm or longer. If not, it will revert to regular “Program.” Aperture priority mode is straightforward. Manual permits the user the set the shutter speed on the camera dial, set the aperture on the lens, and the camera will let you know if the settings do not match the meter, by either blinking a shutter speed above or below the selected setting.
Auto Film Loading: The N2020 has the traditional swingback door with a film reminder window. Pull the film across the back and close the door. There is no automatic film rewind.
Underexposure Warning Alarm: The N2020 has a switch on the top that produce a loud beep if the shutter speed / aperture combination is not sufficient for the lighting conditions. Fortunately, you can turn this off.
Motor Drive: The N2020’s integrated motor drive is loud. In the most continuous mode, the camera can achieve up to 2.5 frames per second, which about on par with contemporary non-professional cameras. In normal ideal shooting conditions, the N2020 is good for about 1.5 – 2 frames per second.
Film Speed: The N2020 has a DX setting for coded film cassettes. Otherwise, the user can manually select any speed from 25 to 3200.
Exposure Compensation: On the ASA dial, there is a wheel for exposure compensation from -2 to +2. A separate adjacent button must be simultaneously pressed for the wheel to rotate.
Accessories
Focusing Screens: The standard “B” screen comes with the camera. Nikon also offered a “E” and “J” screen.
MB-3 AA Battery Pack: The stock N2020 uses 4 AAA batteries. The optional MB-3 module permitted the use of 4 AA batteries.
The MB-3 Battery Pack
SB-20 Flash: The SB-20 is a really nice flash with a native bounce ability. Like other better Speedlights, in low light conditions, it will shoot a red light from the unit to assist the camera to focus in low light. The N2020 also has native TTL and auto flash ability with the older SB-15 and SB-16B units. The SB-18 could be used only in TTL or manual mode. With the SC-23 cord, the SB-14 and SB-11 could be used in TTL or manual mode. I am not sure if later Speedlights will work as my SB-30 would not couple with the camera.
Conclusions
So what is a case for the N2020 today? While the camera is of average weight, with an average viewfinder, and has a very loud autofocus, shutter, and film advance, the N2020 was the last Nikon 35mm autofocus film body that retains a “classic” SLR look. The ability to use manual focus lenses in focus assist mode and AF/AF-D autofocus lenses makes it a more versatile platform than any of the consumer-oriented manual focus SLRs of the late 1970s and early 1980s. While the best Nikon camera of the 1980s is clearly the F4, the N2020 offers some of the same functionality in a much smaller package. However, with most Nikon AF film bodies being so cheap these days, if not the F4, F5, or F6, cameras like the N90s or the F100 simply blow the N2020 out of the water in all regards.
The 1987 East German Praktica BX20 was the penultimate model in Pentacon’s “PB” line of cameras. A departure from the design of Praktica’s prior 1979 B200 and 1984 BC-1, the plastic-shelled BX20 incorporates everything interesting about PB cameras while adding the capability for TTL flash. With a great selection of lenses by Carl Zeiss Jena and Pentacon, the BX20 is a nice little camera, although a little inelegant and clunky.
In line with prior moves from Pentax, Fujica, Yashica, and others, Pentacon dropped the M42 lens mount for its Praktica-branded cameras in 1979 and adopted a new bayonet mount. Praktica’s final “new” M42 camera bodies, the 1977 EE2 and the short-lived 1979 EE3, were interesting autoexposure models with decent capabilities, but far from perfect. Praktica did not completely abandon the M42 standard in 1979 as it continued to produce the outdated third-generation MT series until about 1989.
Praktica’s first bayonet camera model, the 1979 B200, adopted not only a new lens mount but also employed a stepless electronic shutter, capable of aperture-priority autoexposure. During the 1980s, Praktica produced both a higher-end and lower-end models in this mount. The B200 (1979), also known as the BC-X (export version), the BC-1 (1984), also known as the BC-3 and Jenaflex AM-1 (export versions), and the BX20 (1987) were the “higher end” models. The “lower end,” de-featured models included the B100, BCA, BCS, BCC, BMS, and Jenaflex AC-1. For the best source of information of essentially all Praktica camera bodies, check out this famous site.
For its part, the B200 was a competitive advanced amateur SLR body for 1979, the era of the Nikon FM, the Canon A-1, and the Pentax ME. During the run of the B200, its lens lineup contained a mix of: (1) more expensive Carl Zeiss Jena lenses; (2) “reasonably”-priced Pentacon-branded ones; and (3) a few aftermarket, mostly-zoom lenses made in Japan. Although the SLR camera market was becoming increasingly competitive, Praktica’s 1984 BC-1 (essentially, a slightly-redesigned B200) did not move the ball forward.
Pentacon’s 1987 Praktica BX20 included a complete body redesign, a slightly faster flash sync speed, the capability for TTL flash (using the same system as Olympus), and a relocated exposure lock button. During its run, the BX20 was typically bundled with the final version of the Pentacon-made 50mm f/1.8 Prakticar lens, reportedly based on the earlier Meyer Optik 50mm f/1.8 Orestor. Around the time of German reunification, the government formally dissolved Pentacon. In 1991, Schneider Kreuznach acquired much of Pentacon’s camera assets and continued the production of a final model, the Praktica BX20s, until about 2001. The BX20s included another slight body redesign and the incorporation of DX film coding.
That all being said, more than 35 years after its introduction, is the BX20 a worthwhile platform? Part of the appeal of these late Prakticas is that while they are plentiful and relatively cheap in Europe and other markets, the B/BX series was pretty much unknown in North America. Compared with any run-of-the-mill 1970s M42 camera body, the B and BX bodies have generally brighter viewfinders, aperture-priority autoexposure, exposure lock, and TTL flash capability. If you enjoy using late-model multicoated Carl Zeiss Jena SLR lenses, the Praktica B series is arguably a better platform for these lenses than any classic M42 body. The B-series can also employ some CZJ lenses that were either extremely rare or never existed in M42 mount, like the 55mm f/2.8 Macro (no M42 version), both versions of the 50mm f/1.4 (no M42 version), and the 35-70mm f/2.7-3.5 zoom (rare and expensive in M42 mount).
Specifications for the Higher-End Praktica B Camera
There is not much that distinguishes the higher-end Praktica B camera bodies from each other in terms of functionality. They all seem to use the same shutter, focusing screen, viewfinder design, and metering system. Here the are features compared:
B200
BC-1
BX20
BX20s
Year
1979
1984
1987
1992
Manufacturer
Pentacon
Pentacon
Pentacon
Schneider
Shutter
Vertical Metal
Vertical Metal
Vertical Metal
Vertical Metal
Shutter Speeds
B, 40 sec – 1/1000
B, 40 sec – 1/1000
B, 40 sec – 1/1000
B, 40 sec – 1/1000
Battery
PX28
PX28
PX28
PX28
Weight
530g
530g
510g
510g
ASA
12-3200
12-3200
12-3200
25-5000 (DX); 25-400 (Manual)
Meter
Center
Center
Center
Center
VF Coverage
95%
95%
95%
95%
Focusing Screen
Wedge / Microprism / Ground Glass
Wedge / Microprism / Ground Glass
Wedge / Microprism / Ground Glass
Wedge / Microprism / Ground Glass
Flash Sync
1/90
1/90
1/100
1/100
Shutter Speed / Aperture in VF?
Yes
Yes
Yes
Yes
TTL Flash?
No
No
Yes
Yes
AE Lock?
Button on Top
Button on Top
Button in Front
Button in Front
Motor Drive Capable?
Yes
Yes
Yes
Yes
DX Coding?
No
No
No
Yes
Praktica B Lenses
Perhaps the primary reason to acquire a Praktica B camera is for the use of the several pretty good lenses that were made for the system. For a great and exhaustive resource on the Praktica line of PB-mount lenses, check out this site. While most of the system’s prime lenses were sourced by Pentacon either in-house or using third-party East German designs, CZJ either designed (or at least put its name on) other lenses, including some carryovers from the M42 era. Here is a list of the East German-designed lenses for the system.
The Rare-ish 55mm f/2.8 Macro Lens in PB Mount
Brand
Focal Length
Elements/Groups
Min. Focus
Filter Size
Notes
CZJ
20mm f/2.8
9/8
0.19m
67mm
M42 Carryover
CZJ
28mm f/2.4
8/8
0.19m
49mm
Floating Element; Extremely Rare
CZJ
35mm f/2.4
6/6
0.22m
49mm
M42 Carryover
CZJ
50mm f/1.4 V1
7/6
0.36m
52mm
Based on M42 55mm f/1.4
CZJ
50mm f/1.4 V2
7/6
0.40m
52mm
Better Version
CZJ
50mm f/1.8
6/5
0.35m
49mm
M42 Carryover
CZJ
50mm f/2.8
4/3
0.35m
49mm
M42 Carryover; Very Rare
CZJ
55mm f/2.8
6/5
0.25mm
49mm
1:2 Macro; Rare
CZJ
80mm f/1.8
6/5
0.65m
52mm
M42 Carryover
CZJ
135mm f/3.5
4/3
49mm
M42 Carryover
CZJ
200mm f/2.8
6/5
2.00m
New Design
CZJ
300mm f/4
6/5
4.00m
New Design
CZJ
35-70mm f/2.7-3.5
9/8
M42 Carryover
CZJ
80-200mm f/4
12/6
1.10m
M42 Carryover
Pentacon
28mm f/2.8
7/7
0.25m
49mm
East German Design
Pentacon
50mm f/1.8 V1
6/4
0.33m
49mm
Earlier Kit Lens
Pentacon
50mm f/1.8 V2
6/4
0.45m
49mm
Later Kit Lens
Pentacon
50mm f/2.4
5/4
0.60m
49mm
Two Versions (Metal / Plastic)
Pentacon
135mm f/2.8
5/4
1.70m
55mm
Orestor Design
The Veritable 35mm f/2.4 Flektogon in PB Mount
The winners in this list mostly include all of the CZJ lenses. The Pentacon lenses can be pretty decent performers, but they are really nothing special for the 1980s.
Features
The BX20 presents the standard set of features found on many late-1970s to mid-1980s advanced-amateur SLRs. Its plastic body does not feel particularly cheap and is pretty comfortable in the hands.
Battery: The PX28 was originally a 6V mercury battery. While PX28s are no longer available, there are both silver oxide (S28PX) and alkaline (A544) replacements widely available. Lithium 6V substitutes do not seem to work.
Viewfinder/Focusing Screen: The BX20 has a relatively nice and bright viewfinder that displays in LED the shutter speed, the selected aperture (for PB lenses), an +/- indicator on the left that tells you if the exposure compensation is activated or manual ASA is set, and a green light to remind you whether the exposure lock has been activated. The PB series all share a nice and useful focusing screen with a dual 45 degree split-image, a microprism collar, and a ground glass.
Shutter Speeds: A 1/1000 top shutter speed is definitely below average for 1987. The shutter sound is a a bit metallic but not unpleasing.
Exposure Lock: The BX20 relocated the exposure lock button from the top to the front of the camera. To use this, half-depress the shutter to take a reading of the desired subject, press the button while still half-depressing the shutter, and then shoot. If you take your finger off the shutter release at any point, the AEL stops working. The system is a little finicky as I had a beautiful condition BX20s whose AEL did not work at all. My example of the BX20 sometimes takes more than one press to get the AEL mode to function.
Adapting M42 Lenses
Pentacon did not leave its legacy M42 users completely high and dry and produced an OEM adapter permitting autoexposure with “stopped down” metering, which means that an M42 lens must be closed down to taking aperture (thus, darkening the viewfinder) for the camera to meter. This is pretty much how all modern M42 to whatever adapters work. However, the adapter required an electrical connection to the camera body because the light meter will not function unless those contacts are made. As far as I know, there are no other third-party M42 to Praktica B adapters apart from the OEM one.
Accessories
Leather Case: Praktica produced a universal ever-ready case for the B and BX series.
Motor Drive: For the B and BX series, Praktica produced three unremarkable external power winders with three separate names: the “Winder,” the “B Winder,” and the “BX Winder.” The first two were allegedly made in Japan while the BX Winder was made in Germany. The BX Winder apparently promised 3 frames per second. All three winders are incredibly loud and take AA batteries.
TTL Flashes: Because Praktica BX cameras share TTL technology with the Olympus OM series, there are a wide variety of TTL flashes that can be used. The actual Praktica-branded TTL flashes include the basic BD-24, the more advanced LCD-style BD-32 (produced by Samyang), and a simpler BD-36 (produced by Samyang). The BX series can also use Metz TTL flashes with the SCA321 module.
Conclusion
Folks often say that forbidden fruit often tastes the best. While Praktica B/BX camera bodies were relatively popular in Europe (being a good value, German-designed camera), they never really reached North America when sold as new. With its standard Pentacon 50mm f/1.8 lens or with any of the mediocre zooms offered for the system, the case for the BX series over plenty of other options becomes pretty weak. While the BX bodies are not really spec-competitive with most popular SLRs made after 1985 or so, they remain the only film platform for some world-class CZJ lenses. While some have reported electronics failures with the BX series over the years, there are still plenty of working models out there. With the primary source of used BX cameras still being Europe, they are nevertheless purchasable any day through the normal internet channels.
In the history of Nikon 35mm film SLR cameras, none arguably was more revolutionary than the 1988 F4. The 1959 Nikon F ushered in the film SLR era. The 1971 F2 improved upon the concept. The 1980 F3’s stunningly bright finder, rugged reliability, and 5.5 frames per second motor drive set the bar for photojournalism during the Reagan-Thatcher era. The F4 significantly changed the game in its own way.
By the early 1980s, the SLR game was changing fast. Everyone foresaw that the future was autofocus, and the race was on. In 1982, Canon introduced the consumer-oriented AL-1 with a primitive “phase detection autofocus” that permitted the use of manual focus lenses in an “assist” mode. In 1983, Nikon responded with the F3AF, a version of the F3 that used a special finder that permitted the autofocusing of specially-designed 80mm and 200mm lenses. Still, this primitive foray was arguably ahead of most other manufacturers at the time. However, it was the 1985 Minolta Maxxum 7000 that beat both Nikon and Canon to the punch with an LCD shooting menu, an integrated autofocus mechanism, and a built-in motor drive.
Nikon responded in 1986 with the N2020 (the F-501 in other markets). Although directed at the consumer market, the N2020 was built upon the prior 1985 N2000 non-AF chassis, had a fairly advanced for the time phase detection autofocus, and a 2.5 FPS integrated motor drive (but no auto rewind). A motor inside the camera drove the autofocus mechanism (a so-called “screw drive” mechanism). Today, such motors are inside the lenses themselves. No shooting menu LCDs, just switches and dials. However, Nikon’s first-generation autofocus system found in the N2020 was slow, noisy, and not entirely reliable in low-light conditions.
Canon seriously upped the ante in March 1987 with the introduction of the EOS 650 and then the slightly more advanced 620 later that year. Canon developed a completely new lens mount (the “EF”) not natively-compatible with any of its previous-generation manual focus lenses (the “FD” mount). With fast autofocus, matrix TTL metering, LCD menus, and a 3 frames per second motor drive, the 620/650 arguably became the most advanced SLR in the world.
For its part, Nikon decided that instead of creating a new lens mount for the autofocus generation, it would create AF lenses in F mount — which meant that new AF bodies could use the older manual focus lenses, and the manual focus bodies could use the AF lenses (in manual focus mode only, of course). Nikon’s decision to stick with the F mount, unlike Canon and Minolta that “ditched” their legacy lenses in their new systems, certainly endeared itself with many users. In 1986, in connection with the launch of the N2020, Nikon’s “AF” lens series emerged. In 1992, Nikon updated these lenses to “AF-D” specification to assist with TTL flash control.
The F4 is one of the most intelligently-designed SLRs of all time. Unlike the LCD menus of Canon and Minolta, the F4 is all dials and switches. The F4 was a complete system camera with every possible accessory the professional market could ask for: motor drives, focusing screens, interchangeable finders, data backs, battery modules, underwater housings, and on and on. The F4 upgraded the autofocus module found in the N2020 and provided a fairly advanced TTL flash system with auto day fill flash capability, multiple metering modes (including matrix metering), auto film rewind, multiple single and continuous shooting modes, and an integrated 4 frames-per-second motor drive. The “F4s” version included a vertical grip and a larger battery pack (the MD-21) and allowed up to 5.7 FPS, and the F4e had an even larger battery pack (the MD-23). Nikon also made an MD-22 that permitted the use of an external power source. I am not going to endeavor to detail the equipment and technical specifications of the F4 system, but you can get a good sense here.
Although the F4 was made to complement Nikon’s contemporary line of late-1980s AF lenses, it still both autofocuses and retains “program” and “shutter priority” functionality with modern AF-S lenses. It will focus-assist with Ai and Ai-S lenses.
The F4’s electronics, now over 30 years old, have held up pretty well with very few, if any, endemic mechanical or electronic problems. The only problem of note is that a few of DP-20 finders have had their LCD displays start to leak. Manufacturers of the 1980s warned people of this possibility with all LCD-equipped cameras. However, the average DP-20 is still working just fine today.
Using the F4 In Real Life
The Nikon F4 is a rather hefty machine, even bulkier with the larger battery pack/motor drive combos (the F4s and F4e). The primary selling point is the extremely bright viewfinder — really blowing away any non-professional film SLR. The F4’s aluminum alloy body is also tough as nails. If you are, like me, someone invested in a variety of 35mm film machines, the F4 is a go-to in circumstances that require that you get the shot — in focus and properly exposed.
The F4 is a such a sophisticated camera that it would be impossible to run through the entirety of its functionality. Other than fast-moving sports or other similar subjects, where it has been definitively surpassed, there is no other job that the F4 and its dedicated accessories cannot tackle.
For Ai, Ai-S, AF, AF-D lenses, the F4 can operate in a complete dummy Program mode, or if you prefer Aperture-Priority, Shutter Speed-Priority, or Manual modes. One of the most ingenious and useful features of the F4 is the “Program High” mode. This mode automatically tells the camera to set a wide aperture for maximum depth of field and loss of motion blur. Program High also assists with shooting AF-S lenses where no manual aperture control on the F4 is possible. Although you cannot set the exact aperture on these later lenses, you can tell the F4 to “prefer” depth of field + higher shutter speeds, so achieving the same basic result.
In practice, I find using the stock focusing screen and matrix metering fine for most settings. Without the auxiliary built-in finder light, I do have a hard time seeing the LCD readout in DP-20 finder. In daylight, a SB-20 and SB-30 Speedlight flashes perform well in auto fill-flash mode (perhaps a tad bit overexposed). The built-in motor drive is remarkable and suitable for most purposes. Focus tracking on fast moving subjects is not good and nearly useless. In the past, I have used the MD-21 battery pack which contains a separate shutter release for when holding the camera vertically. But for everyday shooting, its added bulk normally adds little to the experience.
Conclusion
Although your grandparent’s F/F2 may hold sentimental value, your acquisition of a former pro photographer’s beat-up but working F3HP may be a great conversation piece, and the FA, FG, EM, and FM2 are all super cute, none of them beat the F4 on any metric other than size and weight. While the F5, F100, and F6 all moved the ball significantly forward, especially with their faster auto focus modules and increased lens compatibility (i.e. with “G” lenses), the F4 has everything most photographers would need in a camera. With F4 bodies being offered for so cheap these days, they are one of the great deals in 35mm film photography today.
The 1989 109 MP was the last of a line of follow-up cameras to the 1985 FX-103 and Yashica’s final manual-focus 35mm SLR with the Contax/Yashica lens mount. The 107/108/109 series was a hard departure from prior Kyocera Contax and Yashica outings in terms of both design and functionality. Sharing virtually nothing in common with contemporary Contaxes (perhaps some internal components), the 109 was without a doubt the “best” of the 107 series, having a 1/2000 top shutter speed and an auto load/advance/rewind motor drive. It is not a bad camera, but it seems like the answer to a question that no one asked.
Kyocera bought out Yashica in 1983 and continued to produce cameras under both the Contax and Yashica brand names. The first SLRs to come out after the buyout were two electronic-shutter models that introduced “program mode” autoexposure to the lineup: the Contax 159MM and the Yashica FX-103. While the 159MM is undoubtedly a superior product to the FX-103, the cameras were not universes apart. After the 159MM and FX-103, Kyocera would continue to push Contax upmarket and Yashica downmarket.
For 1986, Kyocera unveiled the next two Contax/Yashica products: the 167MT and the FX-3 Super 2000. While the 167MT was the most advanced Contax to date, which an integrated motor drive, multiple metering and exposure modes, advanced flash options, etc., the FX-3 Super 2000 was a minor update to the mechanical-shutter 1984 FX-3 Super, adding a 1/2000 top speed.
While the next Contax-branded product would not appear until 1990 (the professional RTS III), Yashica introduced several new models, including its first autofocus camera, the 200 AF (1987). A year later, Yashica introduced the manual-focus 107 MP. Over the prior FX-103, the 107 MP had an automatic film load and advance, a top shutter speed of 1/2000, and an additional “low-speed” program mode. At the same time, the 107 MP had a lower magnification finder, no detailed exposure information in the viewfinder, no aperture-priority autoexposure mode, and a DX-coded-only film reading system (defaulting to 100 ASA for non-DX canisters). Yashica followed up in 1989 with the 108 MP, which eliminated the “low-speed” program mode in favor of an aperture-priority setting.
The 109 MP would be the best of the series. Over the 108, the 109 would add an auto-rewind feature.The 108s and 109s most often came bundled with a Yashica-branded 35-70mm f/3.5-4.8 zoom. It is not clear how long the 109 MP was produced. It appears that the only Yashica prime lens still being produced into the 1990s was the 50mm f/1.9 ML. Does the 109 have anything to add to the Contax/Yashica universe? Let’s see,
Yashica Models Compared
Here are the FX-103, 107, 108, and 109 compared.
FX-103
107 MP
108 MP
109 MP
Year
1985
1988
1989
1989
Weight
460g
500g
500g
510g
Battery
2 x SR44
4 x AAA
4 x AAA
4 x AA
Shutter Speeds
B, 11 sec – 1/1000
B, 16 sec – 1/2000
B, 16 sec – 1/2000
B, 16 sec – 1/2000
Viewfinder
95% / 0.86x
92% / 0.82x
92% / 0.82x
92% / 0.82x
Flash Sync
1/100
1/90
1/90
1/90
Focusing Screen
Microprism / Split
Microprism / Split
Microprism / Split
Microprism / Split
ASA Range
12-3200
50-3200 (DX) / 100 ASA Default for non-DX
25-3200 (DX) / 100 ASA Default for non-DX
25-3200 (DX) / 100 ASA Default for non-DX
Motor Drive?
External (Advance Only)
Advance Only
Advance Only
Advance & Rewind
Autoexposure Modes
Program (High & Normal) / Aperture
Program (High / Normal / Low)
Program High / Program / Aperture
Program High / Program / Aperture
DOF Preview?
No
No
No
No
Settings in VF
Shutter Speed
3 LEDs (Flash / P / M)
4 LEDs (Flash / Circle / 2 Arrows)
4 LEDs (Flash / Circle / 2 Arrows)
Exposure Lock?
No
No
No
No
Operation
The 109 MP is not a complicated machine, but let’s walk through some of its major features.
Size & Weight: Despite its mostly plastic body and class-average weight, the 109 has fairly large physical dimensions.
Exposure Modes: The 109 MP has four exposure modes: program high, program, aperture priority, and metered manual. The camera can use the program modes with every C/Y-mount lens. In both PH and P, simply set the lens to its minimum aperture and shoot away. However, in the P modes, there is no “floor” to how low the shutter speed will go. The camera will set as long a shutter speed as necessary in both P and A modes to take the shot. If you are wondering how the P exposure combinations are calculated, the manual includes the following chart. As you can see the 109 does not have very aggressive programming between “P” and “P High.” You really would want at least a three-stop aperture-stop difference between the two for better background separation. Contax-branded bodies with program modes are more ambitious in this regard.
Metering and Exposure Compensation: The 109 has a single center-weighted metering mode. There is no formal exposure compensation dial or the ability to change the film speed rating. There is also no exposure lock. However, the 109 does include a +1.5 backlight button next to the lens mount. In reality, a +1.5 exposure pull can be used somewhat effectively in real life once one gets the hang of it. It is not just for backlit situations, but also in brightly-lit scenes where shadow detail is sought. It is not a substitute for real exposure compensation or even an exposure lock, but it is better than nothing.
Viewfinder: Unfortunately, the 109 does not display any meaningful exposure information in the viewfinder. There are only four LED lights on the right side of the screen: a flash, a green light, a “down” arrow, and an “up” arrow. However, these four lights provide adequate guidance for any of the exposure modes. In P or A modes, a sole green light will appear if sufficient light exists. If insufficient light exists, the flash LED will blink. It is not clear at what shutter speed the “flash” LED comes on, but my guess is 1/60. In metered manual, the user sets the aperture and shutter speed combinations until the “down” and “up” arrows are both illuminated.
The finder magnification, coverage, and brightness are about average for a camera of this class. The focusing screen has about average brightness. With large-aperture lenses, it is fairly easy to focus. However, with slower zooms, it becomes more difficult. The non-interchangeable focusing screen is the standard microprism collar / split-screen type.
Motor Drive: Unlike the 107 and 108, which could only automatically load and advance the film, the 109’a motor drive can also rewind the film at the end of the roll. Loading the film is straightforward and automatic. The manual does not state the camera’s frames-per-second rate but it appears pretty slow, probably around 1.5 FPS max. The drive is not excessively loud.
DX Coding: Although the 109 can read DX-coded film cassettes from 25 – 3200 ASA, non-DX film will default to 100 ASA with no ability for manual override. This is bad news for those who roll their own film or those who want to push or pull film.
Flash: The 109 has a standard hot shoe and an X-sync port. There is no TTL flash capability. The sync speed of 1/90 is nothing special. With the Yashica-branded CS-140, CS-220, or CS-240 flashes, the camera will automatically set the shutter speed to 1/90 when the flash is attached and on. It is not clear whether any of the contemporary Contax flashes will do the same. With any other auto flash, select the “X” on the shutter speed dial.
Accessories
Besides various Yashica-branded flashes, only two camera body accessories exist.
F-3 Eyecup: The 109 MP takes the standard Contax/Yashica rectangular rubber F-3 Eyecup. These pieces are interchangeable with any Contax or Yashica SLR with the rectangular-style viewfinder piece, like the FX-103, 167MT, and the Aria.
DA-1 Databack: The DA-1 databack’s only capability is the imprinting of the date and year on a negative. The DA-1 worked with both the Yashica autofocus models as well at the 107, 108, and 109. I have never been sure why anyone would want this. The databack reportedly only goes to 2019.
Conclusions
At the end of the day, no C/Y-mount Yashica 35mm film SLR is particularly competitive with a post-RTS II Contax body. However, if one were to consider a Yashica body for the use of C/Y lenses (and you are not a mechanical shutter purist), the FX-103 and 109 remain the most interesting. The 109’s positive aspects are that it has a 1/2000 top speed, can use its P modes with all C/Y lenses, and has a useful motor drive. At the same time, its relatively bulky size, lack of actual exposure information in the viewfinder, lack of exposure compensation or DX override, and lack of exposure lock keep the 109 MP from being a truly competitive manual focus camera. The obvious alternative would be the FX-103, which only has a top shutter speed of 1/1000 and requires an external winder for auto advance. Yet, the FX-103 has exposure override, no DX-coding issue, and shutter speed information in the viewfinder. Combining the best features from the FX-103 and the 109 MP would have resulted in a somewhat competitive product, and easily possible, but alas, never happened.
At the end of the day, if looking for a beginner SLR or a second or third or fourth body for your C/Y lens collection, or just want to try something different, the 109 MP is certainly a capable and seemingly reliable machine. While the prices for all working 35mm film SLRs are rising, the 109 has remained (for now) outside of both the “collector” and “influencer” spheres that are driving the upward spiral.
Appendices
Here is a timeline of Contax and Yashica manual-focus 35mm SLRs.
In 1951, Nikon introduced its 35mm f/2.5 lens for its rangefinder cameras, the then-fastest mass-produced lens in the 35mm focal length. Up until that time, the gold standards had been the 35mm f/2.8 Zeiss Biogon (produced mostly in Contax rangefinder mount, with some in Leica screw mount) and the late 1940s 35mm f/3.5 Leica Summaron. It was not until 1958 that Leica introduced the next generation of its 35mm rangefinder lenses: the 35/2.8 Summaron and the 35/2 Summicron for use with its M2 and M3 cameras.
Although the Summaron is well-known, the W-Nikkor has traditionally received far less attention. Because the W-Nikkor and the Summaron share a similar symmetrical double-gauss design, why would we think that one would clearly out perform the other? Evaluating the W-Nikkor as an alternative to the Summaron makes some sense as the former is a far cheaper lens in both its Nikon RF version ($200-300) or the Leica screw mount version ($300-500). With the availability of the $250 Amedeo adapter, the plentiful Nikon RF version of the W-Nikkor can now work perfectly on an M body. On the other hand, the prices for used Summarons have been slowly creeping up in price, with the non-goggled version now often exceeding $1,000.
Let’s take a closer look at the operation and performance of these two contemporaries (and rivals) to see how they perform and whether one clearly bests the other. What we are endeavoring to do is get past the superlatives often used in online discussions and try to get a sense of the actual abilities of these lenses.
The 35mm f/2.5 W-Nikkor (1951-1960)
From 1948, Nikon produced a 35mm f/3.5 lens in its own rangefinder mount and later in Leica screw mount. The 35mm f/3.5 was a simple 4 element, 3 group Tessar design. In 1951, Nikon followed up with the 35mm f/2.5. The W-Nikkor had a completely different design than the prior f/3.5 – a symmetrical scheme like Leica’s 1940s Summaron.
The Symmetrical Design of the 35/2.5
The W-Nikkor was produced in two primary versions, in Nikon S mount and in Leica screw mount. Some unknown number was also probably made in Contax RF mount. Check out this page for some good visuals of the various iterations of the W-Nikkor.
The Nikon RF versions came in a chrome barrel and then later in a black paint version. Both are very handsome designs. For most of the production, the W-Nikkor came in the design pictured above, with its aperture settings visible on the inside of the lens. Only in the final iteration of the lens did Nikon produce a version where the aperture selector ring is visible on the exterior of the lens. This last version now is rare and expensive collector’s item. The Leica screw mount version has a completely different external appearance and some different specifications. It is slightly heavier, has a much more traditional 1930s/40s Leica exterior lens design, cannot focus as closely as the S mount version, and takes an odd filter size.
Nikon Rangefinder
Leica Screw Mount
Years Produced
1951-1960(?)
?
Optical Design
6 elements, 4 groups
6 elements, 4 groups
Aperture
f/2.5-22
f/2.5-22
Aperture Blades
8
8
Min. Focusing Distance
0.9m
1.0m
Weight
111g
126g
Filter Size
43mm x 0.50m
34.5mm / Series VI
Leica Summaron 35mm f/2.8 (1958-1974)
Between 1956 and 1958, Leica introduced three M-mount 35mm lenses for its M3 and M2 cameras: the 35mm f/3.5 Summaron (the same design as its prior screw mount lens), the 35mm f/2.8 Summaron, and the 35mm f/2 Summicron. The Summaron and Summicron both came in two different versions: (1) a “goggled” version for use with the Leica M3; and (2) a detached version originally for use on the M2.
Another Symmetrical Design
Lens Mount
Leica M and Leica Screw Mount
Years Produced
1958-1974
Optical Design
6 elements, 4 groups
Min. Focusing Distance
0.65m (M3); 0.70m (M2, M4, M6, etc.)
Weight (Lens Only)
210g
Aperture Blades
10
Filter Size
39mm
After discontinuing the Summaron in 1974, Leica would not produce another 35mm M-mount rangefinder lens slower than f/2 until the 2007 35/2.5 Summarit.
Performance
Conventional wisdom would suggest that the Summaron would outperform the Nikkor. But does it? Let’s try both on a Nikon Z6 to see whether where each lens falls. To see how these older lenses compare with a modern optic, we will throw the Biogon-type Voigtlander Color Skopar 35mm f/2.5 into the mix. A full-frame 24 megapixel sensor should give us some sense of both lenses’ strengths and weaknesses.
Before we start, let’s review some impressions of those who have gone before us. According to Nikon, the development of the 35mm f/2.5 presented a variety of difficult optical challenges. Nikon’s prior 35mm f/3.5 was a Tessar derivative and its 50mm f/1.5 and 50mm f/2 rangefinder lenses had been Sonnar derivatives. According to its technical data, we would expect the 35mm f/2.5 to have excellent resolution in the center, very little overall distortion, good field curvature correction, but to exhibit “front focus” at the corners wide open that should get gradually better as the lens stops down.
Let’s start with the infamous “bookshelf test” at about 1.1 meters from the subject. Click on each image to bring up a larger image. Or if you want, just scroll down to “Conclusions.”
f/2.5
W-Nikkor
VC
f/2.8
W-Nikkor
VC
Summaron
F/4
W-Nikkor
VC
Summaron
f/5.6
W-Nikkor
VC
Summaron
f/8
W-Nikkor
VC
Summaron
Let’s now look at a typical daylight shot at a building in the distance.
f/2.5
W-Nikkor
VC
f/2.8
W-Nikkor
VC
Summaron
f/4
W-Nikkor
VC
Summaron
f/5.6
W-Nikkor
VC
Summaron
f/8
Here is a closer object at about 0.8m. It was too close for the W-Nikkor — so it’s just the Summaron and VC here.
f/2.8
VC
Summaron
f/4
VC
Summaron
f/5.6
VC
Summaron
f/8
VC
Summaron
Finally, here is a cute little neighborhood book deposit box.
f/2.5
W-Nikkor
VC
f/2.8
W-Nikkor
VC
Summaron
f/4
W-Nikkor
VC
Summaron
f/5.6
W-Nikkor
VC
Summaron
f/8
W-Nikkor
VC
Summaron
Conclusions
The Summaron beats the other two consistently in distortion control. Both the W-Nikkor and VC have similar levels of barrel distortion through the range.
The VC lens is the “sharpest” lens of the three. It renders in a very modern and clean way. At the same time, the VC has lots of weird light fall-off a wider apertures. The fall-off is very noticeable at f/2.5, and one can still discern it in daylight shots even at f/8. The light fall off after f/2.5 is not a deal killer and on film or digital may not even be noticed, again unless you are looking for it. The VC lens consistently produces larger digital file sizes and overall captures more detail than either the Summaron or the W-Nikkor. It probably can be said that the VC is the “best” lens of the three based on a totality of performance factors, but it cannot be said that the VC is “clearly” better in all aspects.
In a head-to-head between the Summaron and W-Nikkor, neither lens knocks the other out. Both lenses are rather well-corrected for field curvature and chromatic aberrations. Because of its ancient single lens coating, the W-Nikkor suffers from flare that is apparent indoors and outdoors. Besides the W-Nikkor’s flaring, I cannot discern any noticeable difference in center sharpness between the two lenses at any aperture. The corners of the Summaron are also slightly better than the W-Nikkor throughout the range — but not by much — I would attribute any difference to distortion and the quality of the lens coating. Neither lens has an advantage in light fall-off. In many situations, the W-Nikkor is producing larger digital file sizes than the Summaron at f/2.8 and f/4. By f/5.6 and f/8, both lenses are producing images of roughly equal detail. The W-Nikkor renders a “cooler” color image than the Summaron.
In the 35mm focal length, you cannot go wrong with any of these lenses, especially on film. The W-Nikkor (in either Nikon S or Leica screw mount) is generally 1/4 the price of a Summaron. On the other hand, the Summaron is cheaper than any version of the Leica 35/2 Summicron. Whether you would choose one lens over the other may come down to personal preference. If you just want to get the job don for the least amount of money, certainly consider the VC. For its performance, it is probably the best value in an M-mount 35mm focal length lens. If you want to enjoy the classic rangefinder experience and tend to shoot film, the W-Nikkor and Summaron are both a pleasure to use.
The Big Mini 21 is a rather obscure point-and-shoot camera with a fixed 30mm f/4.5 lens produced by Konica around 1994. Sharing nothing physically in common with any other Konica product of the 1990s, and with the manual so far MIA on the internet, the BM-21 remains somewhat of a mystery in terms of functionality. Does the entirely automatic BM-21 take good photos? Is Konica’s 30mm lens any good? After some testing, and unfortunately, it seems that there is nothing particularly special about the performance and functionality of the BM-21 (other than its size); and it is about par for the course for mid-range consumer point-and-shoots of the mid-1990s.
Upon shutting down its SLR business in 1987, Konica shifted its focus to the continued production of compact 35mm point-and-shoot cameras. During 1989, Konica introduced the “A4,” its next generation autofocus point-and-shoot that provided the platform for the successful “Big Mini” camera line of the 1990s. The next year, Konica launched the first “true” Big Mini model, the BM-201. During 1993, Konica introduced the iconic “Hexar AF,” perhaps the most capable autofocus point and shoot ever produced. Konica’s 1990s higher-end models like the BM-301 and the Big Mini F are well-known and have been extensively reviewed.
With a design wholly distinct from the rest of the Big Mini line, the BM-21 offered the usual consumer features but with a wider 30mm f/4.5 lens. It seems that the BM-21 appeared and then disappeared rather quickly, with the initial batches apparently having some mechanical and/or electrical gremlins that were eventually worked out in later production. It is also not clear if the BM-21 was ever officially offered for sale in North America as I cannot find it advertised in the media of the time. Although BM-21s do occasionally pop up for sale, it seems that most examples reside outside of North America. In 1996, Konica introduced the apparent successor to the BM-21, the “VX BM-701” (assembled in China), a more conventionally-styled point and shoot with a fixed 29mm f/4 lens (most likely the same lens as found in the BM-21). There were plenty of similar contemporary consumer cameras with fixed 29-30mm lenses, like the Nikon Fun Touch 5, the Pentax PC-55, the Ricoh R1e, and others.
The BM-21 is truly a camera that can fit in any pocket, purse, or bag. With no manual out there so far to guide us, let’s try to figure out how it works.
Specifications
Introduction
1994
Weight
155g
Dimensions
100 x 63 x 32mm (4 x 2.5 x 1.25 in.)
Lens
30mm f/4.5
Lens Design
?
Shutter Speeds
?
DX Coding
Yes
Flash Modes
5
Autofocus Lock?
?
Underexposure Warning?
No
Battery
1 x CR2 Lithium
Operation
Styling: The BM-21 has a completely different design than any previous or subsequent Konica camera. It is tiny, approximately the length of playing card. In my opinion, it is one of the more attractively-designed 1990s point and shoots.
Film Loading: The BM-21 has the usual automatic load, advance, and rewind typical for point and shoots of the era. However, the film loads the opposite way from most cameras: from right to left. Not sure what that is all about. This also means that your photos will be upside down on the negatives. The film transport and rewind have the typical point and shoot high-pitched tinny sound.
30mm f/4.5 Lens: Other than the 29mm f/4 found on the later VX BM-701, it does not appear that the BM-21’s 30mm f/4.5 lens appeared on any other Konica product. While a 30mm lens can be much more versatile than a 35mm, especially for candids and travel, f/4.5 is rather slow, 2/3 of a stop slower than an f/3.5 lens. The bright side is that with a large depth of filed these types of lenses can be quite sharp and resolve wonderfully. It is unclear what the minimum focusing distance is, but I would guess somewhere between 1-1.5 meters. The 30mm lens produces photos of acceptable quality and sharpness for the 4×6 print era but do not expect “premium” point-and-shoot optical performance. The lens displays a little barrel distortion in certain conditions and sometimes vignettes a little bit.
Shooting: I think that those of us who shoot “real” cameras often expect too much from point-and-shoots. Cameras like the BM-21 were designed to be as easy as possible to use for folks who know nothing about photography. The death-knell of any photo is that it is out-of-focus because of missed focus or camera shake. Cameras like the BM-21 did their best to address this. A wider lens with a large depth-of field eliminates many focusing errors. A relatively high minimum shutter speed prevents most camera shake.
That being said, and frustratingly, the autofocus performance of the BM-21 at closer distances is hit or miss. I found that although the subject generally filled the frame at 1 meter or more, the BM-21 still managed to focus behind the subjects. The lack of: (1) feedback regarding whether a subject is too close for the minimum focusing distance (which is currently unknown); (2) confirmation of an autofocus lock (if it actually has it); and/or (3) an underexposure warning can really ruin your day. Whether the BM-21 can focus lock and how it works are really important to know, as many point-and-shoots will just focus in the center of the frame, regardless of whether the subject actually is.
It is unclear what the minimum and maximum shutter speeds are. Taking a look at the operation of the shutter, I would guesstimate that the minimum speed is about 1/15 (or even 1/8). The maximum shutter speed appears to be probably 1/250 or 1/500.
The only real control the user has over the BM-21 is the flash settings. There are five modes: (1) automatic flash operation (default); (2) red eye reduction. (3) flash always on; (4) flash always off; and (5) daylight fill flash. It is important to note that the BM-21 will always default to using the flash if it determines insufficient light exists, even in what would appear to be regular daylight conditions. Remember to turn the flash off when taking daylight photos if you do not want the flash to fire unexpectedly.
LCD: The top-mounted display only shows the frame count and the flash modes.
Viewfinder: The BM-21 has a fairly large and bright viewfinder for how diminutive the body is. There is no exposure or autofocus information in the viewfinder. There are no etched marks for any parallax correction (but a 30mm lens does not really need them).
DX Coding: The BM-21 accepts and reads DX-coded film, but it is not clear what the range is. I would guess that it would be at least 100-800. It also not clear whether the camera defaults to ASA 100 or something if a non-coded cartridge is used. There is obviously no DX override.
Conclusions
Given its unique and very cool form factor, I really, really wanted the BM-21 to be some kind of capable, reliable dark horse winner. Unfortunately, that is not the case. While its hyperfocal performance works fairly well and can produce some nice results with good color fidelity, the lack of any focus or exposure feedback drives me nuts. Full disclosure: I am generally not a fan of most point-and-shoots in any price range. I will 10/10 choose to carry a larger, heavier, and more conspicuous 35mm camera that can provide both focus and exposure feedback.
Sample Photos
Feel free to follow the Instagram account to see sample photographs from the BM-21 at the hashtag #konicabm21.
Beginning in 1988, Konica introduced a series of durable, weather-sealed point-and-shoots for construction and industrial uses in a variety of configurations and at different focal lengths. The Genba Kantoku 28HG was one of the final models. With some impressive features, including a high-quality, close-focusing 28mm lens, the 28HG makes a good case for being a fantastic “take everywhere” camera.
Konica appears to have produced three primary versions of Genba Kantoku bodies with a 28mm f/3.5 lens. Here is a comparison. The 1992 “28 New” is left off the list as it is similar to the 28WB.
Wide 28
28WB
28HG
Year
1990
1994
1994
Weight
400g
350g
375g
Lens
28mm f/3.5
28mm f/3.5
28mm f/3.5
Lens Design
8 Elements, 7 Groups
5 Elements, 5 Groups
5 Elements, 5 Groups
Minimum Focus
0.75m Separate Close-Up Mode 0.5-0.75m
0.5m
0.4m
Focus/Exposure Lock?
Yes
Yes
Yes
ISO Range
25-3200
25-3200
25-3200
Default for Non-DX
25
25
25
Shutter Speeds
1/4 – 1/280
1/4 – 1/280
1/4-1/280
Exposure Comp Mode?
None
?
Yes +2
Water Resistance
Class 4
Class 7
Class 7
Panoramic Mode?
No
No
Yes
Battery
2CR5
2CR5
2CR5
It appears that the Genba Kantoku series represents an evolution of prior Konica point-and-shoot models such as the MG and the MT series. I do not see much similarity in external or internal design between the Genba series and the 1992 Konica Hexar AF. Although the 28WB and 28HG have similar specifications, the bodies are different. The 28HG has a different built-in flash, and its viewfinder was moved from to the left of the autofocusing sensors to in-between them.
The 28HG has a fixed 28mm f/3.5 lens that focuses down to a very impressive 0.4m. While many 28mm lenses out there suffer from some degree of barrel distortion, the 28HG produces a remarkably flat image. The lens performance of the 28mm is pretty good and certainly better than the vast majority of film point and shoots. Its shutter speeds range from 1/4 to 1/280. It requires the use of DX-coded cartridges or otherwise will default to ISO 25.
The 28HG’s operation is pretty basic. The viewfinder has no information in it other than a central circle autofocus point and some fixed parallax correction lines for closer focus. A half-press of the shutter button will activate the autofocus, with a green light to the right of the viewfinder confirming that focus has been locked. If the focus point is below 0.4m, the green light will flash. A red light will illuminate if the camera detects that the lighting is insufficient and will fire the flash unless it is manually switched off. If the flash is switched off, and the exposure is insufficient, the red light will flash. One aspect that is unknown is the minimum shutter speed the camera will use if the flash is turned off before it warns you of underexposure (My guess would be 1/60, but it may be 1/30 or 1/45). The exposure and focus can be “locked” with a half-press of the shutter button. While this type of autofocus that provides no real-time feedback as to the actual focus point, the 28HG “misses” a locked autofocus spot far less than the prior Konica MGs and the MTs do.
The primary drawbacks of all of this system (and also with the prior MG and MT) are that there is no displayed exposure information and no confirmation of the actual focal point. However, the 28HG has nice ergonomics overall, with fairly fast focusing in daylight and a surprisingly muted shutter and film advance sound (quieter than the advance of the Hexar AF). The 28HG automatically rewinds at the end of the roll but does not have the “delay” that permits you to stop it before the leader is pulled in like the Hexar AF.
Although the operation could not be simpler (it was after all designed for construction workers and not professional photographers), the 28HG does have some meaningful user override. Through the LED menu, the flash can be set to “auto,” can be turned off and can be forced on (for daylight fill). The menu can also lock the camera to infinity focus, provide +2 stops of exposure for backlighting situations, and a self-timer. However, every time the camera is turned off, these settings will reset.
The top shutter speed of 1/280 is certainly a little limiting for use with faster film. Unlike the Hexar AF, there is no provision for a neutral density filter. While this only practically matters in bright daylight conditions with 400+ speed film, it is something to keep in mind.
The panoramic mode is kind of cool, but it is achieved just by cropping the negative into a rectangle in the middle of the frame, something one can obviously in post with a regular shot. A switch by the viewfinder will close down the viewfinder and activate a mask inside the body.
It is difficult to find any 28mm fixed-lens autofocus point-and-shoot that can match the 28HG’s capabilities other than the significantly more expensive, yet more richly-featured Ricoh GR1 ($500+) Nikon 28Ti ($800+), and Minolta TC-1 ($800+). However, when shooting at 28mm, which has such a wide depth-of-field, comprehensive manual control over exposure settings means a bit less than shooting at 35mm or longer. In my opinion, critical work at 28mm is usually better accomplished with an SLR.
A tip for use of the 28HG is when in daylight conditions, immediately turn off the flash, as the auto flash can be occasionally unpredictable even where it appears that there is sufficient ambient light. Another one is that in hard contrast situations, force the flash on as daylight fill can do a decent job of filling in shadows at closer distances.
At the end of the day, the 28HG is a cool camera and recommended as a durable, easy-to-use point-and-shoot with a high-quality lens. As the final model in the series, although sometimes rare on the secondary market (perhaps because it may have never been exported outside Japan in sufficient quantities), it is probably worth holding out for over a 28 Wide or 28WB. If 28mm is not your bag, there are a variety of other Genba Kantoku models out there with different fixed lenses and zooms to try out.
Because the original manual for the 28HG may not have originally been translated into any other language, a Google-translated English PDF copy of it can be found here.
The Nikon N50 (F50) was an entry-level autofocus camera body produced from 1994 until 1998, when it was replaced by the N60 (F60). Compared to the universe of Nikon autofocus SLRs of the 1990s and early 2000s, the N50 has somewhat limited capability and awkward interfaces. Given the existence of numerous, superior, and affordable alternatives, is there any case for the N50 today? Probably not.
From the introduction of consumer autofocus SLRs during the late 1980s until their general demise in the early 2000s, the market was incredibly competitive and all models radically improved through the era in all respects, most notably in autofocus speed and accuracy. Unfortunately, Nikon had to play some serious catchup in this segment to Canon, which was introducing some fine SLRs with faster autofocus speed and accuracy. Starting in 1986 with the N2020 (F-501), Nikon produced a series of advanced consumer autofocus cameras: the N4004 (1987), the N8008 (1988), the N4004S (1989), the N6006 (1990), and the N8008S (1991). These models were followed by the well-featured N90 (F90) in 1992, and then by the updated N90s (F90x) in 1994. The N90s was clearly and purposefully the best of the bunch and an important stepping stone between the professional Nikon F4 (1988) and the F5 (1996).
Alongside the introduction of N90s, Nikon introduced two consumer-level cameras for 1994: the N70 and the N50. The N50 was often packaged with two “kit” zoom lenses: the 35-80mm f/4-5.6 AF-D and/or a 80-200mm f/4.5-5.6 AF-D. The general consensus is that the 35-80mm is not a very good lens, but the 80-200mm has its fans. The N50 was replaced with the more-intelligently designed N60 in 1998 and then by the further improved N65 in 2001.
Specifications
Here are the compared specifications of the 1994 N90s, N70, and N50.
N90s
N70
N50
Shutter Speeds
30 sec – 1/8000
30 sec – 1/4000
30 sec – 1/2000
Viewfinder Mag.
92% / .78x
92% / .77x
90% / .78x
Motor Drive
Load / Advance / Rewind
Load / Advance / Rewind
Load / Advance / Rewind
AutoFocus
CAM246 Module
CAM274 Module
AM200 Module
ASA Range
DX (25-5000); Manual (6-6000)
DX (25-5000); Manual (6-6000)
DX (25-5000); Manual (6-6000)
Battery
4 x AA
2 x CR123A
2CR5
Weight
755g
585g
580g
Flash Sync
1/250; TTL
1/125; TTL
1/125; TTL
Metering
Matrix / Center / Spot
Matrix / Center / Spot
Matrix / Center
Exposure Modes
P / A / S / M
P / A / S / M
P / A / S / M
Full Lens Compatibility
AF; AF-D; AF-S; AI-P
AF; AF-D; AF-I; Non-G AF-S
AF; AF-D
Partial Lens Compatibility
AI; AI-S
AI; AI-S
AI; AI-S; AF-S; AF-I
Operation
While certainly capable of taking great photos and with a variety of useful features, the N50 is nevertheless hobbled by a poor user interface and limited capability to use both manual focus lenses and Nikon’s later and better AF lenses. Even in its class of entry-level cameras, later models like the N75 and N65 just blow it away. Given that, and without going exhaustively through all of its features, let’s look at what it can and cannot do.
Limited Nikon Lens Compatibility: The N50 was designed to work primarily with Nikon’s contemporary line of AF and AF-D lenses. While there are some winners in this line-up, especially the professional zooms and the prime telephotos, Nikon’s later AF-S lenses were largely a significant improvement. While the N50 cannot autofocus either AF-S or AF-P lenses because of a lack of appropriate interfaces, it still can operate them in all shooting modes with a focus-assisted manual-focus mode. More importantly, the N50 cannot meter or focus-assist the AI or AI-S line of lenses.
Viewfinder: The N50 seems to have borrowed the viewfinder design of the Nikon F4, with its signature green LCD screen at the bottom displaying the shutter speed, aperture, and focus assist indicators. Unlike the F4, where the illuminator has to be switched on, the N50 illuminator always lights up when the exposure meter is activated. The 92% frame coverage with .78x magnification is not that great but similar to the N90s and N70.
Autofocus: The N50 uses the same 1988 autofocus module as the Nikon F4. The AM200 is relatively fast and accurate but had certainly been long-surpassed by 1994. The autofocus from the screw drive is fairly noisy. A half-press of the shutter button will trigger the autofocus and turn on the exposure meter. To lock the exposure, one must press an external AE-L button on the back upper-right of the body. The N50 has both a single and continuous autofocus mode. The continuous mode remains fairly primitive by modern autofocus standards.
Exposure Metering: When using AF, AF-D, AF-S, or AF-I lenses, the N50 automatically defaults to a now-primitive six-segmented matrix light metering. When switching to manual exposure mode, the N50 will switch to center-weighted metering.
TTL Flash: Apart from a fairly useless built-in pop up flash, the N50 can use the world of Nikon TTL flashes contemporary to it and has a fairly average x-sync speed of 1/125. The N50 can use Nikon TTL flashes for automatic daylight fill.
Other Features: The N50 had a variety of other standard features, like an integrated motor drive and automatic film loading and rewinding,
Shooting Modes: The N50’s most significant shortcoming is its often-confusing and unnecessarily complicated shooting modes. Instead of using what ended up becoming “standard,” a top mounted LCD readout and rotating dials moved by one’s fingers, the N50 uses a series of buttons and LCD readouts consisting of pictures, numbers, and letters that on a good day would take some getting used to. The primary modes are labelled “Simple” or “Advanced.”
In “Simple” mode, the camera gives you four pre-set options to select on the LCD menu on the top right of the body: (1) “General Purpose Program” (camera icon); (2) “Landscape” (mountain icon); (3) “Portrait” (lady in a hat icon); and (4) “Close-Up Program) (a flower icon). No technical exposure information (shutter speed or aperture) is displayed in the viewfinder. However, there is an autofocus confirmation circle and the flash icon will blink if there is not enough light.
In “Advanced” mode, to choose standard exposure modes (P / A / S / M), the user selects with a button under the appropriate letter. If P is selected, there are four additional pre-programmed modes to choose from: (1) “Sport Program” (runner icon); (2) “Night Scene Program” (buildings with moon icon); (3) “Motion Effect Program” (a runner with wind icon); and (4) “Silhouette Program” (setting sun with palm tree icon).
By selecting “A,” you can use the top controls to select your preferred aperture without having to change the settings on the lens itself. If insufficient light exists, the viewfinder will blink the “flash” icon. By selecting “S,” you can use the top controls to select a preferred shutter speed and the camera will set the appropriate aperture. If your shutter speed is too high or low for the lighting, the viewfinder will signal “Lo” or “Hi.” By selecting “M,” you can use the top controls to manually set a shutter speed and aperture. If your manual settings disagree with the camera’s meter, the viewfinder will tell you in +2 / -2 how much you are off and also blink the flash icon if necessary.
Conclusions
Because N50s are basically free today, it is difficult to find anything wrong with the camera at that price point. I think that the N50 is best used in a standard “Program” or “Aperture Priority” modes, which allows the camera to fully function so you can focus on the shot, and not trying to figure out how to change the settings on the fly. The inability to autofocus the much better and quieter AF-S lenses is a real downer, especially since, save for the 1998 N60, Nikon would never make another 35mm film SLR that could not autofocus them. The inability to effectively use manual focus lenses is also a bummer. You just have to deal with the pain of its relatively loud autofocus mechanism and one of Nikon’s earliest autofocus modules.
Instead of the N50 for an easy-to-use, entry-level AF Nikon SLR, I would look at the early 2000s N80 (F80) or the N75 (F75). These cameras are much more fully featured, relatively lightweight, and can use virtually every Nikon AF lens ever made. If you have a few more bucks, consider the F100, which has everything you would want in Nikon autofocus camera. Unless a camera like the N50 falls in your lap, I would skip it entirely.
Without a doubt, the 1993 Konica Hexar AF was and remains the most advanced fixed-lens 35mm “point and shoot” ever produced. Konica centered this masterpiece around its newly-designed 35mm f/2 Hexar, a direct descendant of the famous 1950s Nikon 35mm f/1.8 W-Nikkor, which itself was produced in relatively small quantities in Nikon rangefinder and Leica screw mount.
Nothing about Konica’s early 1990s camera product line, consisting mostly of semi-advanced point-and-shoots in the form of the “Big Mini” series, would have foreshadowed the AF. The AF’s most immediate ancestor appears to have been the 1988 Konica “Genba Kantoku” series of autofocus point-and-shoots made for the construction industry. That line had four basic models, with the following lenses: a 28mm f/3.5, a 35mm f/3.5, a switchable 40mm / 60mm, and a 28-56mm zoom. These tough, weatherproof cameras were entirely automated with no meaningful user override. These cameras were never really exported to North America and remained largely unknown outside of Japan until the internet era.
The Hexar AF came in two primary versions: the black original Hexar AF (1993) and the better-featured Hexar AF Silver (1997). There were also a few limited editions like the “Classic,” the “Gold,” and the “Rhodium.” With the AF Silver arguably being the “definitive” version, let’s take a look at that one specifically.
Specifications Compared
Here is the AF compared with the internet’s favorite point-and-shoots with fixed lenses around the 35mm focal length: the Contax T3, the Fujifilm Klasse, the Leica Minilux, the Nikon 35Ti, and the Yashica T4.
Hexar AF Silver
Contax T3
Fujifilm Klasse S
Leica Minilux
Nikon 35Ti
Yashica T4
Year Introduced
1997
2001
2007
1995
1993
1990
ASA Range
6-6400
25-5000
25-3200
25-5000
25-5000
50-3200
ASA Override?
Yes
No; Non-DX Defaults to ASA 100
Yes
No; Non-Dx Defaults to ASA 100
No; Non-Dx Defaults to ASA 100
No; Non-Dx Defaults to ASA 100
Lens
35mm f/2
35mm f/2.8
38mm f/2.8
40mm f/2.4
35mm f/2.8
35mm f/3.5
Lens Design
7 Elements / 6 Groups
6 Elements / 4 Groups
4 Elements / 3 Groups
6 Elements / 4 Groups
6 Elements / 4 Groups
4 Elements / 3 Groups
Lens Type
Modified Xenotar
Sonnar
Tessar
Double-Gauss
Double-Gauss
Tessar
Viewfinder Coverage / Mag.
?
85% / .50x
85% / .48x
83% / .35x
85% / .50x
?
Filter Size
46mm
None; Accessory for 30.5mm Filters
None
None
None
None
Metering
Center / Spot (in M)
Center
Center
Center / Spot
Center
Center
Min. Focus
0.60m
0.35m
0.40m
0.70m
0.40m
0.35mm
Focus Lock?
Yes
Yes
Yes
Yes
Yes
Yes
AutoParallax-Corrected?
Yes; Automatic
No
No
No
No
No
Exposure Modes
P / A / M
P / A
P / A
P / A
P / A
P
Exposure Compensation?
+/- 2
+/- 2
+/- 2
+/- 2
+/- 2
None
MaxShutter Speed
1/250
1/1200
1/500 (f/2.8); 1/1000 (f/16)
1/400
1/500
1/700
Flash
External GN System
Built-In; Optional External TLA 200
Built-In
Built-In
Built-In
Built-In
Battery
2CR5
CR2
CR2
CR123A
CR123A
CR123A
Weight
495g
230g
270g
366g
310g
190g
The Good
I have owned a Hexar AF Silver for over 20 years. In my opinion, the most impressive aspects of the AF include: (1) its fantastic lens; (2) its modern implementation of the 1960s guide number flash system; (3) its nice parallax-corrected viewfinder; (4) extensive user control over all of its functions; (5) its optional “silent mode;” and (6) the ability to use regular camera filters.
Lens: The 35mm f/2 Hexar lens on the AF is a multicoated, Xenotar-type descendant of the Nikon’s 35mm f/1.8 W-Nikkor. The two lenses perform remarkably similarly. The Hexar even displays the same focus shift as the Nikkor. Aware of the focus shift issue, Konica designed the autofocus system of the AF to compensate automatically for any shift in focus. The Hexar’s only real shortcoming is its noticeable barrel distortion. Oddly enough, the 1950s W-Nikkor’s barrel distortion is much better controlled, perhaps due to its use of discontinued (and slightly radioactive) lanthanum glass. The Hexar AF’s lens was so desired that large Japanese camera stores commissioned Konica to produce several Leica screw mount versions of it, including the limited edition, brass-barrel 35mm f/2 UC Hexanon.
Guide Number Flash System: The AF’s electronic leaf shutter permits flash synchronization at all shutter speeds. The AF’s external hot shoe flash system was a modern implementation of the old 1960s guide number flash system, appearing in such products as the Auto SE and the Auto S3. This system was quite ingenious. Using virtually any electronic flash in existence that has a manual mode, the user would simply dial in the flash’s guide number (at ASA 100). With the camera knowing that the flash would always fire at that full power setting, it would automatically compensate for both the ambient lighting and the focusing distance to arrive at the correct exposure for both indoor and daylight conditions. Of course, the AF can also use any regular old electronic “auto mode” flash. Konica did offer the HX-14 flash that could operate both in GN and auto mode.
Automatically Parallax-Corrected Viewfinder: The AF’s bright viewfinder automatically compensates for parallax error by collapsing the framelines to the appropriate size. The viewfinder also includes lights for over/under exposure, a spartan distance scale which collapses appropriately, and a warning light if the subject is too close to focus.
Silent Mode: During the 1990s, Konica got into a bit of legal trouble by including an optional “silent mode” where the camera makes virtually no noise when autofocusing, tripping the shutter, and advancing the film. This apparently appropriated another company’s intellectual property. While this function does slow down the autofocus, it is still doable. The focus and advance are not truly “silent,” but they are pretty muted. Because of the aforementioned legal trouble, Konica stated that it had “removed” this feature from the AF Silver. However, if you know the secret code, you can enable it.
Filters: The AF’s compatibility with any screw-in 46mm filters is another great attribute. Filters are very useful for, e.g., protecting a lens, for black and white photography, and for increasing exposure time with neutral density filters.
Functionality
Without going through the whole list, here are the salient features of AF in no particular order:
Multiple Exposure Modes: The AF can operate in three separate modes: Program, Aperture-Priority, and Manual. “Program” is a true point-and-shoot mode, with the camera setting both the aperture and shutter speed. “Aperture Priority” is also straightforward, with you setting the aperture on the rotating dial and the camera sets the appropriate shutter speed. Manual mode is less straightforward, with you setting the aperture on the dial and then scrolling through some buttons to set the shutter speed via the LCD.
Minimum Shutter Speed Setting: To prevent camera shake from ruining your photos, you can program the AF to a minimum shutter speed while in Program or in Aperture-Priority mode: 1/4 to 1/60 of a second. I find that 1/30 is generally sufficient if you have a somewhat steady hand.
Focus & Exposure Lock: A half press of the shutter button will lock both the focus and exposure. This is an essential feature for this type of camera.
Exposure Compensation: In either P or A mode, you can easily set exposure compensation using two buttons beneath the switch.
Film Speed Override: The DX override is a fantastic feature. It allows one to use non-DX coded film cassettes at any ASA. It also works well for exposure compensation when using filters.
Automatic Infrared Film Focus Compensation: When using infrared film, the AF has a setting that will automatically adjust the focus appropriately.
Multiple Exposures: The AF has a feature that easily permits multiple exposures, as many of you want, within reason.
The So-So
Despite the AF’s impressive optics and features, there are a few aspects that could have been better.
1/250 Top Shutter Speed: The most popular gripe about the AF is its relatively-low maximum shutter speed of 1/250. This limitation is puzzling as leaf shutters can often achieve at least 1/500.
Size/Dimensions: Although the AF generally operates like a point-and-shoot, it is not point-and-shoot sized, more resembling the dimensions of a classic 1960s fixed-lens rangefinder.
No Exposure Information in Viewfinder: While the AF’s viewfinder contains automatic parallax corrected framelines, an abbreviated distance scale, warnings for over/under exposure, and an indication if the subject is too close to focus, there is no actual exposure information communicated.
Too Many Buttons? While the AF can do a lot, many of its advanced functions require some button and switch combinations that are neither necessarily intuitive or easy to remember without a cheat sheet.
The Data Back: The AF Silver came with a data back whose only function is to perhaps ruin your photo by imprinting a date on the bottom right quadrant of your negative. While this function may have been useful for some documentary, industrial, or scientific purposes, it is useless for taking real photos. The date function only goes up to December 31, 2019.
Tips for Use
Neutral Density Filters: One of the best things you can do to get the most out of the AF is to invest in a high-quality 2 or 3 stop neutral density filter. If using 400/800 speed film in daylight conditions, a neutral density filter is pretty much necessary. A 3-stop ND filter reduce 400 speed film to 50 and 800 speed to 100, allowing you to use the same roll in a variety of lighting conditions.
Unlock the Silent Mode!: If you have a Silver AF, that had the silent mode disabled from the factory, be sure to unlock the secret silent mode. The code can be found through an internet search.
Take Advantage of the GN Flash System: Because the AF Silver does not require the use of a proprietary flash, invest in whatever large or small flash that suits you, as long as it can shoot in manual mode (i.e., full, 1/2, 1/4 power, etc.). The Konica HX-14 flash is cute but not necessary. The daylight fill flash feature works quite well but can lean towards a little overexposure, just like SLR TTL flashes.
Treat It Like a Point and Shoot: At the end of the day, although the AF has remarkable capability and user override, in my opinion, the AF is really best used as an advanced point and shoot that can excel in available-light situations.
The Contax Aria is one of my favorite 35mm film SLRs. With its bright viewfinder, a 1/4000 top shutter speed, integrated motor drive, lightweight construction, capability of using the latest Contax TTL flashes, and multiple metering modes, it checks all of the boxes. It’s a little pricey but worth it.
The 1998-2004 Aria was the last “new” manual-focus 35mm film SLR produced by Kyocera under the Contax brand name (for the purposes of this statement, we are going to exclude the later de-featured RXII). Contax would only release two more new 35mm film SLRs afterwards: the autofocus models N1 (2001) and NX (2002). Unfortunately, neither of these later autofocus bodies are compatible with C/Y lenses. Not designed or marketed as a professional’s camera, the Aria’s main attraction is that is light, so light in fact that almost all of the great Contax SLR lenses make the camera decidedly front heavy. The Aria pretty much combines everything a regular person would want in a film SLR.
When autofocus technology substantially improved during the early 1990s, most major manufacturers abandoned the concept of the advanced manual-focus SLR with integrated motor drives. One would have to go back to 1990 to find the last similar model produced by Nikon, the extremely underwhelming F-601M (the N6000), a manual focus version of the F-601 (N6006). For Canon, we would have to go all the way back to the 1986 T90. By the 1990s, only Leica and Contax were producing high-quality, professional-level, manual-focus 35mm film SLRs.
The Aria has extensive functionality for a non-professional SLR body. Over the Aria, the professional RTS III has only the following real-world advantages: (1) better viewfinder coverage and brightness; (2) a more powerful internal motor drive; (3) built-in viewfinder diopters; (4) a 1/8000 top shutter speed; and (5) a 1/250 flash sync speed.
Light! One of the main draws of the Aria is its size and weight, only 460 grams (without the batteries). A Leica M7 body is 610 grams. A Contax 167MT body is 620 grams. A Nikon F4 body is 1280 grams. An iPhone 13 Pro Max is 240 grams. The body is so light that any of the professional C/Y lenses will often double the weight of the set up (the 50mm f/1.4 is 330 grams, the 85mm f/1.4 is 595 grams, and the 35m f/1.4 is 600 grams). The Aria’s diminutive package makes it great candidate for a camera you could easily slug around all day, whether it be at a party, on a hike, or vacation, whatever.
Metering Modes: The Aria has three separate metering modes (spot, center, and full) adjustable via a switch on the back of the camera. The selected mode is visible in the viewfinder. These work reasonably well. I find that in non-straightforward lighting situations, the full view errs on the side of underexposure. The Aria’s metering is good but certainly not as sophisticated as, say, Nikon’s matrix-metering system.
Integrated Motor Drive: The Aria has an integrated motor drive that can automatically load, advance, and rewind the film. The advance has two setting: single and continuous. The “continuous” mode apparently can achieve up to 3 frames per second in absolutely ideal conditions.
Exposure Modes: The Aria has five exposure modes: program, aperture-priority, shutter-speed-priority, metered manual, and TTL auto flash. These are set via a dial on the upper left side of the camera.
Reasonably Bright Viewfinder. The Aria’s viewfinder brightness is pretty good, far better than most consumer SLRs that came before it, but not quite “professionally good.” It is on par with cameras like the older Contax 137MA and just slightly darker than the RTS II. The right side of the viewfinder displays: (1) the shutter speed; (2) the selected aperture; (3) a metering mode icon (blinking if locked); (4) the frame count; (5) a flash-on icon; (6) a “M” or “X” if set to either mode; (7) exposure compensation marks; and (8) over/under exposure warning indicator.
The Aria can use four different focusing screens, the same ones used by the 167MT. I believe the FU-4 is the standard screen.
Quiet Operation. The motor drive is not silent by any means, but it is quiet. Most likely the quietest of all Contax SLRs.
AE Lock Functionality: Like most other Contax bodies, the Aria’s exposure lock is activated by metering the scene and then switching the top lever from “On” to “AEL.” The AEL setting will hold the metering forever until the switch is toggled back to “On.” However, the Aria permits you to set a Custom Function where a half-press of the shutter button will lock the exposure. The other four Custom Functions include: (1) switching the automatic bracketing mode from regular-over-under to over-regular-under; (2) altering the rewind function to prevent the leader from being rewound; (3) overriding the automatic rewind at the end of the film; and (4) overriding the advance to the first frame when loading the film.
Lens Compatibility. The Aria can use any Contax lens designated “MM” in all exposure modes (“MM” lenses are easily identified by their minimum aperture in green paint). Older Contax “AE” and Yashica lenses can be used in aperture-priority or manual mode.
Other Features: The Aria has a number of other interesting features, including: (1) a depth-of-field preview button; (2) an auxiliary shutter release on the side of the lens, (3) automatic exposure bracketing; and (4) exposure compensation dial (+/- 2 stops)
D-9 Data Back. A holy grail-type accessory, the D-9 data back can, among other less impressive functions like “interval shooting” and the imprinting of the exposure data either as a list on a frames of the film roll itself or between the frames. Today, these are pretty hard to find unless you can purchase an body with one already attached. I believe that the D-8 (AX), D-9 (Aria), and the D-10 (for the N series) were the only Contax data backs that could do exposure imprinting.
Flash Stuff. Flash sync at 1/125 is ok for this class of camera. All TLA series Contax flashes will work in TTL mode with the Aria, but only later flashes with five pins can take advantage of rear curtain sync. With TTL-capable flashes, the Aria can perform a pretty good automatic daylight fill. And dialing down TTL flash compensation is very easy by using the exposure compensation dial to cut or increase the relative flash power.
Versus Other Contemporary Higher-End Manual Focus SLRs
If the Aria had any direct contemporary competition in the higher-end, small-body, manual-focus SLR market, it would have been the Leica R7 and the Nikon FM3a. Here are the three compared.
Specifications
Contax Aria
Nikon FM3a
Leica R7
Years Produced
1998-2004
2001-2006
1991-1996
Shutter
Electronic Metal Focal Plane
Hybrid Focal Plane
Electronic Metal Focal Plane
Shutter Speeds
B, 16 sec – 1/4000
B, 8 sec – 1/4000
B, 16 sec – 1/2000
Flash Sync
1/125
1/250
1/100
Exposure Modes
P / A / S / M
A / M
P / A / S / M
Metering Modes
Matrix / Center / Spot
Center
Matrix / Center / Spot
ASA
6-6400
12-6400
6 – 12800
Exposure Compensation
+ 2 EV to – 2 EV
+ 2 EV to – 2 EV
+ 3 EV to – 3 EV
Viewfinder Coverage
95% / 0.82x
93% / 0.83x
92% / 0.80x
Batteries
2 x CR2 Lithium
1 x CR1/3N
2 x CR1/3N
Drive
Integrated Load / Advance / Rewind
External MD-12
External Motor Drive R
Weight (Body)
460g
570g
670g
Although the R7 and FM3a are both excellent camera bodies, neither of them really overall outclass the Aria. Although R7 bodies are not terribly expensive today, used Leica R lenses are in the running for the most overpriced items in 35mm photography today. And it is far from clear whether Leica R lenses perform objectively better than their Contax equivalents. The now-pricey Nikon FM3a is indisputably a masterpiece of late film SLR design; but most Ai-S lenses are not in the same performance league as Contax or Leica R glass. Given the price of the bodies, the relative capabilities of the cameras, and the price-to-performance ratio of the desirable lenses, I would still take the Aria over the R7 or the FM3a.
Conclusions
The Aria is a fantastic little SLR that checks all the boxes: lightweight, a fast top shutter speed, a reasonably quick motor drive, multiple metering modes, all of the standard exposure modes, and an above-average viewfinder. The Aria is a far superior and more capable tool than any of the older non-professional Contax bodies like the 139, 137, 159MM, or the 167MT. The Aria is a little pricey for a manual-focus SLR, but entirely worth it. If looking to save a few bucks, maybe look at the Contax RX, which has the same essential feature set but in a larger and heavier package.
In a project launched in 1998, Nikon spent an extraordinary amount of effort recreating its 1958-64 S3 rangefinder camera. If you have not already, be sure to read Nikon’s official account of this project. In short, a leading Nikon employee had an idea to recreate the company’s S3 rangefinder lens with a copy of its mid-1960s “Olympic” version of its 50mm f/1.4 S-mount lens. As part of the research phase, Nikon engineers reportedly had to go out and purchase a few original S3s from local camera stores. In 2000, Nikon launched its new S3 in the Japanese domestic market, including a recreation of the original packaging, the body, the lens, the lens cap, and the lens hood. In 2002, Nikon produced an additional 2,000 “black paint” copies. Not quite finished with the trip down memory lane, in 2005, Nikon produced 2,500 black-paint replicas of its classic SP rangefinder paired this time with a re-pop of its world-famous 35mm f/1.8 W-Nikkor.
Although Nikon had to modify just a few minor parts from the original S3, there is no doubt that that the year 2000 S3, like its late 1950s predecessor, exhibits outstanding craftsmanship and attention to detail. But, other than as a conversation piece or a shelf queen, is the 2000 S3 actually a good real-world shooter in the 21st century? I am not quite sure. Let’s take a look.
The Viewfinder & Focusing Accuracy
Although bright and life-sized, the S3’s viewfinder is its own greatest enemy. In an era where most major manufacturers used projected (or reflected) framelines, the S3’s 35/50/105 thick, cluttered, non-parallax corrected framelines are etched into the piece of glass closest to your eye. The decision to go with etched framelines is puzzling, as Nikon’s S2 and SP rangefinders both used projected framelines.
It gets a little worse. The 35mm frameline cannot be really seen if glasses are worn, and barely can be seen without them. Even if specific diopters did exist at some point for the S3, you will likely have a hard time finding one today. The S3 really appears to be optimized for non-glasses-wearing, right-eyed shooters keeping both eyes open. If you can accomplish this, the viewfinder is actually pretty great. Additionally, if you are unfamiliar with Nikon rangefinders, the rangefinder patch is not the nice, easy-to-see rectangle used by Leicas. It is a fuzzy deal that can be difficult to see without some practice. At the same time, the 50mm and 105mm framelines are easy to see, yet they are almost on top of each other.
The combination of the S3’s incredibly long effective rangefinder baselength plus the relatively long focus-throws of S-mount lenses can make for accurate focusing at the widest apertures. However, because there is no viewfinder parallax correction, framing will be off a closer distances with a 50mm and are incredibly off with the 105mm. If you are going to use the 105mm at closer distances, you almost have to invest in the Nikon 105mm external viewfinder, which can be parallax-corrected.
Operation
Despite the shortcomings of its viewfinder, the S3’s design is well thought out, intuitive, and with high quality parts everywhere. Much of the original S3 made its way into the 1959 Nikon F SLR. Here are a few highlights.
Focusing: As with Contax, Nikon rangefinder lenses come in two varieties: external mount and internal mount. External-mount lenses are conventional with their helicoids in the barrel. They latch onto the outside of the S3’s lens mount. Internal-mount lenses use the camera body itself for the helicoids. Focusing can be accomplished in two ways: either turn the lens barrel to line up the rangefinder patch or use the finger wheel on the body. The minimum focusing capability of the body is only 0.9m. This is another bummer as the S3’s long effective rangefinder baselength is capable of accurately focusing fast lenses at much closer distances than that. Finally, because most S-mount rangefinder lenses want to turn when you want to change the aperture, you must usually hold the focus in place to do this.
Shutter: The rubberized-silk shutter is smooth as, well, silk. It creates little noise and little vibration. It is not as quiet as Leica, but it is pretty close. The top shutter speed is 1/1000, as good as it got during the 1950s.
Manual Exposure: Because the S3 comes from a time before camera electronics, there are plenty of dials and switches. There is a sync port for a bulb flash is right in front of the hot shoe. The film counter window is above the advance lever, which also contains a reminder for how many exposures are on the film you are using. There is a shutter lock around the shutter lock. There is a film speed reminder dial on the bottom of the camera. There is a self-timer switch on the front.
Flash: The S3 was introduced at a time when electronic flashes were just becoming widely available. At the time, it was assumed that you would be using some kind of bulb flash system, which of course has not been used now for at least 50 years. However, the S3 does have a X-sync port on the side which will work with any modern flash. The flash modes must be manually scrolled through by lifting up and turning the ring around the shutter speed dial. The X-sync speed is 1/60 and below, slightly better than a Leica M’s 1/50.
Film Loading: For those unfamiliar with Nikon rangefinders in general, the S3 requires the removal of the camera back to access the film loading mechanism. However, unlike Leica Ms, one can simply pull the film across the plane and into the take up spool without an unnecessary headache.
Accessories: During its production run, the S3 had a few dedicated accessories, most of which are not very common today. These accessories will still work with the 2000 re-issue. These includes a case (the new case has a longer nose for the new 50mm lens), a shoe-mount coupled selenium light meter (most surviving examples are now dead), and the BC-4 bulb-flash unit. The holy grail accessory for the S3 is its S36 motor drive. The S36 replaced the back of the camera with bottom-mounted motor drive powered by an external battery pack. These units, when working, sell for multiple thousands of dollars. Too bad Nikon did not make a modern version of these when it had the chance.
Versus the Voigtlander Bessa R2S
An obvious alternative to an S3 (or SP) would be the short-lived 2002-05 Voigtlander Bessa R2S. Based upon the chassis of the Leica-mount Bessa R2, the Cosina-produced R2C (Contax mount) and R2S (Nikon S mount) were the first new cameras in those mounts made in nearly 40 years. Along with the camera bodies, Cosina also re-popped some of its existing Leica-mount lens designs for the systems. While not selling particularly well at the time, people seem to be only now appreciating them. Consequently, used copies of the R2C and the R2S have exploded in value, selling sometimes for double or triple than what they cost brand new.
Here is a comparison of the specs between the S3 and the R2S.
Nikon S3
Bessa R2S
Years Produced
1958-64; 2000-02
2002-05
VF Coverage / Magnification
100% / 1.00x
87% / 0.70x
Shutter Speed Range
B, 1 sec – 1/1000
B, 1 sec – 1/2000
Minimum Focus
0.9m
0.9m
Shutter Design
Rubberized-Silk Horizontal Focal Plane
Copal Metal Vertical Focal Plane
Weight
590g
520g
Metering
None
Center-Weighted
Framelines
Etched, Non-Parallax-Corrected 35/50/105
Projected Parallax-Corrected 35/50/85
Optional Winder
S36 Motor Drive
Trigger Winder
Effective RF Baselength
60mm
25.53mm
Batteries
None
2 x SR44
Flash X-Sync
PC; 1/60
Hot Shoe; 1/125
Of course, the largest advantages that the R2S have over the S3 is the existence of a built-in light meter, a faster top shutter speed, and parallax-corrected framelines. However, while metering and fast shutter speeds are always a plus, the S3’s longer rangefinder baselength can effectively focus S-mount lenses far more accurately than the R2S. Also, in my opinion, Cosina may have made a miscalculation by not making the R2S’ framelines 35/50/105, instead of 85. While Nikon’s S-mount 85mm f/2 is a fine lens, and with the 85mm f/1.5 currently an unobtanium collectors’ model, being able to accommodate natively the superb and common 105mm f/2.5 would have been killer.
Nikon Rangefinder Lenses
The number one reason why you would want to use a Nikon rangefinder camera is to shoot with the world of S-mount lenses. Although all of the original 1940s-60s lenses for the system have been long surpassed in objective optical performance, and with certain of the rarer and faster lenses like the 50mm f/1.1 and 85mm f/1.5 remaining hopelessly expensive collectors’ items, the S-mount lenses still are capable of producing fantastic images. The main drawback of these older lenses is not so much their optical design but their primitive lens coatings, which result in sometimes strange color rendition, flaring, and loss of contrast at wider apertures.
As an initial matter, the ideal modern platform for S-mount lenses may not be a Nikon rangefinder camera at all, but a Leica M-mount body. With the various iterations of the rangefinder-coupled Amedeo S-mount to M adapter, it is far easier and more economical to mount these lenses to a metered Leica M body, a Zeiss Ikon ZM, a Minolta CLE, or an R2-R4 Voigtlander Bessa. With the CLE and M7, you can even get aperture-priority autoexposure with these lenses.
Unfortunately, while the vast majority of S-mount lenses can be used on a Leica M platform with the adapter, certain lenses (i.e., arguably, the most desirable) cannot as their design interferes with the Leica rangefinder cam. The 21mm f/4.5 Contax Biogon, the 21mm f/4 Nikkor-O , the 25mm f/4 W-Nikkor, the 35mm f/1.8 W-Nikkor, and the 50mm f/1.1 Nikkor-N cannot work with any adapter currently being made. What a bummer. Furthermore, unless you have an M-mount camera that can manually select and lock framelines, the current M adapters will only bring up the 50mm framelines, making it cumbersome to use 28/35/85/105 lenses. Of course, apart from the 21mm Biogon, you can try to find the rare M39 versions of the aforementioned lenses somewhere, but these tend to be very expensive and are becoming more so. As perhaps the ultimate camera body alternative, you can go for the Bessa R2S, which can use all S-mount lenses without restriction.
If looking for lenses for the S3, an ideal set would match its 35/50/105 framelines.
35mm: There are plenty of OEM and aftermarket options in the 35mm focal length for Nikon rangefinders. Nikon produced three different 35s: a 35mm f/3.5, a 35mm f/2.5, and a 35mm f/1.8. The f/3.5 is an older design and is not as good as the others. Between the 35mm f/1.8 and f/2.5, the slower f/2.5 is arguably a better “all-around” lens, with good distortion control, no real focus shift, useable at all apertures, and is approximately comparable with the 1950s Leica 35mm f/2.8 Summaron. What the fast f/1.8 does well is control distortion and is very sharp in the center. It has typical light fall-off at wider apertures and its single coating shows its age, especially in color shooting. Finally, the 1.8 has some pronounced focus shift as the lens is stopped down.
There were several third-party companies like Komura that produced S-mount lenses in the 35mm focal length Although Contax and Nikon rangefinders have a small registration difference, the lenses at 35mm and wider can generally be interchanged with each other. This means that any of the numerous versions of the pre-war and post-war 35mm f/2.8 Contax Biogons can be used. However, I am not sure whether the Biogon is a better lens than the 35mm f/2.5 W-Nikkor. Finally, Voigtlander produced a version of its Leica-mount 35mm f/2.5 Color Skopar, which is an excellent lens and probably the best overall S-mount 35mm.
50mm: The choices in 50mm include a few OEM lenses and some modern lenses Voigtlander introduced in connection with the R2S. Nikon’s 50mm f/1.4 came in three varieties: a 1950s Sonnar-derivative, a 1960s Double-Gauss version, and the 2000 Double-Gauss re-issue. The 1950s f/1.4 is ubiquitous and very affordable. However, it also has primitive lens coatings and noticeable focus shift. The 1960s “Olympic” f/1.4 is a rare bird, but its Double Gauss design makes it more suitable for general applications and will work well at all apertures. The 2000 re-issue f/1.4 is more or less the same basic optical design as the 1960s version but with modern lens coatings. It is a really good lens, pretty much maxing out at f/8 or f/11 like most lenses of its class, most likely better in objective performance than any “classic” 1950s or 1960s 35mm rangefinder lens from any manufacturer, but is not as good as a modern Summicron. Voigtlander produced three S-mount lenses in the 50mm focal length: a 50mm f/1.5 Nokton, 50mm f/2.5 Skopar, and 50mm f/3.5 Heliar. These are all excellent lenses.
105mm: The 105mm f/2.5 Nikkor-P was one of Nikon’s best rangefinder lens designs, more or less replacing the earlier 85mm f/2. Produced in relatively large quantities and eminently affordable, the 105mm was the only Nikon rangefinder lens to be reworked with only minor tweaks as a regular (non-mirror-lockup) F-mount SLR lens, in use until the early 1970s. Using the Sonnar template, the 105mm is a fantastic portrait and landscape lens. The F-mount version is still regarded as one of Nikon’s best portrait lenses ever for its flattering rendering. It is best used at about f/2.8-4 for close up subjects and f/8-11 for longer distances. Komura also made several 105s in S-mount, a 105mm f/2.8 and a 105mm f/2. Both of these Komura lenses are quite rare today and it is not clear if they are any better than the Nikkor-P.
Conclusions
If I had been Nikon in the late 1990s, instead of putting forth the extraordinary effort to create a breathtaking copy of the S3, a camera that during its own time was neither revolutionary nor had any unique capabilities, I would have designed and produced a brand-new S-mount camera from the ground up. A “Nikon S5,” if you will. Use the FM3a’s 1/4000 top-speed hybrid mechanical/automatic shutter, metering with aperture-priority autoexposure, swing-back film loading, and selectable framelines with maybe varying degrees of viewfinder magnification. This was not theoretically unachievable as both Konica and Cosina built ground-up, innovative Leica-mount film cameras during this same era. Would an “S5” have been a more expensive and less profitable endeavor than reverse engineering and then hand-building the S3 and SP re-issues? I guess we will never know. Also, as long as they were re-making these lenses in S-mount, Nikon should have considered making Leica-mount versions of the new 50mm f/1.4 and 35mm f/1.8 W-Nikkor.
To me, unless you are just in love with the concept, the S3 does not present a compelling case as a regular shooter. Apart from the non-metered operation, the cluttered, non-parallax-corrected viewfinder make taking photos kind of chore. To me, the R2S seems like an overall better choice as an actual shooter. In the end, although Nikon’s 2000 S3 is indisputably a masterpiece of design and engineering, and remains relatively cheap in the market today despite its uniqueness and incredible build quality, it is not for me a go-to platform for rangefinder photography.
During the Autoreflex era, Konica produced two lenses in the 35mm focal length: a 35mm f/2.8 and 35mm f/2. Konica would later outsource to Tokina the production of a second, perhaps slightly better 35mm f/2.8. Today, the original f/2.8 is a fairly common lens on the used market while the 35mm f/2 remains somewhat rare and expensive.
Following the tumult of the Second World War, manufacturers of early 35mm single-lens reflex cameras sought to develop wider angle lenses than standard 50mm lenses. In 1950, two lens designers each came out with their own retrofocal 35mm lenses: the Angeniuex 35mm f/2.5 (France) and the Carl Zeiss Jena 35mm f/2.8 Flektogon (East Germany). The two designs shared similar overall characteristics, with a large curved front element followed by a smaller rear group. The Angenieux design used a Tessar-syle rear group and the CZJ design used a Biometar/Xenotar-style rear group. Without a doubt, these two designs provided the template for at least the first generation of 35mm focal-length SLR lenses to follow.
During 1959-60, Japan-based companies Canon, Nikon, and Konica each unveiled their first SLRs, the Canonflex, the Nikon F, and the Konica F. The launch of these cameras was accompanied by the unveiling of a whole system of lenses. Among these were the Canon 35mm f/2.5, the Nikon 35mm f/2.8, and the Konica 35mm f/2. For 1962, Nikon redesigned its 35mm f/2.8 with a double-gauss style rear group. During the early 1960s, 35mm focal-length SLR lenses were quite expensive to produce and all were fairly pricey.
Konica’s 1960 F-mount 35mm f/2 was for a few years the fastest SLR lens in the focal length. With a massive 72mm front filter and weighing 360g, the lens was a monster. It is a rare and highly-collectible lens today. The following year, Konica introduced a cheaper and smaller 35mm f/2.8. The f/2.8 was very similar in design to the first Nikon 35mm f/2.8 lens.
In 1965, Konica abandoned its F mount altogether and introduced its brand-new lens “Autoreflex” line of camera bodies and lenses. Among the initial lenses offered for the system was the carried-over 35mm f/2.8. At some time around 1972-73, Konica introduced a brand-new 35mm f/2 around the launch of the Autoreflex T3. The f/2 version had nothing in common with the Flektogon-inspired design. The later versions of both lenses evolved with Konica’s barrel redesigns, using rubber focusing rings. Despite the differences in barrel design, the lens designs remained unchanged.
During the late 1970s, Konica contracted out certain lens designs to Tokina. Among the Tokina-produced lenses was a new version of the 35mm f/2.8. The Tokina lens was again a Flektogon-derived design, superficially resembling the 1962 35mm f/2.8 Nikkor non-Ai lens. Today, this second-generation 35mm f/2.8 is surprisingly rare and pricey. Although I have never used one, it can’t believe that it is anything special.
In my opinion, the 35mm f/2 is clearly the better lens overall, has wonderful and gentle rendering at the wider apertures, and remains generally one of the more desirable Autoreflex lenses. Let’s take a look.
Specifications
35mm f/2 AR
35mm f/2.8 (f/16) AR
Year
@ 1972
1965
Taking Angle
63 degrees
63 degrees
Design
9 elements, 7 groups
6 elements, 5 groups
Aperture
f/2 – f/16 in half-click stops
f/2.8 – f/16 in half-click stops
Minimum Focus
0.3m
0.3m
Filter Size
55mm
55mm
Weight
320g
240g
The Earlier, All-Metal Versions of the 35mm f/2 and 35mm f/2.8
Tests
The following were taken on a Nikon Z6 with all automatic corrections turned off. We tweaked the white balance but otherwise made no other substantive changes. Click on the images below to see a 4500 pixel version.
Flat Surface Test
f/2
35/2 HexanonNikon AF-S 35/1.8
f/2.8
35/2.8 Hexanon35/2 HexanonNikon AF-S 35/1.8
f/4
35/2.8 Hexanon35/2 Hexanon
f/5.6
35/2.8 Hexanon35/2 Hexanon
f/8
35/2.8 Hexanon35/2 Hexanon
f/11
35/2.8 Hexanon35/2 Hexanon
Outdoor Shots
f/2
35/2 Hexanon
f/2.8
35/2.8 Hexanon35/2 Hexanon
f/4
35/2.8 Hexanon35/2 Hexanon
f/5.6
35/2.8 Hexanon35/2 Hexanon
f/8
35/2.8 Hexanon35/2 Hexanon
f/11
35/2.8 Hexanon35/2 Hexanon
Indoor Shots
f/2
35/2 Hexanon
f/2.8
35/2.8 Hexanon35/2 Hexanon
f/4
35/2.8 Hexanon35/2 Hexanon
f/5.6
35/2.8 Hexanon35/2 Hexanon
f/8
35/2.8 Hexanon35/2 Hexanon
Conclusions
The advantages of the f/2 over the f/2.8 are: (1) speed; (2) better center and corner sharpness; (3) less light fall-off at wider apertures; and (4) creamier/dreamier/more pleasant out-of-focus details. On the other hand, the advantages of the f/2.8 are: (1) less visible distortion; and (2) its ability to capture more detail in the out-of-focus areas. Both lenses ultimately hit their respective peaks at around f/8-11.
If you regularly use a Konica SLR, the f/2 is great a lens to own. If you are a digital mirrorless user and are looking for “classic SLR lens rendering,” this f/2 will also not disappoint. It is completely useable wide open with pleasant out-of-focus details, is pretty sharp at its optimal apertures, and has plenty of old lens “character.” Any distortion that bothers you can be easily fixed in post.
At the same time, the f/16 version of the f/2.8 is nothing special. It performs adequately, but not spectacularly. It has so-so wide open performance and does not hit its peak until about f/8-11, and even there it demonstrates good, but not great, performance. Maybe Konica’s later f/22 version is better? Who knows?
In this piece, we are going to look at two 35mm rangefinder lenses produced more than 40 years apart: the W-Nikkor 35mm f/1.8 (1956, Nikon S Mount) and the Konica UC-Hexanon 35mm f/2 (2001, Leica Screw Mount). These lenses are rather unique in rangefinder lens history because of their use of a modified “Xenotar” (or “Biometar”) design. It is assumed, but not officially documented by either company, that Konica used the the W-Nikkor’s design as the inspiration for the lens in its 1993 advanced point-and-shoot the “Hexar AF” and then its limited-edition M39 lenses, the 1990s Konica 35mm f/2 Hexanon and the 2001 UC-Hexanon.
Background
From the 1930s through the 1950s, rangefinder lenses in the 35mm focal length existed in four basic designs: (1) the Zeiss Biogon; (2) the Zeiss Biometar / Xenotar; (3) the more-or-less symmetrical Gauss-type; and (4) the Zeiss Tessar. Here are some of the principal lenses from the era in each category.
“Classic” Zeiss Biogon
Manufacturer
Model
Mounts
Year
Zeiss
35mm f/2.8 Biogon
Contax
1936
Zeiss (West Germany)
35mm f/2.8 Biogon
Contax
1950
KMZ (Soviet Union)
35mm f/2.8 Jupiter-12
Contax / M39
1947-50
Cosina Voigtlander
35mm f/2.5 Color Skopar
Contax / Nikon S / M39 / M
2000
Biometar / Xenotar
Manufacturer
Model
Mounts
Year
Zeiss (East Germany)
35mm f/2.8 Biometar
Contax
1950
Nikon
35mm f/1.8 W-Nikkor
Nikon S / M39
1956
Konica
35mm f/2 Hexanon
M39
mid-1990s
Konica
35mm f/2 UC-Hexanon
M39
2001
Nikon
35mm f/1.8 W-Nikkor (Reissue)
Nikon S
2005
Symmetrical (or Mostly) Gauss-Type
Manufacturer
Model
Mounts
Year
Zeiss
35mm f/4.5 Orthometar
Contax
1937
Leica
35mm f/3.5 Summaron
M39 / M
1946
Canon
35mm f/2.8 Serenar I
M39
1951
Nikon
35mm f/2.5 W-Nikkor
Nikon S / M39
1951
Zeiss (West Germany)
35mm f/3.5 Planar
Contax
1954
Canon
35mm f/1.8
M39
1957
Leica
35mm f/2.8 Summaron
M39 / M
1958
Tessar / Other
Manufacturer
Model
Design
Mounts
Year
Leica
35mm f/3.5 Elmar
Tessar
M39
1931
Zeiss
35mm f/3.5 Herar
Unique
Contax
1939
Nikon
35mm f/3.5 W-Nikkor
Tessar
Nikon S / M39
1948
From the late 1940s through the 1950s, Nikon produced three lenses in the 35mm focal length with three different designs: (1) the 1948 35mm f/3.5 (Tessar); (2) the 1951 35mm f/2.5 (symmetrical); and (3) the 1956 35mm f/1.8 (modified Xenotar). While it is not clear to what extant that Nikon engineers had studied the existing Zeiss and Leica designs, it can probably be assumed that the company was familiar with these German templates and continued to significantly improve them.
While the 35mm f/3.5 W-Nikkor was not a particularly impressive lens (although competent), the 35mm f/2.5 certainly was and remains so. Faster than the pre-war Zeiss Orthometar, the existing post-war Leica f/3.5 Summaron, and West German Zeiss f/2.8 Biogon, with no focus shift, and with better lens coatings than all three, the f/2.5 was mostly likely until the introduction of the Leica f/2.8 Summaron, the best overall rangefinder lens in the 35mm focal length that was actually widely available.
During September 1956, Nikon introduced the world’s fastest mass-produced lens in the 35mm focal length: the W-Nikkor 35mm f/1.8. Produced primarily in Nikon rangefinder mount until the mid-1960s (@ 7,000 in total), with a smaller number made in Leica screw mount (@ 1,500), over 60 years later the 35mm f/1.8 still remains one of the most sought-after 35mm rangefinder lenses. In 2005. Nikon re-popped the 35mm f/1.8 in Nikon rangefinder mount in connection with its Nikon SP re-issue.
One could hazard an educated guess most immediate ancestor to the W-Nikkor was the East German Zeiss 35mm f/2.8 Biometar. Nikon took a different approach with the 35mm f/1.8 by significantly modifying the Biometar template to add a two-element cemented group at the rear and adding Lathanum glass. The resulting lens was seven elements in five groups instead of five elements in four groups. The addition of the rear cemented group was able to improve spherical aberrations, chromatic aberrations, and coma endemic in wide angle lenses.
The Classic BIometar / Xenotar
Nikon’s interesting modified Xenotar design seemed destined to be lost to camera history. Leica continued to use, and possibly perfect, its mostly-symmetrical 35s in the late 1950s and 1960s, with its excellent, but simple 35/2.8 Summaron and its more complicated 8-element 35mm f/2 Summicron. It would not be until 1961 that Leica would produce a rangefinder lens in the 35mm focal length faster than the W-Nikkor: the 35mm f/1.4 Summilux.
Fast forward to the 1990s. During this time, a growing and competitive segment in photography was the “premium” compact camera. Popular platforms in this new higher-end genre included the Contax T2, the Nikon 35ti, the Yashica T4, and the Leica Minilux. As many of you know, the used prices on these compacts have skyrocketed.
The UC-Hexanon (2001) & Konica Hexar AF (1993)
Not to be left behind, Konica’s entry into this market would be the 1993 Hexar AF. In the 1980s, Konica had produced some decently-competitive compact cameras, but none of them on the level as those noted above. The Hexar AF is probably still the most advanced point-and-shoot 35mm film camera ever made. For the Hexar AF lens, Konica chose not to utilize any of its prior f/2.8-3.5 Tessar-style lenses used in its famous C35 and 1980s point-and-shoots. Instead, Konica appears to have chosen the design of the 35/1.8. Konica was no newcomer to rangefinder lenses. In the 1950s, it had produced two outstanding lenses in Leica screw mount, a 50mm f/1.9 (an “Ultron” design during a period when most non-Leica 50s were Sonnar-types) and the now-famous and ungodly expensive 60mm f/1.2.
There are some differences between Konica’s design and the W-Nikkor. The second lens group does not appear to be cemented, and the front element of the rear lens group differs in orientation to the Nikkor. For a reason not expressly explained by the extant literature, Konica designers struggled with the spherical aberration and field curvature in its design. Without offering any unfounded speculation on why this was a problem, Konica decided to “undercorrect” for the spherical aberration. “Undercorrecting” for spherical aberration would exacerbate, inter alia, “focus shift” issues. To solve the problem of the resulting focus shift, the Hexar AF’s autofocus computer would change the focus point at a particular f-stop and distance to compensate. That is a pretty amazing feat — even decades later. Only in the most recent high-end cameras are we seeing computer-based compensation for focus shift.
In 1996, at the request of a large camera store in Japan, Konica replicated the 35mm f/2 lens from its Hexar AF in Leica screw mount thread (M39). In 2001, Konica made another run of 1,000 of these lenses — with a beautiful painted brass barrel body, a focusing tab, a click aperture ring in half stops, and multi-coated glass surfaces, superficially resembling Leica’s IV 35/2 Summicron. In this new production batch, Konica revived its iconic “UC” (“ultra-coating”) trademark used for its higher-end 1970s and 1980s SLR lenses. When Konica introduced its M-Hexanon 35mm f/2 for its Hexar RF camera series in the early 2000s, it was of a completely different, yet more conventional, design.
Specifications
35mm f/1.8 W-Nikkor
35mm f/2 UC-Hexanon
Year Introduced
1956
2001
Lens Mount
Nikon S & M39
M39
Number Produced
@ 8,500
@ 1,000
Optical Design
7 elements, 5 groups
7 elements, 6 groups
Aperture
f/1.8 to f/22 (Full Clicks)
f/2 to f/16 (Half Clicks)
Aperture Blades
9
10
Minimum Focus
0.9m
0.9m
Filter Size
43mm x 0.50m
43mm x 0.75m
Weight
160g
132g
Some Comparisons
A burning question for me has always been whether Konica’s take actually improves upon the Nikon design. It must be remembered that Konica designed the lens for use in an advanced point-and-shoot and did not originally design the UC Hexanon as an interchangeable rangefinder lens.
From a physical and ergonomic perspective, both lenses are quite stunning. The W-Nikkor has weight and substance, has an intuitive scalloped focusing ring, and an aperture ring that is easy to see. If you have never used a Nikon RF lens, you may be surprised that as you focus the lens, the entire barrel moves, along with the aperture selection ring. The UC Hexanon’s black-painted brass barrel, click-aperture function, and focusing tab make it feel and operate more like a modern Leica M-mount lens.
Because we cannot look at these two lenses in a vacuum without a point of reference, for the f/2 and f/2.5 shots, we are going to throw a few others lenses into the mix: the Voigtlander 35mm f/2.5 Color Skopar II (2004), the Konica 35mm f/2 AR Hexanon, and the 35mm f/1.8 AF-S G Nikon lens. We are not going to test all five against each other at all apertures because you can assume as the aperture stops down, performance will only get better from wide open.
We are going to use a Nikon Z6 in aperture priority mode ith all automatic corrections turned off and then with color removed (as the subject matter is not color). Remember that although mirrorless is a pretty good way of assessing the raw performance of lenses, four of the five lenses were designed for film use, and the AF-S lens was designed for digital SLRs (but also works on film cameras, obviously). Click on the images below to see them at a larger size (4500 pixels).
f/2
Konica UC-HexanonNikkor 35/1.8Konica AR 35/2AF-S Nikkor 35/1.8
f/2.5
Konica UC HexanonNikkor 35/1.8Skopar II 35/2.5Konica AR 35/2AF-S Nikkor 35/1.8
f/2.8
Konica UC Hexanon 35/2Nikkor 35/1.8
f/4
Konica UC Hexanon 35/2Nikkor 35/1.8
f/5.6
Konica UC Hexanon 35/2Nikkor 35/.18
f/8
Konica UC Hexanon 35/2Nikkor 35/1.8
f/11
Konica UC Hexanon 35/2Nikkor 35/1.8
Outdoor Shots
f/2
AR 35/2UC HexanonW-Nikkor
f/2.8
AR 35/2UC HexanonW-Nikkor
f/4
AR 35/2UC HexanonW-Nikkor
f/5.6
AR 35/2UC HexanonW-Nikkor
f/8
AR 35/2UC HexanonW-Nikkor
Inside Shots at Minimum Focusing Distance
f/2
UC HexanonW-Nikkor
f/2.8
UC HexanonW-Nikkor
f/4
UC HexanonW-Nikkor
So what are we seeing here?
At f/2.5, the modern lenses — the AF-S Nikkor and the VC are clearly overall outperforming both the UC Hexanon and the W-Nikkor. The modern lenses have sharper corners and less distortion. Thus, it is probably safe to say that higher-end modern 35mm primes have eclipsed both of these older lenses.
Center Sharpness
On a 24 megapixel sensor, the UC Hexanon and the W-Nikkor have virtually indistinguishable center sharpness. Both perform very well. The flaring of the W-Nikkor gives the UC Hexanon a slight edge.
Distortion
There is no competition here. The W-Nikkor has much better distortion control than the UC Hexanon — very impressive for the 1950s and on par with the famous 35/2.8 Leica Summaron. The W-Nikkor controls distortion throughout the entire aperture range, maybe getting a tiny bit better by f/11. The UC Hexanon’s distortion only slightly, almost imperceptibly improves by f/11.
Vignetting
At f/2, both lenses have noticeable light fall-off. The UC Hexanon is slightly better, but not by much. By f/2.8, the light fall-off in real world situations is essentially gone with both lenses. As the lenses are stopped down, vignetting disappears.
Warmth
The W-Nikkor renders a warmer image than the UC Hexanon. I would guess that it may be attributable to the aging Lanthanum element.
Flaring
Flaring because of a primitive 1950s lens coating is the W-Nikkor’s main weakness. It is noticeable at every aperture, getting better as the lens is stopped down. Without the flaring, the W-Nikkor would be a 100% better lens. On the other hand, the UC Hexanon has very little flaring at any aperture. The UC’s modern lens multicoatings certainly allow the lens to punch above its weight.
Corner Performance
The UC Hexanon is better in the corners at every aperture. At larger apertures, the W-Nikkor seems to have some “smearing” in the corners that does not seem attributable to a focus shift. Both lenses improve as they are stopped down, but the W-Nikkor never catches up with the UC Hexanon
Stopped Down Performance
Both lenses get markedly better stopped down. By f/2.8, both lenses are hitting their stride. The W-Nikkor starts providing “all-around” good results at f/4 and smaller. By f/8-11, both lenses are at their peaks. The UC Hexanon’s MTFs are off the charts.
With both lenses, I would reserve f/2-2.8 for closer, centered objects were you are looking to isolate the subject. However, the minimum focusing distance for both lenses being only 0.9m, they are not particularly ideal for portrait-y types of shots. For general use, I would stick to f/5.6-11 for both lenses.
Focus Shift
Focus shift is a phenomenon where the focus point of a lens changes as the aperture stops down. This effect plagues most lenses, both SLR and rangefinder. In the age of film, most people probably never noticed it — the shift was calculated to be in the range of the depth of field of focus at a given aperture. For SLRs, when you focus a lens, you are actually seeing the focal plane at the lens’ widest aperture, which then stops down automatically when you click the shutter. If you are focusing at f/1.8, and then the lens instantly stops down to your desired f/8 aperture, the actual focus point will shift slightly. For rangefinders, your lens will usually be calibrated to line up with the rangefinder at a certain aperture (most will be wide open or close to that). When you stop down, what the rangefinder patch is telling you is no longer the actual focus point. Konica engineers were aware of its focus shift and programmed the autofocus of the Hexar AF accordingly. Unfortunately, the same automatic correction is not possible on a rangefinder lenses.
The UC Hexanon and W-Nikkor both exhibit similar focus shift. If you focus a shot at f/2 with both, and then change to f/8 without changing the focus, you will find that at f/8, the lenses “front focus” — that is to say that at f/8, the lenses think the subject is closer than the lens thinks it is at f/2. While the shift at f/8 is at the far edge of the depth of field for both lenses, remember the depth of field is only about useable focus and even on film it does not mean that “everything” is in perfect focus from X to Y distance. Despite the depth of field, you still want your shots to be as accurately-focused as possible.
Conclusions
The W-Nikkor and the UC Hexanon are both remarkable lenses. Even now, over 60 years later, the W-Nikkor remains competitive. The downsides of the W-Nikkor include noticeable corner light fall-off wide open, just decent corner performance at smaller apertures, and visible flaring that gets better as the lens stops down (due to lack of modern lens coatings). The minimum focus of only 0.9m, the focus shift, the obsolete filter thread size, and the fact that the S-Mount version of the lens cannot be used on Leica rangefinders also are some other downsides. However, the W-Nikkor’s distortion control and center sharpness remain quite remarkabley. At f/2.8 and smaller, the W-Nikkor produces overall lovely results.
For an afterthought lens based on an optic from a point-and-shoot camera, the UC Hexanon is surprisingly good. While its distortion is very noticeable (obviously can be fixed in post and many modern 35mm lenses also demonstrate the exact same distortion), its minimum focusing distance is not class competitive, and it also has a focus shift issue, it still beats out the W-Nikkor at every aperture. As its MTFs demonstrate, the UC Hexanon is an incredibly sharp lens in the center while retaining very competitive corner performance. While Konica engineers obviously did a good job improving upon and modernizing the W-Nikkor’s design, especially by multi-coating all glass surfaces, the distortion issue is a head-scratcher.
At the end of the day, if you enjoy shooting the 35mm focal length, both of these modified Xenotar lenses will perform nicely. And both will always remain unique in the history of 35mm rangefinder photography.
From the late 1940s through the 1950s, Leica, Contax, and Nikon were in serious competition in the interchangeable-lens 35mm rangefinder market. While Contax and Nikon rangefinders share the same physical lens mount, Nikon chose to use Leica’s registration distance (51.6mm) rather than Contax’s (52.4mm). As a result, all but the widest angle lenses were not quite compatible between the Contax and Nikon systems. While Nikon did produce a number of its S-mount lenses for the Leica M39 standard, Contax produced very few (usually just its 50mm f/1.5). Even back during the 1950s, there was interest in adapting native Nikon and Contax rangefinder lenses directly to M39, with two companies (Cooke in the UK and Orion in Japan) fabricating adapters in small quantities.
Four adapter options currently exist that permit rangefinder coupling of most (but not all) Nikon S-mount rangefinder lenses to the Leica standard.
Manufacturer
Adapter
Lenses
Min. Focus
Price
Amedeo
Leica M
50mm / External Only
0.7m
$250
Amedeo
Leica M
Universal / Internal & External
0.9m
$350
Amedeo
Leica M39
Universal / Internal & External
0.9m
$400
Coiro Optics
Leica M
Universal / Internal & External
0.7m
$420
Although these adapters are pretty great, some of the most desirable Nikon S-mount lenses are not compatible with them, not because of the adapter itself but because those lenses’ design interferes with a Leica’s rangefinder cam. Here is a compatibility chart of the adapters and Nikon S-mount lenses.
Lens
Elements/Groups
Min. Focus
M39 Version?
Compatible?
21mm f/4 Nikkor-O
8/5
0.9m
Yes (Rare)
No
21mm f/4.5 Zeiss Biogon
8/5
1.0m
No
With M39 Adapter
25mm f/4 W-Nikkor
4/4
0.9m
Yes (Rare)
No
28mm f/3.5 W-Nikkor
6/4
0.9m
Yes
Yes?
35mm f/1.8 W-Nikkor
7/5
0.9m
Yes (Rare)
No
35mm f/2.5 W-Nikkor
6/4
0.9m
Yes
Yes
35mm f/3.5 W-Nikkor
4/3
0.9m
Yes
Yes
50mm f/1.1 Nikkor N.C.
9/7
0.9m
Yes (Rare)
No
50mm f/1.4 Nikkor S.C.
7/3
0.9m
Yes
Yes
50mm f/1.4 Nikkor (“Olympic”)
7/5
0.9m
No
Yes
50mm f/1.4 Nikkor (“2000”)
7/5
0.9m
No
Yes
50mm f/2 Nikkor H.C.
6/3
0.9m
Yes
Yes
50mm f/3.5 Micro Nikkor
5/4
0.9m (0.45m)
Yes (Rare)
Yes
85mm f/1.5 Nikkor S.C.
7/3
1.0m
Yes (Rare)
Yes
85mm f/2 Nikkor P.C.
5/3
1.0m
Yes
Yes
105mm f/2.5 Nikkor P.C.
5/3
1.2m
Yes
Yes
135mm f/3.5 Nikkor Q.C.
4/4
1.5m
Yes
Yes
So why would you want to adapt Nikon S lenses to Leica? Well, for those invested in both systems, having an adapter would make sense. Furthermore, certain compatible lenses tend to be a little cheaper in Nikon mount than in M39, like the excellent 35mm f/2.5, the iconic 105mm f/2.5, and and the 50mm f/3.5 Micro Nikkor (if you can find one). If you have the 2000 version of the 50mm f/1.4 Olympic Nikkor, that provides a fast, capable, and affordable alternative to the Leica Summiluxes. Otherwise, because there are M39 versions of the compatible Nikon S lenses, one could just go that route.
The only major issue with the various Nikon S to Leica M adapters is that they will all bring up the 50mm frameline on a Leica body, regardless of the focal length of the adapted lens. Thus, if using a 35mm or 105mm Nikon lens, you would have to manually use the Leica frame preview lever for the appropriate frameline. This would obviously not be an issue on the Voigtlander Bessa M-mount cameras, as those cameras permit the manual selection of the framelines.
If using Nikon S lenses on a native Leica M body other than the 50mm models, a better choice may be the Amedeo M39 adapter. Not only will you be able to use compatible Nikon S lenses on all M39 camera bodies, but you can use the appropriate M39 to M adapter to bring up the correct frameline on a native Leica M body. If looking to adapt a variety of Nikon S lenses to Leica, the Amedeo M39 adapter may be the way to go.
Call me crazy, but I prefer 50mm lenses to be good at everything. A modern 50mm lens should produce exceptional shots at all apertures. Today, this is the case. But it was not always the case.
As an initial matter, I really do not understand the hoopla about Soviet lenses. So many internet reviews declaring X, Y, or Z Soviet lens the “King of _____.” I remain skeptical of these claims. In no way do any mass-produced Soviet 35mm lenses come close to being among the best overall optics of the 1950s, 1960s, 1970s, or 1980s. Constantly reminding people that our Helios 44-2, for example, is a “Zeiss Biotar” copy does not somehow improve its performance. The “Biotar” represented a pre-war attempt by Zeiss to create a fast, workable, high-performance modified Double Gauss design (as opposed to the Zeiss Sonnars that became the gold standard in 50mms and short telephotos from the 1930s until the mid-1950s). In 1953, with the help of some rare earth elements, Leica finally produced a decent Double Gauss concept in its Version 1 50/2 Summicron. From that point onwards, the modified Double Gauss design for 50mm lenses has reigned supreme. In the West, we generally call the design “Planar” (West German) and not “Biotar” (East German / Soviet bloc).
1950s Leica 50/2 Collapsible Summicron Diagram
Originally a cinema camera lens developed by Zeiss in the late 1930s, Zeiss Jena (East Germany) continued to produce its 58mm f/2 “Biotar” in various manual and semi-automatic versions for M42-mount Contax and Praktica SLRs until about 1960. (Check the links here for some nice write ups on the original Zeiss Jena lens). Starting in 1958, the Soviets began produce the “Helios 44” which was a Biotar derivative but made in Zenit’s then-proprietary bayonet mount as well as in M39 (not compatible with Leica, however). The Soviets did not do much to improve upon the original Zeiss design until they started multi-coating the optics years later.
The mid-1960s Helios 44-2 shares the same design as the prior 44 but was made only in M42 mount for the new generation of Soviet Zenit SLR cameras — the “E” and the “B.” Our example appears to have produced in 1982 by the Valdai Optical-Mechanical Factory. It appears that 44-2s were produced until the end of the 1980s. By the early 1970s, the Soviets were producing another version of the Helios called the “44M” — a lens that has standard automatic aperture operation — for the “Zenit EM” series. The Soviets continued to make different versions of the “44M” for decades. Reportedly, the last series (the 44M-7s) are the best performers.
Specifications
Lens Design: 6 elements in 4 groups Filter Size: 49mm Weight: 230 grams Minimum Focus: 0.5 meters Lens Mount: M42
Operation
The 44-2 is designed for “stop down” mode. Thus, you have to open the lens to maximum aperture to focus effectively, and then stop the lens down to your actual desired aperture on your own by rotating a ring at the front of the lens. A separate click-ring at the front of the lens allows you to select the maximum aperture, allowing you to move a separate ring to actually select the aperture within the chosen range. For instance, you can choose a minimum aperture of f/5.6, which permits you ultimately to chose any aperture at f/5.6 or wider, but not smaller. Most older M42 camera bodies operate this way. It really slows down the process. By contrast, the 44M series operate in normal aperture priority mode with the appropriate compatible M42 camera body.
Performance
For the film shots, we used our shutter-priority Konica FC-1 with the appropriate M42 to AR adapter. Konica AR bodies are some of the only film camera platforms that can natively use M42 lenses from minimum distance to infinity. The ability to meter M42 lenses in stop down mode is a big plus. On digital, we used a Nikon Z6 with a Konica AR adapter with all automatic corrections turned off.
The Helios 44-2 has a distinctly “warm” look through an SLR viewfinder. This is probably due to the lens coating used.
Digital Examples
To put the lens of the Helios 44-2 in perspective, we will compare it head-to-head with a contemporary — the 1962 non-Ai Nikkor 50/1.4 lens. The Nikkor is considered to be one of the better 50mm SLR lenses of the early to mid 1960s and seems to be a good comparator to determine whether the 44-2 can compete as an “all-around” 50mm lens. We are using a reproduction of the “Eighth Plan of Paris” (the City as it stood in 1705) as a target.
Helios 44-2 at f/2
As you can see, center sharpness looks pretty good and pretty much maxes out the 24 megapixel sensor. However, the corners quickly fall apart in terms of contrast and resolution. The corners are very bad compared to any modern lens. It also appears to my eyes to demonstrate slight pincushion distortion.
Nikon 50/1.4-S.C. at f/2
At f/2, the Nikon definitely demonstrates some barrel distortion. It actually appears to have lower contrast in the center than the Helios. However, despite the barrel distortion, the corners below the Helios away in terms of resolution, contrast, and light fall-off.
Helios 44-2 at f/2.8
Much better at f/2.8. The center resolution and contrast is slightly higher. The corner light fall off is becoming better controlled. The corner resolution has improved but still very noticeable.
Nikon 50/1.4 at f/2.8
The lenses appear to be neck-and-neck in the center at f/2.8. Remember, however, that the Helios is a longer lens so the Nikon is focusing from further away. We still see some barrel distortion from the Nikon. The Nikon corners again are far, far better resolved than the Helios.
Helios 44-2 at f/4
At f/4, we are seeing a slight improvement all over over f/2.8, but not as dramatic as between f/2 and f/2.8.
Nikon 50/1.4 at f/4
At f/4 and smaller, it is game over. The Nikon has solved most of its distortion issues and is sharp across the entire frame. I would say that on a 24 megapixel sensor, the center is pretty much indistinguishable between the two lenses. However, the Nikon is sharper across the frame at all apertures with much less light fall-off. We will focus the rest of this just on the Helios.
Helios 44-2 at f/5.6
At f/5.6, the Helios 44-2 is getting far better in the corners and with less light falloff. We are still seeing incremental detail and contrast improvement in the center as well.
Helios 44-2 at f/8
At f/8, we are approaching maximum performance for the lens. The corners are much, much improved. However, the extreme corners still show some fall-off. There is no perceptible improvement in the center over f/5.6.
Helios 44-2 at f/11
At f/11, the Helios 44-2 is at its best frame-wide — pretty much maxing out the visible resolution of the Z6. No more traces of light falloff and the entire view is in focus.
Film
The 44-2 is a more than capable “standard” lens on film at normal apertures. There is nothing truly outstanding about its performance but, like most standard SLR lenses, it produces nice images. I find the 58mm focal length a bit too “long” for general photography, though. Here are a few examples taken on Ilford XP2.
Conclusion
What is mildly impressive about the 44-2 is its center sharpness wide-open — far better than the infamous Sonnar-derived 50/1.5 Jupiter-3 — and is virtually indistinguishable on a 24 megapixel sensor from the Nikkor. Remember that wide-open, the 44-2 only excels at “center sharpness” — so if you like to shoot your close-up shots off-center, then whomp whomp. Although the sharpness out towards the edges gets better and better stopped down, it never quite achieves the performance of even a first-generation Japanese-made SLR lens like the Nikkor. Yes, it does have an interesting out-of-focus effect in certain shots and certain distances wide-open, but it is not an effect that occurs in commonplace photos.
58mm is also not exactly a general-purpose focal length. The stop down operation can really slow you down — even on a metered camera.
M42 is an obsolete lens mount today. On film, the 44-2 can only really be used on M42 cameras produced long ago primarily by Praktica (East German), Zenit (Soviet), and Pentax (Japanese). You can certainly use M42 lenses on Konica bodies with the right adapter — but Konica lenses, especially its 50mms, are so much better than the 44-2 or probably any other M42 50mm lens. All other adapters (Canon, Nikon, etc.) will not provide a full range of focus unless you buy one with an auxiliary glass element (which will degrade image quality). The 44-2 lens will mount and operate fine on any mirrorless camera.
For digital photography and digital video, the 44-2 has its fans.
Because the Soviets mass-manufactured camera equipment and exported much of it around the world, a draw may be that Helios 44-2s are cheap and easy to find. Getting a good one might be a crapshoot, though. If I were to do this all over again, I would have gone for the most modern, multicoated version of the 44 (the 44-7 or whatever) with automatic diaphragm operation. At the end of the day, the Helios 44-2 can be considered a “one-trick” pony — when shot wide-open, it produces a different kind of effect in very limited circumstances. Otherwise, just get the 50 that was designed for your camera.
From its first SLR introduced in 1960, Konica advertised that one of the advantages of its system was the ability to adapt lenses from other manufacturers. Konica designed its SLRs to have an incredibly short “film-to-flange” distance (40.5mm). This meant that while Konica lenses could not generally be adapted to other systems, many lenses could be theoretically adapted to Konica. During the original F series run (1960-65), Konica produced OEM adapters for both Exakta and M42 lenses. During the Autoreflex era (1965-1987), Konica produced adapters for lenses in the Exakta, M42, and Nikon F mounts.
The number and type of lenses for the Exakta, M42, and Nikon F systems are staggering. These all-metal adapters work wonderfully for their intended purpose. The only real inconvenience is that because Konica AR bodies are all “shutter-speed” priority, the light metering only works in “metered manual mode.” That means that: (1) the lens must be stopped down to the taking aperture for the camera to take an accurate meter reading; and (2) you must set the shutter speed so that the viewfinder shows a blinking light (or needle reading for older AR cameras) in the blank space above maximum aperture. The manual explains it better than I could. Too bad Konica never produced an aperture-priority camera body, because that would make this so much easier.
From the Konica FC-1 Manual, But the Principle is the Same for All AR Bodies
Instructions
Here are the instructions if you need to see them.
The Praktica / M42 Adapter
Konica FC-1 with the Russian Helios 44-2 58mm f/2
Konica FT-1 with Russian Industar 50-2 50mm f/3.5
The Nikon F Adapter
The Nikon adapter allows one to use most F lenses on an AR body, with the exception of the newest G, AF-S, and AF-P and any other lenses that lack a manual aperture ring. This means that most non-Ai, Ai, Ai-S, AF, and AF-D lenses will work just fine.
Konica FC-1 with the Veritable non-Ai Nikkor-S.C. 50/1.4
There is nothing quite like detachable motor drives for 35mm cameras. By the 1970s, external motor drives were being offered by all major SLR manufacturers. For instance, the 1973 MD-2 motor drive for the Nikon F2 could achieve 5 frames per second and could automatically rewind the film. Even for consumer-level SLRs, the major manufacturers offered cheaper drives that could achieve 1.5 – 3 frames per second. By 1984, the Canon F-1 had a special edition motor drive that could achieve 14 frames per second. At the absolute top of the best-looking motor drive pyramid was the MD-4 for the Nikon F3HP.
No Better Looking 1980s Motor Drive Than the MD-4
The Leica Motor Drives
Before 1976, there had been two options for rapid film advance for its M cameras. The first was the 1960-66 “Leicavit,” a very limited production bottom trigger advance that only fit on the Leica M1, M2, MD, and the original MP. According to Cameraquest, only 2,000 to 3,000 of these units were produced. The second option was the custom “New York Motor Drive” developed privately by famous camera guru Norman Goldberg. In 1965, Leica purchased all of the designs and tooling from Mr. Goldberg to produce the motor drive for special versions of the M2 and M4 (the “M2-M” and the “M4-Motor“). Model “14000” was a pretty unique, but massive unit. The bottom of the drive had a switch that permitted up to 3 frames per second for speeds 1/50 to 1/1000 and a 1 frame per second mode for operation down to 1 second. Needless to say, both of these units today are hopelessly expensive collectors’ items.
In 1976, Leica introduced the “M4-2 Winder” (Model 14214) contemporaneously with the Leica M4-2. It really only worked on the M4-2 and not on earlier or later cameras. Many on the internet have reported that the M4-2 Winder just has too much torque for any M camera and perhaps should just be relegated to the camera shelf of history. For the adventurous, there is a write up for pros-only about how to re-calibrate the M4-2 Winder for less torque. Leica later introduced a slightly different M4-P Winder, but it is similarly not too desired.
In 1987, Leica introduced the “Winder M” (Model 14403). The Winder M is basically the same unit at the previous M4-2 Winder but works with the M4-2, the M4-P, the M6. the M7, and the new MP. I would imagine that it also would work with the new M-A. The consensus is that the Winder M has less torque than its predecessor, so can be used safely with any M except for the M3 (due to its more fragile components) Leica suggests that one not activate the motor without film in the camera body.
In 2000, Leica replaced the “Winder M” with the “Motor M.” Although a much smaller unit, it retained the 3 frame per second capabilities and adds an actual integrated grip.
Starting in 1989, the late, world-famous Tom Abrahamsson designed and built about 3,000 high-quality trigger-operated “Rapidwinder.” In 2003, Leica began producing a new trigger-operated “Leicavit” for the M4-2, the M4-P, the M6, the M7, and the MP. These retail new for about $1,300 and advertise that “with practice,” you will be able to use your third hand to advance the film up to 2 frames per second. It appears that the Motor M has now been discontinued.
The Winder M (1987)
The entire idea of a “motor drive” is somewhat of an anathema to many Leica aficionados. For maybe good reasons? A motor drive on a Leica M (or any rangefinder camera) adds unnecessary weight, bulk, and noise for arguably minimal increased functionality. These motor drives cannot power the camera. They cannot rewind the film. They will never approach SLR-like performance. Secondary concerns revolve around how motor drives have the potential to damage internal camera components and how dead batteries can ruin your day.
For me, any of those concerns fall away when you realize that you can purchase a Winder M any day of the week for as little as $40. One cannot even buy a OEM Leica lens cap for $40. Does the Winder M deserve the condemnation and/or indifference it has received? Let’s check it out.
An initial aspect to note about the Winder M is that there are no electrical contacts between the body and the motor drive. The motor drive operates mechanically, advancing the film take-up until it encounters resistance when the camera is “wound” for the next shot, and then automatically trips itself “off.” For SLRs, the widespread advent of electronic shutters during the 1970s made it possible for the camera body to trigger an external winder electrically, which is a better system.
CHEAP: For some reason, the Winder Ms are among the cheapest OEM Leica M accessories available. With so many still in circulation, we can assume that the Winder M does not have many latent problems that would have killed these units over time.
Putting It On: Be sure that film is loaded and that you have fired the shutter. Pull the Winder lever all the way around the unit by pressing up on the lever. Take the bottom plate off your M and then replace with the Winder. Then turn the lever all the way around to the “On” position to lock and enable the unit. You are ready to go.
On/Off: Move the lever back from the “On” position and that will disengage the motor drive for regular, old-timey shooting. However, unless you want to remove the motor drive in the dark and replace the original camera baseplate, you are stuck with the drive until you finish your roll.
Shutter Feedback: When the motor advances, the shutter button will rebound a bit on your finger. Do not be alarmed.
Batteries: The Winder M takes 4 1.5V Alkaline AA batteries or any of their substitutes. These fit nicely into a little tray in the bottom part of the unit.
Noise: Is the Winder M especially noisy? I do not think so. Certainly quieter than 1970s-era external motor drives.
Leica M7 Exposure Lock Woes: Unfortunately, the M7’s exposure lock resets every time the film advances with a motor drive. Thus, if you have locked the exposure for shot number 1, the metering will reset as soon as the photo is taken. As explained below, this occurs with the newest Motor M as well. Most likely, Leica did not take this into account when designing the AE system on the M7.
Gripes About the Grip: The Winder M does not have an integrated grip. Although it would have been nice, holding the camera is not especially difficult without one.
Using the Winder M: This probably comes down to whether you enjoy using motor drives or not. Certainly, an idea use would be for tripod work. For left-eyed shooters (like me), you do not have to remove your eyes from the viewfinder to advance the film. It also removes a step from the photo-taking process so you can focus on getting the shot, especially when the scene is moving around you. You trade some inconspicuousness for some functionality. Nothing in life is free. Especially Leica stuff.
Motor M (2000)
The current Motor M is a much smaller and probably better designed motor drive than the Winder M. Although sharing the same theoretical maximum FPS rate, the Motor M is a little quieter, much smaller, has a handy grip, and actually has several mode selections It is compatible with the same stable of post Leica M4-2 cameras. Although the Motor M more or less coincided with the introduction of the new electronic-shutter M7, Leica decided that backwards compatibility was important than automation, i.e., Leica could have designed a motor drive that was electronically triggered, as opposed to manually. The Motor M essentially works in the same mechanical method as the Winder M.
NOT A TERRIBLE DEAL: Used Motor Ms appear to go as low as $300. Still a very cheap Leica accessory.
Putting It On: Unlike the Motor M, there is no “On” latch to rotate to lock the drive into place. Simply remove your M baseplate and slap the drive onto the base. The locking mechanism is the same as the standard baseplate.
Modes: The Motor M has three switch positions — Off / 1.5 FPS (quiet) / 3 FPS (louder). So you can turn the motor on and off at will. However, turning the motor drive off does not fully disengage the unit — so film advance smoothness is compromised. Word on the street is not to use continuous modes at less than 1/50 or the motor may advance before the shutter closes. Mr. Nemeth advises to not use “I” mode anyway for true continuous shots — only use “II.” I agree,
Shutter Feedback: Just like the Winder M, there is shutter recoil. No big deal.
Batteries: 2 x 123A Lithium batteries — they fit into the grip and are loaded through the bottom. Supposedly good for 100 rolls. Speaking of the grip, there have been reported problems with the grip portion popping out. It is easily noticed — so watch out for that if you buy a used one.
Noise: Do not expect the Motor M to be as quiet as a regular Leica shot. You will hear the click plus the whirl of the motor. “I” is supposed to be quieter than “II” — but in the real world, it’s pretty close. The Motor M is quieter than the Winder M, but they make different sounds.
Leica M7 Exposure Lock Woes: Just like the Winder M, the M7 will reset its exposure lock after each shutter activation.
Using the Motor M: The Motor M has a much lower profile than the Winder M and feels better integrated into the body. The grip allows better positioning for vertical photos. Although the performance is not impressive when compared to any modern SLR motor drive, the unit is small enough that the added weight (225g) is not going to bother you.
Conclusions
Leica did a fairly good job developing motor drives for cameras that were not designed for motor drives. Thank Mr. Goldberg who in the early 1960s conceived of the idea and made it work. Still, the Leica motor drives remain generally unpopular with the mainstream crowd as somewhat antithetical to the ethos of rangefinder photography. If these units were more expensive, I would tend to agree. However, with the Winder Ms being so cheap, it’s almost that you cannot afford not to own one if you use a M4-2, M4-P, M6, M7, or MP. It is definitely a different way to shoot with a rangefinder that takes a little getting used to. You probably will not hate it or think that the motor drive will alert everyone on the street to your presence. Think of it this way — if you only get one chance to capture the “decisive moment,” you can now multiply that chance by 1.5 to 3 times.
There are some advantages to either system. The Winder M: (1) takes easier to find and slightly cheaper AA batteries; and (2) is way cheaper (1/8 the price on the used market). The Motor M: (1) is quieter; (2) has built-in grip: (3) has three selectable modes; and (4) is newer model so in theory easier to get OEM service if something goes wrong. You will most likely not regret acquiring and using either one. If you shoot often, you will find situations where a motor drive will be useful.
Introduced in 2006 and discontinued in 2015, Voigtlander’s Bessa R4A and R4M remain unique in rangefinder camera history because of their ultra-wide viewfinders with framelines for 21, 25, 28, 35, and 50mm lenses. While probably not fully appreciated during their introduction and run, both of these models have rapidly increased in both popularity and price. Is the R4 a camera you should add to your rangefinder arsenal? Sure, why not?
Although the Bessa “R” line of rangefinder cameras all have a certain “1980s SLR” feel to them (probably because Cosina produced many of the cheaper 1980s and 1990s manual-focus SLRs), the R4A (electronic shutter) and the R4M (mechanical shutter) are perhaps the most interesting of the bunch. Regarding the body design, the Bessa Rs are not much to look at, exalting function over form. While the R2 and R3 series did a relatively decent job at providing the basic functionality and experience of the Leica M2 and M3, respectively, at a fraction of the cost, the Bessa R series all have three features over any Leica M film body: a top shutter speed of 1/2000 (instead of 1/1000), a flash sync of 1/125 (instead of 1/50), and user-selectable framelines.
Today, Bessa R cameras have never been more expensive. For me, even though they have some functionality advantages, the Bessa R/R2/R3 cameras, for the cost, do not present particularly compelling cases over a Leica M body. On the other hand, the super-wide viewfinder of the R4 series has no Leica M equivalent. If you are a wide-angle rangefinder shooter, is the Bessa R4 a better system for taking photos than using various shoe-mounted external viewfinders or even Leica’s Frankenfinder? The answer to that question is probably a qualified “Yes.”
Bessa R4M Specifications
Lens Mount
Leica M
Viewfinder Magnification
0.52x
Rangefinder Baselength
19.24mm
Framelines
Parallax-Corrected 21/35, 28 & 25/50
Shutter Speeds
B, 1 sec – 1/2000
Meter
TTL Center-Weighted
Batteries
2 x SR44
X-Sync
1/125
Weight (Body)
440g
ASA Range
25-3200
Shutter
Vertical Metal Focal Plane
Operation
The Viewfinder: The primary draw of the R4M is its low-magnification, bright viewfinder for wide angle lenses. With any other rangefinder camera, hotshoe accessory finders would be required for 21mm and 25mm (and in some cases 28mm) lenses. The R4M lives up to the hype in that regard. The user-selected, parallax-corrected 21/35, 28, and 25/50 framelines make focusing and framing a breeze. The 21mm frameline does hug the absolute outside of the frame, while the 50mm frameline is small.
Metered Manual Operation: Unlike the R4A that provides aperture-priority autoexposure, the R4M employs a “metered manual” operation, like a traditional mechanical-shutter camera bodies and the Leica M6/MP. The R series has an LED indication system for metering that is activated through a half-press of the shutter button. Unlike metered Leica Ms that display arrows for over/under exposure, the Bessa reads out exposure in displayed half stops of exposure: from -2 to +2. Because silver oxide batteries only power the light meter, the R4M can be used at all shutter speeds without them.
Short Effective Rangefinder Baselength: To create the wide-angle viewfinder, some compromises had to be made. The 19.24mm effective rangefinder baselength is about the same as the early 1970s Leica CL. The baselength is more than adequate for accurate focusing of lenses 35mm and wider.
Longer Lenses Partially Block the Viewfinder: It is obvious that the Bessa R series was designed to accommodate many of the slimmer first-generation Voigtlander lenses, like the 21mm f/4, 25mm f/4, 28mm f/3.5, 35mm f/2.5, and others. Lenses that are physically longer tend to block a portion of the viewfinder, especially if one uses a lens hood. The 21-35mm f/3.4-4 Dual Konica Hexanon, which is pretty much an ideal all-around lens for the R4, significantly blocks the 35mm frameline.
Averagely-Quiet Shutter: The vertical metal mechanical shutter is also not particularly quiet. Perhaps not as loud as the mechanical SLRs of the 1980s, but noticeably louder than a Leica M camera.
Reflected LEDs in the Viewfinder: Due to some design oversight, the LEDs for the meter in the viewfinder sometimes reflect off the sides of the assembly.
The 21mm & 50mm Framelines: While the R4’s 21mm frameline is usable, what the viewfinder does not show is the actual distortion in the final image. In other words, while the viewfinder shows a flat view, that is not at all what the shot will look like, especially at closer distances. The framing at 21mm and 25mm is also not terribly accurate, with the subject image being somewhat smaller on the resulting negative than what was framed through the viewfinder. For its part, the 50mm frameline is pretty small (think of the 90mm frameline on a Leica M3).
Platform for Contax & Nikon Rangefinder Lenses: What is nice about the Bessa R series in general is the ability to change framelines manually. This means that using the various Contax or Nikon rangefinder adapters to Leica M becomes much easier, as they are all keyed to Leica M 50mm framline.
Bessa Accessories: The Bessas had a few useful accessories. Of note, there is a bottom trigger winder and a decent body case. I would suggest getting one of the cases for camera protection. The trigger winder is kind of fun and does not interfere with also using the lever advance after a shot.
Conclusions
The R4M is a fun-to-use camera that occupies a unique place in rangefinder history because its super-wide finder. The R4s were largely overlooked at the time apart from a dedicated few, and it is nice to see folks appreciating them now. It is perhaps an ideal travel rangefinder camera for those who prefer the 21-35 range. However, R4s are a bit overly-expensive at the moment given their relative scarcity and a renewed demand for M-mount film bodies. The only real downsides of the R4 are that: (1) the viewfinder does not effectively communicate the visual distortion in the finished shot; and (2) the framing at the widest settings (21mm mostly and 25mm to a lesser extent) is not terribly accurate.
On the morning of June 30, 1998, an errant truck driver hauling paint attempted to pass through the small, medieval streets of the French-speaking Belgian town of Stavelot. The truck crashed and caught on fire. The ensuing fire ravaged the historic core of the city. Two people died and many were injured.
Stavelot was founded around 648 ACE as a location for a monastery by a cleric named Saint Remacle (or Remaclus), who had been provided support by the Merovingian King Sigebert III. I happened to be there as part of an archeological program that was slowly unearthing the foundations of the original 7th-century abbey. The town was caught in the crossfire of King Louis XIV’s 17th-century wars. It was then in the center of the fighting during the December 1944 Battle of Bulge and the site of a Nazi massacre. Needless to say, the town had experienced its share of misfortune.
We heard the explosion from a few hundred yards away and saw the massive fireball emerge over the tops of the houses. Being a smaller town, it took the local and regional firefighters some time to get on the scene. I grabbed my Canonet 28 and tried to take some photos, on gold old Kodak Gold 800-2.
Ground ZeroGround Zero, Part DeuxFirefighter at the SceneFirefighters on a RooftopThe Fire Rages in the Historic DistrictLocal Helping the Firefighters Connect the HosesA Canadian Friend (Top) Helps Rescue a Woman and Her CatHelicopter Evacuation of the Injured
On a quick trip to central Italy during the fall of 2003, we travelled to the Umbrian town of Gualdo Tadino (pop. @ 15,000). In the region of Umbria, Germanic influence was significant. The dual name for the town reflects this. “Gualdo” derives from the German “wald” for “forest.” “Tadino” refers to the old Roman town of “Tadinum.” From 996, the town was called “Gualdo.” Later, in 1833, Pope Gregory XVI re-added the Roman “Tadino” portion of the city’s name. Our Italian side’s family village, Gaifana, is just about 8km down the famous Roman Road, Via Flaminia, originally built in the 3rd century BCE, stretching from Rome to Rimini.
From the 6th until the mid-14th century, Gualdo Tadino existed as part of the Lombardic Duchy of Spoleto. The Lombards were a Germanic people who had invaded Italy in the late 6th century. In the mid-14th century, Umbria became part of the Papal States. For the next several hundred years, the population of Umbria waffled between loyalties to the Vatican or to the Holy Roman Empire before ultimately being annexed by the modern state of Italy in 1860. Today, along with other towns in Umbria, Gualdo Tadino is known for its ceramics.
Every fall, in a tradition started around 1970, the people of Gualdo Tadino host a three-day festival called “Giochi de le Porte” (or “the Games of the Gates”), dedicated to St. Michael the Archangel, pitting teams from neighborhoods of the four principal town gates against each other in medieval games — including a cart race, a donkey race, slingshot and archery competitions. Each team wears a different colored handkerchief to signify their gate. Day one starts with the “opening of the taverns” where the town inhabitants gather to eat and imbibe, and the traditional exchange of gifts between different teams. At the end of the races, the winning team has the honor of burning an effigy of Bastola, a reputed witch accused of destroying the town by fire in 1237.
The event is quite spectacular with what seems like the entire town turning out for each phase of the festival. It is certainly a part of Italy where a knowledge of Italian is essential.
Here are a few snaps of the festival taken with a 1968 Konica Autoreflex T on Kodak Portra film.
A poignant War Memorial in the family village of Gaifana
On July 22, 2001, during the 300th anniversary celebrations of the founding of the City of Detroit, an article appeared that flipped the traditional narrative of the city’s origins. In the 20th century, every southeastern Michigan school kid was taught that Detroit was founded by an individual named Antoine de la Mothe Cadillac, a French aristocrat from southern France. In the illustrations in the textbooks, Cadillac, dressed in a Three Musketeers ensemble, replete with a tricorne hat, disembarks from a French naval vassal with red and blue flags emblazoned golden fleurs-de-lis, firmly planting it on some part of the modern riverfront.
But the well-researched article pointed out that Cadillac was no aristocrat and no hero. Cadillac was born the son of a provincial judge in 1658 in Gascony. Arriving in the New World in 1683, he re-invented himself as a French nobleman, swiping the “de la Mothe” name from a local chateau near his hometown. Cadillac then lied to the Governor of Montreal about his origins. He made a fortune selling liquor and firearms to Native Americans. Once the leader of the Detroit settlement, he sold the government offices to friends and family. He hated Native Americans, Jews, and Jesuits. After a brief stint in New Orleans starting in 1713, he returned to France 1717, where he was promptly thrown in La Bastille from crimes against le royaume. After being released in 1718, he lived out his life in France, dying in 1730. Canadian historians remain baffled by Detroit’s admiration for the figure, deeming him “one of the worst scoundrels ever to set foot in New France.”
Fast forward 301 years to 2002. That year, Detroit elected the young, charismatic, larger-than-life Kwame Kilpatrick as Mayor. After decades of mismanagement, stagnation, decay, the City appeared to be again on the move. During the late 90s and early 2000s, a new influx of young people began to settle within the Grand Boulevard Arc (the historic core of the City). While those neighborhoods witnessed a small spike in revitalization and interest, the remaining 80% of the City struggled to stabilize and endure. The 2000 to 2008 period, for better or for worse, and purposefully or not, laid the groundwork for the incredible “gentrification” or “revitalization” (answer depending upon whom you ask) of the neighborhoods within the Grand Boulevard Arc.
Without the benefit of enough hindsight, it is difficult to say whether in that particular part of Detroit, a mini Renaissance had occurred — probably because we often mix up the joy of being young with the joy of being in a particular place at a particular time. Needless to say, with residential and commercial rents being cheap and crime being relatively low (yet still existing), more things became possible for a particular group of people.
It was definitely a good time to be in school, which I was between 2003 and 2006. At the time, I had a Nikon F4 and a Konica Hexar RF, until both of them were stolen in an apartment break-in during the mid-2000s.
Twilight of the Decay
Unlike many cities around the world, Detroit failed at preserving its past. Indeed, it probably can be said that Detroit made a conscience effort to destroy it. Starting in the 1950s, the City began demolishing much of its remaining downtown Victorian and early-20th century government and commercial buildings, replacing them mostly with empty lots. This destruction continued unabated, and undeterred by strong protests from preservationists, through the mid-2000s, with perfectly mothball-able buildings being torn down and replaced with nothing.
Statue of Pope John Paul II in Hamtramck
Abandoned Apartment Building Between Brush & John R.
General Motors Headquarters Seen From a Derelict Warehouse
The Iconic Bronx Bar in 2006
Barbecue in Detroit’s Eastern Market
Detroit Firefighters Combat Another Blaze in the Cass Corridor in 2006
Tiger Stadium (1912), Sitting Derelict Here in 2007; Torn Down in 2008
Abandoned Boat in a Woodbridge Alley
February 2003 Downtown War Protest
On an extremely cold day in February 2003, U.S. House Representatives John Conyers, Jr. and David Bonior assisted in the organization of an anti-Iraq War protest. The turnout was phenomenal.
2004 Cinco de Mayo Parade, Southwest Detroit
2004 Corktown St. Patrick’s Day Parade
A tradition since 1958, the Corktown St. Parade, taking place unfortunately on a winter Sunday in late February or March each year, was and is the most debaucherous day of the year in Detroit.
To Americans, “Okinawa” usually conjures images of a fierce two-month battle in 1945 against entrenched and determined forces of Imperial Japan. The battle killed half of the native Okinawans, nearly 150,000 of a pre-war population of approximately 300,000. The fighting and bombing destroyed virtually every building, historical site, and record. A little-known fact is that the United States annexed Okinawa after the battle, installing a military government that lasted until a 1972 democratic referendum that voted for reunification with Japan. Okinawa still houses large, sprawling military bases for both forces of the United States and Japan.
Although an integral part of Japan today, Okinawa was not traditionally part of it. In fact, the islands were known as “Ryukyu” to the Chinese as early as the 8th century ACE. “Okinawa” is the Japanese term. Sitting in an archipelago stretching to Japan to the north and Taiwan to the southwest, Okinawa operated an semi-independent kingdom throughout what the West considers to be the Middle Ages.
Before the 17th century, Okinawa existed as an independent kingdom and nominal “vassal state” of the Kingdom of China. However, China only imposed tribute and loyalty obligations on their vassal states. Although Okinawa had its own language and indigenous culture, like most other neighboring peoples, Chinese cultural influence was dominant. During this period, Okinawa enjoyed some success and autonomy by acting as sort of a “neutral” trading ground among the kingdoms of China, Korea, and Japan.
In 1609, the Japanese Shogunate invaded and conquered Okinawa. Henceforth, Okinawa operated as both a kind of vassal state of both China and Japan. As the story goes, because Japan outlawed civilian weapon ownership, Okinawans subsequently invented a martial art known as “karate.” In 1879, Meiji Japan formally annexed Okinawa. However, despite pressure by the Japanese at this time to assimilate the Okinawans and suppress local language and customs, encourage them to adopt Japanese versions of their name, and to conscript them into the military, Okinawans retained a strong independent identity, even up through the 1945 battle.
Because of the significant need for laborers for the sugar and pineapple plantations, the Kingdom of Hawai’i imported a large number of Japanese, Chinese, Korean, and Filipinos laborers during the late 19th century. However, the international conglomerates running Hawai’i agriculture treated Asian laborers little better than slaves. “Pidgin,” which still can be heard in Hawai’i, was a dialect developed by Asian and native Hawai’ian laborers combining words from multiple languages to communicate with each other and with their overlords. In a little-known, but impressive, act, after the United States formally annexed Hawai’i in 1898, the Hawai’i Organic Act was passed in 1900, which invalidated the oppressive labor contracts imposed upon immigrant and native laborers and forced renegotiation of their terms. Also around 1900, significant numbers of Okinawans began moving to Hawai’i to take advantage of the booming opportunities in agriculture. However, in 1924, the United States halted further East Asian immigration. Americans of Okinawan descent served with distinction with many military units throughout the war.
To this day, because of the late 19th and early 20th century immigration, Hawai’i and Okinawa share a strong cultural connection. In fact, in the aftermath of the 1945 battle, Hawai’ians organized a humanitarian relief effort to aid the local population. In Okinawa today, you can see people wearing Hawai’ian shirts. More info on the history of the deep bonds between Okinawa and Hawai’i can be found here.
In 1945, the United States, obviously knowing very little about Okinawa, did not appreciate the fact that many Okinawans still regarded the Japanese as outsiders and colonizers. As a result, the battle was unnecessarily vicious and destructive. The United States surrounded the isolated island with a large armada. And for two months, the military destroyed everything on the island.
After the war, the United States occupied and annexed the island. Throughout the 1950s and 1960s, Okinawans, resenting the large military presence, starting demanding an end to the occupation. Resentment only grew with the United States using Okinawa as a staging ground for the bombing of Vietnam. The protests ultimately culminated in a referendum in 1972 which ended American military rule and reunited the island with Japan. However, the militaries of United States and Japan continue to occupy a significant portion of the main island. Given their resentment at the occasional serious crimes committed by military personnel, and their desire not to be a military target again in a future war, most Okinawans still wish to see the departure of all military personnel from the island.
After reunification, Japan poured a significant amount of resources into the island. Today, the population of Okinawa is about 1.4 million people, five times its pre-war population. The cities, nestled in the valleys between principal hills, are densely populated, with gridlock traffic during the work day. Small farms dot the landscape in between the cities and hillsides.
The 1945 battle pretty much erased much of the physical evidence of Okinawa’s history, destroying its cities, its unique family tombs that had been carved into hillsides, its palace, and its historical and government records. What did survive, in part, were some of its stone hilltop 14th and 15th century “Gusukus” (meaning “castle” or “fortress” to some, “holy place” to others, depending on how one interprets Chinese characters). Although many of the gusukus were damaged by military shelling and bombing during the battle (as the Japanese used many of them as artillery positions), significant post-war efforts have restored many of them.
Here are some touristy travel shots were taken with a Konica TC-X with my Dad’s old 35/2.8 Hexanon (borrowed from my brother). I liked this lens so much that after this trip I located and purchased the 35/2 Hexanon. The color photos were taken with a Fuji X20 digital camera.
The Gusukus
During the 14th and 15th centuries, Okinawa was divided into several smaller principalities. During this period, local leaders built large stone castles on hilltops overlooking the sea and the land below. The ruins of the gusukus dominate the landscape of Okinawa from north to south. Scholarship has revealed that even after these installations fell into disrepair with the Shogunate invasion, local religious rites were carried out on the ruins of these sites. Apparently, both ancient Roman and Ottoman currency have been found at these sites — a testament to Okinawa’s importance as a center of trade and cultural exchange.
Shuri Castle
This 14th century edifice was completely destroyed during 1945. Since the unification of the Ryukyu Kingdom, it was its political, economic, and cultural hub. Built on a commanding hill, its architecture is distinctly Chinese. In the 1920s, a Japanese architect assisted in the castle’s restoration, and it was declared a “national treasure.” In 1945, shelling from the battleship U.S.S. Mississippi destroyed all of palace buildings. Starting in 1992, Shuri Castle was reconstructed according to old plans and photos. It is pretty magnificent.
“Turtle Back” Tombs
An ancient Okinawan tradition included establishing an extended family tomb in the side of a hill. These tombs are scattered throughout the island. The space doubled as an area to pay respects to one’s ancestors. Many of these tombs were obliterated during 1945, with some being rebuilt after the war. Okinawans tell heartbreaking tales of families hiding out in the tombs during the bombing of the island. However, the tradition remains alive as “new” traditional tombs are still being built today.
World War II Stuff
Unfortunately, the 1945 battle imprinted a lasting mark on both the people and physical landscape of the island. Around the time of reunification with Japan in 1972, Okinawa began construction of its “Peace Memorial Park” on the southern part of the island where the Japanese made their last stand and where General Mitsuri Ushijima, who led what many military historians consider a skillful defense of the island given the massive inferiority of his forces, committed suicide when the battle was lost.
The Peace Memorial Park contains freestanding monuments listing by name the roughly 240,000 people who died in the battle — Okinawans, Japanese, Koreans, and the Allied Forces. The Koreans who fought with the Japanese have their own monument. While there, we witnessed Japanese naval personnel visiting the Park.
Small portions of the intricate series of tunnels dug by the Imperial Japanese Army are open for view. In these tunnels, one gets the sense of the desperation and futility of the fight. Besides the military conflagration, the ultimate tragedy were the deaths of so many Okinawans, pressed into service by the army to fight a hopeless battle.