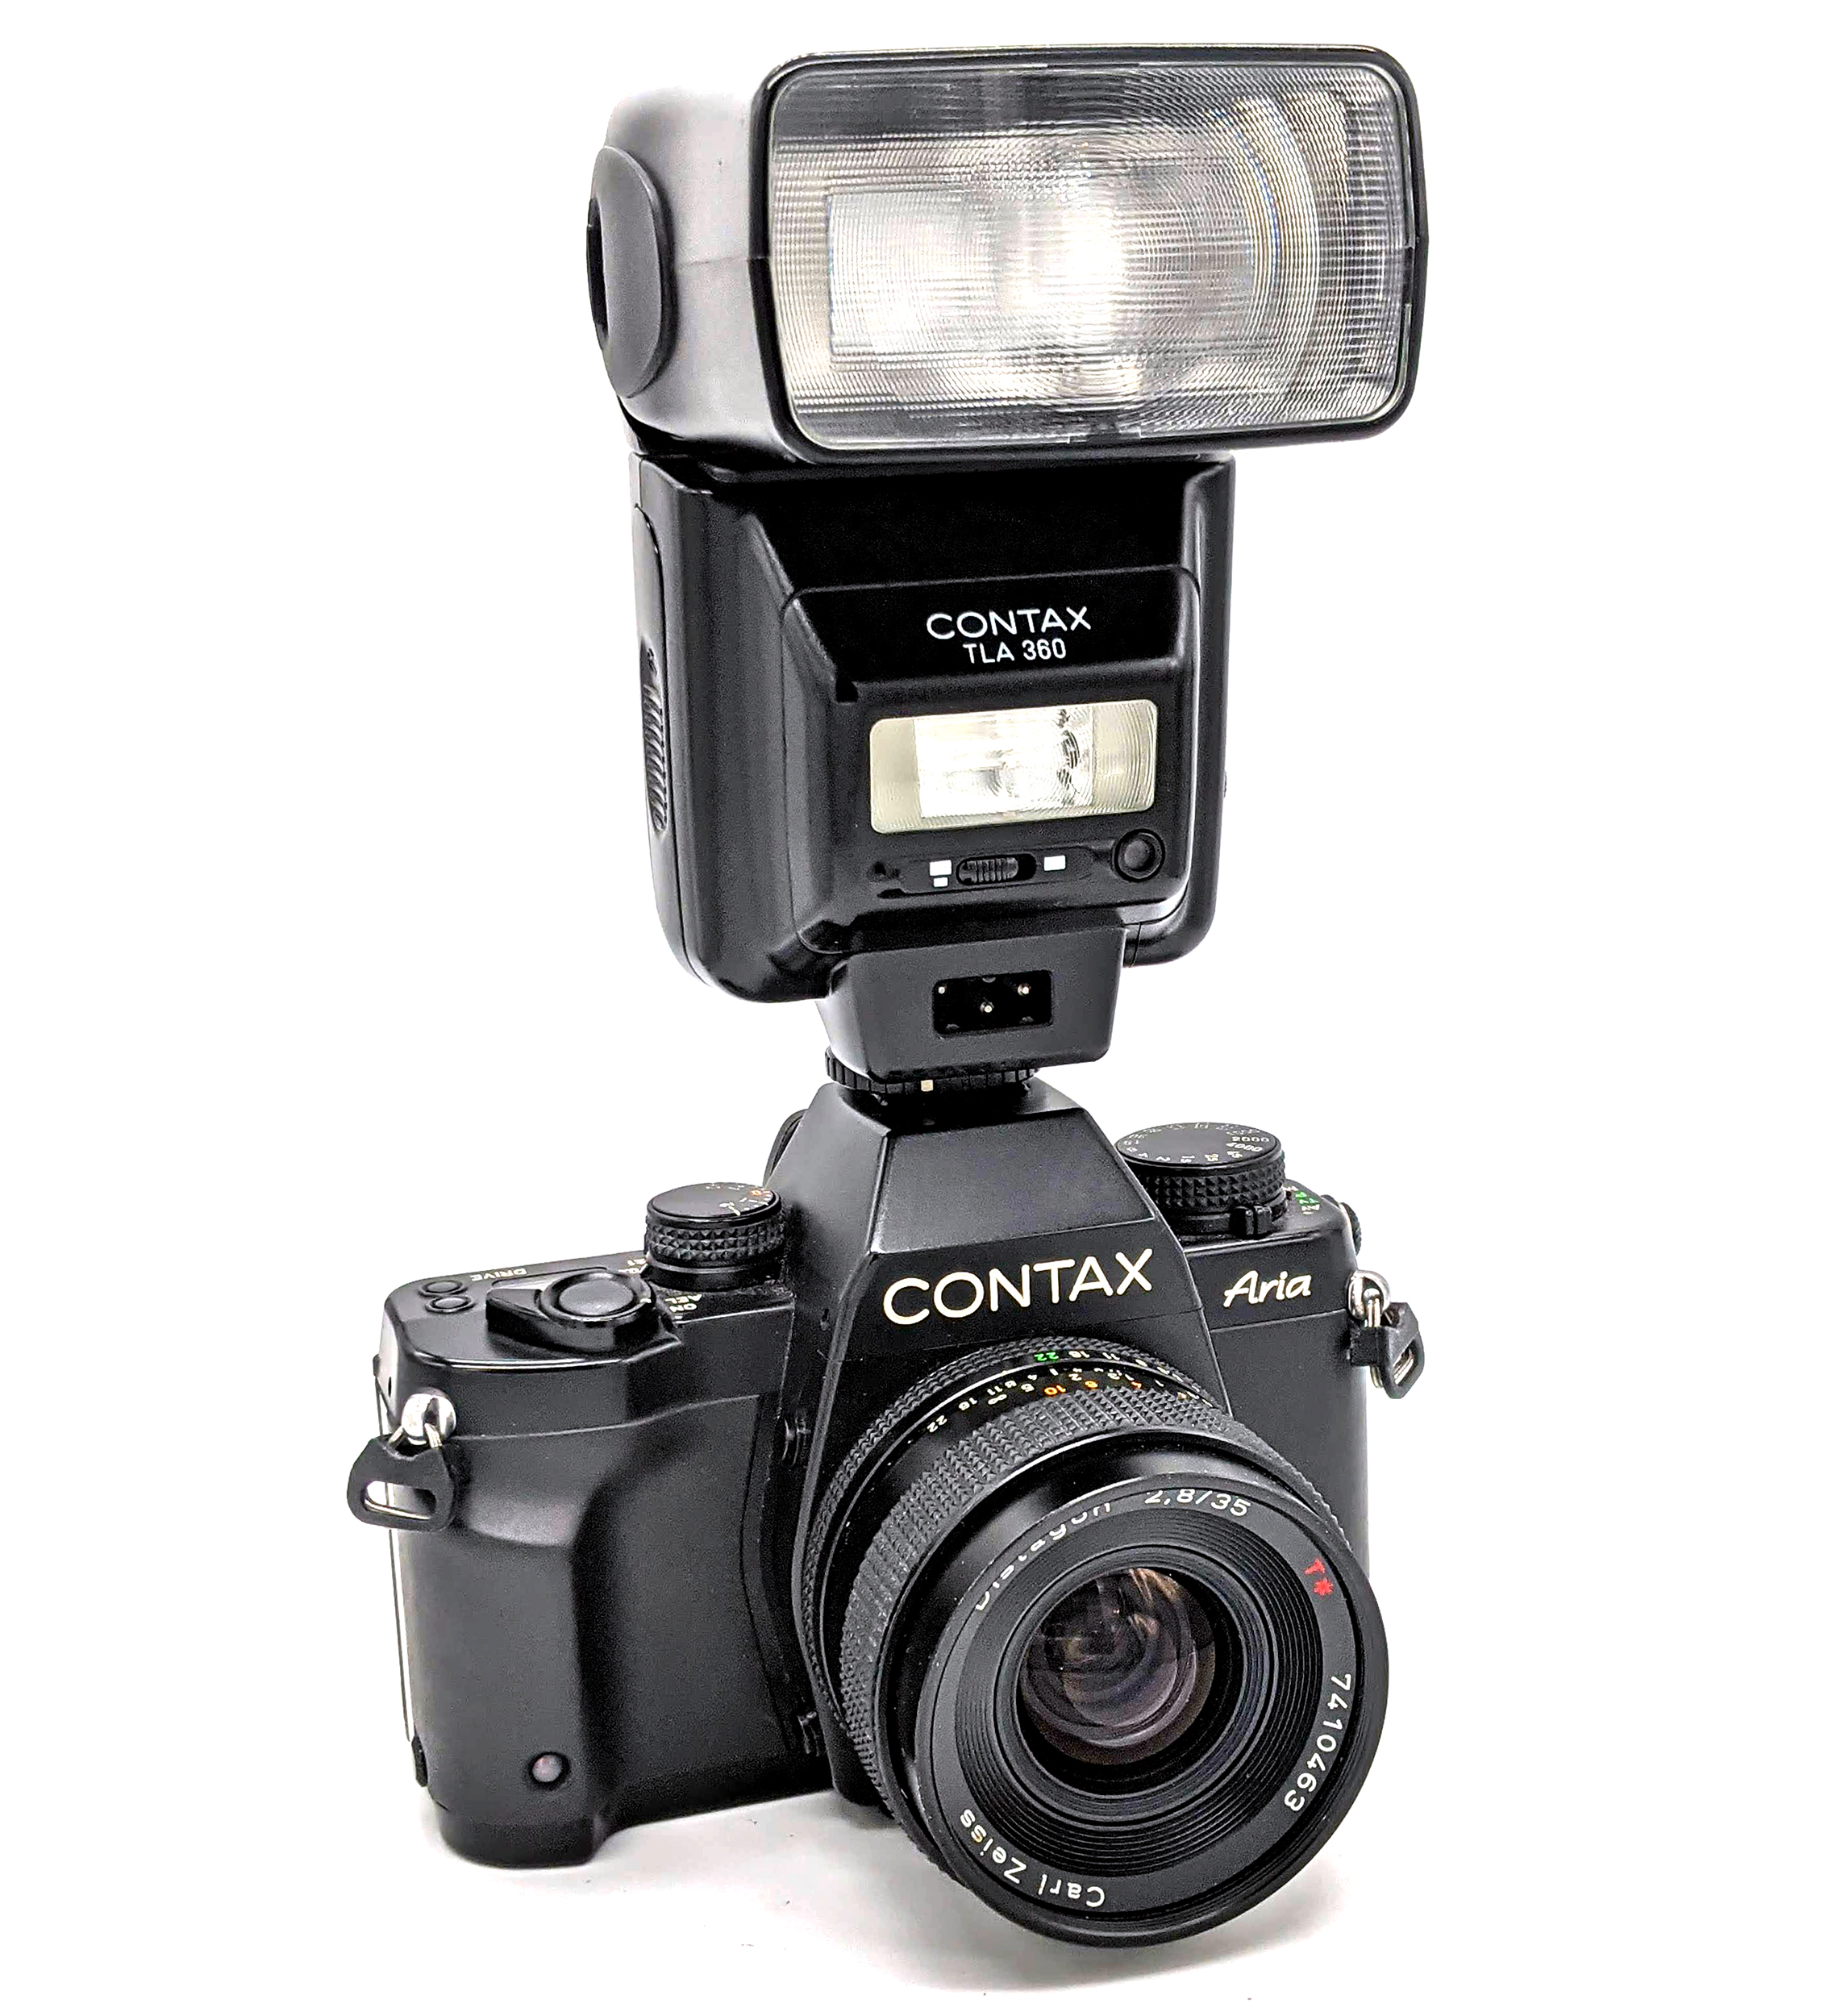
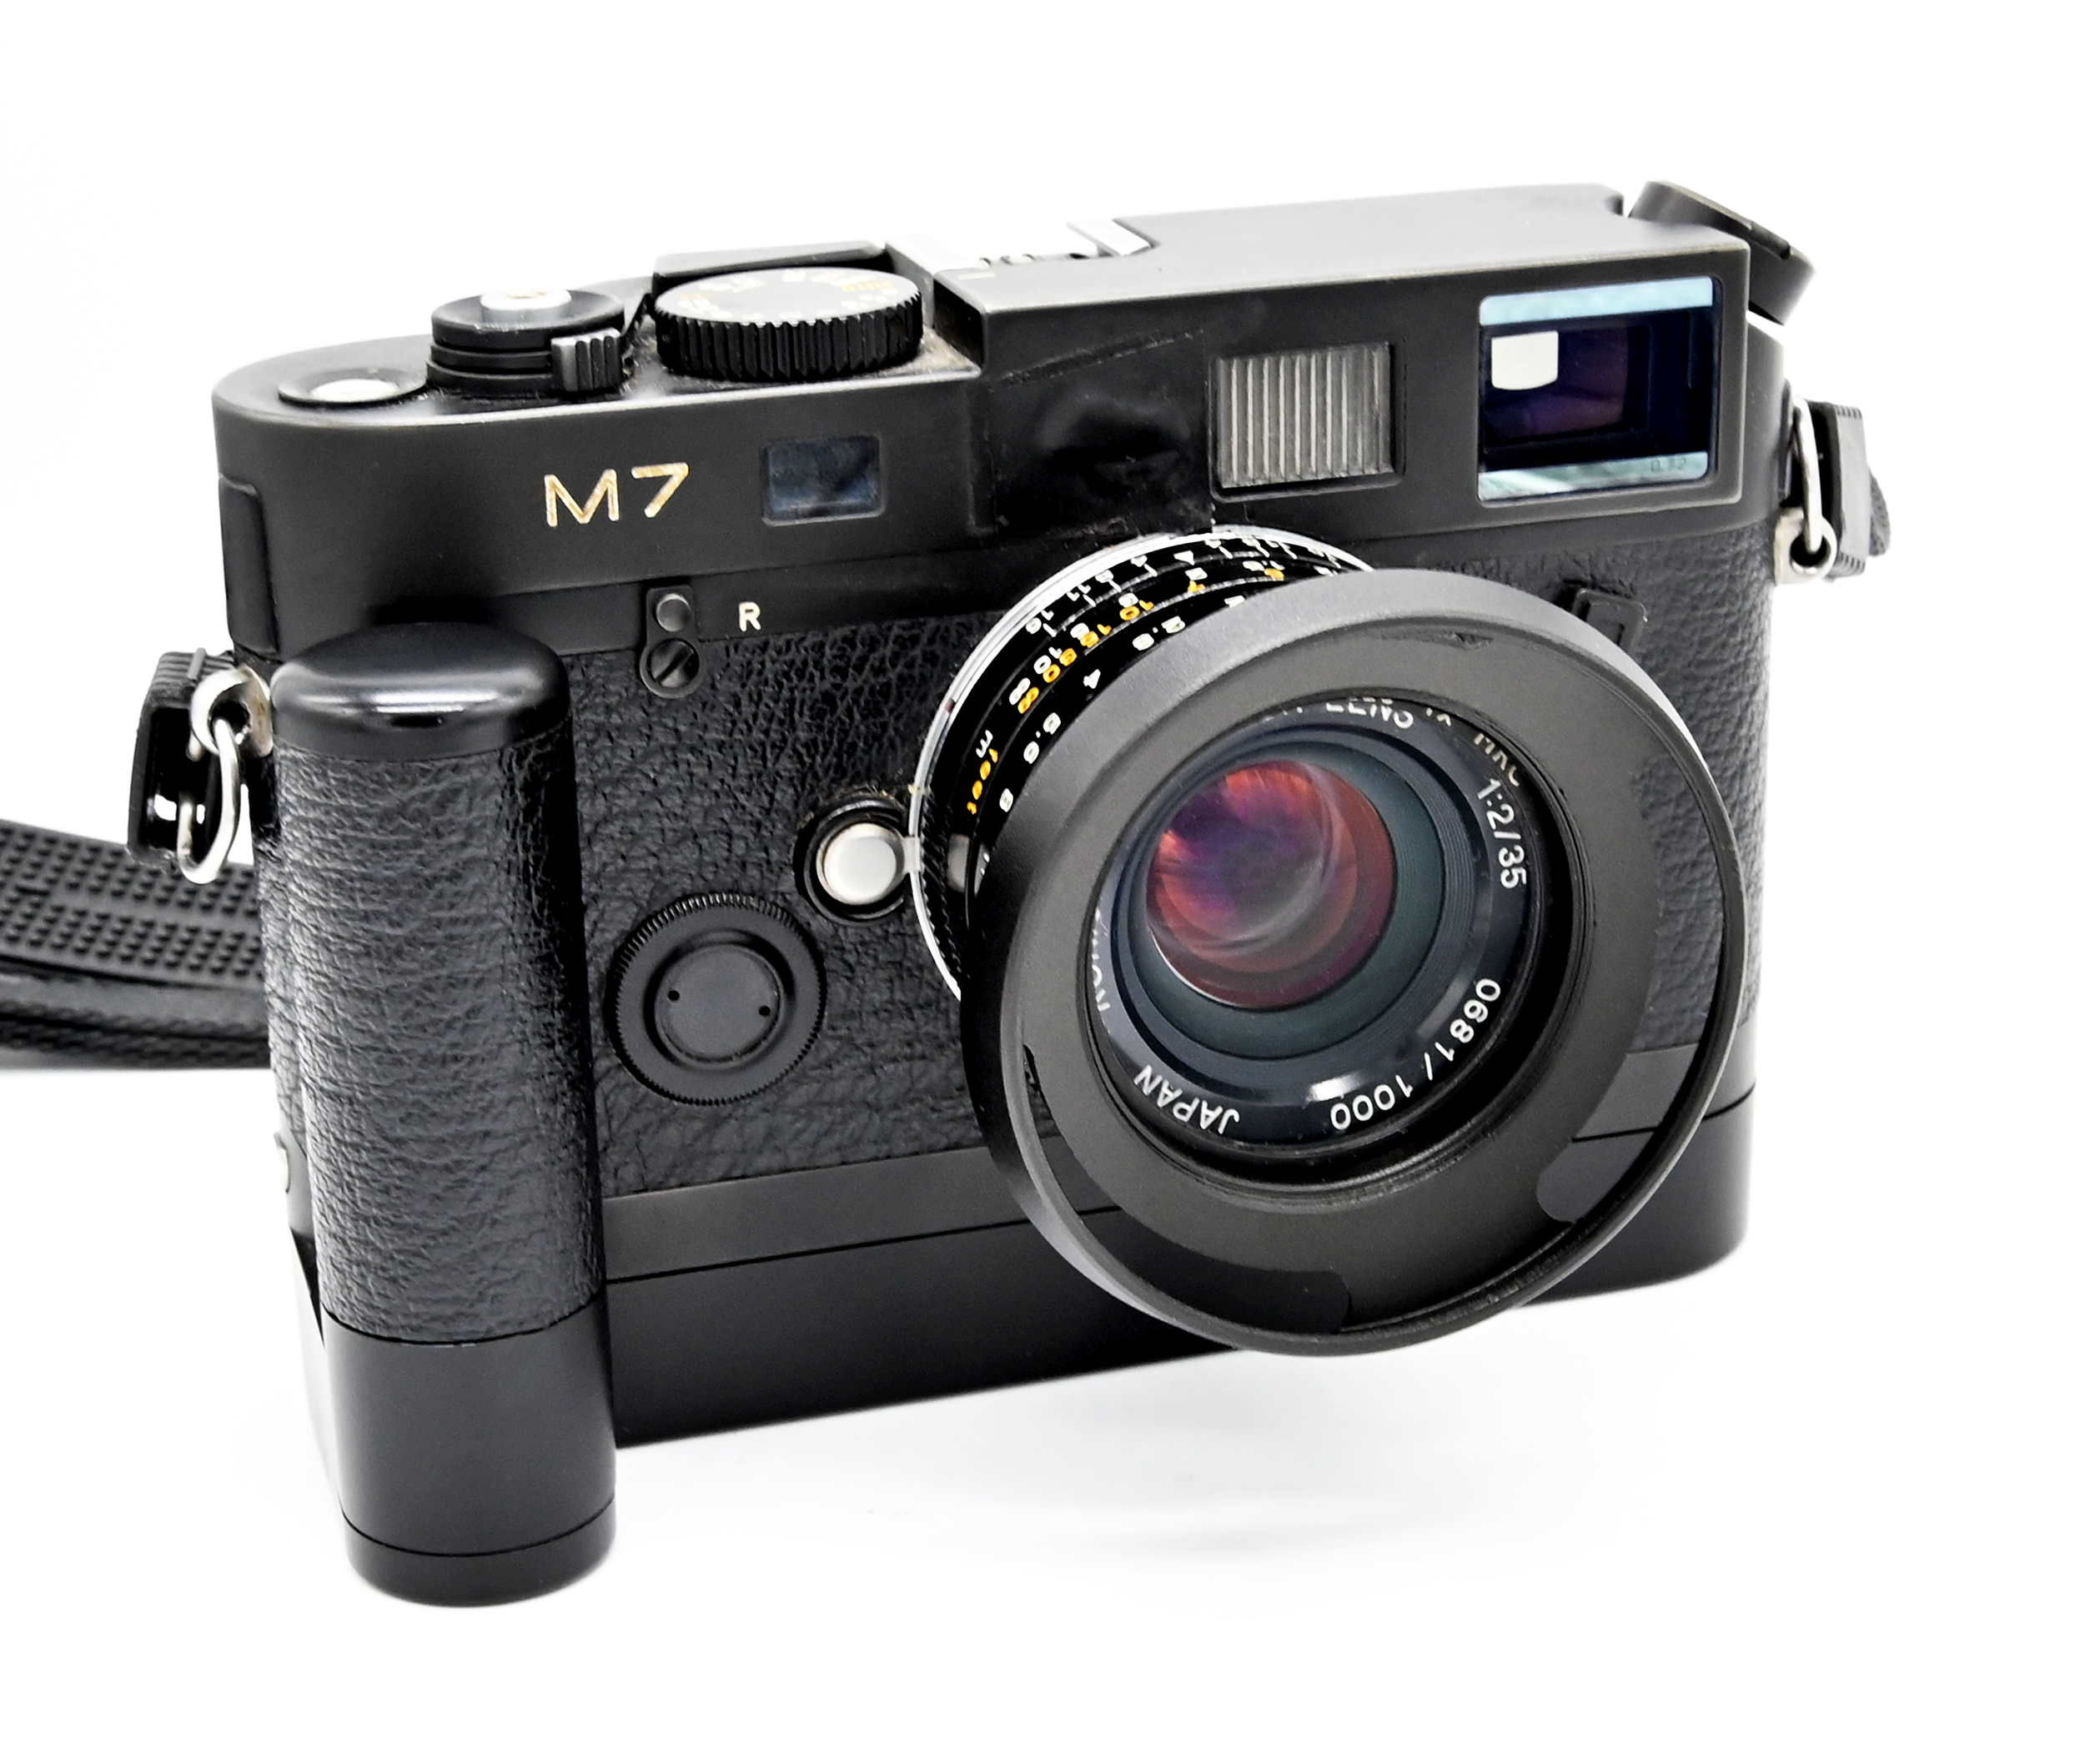
With information on this subject somewhat scattered around the public domain, this piece will quickly run down through the options for TTL flash for Contax and Yashica manual-focus 35mm SLRs. The Contax models that were capable of utilizing TTL flash were the 139, 137, RTS II, 159MM, 167MT, ST, RTS III, AX, and Aria. The only Yashica model with TTL flash capability is the FX-103. Most flash equipment from the film era is dirt cheap today.
Contax-Branded TTL Flashes
Flash
GN (100)
Weight
Battery
Bounce
Recycle (Full Power)
Coverage
Modes
Rear Curtain
TLA 20
20
180g
4 x AA
No
5 secs
Insert (24mm)
TTL / A / M
No
TLA 30
30
290g
4 x AA
Vertical
9 secs
Insert (24mm)
TTL / A / M
No
RTF 540
40
720g
Multiple Options
Vertical
Depends
Insert (24mm)
TTL / A / M
No
TLA 140
14
80g
1 X CR123
No
4.8 secs
28mm
TTL / M
No
TLA 200
20
90g
2 x CR2
No
3.5 secs
Zoom (28-90)
TTL / M
?
TLA 280
28
260g
4 x AA
Vertical
5 secs
Zoom (28-85)
TTL / M
Yes
TLA 360
36
390g
4 x AA
Vertical / Horizontal
9 secs
Zoom (24-85)
TTL / A / M
Yes
TLA 480
48
830g
8 x D
Vertical / Horizontal
Depends
Insert (24mm)
TTL / A / M
Yes
The two-pin TLA 20 and TLA 30 were the flashes in existence during the era of the 139, 137, RTS II, 159MM, 167MT, and the ST. The TLA 140 and TLA 200 were designed for the Contax G1 and G2 autofocus cameras. The five-pin TLA 280, TLA 360, and TLA 480 are optimized for the later RX, AX, RTS III, and Aria. However, all TTL Contax flashes are generally compatible with all TTL-capable Contax bodies in A and P modes. For instance, a TLA 30 should fully function with the RTS III or Aria, including daylight fill flash. The TLA 360 will work on an RTS II and automatically set the shutter speed to 1/60, but the body does not “communicate” its aperture setting with the flash. Ergo, it appears that you must manually dial in the f-stop on the RTS II’s lens for proper TTL flash operation (i.e., f/4). Of course, you can alter the settings on the TLA 360 flash itself to accommodate other selected apertures when using the RTS II.
As a general rule, although the TTL flashes are generally cross-compatible across the Contax range, it would probably be best to match a TLA 30 with the 137/139/RTS II and the TLA 360 with the RX and later bodies. The TLA 30 is a really nice and affordable flash unit (f not rather large), with its capabilities for bounce flash and for shooting at all apertures to achieve a primitive daylight fill operation. The TLA 360 is a quintessential “modern” flash with all the bells and whistles one would expect and has fully communication with the later bodies when using MM lenses.
Yashica-Branded Flashes
Despite the fact that Yashica only produced one manual-focus SLR capable of employing TTL flash, it produced three flashes that should work with any TTL C/Y body.
Flash
GN (100)
Weight
Batteries
Bounce
Recycle (Full Power)
Coverage
Modes
Rear Curtain
CS-203
20
?
2 x AA
No
?
?
TTL / M
No
CS-221
22
176g
4 x AA
Vertical
5 secs
35mm
TTL / M
No
CS-250AF
27
235g
4 x AA
Vertical
6 secs
Zoom (28-85)
TTL / M
No
Aftermarket Metz Options
To broaden one’s horizons, with the proper module and sync cords, many TTL-capable Metz flash units will work perfectly Contax cameras and the FX-103. Metz made two basic lines of flashes during the film era: the 300 and 3000 series. Properly-adapted Metz TTL flashes will provide the same capabilities as a TLA flash would on your particular Contax body. The proper module for 300-series flashes is the SCA 382 (there is an older SCA 380 that will work). The proper module for 3000-series flashes is the SCA 3801. Of course, you can mix and match modules and the 300/3000 series flashes as long as you can read Metz’s complicated flow charts. Check here for the full info. Metz offers a much larger world of flashes than were ever made for Contax.
Aftermarket Sunpak Options
A competitor to Metz back in the day, Sunpak also made flashes that could be adapted to different camera TTL systems. The correct TTL module for Contax cameras is the YC-1D. The modular Sunpak flashes are dirt cheap, most even more affordable than equivalent Metz equipment. Sunpak has some fun and quirky units like the 120J and its TTL ring units.
Originally developed before WWII, the M42 lens mount was, for a time, a standard shared among multiple camera body manufacturers starting during the late 1940s. By the early 1970s, this coalition began to fall apart with each major manufacturer developing their own proprietary versions of M42 lenses to work with their own open-aperture light metering systems. By the mid-1970s, with 35mm SLR camera technology rapidly advancing, M42 bodies were on their way out. Because no truly “modern” M42 camera body was ever produced, there has always been much debate about what the “best” body was or is. None of them is the “best,” but some are better than others.
M42 technology evolved in five basic generations. The first generation (1938) included simple screw-in lenses with no mechanical linkage between the lens and the camera body. The second generation (1956) introduced auto-diaphragm lens operation which permits the lens aperture to be held wide open for easier focusing and then upon tripping the shutter, the camera would automatically stop down to the taking aperture. The third generation (1964) combined the auto-diaphragm function with stop-down TTL light metering. The fourth generation (1968) employed auto-diaphragm operation but also included an extra mechanical or electrical linkage that communicated the lens aperture to the camera body for one-step TTL light metering purposes. The final generation (1971) incorporated auto-diaphragm operation, the extra linkage, and an electronic shutter that permitted aperture-priority exposure. Apart from these, during the early 1970s, Cosina and Chinon developed a separate system that permitted a primitive aperture-priority autoexposure with every auto-diaphragm M42 lens. Here is a list of most M42 camera bodies listed by generation.
First Generation: The first generation had its birth before WWII but became commercially available starting in the late 1940s. Famous cameras from this period included the Contax S (1949), the original “Praktica” (1949), the Asahiflex (1952), and the Praktina FX (1953). These cameras came in various configurations and with and without pentaprisms. Their operation was simple: M42 lenses would just screw into the body. Best practice would be to focus at the widest aperture, and then physically stop down to taking aperture to take the shot. Of course, stopping down the lens would darken the viewfinder, making it nearly impossible to focus at the actual taking aperture (say, at apertures smaller than f/4).
Second Generation: During 1956, Contax of East Germany introduced the “F,” which had the ability to hold the aperture wide open regardless of the aperture set on the lens. However, this ability required the use of not-yet-to-market “auto-diaphragm” M42 lenses that contained a “stop-down” pin. Other notable cameras in this generation included the Asahi Pentax K and the Praktica FX3.
The 1958 Pentacon (Contax) FM
Third Generation: This generation fully adopted auto-diaphragm operation and combined it with TTL light metering. However, M42 camera manufacturers created an awkward, two-step procedure for bodies to combine the two concepts. Because the lenses could not communicate the selected aperture with the camera’s light meter, an external button or switch was added to the camera body that, while pressed, temporarily “stopped down” the lens so that the body could take a light meter reading at the actual taking aperture. You then fiddle with the aperture and/or shutter speed until the “match-needle” in the viewfinder was in the correct spot. After releasing the external button or switch, the light meter would shut off and the aperture would return to wide open so you can frame and re-focus if necessary. Every major M42 SLR manufacturer (Pentax, Yashica, Praktica, Fujica, Chinon, Zenit, etc.) produced zillions of these cameras from the mid-1960s to the late 1970s (with certain models produced into the late 1980s), which now litter closets, drawers, and second-hand stores all over the world. In addition to their cumbersome operation, most of these cameras were generally heavier, had fairly dark viewfinders even with faster lenses, and used now-obsolete batteries.
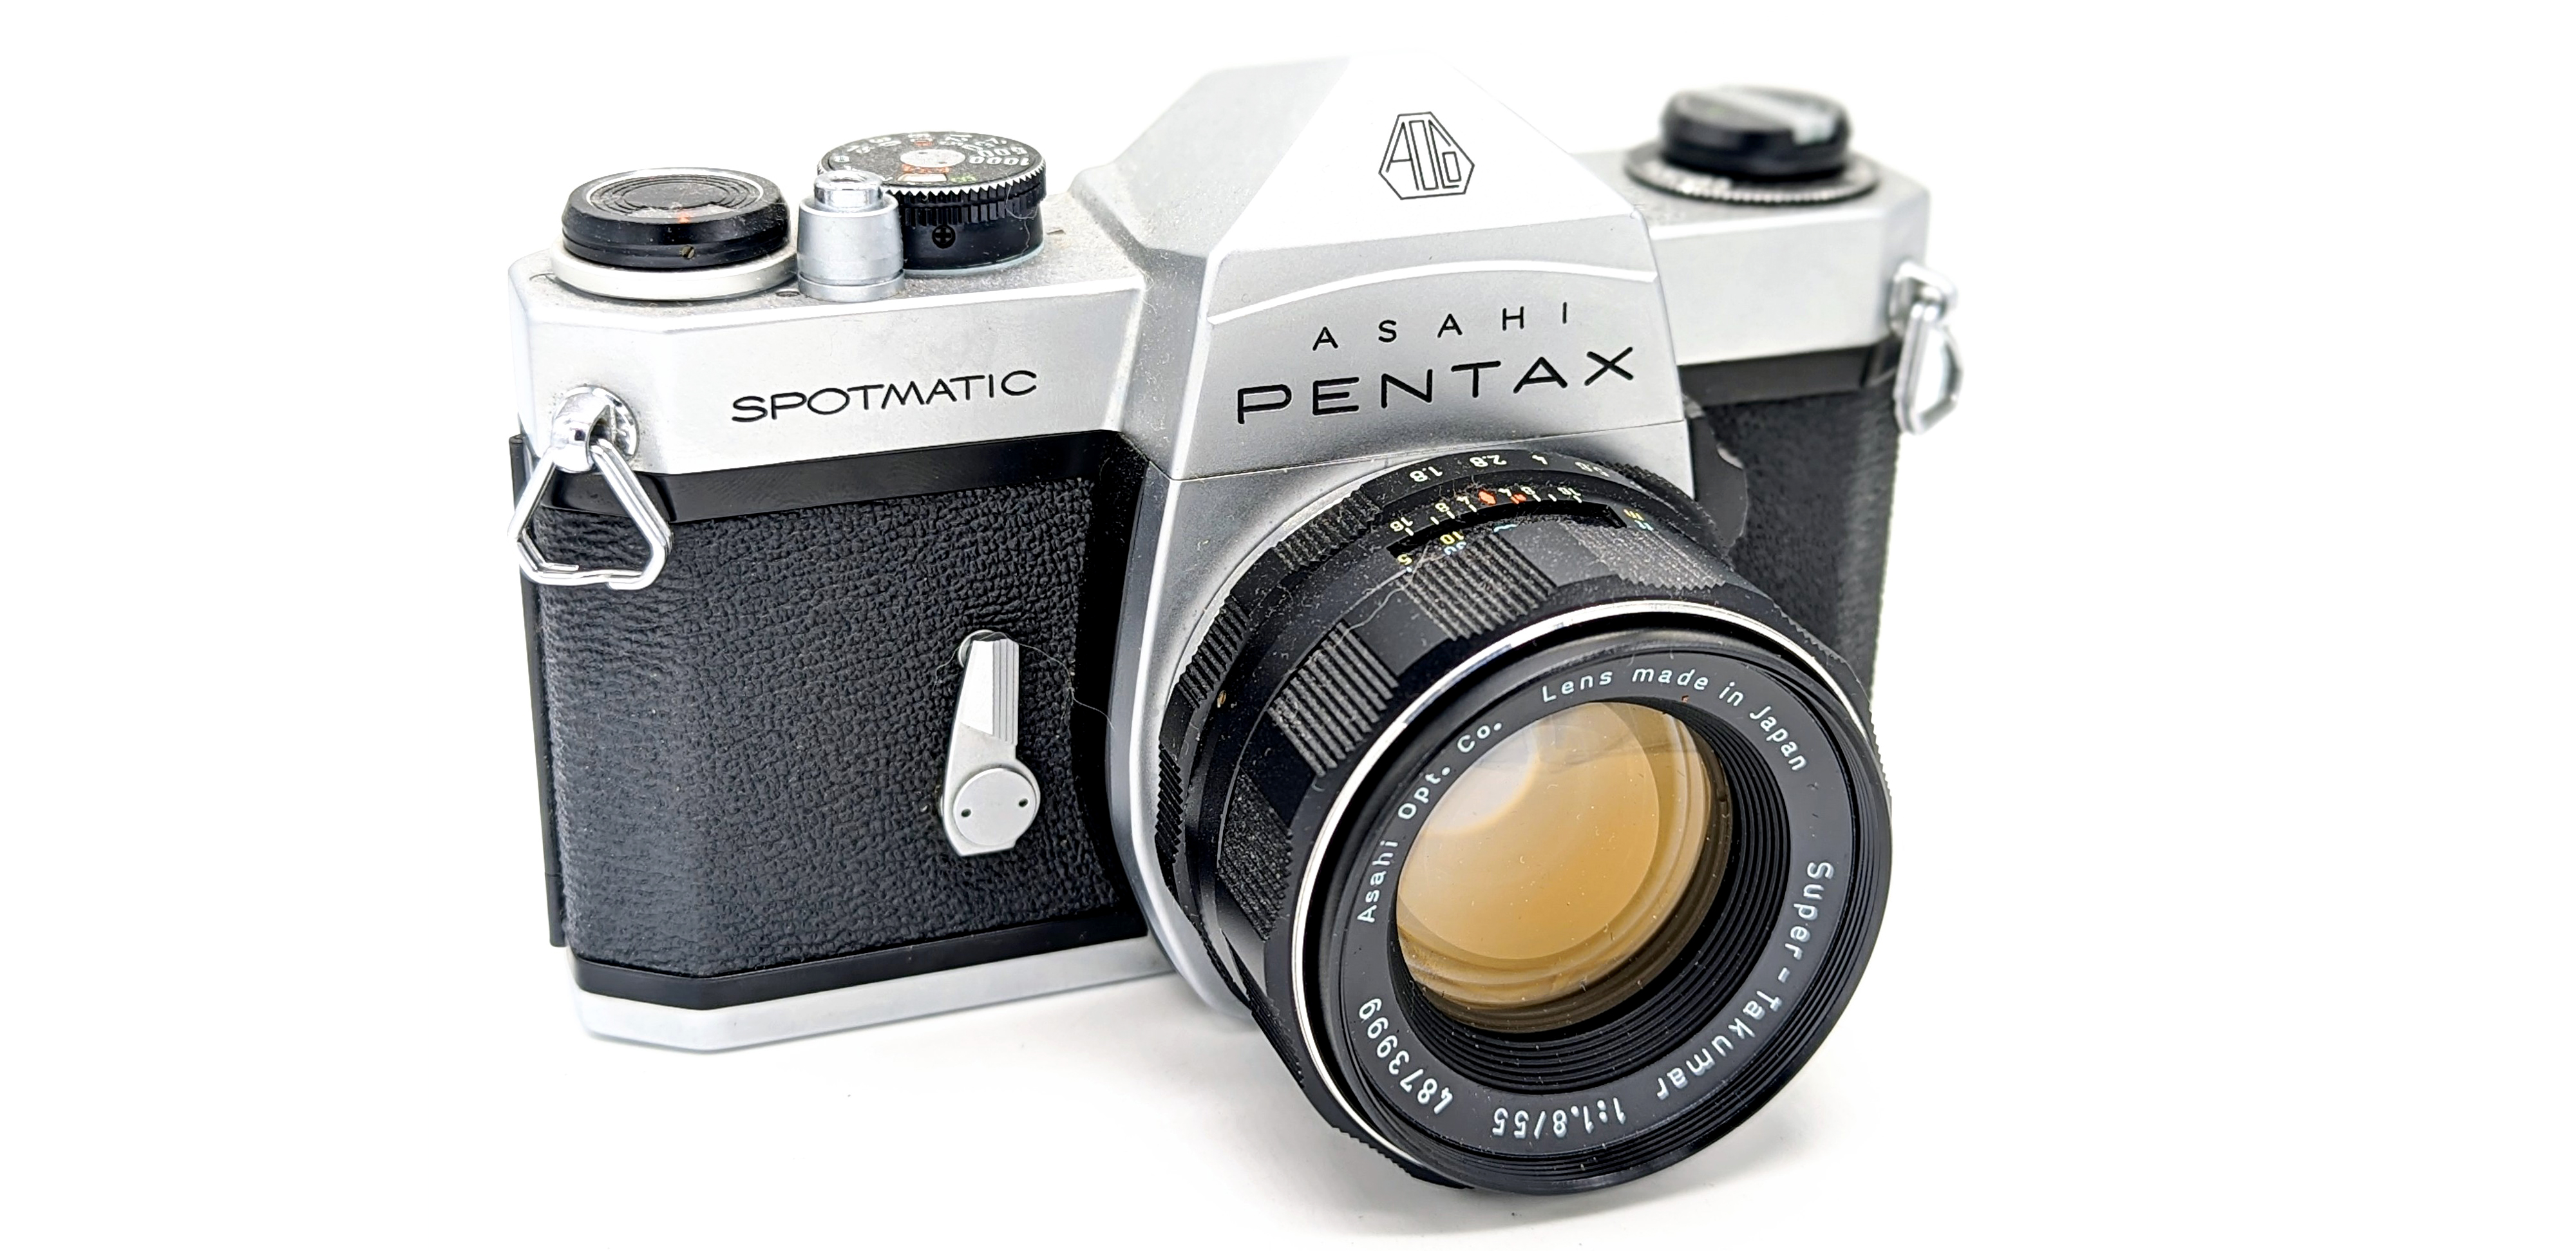
The 1964 Pentax Spotmatic
During 2003, Voigtlander (Cosina) introduced a final “third generation” M42 camera body, the Bessaflex TM. In conjunction with the Bessaflex, Zeiss produced in M42 mount (“ZS” lenses) some of its excellent contemporary manual-focus lenses it was also making in Nikon and Canon mounts and Voigtlander introduced a nice redesigned 58mm f/1.4 inspired by the legendary 1960s Topcon lens. The mechanical-shutter Bessaflex had some nice features, like a beautifully-bright viewfinder and a top shutter speed of 1/2000. Like other third-generation M42 bodies, the Bessaflex requires the activation of an external stop-down switch to activate the TTL light meter and has no autoexposure capability.
The Pentacon Super: During the mid-1960s, after an unusually long development period, East German engineers developed a solution for open-aperture metering with M42 lenses without a manual stop-down step in the form of the 1968 Pentacon Super. Pentacon’s solution to open-aperture metering at different f-stops was to introduce a new line of M42 lenses that contained a second pin towards the outside of the lens that would interact with a curved piece of metal around the body’s lens mount. With the use of a removable, battery-powered prism (kind of like the Pentacon Six), the body could hold the lens wide-open and then meter the scene at the actual selected f-stop through a match needle system in the viewfinder. The Super’s metered prism could also display both the selected shutter speed and aperture in the viewfinder. Unfortunately, the Super was an extremely expensive camera at the time, could only be used to its full potential with a handful of specially-designed Carl Zeiss Jena lenses, and was ultimately produced in relatively small numbers.
Fourth Generation: Like the Pentacon Super, the fourth generation used extra linkages that would permit the lens to communicate the selected aperture for the purposes of light metering without the lens having to physically stop down. Besides the Super, the first to market with this technology was the 1969 “Praktica LLC.” Praktica used electrical, rather than mechanical, contacts to accomplish the extra lens-camera connection. This system was not “autoexposure” as it still required the manipulation of the both shutter speed and aperture so that a needle in the viewfinder sat in the correct place. Other examples of this generation include the 1971 Zeiss Ikon SL706, the 1972 Fujica ST-801, and the 1973 Pentax Spotmatic F. Most of these cameras also included a stop-down lever or switch so that you could use any manufacturer’s auto-diaphragm lenses in “third generation” mode.
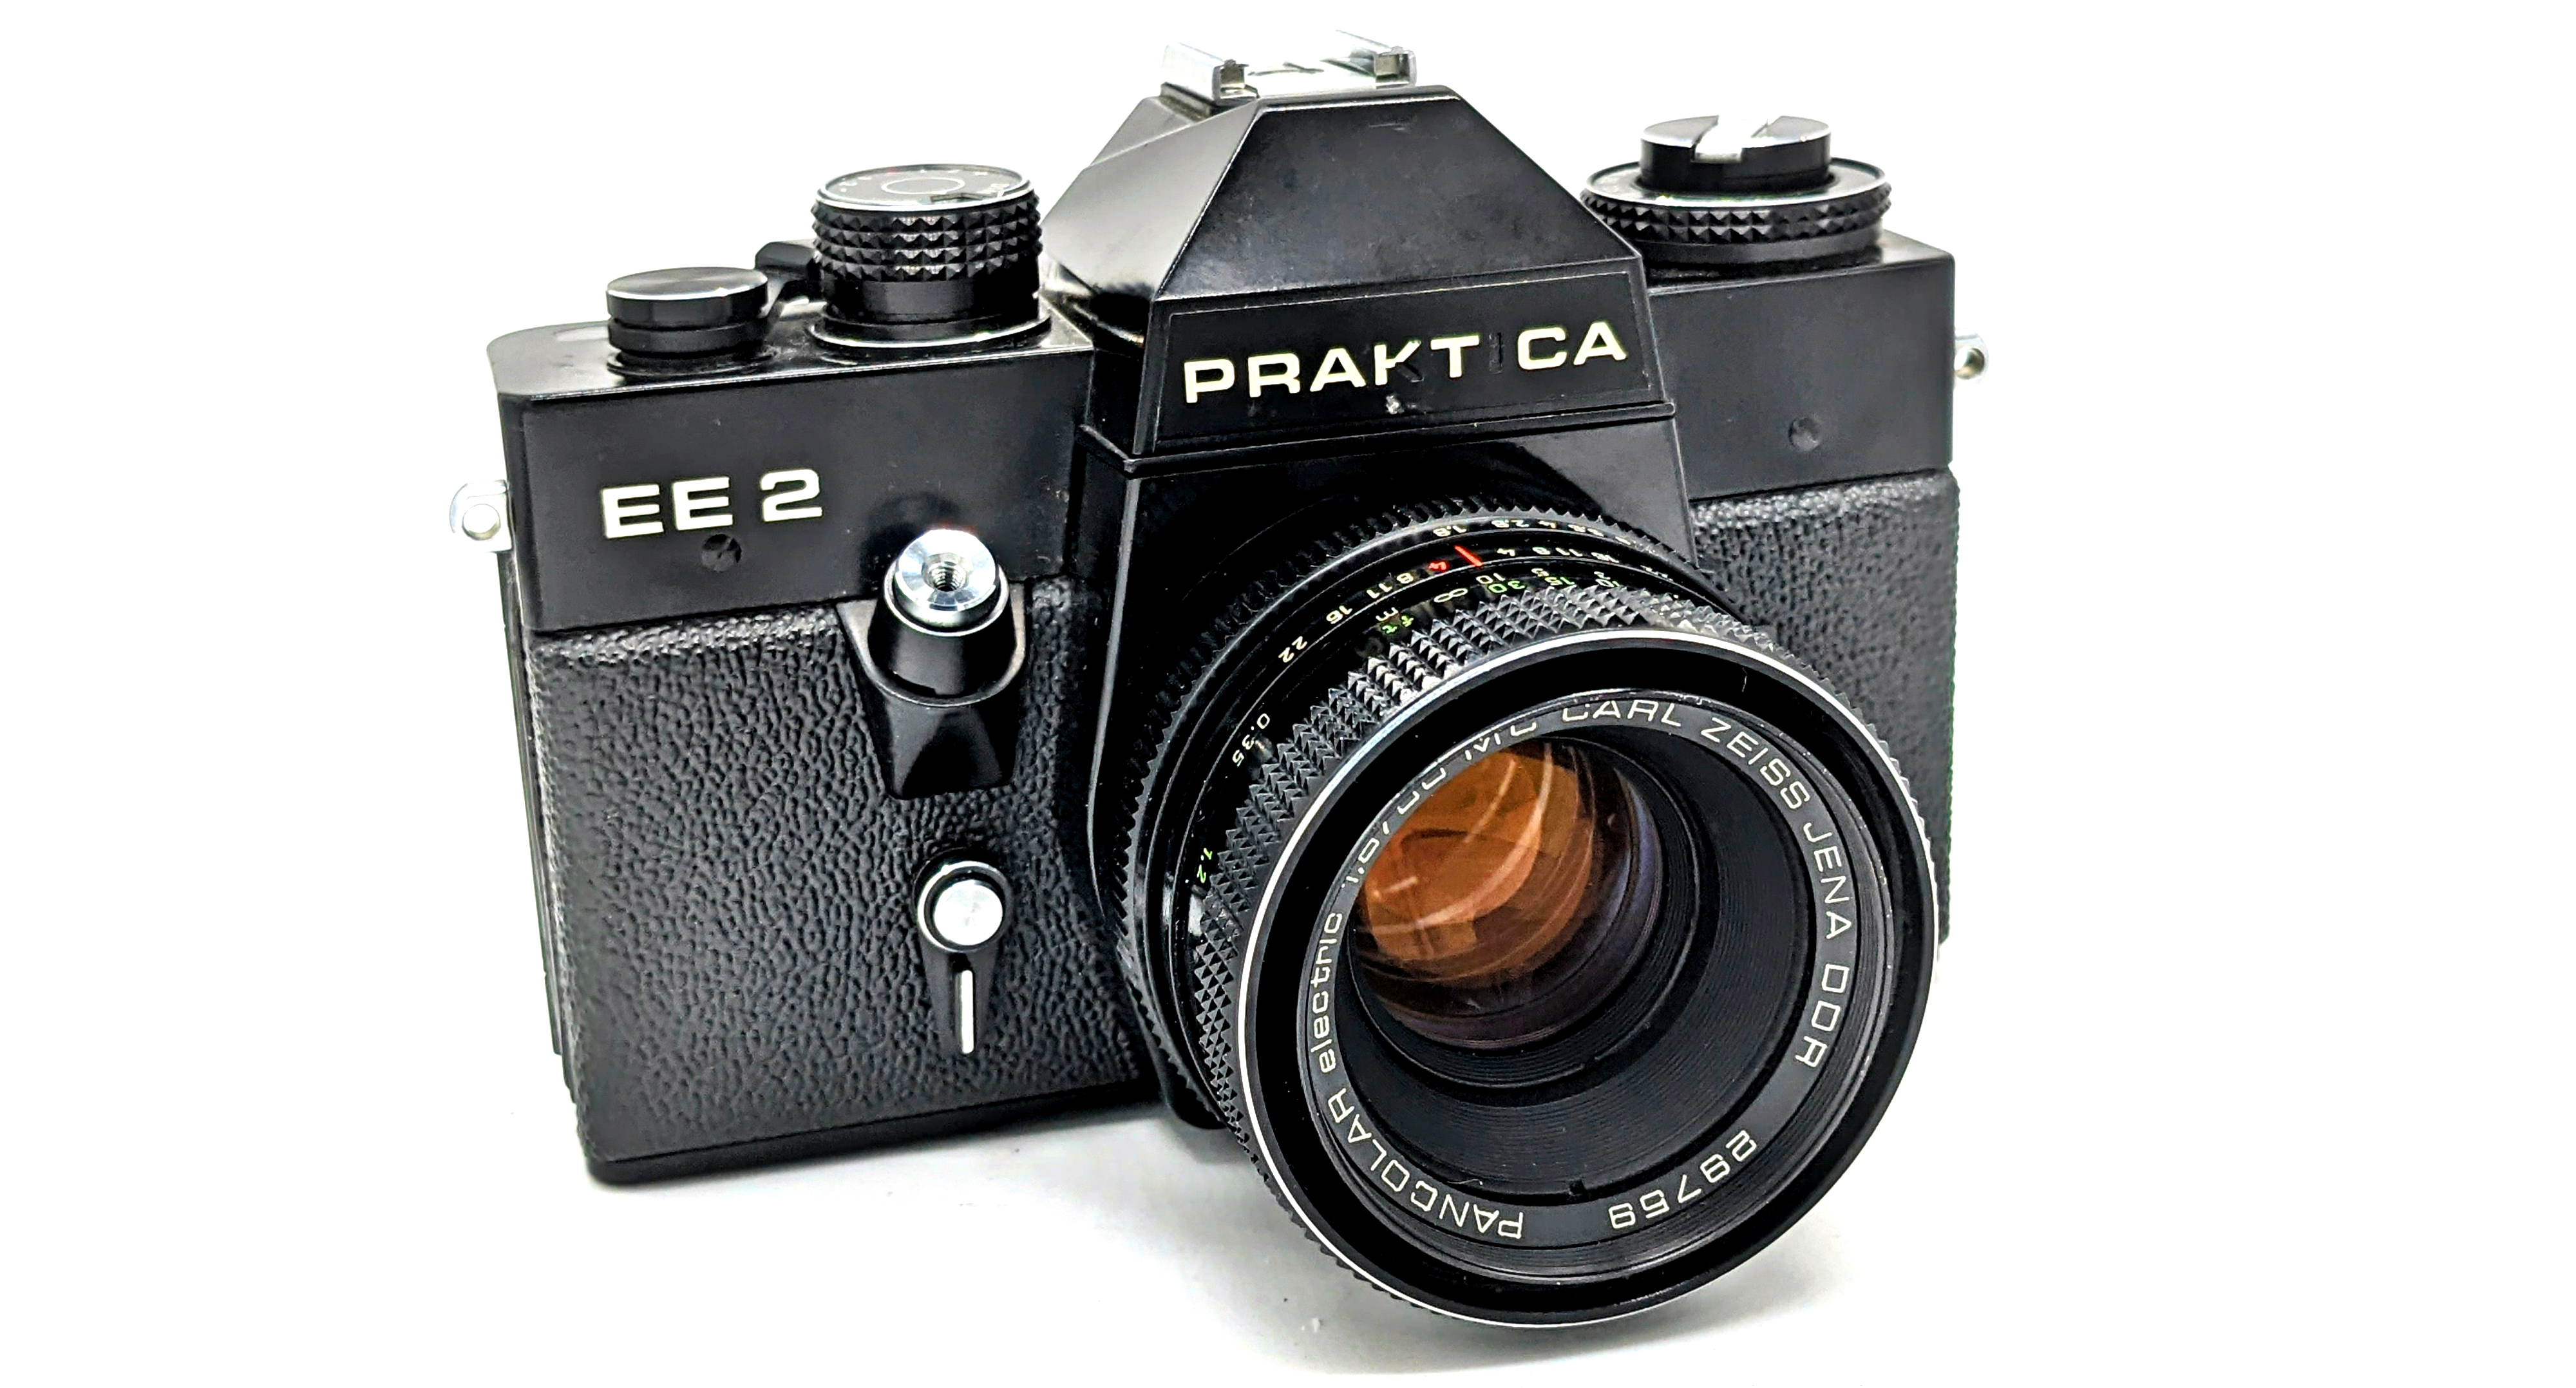
Fifth Generation: During 1971, Pentax was first to market in the final generation of M42 cameras with its electronic-shutter “ES,” the first M42 camera capable of aperture-priority autoexposure, which of course means that you set the aperture and the camera can automatically set the appropriate shutter speed. This required the use of a “Super-Multi-Coated” Pentax lens with an “open aperture reading pin.” Other fifth generation aperture-priority models included the 1973 Pentax ES II, the 1974 Fujica ST-901 and the 1977 Praktica EE2. There were other models from this generation that employed shutter-speed priority autoexposure, like the 1976 Ricoh Auto TLS and the 1978 Exakta FE 2000. Again, each system required proprietary lenses for the autoexposure to operate in either aperture or shutter priority modes.
The 1977 Praktica EE2
The Cosina/Chinon System: During the early 1970s, Cosina and Chinon introduced an interesting alternative system that allowed a primitive aperture-priority autoexposure with all auto-diaphragm M42 lenses, regardless of manufacturer. The technical solution was clever, but not necessarily revolutionary, and did not require the addition of any proprietary connections between the body and the lens. When mounting an M42 lens set to “A” on the diaphragm, the camera could be focused at an open aperture. When taking a photo, if the shutter button itself were pushed half-way down, the camera would stop the lens down to the taking aperture to meter the scene (thus darkening the viewfinder temporarily while the shutter button is half-depressed). The viewfinder would then display the shutter speed that would be automatically used if that aperture were selected. To take the photo, a full depress would instantaneously stop the lens down to the selected aperture and fire the shutter. The resulting stop down action happens so quickly that you don’t even notice it. Essentially, the bodies combined the traditional second-generation metering switch and shutter button into the same mechanism. The models equipped with this technology included the Cosina Hi-Lite EC (1972), the Cosina High Lite ECL (1976), the Chinon CE-II (1976), and the Chinon CE-3 (1978). Cosina, Chinon, and Zenit also used this shutter-button “stop-down” mechanism for a variety non-AE cameras.
So, what is the “best” M42 SLR camera body? The true answer is a bit complicated because it depends on how much work you want to do to take a 35mm photo and what kind of M42 lenses you want to use. I am generally not a fan of any of the first, second, or third generation of M42 bodies because the Cosina/Chinon system and the fifth generation systems are just easier to use. If you want a M42 camera to operate like a swiss army knife, to have full functionality with all auto-diaphragm M42 lenses, to have the option of aperture-priority autoexposure, to display the shutter speeds in the viewfinder, to use common modern batteries, to have an exposure lock function, and to be able to use a motor drive, my answer would be the Chinon CE-3. If you do not mind throwing real money at a camera body with the brightest M42 camera viewfinder, a good top shutter speed, and third generation metering technology, go with the Bessaflex. Otherwise, the fifth generation systems are great but limit full functionality to a smaller world of proprietary lenses. There is no right answer, but there are probably plenty of wrong ones.
Aftermarket Options
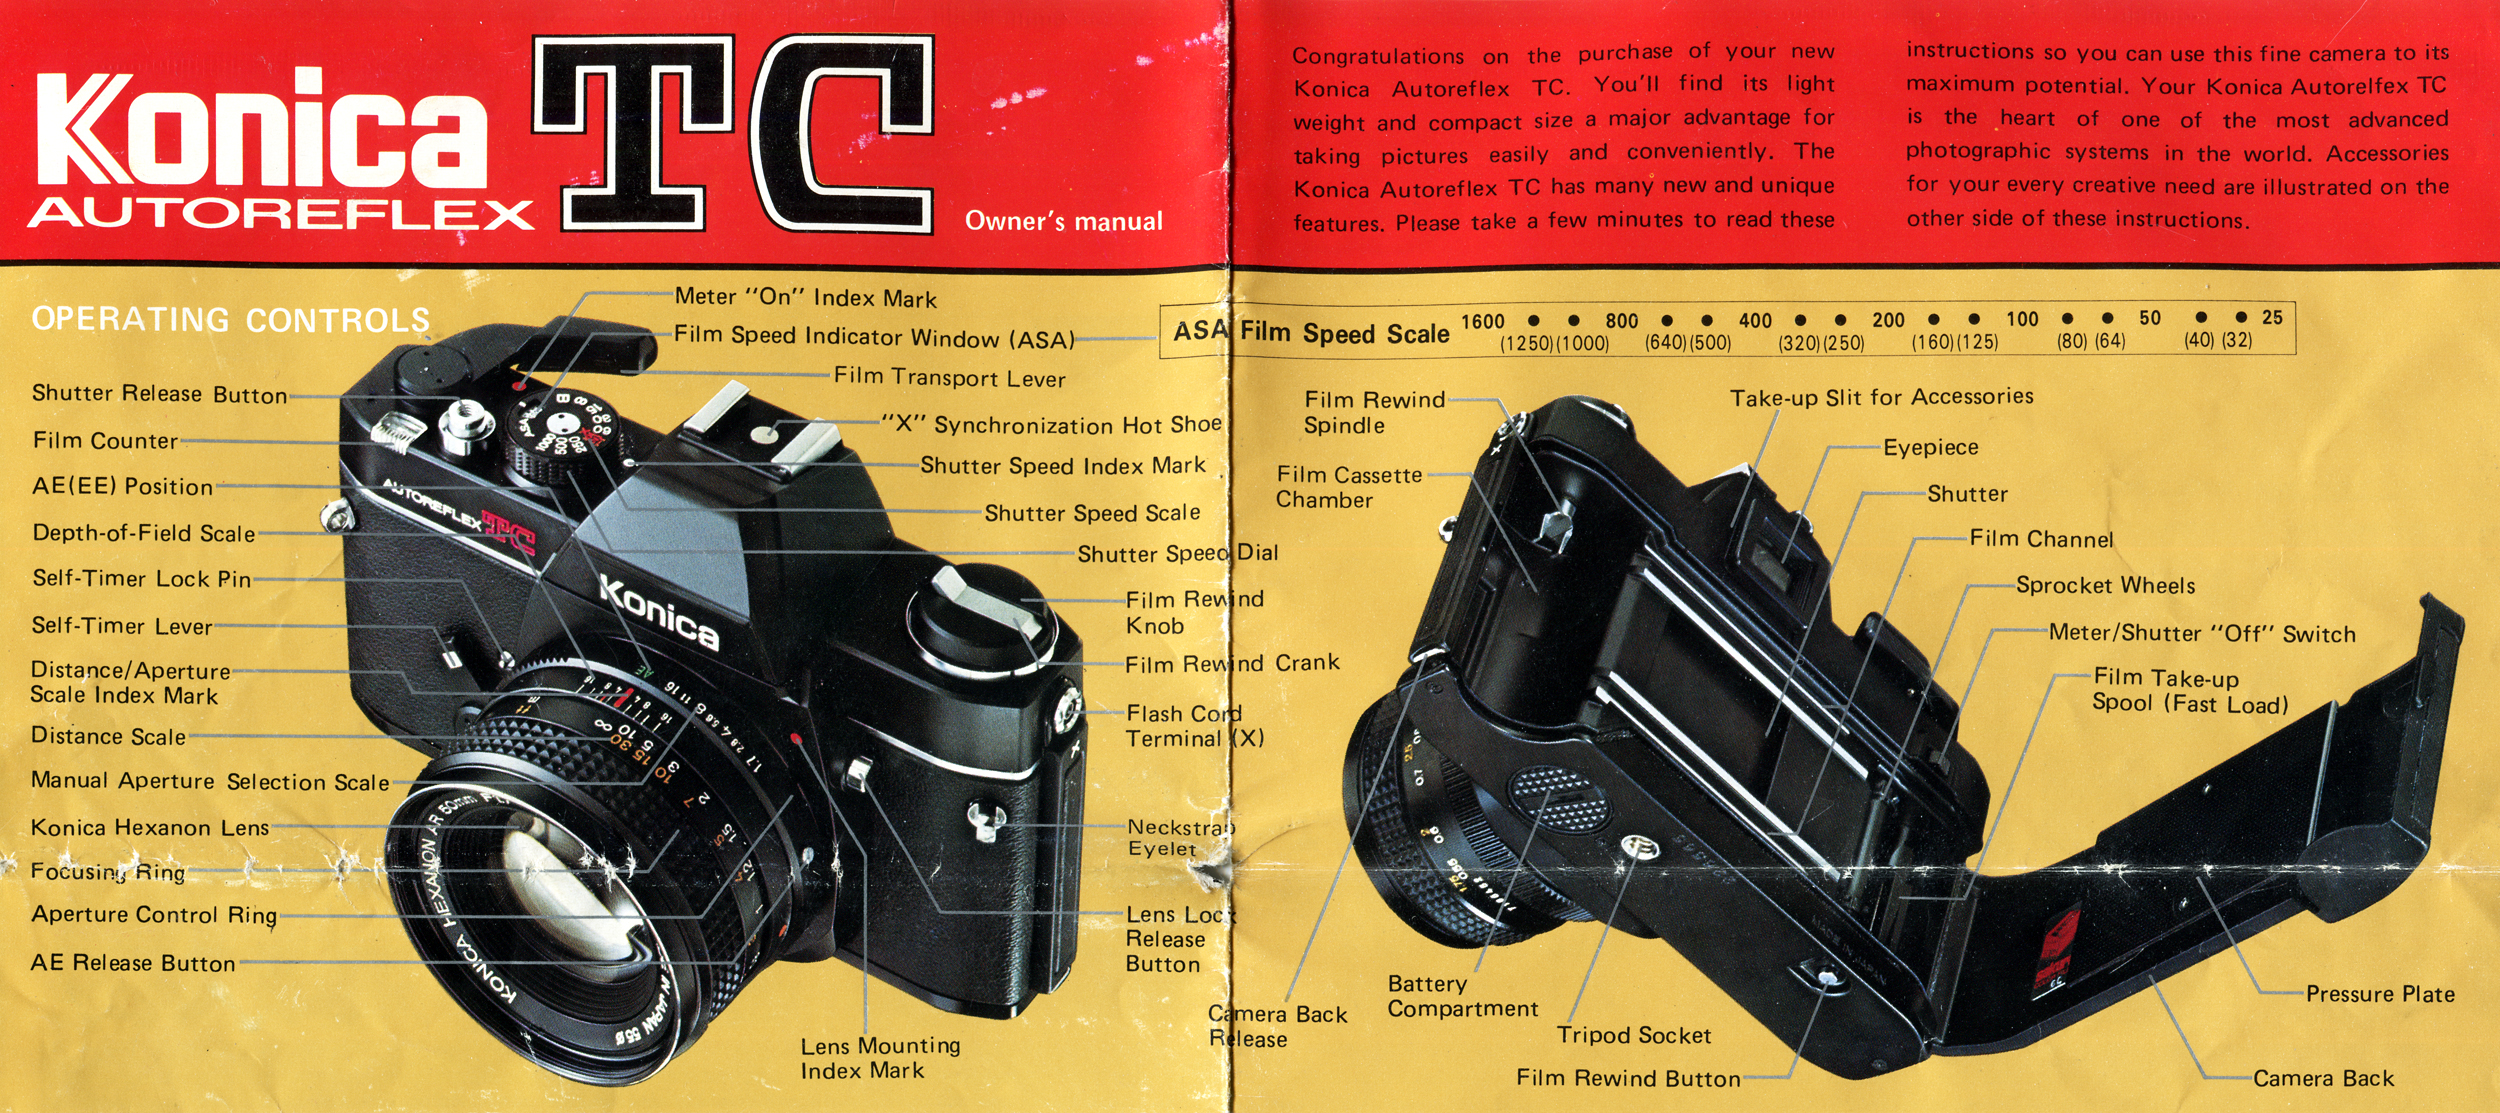
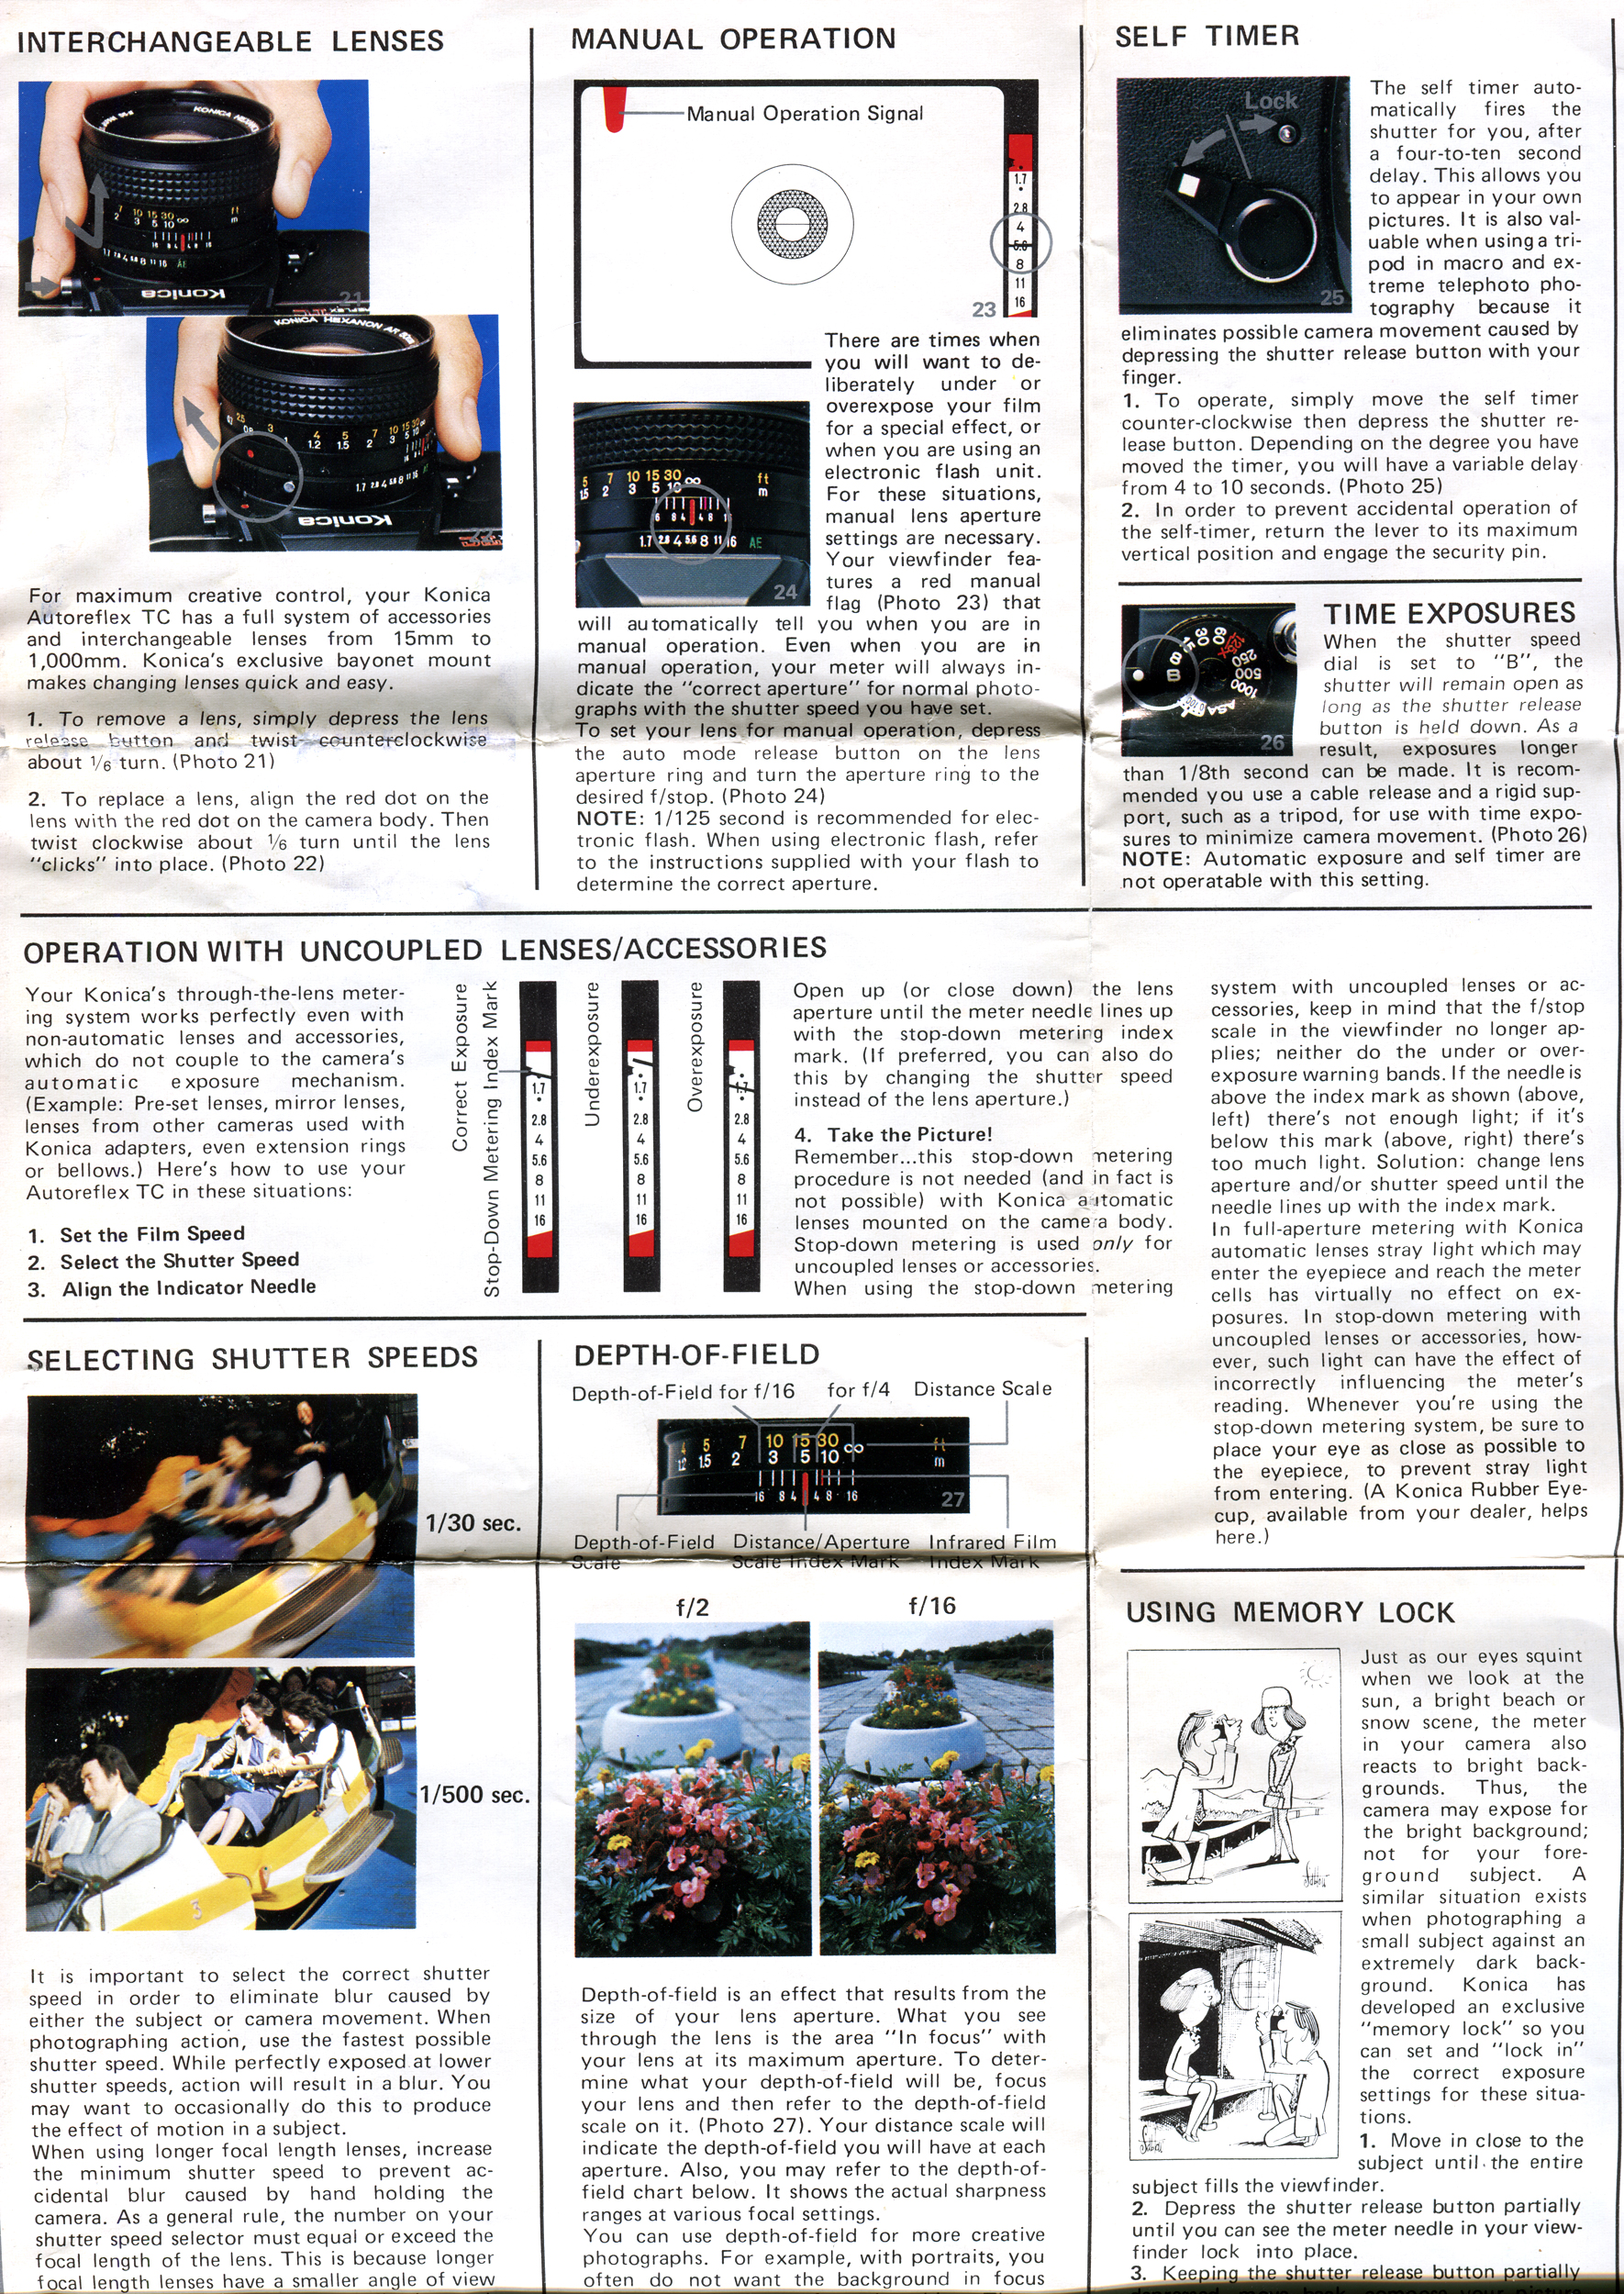
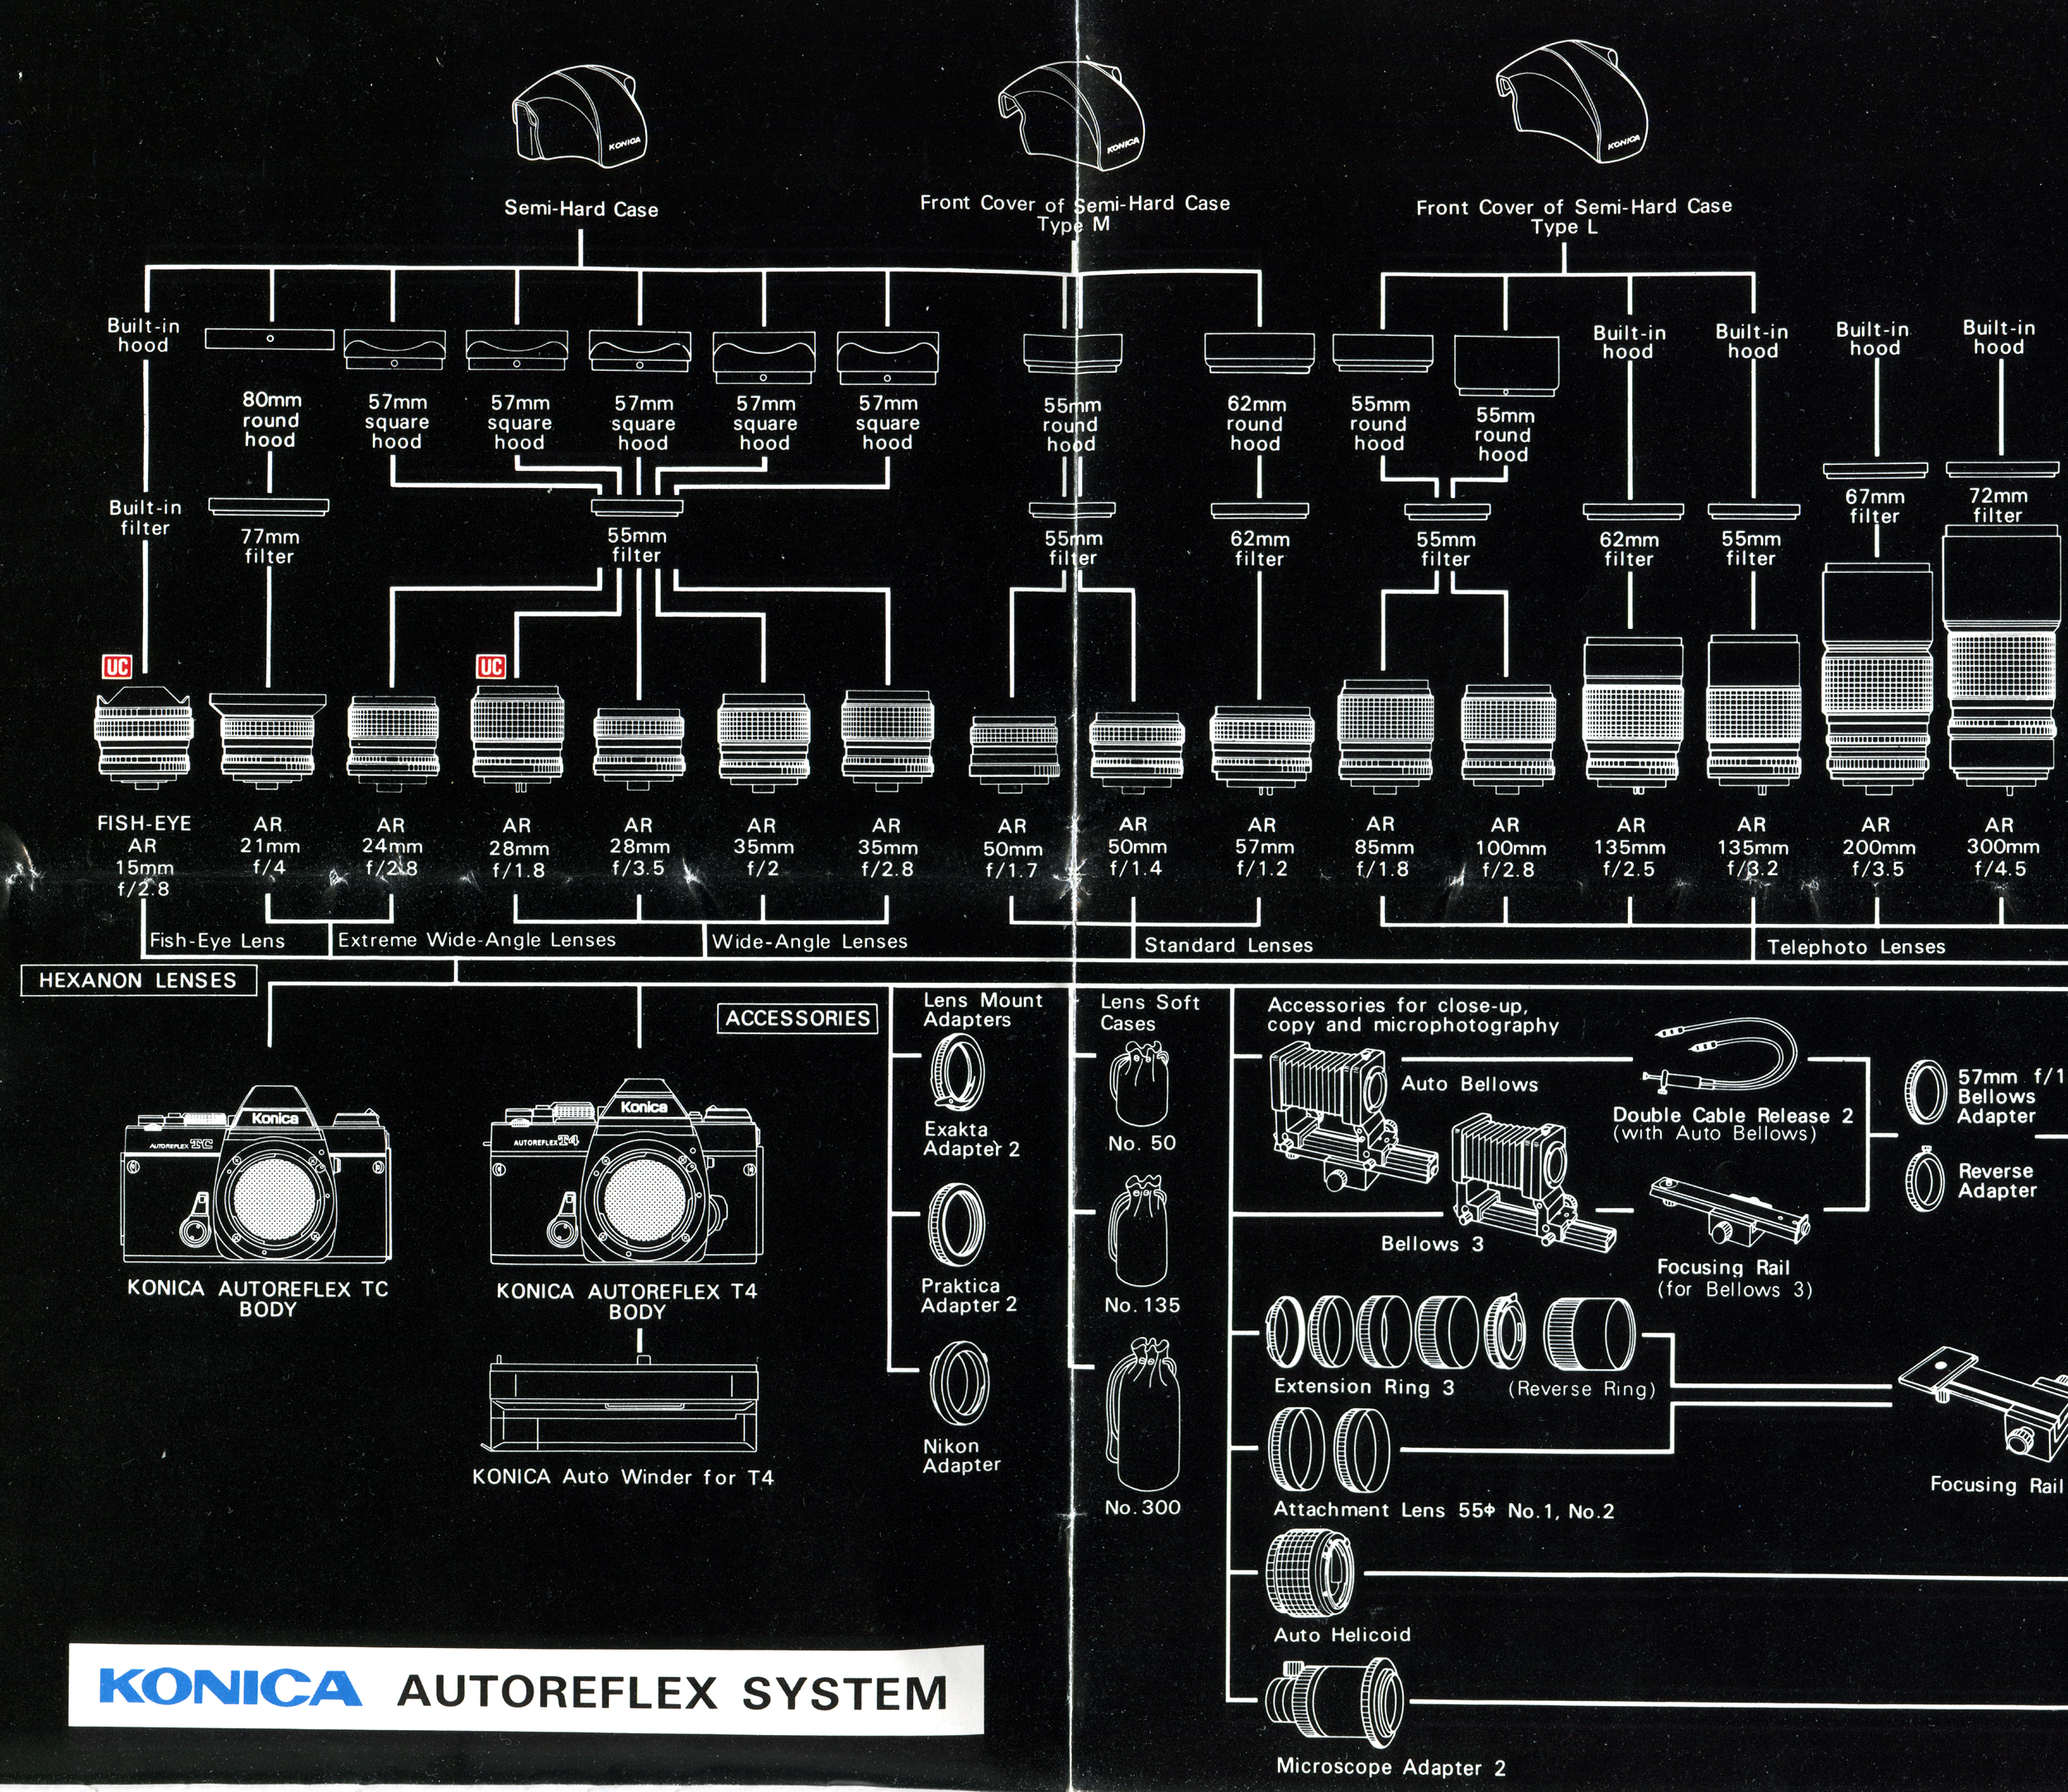
Given the fact that no truly great M42 body was ever produced,, many folks decide to skip them altogether and adapt the lenses to more modern and capable cameras. While M42 lenses can easily be adapted to any modern mirrorless digital system, they cannot be fully adapted with full infinity focus to many film SLR mounts. The popular mounts that can be used with full infinity focusing include: (1) Konica Autoreflex; (2) Praktica PB; (3) Pentax K; (4) Canon EF and FD; and (5) Contax C/Y. None of these cameras permit “true” aperture-priority autoexposure with M42 lenses as they cannot couple to the lenses’ aperture pin. However, aperture-priority operation is still possible, the camera will just not know what aperture the lens is set at and the viewfinder will darken as the lens is stopped down. For those looking for a non-native film camera body to use M42 lenses, there are many alternatives.
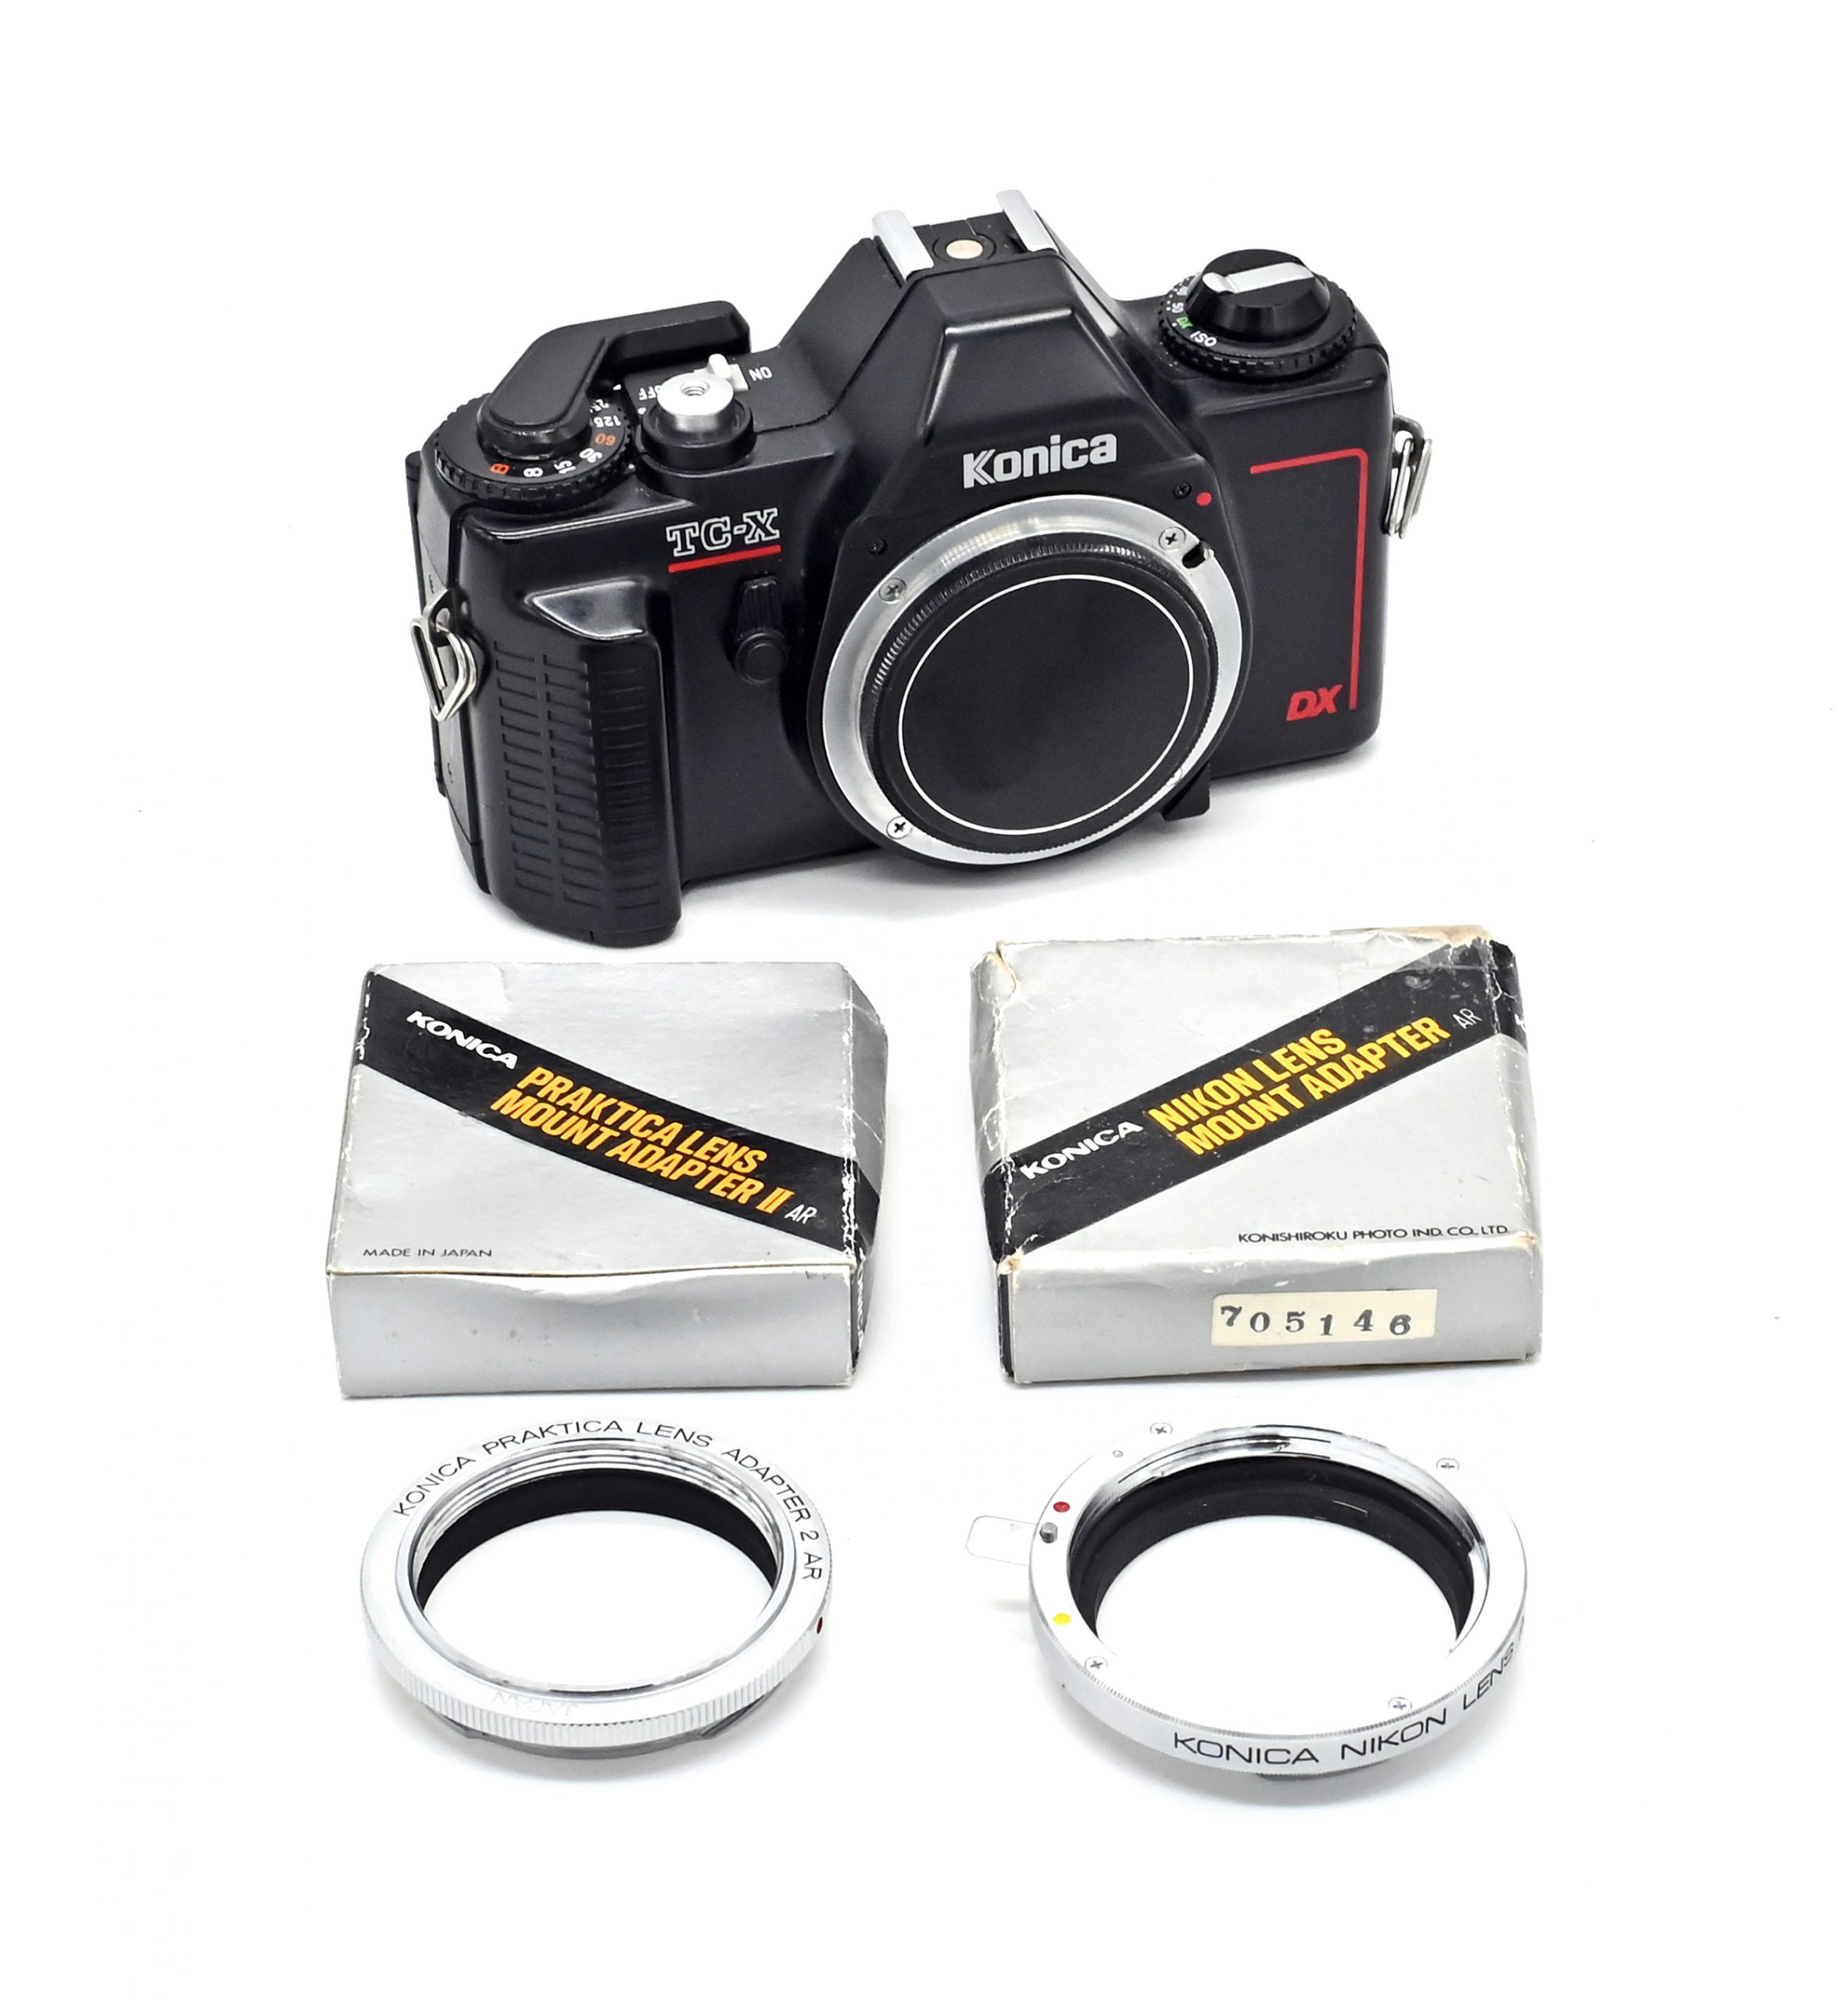
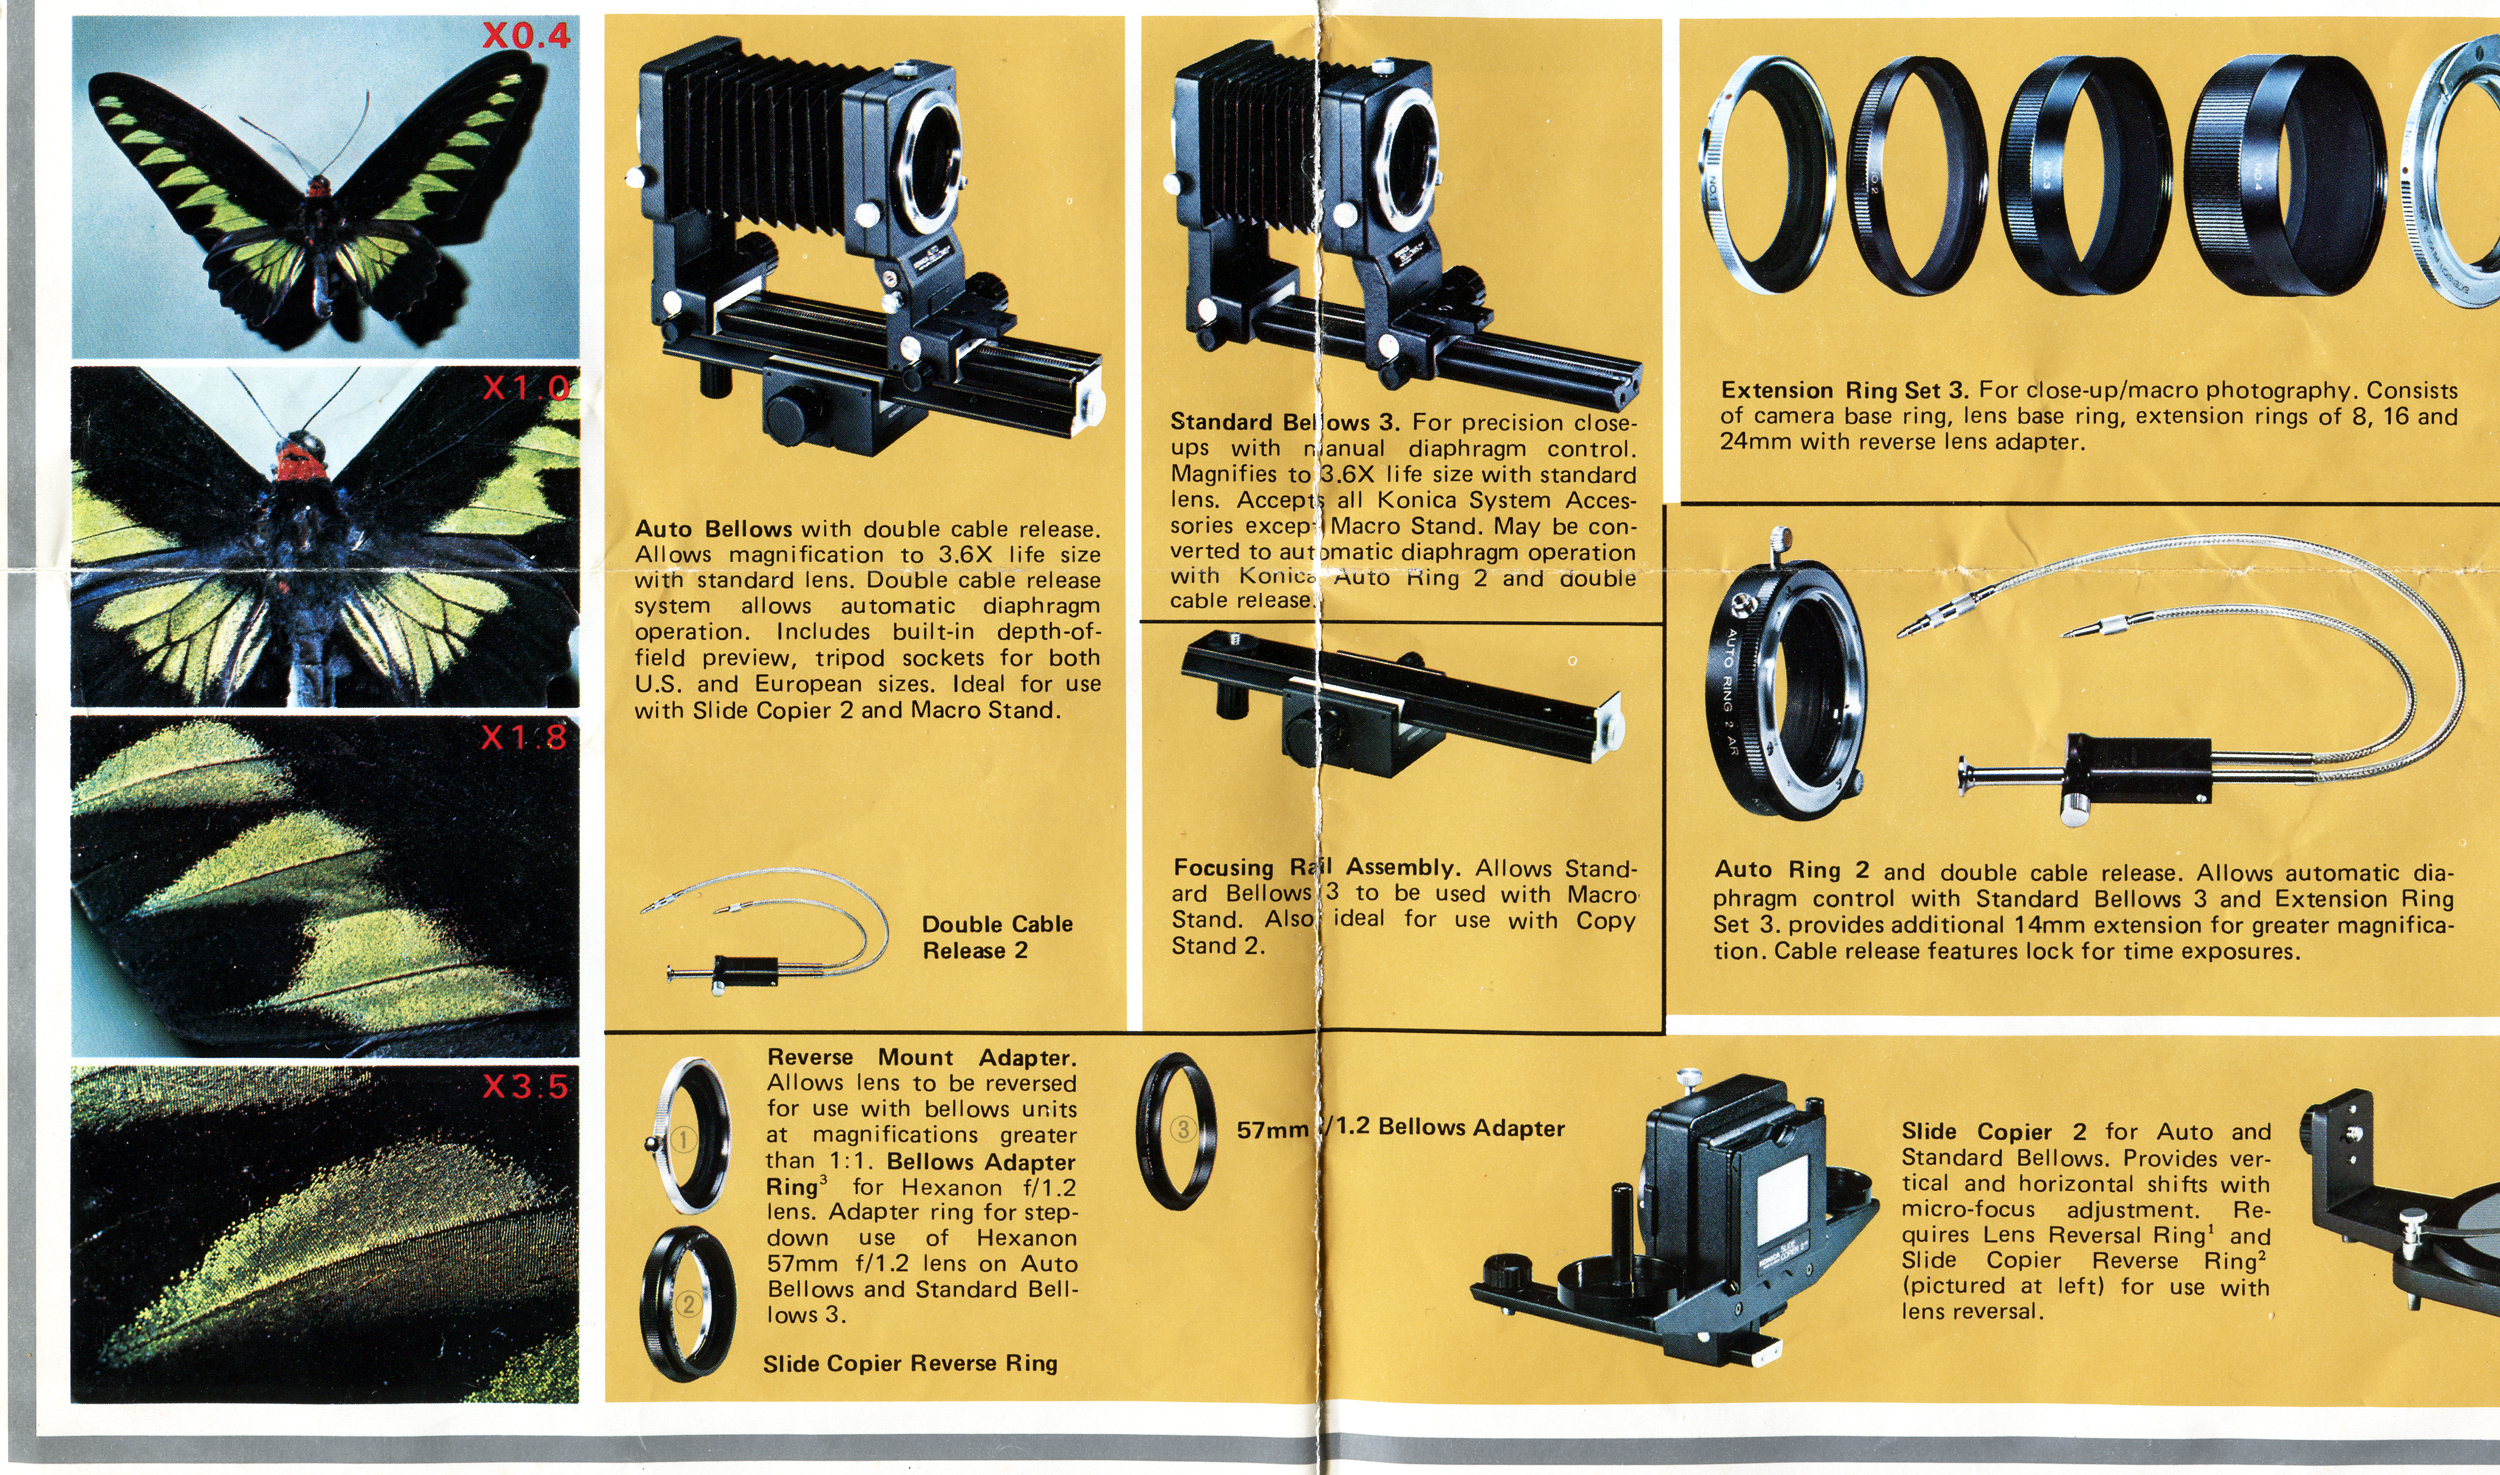
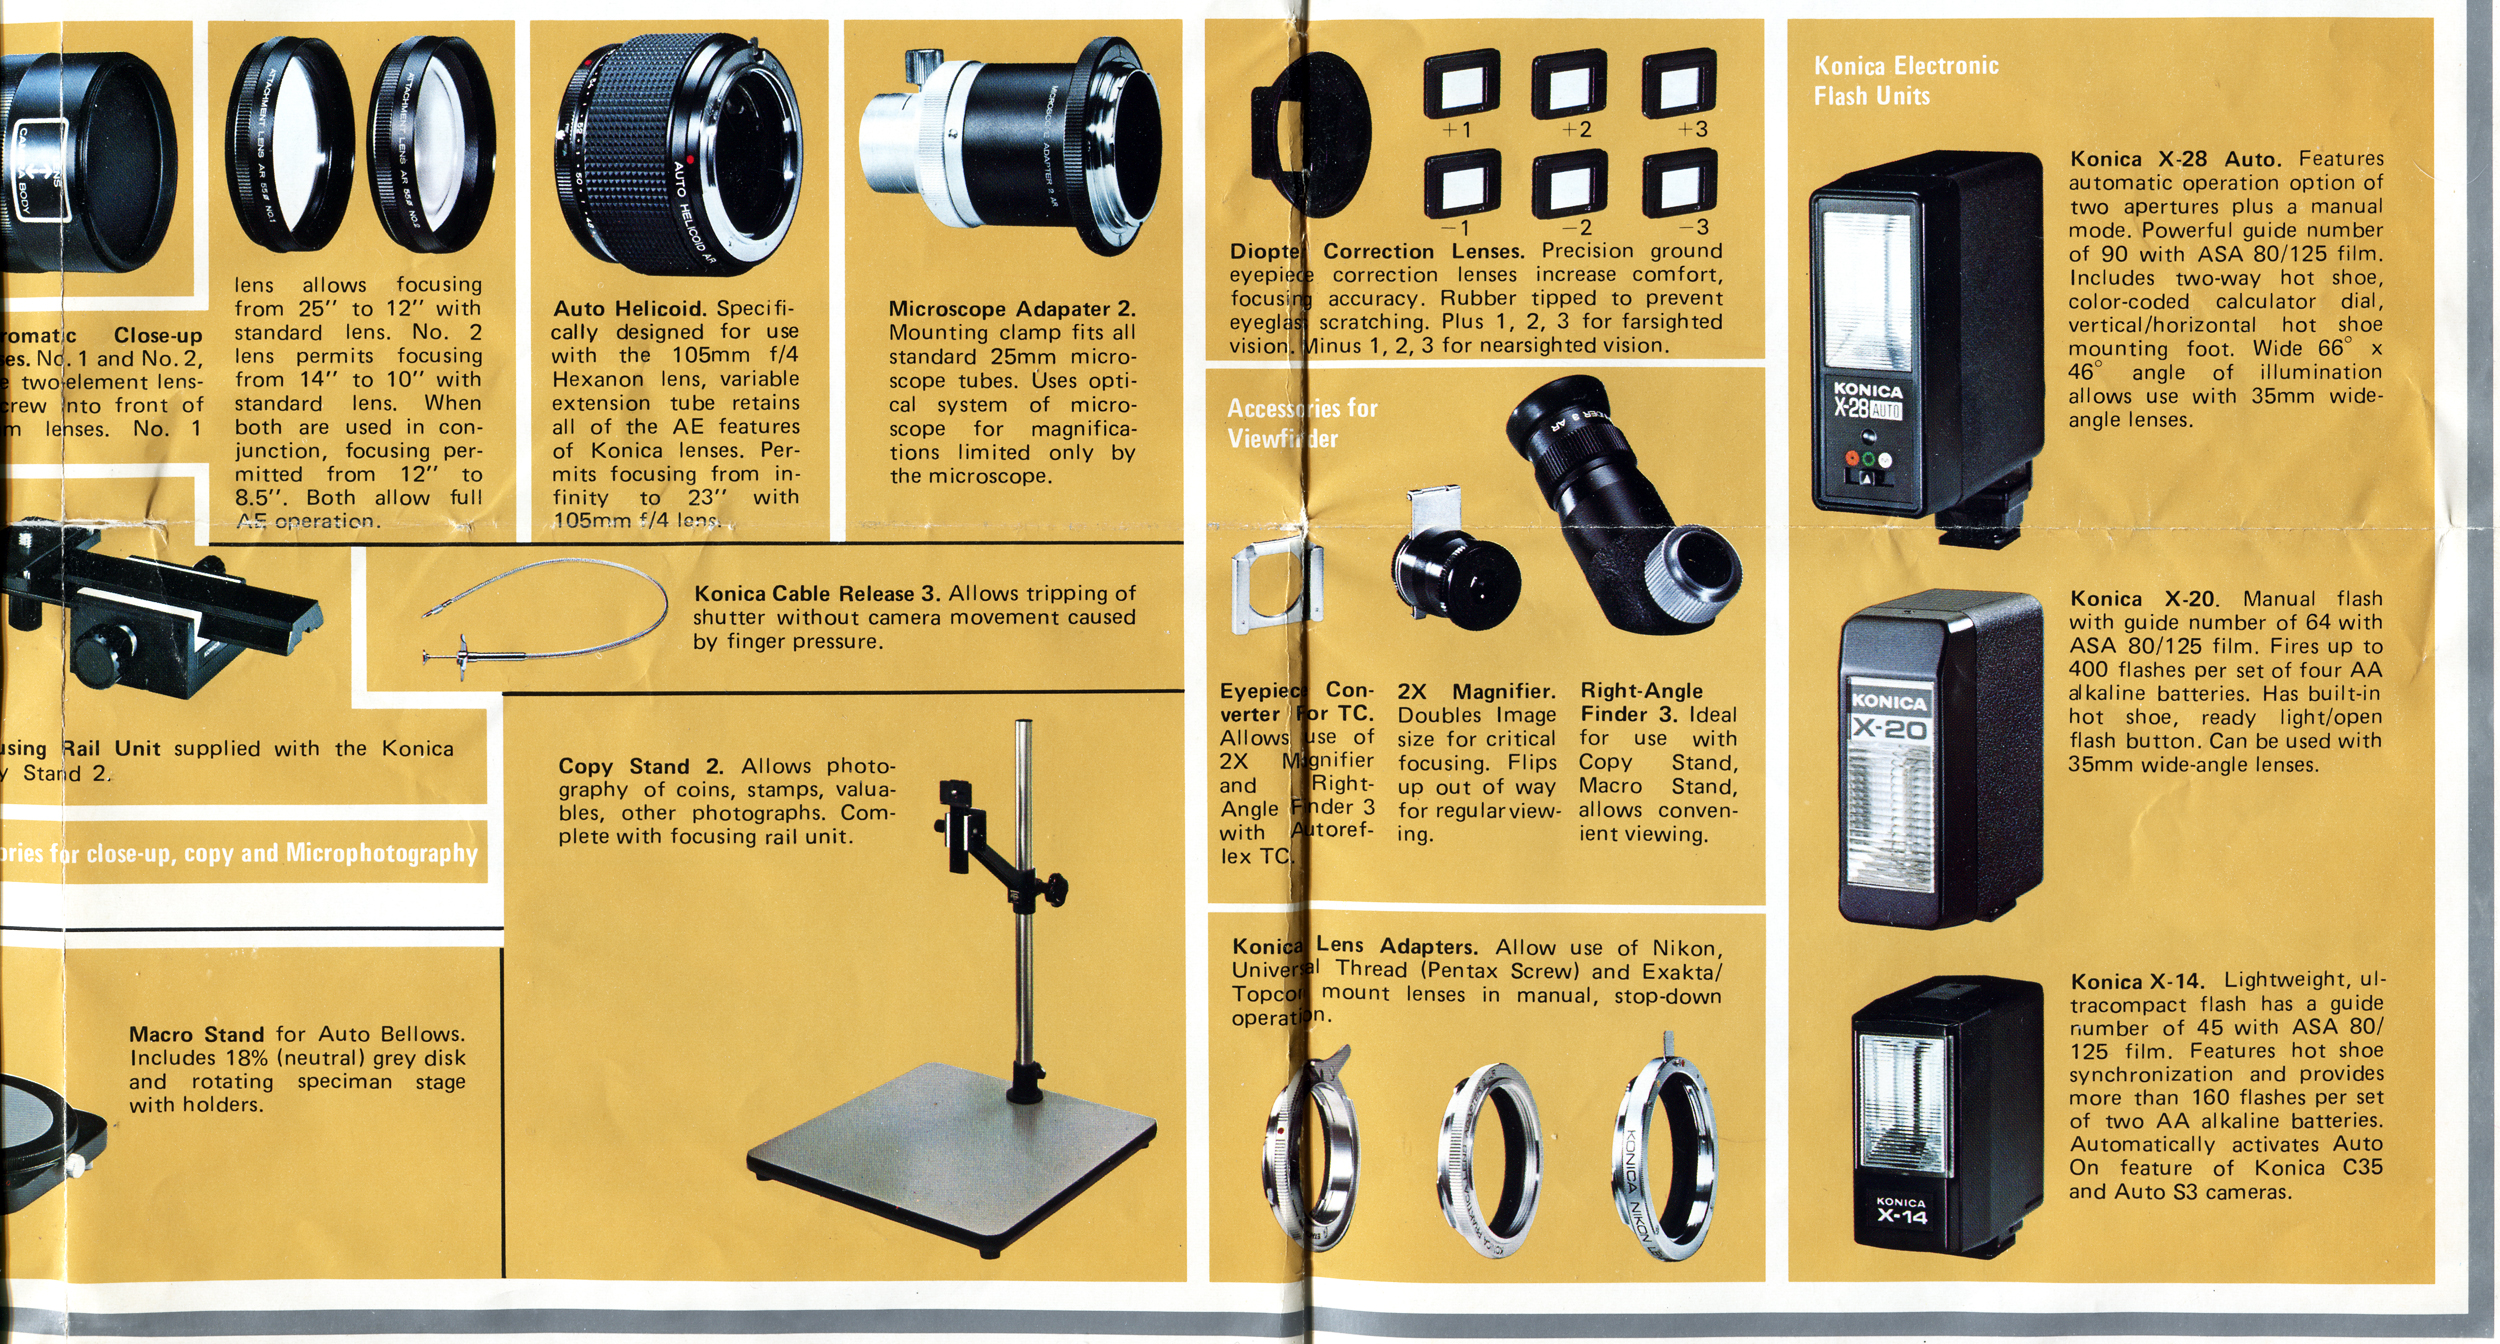
Konica Autoreflex: Konica produced an OEM adapter for M42 lenses, labeled “for Praktica.” However, there are several reasons why Konica AR bodies are not ideal platforms. First, most Konica bodies do not have the brightest viewfinders. Second, the Konica’s shutter-speed priority operation makes metering M42 lenses are bit more difficult. To take a metered shot on an AR body, you first have to focus with the aperture set wide open on the lens. Then, you must stop the lens down and set the appropriate shutter speed to have the Konica body’s metering needle or LED to reach a certain blank spot in the viewfinder above the largest aperture. This operation is necessary because Konica bodies show the aperture in the viewfinder and not the shutter speed. Third, Konica bodies are all limited to a 1/1000 top speed and center-weighted metering. While M42 lenses will work on Konica AR bodies, it is not an ideal second marriage.
Praktica PB: When Praktica switched over from M42 to its bayonet “PB Mount” in 1979, an OEM adapter was initially offered that offered a kind of stop-down aperture-priority metering operation. The higher-end models of Praktica’s PB cameras (like the B200, BC1, and BX20) are actually pretty nice, with brighter focusing screens and better focusing aids than most any other classic 1970s M42 body. The catch is that there is only one available adapter which is fairly rare but not really expensive. The OEM adapter has the correct electrical contact as a Praktica PB camera will not meter a lens that cannot make that contact with the body.
Pentax K: There are few lens mounts as iconic as the Pentax K. Like the Praktica B, an OEM adapter from M42 to K mount was offered to attract the legacy users of the older system. However, no communication between the body and the lens existed, requiring aperture priority, stop-down operation. With so many K-mount cameras produced under so many brands in multiple countries, let’s just pick up the LX as an example. The LX has a top shutter speed of 1/2000, a center-weighted meter, and a bright viewfinder, basically Pentax’s equivalent of the Nikon F3. However, there really is no reason to use Japanese M42 lenses on a Pentax K mount camera because Pentax K-mount lenses are generally regarded as superior to its M42 lenses. At the same time, a camera like the Pentax LX may be a good platform for East German and Soviet lenses, as many of these are sufficiently distinguishable from Pentax lenses to produce different results.
Canon FD/EF: As someone who normally does not use Canon SLR products, I have no firsthand experiences to share. However, there is literally almost 20 years now of internet discussions now about using M42 lenses on Canon digital SLRs. There are certainly some super advanced Canon film SLRs in EF mount that will be able to use M42 lenses at fast shutter speeds, with great viewfinders, motor drives, etc. A quick internet search will reveal dozens of sites and thousands of internet forum postings with useful information if you are looking to go the Canon route.
Contax C/Y: With bright viewfinders, multiple metering modes, top shutter speeds of 1/4000 (up to 1/8000 on the RTS III), relatively quiet shutters, and integrated motor drives, Contax may make the best case (along with Canon) for a non-native M42 lens platform. Various third-party companies make reasonably-priced generic adapters that seem to all operate in the same manner (and all have a little focus slop). Using M42 lenses on Contax bodies is a delight and certainly a good alternative.
Rollei QBM: These cameras are an interesting platform because the OEM adapter allows one to use open-aperture stop down metering with auto diaphragm M42 lenses. This is the only non-native M42 camera body that can do this.
As an addendum to this article, here is a list of M42 camera bodies (post-1948) by technological generation. This is not a complete list and is an ongoing project. I am leaving out Edixa models and most rebadged bodies (Revueflex, Vivitar, Porst, Sears, etc.) for now. Where there is an exact modern silver oxide equivalent to the original battery, that is listed. Where the original battery was a mercury type without an exact silver/alkaline equivalent, the mercury is listed.
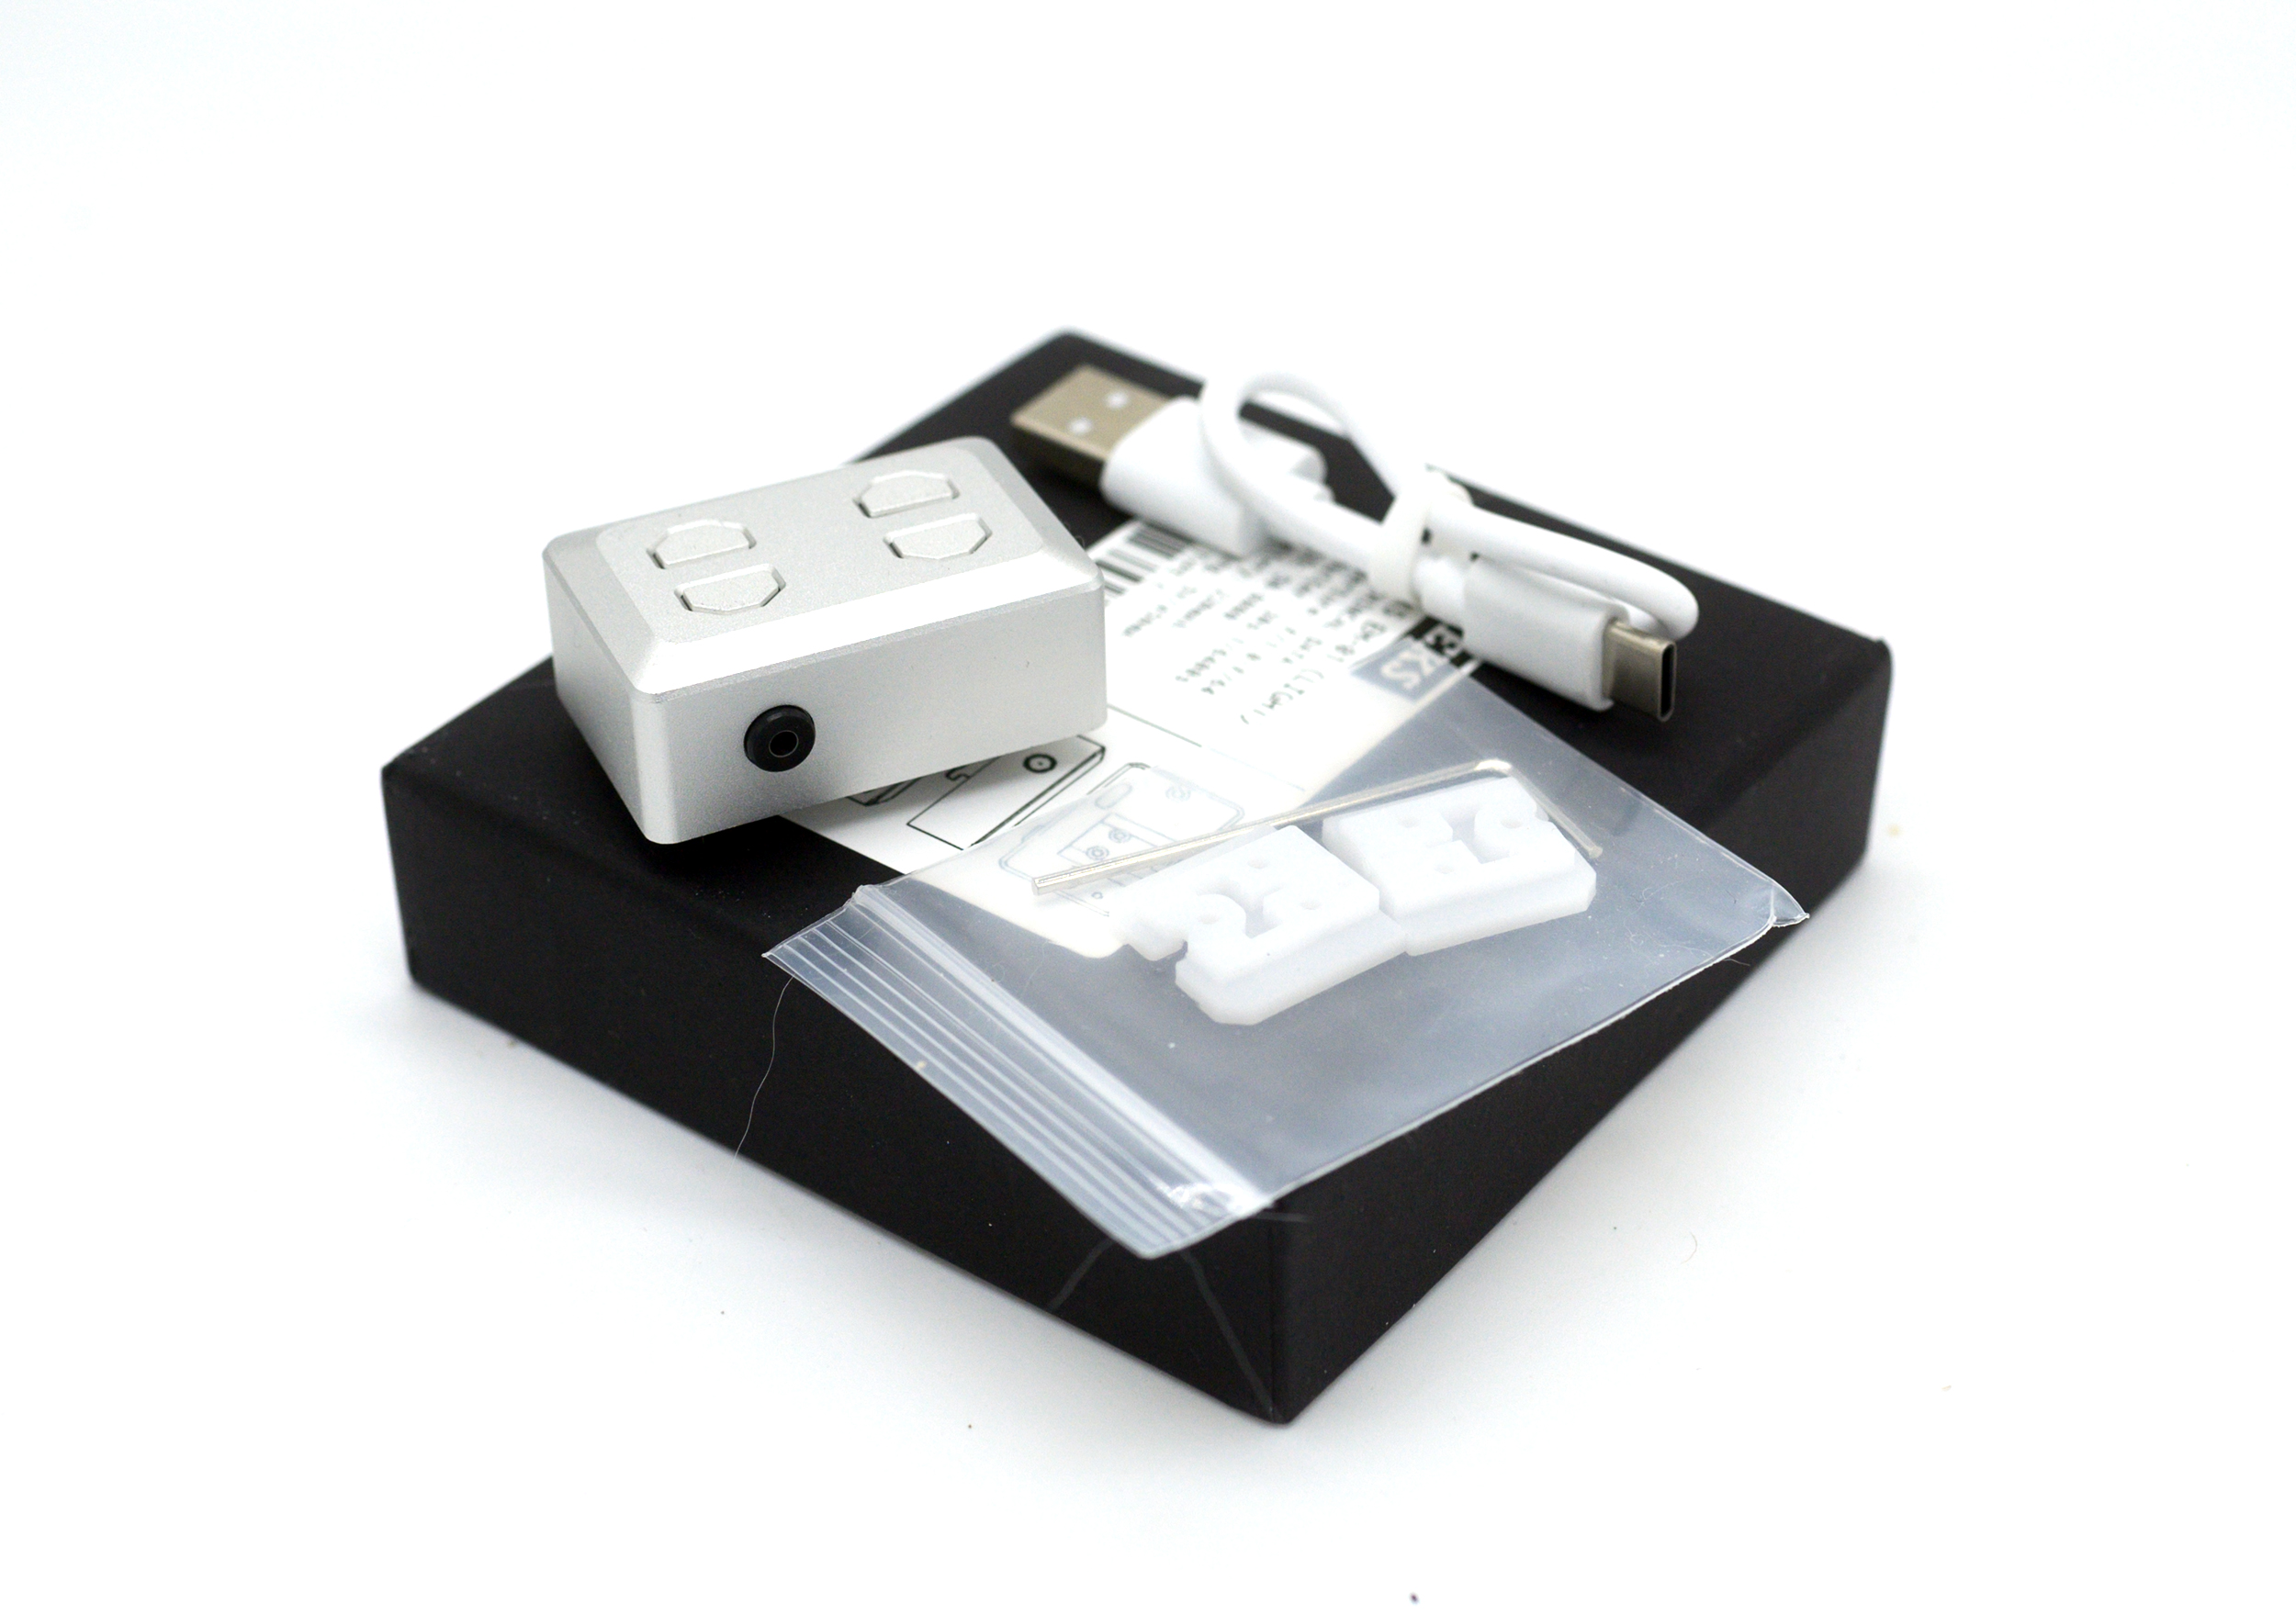
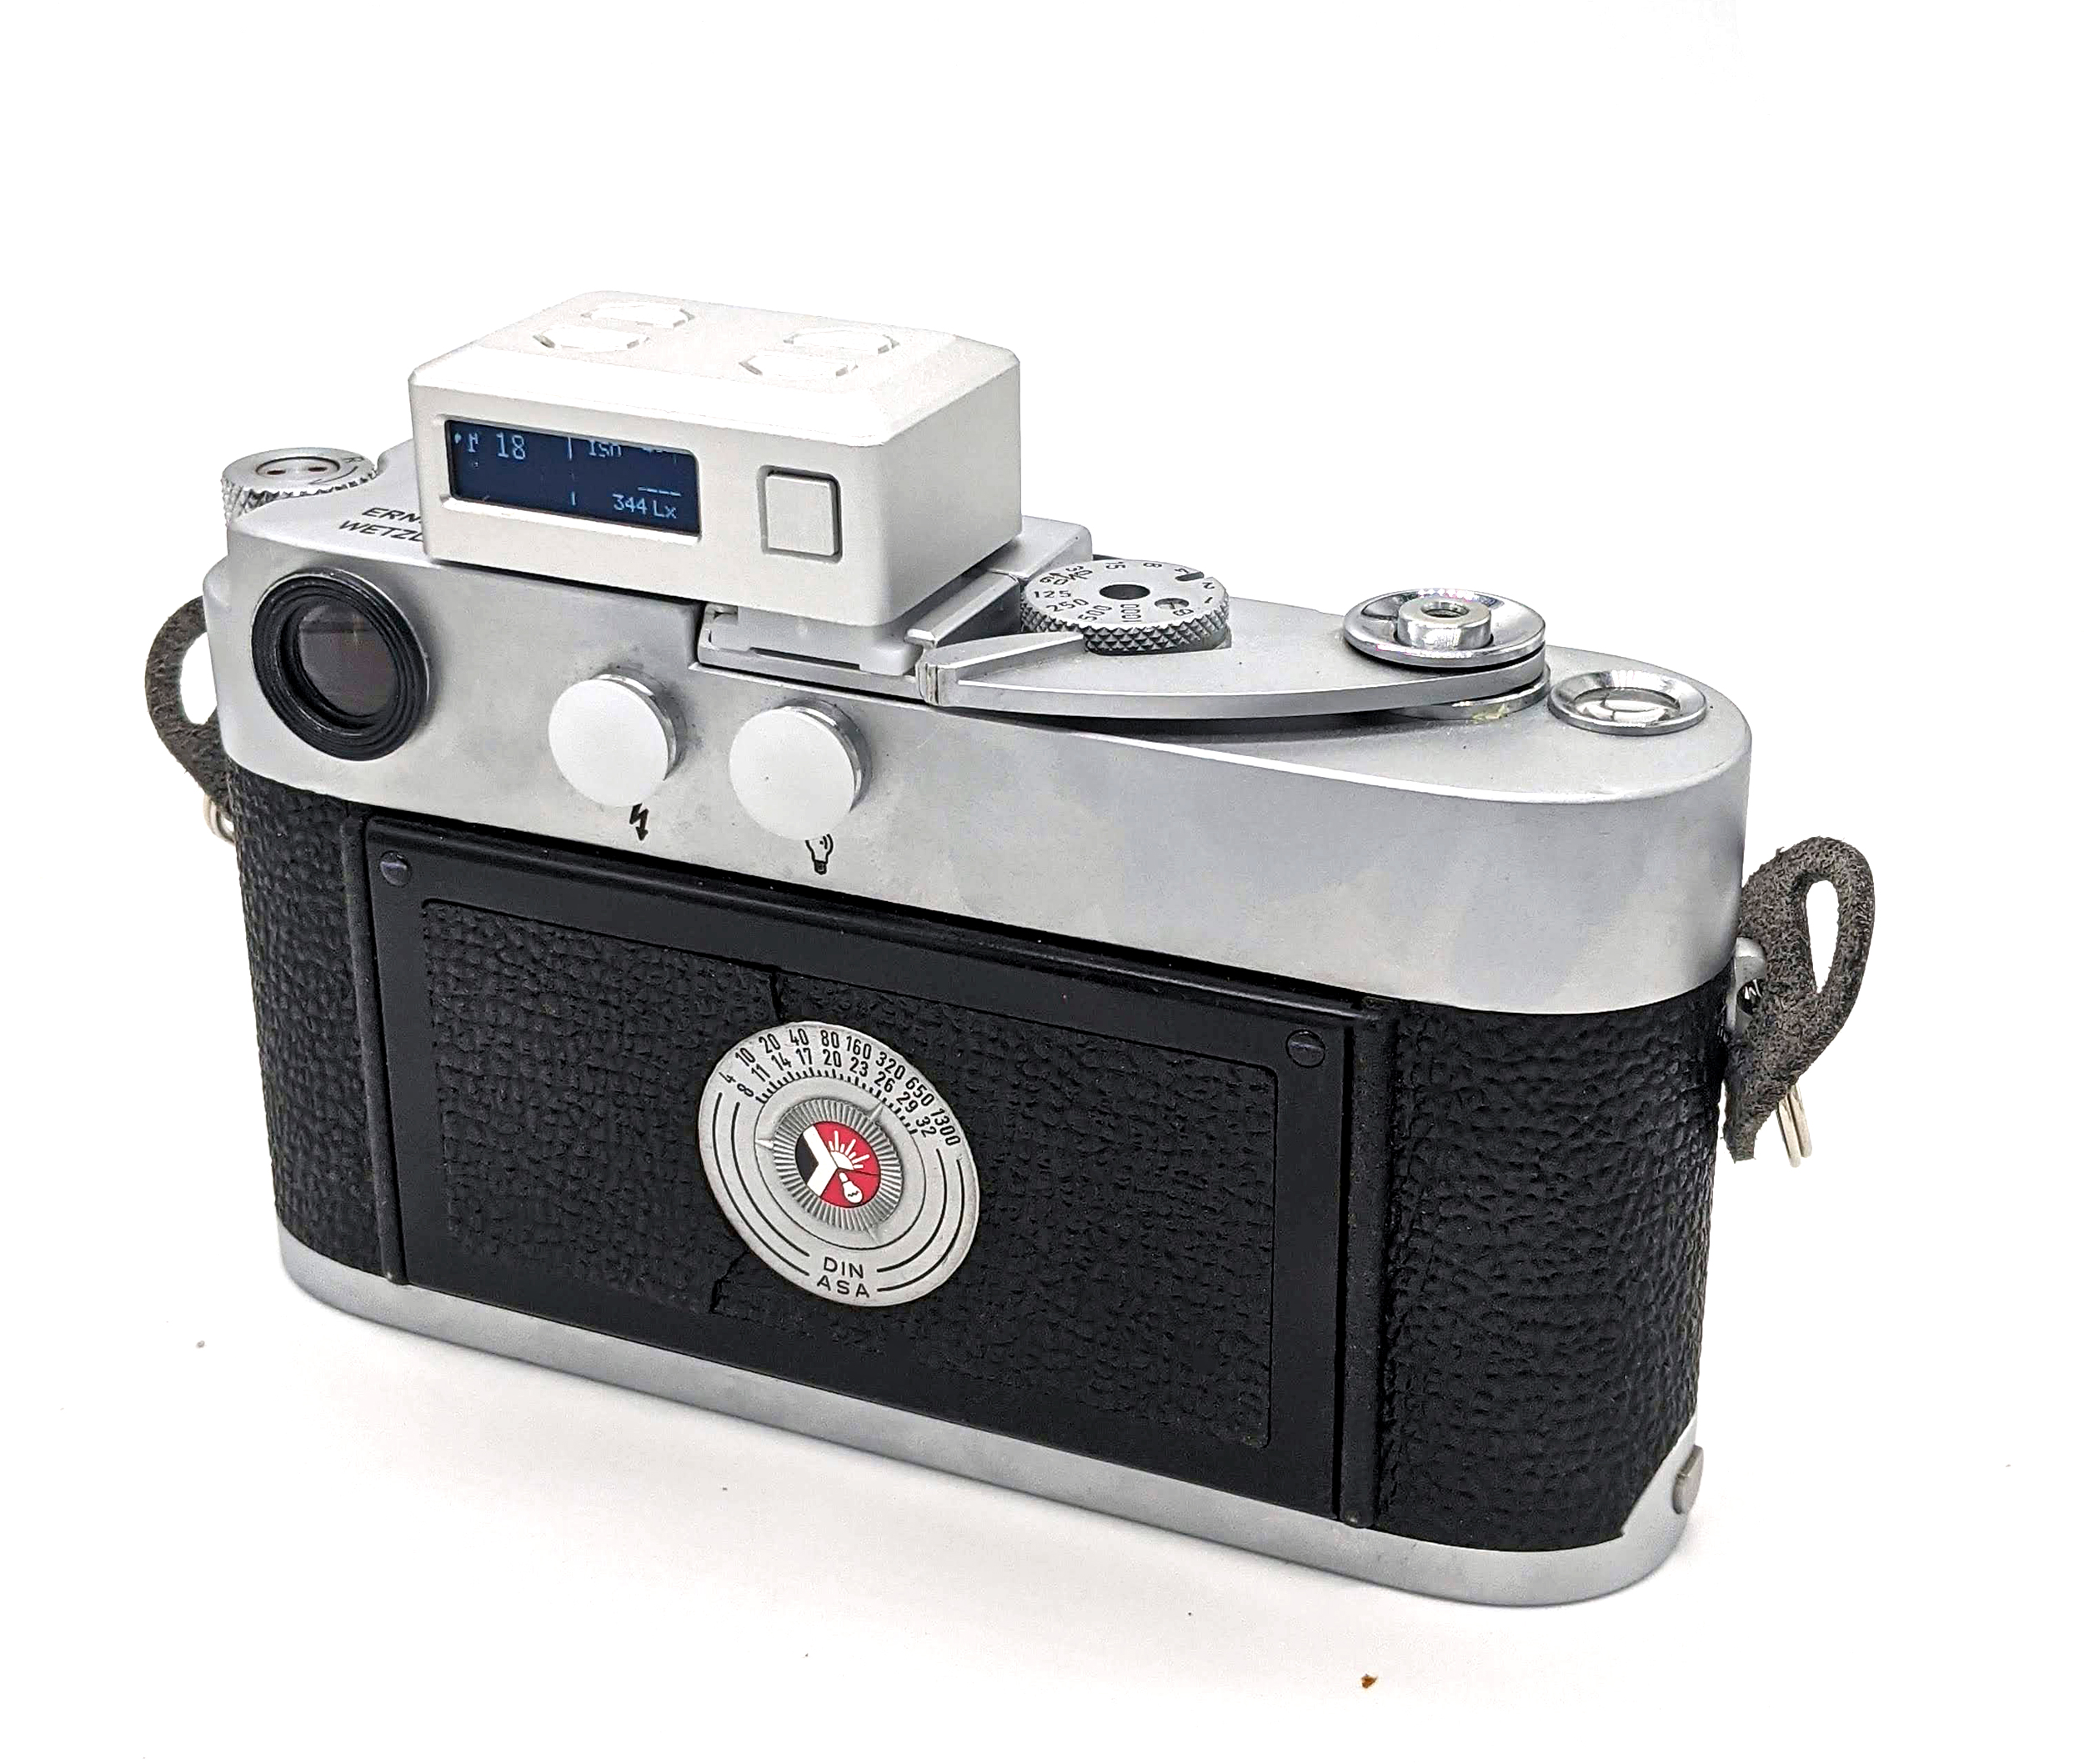
Ca va sans dire that the accurate metering and exposure of a subject is essential for photography. Some photographers swear allegiance to the “Sunny 16 Rule” — and will let you know that they do whenever the subject comes up. Others will say that incident light meters provide the most accurate readings. For most others, the convenience and peace of mind that comes with an electronic light meter reading are essential. Currently (January 2021) coming in about $140 shipped to the USA (if bought directly from Taiwan), will the new Keks EM01 shoe-mount light meter finally encourage you to pull that old meterless camera off the shelf? There is not a whole lot to say about this wonderful little meter, but here are some impressions.
What’s In the Box?
The EM01 comes in a nice little presentation box that includes: (1) the unit itself; (2) a USB-C to USB-A cable; and (3) modular plastic shoe mounts in various thicknesses (Keks also offers optional aluminum mounts for extra). Keks warns the user not to use a USB-C to USB-C charging arrangement, or any charging mechanism that exceeds 5 volts. The standard meter comes in either silver or black.
The first thing one will want to do is determine the correct shoe for your application and use the included allen key to install it. Otherwise, the EM01 will slide right off the camera. The EM01 allows you to install the shoe mount in the center of the unit or offset (for use with multiple hot/cold shoe accessories). However, I find that even the thickest plastic shoe is not quite thick enough to fully secure the meter on certain cold shoes on older cameras. For future models of the light meter, Keks should consider going with a traditional screw-in mechanism to secure the meter to the camera.
Operation
The EM01 has a 30 degree metering angle, which is the equivalent of an 80mm lens view. By way of comparison, the old dedicated Leica MR meters have a 27 degree angle of view (90mm lens view). In regular 35mm cameras terms, 30 degrees is tighter than a traditional internal “center weighted” meter but not close to a traditional “spot” meter (which are usually around 5 degrees or less).
The specifications are impressive, if not standard, in better light meters. The ASA range is 50 to 8000. Aperture range is from f/1.0 to f/64. The shutter sped range is 30 seconds to 1/6400 second. These capabilities should be able to cover the functionality of almost any older and desirable meterless camera.
The EM01 has five unmarked buttons. The button on the back triggers the meter. The unmarked two buttons on the top left change the desired aperture, and the two unmarked buttons of the top right change the desired shutter speed. To adjust the film speed rating, hold the top left button while hitting the metering button to increase the ASA, and hold the lower left button to decrease it. The OLED display displays the f-stop, the shutter speed, ASA, the EV value, and the lumens.
Of all currently-available shoe mount light meters, the EM01 seems to “match” older cameras well from an aesthetic perspective (if such things are important to you).
Note: Like many LED displays, they are nearly impossible to see if one is wearing polarized sunglasses. Keep that in mind.
Looks Pretty Good on a Leica M3
Accuracy
Tested against a Nikon Z6 with center weighted metering (which of course evaluates a wider view than the EM01 with wide and normal lenses), the EM01 performs admirably. In uniform lighting conditions, they match almost all of the time. In mixed landscape scenes, they also generally line up. Because most films have some exposure latitude, a difference of a half-stop is not going to make or break a photo.
As with any reflected-light meter, they are not foolproof. In difficult and/or mixed lighting situations, an average 30 degree meter if pointed at the center of a scene may underexpose if there is a large portion bright sky in the frame, or overexpose if the scene is dominated by dark shades. In challenging lighting conditions, your best best is going to be moving physically closer and taking a meter reading of what portion of the scene should be correctly exposed — or use a best guess in compensating exposure manually.
Conclusions
Unlike the old days, these days, there are certainly plenty of old and new shoe mount light meters available — some cheaper, some more expensive. For older meterless Leica M, it would be hard to go wrong with a working MR or MR-4 meter as it will permit coupling directly with the shutter speed dial. Whether one or another aftermarket shoe-mounted light meter is “better” will invariably come down to personal preference. The expensive Voigtlander VC II meter has manual style knobs and lighted arrow operation. The Sekonic L-208 is rather awkward to shoe-mount, but has the capability for incident metering. The Reveni light meter has the exposure information on the top rather than on the back.
It would be nice if a manufacturer would consider recreating or redesigning the dedicated meters for Leica and Nikon rangefinders — ones that would directly couple the the camera’s shutter speed dial. However, because that day may/will never come, the EM01 remains a very nice little unit that will hopefully encourage more folks to dust off their meterless 35mm and medium format cameras.
If you enjoyed this article and/or disagree with the opinions expressed herein, please feel free to leave a comment!
From the late 1940s through the 1950s, Leica, Contax, and Nikon were in serious competition in the interchangeable-lens 35mm rangefinder market. While Contax and Nikon rangefinders share the same physical lens mount, Nikon chose to use Leica’s registration distance (51.6mm) rather than Contax’s (52.4mm). As a result, all but the widest angle lenses were not quite compatible between the Contax and Nikon systems. While Nikon did produce a number of its S-mount lenses for the Leica M39 standard, Contax produced very few (usually just its 50mm f/1.5). Even back during the 1950s, there was interest in adapting native Nikon and Contax rangefinder lenses directly to M39, with two companies (Cooke in the UK and Orion in Japan) fabricating adapters in small quantities.
Four adapter options currently exist that permit rangefinder coupling of most (but not all) Nikon S-mount rangefinder lenses to the Leica standard.
Manufacturer
Adapter
Lenses
Min. Focus
Price
Amedeo
Leica M
50mm / External Only
0.7m
$250
Amedeo
Leica M
Universal / Internal & External
0.9m
$350
Amedeo
Leica M39
Universal / Internal & External
0.9m
$400
Coiro Optics
Leica M
Universal / Internal & External
0.7m
$420
Although these adapters are pretty great, some of the most desirable Nikon S-mount lenses are not compatible with them, not because of the adapter itself but because those lenses’ design interferes with a Leica’s rangefinder cam. Here is a compatibility chart of the adapters and Nikon S-mount lenses.
Lens
Elements/Groups
Min. Focus
M39 Version?
Compatible?
21mm f/4 Nikkor-O
8/5
0.9m
Yes (Rare)
No
21mm f/4.5 Zeiss Biogon
8/5
1.0m
No
With M39 Adapter
25mm f/4 W-Nikkor
4/4
0.9m
Yes (Rare)
No
28mm f/3.5 W-Nikkor
6/4
0.9m
Yes
Yes?
35mm f/1.8 W-Nikkor
7/5
0.9m
Yes (Rare)
No
35mm f/2.5 W-Nikkor
6/4
0.9m
Yes
Yes
35mm f/3.5 W-Nikkor
4/3
0.9m
Yes
Yes
50mm f/1.1 Nikkor N.C.
9/7
0.9m
Yes (Rare)
No
50mm f/1.4 Nikkor S.C.
7/3
0.9m
Yes
Yes
50mm f/1.4 Nikkor (“Olympic”)
7/5
0.9m
No
Yes
50mm f/1.4 Nikkor (“2000”)
7/5
0.9m
No
Yes
50mm f/2 Nikkor H.C.
6/3
0.9m
Yes
Yes
50mm f/3.5 Micro Nikkor
5/4
0.9m (0.45m)
Yes (Rare)
Yes
85mm f/1.5 Nikkor S.C.
7/3
1.0m
Yes (Rare)
Yes
85mm f/2 Nikkor P.C.
5/3
1.0m
Yes
Yes
105mm f/2.5 Nikkor P.C.
5/3
1.2m
Yes
Yes
135mm f/3.5 Nikkor Q.C.
4/4
1.5m
Yes
Yes
So why would you want to adapt Nikon S lenses to Leica? Well, for those invested in both systems, having an adapter would make sense. Furthermore, certain compatible lenses tend to be a little cheaper in Nikon mount than in M39, like the excellent 35mm f/2.5, the iconic 105mm f/2.5, and and the 50mm f/3.5 Micro Nikkor (if you can find one). If you have the 2000 version of the 50mm f/1.4 Olympic Nikkor, that provides a fast, capable, and affordable alternative to the Leica Summiluxes. Otherwise, because there are M39 versions of the compatible Nikon S lenses, one could just go that route.
The only major issue with the various Nikon S to Leica M adapters is that they will all bring up the 50mm frameline on a Leica body, regardless of the focal length of the adapted lens. Thus, if using a 35mm or 105mm Nikon lens, you would have to manually use the Leica frame preview lever for the appropriate frameline. This would obviously not be an issue on the Voigtlander Bessa M-mount cameras, as those cameras permit the manual selection of the framelines.
If using Nikon S lenses on a native Leica M body other than the 50mm models, a better choice may be the Amedeo M39 adapter. Not only will you be able to use compatible Nikon S lenses on all M39 camera bodies, but you can use the appropriate M39 to M adapter to bring up the correct frameline on a native Leica M body. If looking to adapt a variety of Nikon S lenses to Leica, the Amedeo M39 adapter may be the way to go.
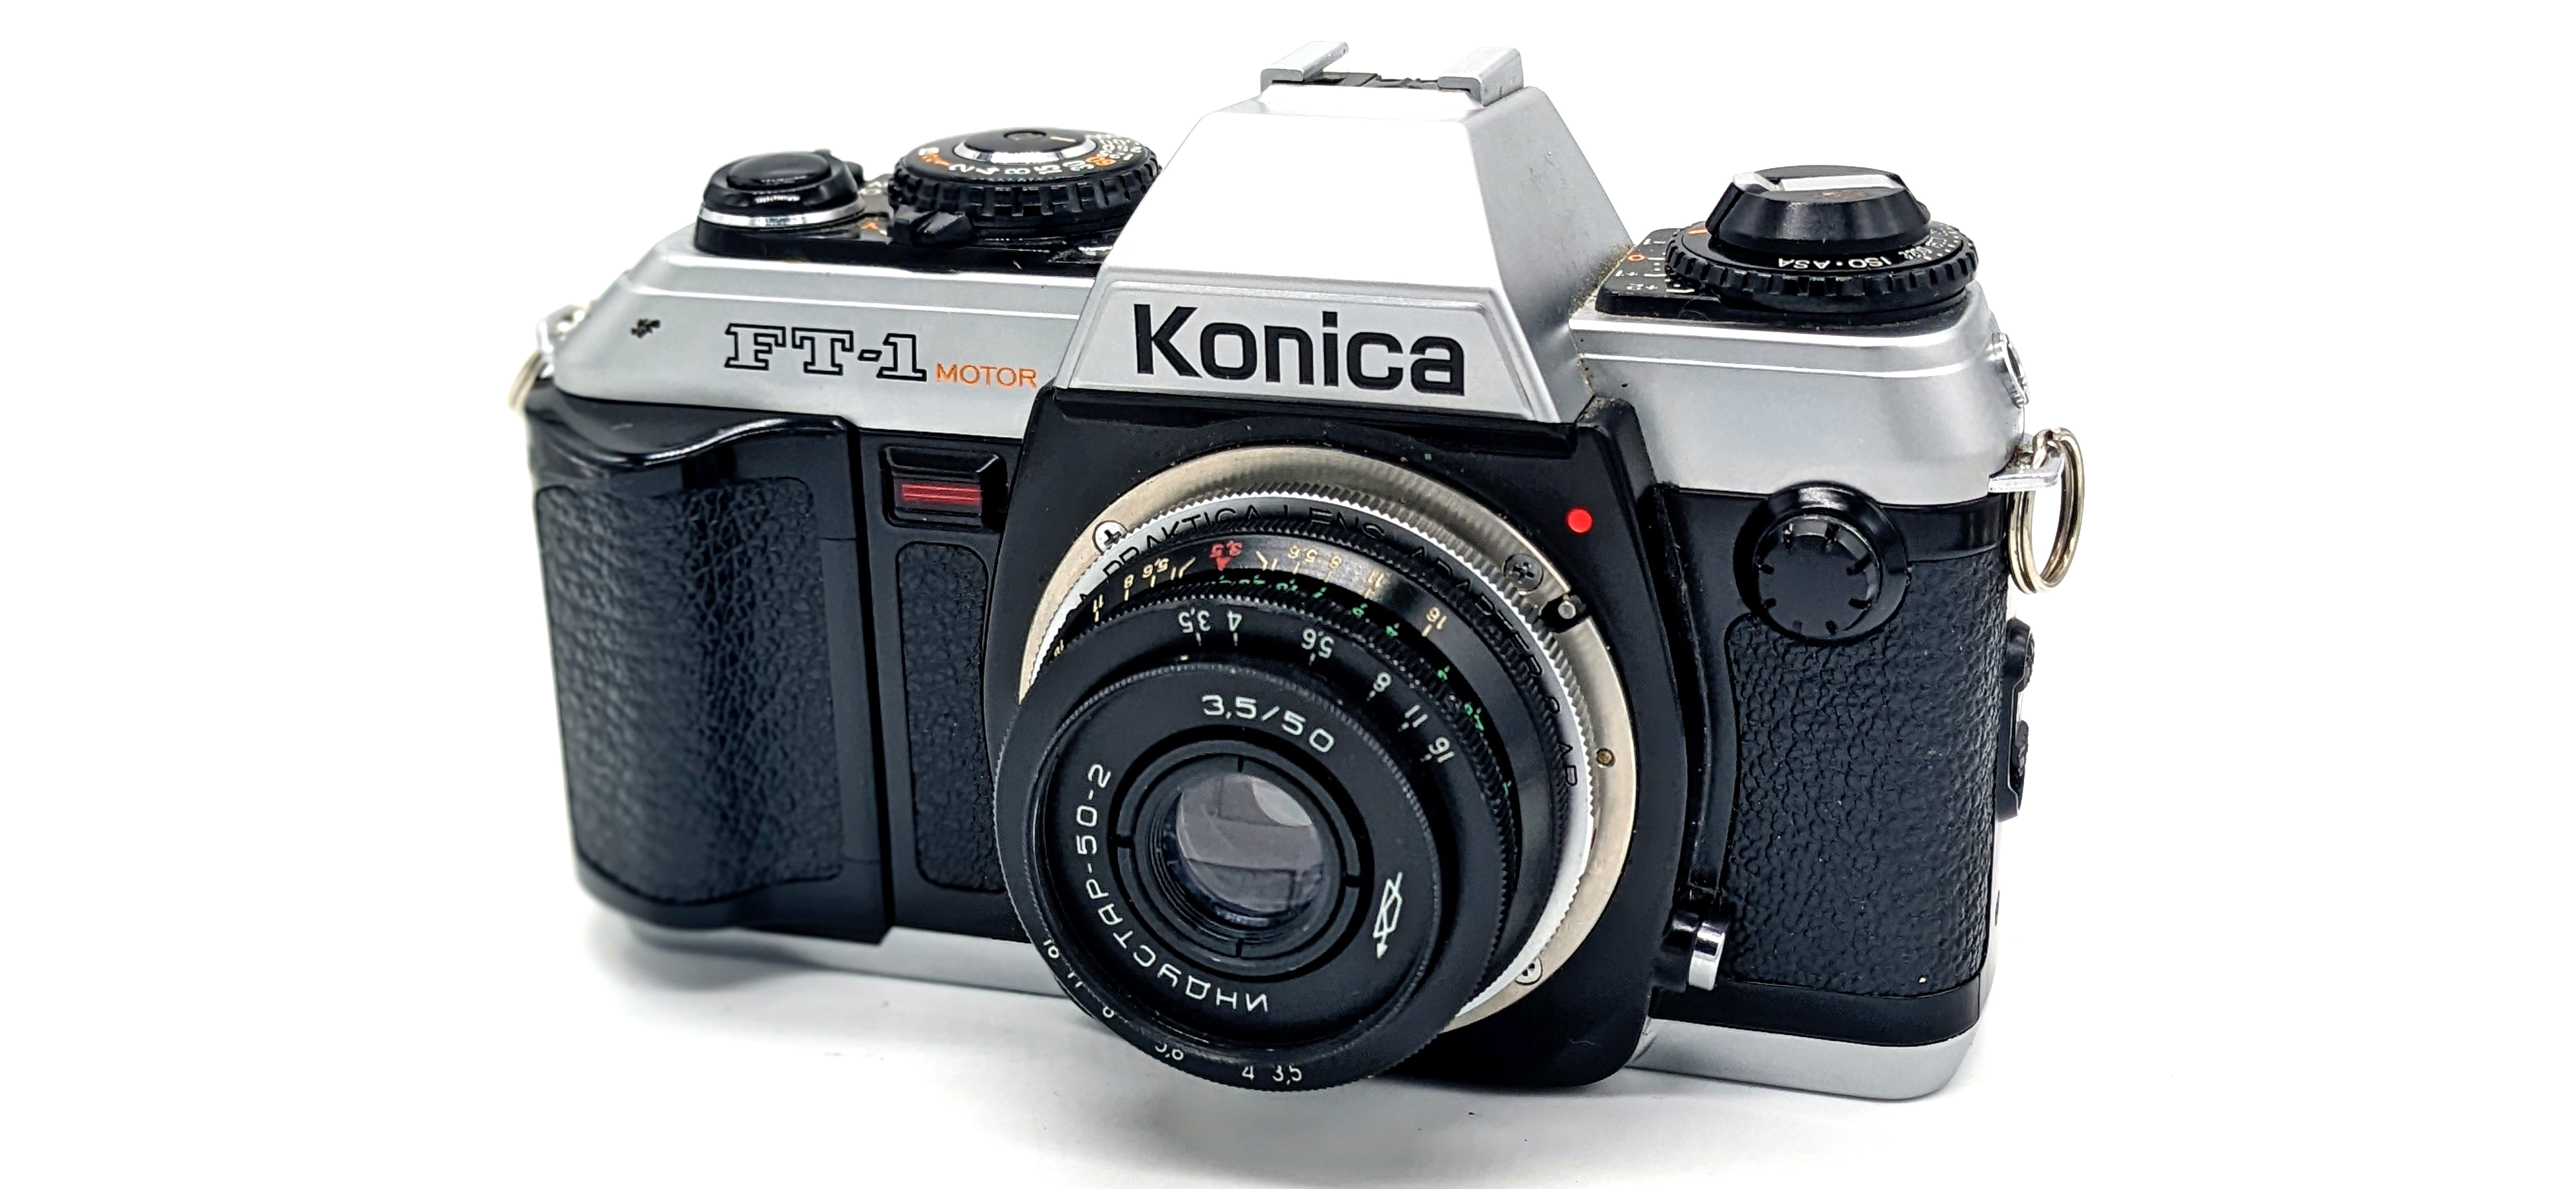
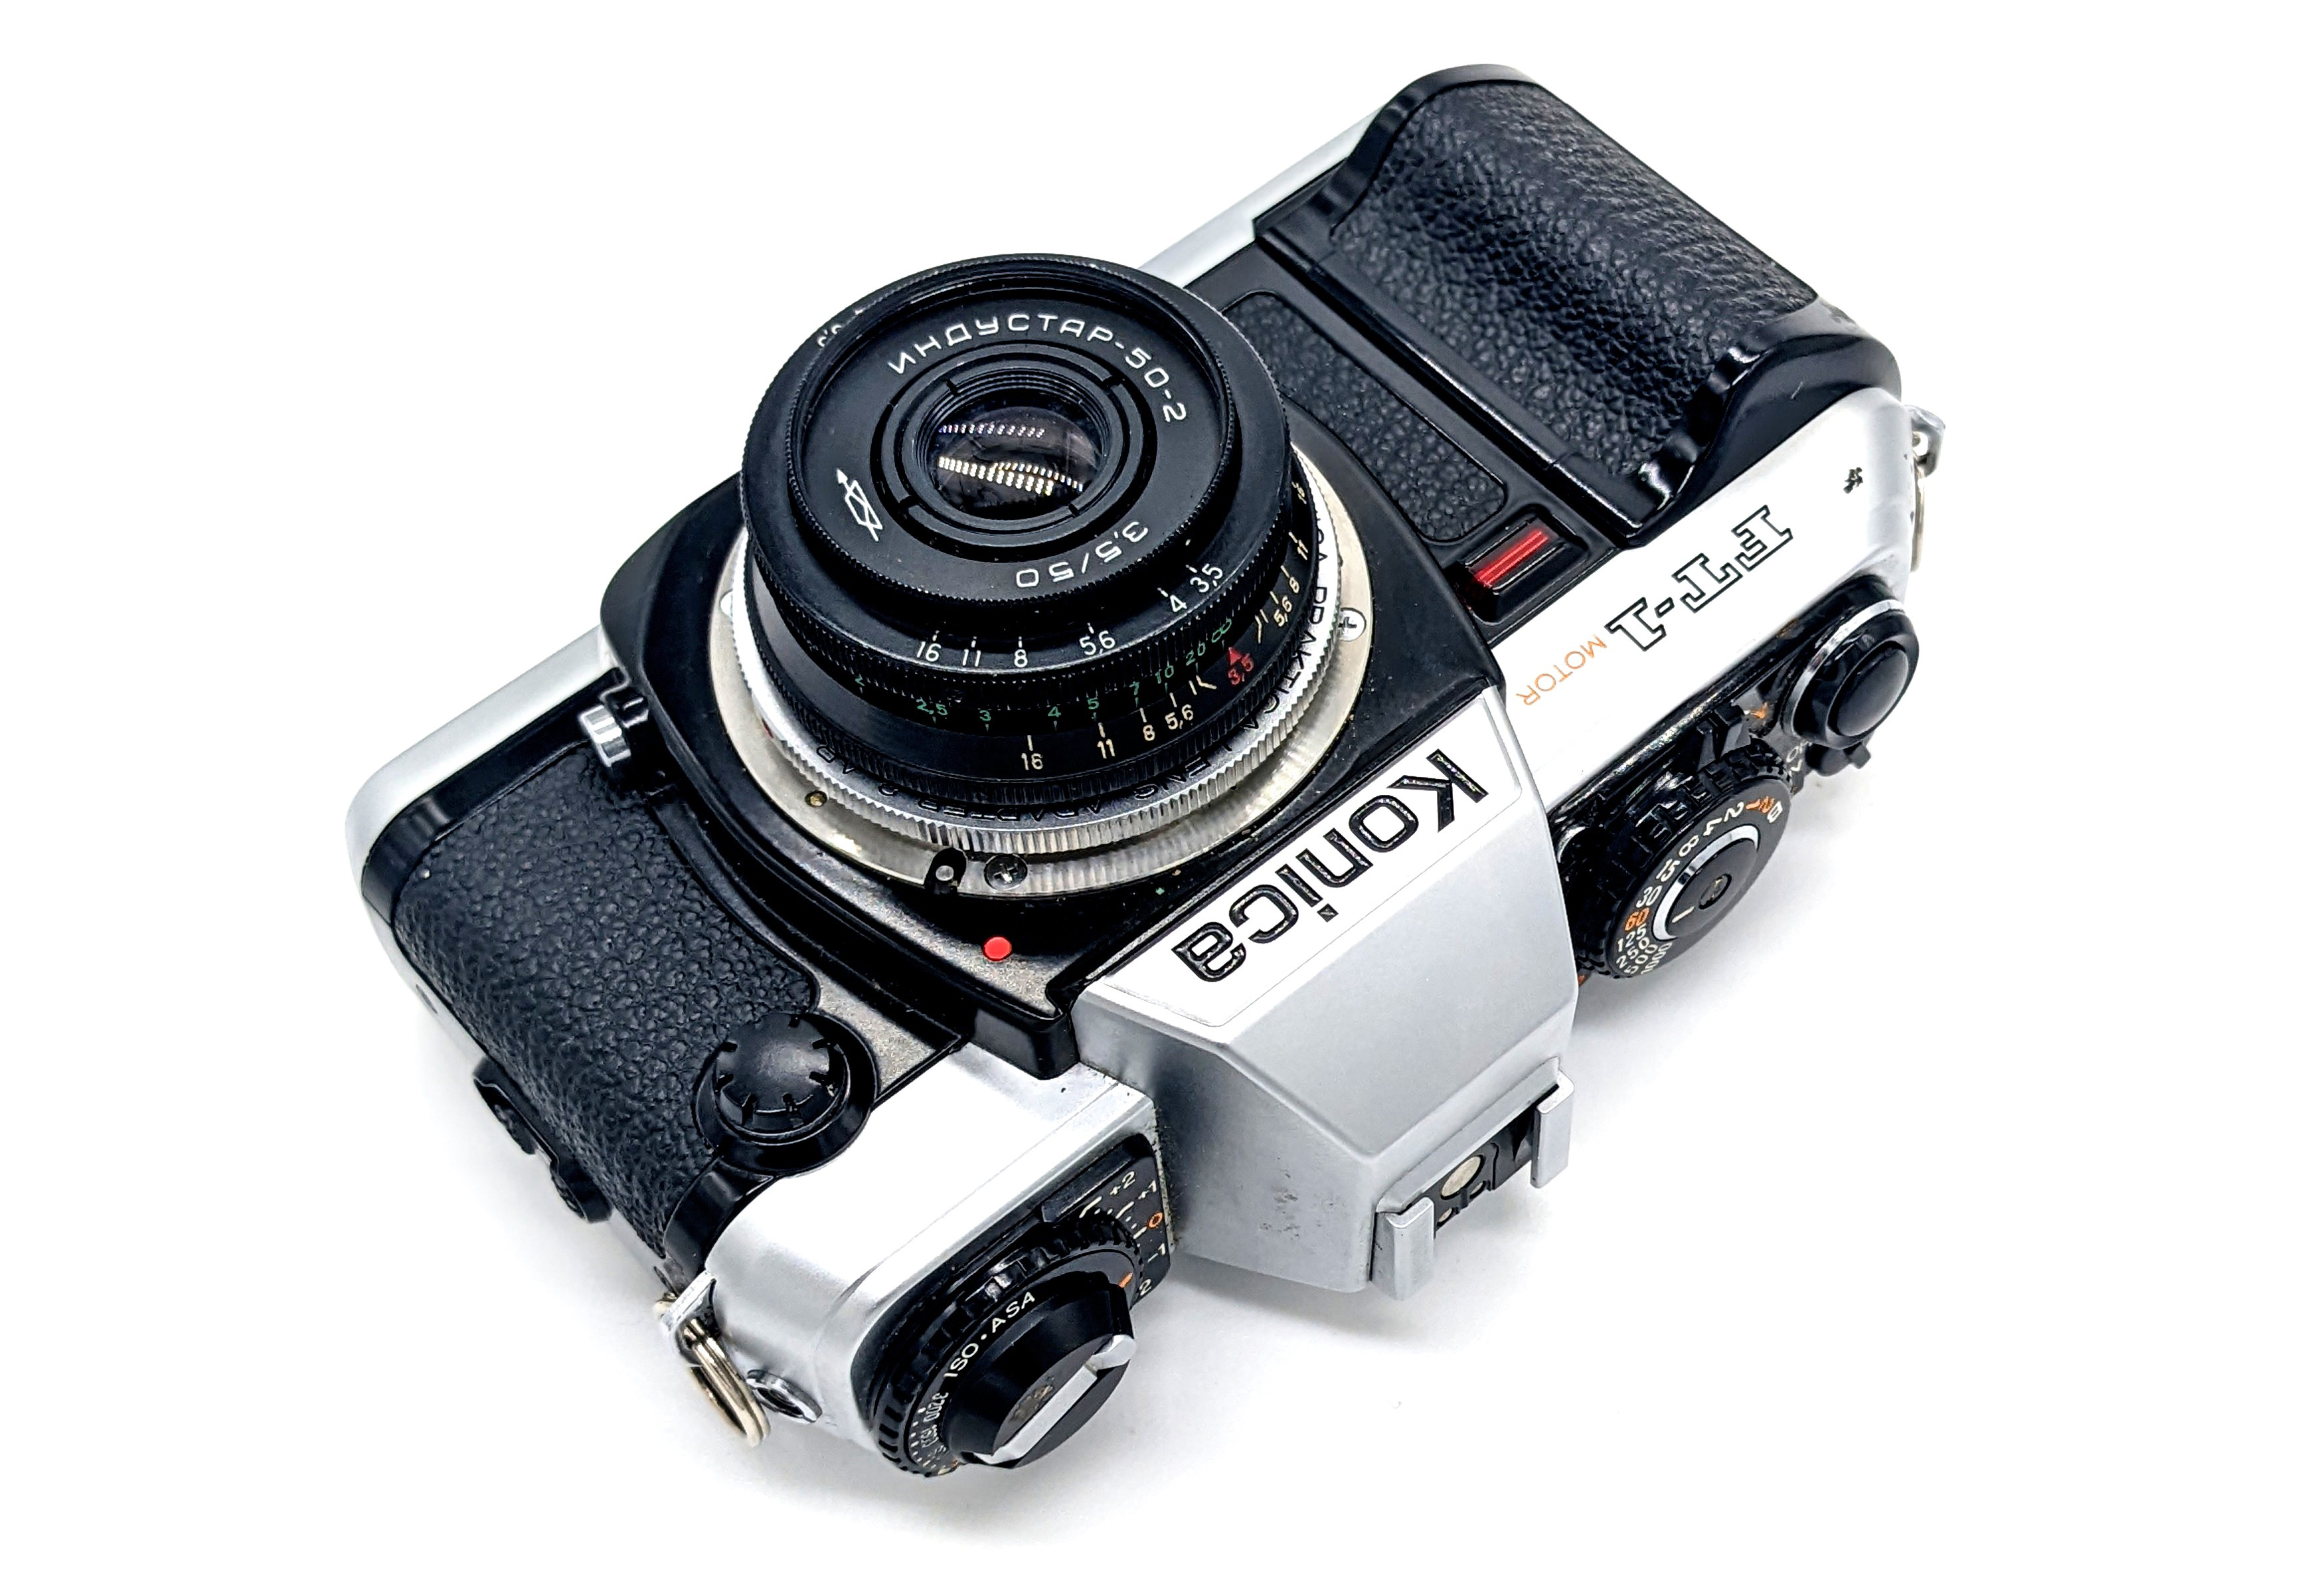
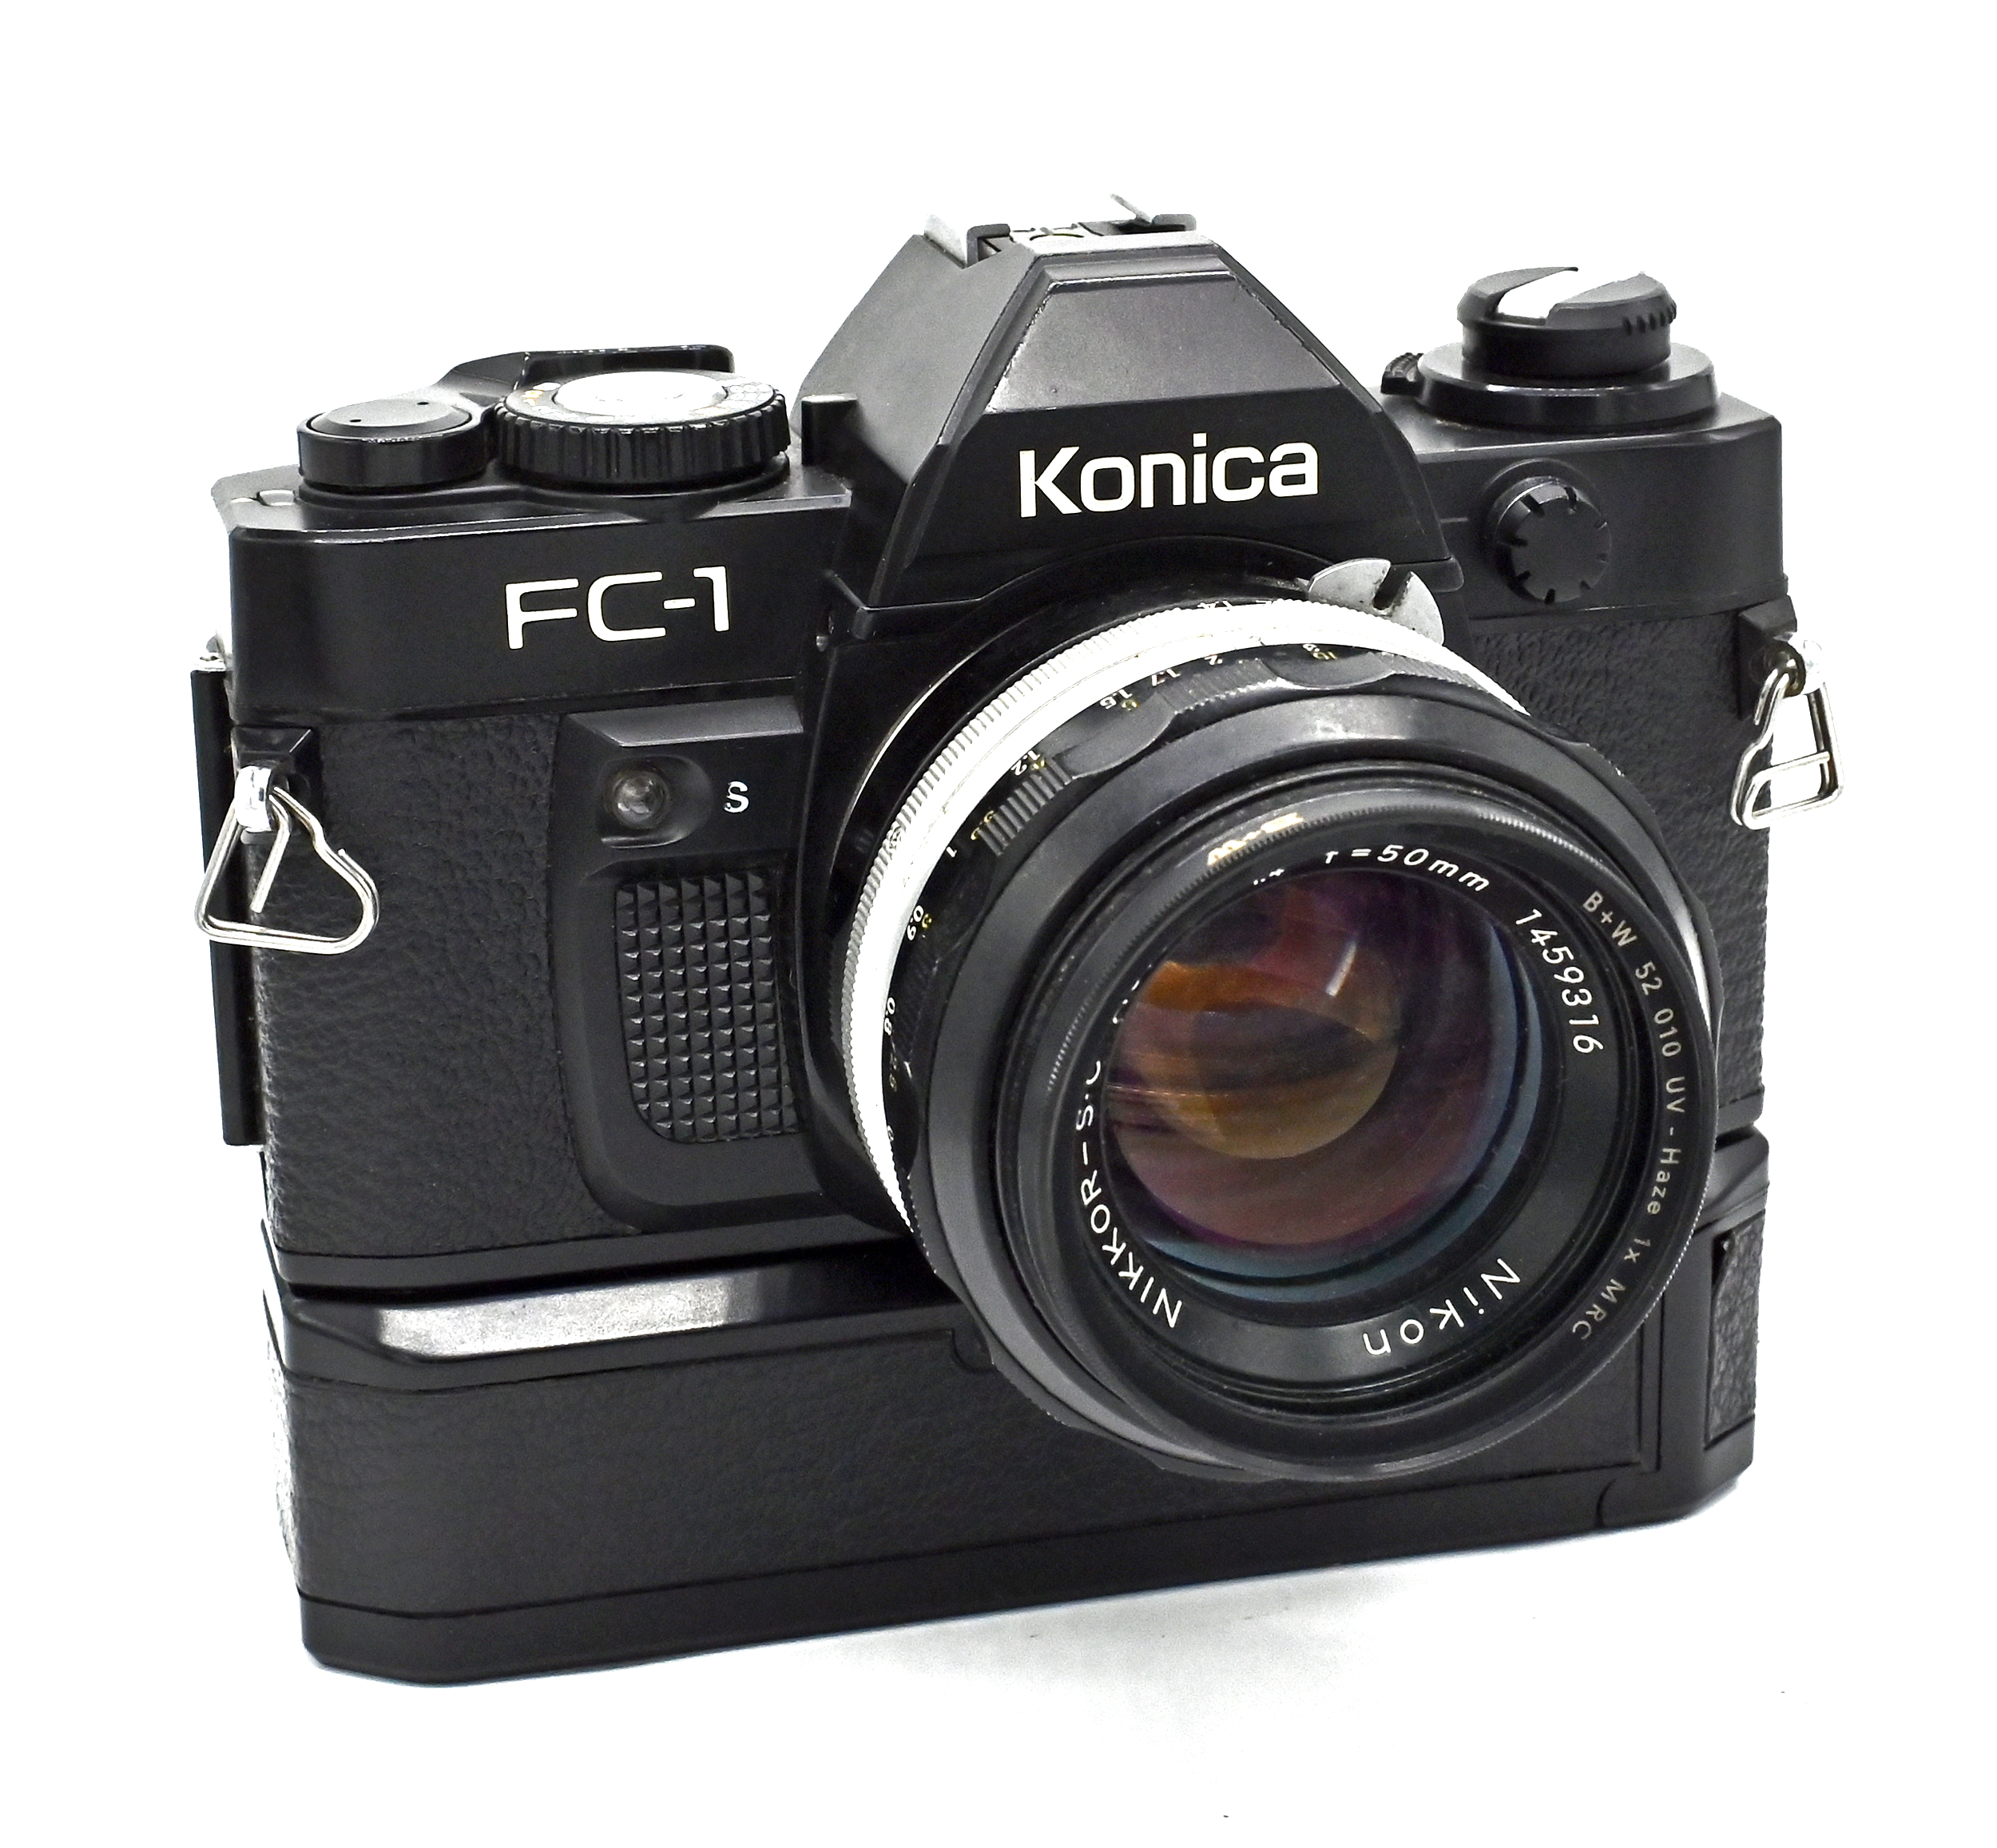
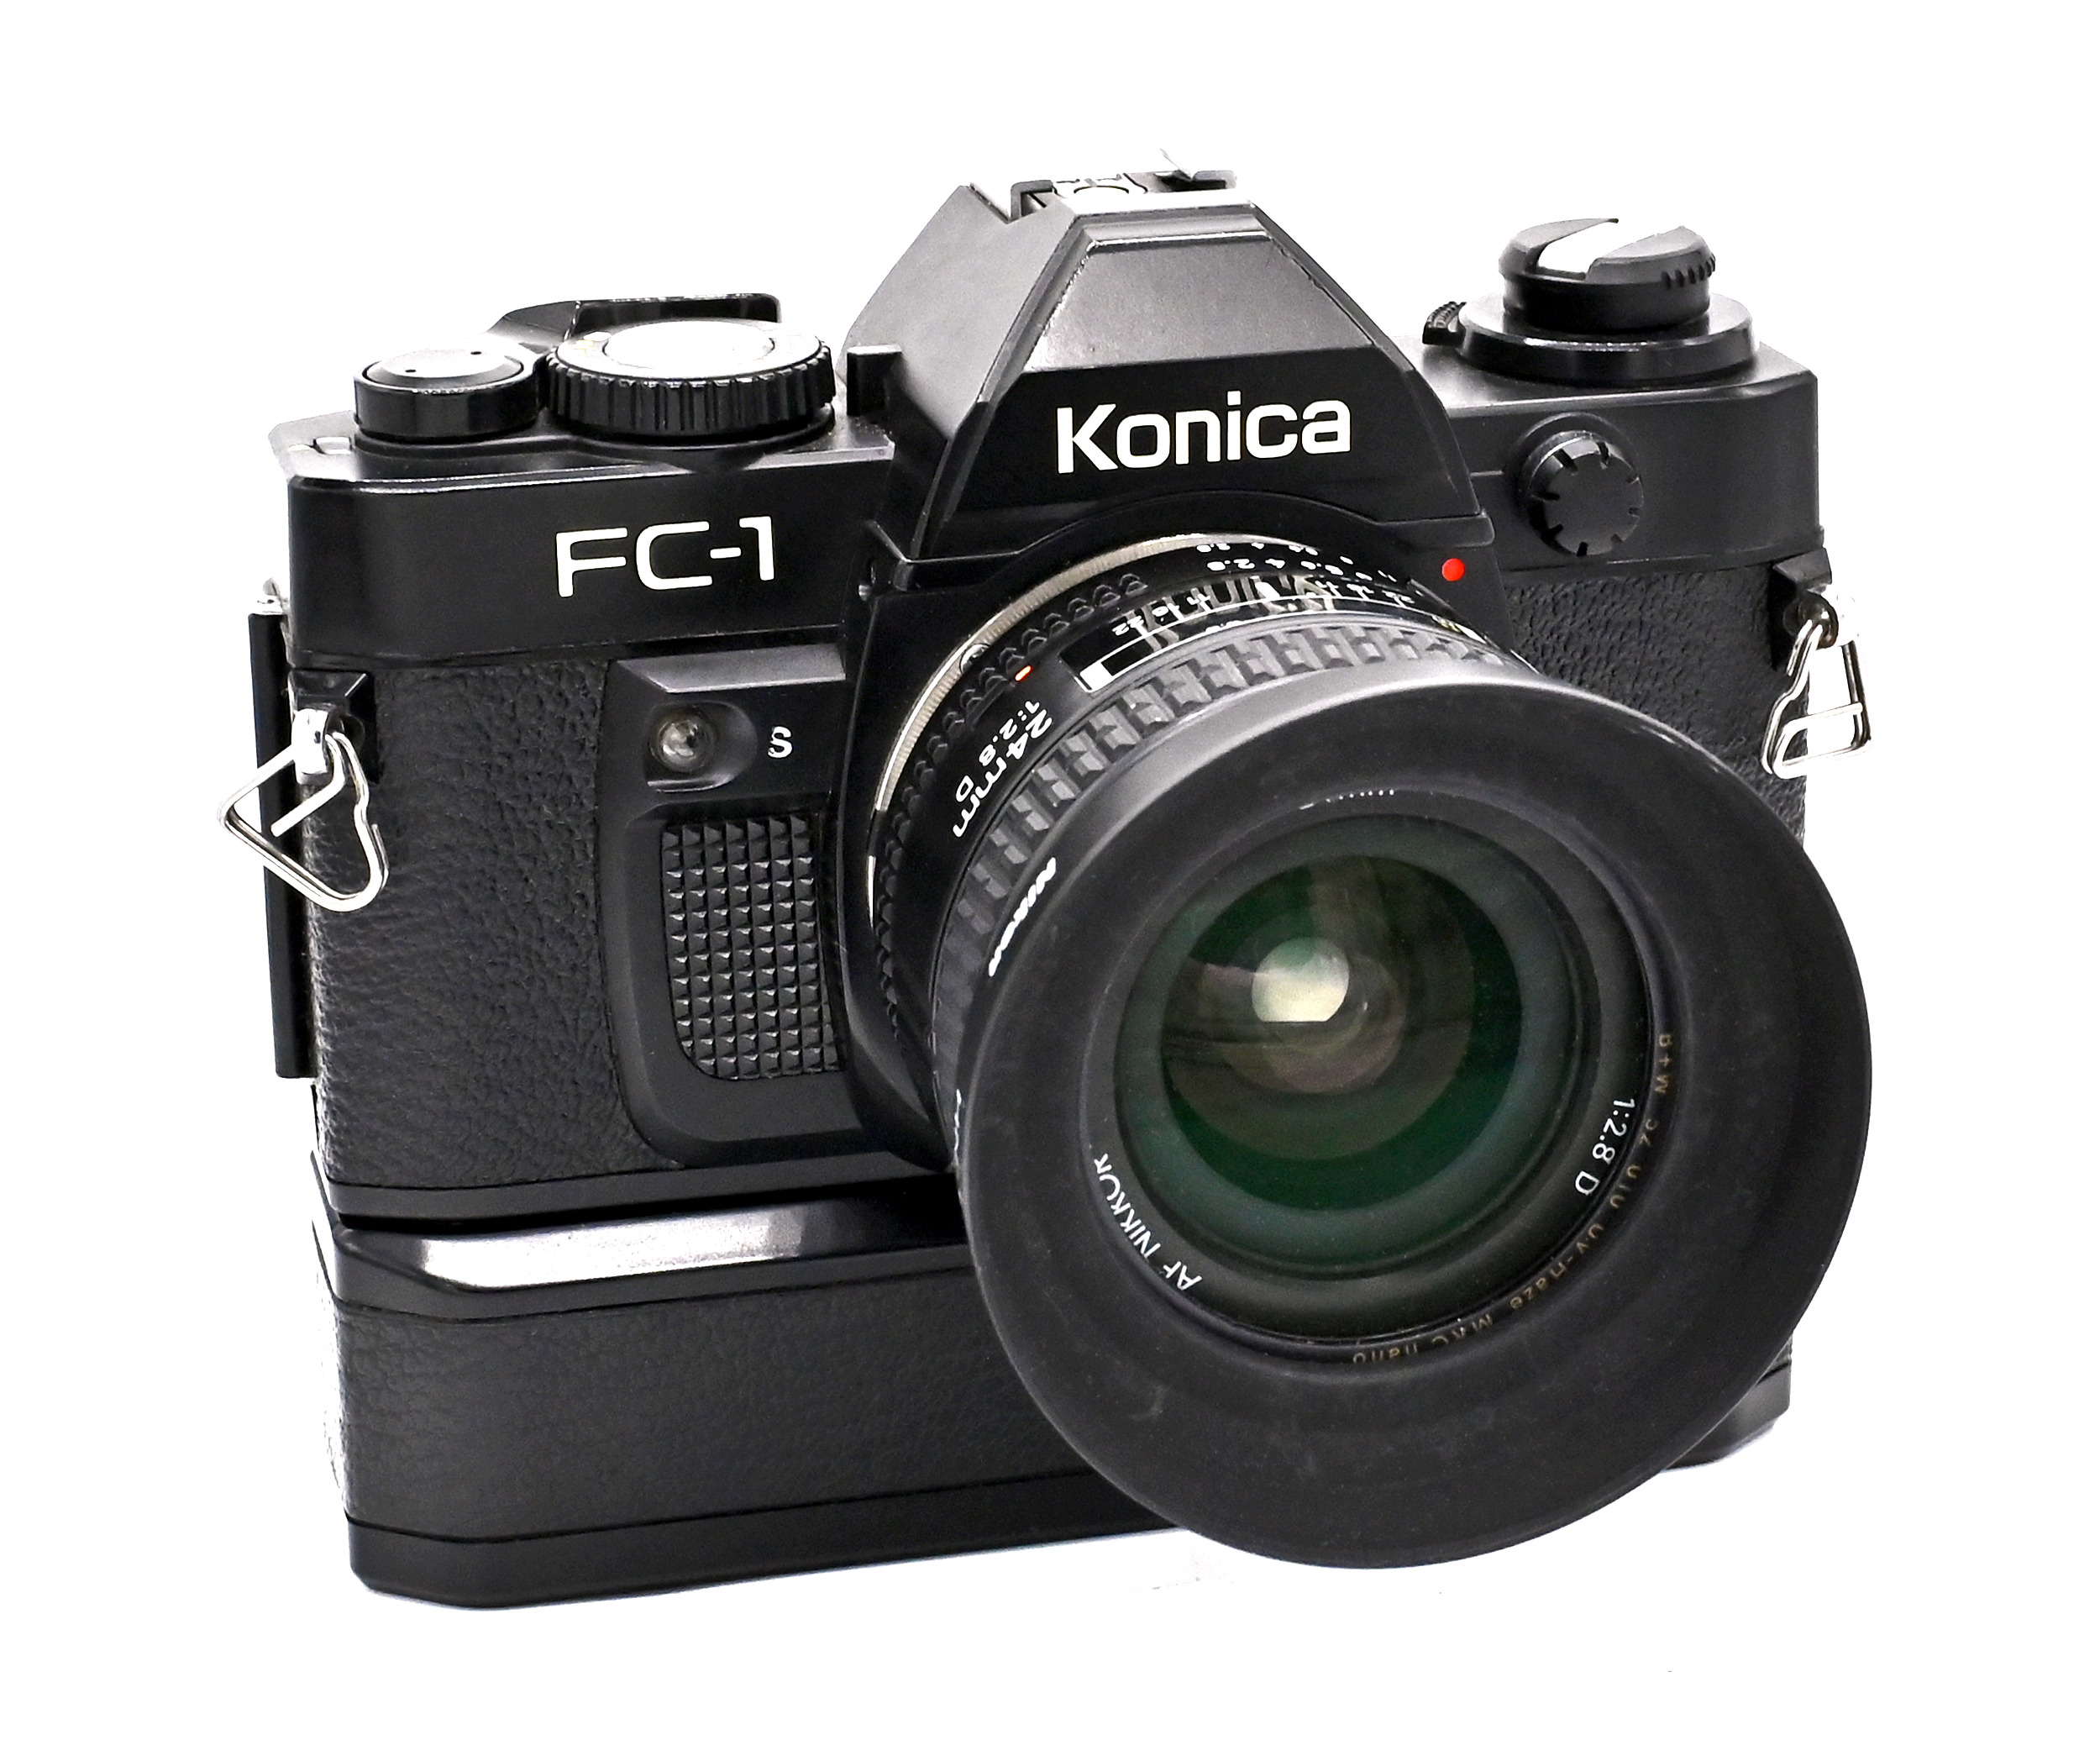
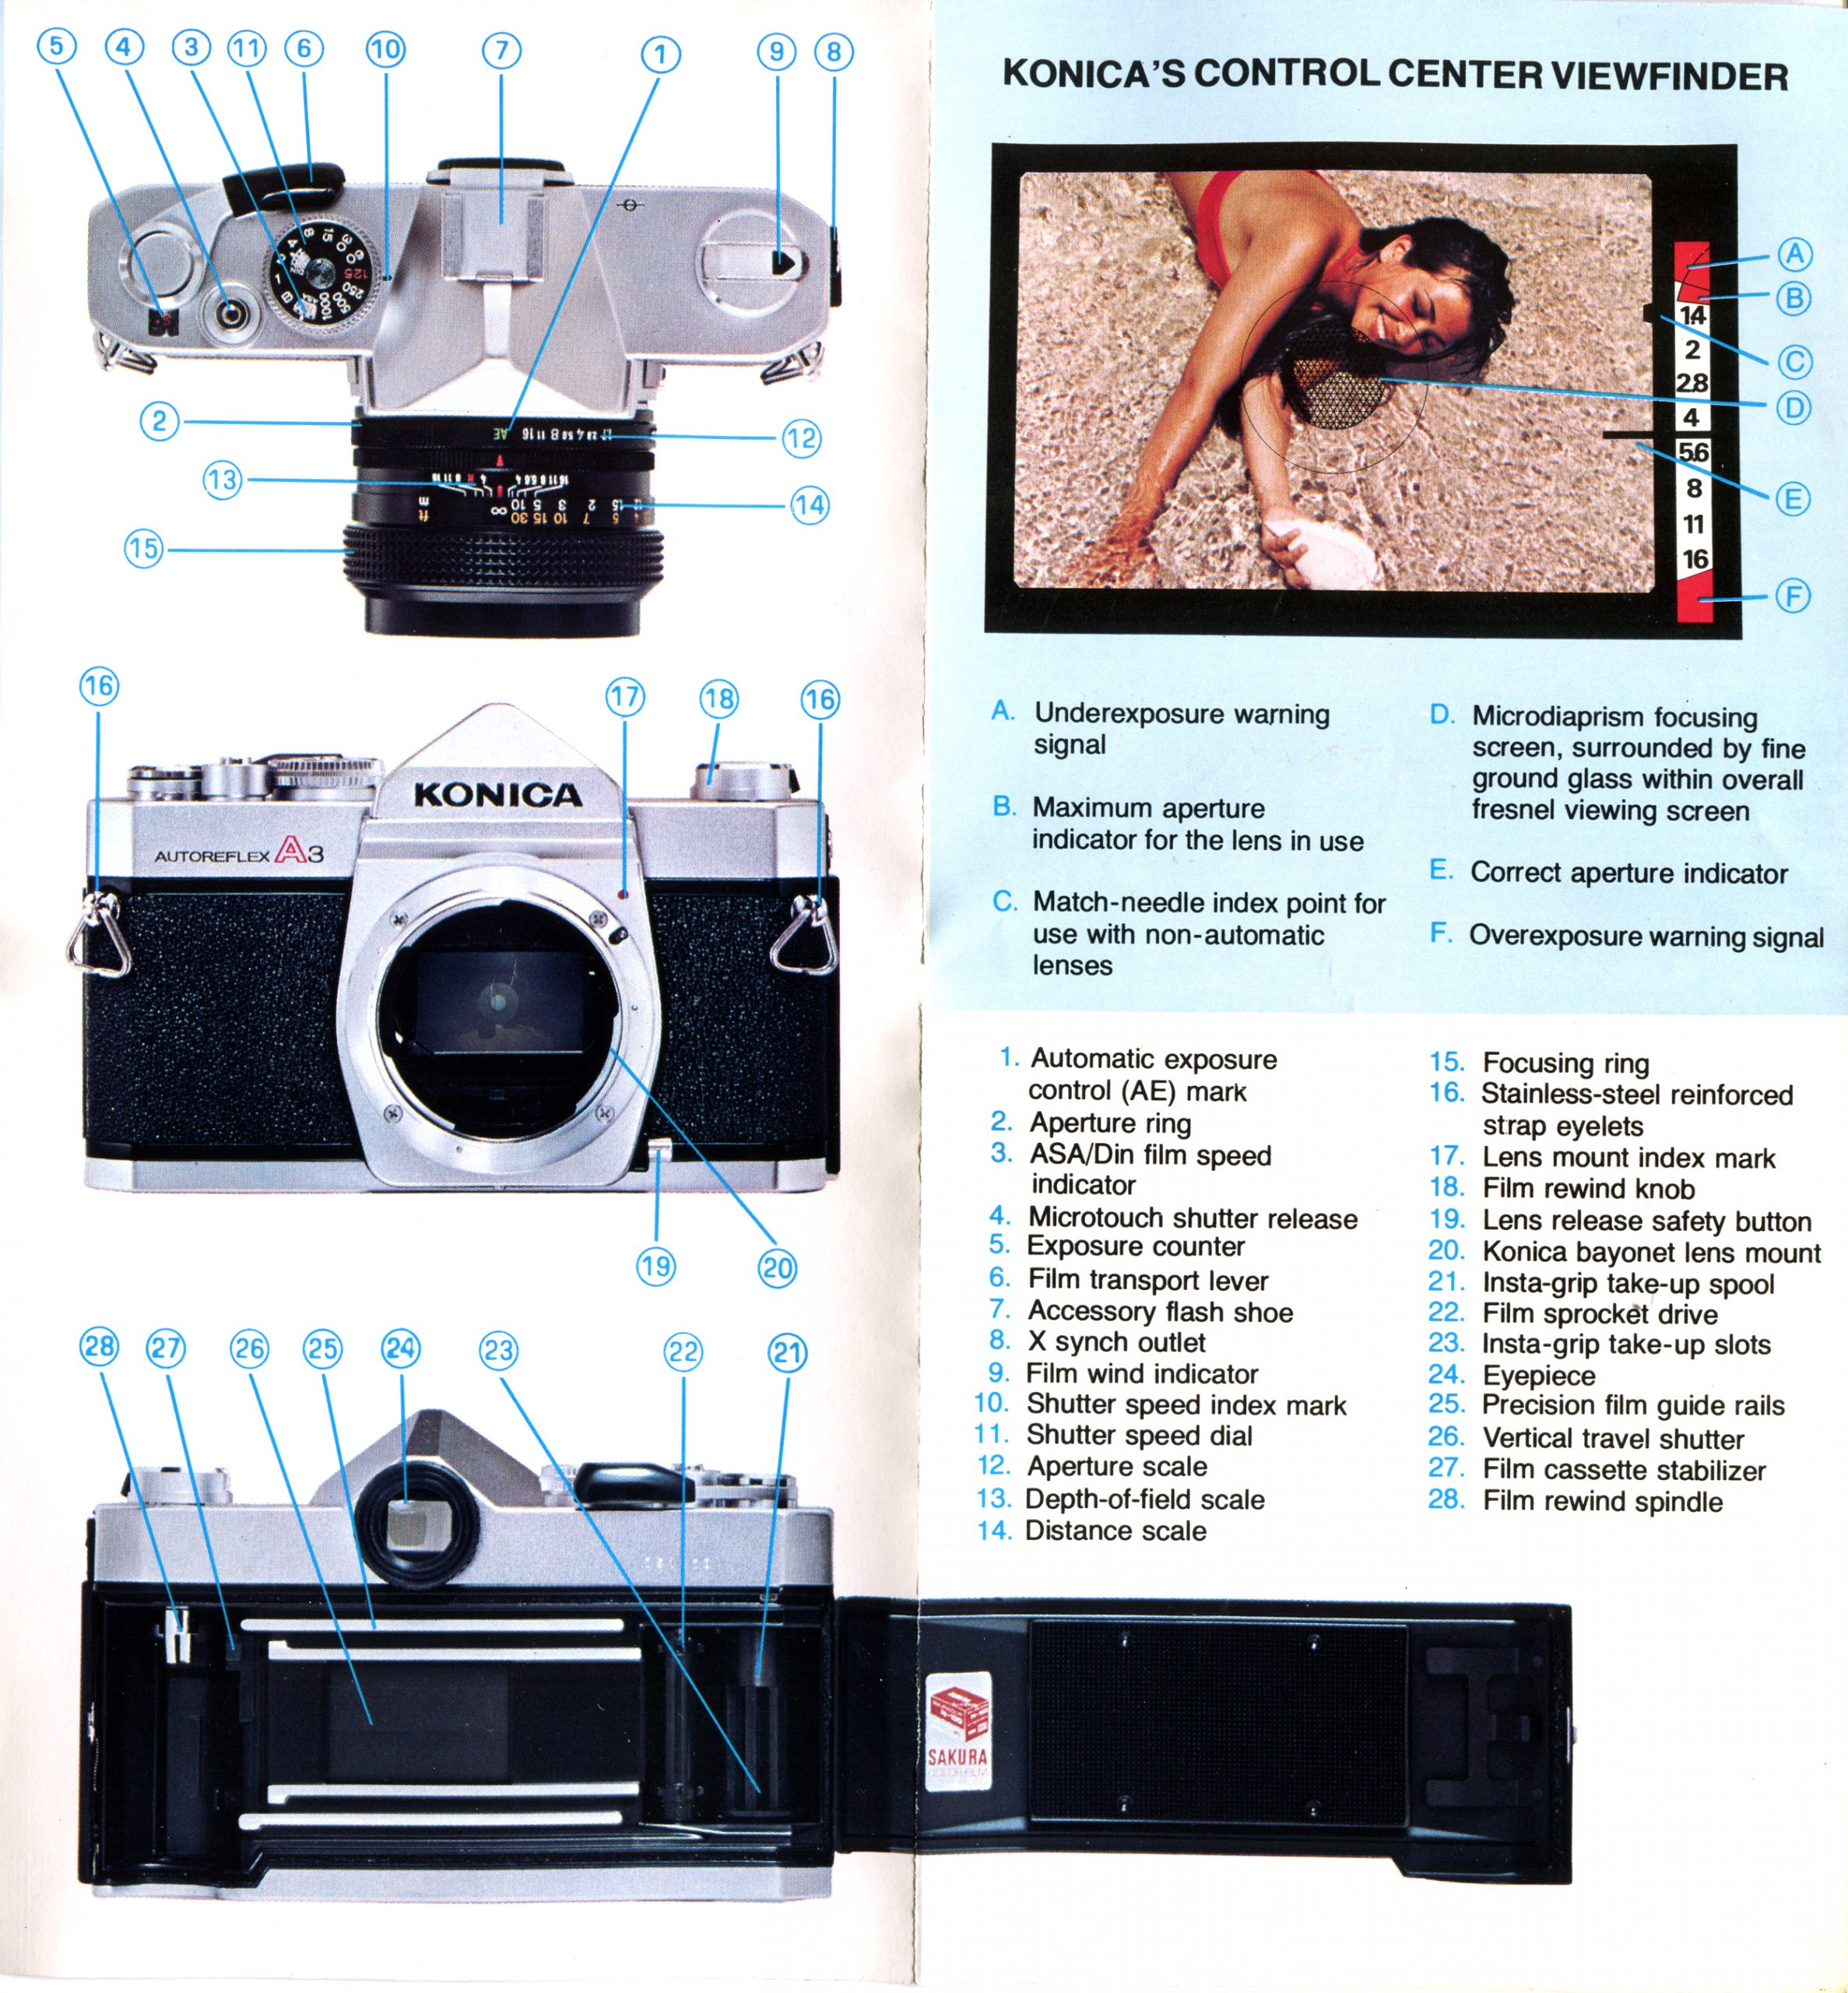
From its first SLR introduced in 1960, Konica advertised that one of the advantages of its system was the ability to adapt lenses from other manufacturers. Konica designed its SLRs to have an incredibly short “film-to-flange” distance (40.5mm). This meant that while Konica lenses could not generally be adapted to other systems, many lenses could be theoretically adapted to Konica. During the original F series run (1960-65), Konica produced OEM adapters for both Exakta and M42 lenses. During the Autoreflex era (1965-1987), Konica produced adapters for lenses in the Exakta, M42, and Nikon F mounts.
The number and type of lenses for the Exakta, M42, and Nikon F systems are staggering. These all-metal adapters work wonderfully for their intended purpose. The only real inconvenience is that because Konica AR bodies are all “shutter-speed” priority, the light metering only works in “metered manual mode.” That means that: (1) the lens must be stopped down to the taking aperture for the camera to take an accurate meter reading; and (2) you must set the shutter speed so that the viewfinder shows a blinking light (or needle reading for older AR cameras) in the blank space above maximum aperture. The manual explains it better than I could. Too bad Konica never produced an aperture-priority camera body, because that would make this so much easier.
From the Konica FC-1 Manual, But the Principle is the Same for All AR Bodies
Instructions
Here are the instructions if you need to see them.
The Praktica / M42 Adapter
Konica FC-1 with the Russian Helios 44-2 58mm f/2
Konica FT-1 with Russian Industar 50-2 50mm f/3.5
The Nikon F Adapter
The Nikon adapter allows one to use most F lenses on an AR body, with the exception of the newest G, AF-S, and AF-P and any other lenses that lack a manual aperture ring. This means that most non-Ai, Ai, Ai-S, AF, and AF-D lenses will work just fine.
Konica FC-1 with the Veritable non-Ai Nikkor-S.C. 50/1.4
There is nothing quite like detachable motor drives for 35mm cameras. By the 1970s, external motor drives were being offered by all major SLR manufacturers. For instance, the 1973 MD-2 motor drive for the Nikon F2 could achieve 5 frames per second and could automatically rewind the film. Even for consumer-level SLRs, the major manufacturers offered cheaper drives that could achieve 1.5 – 3 frames per second. By 1984, the Canon F-1 had a special edition motor drive that could achieve 14 frames per second. At the absolute top of the best-looking motor drive pyramid was the MD-4 for the Nikon F3HP.
No Better Looking 1980s Motor Drive Than the MD-4
The Leica Motor Drives
Before 1976, there had been two options for rapid film advance for its M cameras. The first was the 1960-66 “Leicavit,” a very limited production bottom trigger advance that only fit on the Leica M1, M2, MD, and the original MP. According to Cameraquest, only 2,000 to 3,000 of these units were produced. The second option was the custom “New York Motor Drive” developed privately by famous camera guru Norman Goldberg. In 1965, Leica purchased all of the designs and tooling from Mr. Goldberg to produce the motor drive for special versions of the M2 and M4 (the “M2-M” and the “M4-Motor“). Model “14000” was a pretty unique, but massive unit. The bottom of the drive had a switch that permitted up to 3 frames per second for speeds 1/50 to 1/1000 and a 1 frame per second mode for operation down to 1 second. Needless to say, both of these units today are hopelessly expensive collectors’ items.
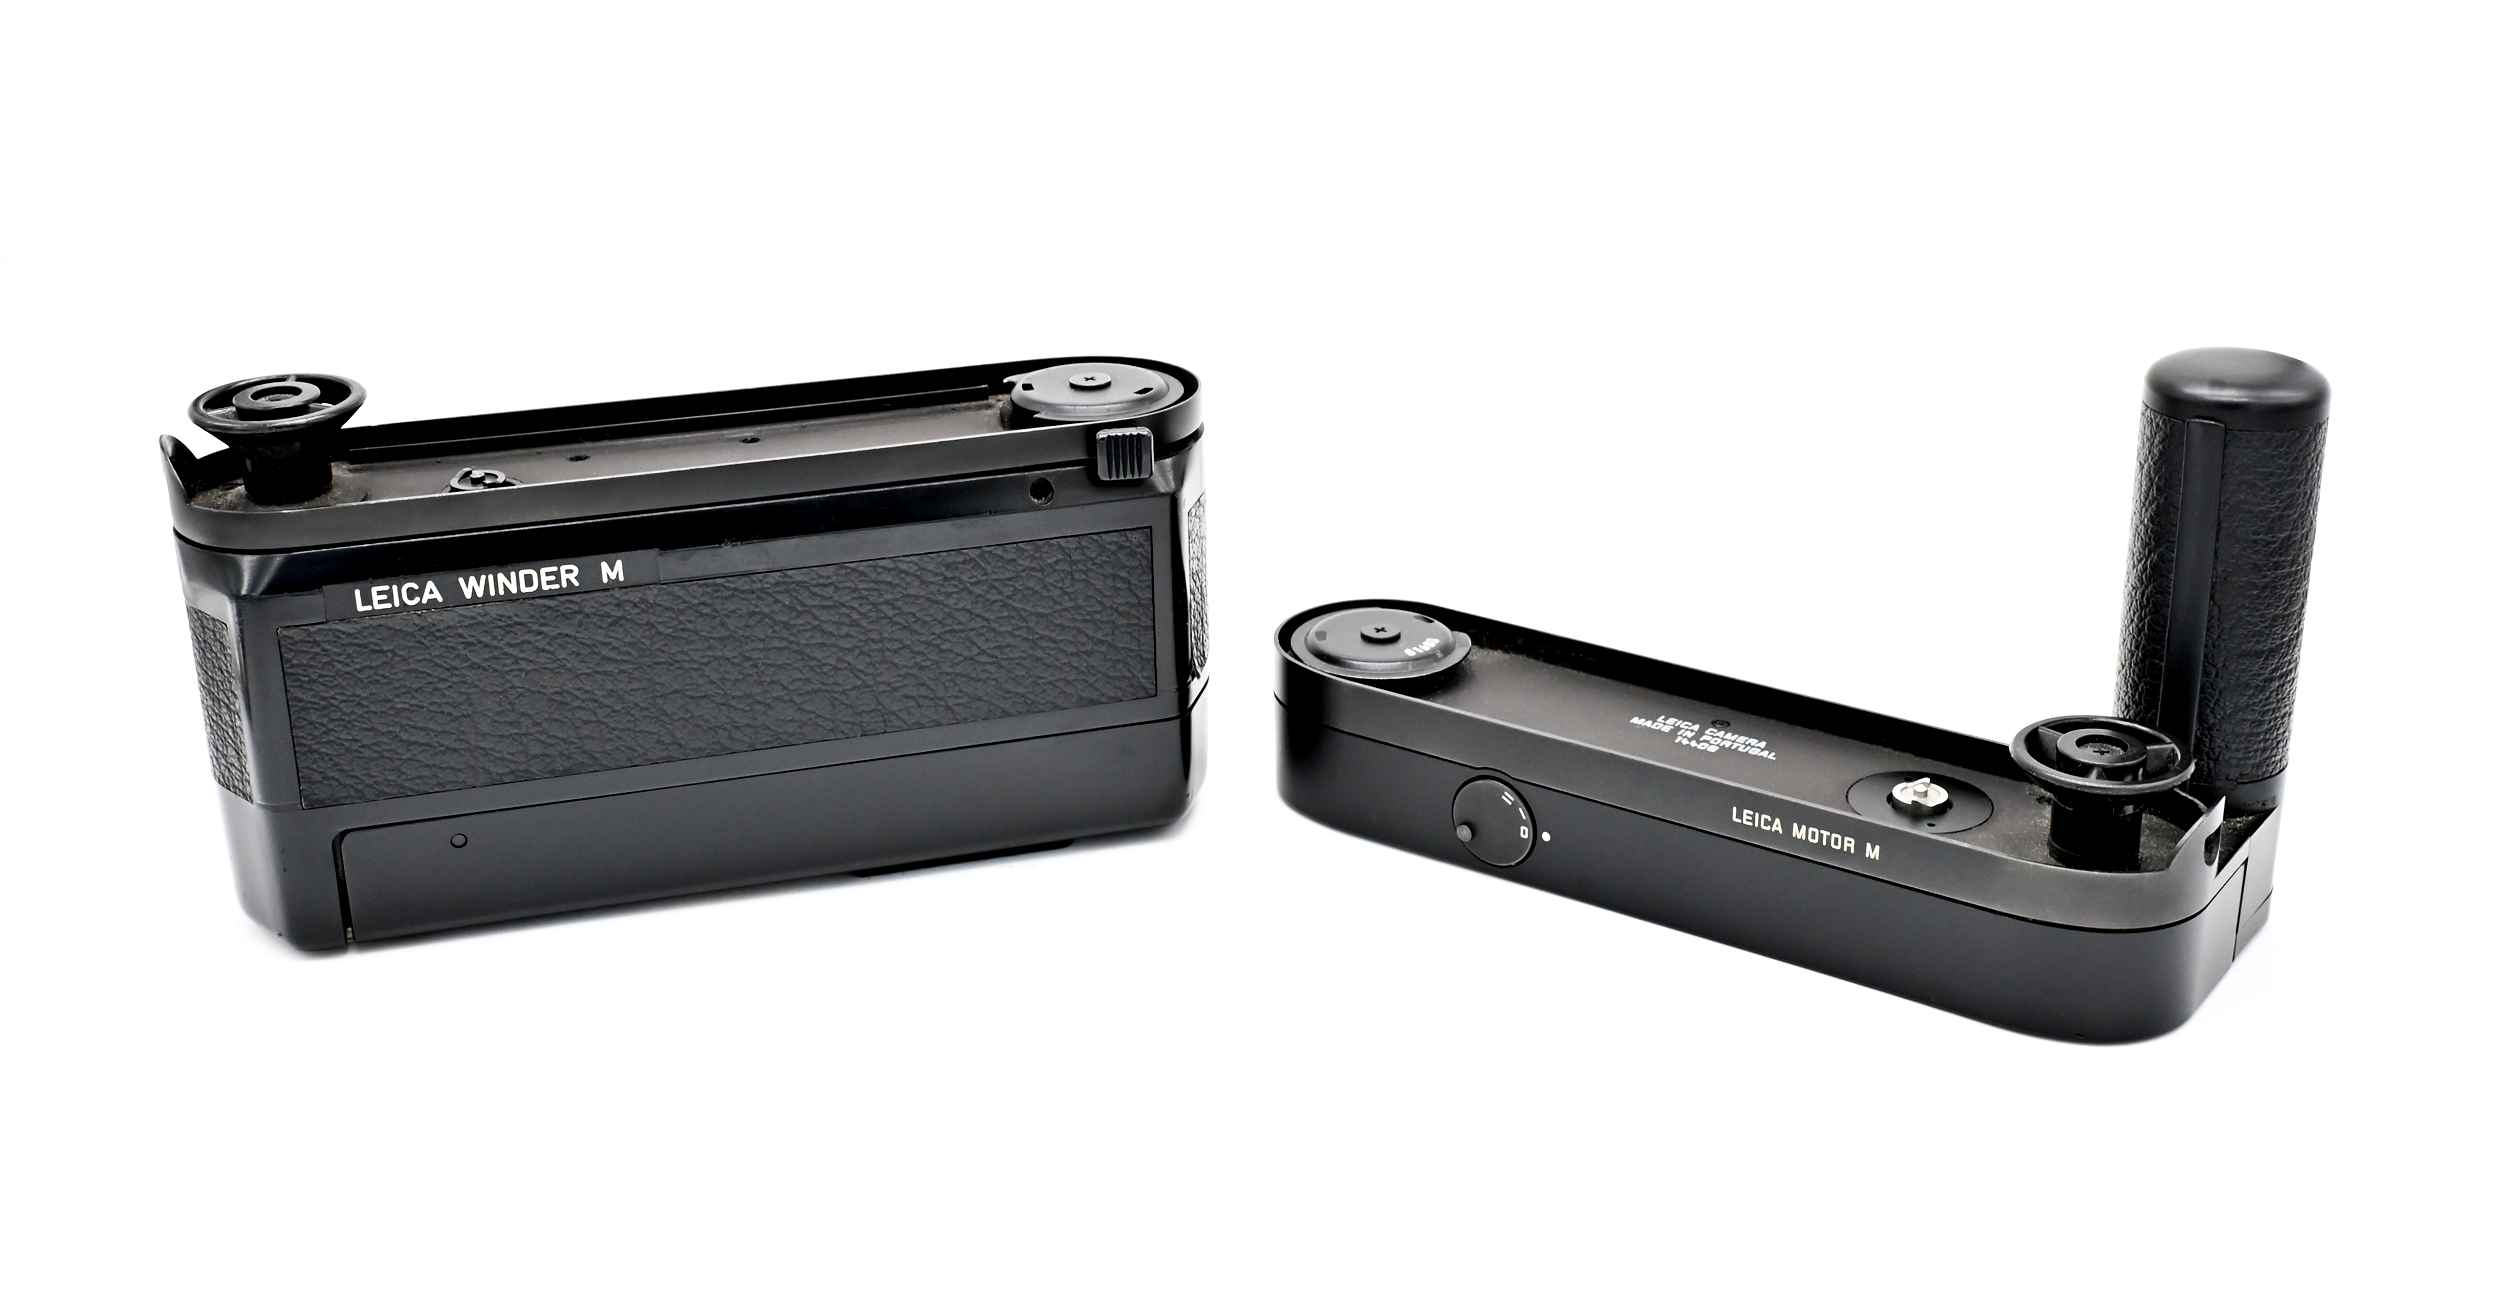
In 1976, Leica introduced the “M4-2 Winder” (Model 14214) contemporaneously with the Leica M4-2. It really only worked on the M4-2 and not on earlier or later cameras. Many on the internet have reported that the M4-2 Winder just has too much torque for any M camera and perhaps should just be relegated to the camera shelf of history. For the adventurous, there is a write up for pros-only about how to re-calibrate the M4-2 Winder for less torque. Leica later introduced a slightly different M4-P Winder, but it is similarly not too desired.
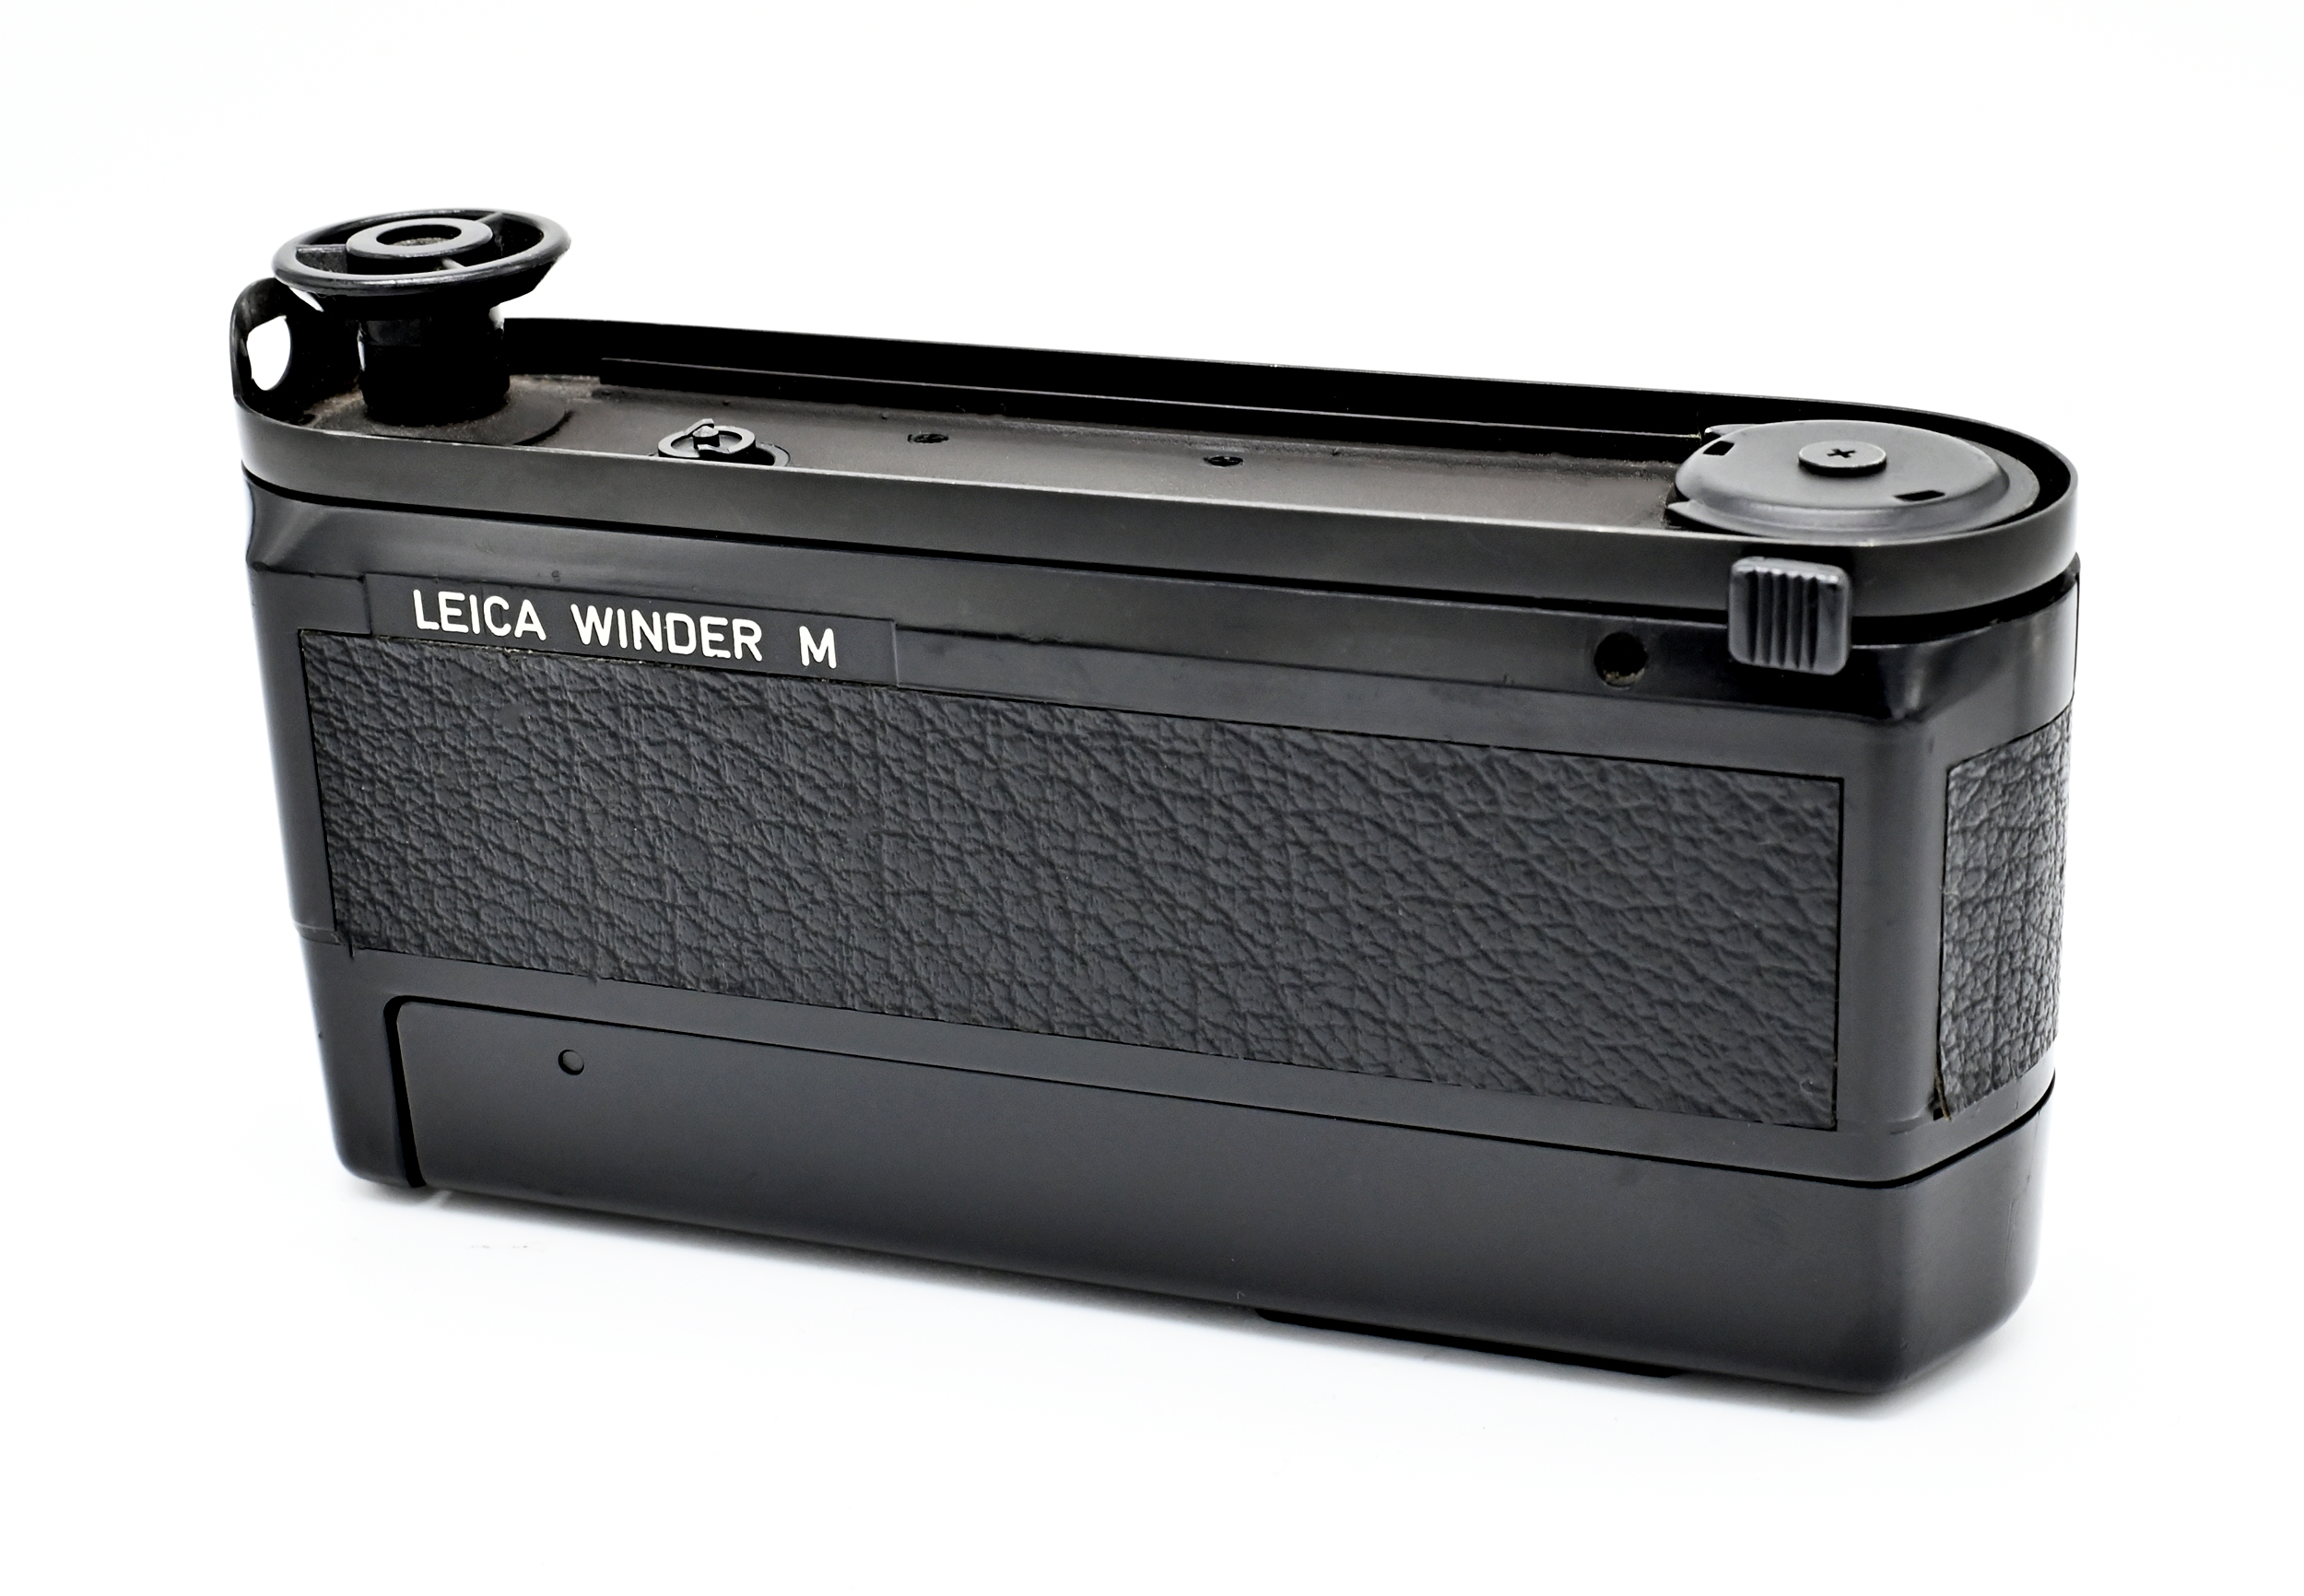
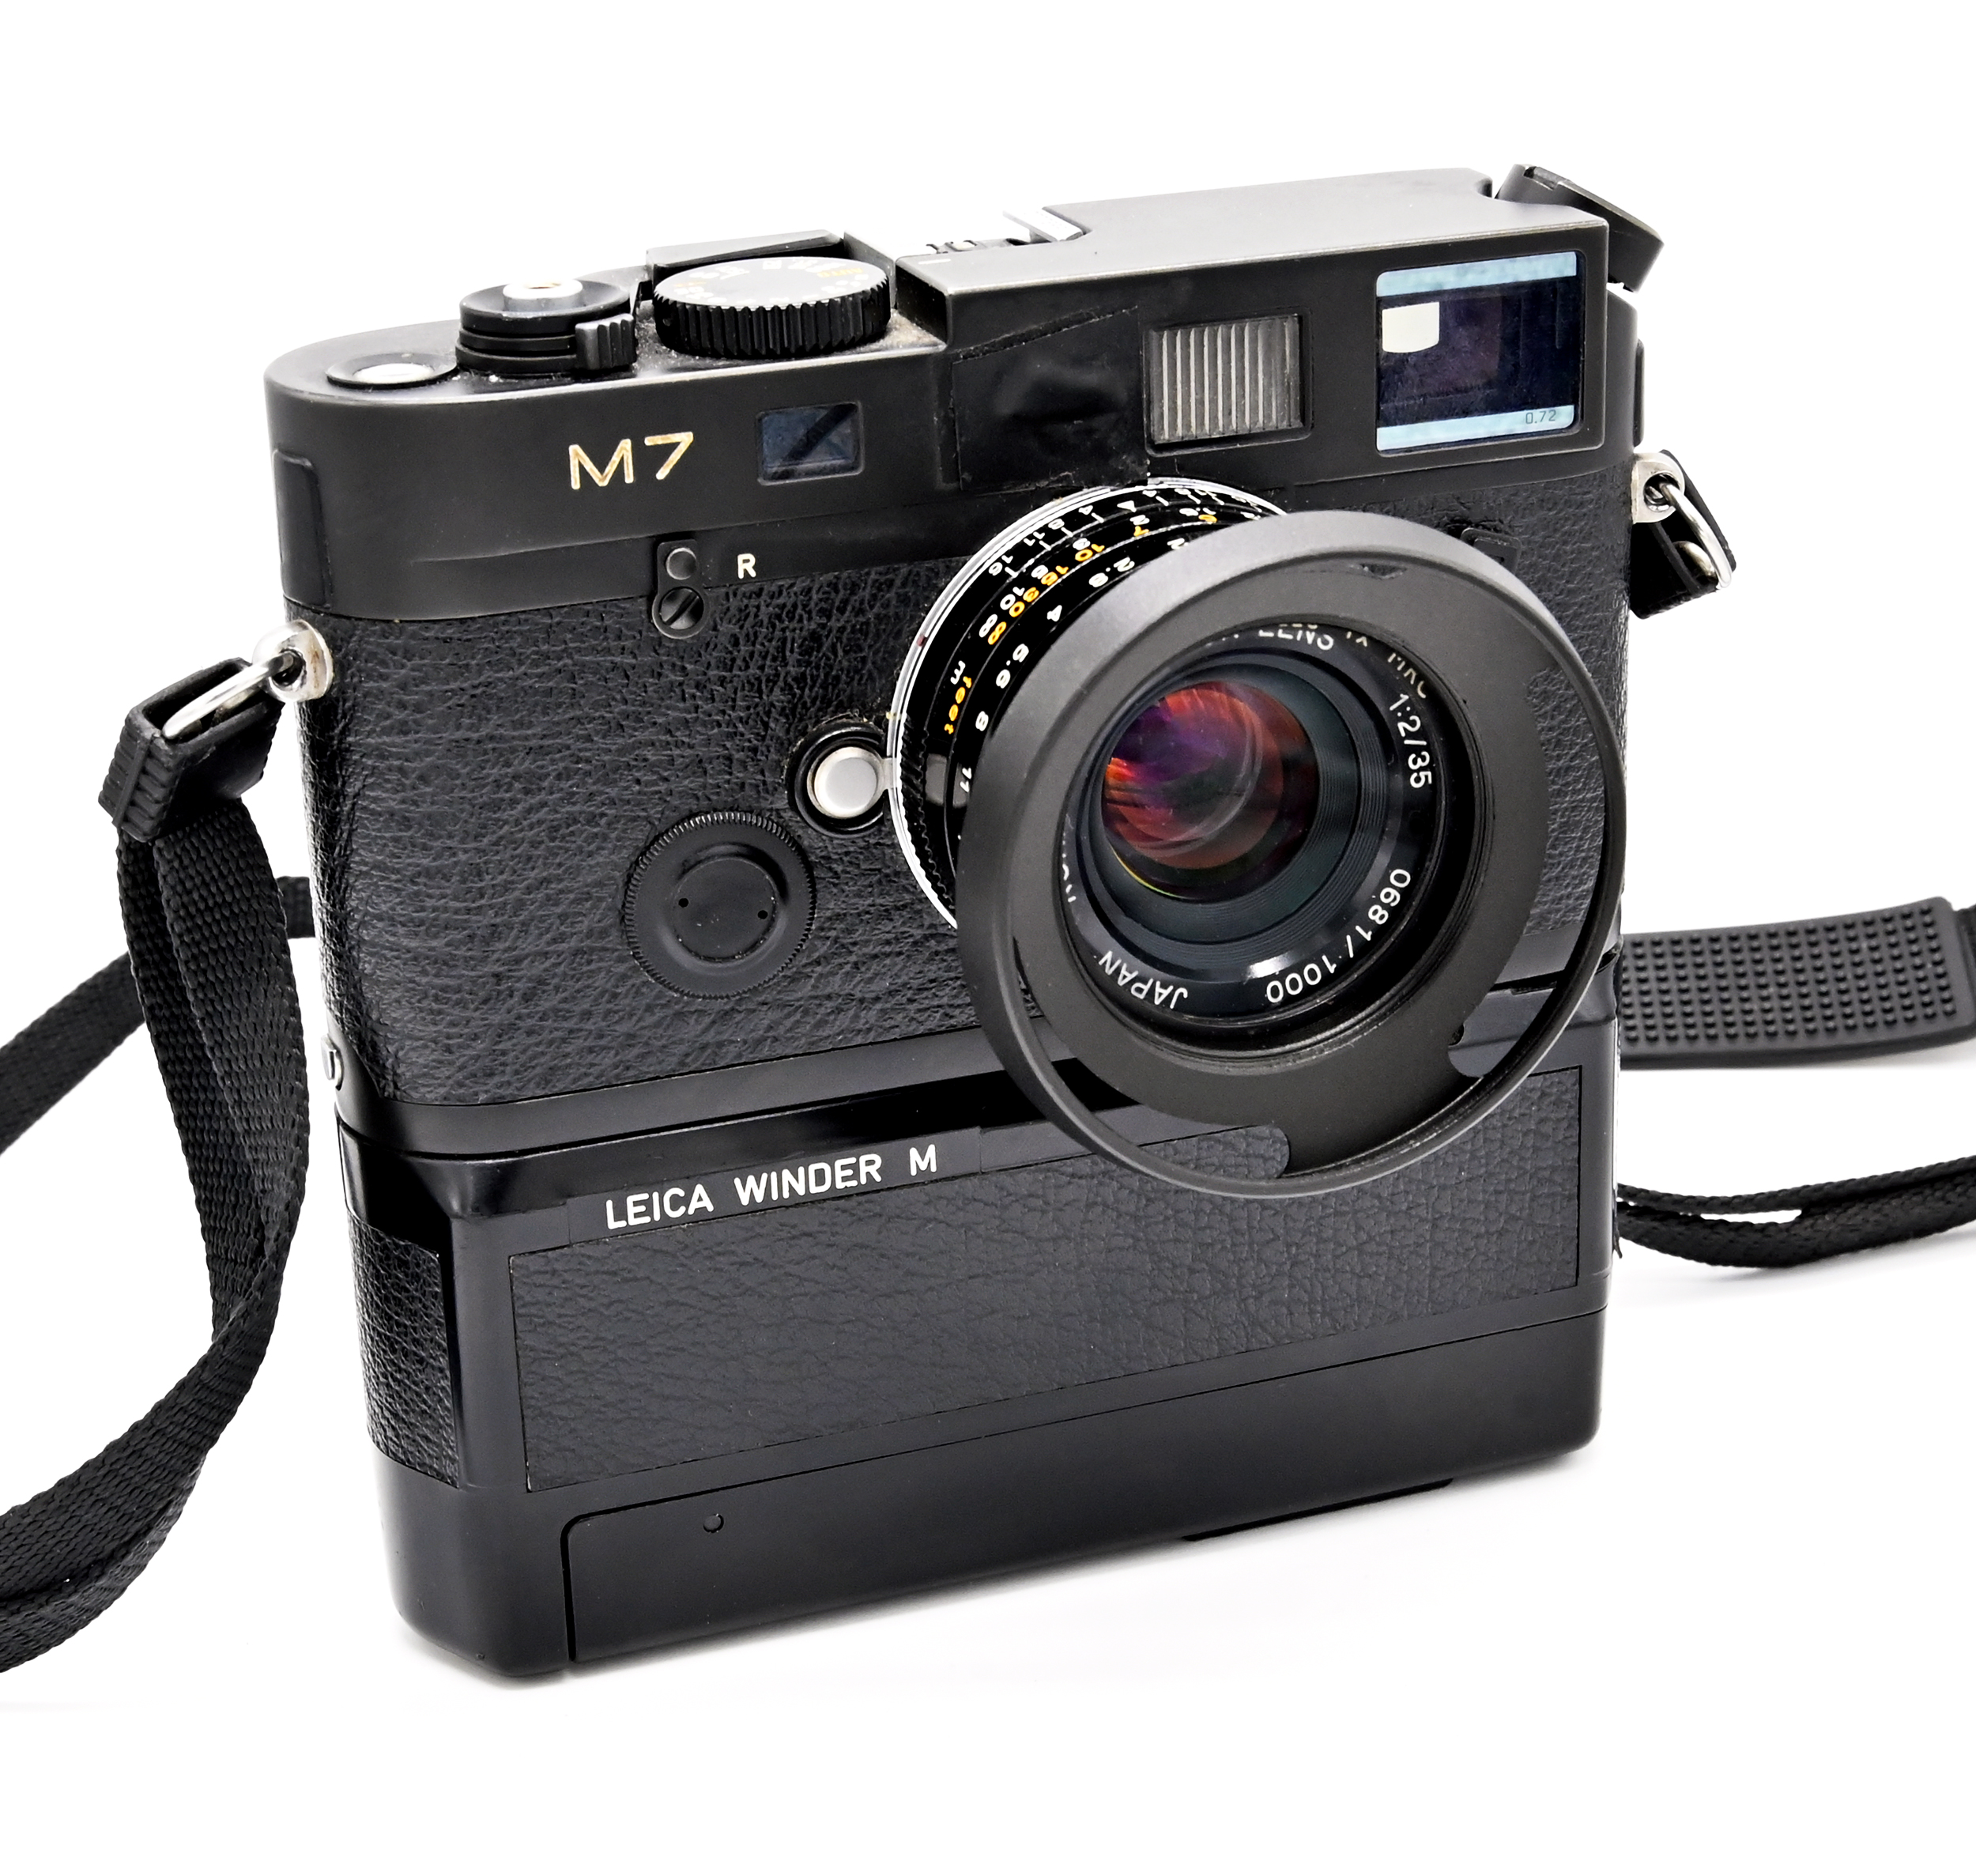
In 1987, Leica introduced the “Winder M” (Model 14403). The Winder M is basically the same unit at the previous M4-2 Winder but works with the M4-2, the M4-P, the M6. the M7, and the new MP. I would imagine that it also would work with the new M-A. The consensus is that the Winder M has less torque than its predecessor, so can be used safely with any M except for the M3 (due to its more fragile components) Leica suggests that one not activate the motor without film in the camera body.
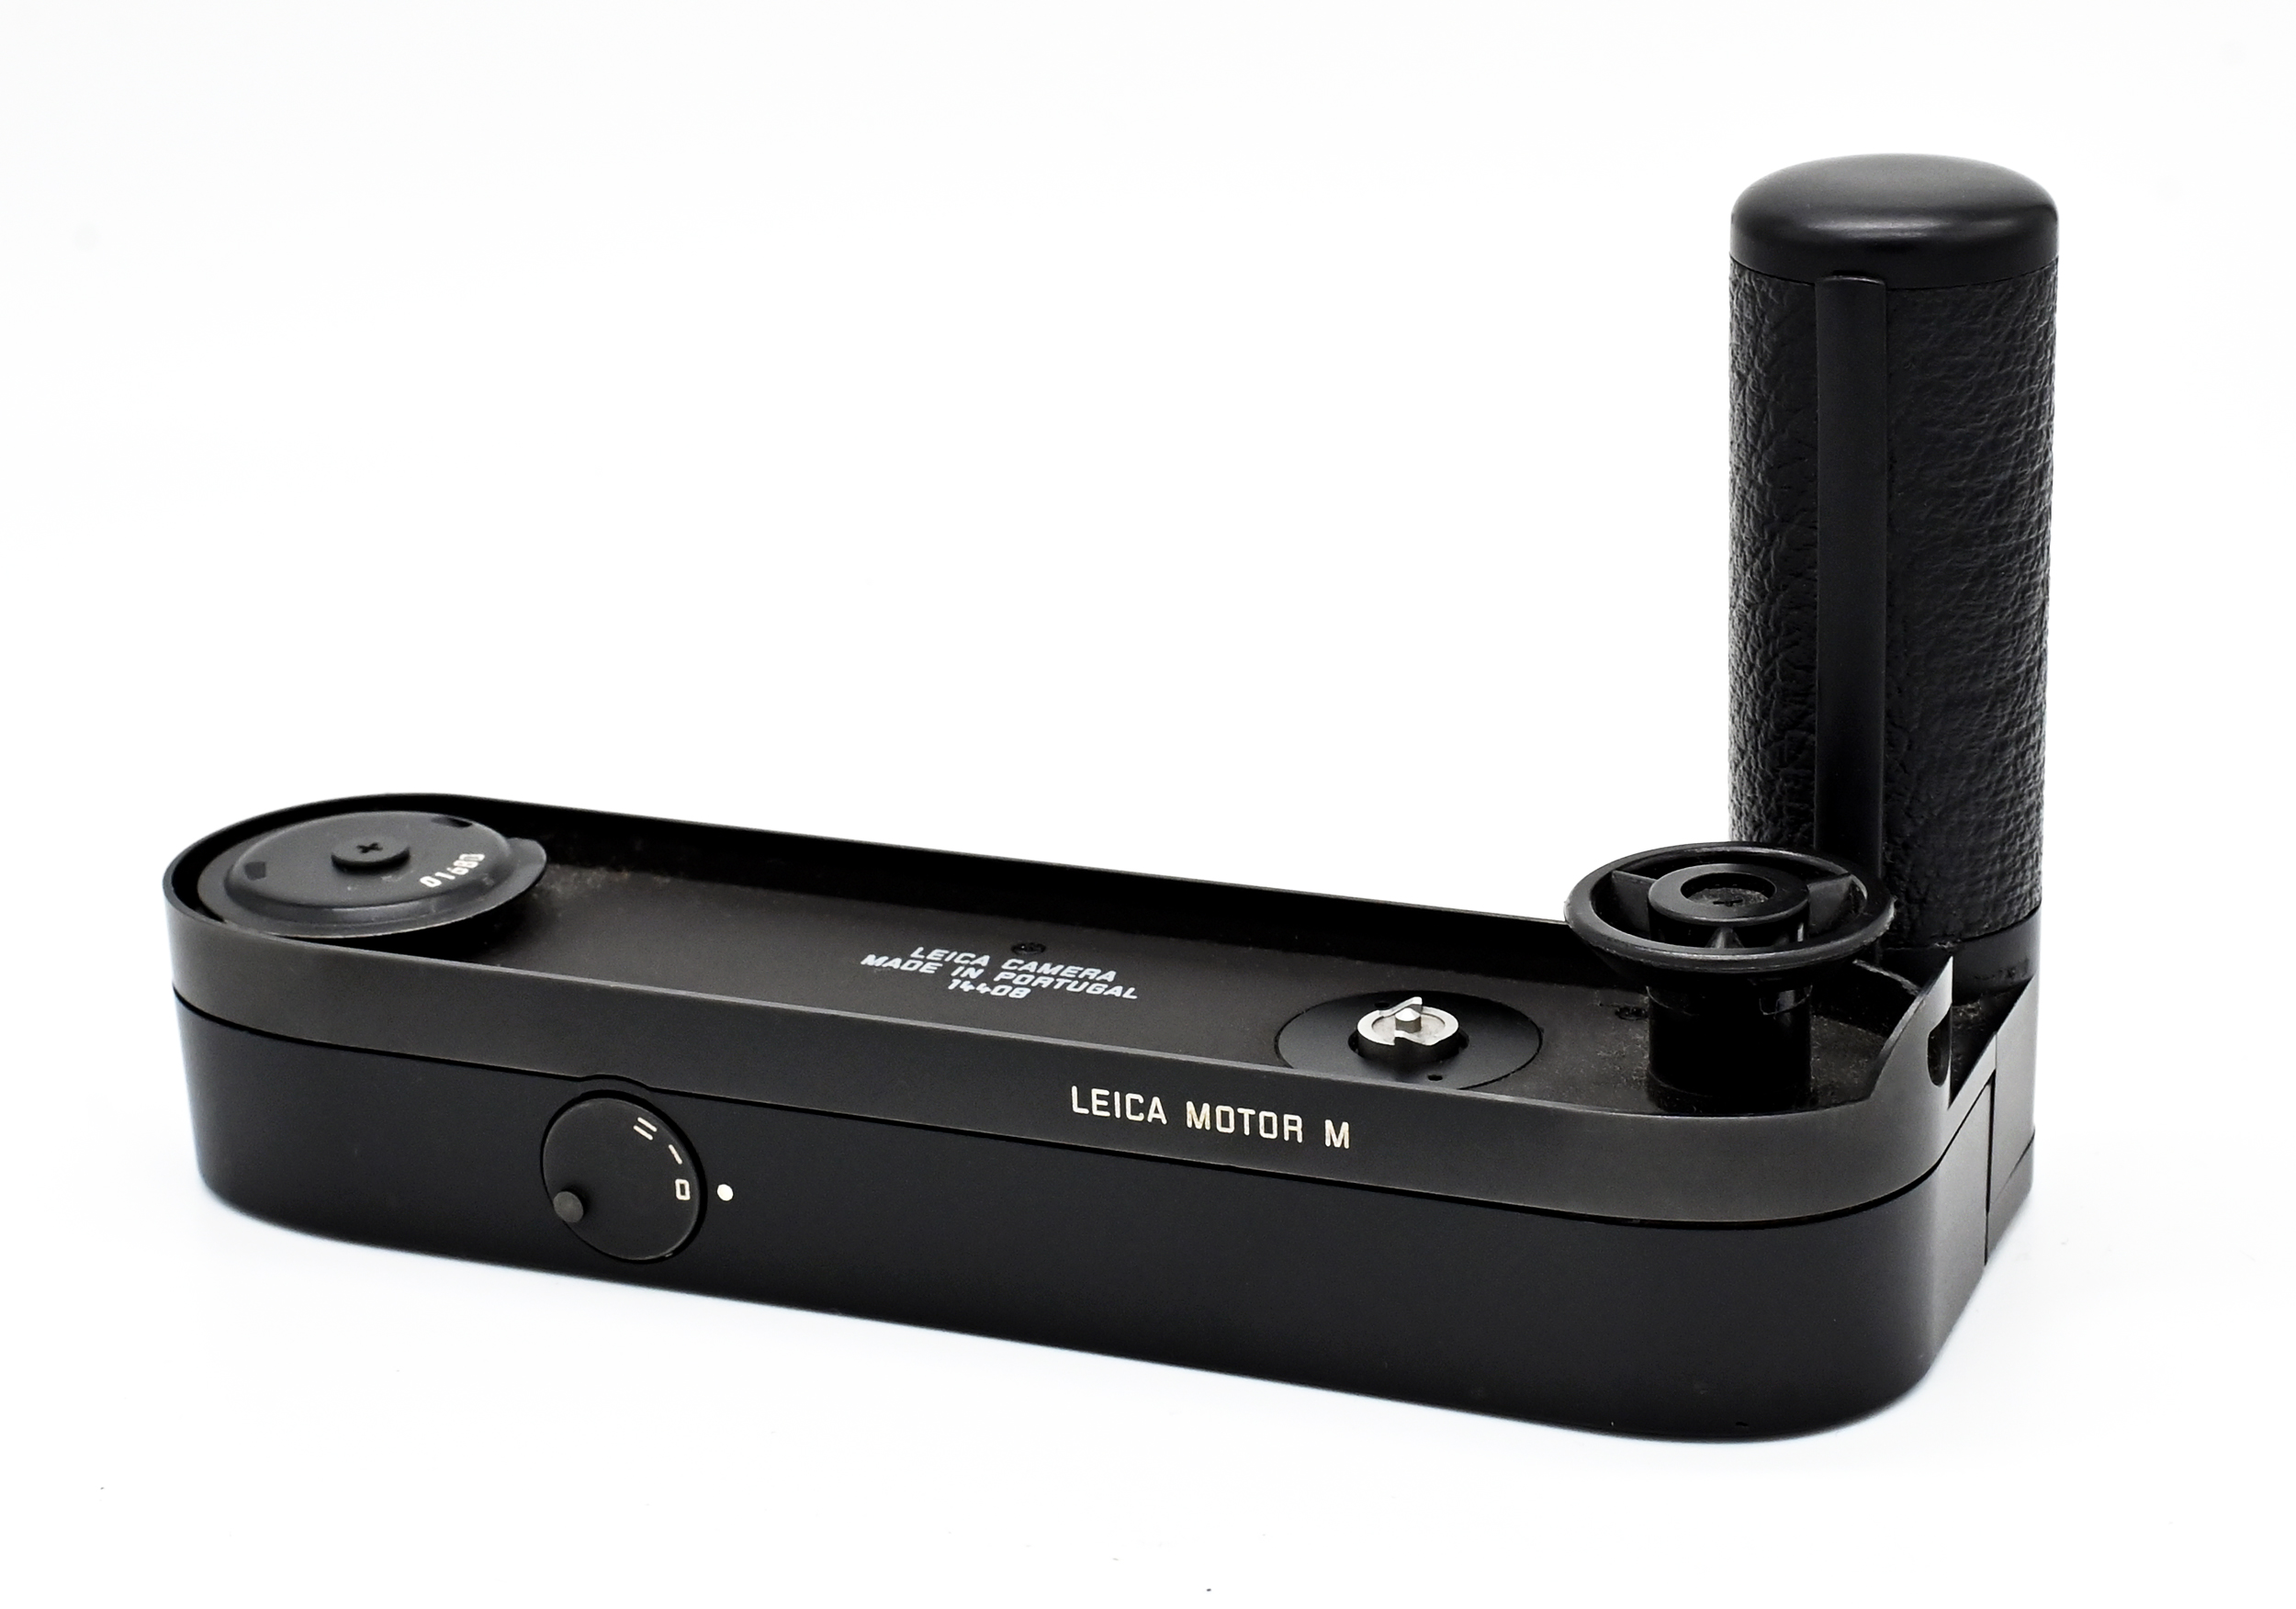
In 2000, Leica replaced the “Winder M” with the “Motor M.” Although a much smaller unit, it retained the 3 frame per second capabilities and adds an actual integrated grip.
Starting in 1989, the late, world-famous Tom Abrahamsson designed and built about 3,000 high-quality trigger-operated “Rapidwinder.” In 2003, Leica began producing a new trigger-operated “Leicavit” for the M4-2, the M4-P, the M6, the M7, and the MP. These retail new for about $1,300 and advertise that “with practice,” you will be able to use your third hand to advance the film up to 2 frames per second. It appears that the Motor M has now been discontinued.
The Winder M (1987)
The entire idea of a “motor drive” is somewhat of an anathema to many Leica aficionados. For maybe good reasons? A motor drive on a Leica M (or any rangefinder camera) adds unnecessary weight, bulk, and noise for arguably minimal increased functionality. These motor drives cannot power the camera. They cannot rewind the film. They will never approach SLR-like performance. Secondary concerns revolve around how motor drives have the potential to damage internal camera components and how dead batteries can ruin your day.
For me, any of those concerns fall away when you realize that you can purchase a Winder M any day of the week for as little as $40. One cannot even buy a OEM Leica lens cap for $40. Does the Winder M deserve the condemnation and/or indifference it has received? Let’s check it out.
An initial aspect to note about the Winder M is that there are no electrical contacts between the body and the motor drive. The motor drive operates mechanically, advancing the film take-up until it encounters resistance when the camera is “wound” for the next shot, and then automatically trips itself “off.” For SLRs, the widespread advent of electronic shutters during the 1970s made it possible for the camera body to trigger an external winder electrically, which is a better system.
CHEAP: For some reason, the Winder Ms are among the cheapest OEM Leica M accessories available. With so many still in circulation, we can assume that the Winder M does not have many latent problems that would have killed these units over time.
Putting It On: Be sure that film is loaded and that you have fired the shutter. Pull the Winder lever all the way around the unit by pressing up on the lever. Take the bottom plate off your M and then replace with the Winder. Then turn the lever all the way around to the “On” position to lock and enable the unit. You are ready to go.
On/Off: Move the lever back from the “On” position and that will disengage the motor drive for regular, old-timey shooting. However, unless you want to remove the motor drive in the dark and replace the original camera baseplate, you are stuck with the drive until you finish your roll.
Shutter Feedback: When the motor advances, the shutter button will rebound a bit on your finger. Do not be alarmed.
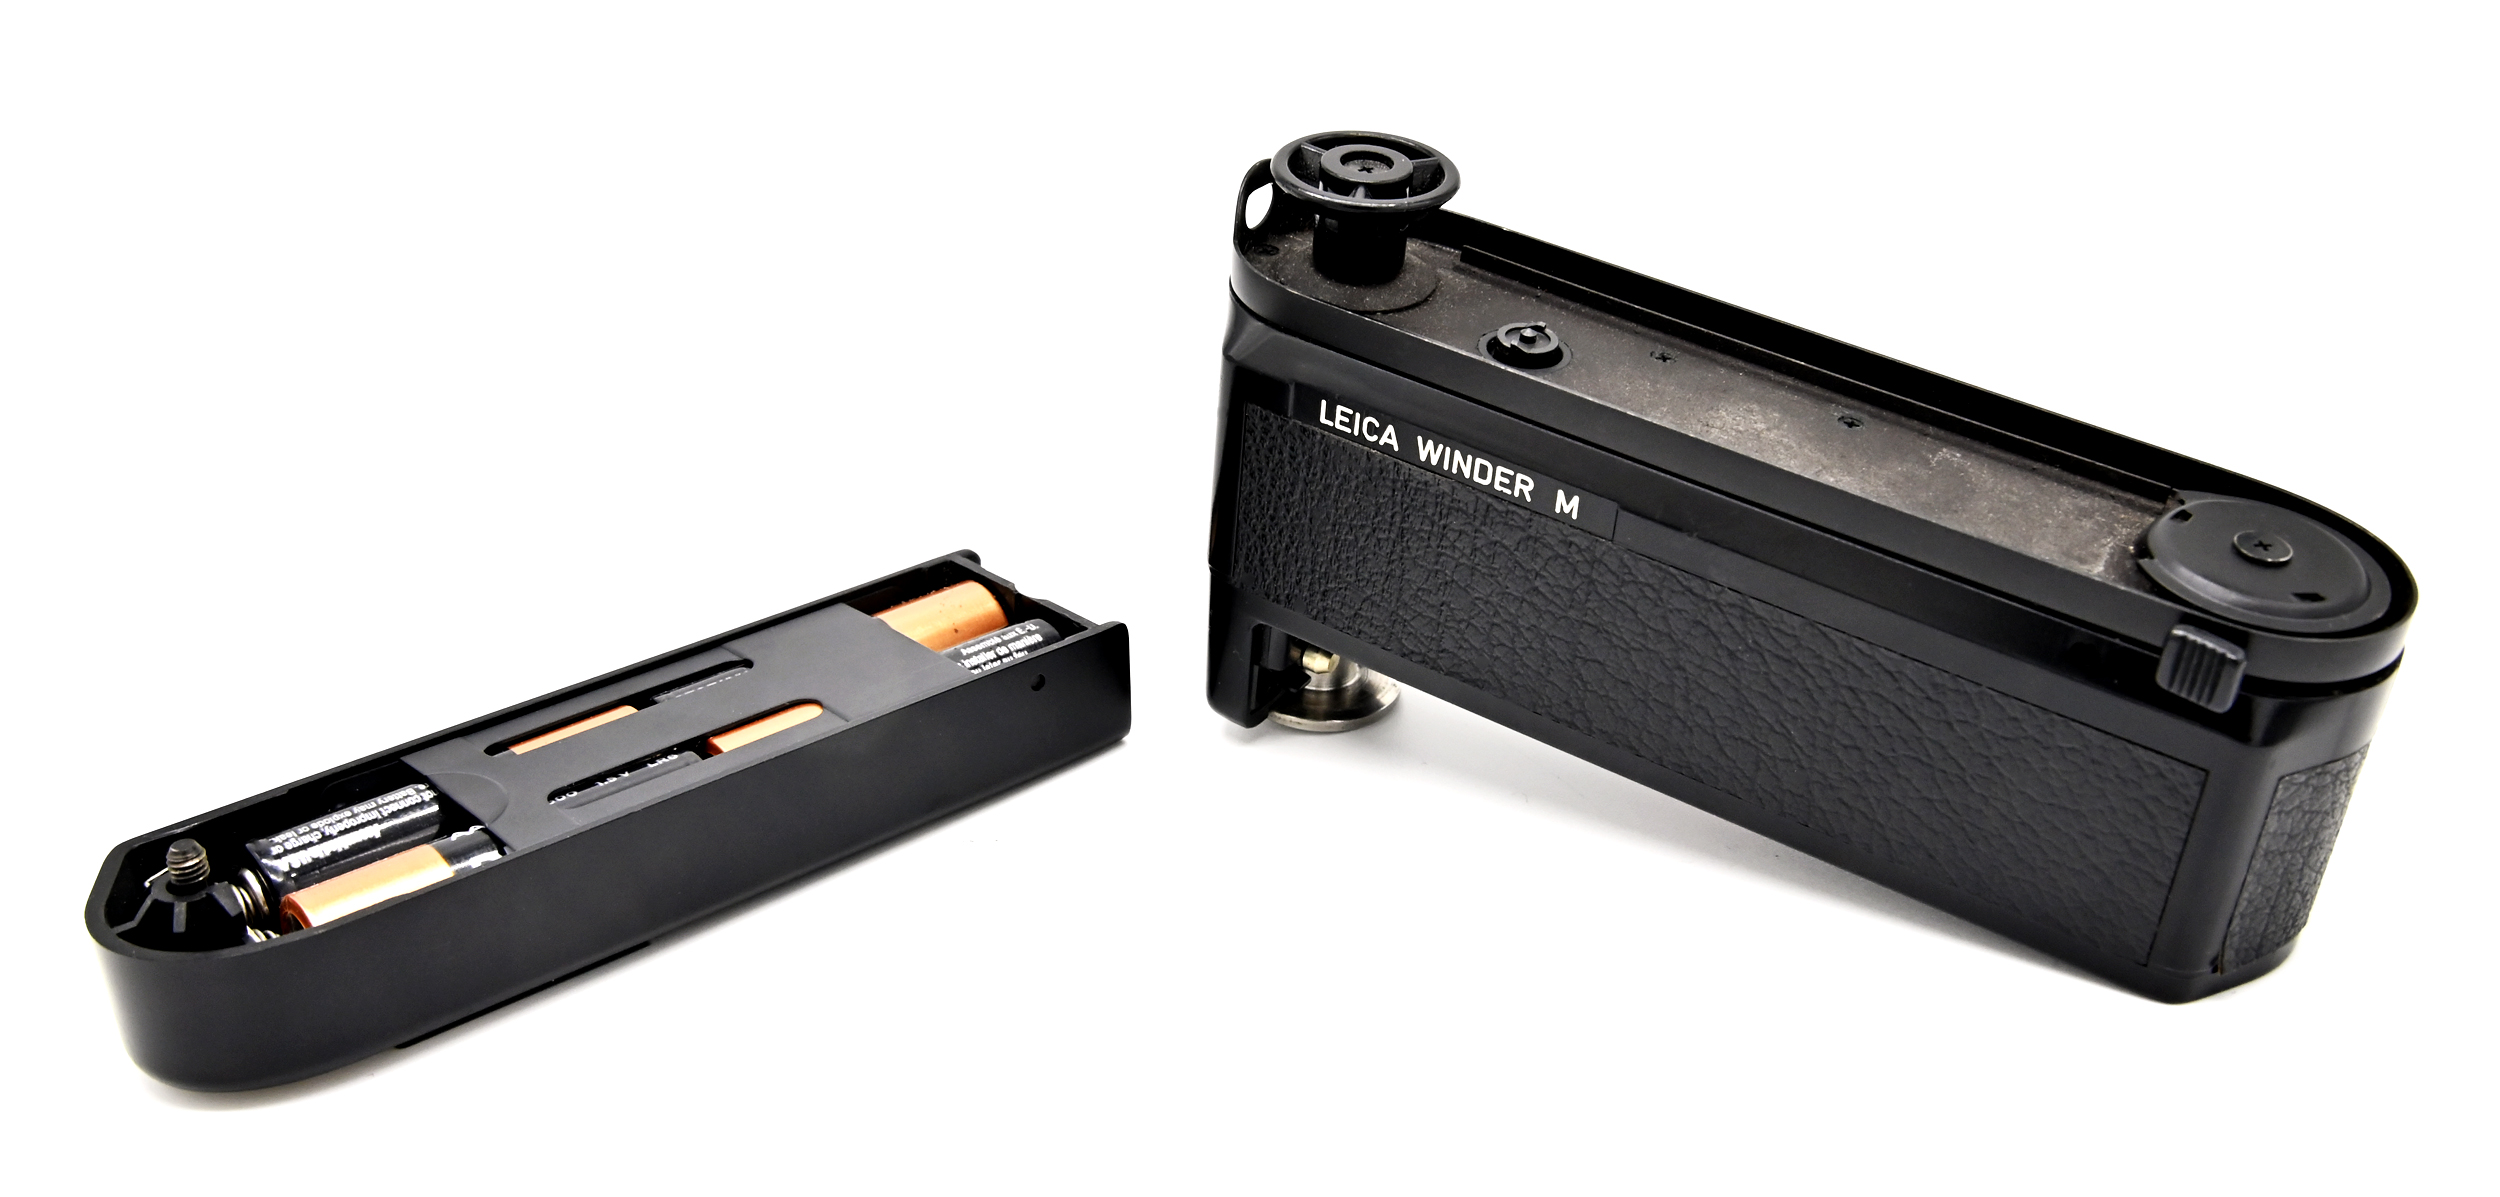
Batteries: The Winder M takes 4 1.5V Alkaline AA batteries or any of their substitutes. These fit nicely into a little tray in the bottom part of the unit.
Noise: Is the Winder M especially noisy? I do not think so. Certainly quieter than 1970s-era external motor drives.
Leica M7 Exposure Lock Woes: Unfortunately, the M7’s exposure lock resets every time the film advances with a motor drive. Thus, if you have locked the exposure for shot number 1, the metering will reset as soon as the photo is taken. As explained below, this occurs with the newest Motor M as well. Most likely, Leica did not take this into account when designing the AE system on the M7.
Gripes About the Grip: The Winder M does not have an integrated grip. Although it would have been nice, holding the camera is not especially difficult without one.
Using the Winder M: This probably comes down to whether you enjoy using motor drives or not. Certainly, an idea use would be for tripod work. For left-eyed shooters (like me), you do not have to remove your eyes from the viewfinder to advance the film. It also removes a step from the photo-taking process so you can focus on getting the shot, especially when the scene is moving around you. You trade some inconspicuousness for some functionality. Nothing in life is free. Especially Leica stuff.
Motor M (2000)
The current Motor M is a much smaller and probably better designed motor drive than the Winder M. Although sharing the same theoretical maximum FPS rate, the Motor M is a little quieter, much smaller, has a handy grip, and actually has several mode selections It is compatible with the same stable of post Leica M4-2 cameras. Although the Motor M more or less coincided with the introduction of the new electronic-shutter M7, Leica decided that backwards compatibility was important than automation, i.e., Leica could have designed a motor drive that was electronically triggered, as opposed to manually. The Motor M essentially works in the same mechanical method as the Winder M.
NOT A TERRIBLE DEAL: Used Motor Ms appear to go as low as $300. Still a very cheap Leica accessory.
Putting It On: Unlike the Motor M, there is no “On” latch to rotate to lock the drive into place. Simply remove your M baseplate and slap the drive onto the base. The locking mechanism is the same as the standard baseplate.
Modes: The Motor M has three switch positions — Off / 1.5 FPS (quiet) / 3 FPS (louder). So you can turn the motor on and off at will. However, turning the motor drive off does not fully disengage the unit — so film advance smoothness is compromised. Word on the street is not to use continuous modes at less than 1/50 or the motor may advance before the shutter closes. Mr. Nemeth advises to not use “I” mode anyway for true continuous shots — only use “II.” I agree,
Shutter Feedback: Just like the Winder M, there is shutter recoil. No big deal.
Batteries: 2 x 123A Lithium batteries — they fit into the grip and are loaded through the bottom. Supposedly good for 100 rolls. Speaking of the grip, there have been reported problems with the grip portion popping out. It is easily noticed — so watch out for that if you buy a used one.
Noise: Do not expect the Motor M to be as quiet as a regular Leica shot. You will hear the click plus the whirl of the motor. “I” is supposed to be quieter than “II” — but in the real world, it’s pretty close. The Motor M is quieter than the Winder M, but they make different sounds.
Leica M7 Exposure Lock Woes: Just like the Winder M, the M7 will reset its exposure lock after each shutter activation.
Using the Motor M: The Motor M has a much lower profile than the Winder M and feels better integrated into the body. The grip allows better positioning for vertical photos. Although the performance is not impressive when compared to any modern SLR motor drive, the unit is small enough that the added weight (225g) is not going to bother you.
Conclusions
Leica did a fairly good job developing motor drives for cameras that were not designed for motor drives. Thank Mr. Goldberg who in the early 1960s conceived of the idea and made it work. Still, the Leica motor drives remain generally unpopular with the mainstream crowd as somewhat antithetical to the ethos of rangefinder photography. If these units were more expensive, I would tend to agree. However, with the Winder Ms being so cheap, it’s almost that you cannot afford not to own one if you use a M4-2, M4-P, M6, M7, or MP. It is definitely a different way to shoot with a rangefinder that takes a little getting used to. You probably will not hate it or think that the motor drive will alert everyone on the street to your presence. Think of it this way — if you only get one chance to capture the “decisive moment,” you can now multiply that chance by 1.5 to 3 times.
There are some advantages to either system. The Winder M: (1) takes easier to find and slightly cheaper AA batteries; and (2) is way cheaper (1/8 the price on the used market). The Motor M: (1) is quieter; (2) has built-in grip: (3) has three selectable modes; and (4) is newer model so in theory easier to get OEM service if something goes wrong. You will most likely not regret acquiring and using either one. If you shoot often, you will find situations where a motor drive will be useful.
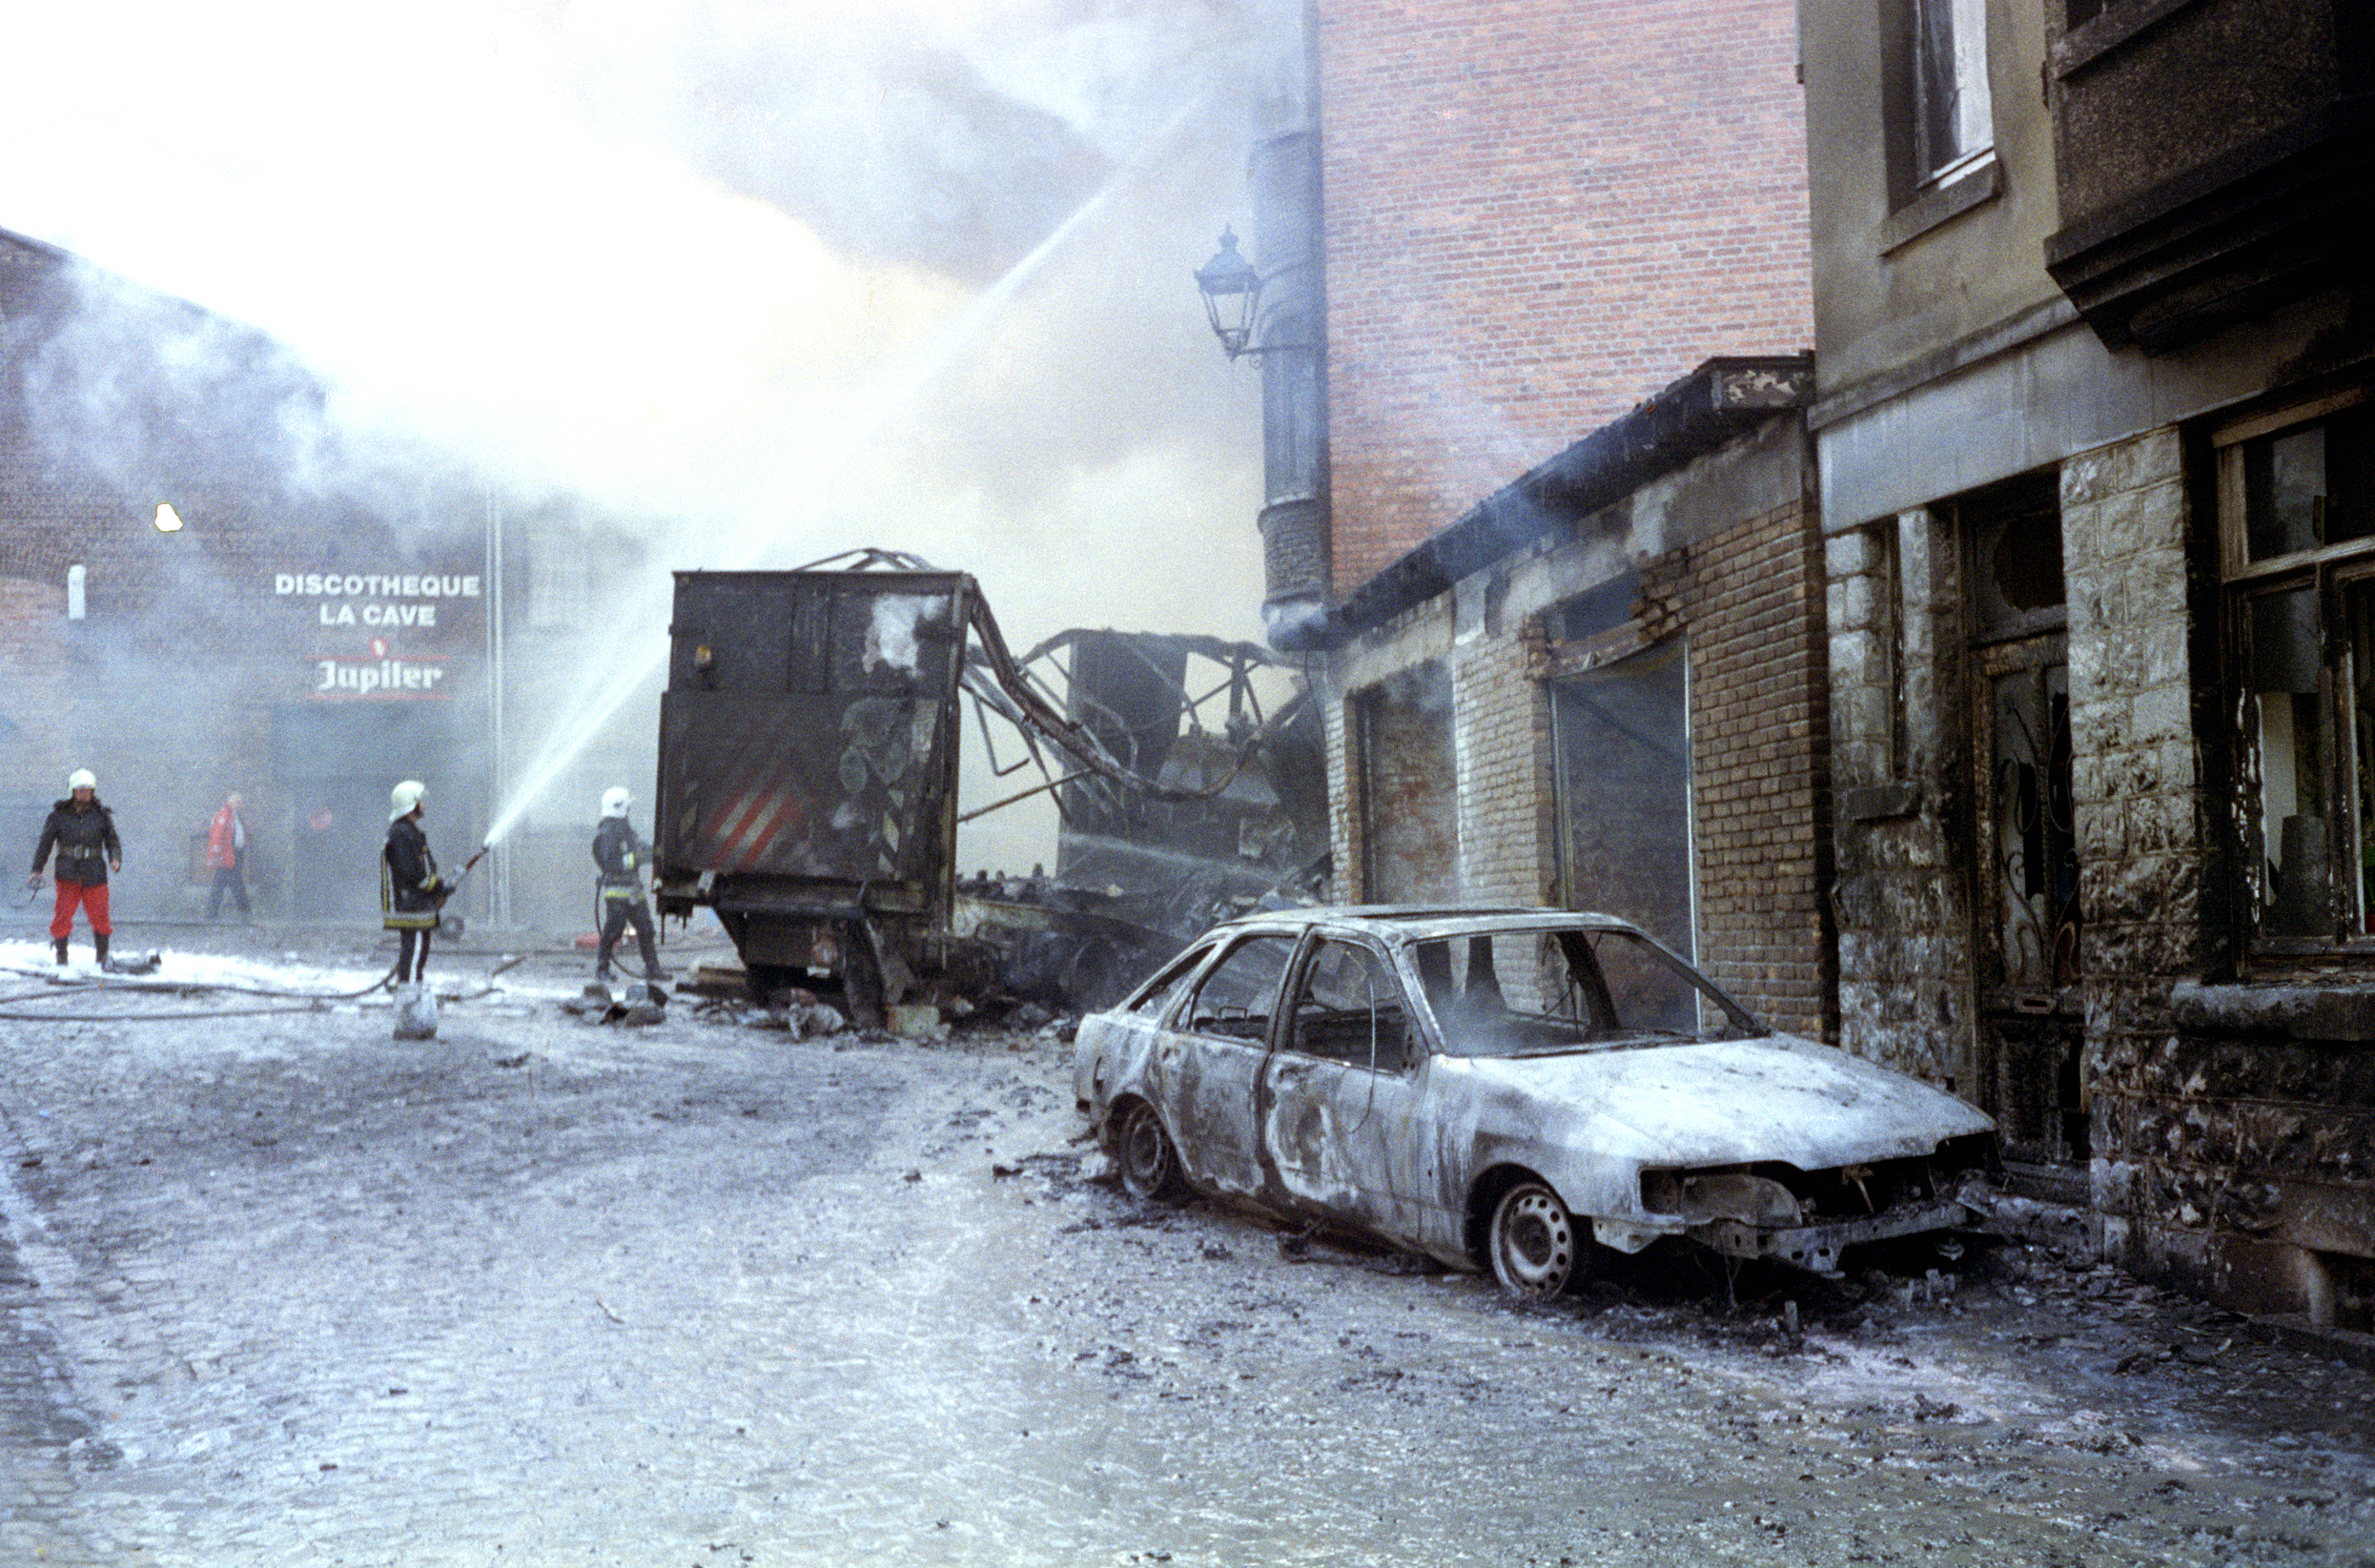
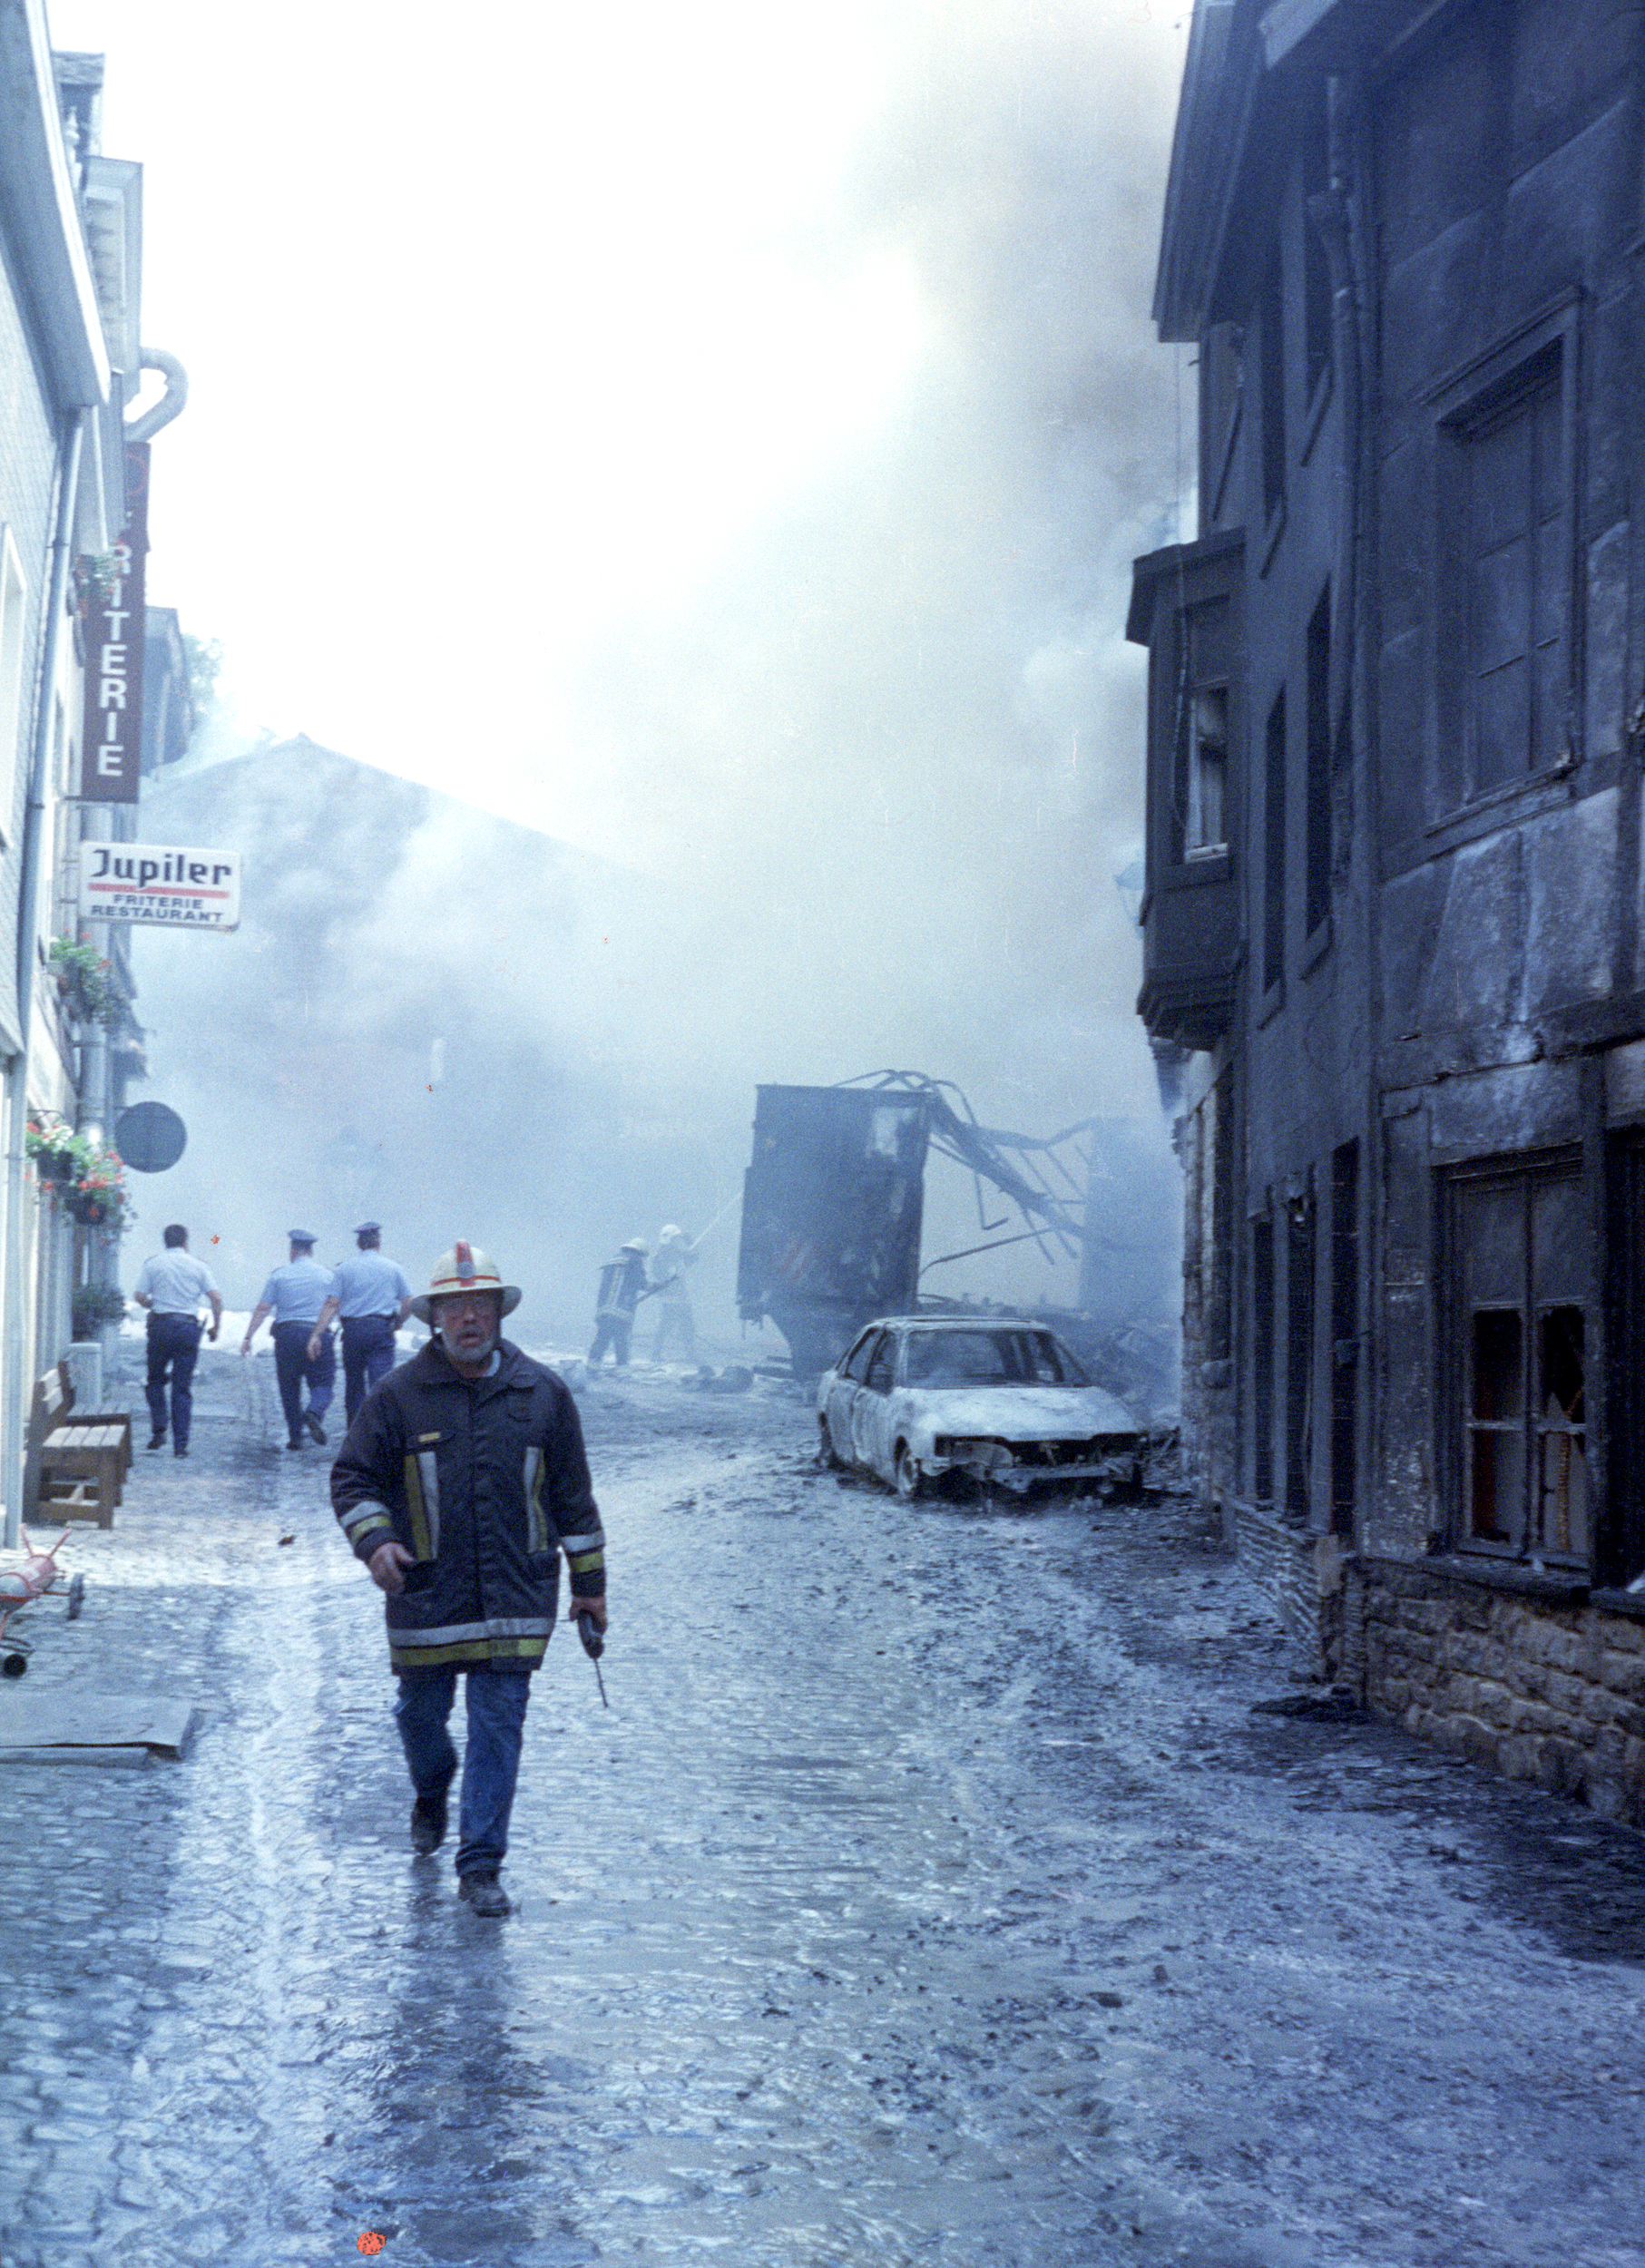
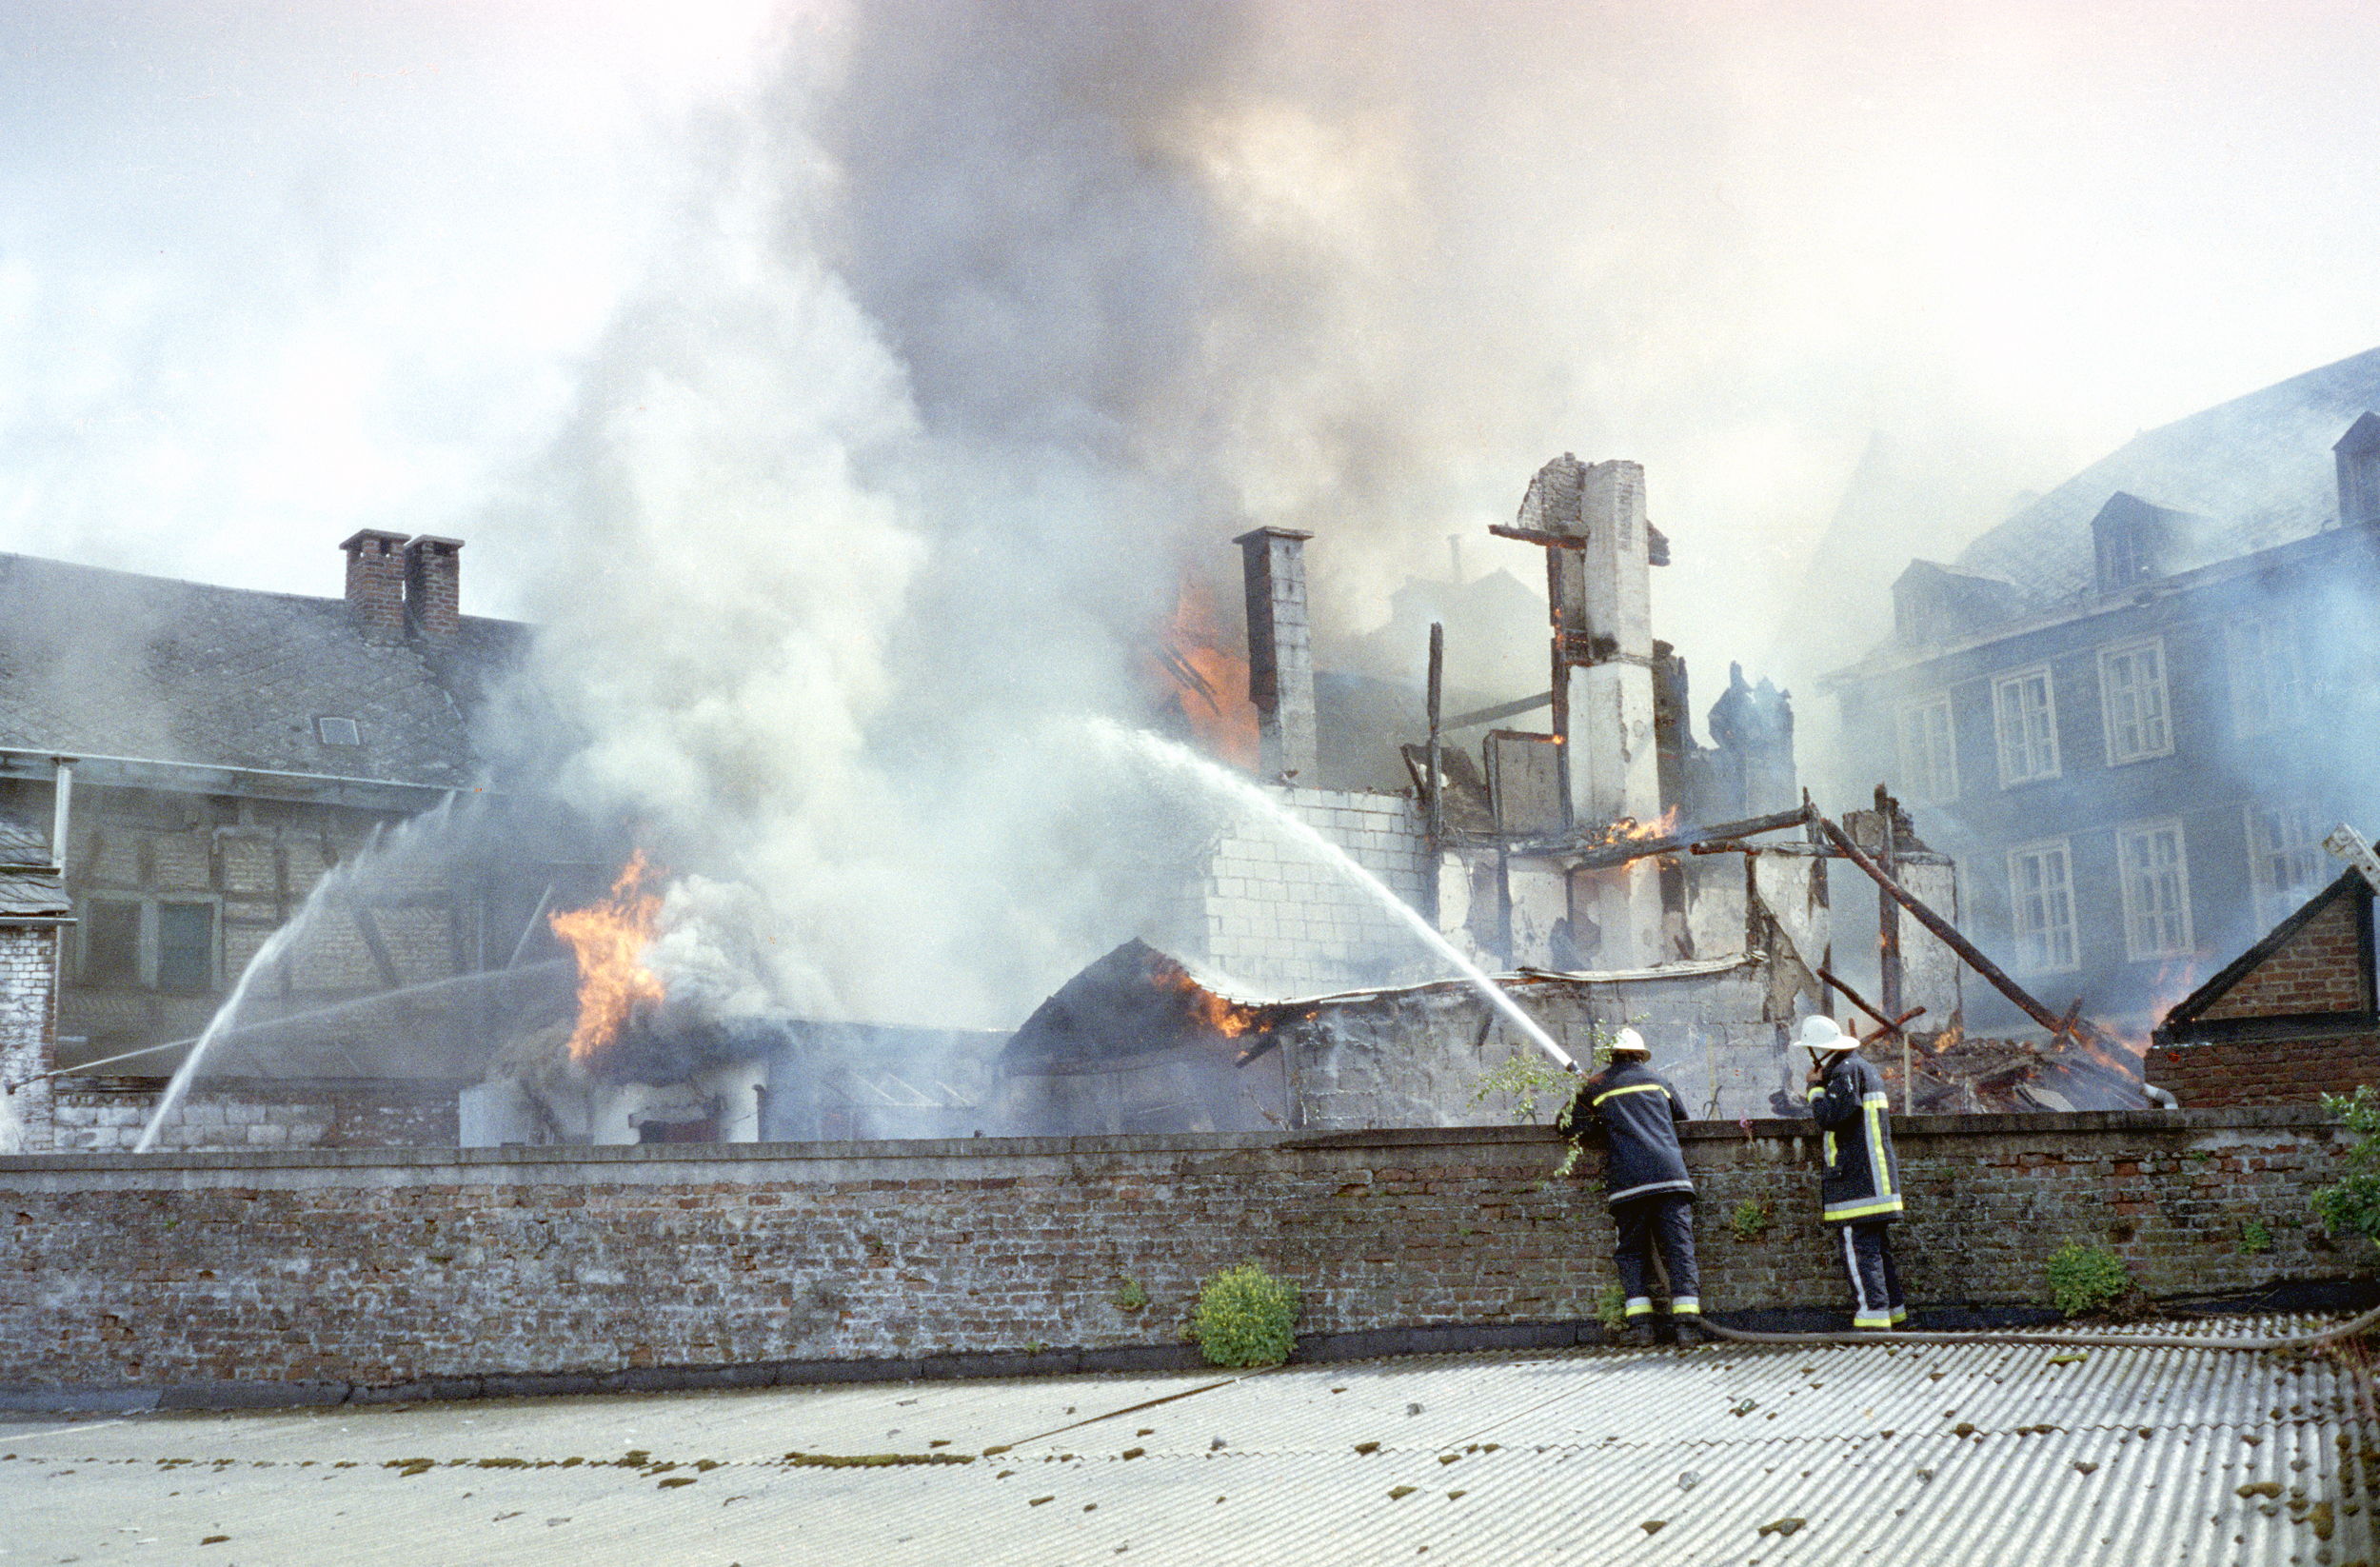
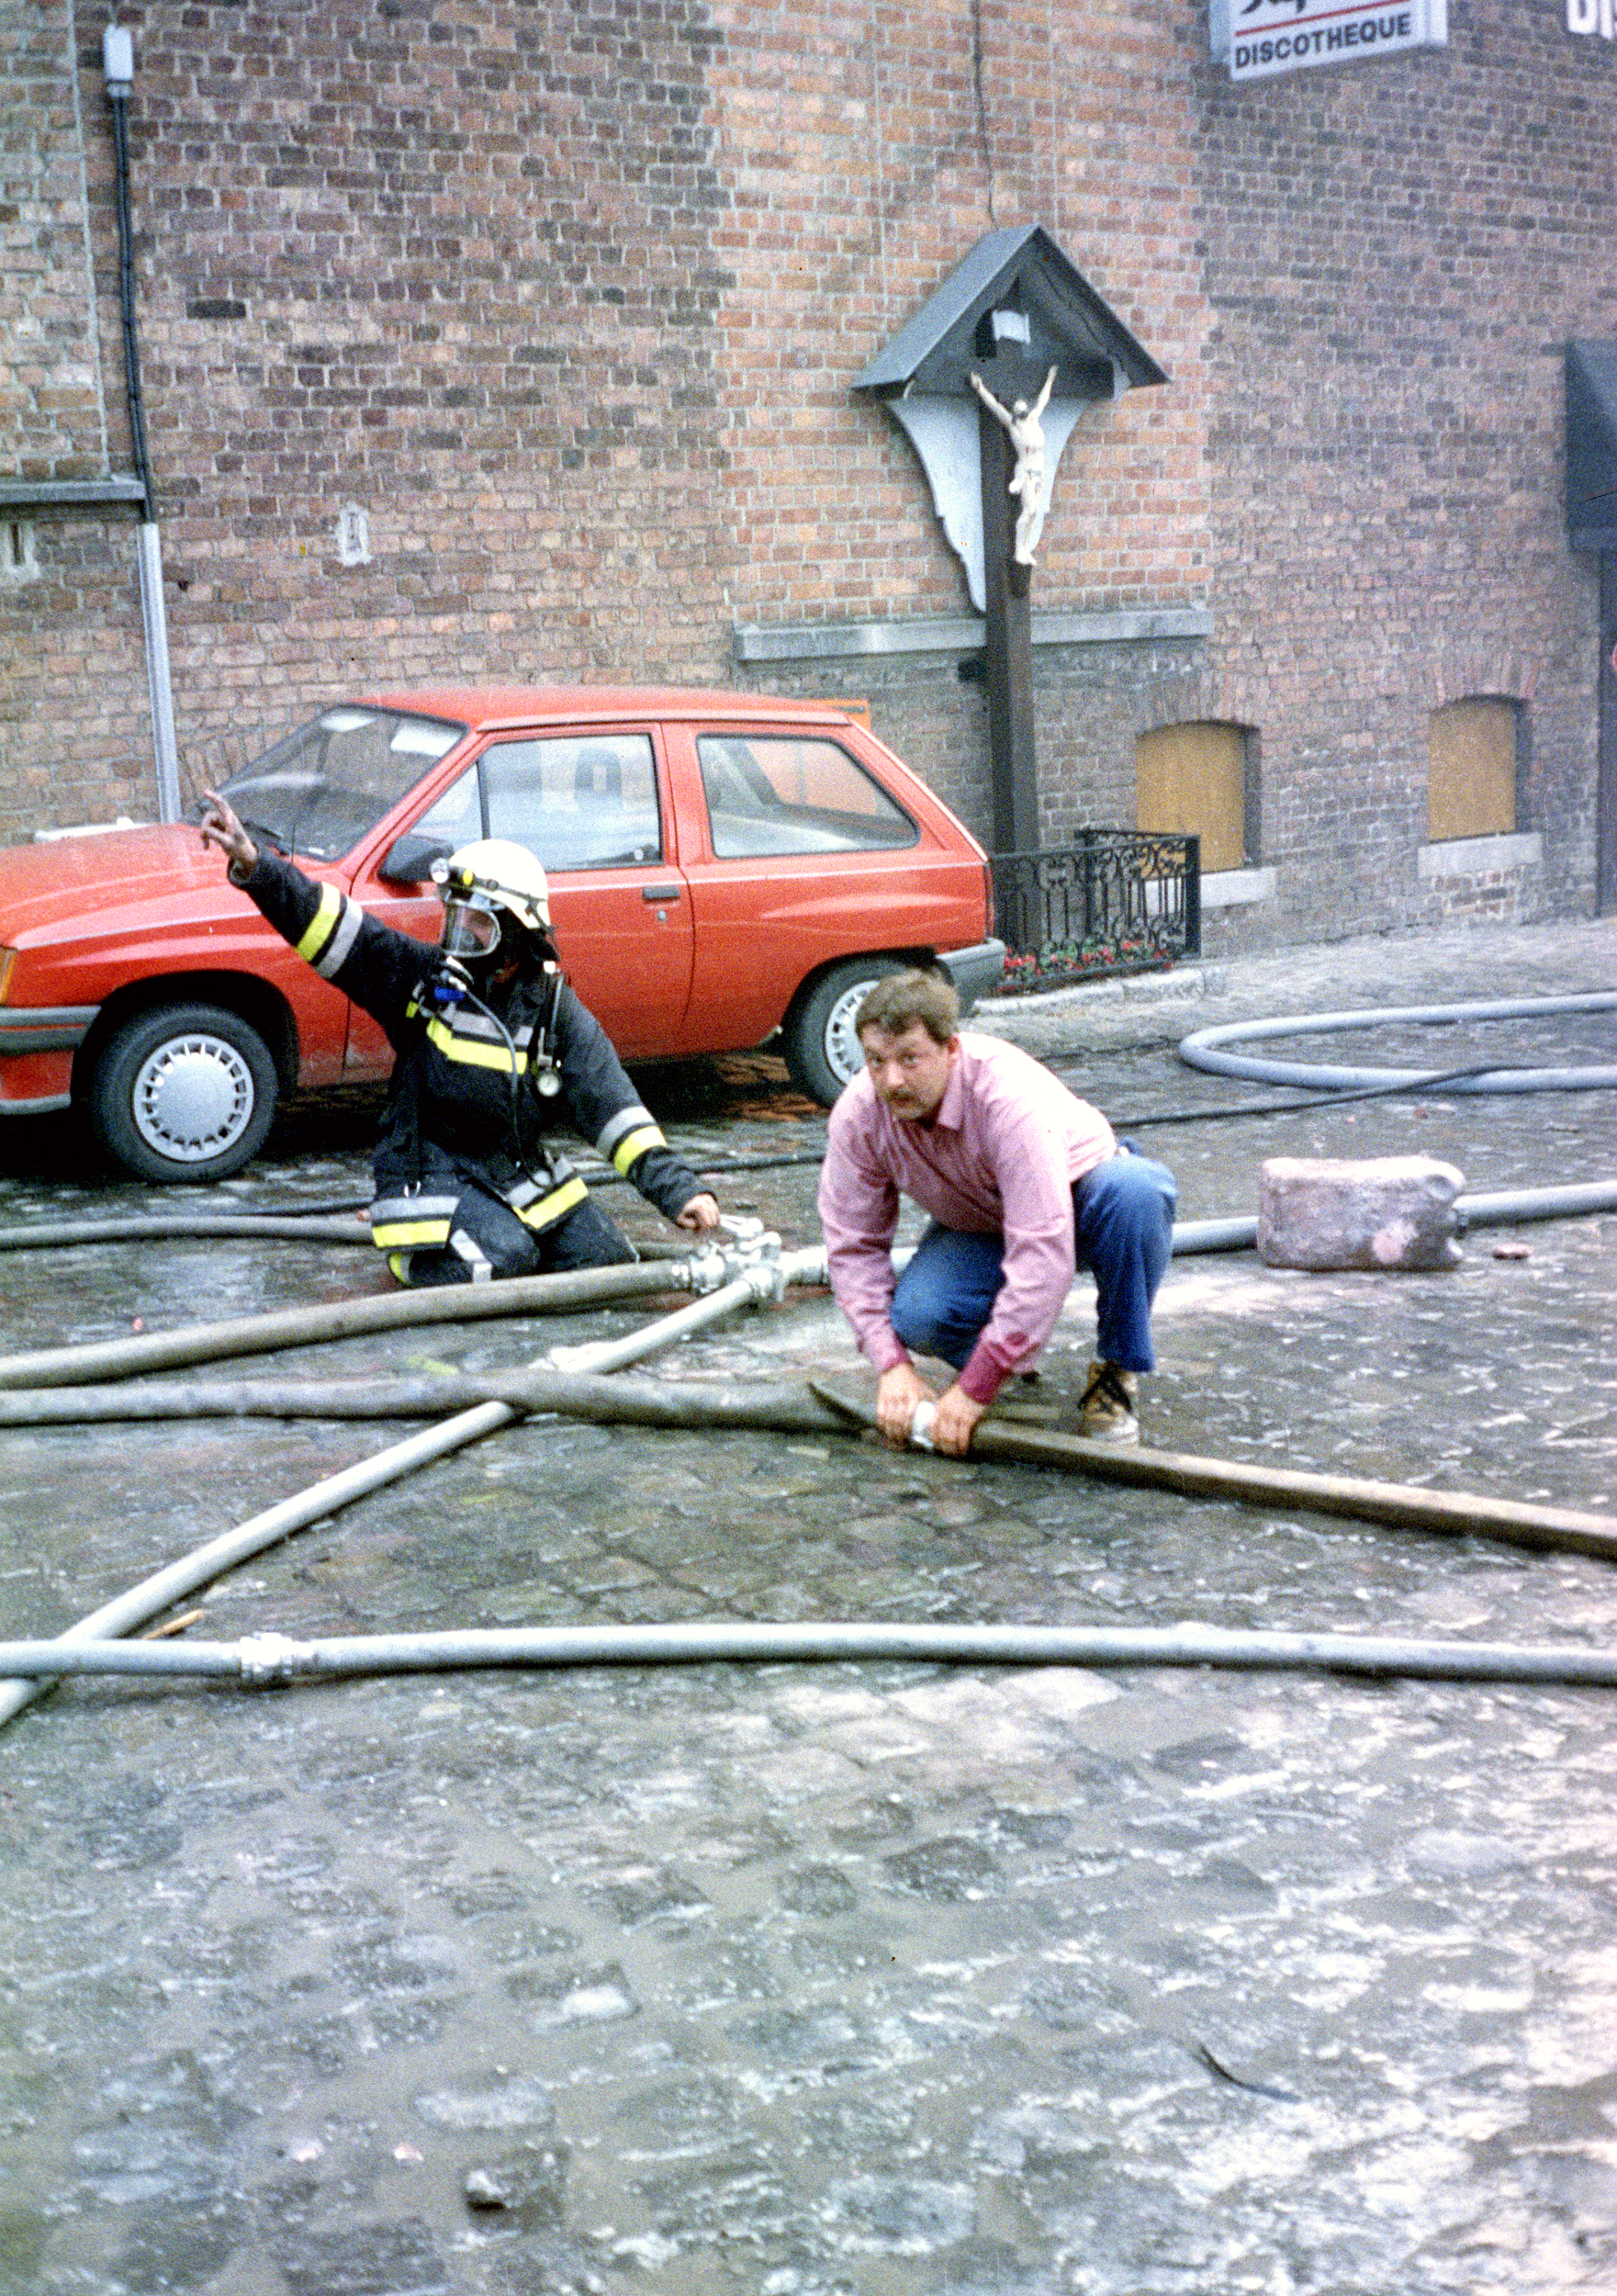
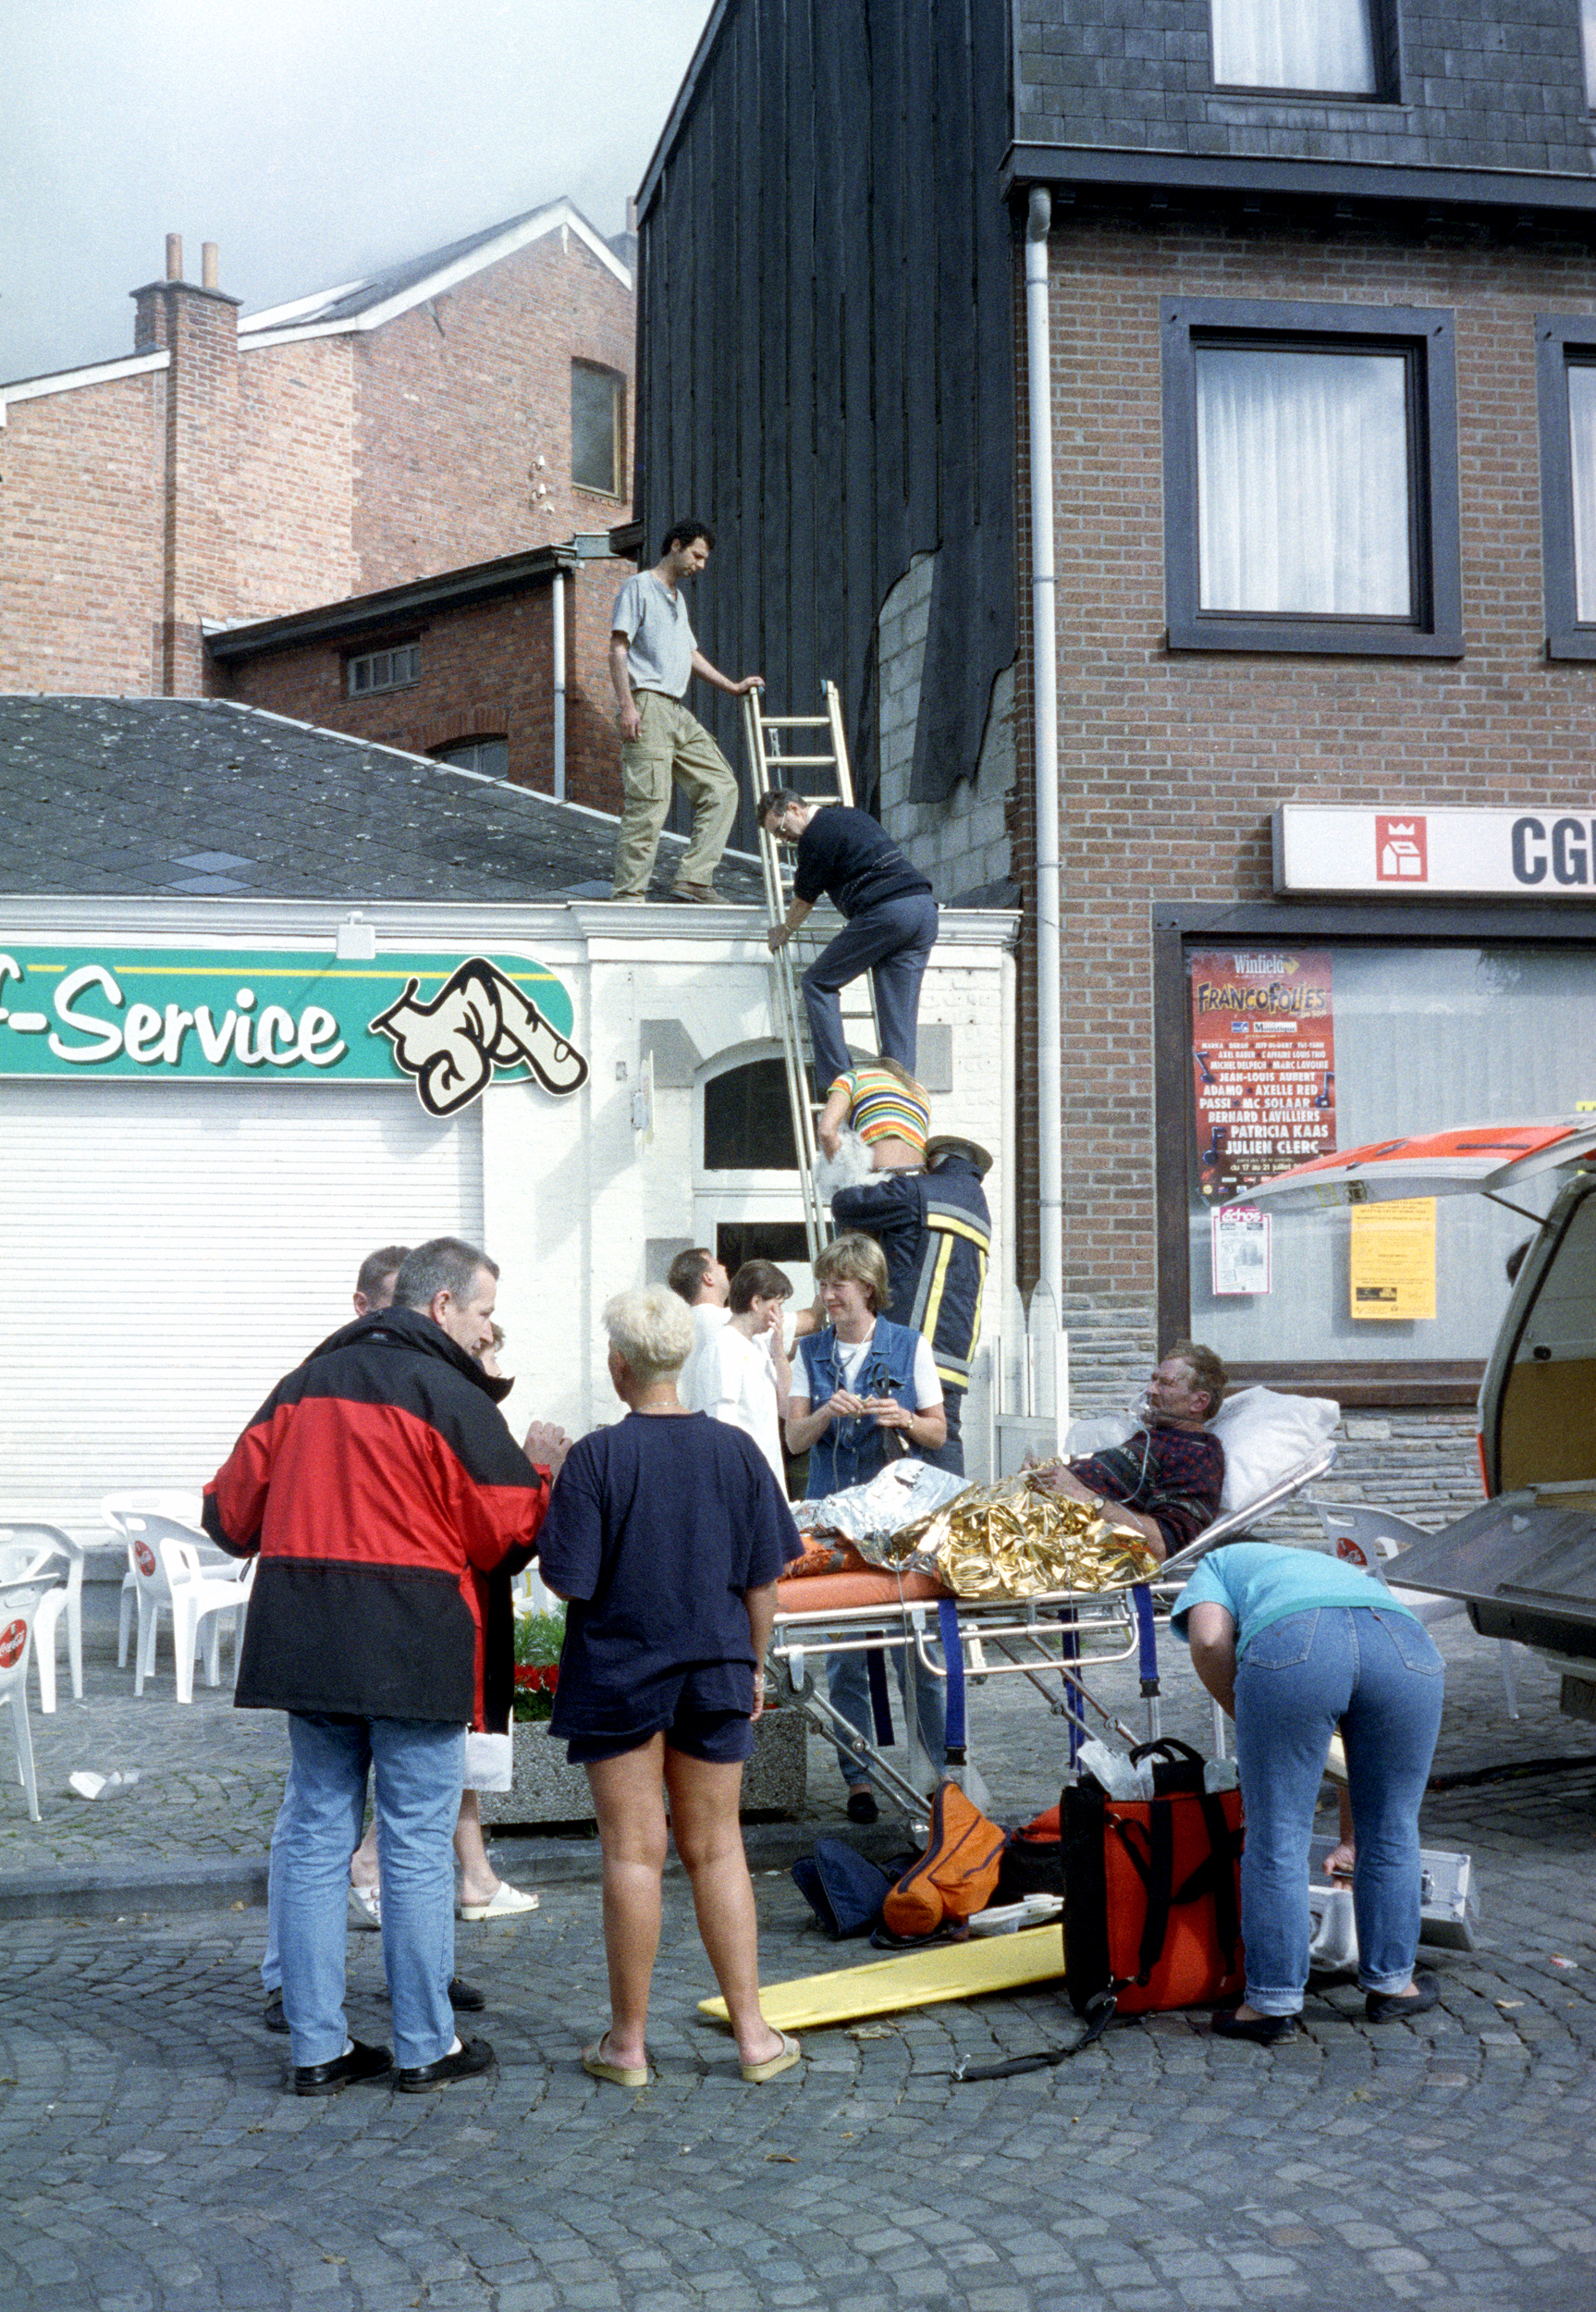
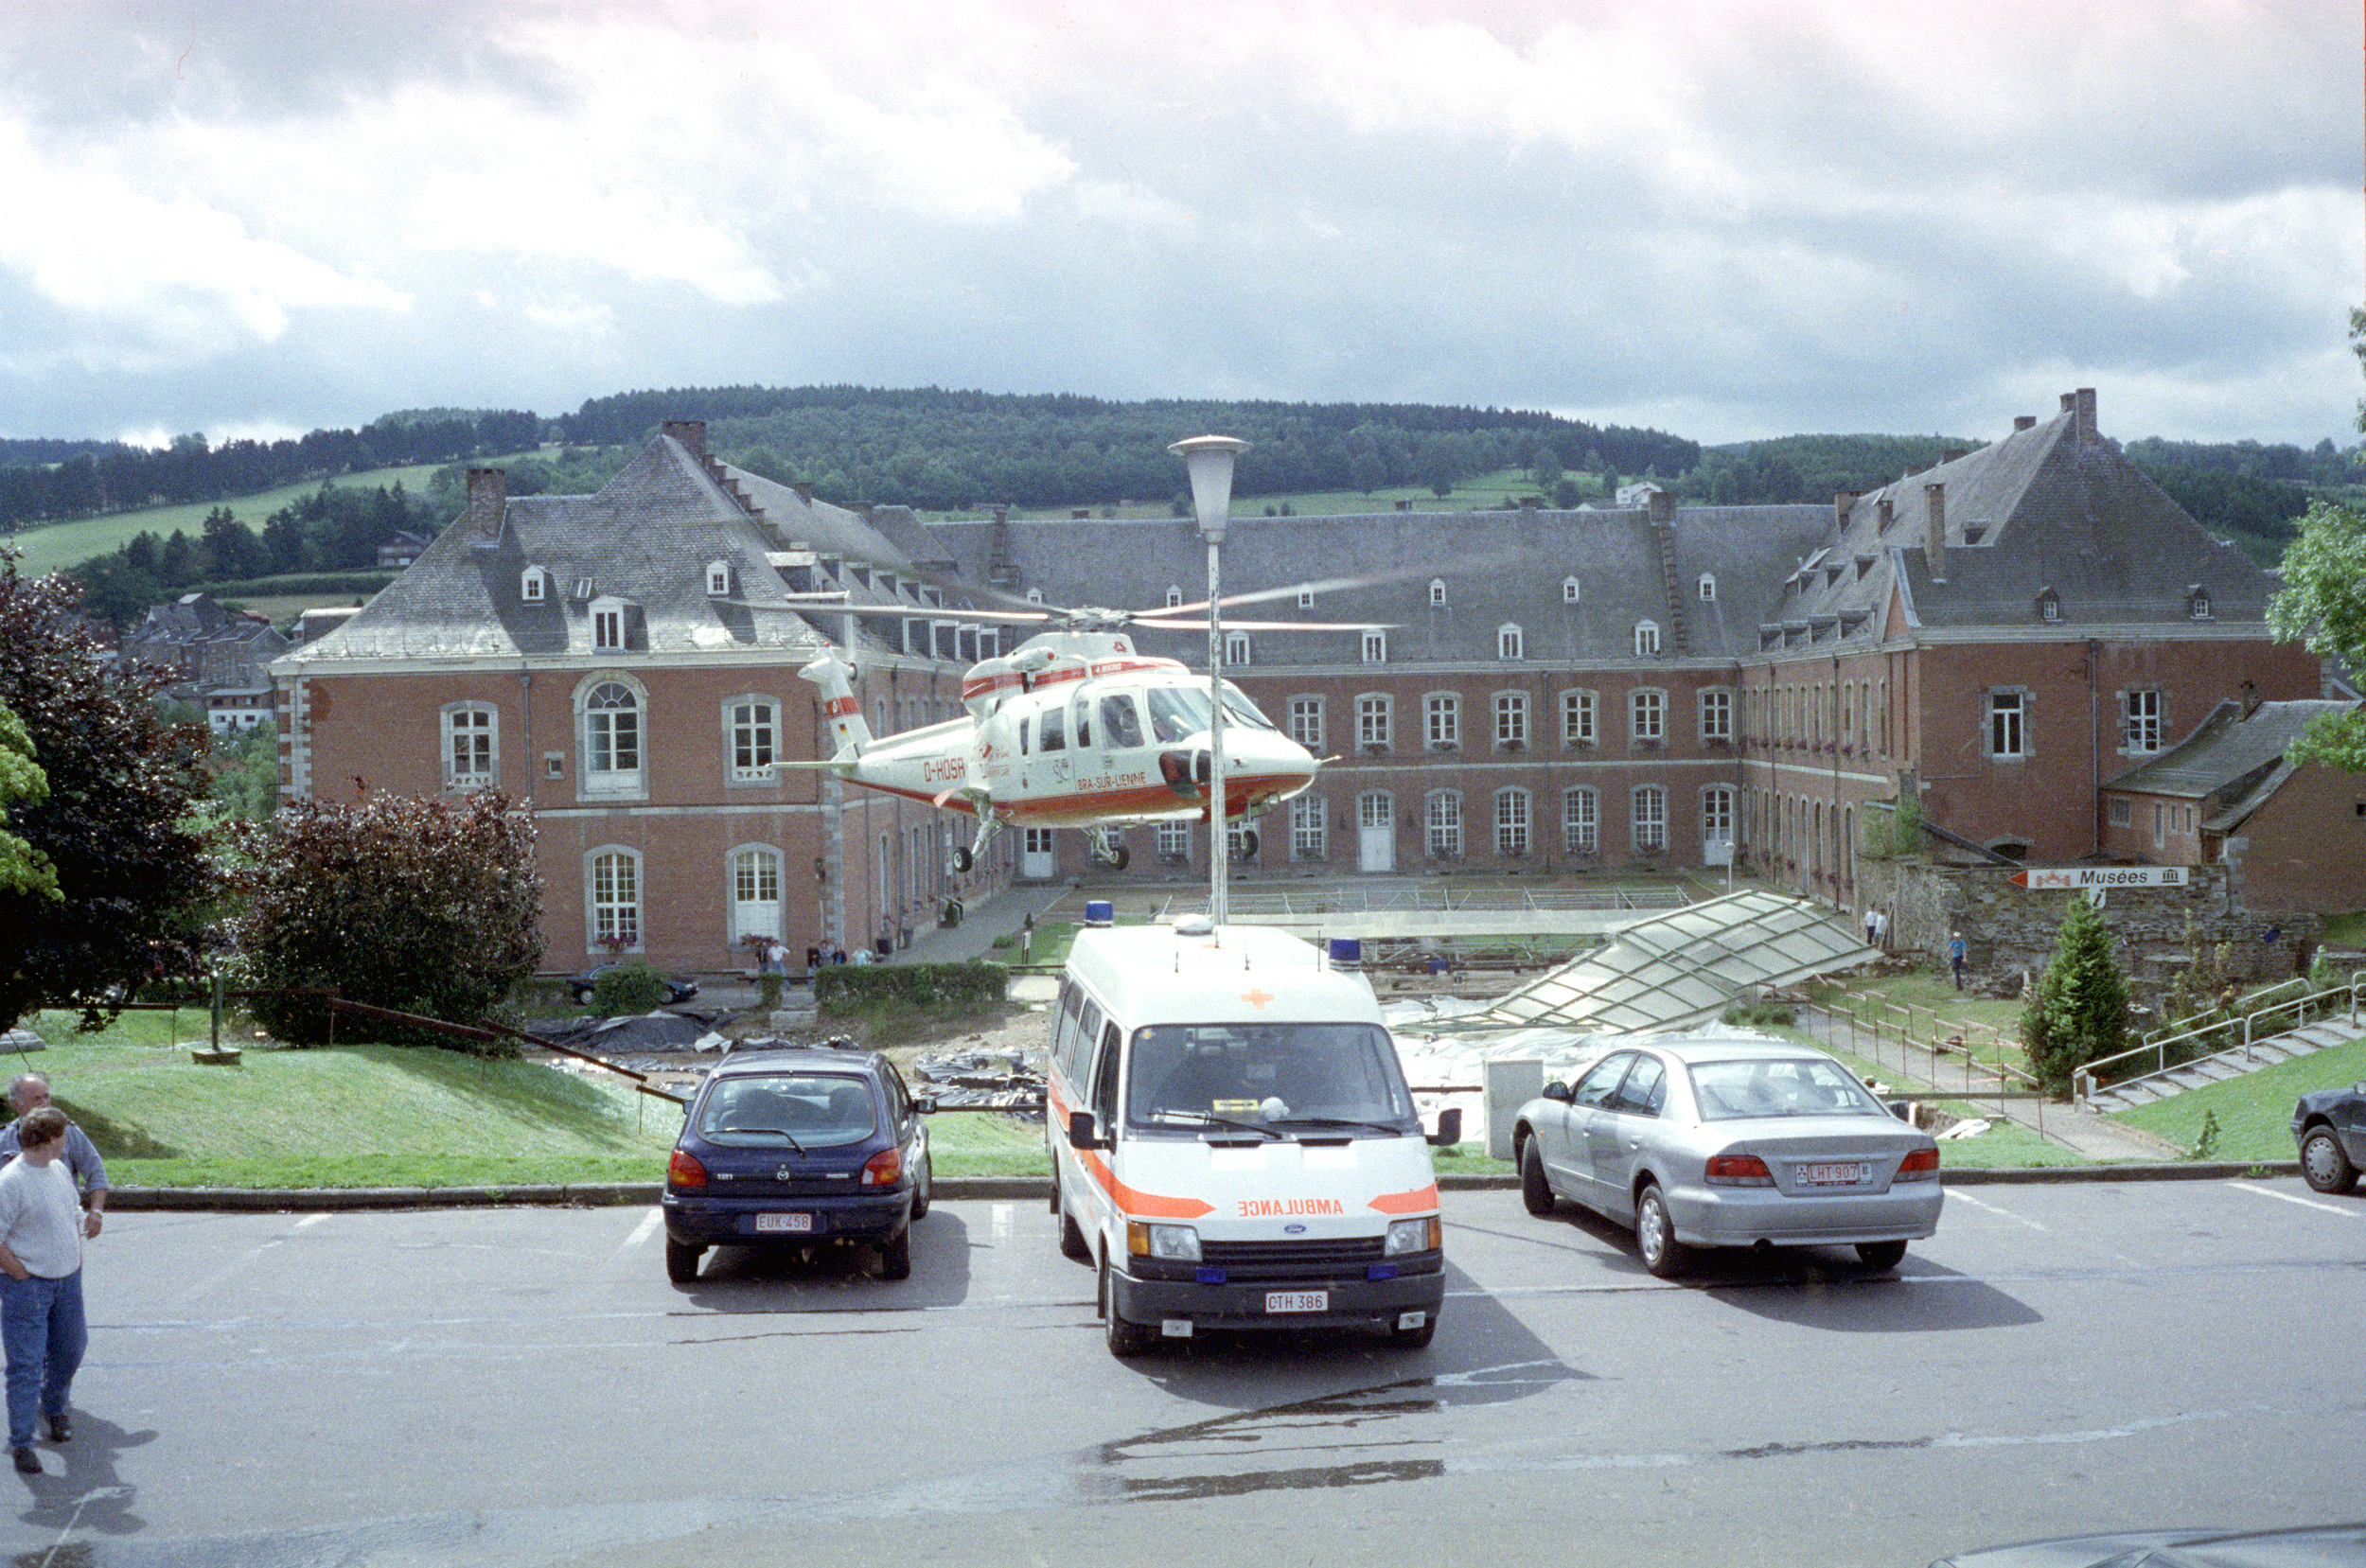
On the morning of June 30, 1998, an errant truck driver hauling paint attempted to pass through the small, medieval streets of the French-speaking Belgian town of Stavelot. The truck crashed and caught on fire. The ensuing fire ravaged the historic core of the city. Two people died and many were injured.
Stavelot was founded around 648 ACE as a location for a monastery by a cleric named Saint Remacle (or Remaclus), who had been provided support by the Merovingian King Sigebert III. I happened to be there as part of an archeological program that was slowly unearthing the foundations of the original 7th-century abbey. The town was caught in the crossfire of King Louis XIV’s 17th-century wars. It was then in the center of the fighting during the December 1944 Battle of Bulge and the site of a Nazi massacre. Needless to say, the town had experienced its share of misfortune.
We heard the explosion from a few hundred yards away and saw the massive fireball emerge over the tops of the houses. Being a smaller town, it took the local and regional firefighters some time to get on the scene. I grabbed my Canonet 28 and tried to take some photos, on gold old Kodak Gold 800-2.
Ground ZeroGround Zero, Part DeuxFirefighter at the SceneFirefighters on a RooftopThe Fire Rages in the Historic DistrictLocal Helping the Firefighters Connect the HosesA Canadian Friend (Top) Helps Rescue a Woman and Her CatHelicopter Evacuation of the Injured